Resources
These show notes feature everything we cover in this episode. Premium Members: download this exclusive ad-free show notes cheat sheet PDF. Not a member yet? Learn more and join the Genealogy Gems and Elevenses with Lisa family here.

 Genealogy is growing dramatically in popularity. Multiple television shows depict family history discoveries, and the use of DNA to help folks climb there family tree has become mainstream. If genealogy is so popular, why is genealogy society membership declining, and how can we slow hat trend?
Genealogy societies have traditionally been centered around genealogists coming together in person, sharing research success stories, and learning more about how to find the records and stories of elusive ancestors.
These days though it’s easy to get distracted by by online research and perceived short cuts. The newest generation of researchers started their search not in a library, but on a computer keyboard. The problem is that they often don’t know what they are missing when it comes to what genealogy societies have to offer.
One solution: show them the value with video!
(Full disclosure: This post contains affiliate links and I will be compensated if you make a purchase after clicking on my links. Thank you for supporting the Genealogy Gems blog!)
One of my favorite video creation tools is Animoto because it helps you creates incredibly professional-looking videos in a shockingly short amount of time. And most importantly, Animoto requires no more technical skill than clicking, dragging, and dropping with a mouse.
Rather than seeing the Internet as the enemy of your society, embrace it and put it to work for it. Online video is terrific tool for:
just to name a few ideas.
Last year I had the pleasure of presenting a full day genealogy seminar in Fresno, California. Turning photos of the day into a video that could be used to build membership was a breeze With Animoto. I selected a design, uploaded my images and added text to help make the case. Here’s an example of a video I created for the Fresno Genealogical Society.
A video like this can spread the word and reach prospective members in a variety of ways. Here are just a few ideas for how a genealogy society can grow membership using video to achieve their engagement goals:
 Just a bit of planning can deliver great results. Here are my recommendations for how a genealogy society can grow membership and achieve promotional video success:
We have lots of how-to video creation resources for you here at Genealogy Gems. Click here to find step-by-step instructions for creating videos on Animoto, and to see more examples of the role that video can play in your family history.

READ: Need a Genealogy Speaker? Here’s the Affordable Solution
Even if you don’t use Snagit, or if you’re a newbie or still deciding whether you want to use it, this video will give you tangible examples of what it can do for you. If you are already using Snagit, this session will definitely take your skills to the next level.
Use coupon code GENE15 to get 15% off. Thank you for using my link for purchasing your copy of Snagit. (We will be compensated at no additional cost to you, which makes the free Elevenses with Lisa show and notes possible.) Don’t worry if it initially shows as Euros in the cart. When you enter your address including country, it will convert the currency appropriately.
In Elevenses with Lisa episode 66 Lisa Louise Cooke will discuss how to use Snagit:
You can also watch at the Genealogy Gems YouTube channel.
Elevenses with Lisa episode 61 was a tutorial for beginners on how to use Snagit, and specifically how I use it for genealogy. I think it really resonated with genealogists because accurately and completely capturing the family information that we’re finding is absolutely essential for good source documentation. It’s one of the most important things we do as genealogists.
So, this video is sort of a “Part 2” session where we dig into more ways to use this amazing screen capture tool and I answer some of your most pressing questions.
Even if you use a different snipping tool, I’m going to give you tangible examples of how you can clip more effectively.
I received the following email from Anne W.: “I very much enjoyed your recent Elevenses with Lisa episode on how to use Snagit. I love the screen clipper on my Mac but this does so much more. I used your link to purchase Snagit and I have found the tutorials very helpful as I figure out how to use it on my Mac with my files. The first thing I did was go back to several newspaper pages I clipped recently in chunks and used Snagit to capture the whole page. It worked like magic! I would love to see another episode about the features of Snagit. Thank you for your regular and premium podcasts. I listen to both regularly. I have learned so much that I can apply to my genealogy research.”
Oh I love hearing how you’re using what we talk about here at Genealogy Gems! And yes, Snagit is fantastic for clipping those squirrely newspaper pages, and so much more!
Let’s get started – I’m excited to show you 5 more problem-solving screen capture projects that you can do with Snagit, and then we’ll wrap up with answers to your Snagit questions.
Bill in San Antonio, TX wrote me last week and told me about a problem that he was having with his online family tree at Ancestry It turns out that some ancestors had duplicate profiles. He didn’t put them there. He asked Ancestry about it but was getting what he called “boiler plate” answers that didn’t solve the problem.
In situations where you’re trying to communicate a complicated problem to someone else, or you’re just trying to work through it yourself, it can really help to visualize the problem, and Snagit can help you do that very effectively.
Bill says: “I am seeing duplicate FACTS in profiles of siblings, parents, and children of a person and cannot figure out where they originate. I go to the profile which seems to be generating duplicate information, but it is not there.”
As I read through all the details that he wrote up about the problem, I found myself getting confused. I asked his for access to his family tree so I could take a look and he wrote back
Bill went on to say, “The duplications I see are all in my tree. I have reviewed each of them to be certain that the data is not coming from a profile, even though it appears in duplicated form elsewhere.
Here is a screenshot of one such issue, showing two siblings with repeated data. Note that in each case, the birth location is slightly different, as in “Texas” vs. “Concho County, Texas”.
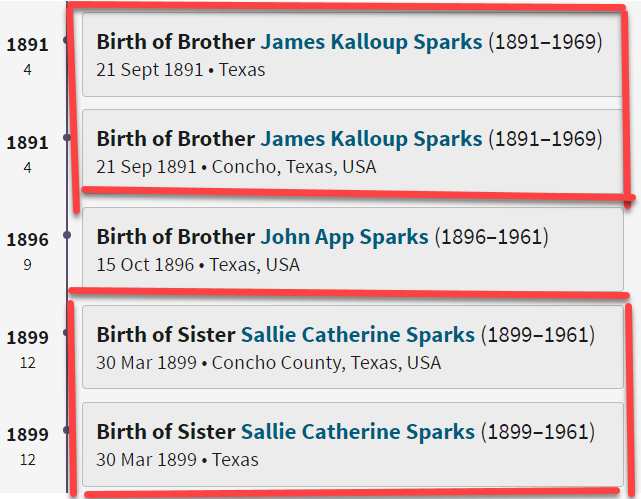
Ancestry Profile – problem of duplication
Bill had annotated his screen clipping to help me zero in on the problem. “(I used SnagIt for the screenshot — thanks for suggesting it!) I see this issue in other profiles, so your suggestions for solving it will be useful in other parts of the tree.”
Here are just three examples of ways you can highlight or call out an item in an image:
After you select and customization a style (such as a red outline shape) you will see that Snagit provides a “ghost” version of it in your list. It’s greyed out and ready to add. Simply click the plus sign to add the style to a theme. There are several themes available and you can create new themes.
I like to make it even faster to find the styles I use the most by adding them to my Favorites. It’s super easy to do. Just click the star on the style. You’ll find your Favorites in the star menu at the top of the screen.
As a side note, I do think this is a bug in Ancestry’s system. I recommended that he do the following to zero in on the problem:
Again, you can use Snagit to help work through things like this. Here’s how to see if you’re indeed looking at the same person: Right-click on each ancestor profile to open it in a new tab so you can compare and capture them. In this case it was Willie (the ancestor) and James and the duplicate of James. Each will have a URL address in your browser bar that will end in person/420009496764/facts. The number in red is the unique number for that person.
Had the tree number or person numbers been different, that would be the likely source of the problem. However, in Bill’s case, they are the same, so that’s more evidence that it’s a bug in Ancestry’s displaying of the information.
After screen capturing each profile they can be combined into one step-by-step document that can then be shared.
My guess is that at some point Bill viewed someone else’s tree or a hint that included this conflicting information, or he may have attached a record that had conflicting information, or rejected information from a record. In any case, some sort of action may have gotten “stuck” in the virtual stratosphere. The system has hung on to something it should not have. Bill says he’s finding more instances of this happening in the same tree, so it definitely needs to be addressed. It would be a shame to keep adding to the tree only to have that glitch continue to duplicate itself in other profiles.
I suggested looking through the records he has attached to James Kalloup Sparks to see if any of the attached records mention Concho, TX as his birthplace. I doubt there is one, but if there is, it is likely somehow linked to the problem.
It’s very odd that on Willie’s profile it shows James Kalloup Sparks’ birthplace as Concho in the duplication, but when you click that profile it doesn’t say Concho. It’s must surely be an Ancestry glitch.
If it were me, I would try downloading your tree and then creating a second tree by uploading it and seeing if the error still occurs. Here’s the Ancestry Help page.
Also, if by chance Bill was syncing his Ancestry online tree with genealogy software on his computer, there’s a possibility that could cause the problem.
Questions from Kelly: “Hi Lisa!, I would LOVE for you to create a very simple tutorial for adding in arrows and any text in “bubbles or boxes”. I have tried to do this and am missing something – I just LOVE Snagit but I am so technically challenged and would love to not become so annoyed when I am missing the simplest of steps.”
The most important thing to remember as you use annotations like text bubbles, shapes and text is you must select what you are working on. The font, color, sizing and other formatting features can be applied to every kind of annotation. You must select the item before applying the formatting.
If you’re ever confused about what “mode” you’re in, look at the top of the screen and note which tab is selected. In the example below, we are in “Shape” mode.
And if you try and try to make a change to an annotation and nothing seems to happen, you probably haven’t selected it. Click on the item to select it before attempting to make any changes.
If you want to move a item such as a shape or a selection of text, again you will need to click it to select it. You should see the “Move” selector handle that looks like this:
If you don’t or you’re having trouble, click “Move” in the toolbar at the top of the screen and then click on the item.
Most of the time if working with annotations or formatting them is presenting a challenge, it’s because the item hasn’t been properly selected before you begin.
Many of the most popular genealogy records websites offer a hinting feature that suggests records to you based on the information in your online family tree. Many of those “records” are quite unique. I recently came across a Photo Hint at Ancestry that was a screen capture of a story in a public Facebook group of the descendants of a particular couple. It was interesting information but I didn’t really want everything that was captured in the image. I used Snagit to capture and then edit the image the way I wanted it so I could then save it to my computer. This included erasing or removing unwanted areas. The following Snagit features can help you accomplish this easily:
Answers to your questions from episode 61 which was my beginning tutorial on Snagit. If you haven’t used it before stick with us in this video to see all the cool things it can do and then go back and watch that episode which is perfect for beginners.
Pat M.: Will OCR work for non-English newspapers?
Answer: Snagit doesn’t translate, but the OCR will Grab non-English text. Learn more here. You can then copy and paste it into Google Translate.
SHB: Don’t see Evernote on the list, how easy is it to save to EN?
Answer: If you have Evernote installed on your computer you should see it in the Share list. You can also download Evernote to add it as a Share destination. In fact, there are loads of programs you can download.
Cyndy B.: Are all these features in older versions?
Answer: No, like all software, each version introduces additional features.
SHB: Curious about printing… if you print a long article, will it print out readable?
Answer: Yes! You can set the resolution. And use Print Preview to make adjustments so it prints exactly the way you want it.
CA Sanders: if I bring a photo into Snagit and work with it will save IN Snagit, not in my original placement…so I would have to “save” or “move” to the folder it was in to begin with my changes.
Answer: After making your edits, use File > Save As to save it in the desired format to the desired location on your computer hard drive. You can also save it to replace the original if that’s your goal.
B Latham: How do we keep the SnagIt program up to date? It sounds as if other viewers here are saying they purchased the program a few years ago and may be outdated. Isn’t there a way to keep it up to date?
Answer: Yes, you can buy a maintenance plant that will include future updates at a reduced fee. Use our link and discount code, and the option will be available at checkout.
Barbara C.: For 2 different laptops, would we need to purchase Snagit twice?
Answer: TechSmith software is licensed per user, so how many computers can I install it on?
Each user may install and use one copy of the software product on up to two computers for their sole use, provided only one computer is in use at any given time. This includes home and work, or a laptop and desktop.
Here’s our link for purchasing your copy of Snagit (screen clipping tool) Thank you for using our link. Use coupon code: GENE15 (We will be compensated at no additional cost to you, which makes the free Elevenses with Lisa show and notes possible.)
These show notes feature everything we cover in this episode. Premium Members: download this exclusive ad-free show notes cheat sheet PDF. Not a member yet? Learn more and join the Genealogy Gems and Elevenses with Lisa family here.
The manufacturer price is going up August 31, 2021. Now’s the perfect time to get your official Elevenses with Lisa mug.
Click here to sign up now and you get your free bonus ebook.
Leave a Comment or Question Below
Some family Christmas traditions carry over easily from generation to generation, and some don’t. Here’s one tradition I tried passing on to my children, and how it has played out. It reminds me that traditions themselves can be unexpected–which ones have staying power and how each generation reshapes heritage in its own way.

That’s me in the green coat, between my grandma and my mom. My dad stands on the left, with my four younger brothers in the back of the truck.
I grew up with several family Christmas traditions: making candy cane cookies, tromping through the snow to cut a live tree and, on Christmas Eve, re-enacting the Nativity with my brothers as my dad read from the Bible. Over the years, my husband and I have tried several of these traditions. Some traditions have translated well into our lives, and some haven’t. (Though I loved it as a child, the year I walked a mile into the woods in heavy borrowed boots while pregnant was my last for cutting a live tree.)
One holiday tradition that has rooted itself in my children’s lives surprised me. It’s not exciting or tasty. Yet they have adopted it fully–and they’ve even started documenting it.
My mom always loved putting up the Christmas tree. She planned a made-for-memories event each year, hoping to have joyful carols, hot chocolate and pictures worth putting in the Christmas letter. What she got from me and my five brothers was usually less idyllic. We sang plenty of carols, loudly, but they were more likely to be “Grandma Got Run Over by a Reindeer” than “Silent Night.” Pictures always had someone sticking out a tongue or elbowing a brother. And my mom often had to wrangle us into putting up the tree and stringing up the lights first, which was guaranteed to make some of us grumpy.
 But every year, my mom made sure we each had a new ornament to hang on the tree. Sometimes she made or bought it. Sometimes another relative sent us ornaments. I don’t know how she always had these ornaments amidst the chaos of Christmas preparations for six children. But she did it. She even labeled them with our names and the year.
When I left home, she gave me a box of my ornaments–along with a list, year by year, of which ornaments we received and extra notes about some of them:

About six years ago when decorating our tree with my husband and children, I pulled out my box of childhood decorations with my mother’s list in it. For some reason, that year, her list especially spoke to my heart. I knew I wanted to do this for my own children. So I divided up the ornaments I’d given Jeremy, Alex, and Seneca over the years. I added a couple of ornaments for years that didn’t have them. I started lists. They weren’t fancy lists: just a piece of notebook paper, like my mom’s on yellow legal paper. I figured if I waited until I found holiday stationery, it would never happen.
 The following year, I presented my children with cute boxes for their ornaments. I slid my lists into sheet protectors and taped them inside each box. They were actually delighted to hang their own ornaments! No cajoling was necessary.
In fact, we had so much holiday cheer that my husband decorated his ear with an ornament. My oldest son Jeremy began snapping pictures. Seneca launched herself at Jeremy, Alex pounced, and they all dissolved into a pile of giggles on the floor, their Santa hats somehow still intact.

Since then, the kids have gone looking for their own boxes of ornaments each year. Some years I am more prepared than others: this year, they will get their 2017 ornaments on Christmas Eve.
I love that my children have come to own this tradition. Alex has actually begun documenting his new ornaments himself. You can see how he picked up where I left off:

Now that I’m a mom, I can’t help but look at my mom’s list a little differently. It’s a chronicle of a mother’s love, steady and shown in little things and relatively unappreciated. Across the top of her list, she wrote, “DON’T LOSE!” She was probably thinking of her carefree young adult children who might not appreciate this box of ragtag ornaments and what it represented to her. Today, I think her message is more than a warning not to lose the ornaments she so carefully tracked and packed away each year. It’s about never losing hold of her love for us–the heritage that matters most.
In our family, at least, the adoption of any tradition is a little messy and uncertain, especially now that I have teenagers. I never know whether’s it’s going to “take,” who’s going to roll their eyes or rebel, whether they will feel and respond to the message behind the time we spend together and the rituals we create. My solution is to try a lot of traditions. To not be afraid to change things up to suit my own little band of a family–even to create new traditions on the fly. To be flexible with my expectations–they may very well wrestle instead of sing “Silent Night” as they hang their ornaments, and that’s fine. As long as they are laughing and creating memories of the ways their family shared its love.
May you enjoy creating or reliving your own holiday traditions this year! Feel free to share any with us on the Genealogy Gems Podcast Facebook Page.
Merry Christmas to your family from mine, and from all of us here at Lisa Louise Cooke’s Genealogy Gems.
![]()
You can use Google Slides for genealogy to create one-of-a-kind presentations, a virtual scrapbook, or a virtual library list…and it’s free! Here’s how to take advantage of yet another awesome Google tool.
I was recently asked if there was a software program or app, something free perhaps, to share a slideshow or create a visual presentation. There is! It’s called Google Slides. Here’s how Lisa Louise Cooke, author of The Genealogist’s Google Toolbox, explains it:
Google Slides is an online presentation application, much like Microsoft’s Powerpoint. It’s part of Google’s free office suite of tools. As a genealogist, it provides the opportunity to create and visually share your family history.
It’s a Cloud-based service and that means you can access your presentations wherever you are and on any computing device. You will sign-in to Google Slides with your personal Google account. That means you will be able to keep everything private unless you decide to share it. Although it’s Cloud-based, you can use it offline too. Any new presentations you create or changes you make will be automatically updated when you get back online. You can show your presentation at the next family reunion or genealogy society meeting even if there’s no Internet access.
There’s a lot of potential for using this powerful tool for genealogy!
With that great introduction, I’d like to share a few unique examples of how a genealogist or a genealogy society could use Google Slides.
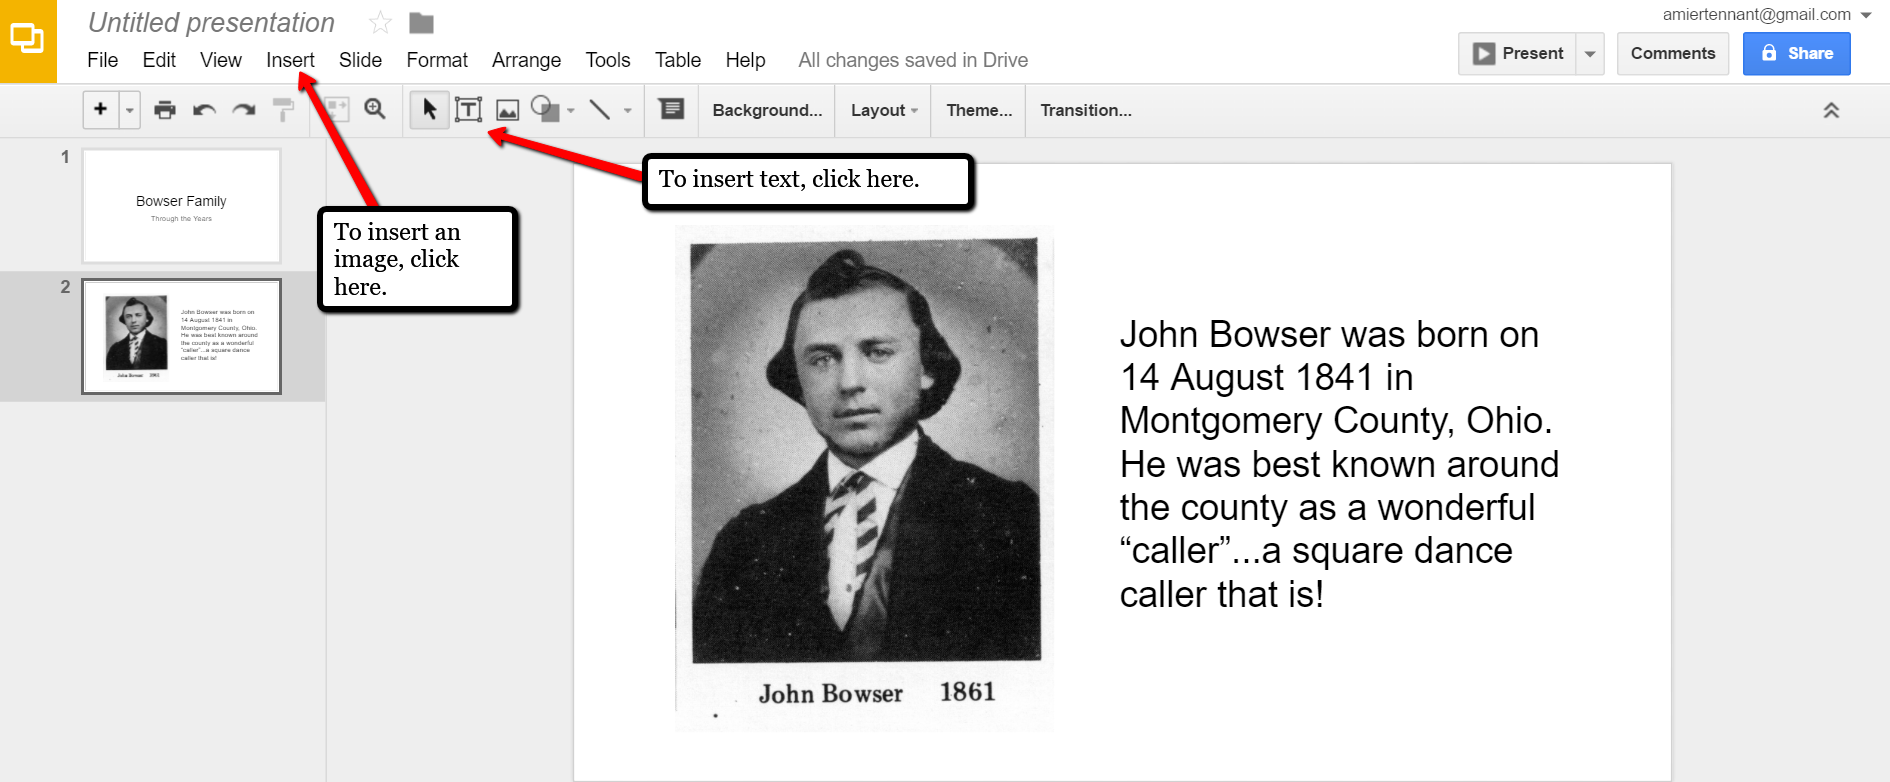
Google Slides is an easy way to create a fun slide show of your ancestor photos. This can be shared at family gatherings or reunions right from your laptop. You can also share the presentation with a click-able link.
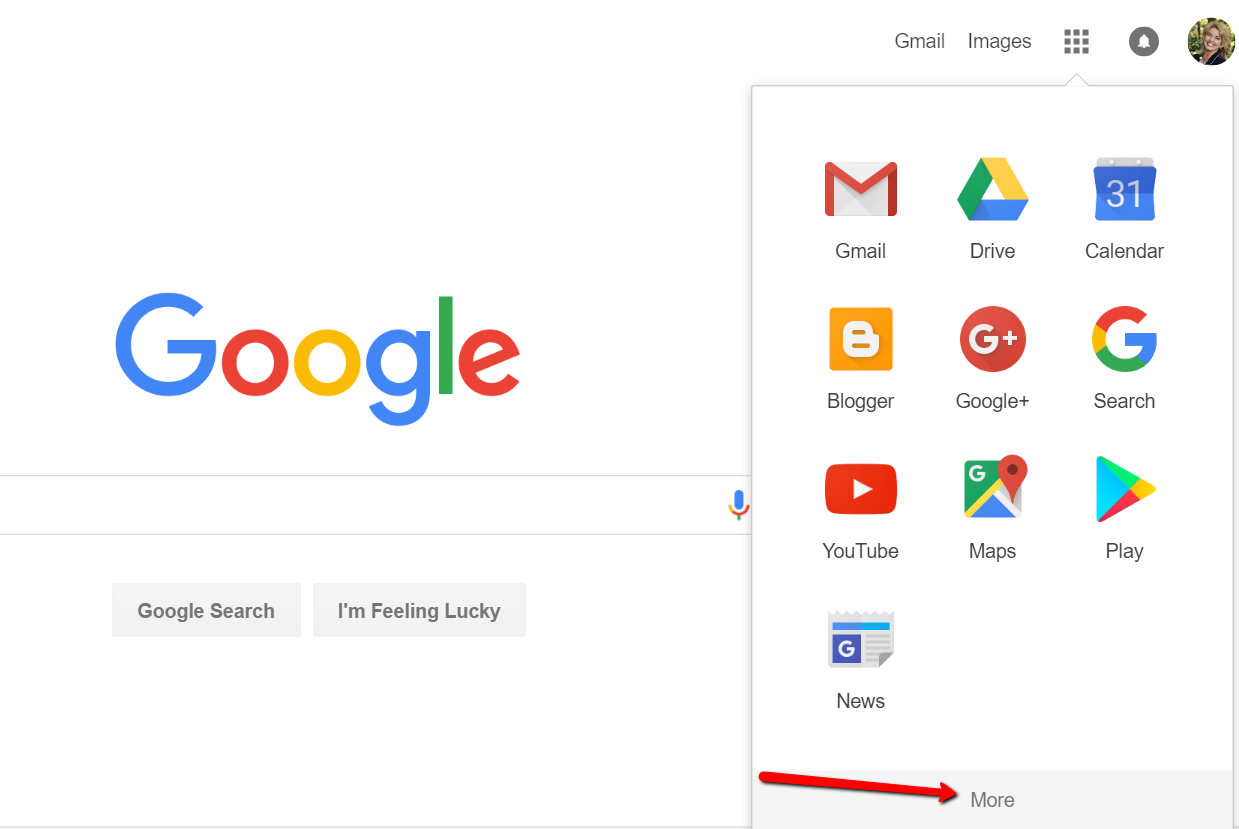
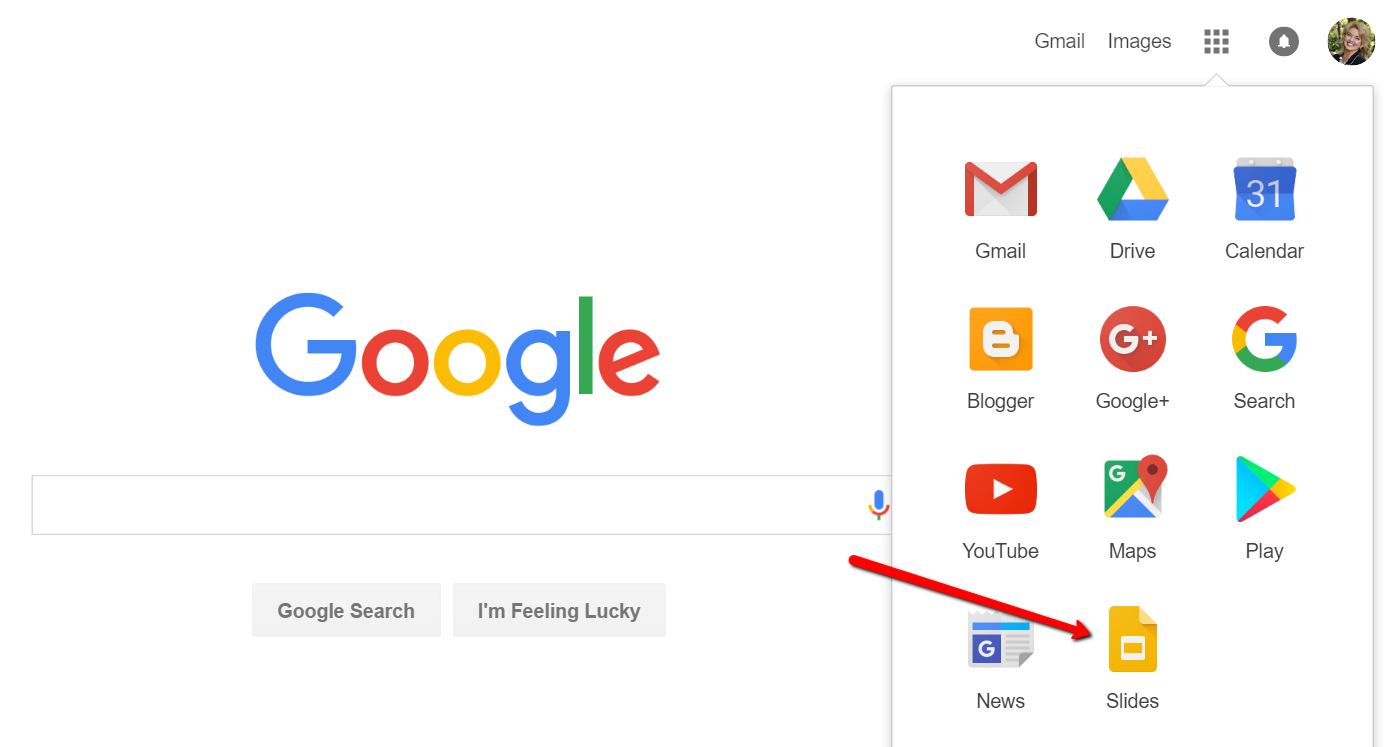
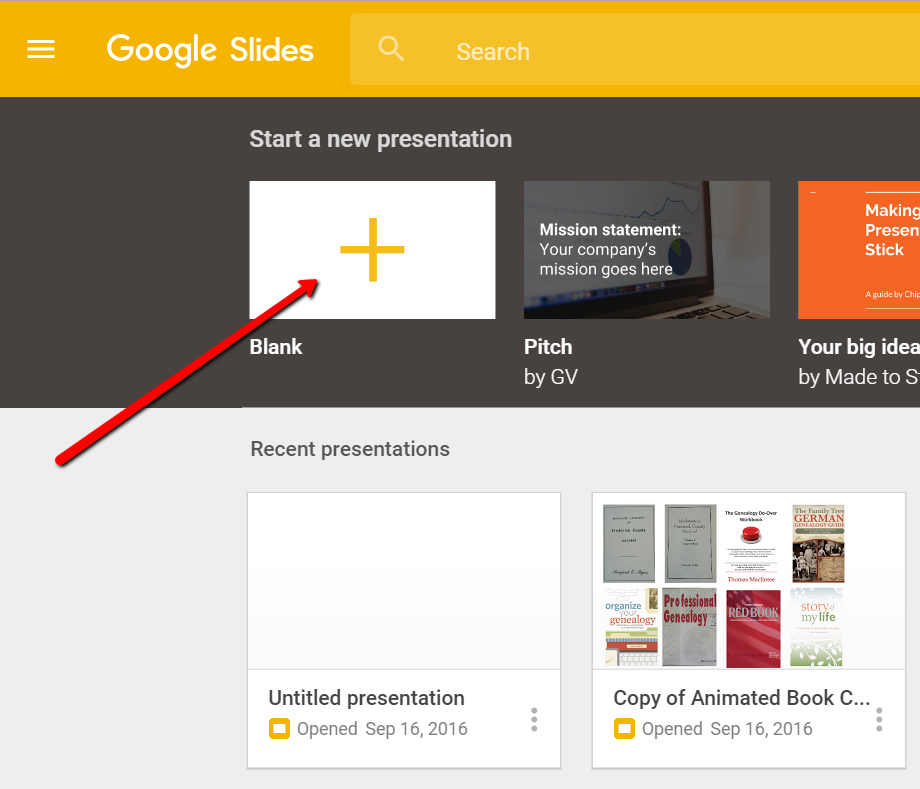
To begin, find Google Slides by going to Google.com and sign-in to your free Google account (or sign up if you don’t have one.) Click on the grid to the left of your sign-in avatar. This will bring down several options. If you don’t see Google Slides as an option, click More at the bottom.
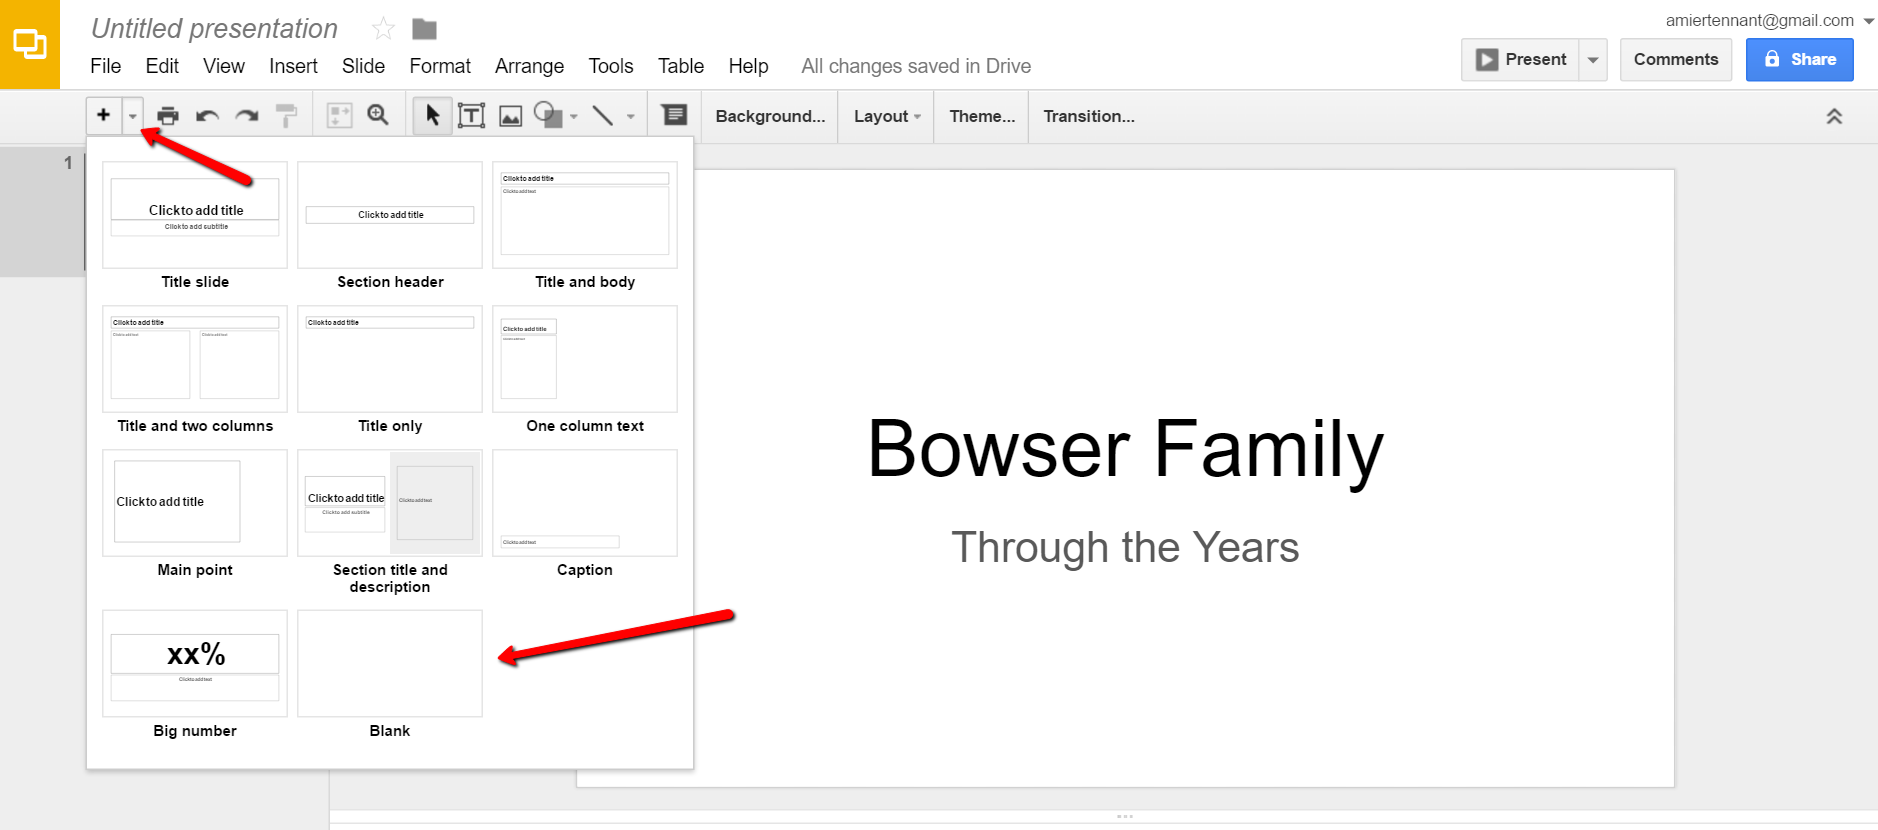
Keep adding your slides until you have all of them created.
Like many of us, I like to share my ancestor photos with my family and friends. While at a family gathering of a small group, I just set my laptop up on the coffee table and we huddle around. Bring up your Google Slides presentation on your laptop or mobile device and click on Present at the top right of the screen. The computer does the rest and presents a slideshow for your viewers.

A pop-up window will appear. Click the little drop-down menu next to the words “can view.” This option allows you to choose whether you wish people to be able to edit, comment, or view only. I typically choose the “view only” option. Then, a shareable link is created for you. Click Copy link and paste that into an email directly to a family member, to your family history blog, in a Tweet, or in a Facebook post. Wa-la! You have shared your Google Slides presentation.
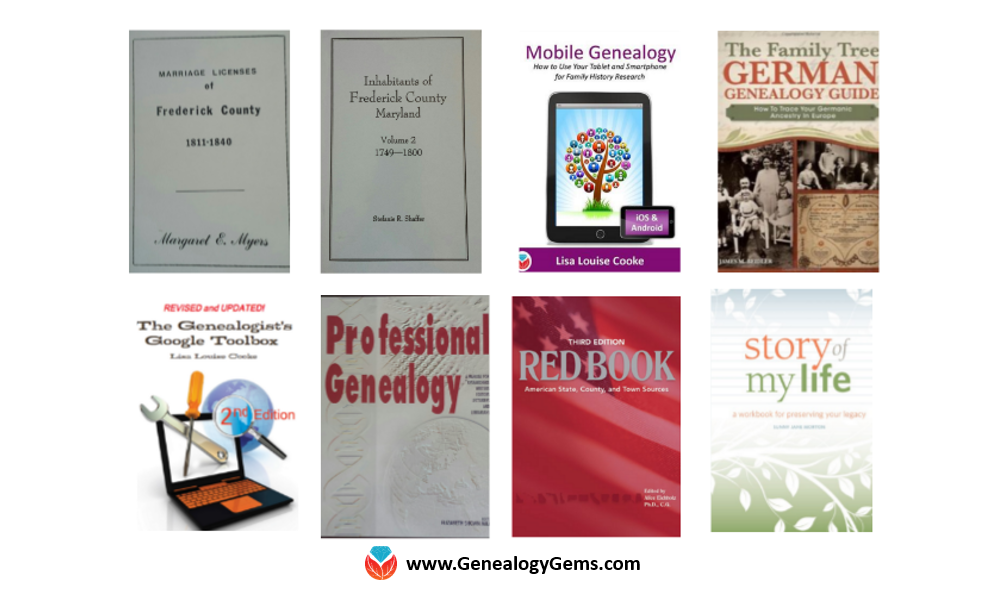
Another stellar way to use Google Slides for genealogy is to create a convenient virtual library list. A recent article found online gave me the idea of creating a library list using images of the covers of books.
For example, if you enjoy attending genealogy conferences and buying books for your society, you may get stuck wondering, “Do we already have that in our collection?” By creating a virtual book cover list, you won’t have to wonder anymore!
You will first need to begin this project by taking a picture of the covers of each of your books and saving the images to your computer or laptop. I took pictures, cropped them, and sharpened them up a bit with my smartphone. Then, I saved them to a file folder on my computer named Book Covers. [Tip: It would be an even better idea to save the Book Covers folder to your Google Drive!]
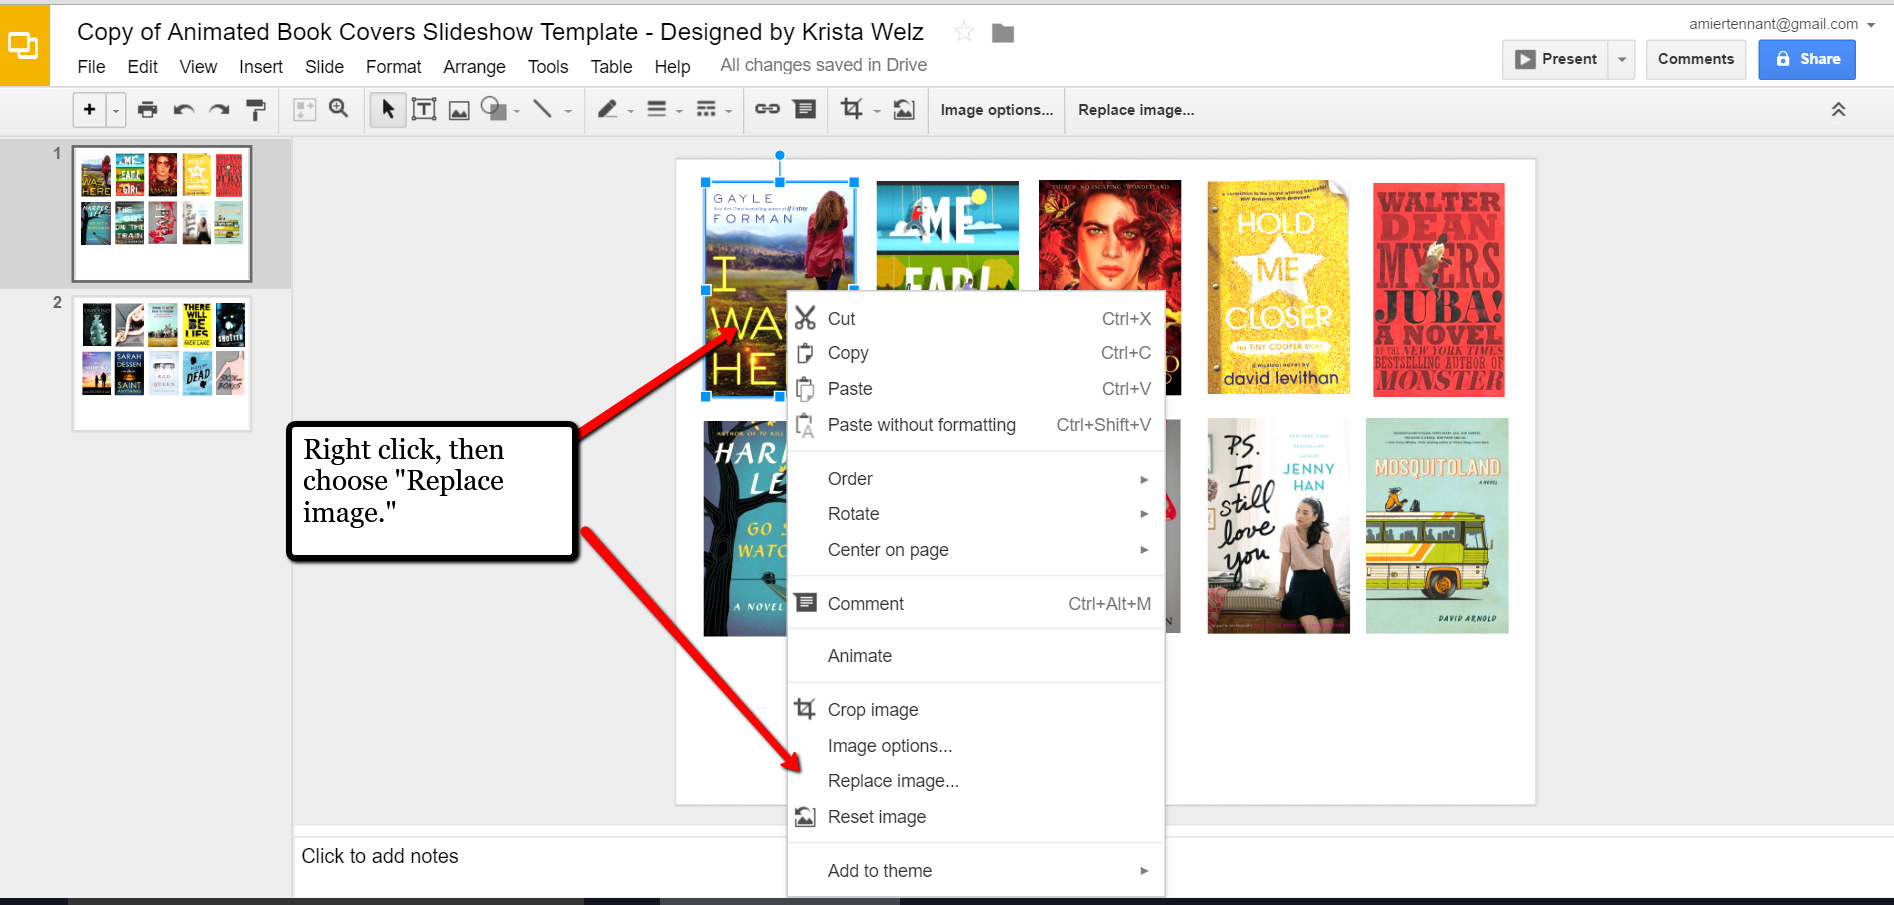
When you have finished, don’t forget to title it. There is no need to save it because Google Slides automatically saves for you. Google Slides is accessible from any of your devices and can even be viewed on-the-go from your mobile device. You’ll love this feature when you are trying to decide what books to add to your genealogy library.
We are sure there are dozens of ways to use Google Slides for genealogy. Give Google Slides a try and if you think of another use for this wonderful tool, let us know about it in the comments below! Thanks for reading, friends.
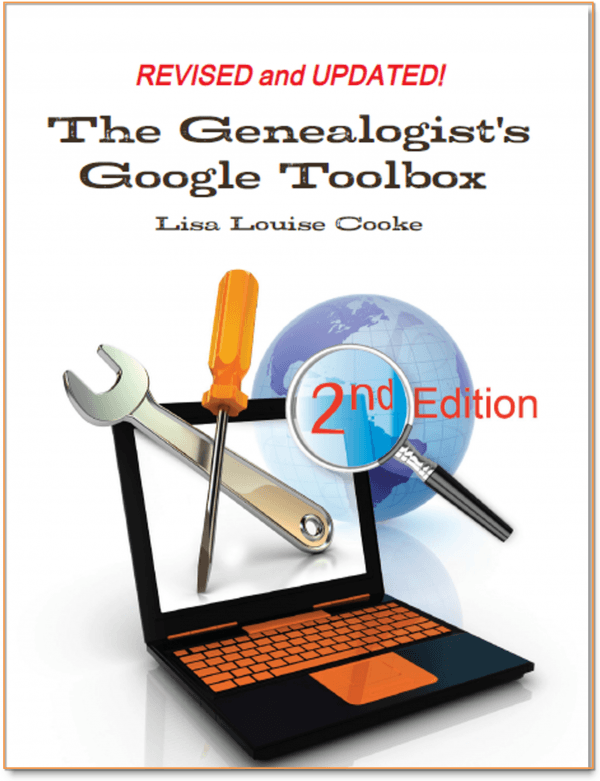 The Genealogist’s Google Toolbox