Eastern Cherokee Applications for Native American Research
Many American families have a tradition of Native American ancestry. Now, Fold3.com has made access to their Native American records collections free between November 1 and 15th. Here are the step-by-step instructions you need to know to effectively navigate the Eastern Cherokee Applications collection at Fold3.com.
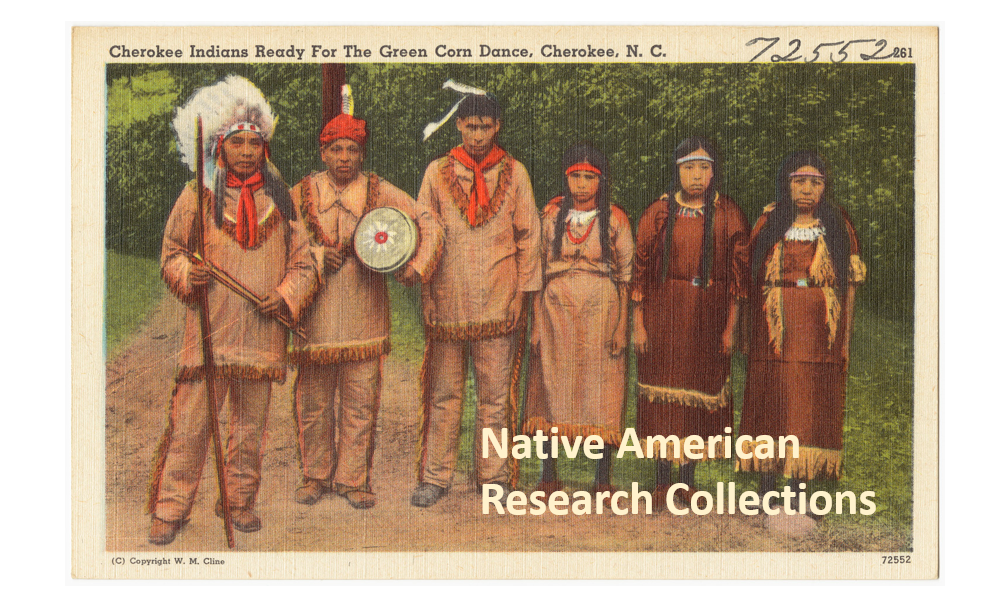
Original image provided by Boston Public Library via Flickr at https://www.flickr.com/photos/24029425@N06/5755511285.
Our Purpose
Our goal is to open the doors to using all types of available genealogical records, and provide you with the skills to explore them with confidence. Our Genealogy Gems team is excited to share with you the opportunity to utilize the free access to Native American records on Fold3.com. While it can be difficult and confusing to know how to navigate these important records, this post will provide you with information to get you started and to feel a little more comfortable jumping in! Now, let’s get started.
Eastern Cherokee Applications Collection for Native American Research
The Eastern Cherokee tribe sued the United States for funds due them under the treaties of 1835, 1836, and 1845. [1] Applicants, or claimants, were asked to prove they were members of the Eastern Cherokee tribe at the time of the treaties, or descended from its members. [To learn more about the lawsuits and allocations, read “Eastern Cherokee Applications of the U.S. Court of Claims, 1906-1909,” in .pdf form provided by the National Archives and Records Administration.]
The courts ruled in favor of the Eastern Cherokees and the Secretary of the Interior was tasked to identify the persons entitled to distribution of funds. The job of compiling a roll of eligible persons was given to Guion Miller.
It is interesting to note that the funds were to be distributed to “all Eastern and Western Cherokee Indians who were alive on May 28, 1906, who could establish the fact that at the time of the treaties, they were members of the Eastern Cherokee tribe or were descendants of such persons, and that they had not been affiliated with any tribe of Indians other than the Eastern Cherokee or the Cherokee Nation.” [Source: page 4, 3rd paragraph of NARA document Eastern Cherokee Applications of the U.S. Court of Claims, 1906-1909.]
The collection at Fold3 titled “Eastern Cherokee Applications” contains these applications submitted to prove eligibility. [Important: Because this act was about money allocation and individuals filling out these applications would have received money if approved, this may raise the question, “Did our ancestor have a reason to lie or exaggerate the truth so that they might be awarded funds?” Further, the Genealogy Standards produced by the Board for Certification of Genealogists (BCG) reminds us: “Whenever possible, genealogists prefer to reason from information provided by consistently reliable participants, eyewitnesses, and reporters with no bias, potential for gain, or other motivation to distort, invent, omit, or otherwise report incorrect information.” [2] In this case, those filling out the Eastern Cherokee Applications did have potential for gain. So, be sure to take any genealogical data, like names, dates, and places, with a grain of salt and find other documentation to back-up the facts.]
The first step in locating whether your ancestor applied is to check the index. If you are not a member of Fold3.com, you will first need to go to www.fold3.com. Click in the center of the homepage where it says, “Free Access to Native American Records.” Next, on the left you will see “Records from Archives.” Go ahead and click that.
From the list now showing on your screen, choose “Eastern Cherokee Applications.” Then click “learn more” at the bottom right of the collection description.

From the new screen, choose “Browse by title.”

Notice, there are two general indexes. The first choice is for surnames between the letters of A and K, and the second general index is for the letters between L and Z. The index is alphabetical by surname.
Scroll through the digital images of the index and find the surname of your targeted ancestor. For example, my ancestor’s last name is Cole.
You will see the state they were currently living in and a number listed to the left of each name. This number is what you will need to find the application of your ancestor. In the example here on the left, Anderson Cole’s number is 31697. Though the step of using this index could be omitted, I wanted you to know how to use it.
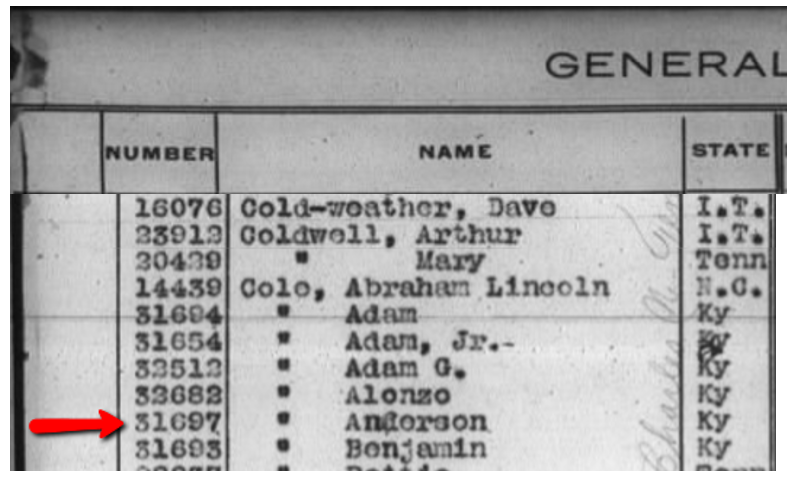
Anderson Cole’s name appears on the General Index of the Eastern Cherokee Applications.
Armed with this number as confirmation, let’s go back to the list of options and this order medication online for pain time, choose Applications.

Applications are broken down by the first letter of the surname, so in my case, I would click on the letter C and then from the new options list, click the appropriate indicator until I reach Anderson Cole.

Anderson’s application is eight pages, however applications vary in size from fewer than eight to several more.
From Fold3.com, you can see each page of the application. Some of the information you may find on the applications include, but is not limited to: name, birth date and location of applicant, names of parents and siblings, name of spouse and marriage date and place, tribe affiliation, Cherokee name, grandparents names, and residences.
The application was sent in to the Commissioner of Indian Affairs and then it was decided whether the applicant was eligible or not.
Lies and Rejection

Anderson Cole’s Eastern Cherokee Application was rejected but held genealogical data.
In Anderson Cole’s case, he was rejected. This is found on the very first page of the application. In other words, the commission did not find him able to prove his relationship with known members of the Eastern Cherokee tribe and therefore, he was not given any allotment of money. This rejection neither proves or disproves whether Anderson was of Native American descent. However, it does suggest that something in his lineage was questioned.
Further, when reviewing the information recorded on any genealogy record, we must ask the question, “Did this person have any reason to lie?” When money is on the line, lying is always a possibility. According to further research, it appears Anderson either lied, omitted details, or was seriously mistaken about many names and dates of close family members. Even then, there are some great hints within the pages of his application and I was happy to find it.
Additional Information in the Eastern Cherokee Applications
In addition to an application being filed for our ancestor, if the ancestor had children under the age of 21, they may have also applied in behalf of the child as a Cherokee Minor.
Anderson’s son, W.T. Cole, applied under the same application number as Anderson. I found his application in the last pages of Anderson’s file. This type of record is direct evidence of a parent/child relationship and can be a wonderful substitute when other vital records can not be located. However, direct evidence (which is anything that directly answers a specific question…like ‘who are the parents of W.T. Cole?’) does not have to be true. In this case, just because Anderson says his son is W.T. Cole, doesn’t mean it is absolutely true. We should always find other records or evidence to back up our findings.
How is the Roll of Eastern Cherokees Different from the Eastern Cherokee Applications?
You may have noticed that besides the Eastern Cherokee applications and general index, there is also a record set titled “Roll of Eastern Cherokees.” Another name for this roll is called the Guion Miller Rolls. This is a roll, or list, provided by commissioner Guion Miller of all those who were approved to receive the allocated money. [We will be discussing the Guion Miller Roll Collection from Fold3 in a later blog post. Be sure to sign-up for our free newsletter so you don’t miss it!]
Anderson Cole and his son do not appear on this Roll of Eastern Cherokees. If however, your ancestor does, additional information on this roll could include application number, the names of minor children, ages of all parties, current residence, and a death date.
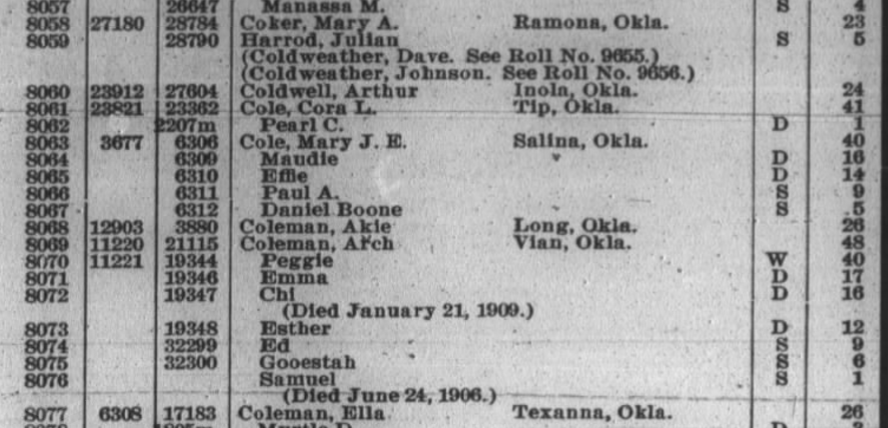
A partial page of the Roll of Eastern Cherokee found online at Fold3.com.
More on Native American Research
Using Native American collections for genealogy research can be challenging. We hope this has helped you to better understand the ins and outs for using the record collections at Fold3. For even more helpful tips, read:
How to Use the Dawes Collections for Native American Research
 Stay tuned as we bring you additional instructions for exploring the Guion Miller Roll and Indian Census Rolls at Fold3.com in the days to come. Sign up for our free Genealogy Gems newsletter for our upcoming posts on this important subject.
Article References:
[1] “The U.S. Eastern Cherokee or Guion Miller Roll,” article online, FamilySearch Wiki (https://familysearch.org/wiki/en/The_U.S._Eastern_Cherokee_or_Guion_Miller_Roll : accessed 1 Nov 2016). [2] Genealogy Standards, 50th anniversary edition, published by Board for Certification of Genealogists, 2014, standard 39, page 24.Disclosure: This article contains affiliate links and Genealogy Gems will be compensated if you make a purchase after clicking on these links (at no additional cost to you). Thank you for supporting Genealogy Gems!
Family History Episode 42: How to Start a Genealogy Blog, Part 5
Family History: Genealogy Made Easy Podcast
with Lisa Louise Cooke
Republished August 26, 2014

Free podcast – available in all major podcast apps.
https://lisalouisecooke.com/familyhistorypodcast/audio/fh42.mp3
Download the Show Notes for this Episode
Welcome to this step-by-step series for beginning genealogists—and more experienced ones who want to brush up or learn something new. I first ran this series in 2008-09. So many people have asked about it, I’m bringing it back in weekly segments.
In today’s episode we finish a multi-part, step-by-step series on setting up your own family history blog. In episode 40 you decided what the purpose of your blog is, and we got you started with the free Blogger web site and picked out your blog name and set up the web address for it, and got the basic framework started. In episode 41 two seasoned bloggers inspired us with their posts.
In this episode I talk about adding a few more gadgets and details, doing a bit of pre-planning for your blog posts, publishing your first article, and then talking about how your readers will subscribe to your blog. You’ll also get great tips on how to create genealogy content that others looking for the same ancestors can find easily online.
Episode 42: How to Start a Genealogy Blog, Part 5
OK, let’s head back to the new blog we created in Episode 40. I named mine Blog Your Family History. (This is just a sample blog: my current blog is part of the Genealogy Gems website.) Please note: blogging platforms change over time. The features and layouts I mention have been updated. Just watch for similar features in newer versions of the blog platform.
So far I have the basic layout set up and I added the vintage photograph of the three ladies sharing some written correspondence. If you’re not signed in to your Google account, you’ll notice a link in the upper right corner of your blog page that says “sign in.” You’ll need to click that and enter your user name and password to get access to your blog dashboard – the area where you customize your blog and write your blog posts.
When you sign in you’ll be taken to the dashboard area for your blog. In my case I have a couple of blogs, so they’ll all be listed here in the dashboard. To get back to your blog just click the View Blog link for the blog you want to view. You’ll notice that when you get there the link in the upper right corner now says “sign out” so you know right now you’re signed in. To get back to the dashboard where we can continue customizing the blog, just click the Customize link in the upper right hand corner of the blog. So far we have a couple of “gadgets” or sections of our blog:
- the title area at the top;
- the blog posts box. In the case of the blog I’m creating here the gadgets run along the right hand side of the blog page.
- About Me
- the gadget with the photo I added
- A followers gadget showing other blogger readers
- the blog archive gadget – this is where readers can access blog posts that are over a month old.
So let’s add another gadget by clicking the Add Gadget link in the top gadget box and a window will pop up showing us out options. I’d like to add a search box so that my readers can easily find articles with keywords they are interested in. So just click the plus sign to add the Search gadget and a Configure Search Box window pops up so I can fine tune this gadget the way I want it. So I’ll keep the title as “Search this blog” since that’s pretty straightforward, and I’m going to just have it search this blog so I will keep that check box checked. And click the SAVE button and now I have a Search box on my blog.
So as you can see adding various gadgets to your blog is easy and you can customize them to appear the way you want. And remember you can rearrange them on your dashboard by just clicking and dragging them into the position you want. Once you get the elements of your blog the way you like them – at least for now, and you can certainly make changes any time you want – then it’s time to start blogging.
What to blog about?
Hopefully you’ve decided what you want to blog about – perhaps a specific line of your family, or maybe you’re going to just sort of journal what you work on each day. No matter what approach you take, there are a few things to keep in mind. First, each time you write an article and publish it to your blog page it’s called a “post.” Post is sort of interchangeable with article, and posting is another word for publishing – basically you’ve made the article available on the web.
When you do post an article you will want people—particularly other researchers—to be able to find it. You’ll have better success attracting readers who are researching the same families if you sort of put yourself in their shoes. Ask yourself, what will they be searching on? When someone goes to Google and starts looking for blogs about their family trees, they are using keywords to do that search.
So while you may have some very creative ideas for blog post titles, if you don’t include some of those important keywords (or at a minimum the surnames) they may never find you. And of course sprinkling keywords into your post will also increase its chances of being found. And when we talk about keywords, we’re also talking about key phrases, such as family history, or family tree. Other good keywords are genealogy, birth, death, research, location names, etc. Just the kinds of things you would search on if you were looking for people writing about your ancestors. Remember too that an ancestor’s name is also a keyword phrase.
It’s a good idea to mix it up because you never know how someone else will be searching. For example, I research my husband’s great great grandfather Senator C J Larson of Winthrop MN. So if I’m writing about him, I will use several variations of his name:
- C J Larson
- Carl Johan Larson
- Charles Larson
- Charles J Larson
- Senator C J Larson
And of course when I use these names in combination with Winthrop, Sibley County, Minnesota, I’m bound to be found by someone also researching him and his family.
Publish your first post
OK, well let’s get right to how to publish your first blog post. At your blog Dashboard (if you’re not there just click the link in the upper right corner that says Dashboard) and click NEW POST. This is like getting a new piece of paper. You’re new post is under the Posting tab and there’s a box where you can write your text and there are some formatting buttons along the top.
My advice is to bite off small chunks. People tend to read something that looks more like a magazine article rather than a novel. And it’s easier to focus in on one topic at a time. So you may want to make your first post a welcome message and explain to your readers what they’ll will be seeing in the future on your blog. I know, you don’t have any readers yet, but since all of your posts are archived, this post will be read tomorrow and two years from now. New readers can find you at any time, and they may very likely take a look at your first post.
The first thing to do is write your post title. I used to wait to title my posts until after I wrote them because writing them often brought to mind the perfect title. But the problem with that is that so often I would forget to go back and type a title in and I would end up publishing without the title. While you can go back and add the title later, it may show up in your readers RSS feeds including those who subscribe to your blog by email. So I find that it works best if I give it the best working title I can come up with, then I write the post, and then I can go back and change it if I want, but if I forget it will at least have a basic title.
Also, remember that your readers probably have many blogs they read – but they probably don’t READ them all, the probably scan the titles and click through to read the ones that sound interesting. So your title has an important job to do. Like the blog text it should contain keywords that will help the post show up in search results, AND it needs to catch your readers’ attention.
When I first started blogging I was always trying to come up with title that as clearly as possible explained what the post was about. But over time I realized that we don’t have to explain it all in the title. In fact, being a bit mysterious or intriguing with the title can entice the reader to click through and read. They’ll find out soon enough all the details of your posting, but your title sets the tone, and catches their curiosity. Of course I don’t advocate bait and switch – but have fun with your titles and use it to your best advantage. And now FINALLY it’s time to actually write your blog post! Of course you can unleash your creativity here, but I do have a few suggestions:
- Keep your paragraphs shorter rather than longer – it just makes them easier and quicker to read
- Incorporate those keywords and phrases
- A picture says a thousand words – add images whenever possible and I’ll show you how in just a moment
- Write in your natural voice. Typically blogs aren’t formal, and you will have an easier time writing if you write more like you speak. And that will come across as more genuine to your readers.
- Don’t bite off more than you can chew. If you have a lot to say on a particular topic, consider publishing your thoughts in a series of blog posts rather than one really long one. And I find that readers really like following a series.
Once you’ve got it written up, it’s time to a bit of formatting. In Blogger there are a few different fonts you can choose from. Just like in Microsoft word, you highlight the text you want to format and then select from the drop down menu which font, and font size you want. The default font and size might be just fine, but it’s nice to know you do have some flexibility. You can also bold and italicize text by highlighting the text and clicking either button. And like Word you can use Control-B on your computer keyboard for bold and Control I for italicize. You can also put your text in a different color. Again just highlight the text to be changed and click on the capital T button with the color boxes and click on the color you want.
Now a word about formatting. Remember when we discussed that it was a good idea to avoid blog template designs that had dark backgrounds with light type because they are hard on the eyes and difficult to read? Well, over doing text formatting is much the same. It can get hard on the eyes. It’s like the rule of thumb that says you don’t type in capital letters because it looks like you’re screaming at the reader.
Well, overdoing the formatting with a ton of bold and italics and colors just ends up looking chaotic and nothing really ends up standing out. So keep in mind that less is more and use it sparingly so that only the most important things stand out. And just like in Word you can select whether your text is left right or centered justified, or fully justified. And you can create numbered and bulleted lists simply by highlight the text and clicking one of those buttons. And you can also use the Block Quote feature to set text apart as a quotation by indenting it from both sides.
With all of these formatting features you will probably want to see what it will look like to your readers. And that will be different to a certain extent than how it looks here in the post editor. To see it as it will look when posted, click the Preview link in the upper right corner of the text box. When you’re in preview mode the link will then say Hide Preview and to go back to editing or what they call Compose mode just click that Hide Preview link.
Next is the Spell check button, which is something you’ll want to use every time you post. Thankfully if you make a spelling error you can fix it after it’s posted, but it’s so much easier just to run the spell check before you do. There are a couple of more things you can add to this text post to spice it up.
The next button is the Add Image button and it does just that, adds your images and photos. When you click the button an Upload Images window pops up where you can browse your computer hard drive and locate the image you want to add, or if you have a website you can type in the URL address for an image you already have hosted on your website and it will use that image. Keep in mind that Blogger has an 8 MB image size limit, so you might have to reduce some of your photos and save them as smaller files to be uploaded to Blogger. This is often the case when you’ve scanned old family photos at high resolutions that create quite large files.
Once you’ve told Blogger which image to use, you can also choose how you want it to appear on the page on the left, in the center or on the right with the text around it, or you can just leave it as None. And you can also choose whether it is Small, Medium or Large. When you’re ready to go just click the orange Upload Image button and in a few moments it will be processed and you can just click the Done button, the window will close, and your image will now be in your blog post. Again, if you want to see for sure how it will look to your readers just click the Preview link.
You can even upload a video to your blog post. It works much the same way. Click the video upload button. A window pops up and you click the Browse button to locate the video on your hard drive. Blogger will accept AVI, MPEG, QuickTime, Real, and Windows Media video files up to 100 MB in size which is typically about 10 minutes at most. They also have rules about the kind of videos you can upload and require you to click the check box to agree to their terms of service, and then you just click the orange Upload Video button.
Videos take a few minutes to upload, so at first you’ll see the Blogger Uploading Video screen on the video player. You’ll see down at the bottom that it is processing. Once your video appears on the screen then you’re ready to go. If you don’t want to wait while it finishes processing you can click the SAVE button on your post and check back later to make sure it’s complete before Publishing.
And finally, if you decide you want to remove the formatting from you text you can do so with the last button which looks like an eraser. It’s called Remove Formatting from Selection. So in the case of the text that I set apart as a quote, if I want to change it back to regular text, I just highlight the text with my mouse and click the Eraser button and it will go back to normal. If you happen to know HTML you can click the HTML tab and work with your blog post code to further customize it. When you’re done just click the Compose tab to go back to regular editing mode.
Once you have everything formatted, you’ve spell checked and you’ve reconfirmed your title, your ready to send it out to the world! Just click the orange Publish Now button and it will immediately be live on your blog. The next window will say Your blog post published successfully! And you can just click the View Blog link to open a new window and see your published post.
Edit your previous posts
Now if you’re like me then occasionally you’re going to want to go back and edit one of your blog postings. And thankfully that’s very easy to do. Just head back to your Blogger Dashboard and next to the blue New Post button which you would click to create another post, you’ll find the Edit posts link. Just click that and you will see the articles you’ve posted with the most recent one at the top. If you wanted to delete the post all together you just go to the right hand side and click the Delete link for that particular post. To edit the post click the Edit link on the far left side of the post title. This takes you write back into Compose mode and you can make any changes you want. When you’re done, just click the Publish button.
Schedule posts to publish in the future
Do you want to write several posts at once, and have them automatically publish one at a time—once a day, once a week, etc? There’s an easy way to set up your posts to publish in the future. At the bottom of the Text box you’ll see a link called Post Options, just click that. This will expand the box and give you some options. Here you can enter the date and the time that you want the post to go live online. Once you’ve typed that in then just click the Publish button. It won’t be live right now, but will be published at the date and time you specified.
When I first started using this feature I kept clicking SAVE and then wondering why my posts didn’t publish at the right time. But you have to click the Publish button even though you’re not publishing at that very moment. It’s a neat feature, and works great when you’re going to be away but want articles to be published each day. Or like when we talked about breaking up a long article into a series of short articles, you could create them all and then set them to publish once a day or whatever time frame you preferred.
Now you probably noticed that you could also check a box in the Post Options for allowing your readers to post comments. But the best place to set that up is under the Settings Tab. So go to your dashboard, and click Settings. This will take you to the Settings tab which offers a lot of options. Click on the Comments menu link and here’s where you can make your selections as to how you would like your readers to be able to interact with you and your blog. Instant communication and connection with your readers is one of the really unique aspects of blogging, and you’ll find that most folks who read genealogy blogs are interested in a civil conversation. So let’s go through the options here.
- Show: I usually have this set to show comments. But you can hide them if you want.
- Under Who Can Comment? I would recommend that you allow anyone to comment. After all, you don’t want to prevent that long lost cousin who finds your family history blog in a search to not be able to contact you.
- For Comment Form Placement that’s just a personal preference, but I find the pop up window is easy for readers to use.
- Another important feature among these settings is the Comment message. And then next you’ll find Comment Moderation. I would recommend that you always moderate your comments, at least to start. This means that when a reader leaves a comment you will have the opportunity to read it and approve it to be published in the Comments section of that blog posting. That way you can eliminate offensive comments. Honestly, I’ve never received anything objectionable, but occasionally I do get people who are fishing for business and simply post “I like your blog” so that they can then tell about their company and give their website address. There’s no harm in setting it to Always and you can change it later if you want.
- Then at the bottom of the Comments Setting I like to type in my email address so that I’ll be notified by email if someone leaves a comment that needs to be moderated. And you moderate and approve comments in your Blogger dashboard.
When you’re done just click the orange SAVE SETTINGS button. And again, you can change these settings any time you want. So how do you moderate reader comments? Well, just click on the Posting Tab, and there will be three options:
- New post
- Edit Posts
- Moderate Comments – just click that link. And if you have comments that need to reviewed and approved or deleted you can do it there.
Let readers subscribe to your blog
And finally, let’s talk about how your readers can subscribe to your blog. That’s the other really cool thing about blogging. Each of your new blog articles can be automatically sent to your readers who subscribe. It’s just like subscribing to a magazine. We subscribe to a magazine so we don’t have to go to the store every day to check to see if a new issue has arrived. Subscribing to a blog is the same idea but of course it’s free. And like magazines being delivered to your mailbox, blog posts can be delivered to your readers blog Reader, or email box.
Your readers subscribe to your blog through your RSS feed. RSS stands for Really Simple Syndication which just means an easy way to send out your posts. But you don’t have to know anything about RSS feeds. Blogger does it all for you and I’m really surprised how many bloggers don’t bother to make it easy for their readers to subscribe. Not everyone who wants to subscribe to your blog will quite know how to do it, or be an experienced blog subscriber. You will want to make it as easy as possible for them to get started. Here’s an easy way to do it.
- Go to http://www.google.com/webmasters/add.html. Here you can add an “Add to Google” button to your blog. That way your readers can easily add your blog to their iGoogle homepage or to Google Reader, a tool they can use to receive and read blogs.
- For Choose your content type select RSS.
- Under Promoting select one blog.
- Select the style of button you want to put on your blog
- Type your blog address into the box, which needs to be your rss feed. In my case, it’s http://blogyourfamilyhistory.blogspot.com/feeds/posts/default?alt=rss. You substitute your blog name in where mine is currently (your blog name in that link instead of blogyourfamilyhistory).
- Click the Generate HTML button. The html code you need to add your button will automatically appear in the box, and it’s already highlighted for you so all you need to do is Control C on your keyboard to copy the code to your computer’s clipboard, and then head back to your Blog dashboard.
- Click Layout.
- Click Add a Gadget.
- Click the HTML / Java Gadget. A window will pop up where you can type in a title such as “Subscribe to this blog.”
- In the big box press Control V to paste the HTML code that you copied into the box.
- Click the SAVE button.
- Back on your Layout page you’ll see at the top that you the “page element has been added” and now the top gadget is “Subscribe to this blog”
Want to see what it looks like? Just click the blue PREVIEW button at the top and it your blog will open up in a new window and there you will see the “Add to Google” button. Now EVERYONE can subscribe and follow your blog quickly and easily. Just close that window, and click the orange SAVE button on your layout page. Now click View Blog and try it out for yourself.
Note: I talk here about iGoogle, which is no longer available.
Add the blog to Google Reader to receive each new blog post when it’s published, and have a link to click through directly to the articles and the blog. It’s very convenient and keeps your blog on the minds and lists of your readers. Now you’re all set to go. You can post your articles, which your readers can follow. As you have more time you can fine tune the settings and layout of your blog. Have fun! Best wishes for connecting with other researchers around the world.
Blogging Tip:
In response to one of our recent tips, a reader named Sarah pointed out that there are services now to “slurp up” blogs and publish them into books. We’ll tell you about one service, but encourage you to shop around. At Sarah’s recommendation, we looked into Blurb.com. According to Blurb’s Web site, this online program works with several blogging platforms including Blogger, LiveJournal, TypePad and WordPress.com.
You can customize and edit your book in real time. The automatic slurp action imports and maps blog text, images and comments and then links it into professionally designed page layouts. What an exciting way to preserve your family history. What a great Christmas gift or Mother’s Day gift.
Once you are ready to publish your book, you can control the price by buying a hardcover, dust jacket, soft cover and other designs. These books can be up to 440 pages and as few as 40. Have a blog book within 10 days of ordering. Now, as you can imagine, this is a little pricey but still very, very reasonable. Prices start at just $12.95 for a 40-page softcover and go up from there. You get bookmaking software free!
How to Find and Decipher Ellis Island Passenger Lists
Passenger Lists Records:
Elevenses with Lisa Episode 34
Video & Show Notes
Original air date: 11/19/20
If you’ve ever struggled to find a passenger list or figure out what it’s telling you about your family history, you’re in the right place. In this episode I’ll show you where to look, and how to interpret what you find. Click to watch the video and follow along with the notes below:
A Question About Passenger Lists
Genealogy Gems Premium Member and Elevenses with Lisa viewer Deborah Huber wrote in about some challenges she was having with passenger lists.
“Hi Lisa, I have a few questions about the passenger records I have found for my mother and grandparents. They are all from Ancestry.com.” Let’s go through Deborah’s questions step-by-step.
Deborah is looking for the Felberg Family:
- Otto age 33 (Grandfather) b. 1894
- Marta age 23 (Grandmother) b. 1904
- Ruth age 3 (Mother) b. 1924
- They Sailed March 25, 1927 from Hamburg Germany to New York
“My mother was born in Heinrichshoff on “Stork Day,” a day celebrating the return of the storks in the spring and welcoming them to their nests on top of the chimneys.”
Passenger List records to look for:
- German Passenger list (the outbound record)
- New York Passenger lists (the incoming record)
Searching for the New York Passenger List
How to search for passenger lists at Ancestry: Search > Immigration & Travel > Search by name and birthdate. If you don’t see both expected passenger lists (ex. Hamburg and New York) check the Card Catalog. Example search: Hamburg passenger or Germany passenger. From the results page you might have the opportunity to click through and see a photo of the ship. You may also find a link to additional passenger lists (in this case, the Hamburg Passenger List).
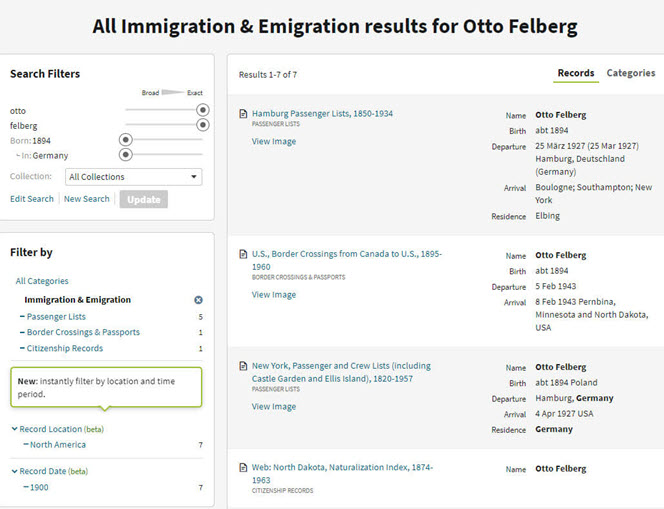
Results page for Otto Felberg
Question: “Also, my mother always said that they didn’t go through Ellis Island but did land in NY City. I think Castle Gardens was already closed in 1927 so I’m trying to figure out where they did land.”
Answer: The record collection title alerts us to what is included in the passenger list collection: New York, Passenger and Crew Lists (including Castle Garden and Ellis Island), 1820-1957
A quick Google search will tell us the dates that Castle Garden was in operation: “From August 3, 1855 to April 18, 1890, Castle Garden was America’s first official immigration center, a pioneering collaboration of New York State and New York City.”
Tip: Search Multiple Sources for Passenger Lists
You may find the quality of the digitized image varies from one genealogy website to the next.
Top Free Resources for searching for Ellis Island passenger lists:
- Ellis Island Passenger List Search at the Statue of Liberty-Ellis Island Foundation, Inc. Website: https://heritage.statueofliberty.org/passenger
- Stephen Morse: https://stevemorse.org/
- FamilySearch
Tip: Finding Passengers When Names are Hard to Read
When names are difficult to read, focus on other information that is easier to spot such as the person’s age. In the Felberg family’s case, Ruth was 3 years old. Looking for a “3” in the age column proved much easier than reading the names.
Identifying the Location Named in a Passenger List
Question: On the screenshot from the Hamburg list is says the destination was “Greenlake”. Is that a port? All I could find on the internet about Greenlake is that it is a NY state park.
Answer: The “Greenlake” mentioned in the indexed passenger list record refers to the final destination, not the port of arrival. Carefully review both original passenger list records.
Tip: Don’t Miss Page 2
Like many genealogical records, passenger lists records may be more than one page. If the index refers to something that you do not see when you click through to the original record, it is a strong indication that there is another page. Always look at the pages before and after any digitized record. In this case, we find Greenlake, WI on page 2!
- 1820 – 1907: Ship manifests are 1 page in length
- After 1907: Manifests are 2 pages with additional information provided.
Source: The Statue of Liberty – Ellis Island Foundation, Inc.
Now that we know that Greenlake is Greenlake, Wisconsin, we can run a quick Google search to find the correct name and county: Green Lake, Wisconsin. Then continue your googling to find more historical information such as old maps and postcards. Click “Images” on the results page to quickly review the results.
Here are a few of the resources we found for Green Lake, WI:
Deciphering the Passenger List
There is a wealth of information on the Felberg’s passenger list, starting with the name of Otto’s father and the town where he lived:
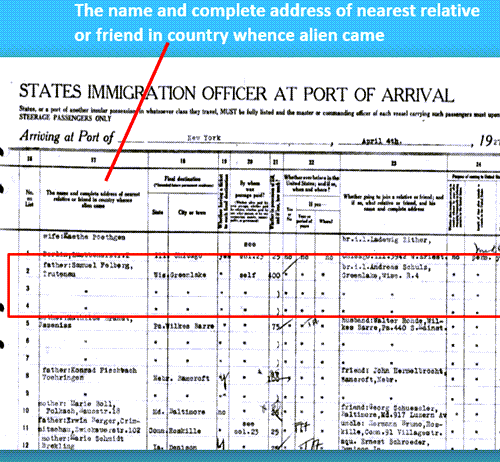
Nearest relative listed on a passenger list
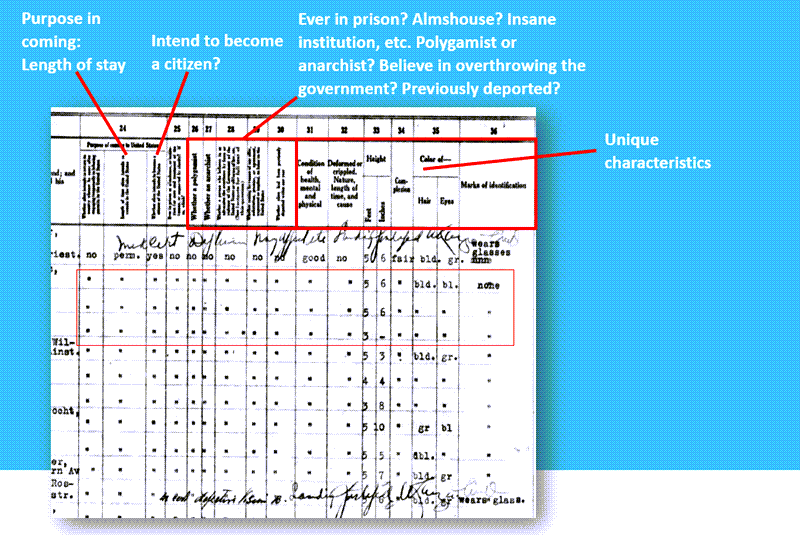
How to decipher an Ellis Island passenger list form.
Hamburg Passenger Lists
Question: “I can’t read the actual document which is the Hamburg Passenger List.”
Answer: The Hamburg passenger list can be found in the Card Catalog. Card Catalog > Search Title (Hamburg Passenger Lists)
2 results: the passenger lists and the index.
We discovered that not only was the passenger list extremely difficult to read due to the ink copying over the page, but also the link did not go to the correct page. This is where the Index, found through the Card Catalog, because indispensable.
Index: Hamburg Passenger Lists, Handwritten Indexes, 1855-1934
- 1925-1934 (The Felberg’s arrived in 1927)
- Band 161 (1927 F-J) (The year of their arrival and “F” for Felberg)
- F (for Felberg)
Search the Index to locate the page number for the passenger’s record. Then go back to the original record and find the handwritten page number in the upper corner.
Tip: Quickly Navigate the Ancestry Record
Simply press the appropriate key on your computer keyboard to quickly navigate the pages.
“N” = Next page
“P” = Previous page
Visit Elevenses with Lisa Episode 17 for more Ancestry search tips and tricks.
We found the Felberg family on page 117, exactly where the index said they would be. It’s a good idea to search all the passengers for others with the same last name. In this case, Otto’s brother Rudolph Felberg was also on the ship. This aligned with the family lore that Rudolph may have sponsored the family’s move.
Resources:
- Genealogy Gems Podcast episode 211 With Barry Moreno, Historian at Ellis Island.
Premium Member Bonus Downloads (Membership required – learn more here):
- Download the show notes handout (ad-free).
- Download the exclusive Ellis Island Passenger Lists Quick Reference Sheet
- Genealogy Gems Premium Podcast Episode 153 Jackie Schalk, Director of the American Family Immigration History Center at The Statue of Liberty-Ellis Island Foundation, Inc discusses clues you may find in US passenger lists.
How to find newspapers in Google Books for free
Show Notes: Google Books is known for having millions of free digitized books. But did you know that it’s also packed with hidden old newspapers? Since newspapers don’t typically appear in your initial search results in Google Books, I’ll show you two ways to filter down to only newspapers. Plus I’ll also show you some of the most effective ways to quickly find the right ancestor and the right article.
Watch the Video
Show Notes
Downloadable ad-free Show Notes handout for Premium Members.
Old newspapers are a tremendous resource for family history information. One of the most surprising places that you can find old newspapers is Google Books. However, newspapers don’t typically show up in the general searches we run at Google Books. It’s important to use specific strategies designed to effectively and find what you’re looking for.
We typically think of Google Books as a place where you look for books. However, we really need to change our thinking on that. Think of Google Books as a place to find printed material. At Google Books you could find not only books, but printed newspapers, catalogs, almanacs, magazines, anything that would have been published on paper. Google Books catalogs all the printed material it finds, and digitizes that which isn’t under copyright restrictions. That means that it’s more common to find older newspapers, books and so on that are digitized and searchable.
Dealing with Too Many Results
I love finding articles like this one about my husband’s grandfather, Raymond H. Cooke.
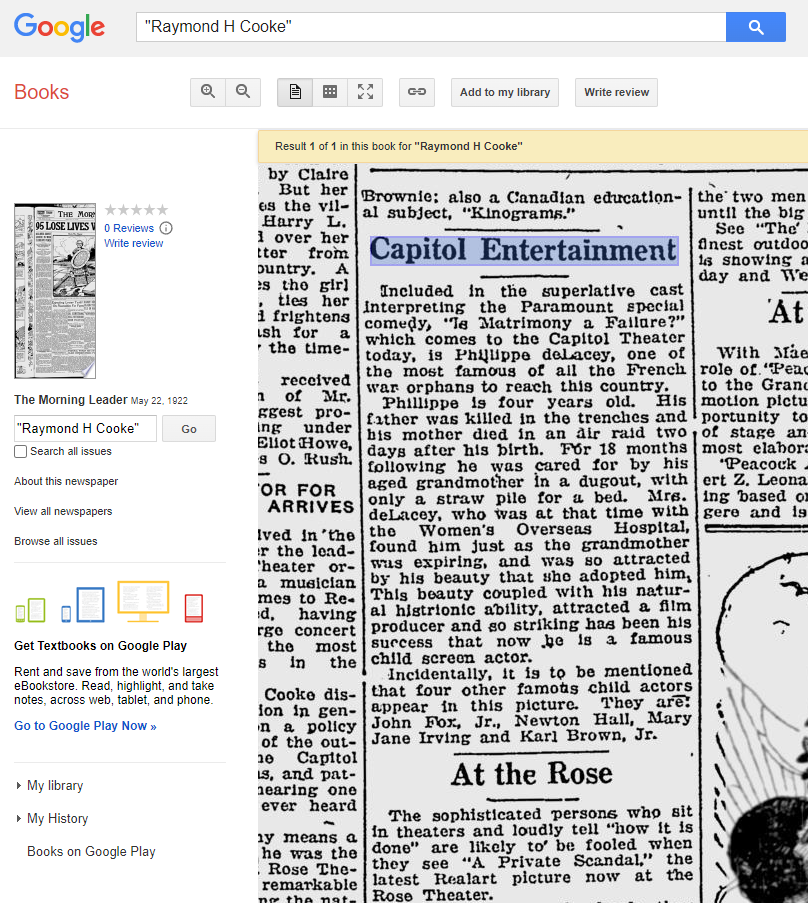
You can find newspaper articles like this at Google Books.
Newspapers clearly offer a lot more than just obituaries. You may be able to find all kinds of articles on what was going on in their life and their community.
We start searching at the Google Books homepage. There are a couple of different ways to find Google Books. You can just google Google Books, or you can go directly to the URL https://books.google.com/.
At Google Books, you can start by typing in an ancestor’s name such as Raymond H. Cooke, or topic of interest. What you will typically see is a list of books, many fairly recent, but no newspapers. In fact there will be typically be an abundance of results, many of which are not a good match. But don’t worry, we can improve these results.
Better Newspaper Results with Quotes
One of the easiest ways to fix this situation is to go back up to the search box and put quotes around the full name. This tells Google Books that I want this exact phrase (name), spelled the way I spelled it. This prevents us from getting results that contain the words but not within the context as a whole name. It also ensures that Cooke will be spelled with an “e”. Without the quotes we get too many non-matching results. Most included one or more of the words, often separate from each other, and some weren’t even spelled the way I spelled the name.
As you can see, using quotes is very effective at reducing unwanted results. However, we can do even more to improve newspaper search results at Google Books.
You’ll notice that most of the results you receive are books, some of which may be digitized and some that are not. What you don’t see typically are newspapers. So, our next strategy will fix this and give us only newspaper results.
Filtering to Only Newspaper Results
It might seem logical just to add the word newspaper to your search query. However, this doesn’t work. Google looks for the words in the text of the material. It doesn’t look at the word newspapers and understand that it’s a type of material.
However, Google Books does give us ways to filter results down to only newspapers. On the search results page you will see a filter menu below the main menu of tabs. If you don’t see it, click the Tools button.
Notice that Any Document is one of the filters. That means that right now our results are showing all types of documents that meet our search criteria including books, catalogs, magazines, newspapers, etc. Click that drop-down menu and select Newspapers. This will display only newspaper in the search results.
At the top of the results list you’ll see exact matches to your query. Sometimes, if there aren’t a lot of matches, Google will then remove the quotes you used, and show you additional results that match without quotes. So several pages of matches doesn’t always mean that they all match exactly. But the good news is, all the exact matches will display first.
Search Name Variations
My example of searching for “Raymond H. Cooke” is very specific. In order to find all the possible articles that mention Raymond, I will need to expand my search to include the name variations that might appear in the papers. Here are just a few examples:
- “Raymond Cooke”
- “Ray Cooke”
- “R. H. Cooke”
- “Raymond H. Cook” (because it’s very possible a spelling error could be made in the newspaper)
Another Way to Filter to Only Newspapers
Google Book’s Advanced Search is another way to filter down specifically to newspapers. It’s not as easy to find or use as the Tools menu, but it can prove very helpful.
There isn’t a link to Advanced Search on the Google Books home page. There are three ways to get to it.
#1 Use the URL
You can use the URL, but it’s not easy to remember. https://books.google.com/advanced_book_search A nice solution is to go there with this link and then add it as a bookmark in your web browser bar.
#2 Google Google Books Advanced Search
The easiest way to find the Advanced Search page for the Google Books is simply to google it.
#3 Any Google Books Catalog Page
The Advanced Search link appears in the search box on the catalog page of all items in Google Books. To find the page, run a search (it doesn’t matter what item you search for) and click the book or other item to open it. If the item is “full view” or “preview” you’ll need to close it. You can do that in the most recent version of the Google Books user interface by clicking the X in the top right corner of the page. This will then display the catalog page for the item, and you’ll see the Advanced Search link in the search field.
The Advanced Search page provides you with a special form. You can use this to run your search as well. You can type the names or phrases that you want to be exact in the Exact Phrase field. Best of all, in the Content section you can click the button for Newspapers to filter your results only to newspapers.
So already, we’re quickly finding newspapers within this massive catalog of over 25 million items in Google Books. I have a few more suggestions of ways to find what you’re looking for in newspapers specifically.
Adding Location to Search
If you want to be look for ancestors in Google Books, it really helps to add a location.
When you look at the search results, you’ll notice that it doesn’t give you a location in the result’s short descriptive paragraph (called a snippet). That makes it a little more challenging to be able to figure out if the items is talking about the right person. Where our ancestors lived is part of what sets them apart from everyone else by the same name. The result usually doesn’t tell us even where the newspaper was published. Try adding the name of your ancestor’s town, county or state to your search query.
Adding Timeframe to Search
While the snippets on the results page show the date of the item, we might have a lot of items to look through. It would be nice to narrow it down to items published during your ancestor’s lifetime. It’s not to say that there might not be a newspaper article published after an ancestor’s death, but it can help to start by first just searching during their lifetime.
On the initial results page, make sure the Tools filter menu it turned on. You’ll find Anytime in the filter menu next to Any Document. Click the Anytime drop-down menu. Here you can select a century. Click Custom Range and enter the years. For example, 1865 to 1930. This will filter your results list down to newspapers published between those years. It’s another great way to filter out results for other people with the same name who didn’t live at the same time. Filtering for both timeframe and the location can really help you zero in on the right person.
The Source of the Newspapers at Google Books
Google Books has not always had newspapers as part of their collection. The digitized newspapers found there today come from the old Google News Archive. This was a newspaper digitization project that was discontinued several years ago. In the last few years they’ve been adding the collection to Google Books. And now with the new Google Books user interface, they are easier to search and use than ever before.
The old Google News Archive can be found at https://news.google.com/newspapers. This old website can come in handy if you’re not sure if Google Books has the issues that you need of a particular newspaper title.
Start by going to https://news.google.com/newspapers and click the letter at the top of the screen that corresponds to the first letter of the first word in the title of the newspaper. For example, if you want to check to see if they have The Lawrence Daily Gazette, and if so which issues, you would click “L”. If you find the newspaper the website will also tell you how many issues are in the collection and what dates they cover. Then you can head to Google Books and search on the title.
It’s possible that Google may have added additional issues since the old Google News Archive closed. You can check this at Google Books by searching on the title and using the Any Time filter to specify the years.
Start Searching for Newspapers at Google Books
Now you can find newspapers at Google Books quickly and efficiently. I hope you’ll leave a comment and let me know about the article that you find!
Resources
Downloadable ad-free Show Notes handout for Premium Members.