Lisa reprises a favorite research detour into vehicle forensics to identify an old family car and shares tips for creating short family history books like those she given as holiday gifts to loved ones.
Hear letters from listeners on a special adoption discovery and a 1940 census mystery that now makes more sense.
Your DNA Guide Diahan Southard weighs in with 4 reasons to take a DNA test if you haven’t taken the plunge yet.
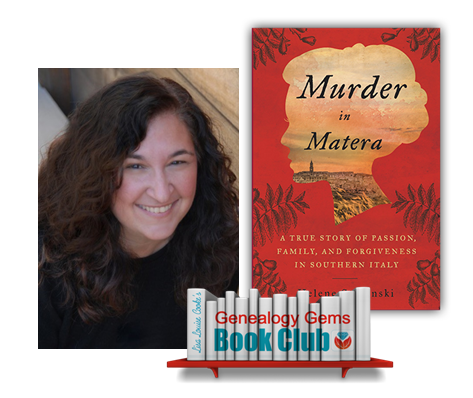
Genealogy Gems Editor Sunny Morton spotlights the current Genealogy Gems Book Club title, Murder in Matera.
The vehicle forensics and family book segments originally appeared in Genealogy Gems Podcast episodes 18 and 13, respectively, and are being republished here for web audiences.
If you’re listening through the Genealogy Gems app, your bonus content for this episode is an audio excursion with Lisa on an old railroad track up to a silver mine in the Colorado Rockies, an excursion she originally shared in Episode 18 of the Genealogy Gems Podcast, not now available online, and is being republished here exclusively for your enjoyment. The Genealogy Gems app is FREE in Google Play and is only $2.99 forWindows, iPhone and iPad users
GEM: MAKING FAMILY HISTORY BOOKS
Genealogy Gems Podcast episode 2 with a segment on transcribing diaries was republished as Genealogy Gems episode 134.
Qualities of a successful short family history book, from Lisa Louise Cooke
The book conveys an overall theme.
Start by reviewing all the available material you have. That will give you a good sense of what the time period was like for your ancestor. You’ll also start to understand their goals, experiences, and emotions. Ultimately a theme should begin to surface.
In the case of A Nurse In Training, I wanted to communicate my grandmother as a young woman taking on a new adventure away from home that ultimately led to this warm, caring woman’s successful career as a nurse. I also tucked a bonus subplot in there of how she just happened to meet her husband at the same time!
You don’t need every scrap of research and every photo to get this theme across. It’s your job to be a sharp editor and to pick out the critical pieces. You want the words and photographs that clearly communicate your theme to the reader.
#2. The book can be read in one sitting.
Like it or not, if it takes too long read, they probably won’t. Strive to create a book that doesn’t look intimidating. I create books that are ten to twenty double-sided pages. People will be willing to pick up a thinner book off the coffee table. If it’s well done they’ll find that all of a sudden they’ve finished the entire book without wanting to put it down. The final goal is that they will walk away with a real sense of having gotten to know that ancestor.
#3. It contains the best of the best of what you have.
This goes back to conveying the theme and being a strict editor. My grandma had many funny stories, but there just wasn’t room for all of them. I picked the best of the best. Anyone who reads the book should hopefully come away with the fact that she had a sense of humor and could laugh at herself. So keep the content of your book focused, full of graphics and photos, and including the best of the best. If you can capture their interest in the first three pages, you’ll have them for the entire book.
#4. There are lots of photos and graphics.
A picture is definitely worth a thousand words. Since the number of words in this size book will be limited, photographs will be your best friend. If you’re lacking in family photos, many of my previous podcasts will give you countless ideas for locating associated photos. In A Nurse In Training, I included scanned images of skating rink tickets, programs and announcements from my grandma’s scrapbook, and journal pages in my grandmother’s own hand. These types of items really add texture and interest to your book, as well as help the reader to see that you’ve really done your homework.
#5. Keep it in chronological order.
This may seem obvious, but it’s easy to get sidetracked and start going back and forth in time. Believe me, for the reader’s sake keep things in chronological order. You as the researcher know this information backward and forwards, but this is probably your reader’s first exposure to it. Be gentle with them and keep it straight forward and simple. Your reader will thank you.
#6. You choose only high-quality images and printing.
High-quality glossy pages, good image quality and a hardcover binding all shout to the reader “I’m worth your time, read me!” For example, I found a drawing of Dameron Hospital where my grandmother worked, but it was a low-quality image and didn’t translate well in the book. As much as I wanted to include it, I ended up leaving it out. I’m glad I did; it wasn’t critical to the book and there were other ways to communicate the hospital to the reader.
Start creating fabulous, irresistible videos about your family history with Animoto.com. You don’t need special video-editing skills: just drag and drop your photos and videos, pick a layout and music, add a little text and voila! You’ve got an awesome video! Try this out for yourself at Animoto.
MyHeritage is the place to make connections with relatives overseas, particularly with those who may still live in your ancestral homeland. Click here to see what MyHeritage can do for you: it’s free to get started.
I used to think that economics was just a series of numbers and calculations that helped to gauge the future growth of companies and countries. In a word: boring. But that was before I discovered that you can study the economics of people and essentially use math to describe human behavior, and therefore in some ways make that behavior more predictable.
This is of course especially intriguing to my current situation as the parent of a teenager, a pre-teen, and a daughter. Teenagers especially are always talking about the things that “everyone else has,” a phenomenon that Malcom Gladwell, one of these interesting people-economists, describes as the “tipping point.” He says that the tipping point is “the moment of critical mass, the threshold, the boiling point.” For my kids it’s everything from the point at which a party becomes fun to doing everything that is humanly possible to procure a fidget-spinner (if you don’t know what that is, ask the nearest 11 year old).
In DNA testing in the United States, that tipping point is now. We have reached the point where most genealogists at least have the passing notion that genetics can be useful in genealogy. Most genealogists (I would guess 85%) who attend the lectures I give have already had at least one DNA test completed. Let’s stop for just one minute and recognize how incredible that is! Not too long ago I was still trying to convince people that this was a good idea and that you didn’t have to dig up your ancestors to do it! But now we have scores of genealogists who have not only tested themselves, but have convinced half their family to test as well!
This got me thinking though, who are those people who haven’t tested? And why not? One category of people sans DNA test are those who have full pedigree charts. I have heard many of them say that they don’t see the need to do DNA testing since they have most of their lines “way back.” To those with the blessing of ancestors who kept better records than mine, I am offering four reasons why you should RSVP to your invitation to DNA test.
Record. First and foremost, your DNA is a record. Just as you have obtained birth certificates and marriage licenses for your ancestors, your DNA is a unique record. It does represent you and your family in a way that no other record can. It is a document of your genetic history, and should be preserved. Further, while you may doubt the ability of your DNA to shed light on your current genealogy, don’t underestimate the contribution it might make in the future.
Second Cousins. And third cousins, and fourth cousins, etc. Having your DNA tested means you can see a biological connection between you and other relatives that have had tested. For many, the idea of meeting or forming relationships with distant cousins is not appealing. But even if you have no intention of attending DNA family reunions or even in corresponding with these relatives, there is something reassuring about seeing them there on your match list. There is a certain thrill that comes with recognizing the connection between you and someone else. A connection that may not add any new names to your tree, but it helps you feel a deeper connection to your ancestor, and a greater appreciation for your biology.
Verify. Which brings me to the next point. Seeing these cousins on your list can actually help verify the genealogy you have already collected and documented. It helps to reassure you that you have made the right steps along the way, and may help you gain additional resources about your relative through their descendants that you find on your match list. Resources that can help turn that ancestor from a name on a chart, to a story and a life worth preserving.
Philanthropy. The last reason to go ahead and have your DNA tested is to help others. If you have been lucky enough to fill in most of the blanks on your tree, you can help others do the same by simply having your DNA tested. Your DNA provides a link to your tree that might be just what someone needs to overcome a brick wall in their family history.
So, if you have been hanging out on the outskirts of DNA testing because you feel like your tree is full enough without it, remember to RSVP to your invitation to be DNA tested, and join the party!
GENEALOGY GEMS BOOK CLUB: A FAMILY HISTORY MURDER MYSTERY!
Lisa Louise Cooke uses and recommends RootsMagicfamily history software. From within RootsMagic, you can search historical records on FamilySearch.org, Findmypast.com and MyHeritage.com. RootsMagic is now fully integrated with Ancestry.com, too: you can sync your RootsMagic trees with your Ancestry.com trees and search records on the site.
Keep your family history research, photos, tree software files, videos and all other computer files safely backed up with Backblaze, the official cloud-based computer backup system for Lisa Louise Cooke’s Genealogy Gems. Learn more athttp://www.backblaze.com/lisa.
GEM: VEHICULAR FORENSICS: Updated links, tips and resources
Here’s the original photo of my grandma next to her father’s car:
The original zoomed in image of the license plate:
The license plate with the “alternative light source” applied:
Since I first published this episode, iGoogle has gone away.
FromItStillRuns.com: “Veteran cars were manufactured before 1903, vintage cars were made between 1903 and 1933, and classic cars are considered to be vehicles manufactured from 1933 until fifteen years ago.”
TIP: Remember that you may be able to make great discoveries IN old photos with your photo editing software (even just with whatever free software is on your computer):
1. Open up the photo editing software
2. Open the photograph in question in the program
3. Use the trim feature to zoom in on the license plate?or whatever feature you want to focus on
4. Zoom in to make it easier to see
5. Try using both the Brightness and Contrast feature of your program in combination until you achieve a favorable result
Lisa Louise Cooke, Host and Producer
Sunny Morton, Editor
Diahan Southard, Your DNA Guide, Content Contributor
Hannah Fullerton, Production Assistant
Lacey Cooke, Service Manager
Elevenses with Lisa Episode 26 Video and Show Notes
Live show air date: September 24, 2020
Join me for Elevenses with Lisa, the online video series where we take a break, visit and learn about genealogy and family history.
Newspaper Navigator is a new free online tool for finding images and photos in old newspapers at Chronicling America. It doesn’t work the way the Library of Congress website works, so in this episode I show you how to navigate the Newspaper Navigator. It’s a fun session that will have you finding new newspaper gems in no time!
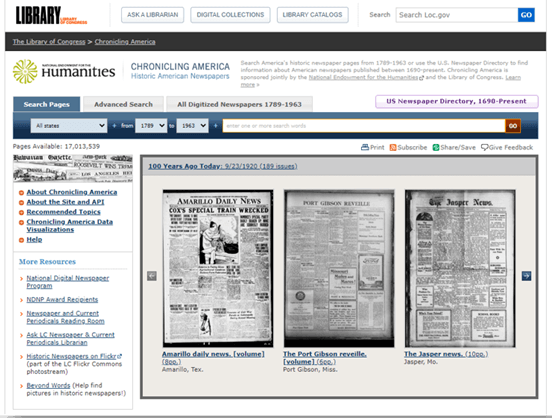
About LOC Chronicling America
Chronicling America is sponsored jointly by the National Endowment for the Humanities and the Library of Congress. It features free digitized historic newspapers spanning 1789-1963.
Newspapers Contain Imagery such as:
Photos
Drawings
Maps
Cartoons
Advertisements
You may not find the newspaper that you need for your research in the Chronicling America digitized collection. In those cases, turn to the US Newspaper Directory. It catalogs newspapers published 1690-present. Click the US Newspaper Directory button on the Chronicling America website to search. The catalog will tell you where known copies of the paper can be accessed.
Uses of Newspaper Images
Most of the old newspapers featured in Chronicling America include images. And because these old images are in the public domain, they are an ideal complement to family histories.
If you are very fortunate you may find photos or images of your ancestors, their homes, or other things specifically about your family.
Newspaper images are also a wonderful source when you need a photo or image to represent an important idea or item when telling your family’s story, whether in a blog post, article, book, video, PowerPoint presentation or other medium. Example of this would include a photograph of a blacksmith shop in the 1890s in the area where your ancestor worked as a blacksmith, or an advertisement for a Sears home kit just like the one your grandfather built.
Chronicling America’s Newspaper Navigator
The Newspaper Navigatordataset currently consists of 1.5 million pieces of extracted visual content from 16,358,041 historic newspaper pages in Chronicling America.
The visual content was identified using an object detection model trained on annotations of World War 1-era Chronicling America pages, made by staff and volunteers.
This “visual content recognition model” detects the following types of content:
Photograph
Illustration
Map
Comics/Cartoon
Editorial Cartoon
Headline
Advertisement
It also includes text corresponding to the imagery, identified by Optical Character Recognition (OCR).
Searching the Newspaper Navigator
You can search all images with captions. The results will be returned in a Gallery view featuring up to 100 images per page. This results format makes it very easy to quicky browse the images.
You can also switch to List view which lists the images along with the text retrieved by OCR.
How to Find Images Faster in Old Newspapers
Run a search in Newspaper Navigator of the word baseball and then run the same search in Chronicling America. A comparison of the results highlights the between Chronicling America and Newspaper Navigator when it comes to finding images in old newspapers.
The search results returned by the Newspaper Navigator are solely focused on photos and images. This means you have a fraction of the number results to review. Another big advantage of Newspaper Navigator over Chronicling America is the size of the image. Newspaper Navigator gives you just the large image to review, while Chronicling America shows you a thumbnail of the entire page with images so small that you must click and load the page to analyze them.
Images appear much smaller at Chronicling America and require you to click through to the page for closer examination.
Start by running a keyword search. (example: Blacksmith). On the results you can filter the results by Location and Years. Because the search currently doesn’t support Boolean operators or other types of search operators, you may need to run a few different versions of the same search to get a complete picture of the potential results. We’ll talk more about search strategies in just a moment.
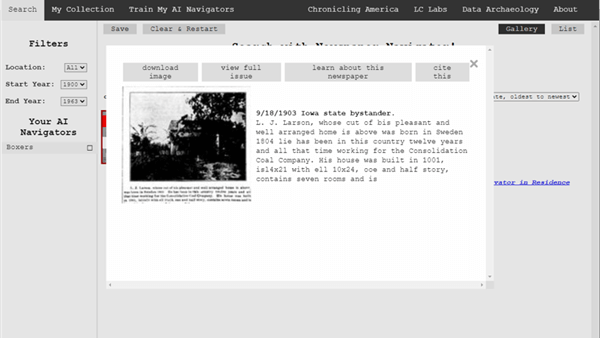
Once you find an image you want, click to open it. The pop-up box offers these four buttons:
Download Image – Downloads a high-resolution copy to your hard drive.
Cite this – Generates a source citation that is automatically copied to your computer clipboard. Then you can simply paste it as needed. You can also cite the dataset by including the image URL, plus a citation to the website such as “from the Library of Congress, Newspaper Navigatordataset: Extracted Visual Content from Chronicling America.” According to the website, all images are in the public domain and free to use. Learn more about Rights and Reproductions at https://chroniclingamerica.loc.gov/about/.
Learn about this newspaper – Takes you to the Chronicling America catalog listing for the newspaper from which the image comes.
View Full Issue – Takes you to the complete newspaper issue at the Chronicling America website.
Click the buttons to select the options
My Collection at Newspaper Navigator
You can gather and save collections of the newspaper images you find using Newspaper Navigator. Start by running a search. On the results page click to select the desired images, then click the Save button. This will generate a URL for that collection and copy it to your clipboard. Since Newspaper Navigator doesn’t currently allow you to log in and return to your past searches during different sessions, I suggest pasting the URL into a research log for future reference.
Train My AI Navigators at Newspaper Navigator
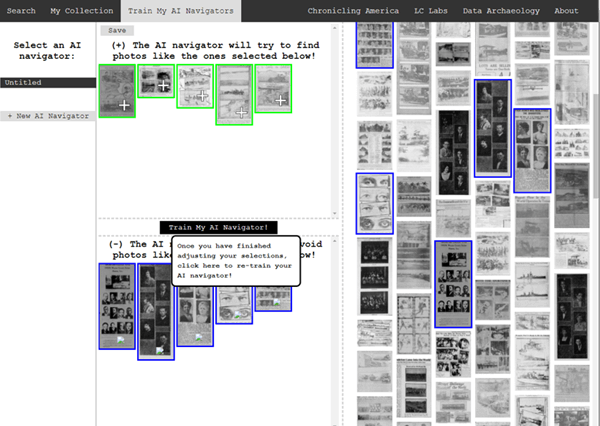
A unique feature of the Chronicling America Newspaper Navigator is the ability to “train” the site to search for you. It does this through machine learning.
Elevenses with Lisa Episode 26
How to Train My AI Navigator:
Run a search
Click to select desired images
Click Save to save the collection of images
Click Train My AI Navigators
Newspaper Navigator will deliver a new set of images based on your selected images. On that page, select additional images that you want by clicking toward the top (+) of the image.
Click unwanted images by clicking toward the bottom (-) of the image.
Click to select the images you don’t want the AI Newspaper Navigator to find.
Click Train My AI Navigator again
Continue adding and subtracting images as needed to further train the system
Type a name for this training session in the Name My AI Navigator The saved AI Navigator name will appear in the Select an AI Navigator column
Click Save to generate a URL for this training session and paste into your research log.
Click + New AI Navigator to create a new training session spring boarding from the first
Click Clear & Restart to start a new search
Newspaper Navigator Search Strategies
Newspaper Navigator doesn’t, as of this writing, support Boolean Operators or offer an advanced search field. Here are some strategies that can help you have more success in searching the site:
Don’t use search operators, use variations
Even a space between initials can make a difference.
Each variation has the potential to deliver a different result in newspaper images.
Search Locations
Considering how many variations there can be to a name, when searching for ancestors try searching first on the name of their town or location. If there are still quite a few results, you can then filter to only newspapers from their state. I search the town name first because an article may appear in a newspaper from a different state. In the case of my search for McMinnville, I received a small, manageable results list. Had it been large and included both McMinnville, TN and McMinnville, OR, filtering to just Oregon would be helpful.
Test your search theories
Analyze your results and try variations based on what you are learning about what Newspaper Navigator is focusing on.
Search for word strings
In testing my search theories, I learned that Newspaper Navigator did not do well with multiple words that do not appear right next to each other. Therefore, I tried to find word strings that pertained to my family that I could search for such as the name of a business: Consolidation Coal Company.
Search for Photos
Another interesting search you can run is the word Photo. On the results page filter to the state and years that apply to your research.
Use List View to Find on Page
When dealing with a large number of results, List View can help speed up the review process. List View also displays the text generated by OCR. While not perfect, it can be helpful. Use your computer’s Find on Page feature (control + F on a PC, Command + F on Mac) and type in a keyword such as a surname. This will take you instantly to all occurrences of that word in the text on the page. Click the next page and run it again.
Find images quickly by word search in the List View
Learn More About Machine Learning
In the menu click Data Archaeology to learn more about machine learning and the Newspaper Navigator project.
If you’re enjoying the show, you can help others benefit from it too by leaving a comment below. Your comments…
helps me understand what matters to you.
helps others gather new ideas and encourages them to give the show a try.
tells Google / YouTube that this show is interesting and worth sending other people to through the search results.
provides great potential content for future episodes.
Clicking the red subscribe on our Genealogy Gems YouTube and then giving this video a thumbs up below the video
By leaving a comment (what you enjoyed, questions you have or what you’d like to see in the future) below this video after the show’s over or at the bottom of the show notes page if you’re watching on my Genealogy Gems website.
Answers to Your Live Chat Questions
One of the advantages of tuning into the live broadcast of each Elevenses with Lisa show is participating in the Live Chat and asking your questions.
Bert asks: Are some newspapers only available for a fee on websites such as Ancestry Lisa’s Answer: Yes, several genealogy websites have exclusive collections of digitized old newspapers. You can usually search or browse the site for free to determine if they have newspapers from the location and time frame that you need before you make a purchase. Here are some of my favorites that I’ve had good success with:
We are compensated if you make a purchase after using our links above (at no additional cost to you.) Thank you for supporting this free show by doing so!
Christine asks: (What is the ) newspaper navigator date range? Lisa’s answer: Here’s a break down of the dates:
Chronicling America covers 1789 – 1963 (digitized newspapers) Newspaper Navigator covers 1900 – 1963 (photos in digitized newspapers) U.S. Newspaper Directory at Chronicling America covers 1690 – present (catalog, only some are digitized and those are part of Chronicling America.)
Rachel asks: I have an ancestor that was in the social pages all the time in our local newspaper in the 1800’s. I thought it would make a great book or video, any ideas on how to showcase them the best? Lisa’s answer: I love both of those ideas and I cover many more in my Premium Membership video Inspiring Ways to Captivate the Non-Genealogists in Your Life. Personally I have found that short photo books and short videos that tell one story are received the best by family members. They both offer opportunities to share and highlight items from newspapers. Learn more about quickly and easily making family history videos by watching Elevenses with Lisa episode 16. And I strongly encourage Premium Members to watch these two videos:
lagomcurt asks: Are local small-town papers included in the collection? Lisa’s answer: Yes.
June asks: When you download it ask what to save as. What is your suggestion? Lisa’s answer: I think you’ll find that JPEG is currently the only option in the Save as Type drop-down menu.
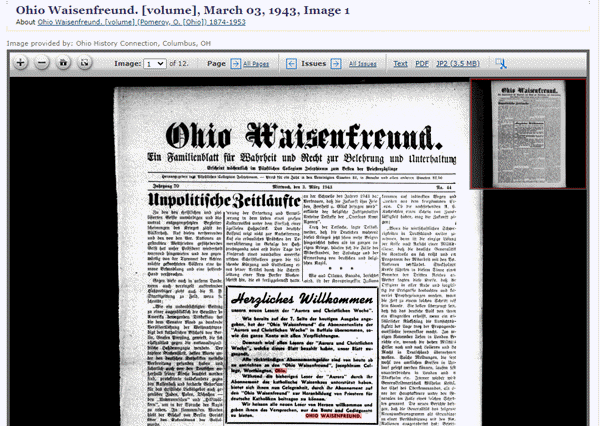
Sharon asks: Does Chronicling America have foreign language newspapers in America? Lisa’s answer: Absolutely! Searching in the language will help retrieve items.
Ohio Waisenfreund newspaper at Chronicling America
Pat asks: Does it have Irish American newspapers? Lisa’s answer: Chronicling America does have Irish American newspapers. If they were published between 1900-1963 then they will be searchable by Newspaper Navigator. I would also recommend searching all newspapers (online and offline) by clicking the U.S. Newspaper Director button at Chronicling America. Then search by ethnicity (Irish) and Material Type (online.) You will find that some are linked to other websites where they can be found online. If you see an image of a newspaper on the catalog page, then you know it is available on Chronicling America in a digital format.
Search for Irish newspapers online at US Newspaper Directory
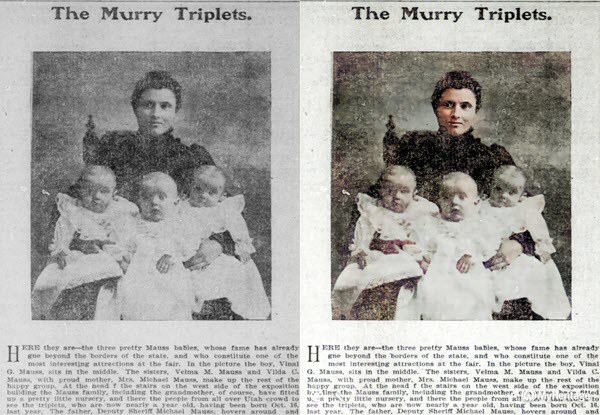
Mark asks: Can the wash out pictures be enhance with the new MyHeritage Photo with the sharping feature and colorization to make it a better final experience with images? Lisa’s answer: Yes indeed. Because the original quality will be poor and with low dots per inch (dpi) it likely won’t improve the way an original photo would. However enhancing and coloring just takes a few seconds and definitely improves the image. Even better, it often makes the print much more readable. I use it on documents too. Click here to try MyHeritage.
Newspaper photo enhanced and colorized with MyHeritage
Kathy asks: If you do a search in English, will it find the search term(s) in newspapers that were written in German? Lisa’s answer: No. You will need to search in German to pick up on any German text. However, if the image itself is similar, My AI Navigator should pick it up.
Lucinda asks: Who is in your necklace and the photo behind you, Lisa? Lisa’s Answer: It’s my maternal grandmother’s high school graduation photo.
Please Leave a Comment or Question Below
I really want to hear from you. Did you enjoy this episode? Do you have a question? Please leave it below. You can also call and leave a voice mail at (925) 272-4021 and I just may answer it on the show!
The Genealogy Gems Podcast Episode 196 with Lisa Louise Cooke
In this episode, expert Kate Eakman from Legacy Tree Genealogists joins us with some tips for those starting to trace their Irish ancestors into Ireland. She shares some great websites for Irish research and places to look for that elusive Irish home county;and an exclusive coupon code for anyone who could use some expert help on a tough research problem.
Listen now – click the player below
In this episode, expert Kate Eakman from Legacy Tree Genealogists joins us with some tips for those starting to trace their Irish ancestors into Ireland. She shares some great websites for Irish research and places to look for that elusive Irish home county;and an exclusive coupon code for anyone who could use some expert help on a tough research problem.
Additional episode highlights:
Gems listeners respond with strong opinions on sharing gossip about our ancestors;
Genealogy Gems Book Club surprises: a past featured author has a new book out?and something different for the new Book Club pick;
Mark your calendars and make some plans for big conferences in 2017;
Organize your DNA test results and matches to help you get the most out of them, now and in the future.
BOOK CLUB NEWS: NEW FROM NATHAN DYLAN GOODWIN
British author Nathan Dylan Goodwin, featured in the past on the Genealogy Gems Book Club with his novel The Lost Ancestorhas a NEW novel out in same forensic genealogy mystery series.
The Spyglass File: Hero Morton Farrier is back, and he’s on the trail of his client’s newly-discovered biological family. That trail leads to the fascinating story of a young woman who provides valuable but secret service during World War II?and who unknowingly became an entry in the mysterious Spyglass File. The connection is still so dangerous that Morton’s going to have bad guys after him again, and he may or may not be kidnapped right before he’s supposed to marry the lovely Juliette. Meanwhile, you’ll find him anguishing over the continuing mystery of his own biological roots?a story that unfolds just a little more in this new book.
“For those that have these old school records, consider donating them (even a digitized image) to the school from whence they originated. I shared class photos taken in the 1940s with my parents’ grade schools. The school was so appreciative! I hope another researcher down the road benefits from the pictures as well.” – Laura
MAILBOX: Passing on the Gossip
Blog post with Jennifer’s letter, my response, and several more comments
Here’s a link to a post about the stamp pendant Jennifer sent me
Lisa Louise Cooke uses and recommends RootsMagic family history software. From within RootsMagic, you can search historical records on FamilySearch.org, Findmypast.com and MyHeritage.com. In the works: RootsMagic will be fully integrated with Ancestry.com, too: you’ll be able to sync your RootsMagic trees with your Ancestry.com trees and search records on the site.
Keep your family history research, photos, tree software files, videos and all other computer files safely backed up with Backblaze, the official cloud-based computer backup system for Lisa Louise Cooke’s Genealogy Gems. Learn more at http://www.backblaze.com/Lisa.
INTERVIEW: Kate Eakman and Getting Started in Irish Genealogy
GENEALOGY GEMS EXCLUSIVE OFFER:Go to www.legacytree.com/genealogygems and use coupon code SAVE100 to save $100 on your purchase of research services.
Legacy Tree Genealogist specialist Kate Eakman shares tips about getting started in Irish genealogy. Here are the highlights:
Q: Where would you recommend the hobbyist start their Irish search?
A: Not a lot of Irish records are available online for free. Top sites for Irish records include: FamilySearch.org (click here for their Ireland landing page), National Archives of Ireland, Irishgenealogy.ie and Findmypast.com (click here for their Ireland page).
Q: What does a researcher need to know before crossing the pond?
A: Where the person was born in Ireland. The county. Find out if they were Protestant or Catholic. Click here for an interactive map of Irish counties, including those of Northern Ireland.
Q: Where do you recommend they look for that info in the U.S. crossing the pond?
A: Death records, marriage records, church records (keep an eye on extended family), passenger lists, naturalization papers. Keep an eye out for extended family members who may have come from the same place. Be aware of traditional Irish naming conventions and patterns.
Q: At what point in the Irish research process do hobbyists usually get stuck?
A: Common names regularly recycled, so it can be tough to sort out who is who. Also, a huge fire at the Public Records Office in Dublin in 1922 destroyed the bulk of government records. Clickhere for a description of what was lost and what surviving fragments are coming soon to Findmypast.com.
Q: How does it work to work with a professional genealogist at Legacy Tree Genealogists?
A: Here’s the process. A manager calls or emails the client to discuss their needs and parameters. They identify the goals and determine what the client already knows. A goal is settled on and then a researcher is assigned to the client. A written report of the research conducted is provided.
GENEALOGY GEMS EXCLUSIVE OFFER: Go to www.legacytree.com/genealogygems and use coupon code SAVE100 to save $100 on your purchase of research services.
The Legacy Tree Discovery package provides for 3.5 hours of preliminary analysis and research recommendations. It’s a great way to get started if you’ve hit a brick wall in your research and could use some expert guidance. Click here to learn more.
This episode is sponsored by MyHeritage.com. the place to make connections with relatives overseas, particularly with those who may still live in your ancestral homeland. Click here to see what MyHeritage can do for you: it’s free to get started.
DNA GEM with Your DNA Guide buy bv medication Diahan Southard: Organizing Your DNA
I can tell whose turn it is to unload the dishwasher by the state of the silverware drawer. If either of the boys have done it (ages 13 and 11), the forks are haphazardly in a jumble and the spoon stack has overflowed into the knife section, and the measuring spoons are nowhere to be found. If, on the other hand, it was my daughter (age 8), everything is perfectly in order. Not only are all the forks where they belong, but the small forks and the large forks have been separated into their own piles and the measuring spoons are nestled neatly in size order.
Regardless of the state of your own silverware drawer, it is clear that most of us need some sort of direction when it comes to organizing our DNA test results. Organizing your matches entails more than just lining them up into nice categories like Mom’s side vs. Dad’s side, or known connections vs. unknown connections. Organizing your results involves making a plan for their use. Good organization for your test results can help you reveal or refine your genealogical goals, and help determine your next steps.
The very first step is to download your raw data from your testing company and store it somewhere on your own computer. I have instructions on my website if you need help.
Once that is complete, we can get to the match list. One common situation for those of you who have several generations of ancestors in the United States, you may have some ancestors that seem to have produced a lot of descendants who have caught the DNA testing vision. This can be like your overflowing spoon stack, and it may be obscuring some valuable matches. But identifying and putting all of those known matches in their proper context can help you realize these abundant matches may lead to clues about the descendant lines of your known ancestral couple that you were not aware of. In my Organizing Your DNA Matches quick sheet I outline a process for drawing out the genetic and genealogical relationships of these known connections to better understand their relationship to each other and to you. It is then easier to verify that your genetic connection is aligned with your known genealogical paper trail and spot areas that might need more research.
This same idea of plotting the relationships of your matches to each other can also be employed as you are looking to break down a brick wall in your family tree, or even in cases of adoption. The key to identifying unknowns is determining the relationships of your matches to each other, so you can better see where you might fit in.
Another helpful tool is a trick I learned from our very own Lisa Louise Cooke, and that is Google Earth. Have you ever tried to use Google Earth to help you in your genetic genealogy? Remember that the common ancestor between you and your match has three things that connect you to them: their genetics, surnames, and locations. We know the genetics is working because they are showing up on your match list. But often times you cannot see a shared surname among your matches. However, by plotting their locations in the free Google Earth, kind of like separating the big forks from the little forks, you might be able to recognize a shared location that would identify which line you should investigate for a shared connection.
So, what are you waiting for? Line up those spoons and separate the big forks from the little forks, your organizing efforts may just reveal a family of measuring Spoons, all lined up and waiting to be added to your family history.
GENEALOGY GEMS BOOK CLUB: Sarah A. Chrisman
Author spotlight: Sarah A. Chrisman, living icon of the Victorian age.
Sarah and her husband Gabriel live like it’s about 1889. They wear Victorian-style clothing and use a wood-burning stove and antique ice box. Sarah wears a corset day and night Gabriel wears 19th century glasses. No TV, no cell phones?and Sarah isn’t even a licensed driver.
For this Book Club, you can take your pick of Sarah’s books! Which would you like to read?
First Wheel in Town: A Victorian Cycling Club Romance. This is from her series of light-hearted historical fiction set in an era she knows well!
In honor of the Book Club theme, Genealogy Gems is going Victorian! From now through the end of the year, you’ll find Victorian-inspired crafts, recipes, décor, fashions and more on our Instagram and Pinterest sites, which of course we’ll link to regularly from the Genealogy Gems website, newsletter, podcast show notes and Facebook page. Nobody does sumptuous holiday traditions quite like the Victorians, and we look forward to celebrating that.
BONUS CONTENT for Genealogy Gems App Users
If you’re listening through the Genealogy Gems app, your bonus content for this episode is a PDF with instructions on accessing the new free Guild of One-Name databases on FamilySearch.org.
Disclosure: This article contains affiliate links and Genealogy Gems will be compensated if you make a purchase after clicking on these links (at no additional cost to you). Thank you for supporting Genealogy Gems!


 Click to select the images you don’t want the AI Newspaper Navigator to find.
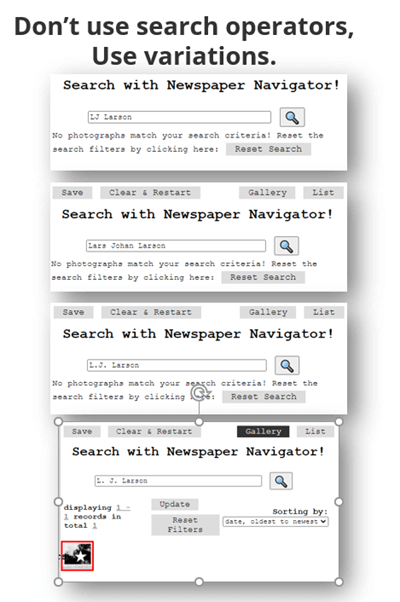


 A: Here’s the process. A manager calls or emails the client to discuss their needs and parameters. They identify the goals and determine what the client already knows. A goal is settled on and then a researcher is assigned to the client. A written report of the research conducted is provided.
 This episode is sponsored by MyHeritage.com. the place to make connections with relatives overseas, particularly with those who may still live in your ancestral homeland. Click here to see what MyHeritage can do for you: it’s free to get started.


 If you’re listening through the Genealogy Gems app, your bonus content for this episode is a PDF with instructions on accessing the new free Guild of One-Name databases on FamilySearch.org.