Remember the board game LIFE? Archives.com has put its own spin on this family favorite that experienced a revival in the 1960s.
(Quick Quiz: 1. What year was the game of LIFE created?
Bonus: 2. What was the original name?)
We recently discovered this cool, interactive webpage for learning more about U.S. history through census facts. It’s called The American Family Through Time and you can “play” it here free at Archives.com.
This clever page uses census data to show how American life has changed over the course of 220 years (and 23 censuses). You can click on decade-by-decade summaries on the “gameboard.” In addition to the census questions, you’ll find some fun now-and-then comparisons for housing, education and occupations. Great for kids of all ages!
Quick Quiz Answers: 1. 1860 2. The Checkered Game of Life
Welcome to this step-by-step series for beginning genealogists—and more experienced ones who want to brush up or learn something new. I first ran this series in 2008-09. So many people have asked about it, I’m bringing it back in weekly segments.
Episode 12: Post Your Family Tree Online
In this episode we focus on posting your family tree online. There’s no use in re-inventing the research wheel! By posting what you know about your family tree online you can easily connect with others who are researching people in your family tree. You can share information, collaborate and even get to know distant relatives.
Updates and Links
A few things have changed in online family tree services, including the 2013 acquisition of Geni.com by MyHeritage and the end of GeneTree. Check out these great sites for creating free family trees (you will need to create a free login to use these sites):
“If I put a PDF copy of a newspaper article or a jpeg photo into Evernote, can I get a copy back? I am putting them there for safe keeping and an easy way to archive them but I want to be able to use them in other places in the future.”
Recently Pam sent me the excellent question above. She’s been using Evernote for a couple of years, she says, “but not very well.” I’ve heard that before! I like how she’s now thinking carefully about not just organizing her genealogy research materials (which is important!) but also digitally archiving them effectively.
As I told Pam, folks have tried to accomplish this in a variety of ways. Here’s my two-cent’s worth on how I look at it.
I haven’t found a simple free way to export a PDF that has been saved to Evernote back out as a PDF. This is a weakness of Evernote. (Click here for a blog post about this.)
If you are keen on saving items to PDFs, I would suggest not bothering to store them in Evernote. If you really want a “note” of the item in Evernote, you could use this technique: First, save the PDF to your hard drive (using my Hard Drive Organization Premium Videos).
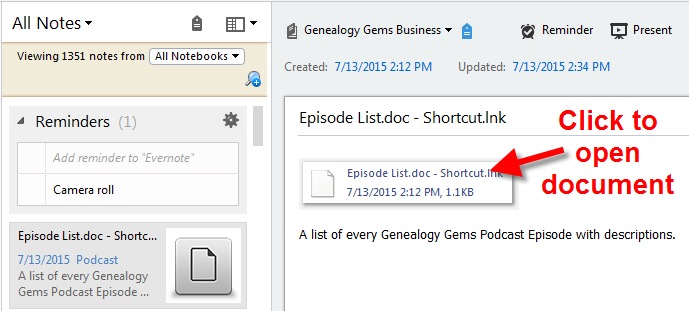
Then right-click the PDF and “Create a Shortcut.” Drag and drop the short cut into a note. Now with one click of the shortcut in the Evernote note, you can instantly open the document on your hard drive and make any additional notations in the note about the item.
If you would rather save the PDF to a cloud service such as Dropbox rather than your hard drive, you can right click the PDF in Dropbox and select “Share Dropbox Link” and then paste that into a note. This, again, gives you one-click access to the item.
I don’t worry about making Evernote the holding tank for absolutely everything. Sometimes other technologies and services are better suited for the task at hand. But it’s pretty easy to create connections so that Evernote is still your central service. There is another alternative called CloudHQ, which can help you export items, but it is a paid service, and I don’t think the value is there for the price when you can use the method I’ve already described.
To get more answers to questions like these about using Evernote for genealogy I invite you to follow this blog.
Resources:
Evernote for Genealogy Quick Guides for Windows and Mac will help you begin using Evernote immediately and effectively.
Here’s how to make a family history interview video. We’ll walk you through an easy and quick process that will result in a professional quality video that you’ll be proud to share with your family and generations to come.
My husband Bill does not enjoy being on camera, and if I add an interview to the scenario, I have an even bigger challenge on my hands. Does that sound like anyone in your family?
Getting a family member to sit down and answer questions about their life or an ancestor they remember can be an uphill battle, but the climb is worth it. Each one of us has a very unique view of the world. Even though we may remember the same person, our memories and feelings will be distinctly individual, and therefore are worth capturing.
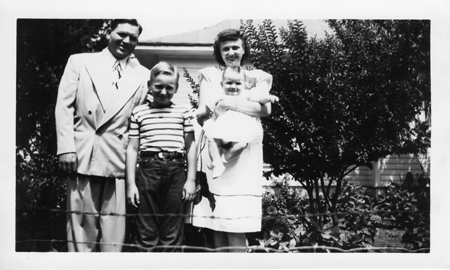
Father’s Day is just around the corner, and we have a new granddaughter joining our family next month. Now seemed like the perfect time to quickly cobble together an interview video with Bill sharing his memories about his dad. I shared some old photos with him and captured his memories. Take a look:
Maybe you’ve been thinking to yourself, ‘Right now just isn’t a good time.’ But guess what! ‘Right now’ is always the ideal time to capture the memories of living relatives. Don’t wait for the opportune moment to present itself, because it might never come. Right now is the perfect time for you to ask questions and record memories that might otherwise have been lost forever.
If you’ve got a few extra minutes to prep for a more polished interview, follow my recipe for creating a video your family will savor for generations to come.
Even though we may remember the same person, our memories and feelings will be distinctly individual, and therefore are worth capturing.
Ingredients for a Family History Interview Video
(Note: I only endorse products that I love and that’s why I’ve accepted Animoto as a sponsor. That means I was compensated for this post. This post also contains affiliate links and I will be compensated if you make a purchase after clicking on my links. Thank you, because they help support the free Genealogy Gems Podcast.)
To create a video like mine, which in total took me about 1 hour from start to finish to create, you’ll need:
a smart phone or tablet (I used my iPhone 7 Plus to capture video of Bill answering my questions. The iPhone has a terrific camera built in, but any mobile device with a camera will do.)
old family photos (I saved mine to a Dropbox folder that I could access on my iPad)
an Animoto slideshow subscription (test drive Animoto with a free trial if you want to get the feel of it before subscribing.)
a short list of questions pertaining to the photos
a willing interviewee (that was my hubby, although I use the term “willing” loosely here)
Pull together everything before you bring in your interviewee. That way, they won’t start off the interview bored or frustrated while you get things ready. We definitely want to get this off on the right foot!
Setting the Stage
Find a comfortable chair for your interviewee and then place it in front of an attractive background in the room. To get a feeling of depth and a nice focus on my subject, I placed my chair in the center of the room so that the background was in the distance. This setup puts the focus on the person you are interviewing and not the items right behind him.
Lighting can make a big difference in the feel of your video, but it doesn’t have to be fancy. Notice that I kept the background fairly unlit, and then turned on a nice soft lamp on one side of Bill. On the other side, out of camera view, I brought in a second light so that both sides of his face would be lit.
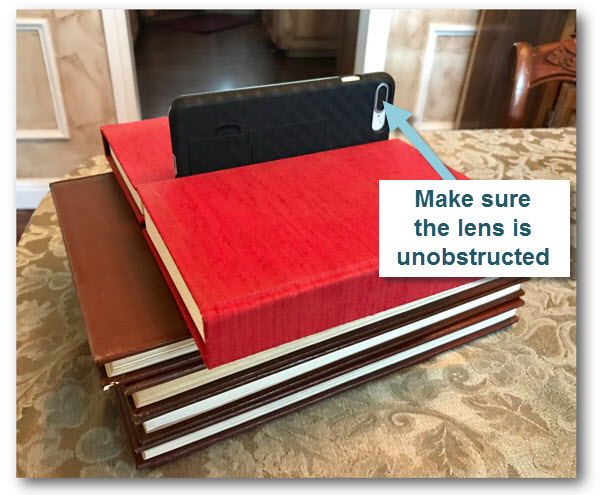
Set up a small, portable tripod on our coffee table in front of my subject and mounted my smartphone (I like this one, which was less than $12). If you don’t have a tripod, just stack up a couple of books on the table to get to the right height, and then use a book on either side of the camera to keep it stable.
The video viewer side facing you as the interviewer
The lens side facing your interviewee
Position a chair for yourself behind the camera, and off to one side. Stay within reaching distance of your camera so that you can turn it on and off between questions. You will want to be off to one side so that your subject is looking at you and not the camera when they answer your questions during filming.
‘Right now’ is always the ideal time
to capture the memories of living relatives.
Start the Interview
Bring your subject in, and get them comfortable in their chair. Have a glass of water nearby for them. Chat with them for a moment about how they are doing, the weather, or whatever else comes to mind (except family history – save that for the video) to sort of warm them up. Explain that they don’t need to worry about the camera, but instead should just focus on talking to you.
To ensure an easy to understand video, encourage them to repeat back the question in their answer because your audio won’t be part of the interview. For example:
You: “What was your mom like when you were a child?” (showing a photo of them and their mom)
Them (OK) : “She took great pride in her home, and she insisted we take our shoes off before entering.”
Them (BETTER) : “When I was young, my mom took great pride in her home, and she insisted that we take our shoes off before entering.”
Folks usually get the hang of it after a couple of tries. Finally, ask them to wait just a beat before they begin talking and to avoid talking over you. Again, the goal is to only capture the audio of the interviewee.
Armed with your list of questions, bring out the first family photo (I did this on an iPad where I had the photos saved in my Dropbox app). On your phone, tap the Camera app to open it, set it to Video, and pressed the big round record button. Move back to your off camera position, and show the first photo and ask your question. Don’t worry about the beginning or the end of the Q&A being messy with getting situated because you will trim that off later in Animoto. After they complete their answer, press the button on the screen to stop recording. It is much easier to work with short video clips rather than one long continuous recording for a number of reasons:
It’s easier to move small video clips from your phone to your computer
Video clips up to 450 MB can be uploaded to Animoto (that’s typically just a little over 4 continuous minutes of video)
One question per clip makes it much easier to move them around in your project to get the exact order you want
It’s easier to interject photos between clips when the questions are individual video clips
Pull up the next photo, press Record, and ask your second question. Repeat for each question and answer. If you go longer than about 20 minutes total, it’s a good idea to stop and ask them how they are doing. Ask if they are agreeable to continuing. Be sensitive to their time and comfort. Remember, people before genealogy.
Post Production of Your Family History Interview Video
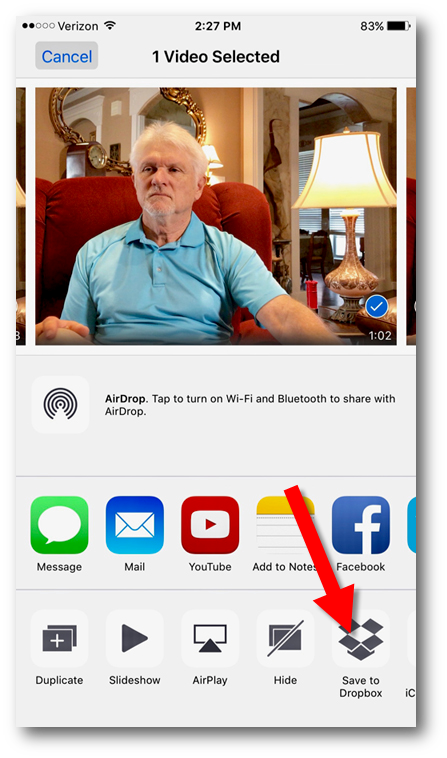
Step 1: In the Camera app, tap Share and Save to Dropbox
As a podcaster, pre- and post-production takes up much more of my time than recording. But with Animoto, your post-production time will be really quick. Here are the steps to creating your finished video:
Step 1: In the Camera app, Share your videos to your computer via a cloud sharing service.
Step 2: On your computer go here to Animoto, sign in and click the Create button to start a new Slideshow video project. (For 10 seconds or shorter video clips you can create your video right on your phone in the Animoto app. But in the case of this type of interview, answers will be longer and you’ll want to use the website.)
Step 3: Select a Style and the Song that will play in the background.
Step 4: On the project page, click Add pics & videos, and upload the video clips and photos. Adjust the length of each video clip as desired, eliminating unwanted portions.
Step 5: Arrange the content in the desired order. I chose to show the answer first, and follow it up with the photo.
Step 6: Add Text if desired. You can add text to photos, or individual ‘title cards’ at the beginning, middle, and end of your video.
Step 7: Click Preview to review your video and make any needed adjustments.
Step 7: Preview one last time and click Produce to render your finished video.
Step 8: Download a copy of the video to your computer, and make sure your computer is backed up! (I use Backblaze.) The ability to download HD quality videos from Animoto for archiving is a HUGE reason why I love it so much.
I’ve got three quick tutorial videos here for you to watch if you feel like you need some help with your first project.
Remember, people before genealogy.
Need more inspiration?
I’ve been having a blast creating Animoto videos about my husband’s family. It’s been a great way to get my non-genealogist husband involved and really interested in family history. Here are two more videos I created about his family:
We already trust Backblaze as the official cloud-based computer backup service for Genealogy Gems. Now they’ve added another optional layer of security: even better!
Recently Backblaze, our computer backup service and a sponsor of the Genealogy Gems podcast, let us know that we can now activate an extra layer of security to better protect the data we have stored with them.
The feature is called two-factor verification. It requires that we present both our account credentials and a verification code from a second device to gain access to our Backblaze account. That means someone who was trying to steal our data would have to have both our account information and access to the phone that’s tied to the account. Pretty unlikely!
“This feature is available immediately to all Backblaze users and does not require an update to be used,” they told us. It’s also not automatic–you can activate it if you choose.”
We’ve heard from so many Gems listeners and readers who have purchased Backblaze that we wanted to share with you how to enable this optional feature.
How to Activate Backblaze Computer Backup Service’s Two-factor Verification Security
1. Log in to your existing Backblaze account.
2. Open the “My Settings” page as shown here.
Step 4
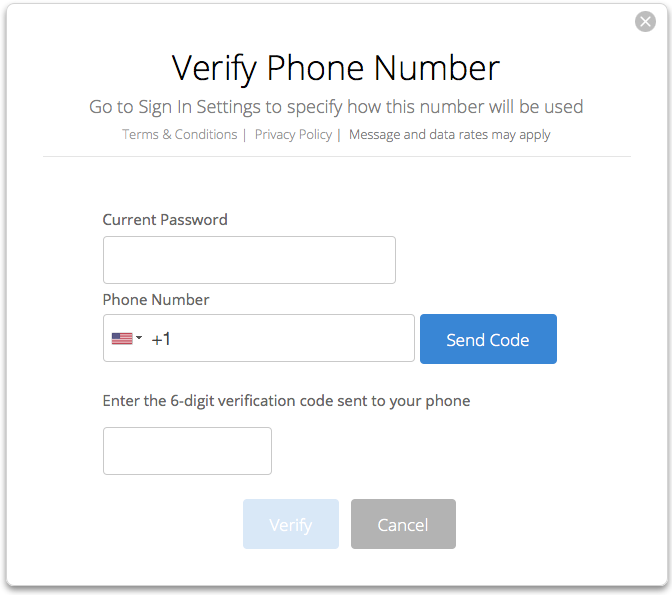
3. Click on the “Sign in Settings” link on the right hand side. If you already have a phone number set up for your account, go to Step 4. If you do not have a phone number set up for your account you will see this screen:
In the “Verify Phone Number” window, you’ll enter your phone number and then verify it is correct by having Backblaze send a verification code to the phone. That verification code is entered in this window. You can not turn on two-factor verification without successfully completing this step.
4. Once you have a phone number set up for your account, you’ll see a screen like this when you click on the “Sign in Settings” link.
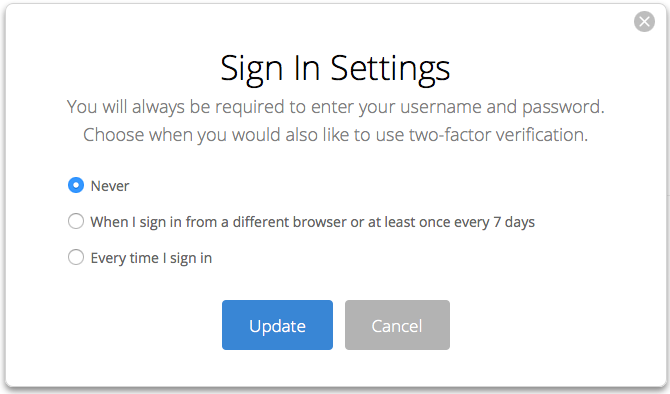
Step 5
5. Choose the two-factor verification setting you desire and select “Update” to change the setting.
6. The set-up/change of your two-factor verification setting is now complete.
What it will be like to use Backblaze two-factor vertification
Let’s say you have selected the “Every time I sign in” option for your two-factor verification setting. Here’s what happens when you sign in to Backblaze:
1. Click the sign-in button and enter your Backblaze account credentials.
2. A unique text message is sent to the phone number on your account, as shown here:
3. At the same time, a “Two-Factor Verification” screen is presented.
4. Enter the code from the text message you received into the “Two-Factor Verification” screen, then press “Enter Code.” You have 10 minutes to enter the code. If you do this correctly you will be logged in to your Backblaze account.
Why not use it?
This is an optional feature on Backblaze. Why would you choose not to activate it?
“It is important to weigh the added security of two-factor verification against the possibility that you will not have the second device with you when you require access to your Backblaze account,” says an email from the company. Some users may not consider what they’ve got stored with Backblaze to be the kind of data that needs extra layers of protection. Others may not want the hassle of an additional layer of security.
But think carefully–Backblaze backs up ALL the files you tell it to. You may have personal and financial data in at least some documents: bank account or credit card numbers, digitized birth certificates or Social Security cards.
Consider what works best for you! Our best recommendation is to HAVE a computer back-up service in place. We chose Backblaze because of its reputation, the quality and security of its service and its very reasonable price. Click here to learn more about Backblaze and why we selected them as a sponsor of our free Genealogy Gems Podcast.


 (Note: I only endorse products that I love and that’s why I’ve accepted Animoto as a sponsor. That means I was compensated for this post. This post also contains affiliate links and I will be compensated if you make a purchase after clicking on my links. Thank you, because they help support the free Genealogy Gems Podcast.)
 Find a comfortable chair for your interviewee and then place it in front of an attractive background in the room. To get a feeling of depth and a nice focus on my subject, I placed my chair in the center of the room so that the background was in the distance. This setup puts the focus on the person you are interviewing and not the items right behind him.