Google offers a variety of ways to help you find and search for images. In fact, there are so many different ways it can get a little confusing. In this video and article I’m going to show you how to find images and photographs that apply to your family history. Who knows, we may even find an ancestor’s photo. I’m also going to show you how you can use Google Images to even help identify some of the images and photos you have in your family scrapbooks. These are my best image search strategies and they come my book The Genealogist’s Google Toolbox.
Follow along in the show notes below. The step-by-step instructions are available in an ad-free show notes cheat sheet which is downloadable in the Resources section at the end of these show notes. (Premium Membership required.)
How to Find Photos and Images with Google Images
When it comes to searching for images, part of the confusion comes from the fact that the search experience on desktop and mobile are a bit different. So, let’s start with running a basic image search on computer desktop. There are actually two ways to do that.
#1 Google search for images at Google.com on desktop:
Go to Google.com
Run a search
Click Image results
#2 Search for images at Google Images on desktop:
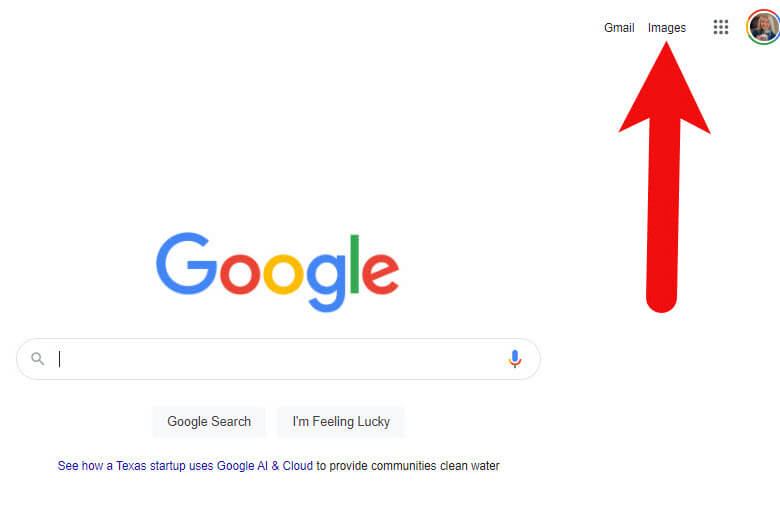
Go to https://images.google.com or go to Google.com and click Images in the top right corner (Image 1)
Image 1: How to get to Google Images from Google.com
Run a text search: Example: John Herring
Images results will be presented
If I’m in a hurry, I’ll usually just search from Google.com because I’m probably over there anyway. But if I really want to find the best image, or I expect to do some digging, I go directly to Google Images.
How to Get the Best Google Images Results
Searching for a name is fine, but chances are there are and have been many people with that name. You’ll need to narrow things down and provide Google with more specific information about what you want.
There are a several excellent ways to refine and dramatically improve your results. The best place to start is by using a few powerful search operators.
The first search operator is quotation marks. By putting quotation marks around a word or a phrase you are telling Google that it must:
Be included in each search result,
Be spelled the way you spelled it,
And in the case of a phrase, the words must appear in the order you typed them.
You can also use an asterisk to hold the spot for a middle initial or middle name. This is important because without it, Google may pass over these since the name was presented in quotation marks which means its to be searched exactly as typed.
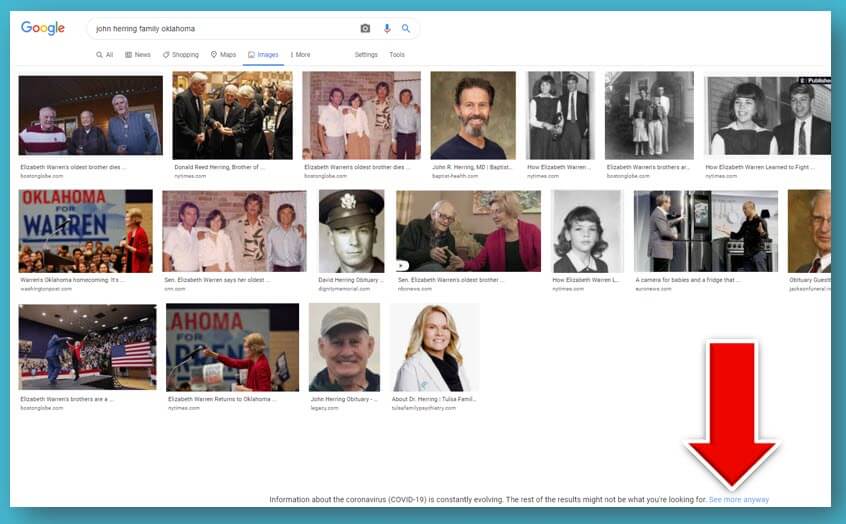
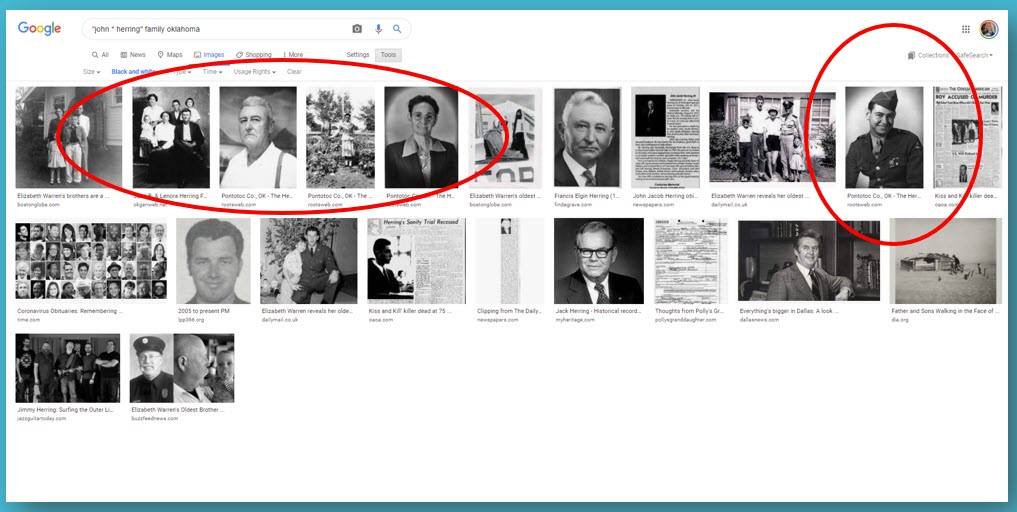
Notice in the following screen shot how this refined search appears. The search operators have made quite an improvement in the image results. I’ve located four photos of my great grandfather! (Image 2)
(Image 2) Google Images found photos of my great grandfather
Google might restrict how many images it shows you. Click See more anyway at the bottom of the screen to reveal all the results. (Image 3)
(Image 3) Click to see more image results
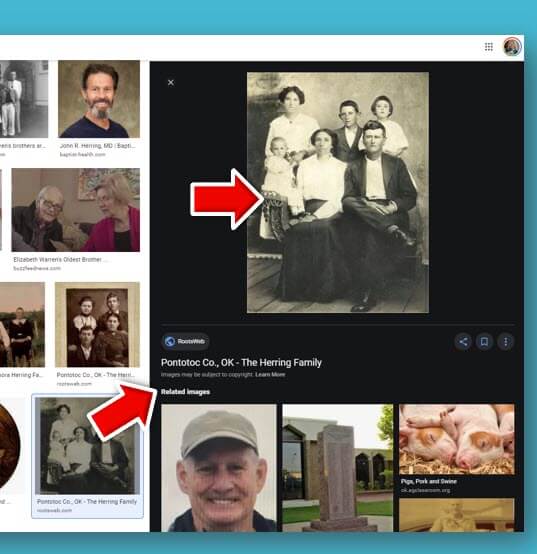
You may need to scroll down to see even more results. Click an image to preview it. (Image 4)
(Image 4) Click to preview Google Image results
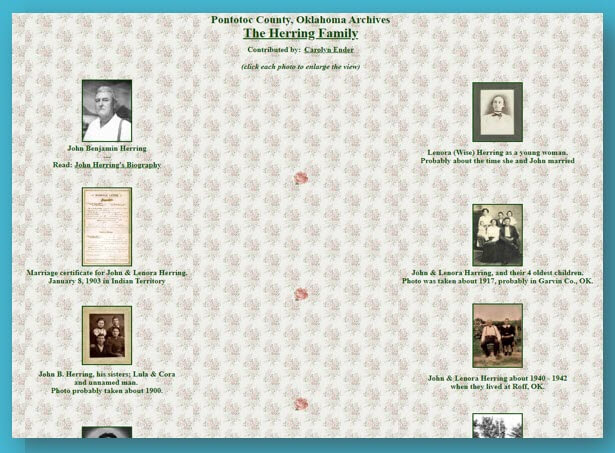
Click the enlarged preview image again to visit the website where it is hosted. I’ve got my fingers crossed that since this website is hosting a photograph of my ancestors, it just might have more. And indeed, it does – genealogy happy dance! (Image 5)
(Image 5) Old family photos found on this web page
How to Narrow Down an Image Search to Old Photos
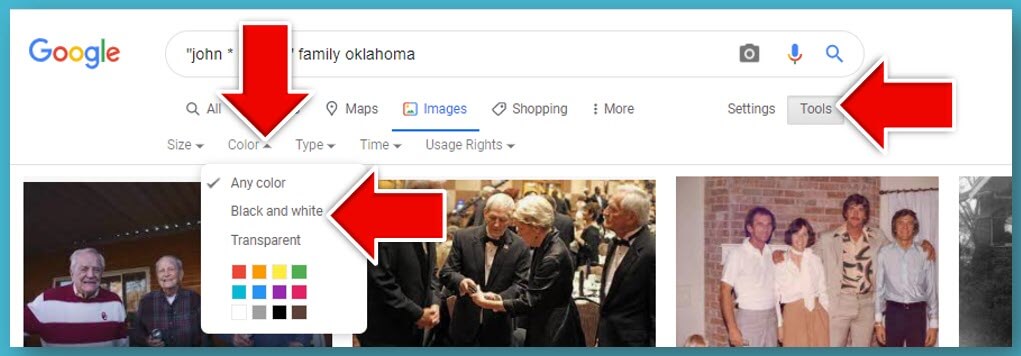
One of the ways you can zero in on old photos is by filtering down to only Black and White images. This makes sense because most of our older family photos are black and white.
On the Google Images search results page click the Tools button. This will cause a secondary menu to drop down. Click the Any Color menu and select Black and White. (Image 6)
(Image 6) How to filter Google Image results
Now all of your image results will be black and white. It’s easy to tell that most of these are older photos. (Image 7)
(Image 7) Filtered image results
Permission to Use Images Found with Google Images
If you want to use any of the photos you find, you’ll need to ensure that you have permission to do so. Start with the FAQ at Google Search Help. This page will help guide you through issues like Fair Use and how usage rights work. In the end, the best thing to do when in doubt is to contact the person who posted the photo and explore any requirements they may have regarding use of the image.
How to Use Google Images to Identify Images and Photos
Do you have unidentified photographs, old postcards or other images in your family scrapbooks or photo albums? Google Images just might be able to help!
Start by first digitizing the image (I use a flatbed scanner) and saving it to your computer hard drive. Then head to Google Images on your computer and click the camera icon in the search field. This will give you two options:
Paste URL (we’ll get to that in just a bit)
Upload an image (this is the one you want – click it)
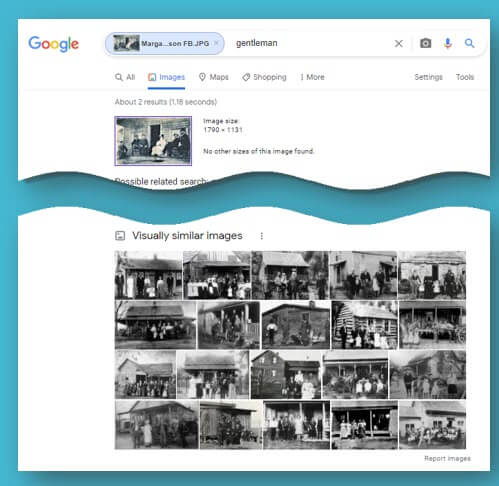
Click Choose File and grab the photo you saved to your computer. Google Images will search the Web for that image. It may find an exact copy, or it may deliver visually similar images.
Notice on the Google Images search results page that Google has added keywords to the search field at the top of the page. You’ll also see a tiny version of the image you searched. The keywords may be rather generic such as gentleman, family, etc. Try replacing these words with more specific words about the photos and what you are looking for. For example, you could replace the word gentleman with your ancestor’s name in quotation marks, or replace the word family with the family surname and the town where they lived. Experiment and try different variations to see what provides the best results.
How to Upload an Image to Google Image Search (Reverse Search):
Navigate to and select the digitized photo you saved to your computer.
Google will attempt to find that exact image. If not the closest visually. You will see words in the search field along with your photo. These words describe what Google AI noted about the photo. For example, when I upload a photo of Margaret Scully sitting in her rocking chair, Google note “sitting” and delivered old photo of people sitting. When I upload a photo of the John Herring family Google notes “family” and provides old photos of family groups. Neither Margaret nor the Herrings are well-known, so this isn’t a surprise. If I upload a postcard from an ancestor’s scrapbook of a well-known or famous location, Google will likely find additional copies on the web and provide background information on the location and a website address for it if there is one.
You can revise this search by replacing the words that Google noted (i.e. family) with the person’s name of the surname. In the case of the John Herring group photo, I replaced family with Herring and then John Herring.
Remember the option to Paste URL? Use this when you find a photo on a website, (or if you have posted a photo on your own website or blog) and you want to find more like it. Right-click (PC – or Control Click on a Mac) on the image and Copy Image Address. Next, head back to Google Images, click the camera icon and paste the URL. Google will use that image to run your image search.
How to Search an Online Photo with Google Images (Reverse Search):
Right-click on a PC (Control Click on a Mac) on the image on the web page.
In the pop-up menu select Copy Image Address.
Go to Google Images.
Click the camera icon in the search field.
Paste the image URL that you copied to your computer clipboard (on a PC use Control V on your keyboard.)
Click the Search by Image button to run your search.
Searching with your own image or an image you find online can help you discover many more website that have the visual content you need. In this episode I searched using an Elevenses with Lisa viewer’s old photo and revised the search with the name of the town. This resulted in a wonderful assortment of websites to look at that also hosted photos from the same town and timeframe.
The initial Google Image results added the keyword gentleman to the search field. But you can see by the visually similar images it found that it was able to target photos that included more similarities than just gentleman. These photos also matched in other important ways (Image 8):
House
Porch
Multiple People
White dress
Old photo
(Image 8)
Who might have photos online of your family? Here’s just a short list of possibilities:
Archives
Libraries
Historical Societies
Newspapers
Genealogy Websites
Cousins
Social Media
How to Use Google Image Search on Mobile
The Google Images camera icon allows you to conduct reverse image searches. However, whether you use a browser app like Safari or Chrome to go to Google Images or you use the Google search app, you won’t find the Google Images camera icon in the search field. Google Images is different on mobile than it is on computer desktop. The main difference is that there is no camera icon for uploading images to search. However, there’s a little secret for getting around that problem.
On an iPhone / iPad you can switch your settings for the Safari app so that it behaves more like a desktop computer. And for our purposes, that means getting the camera icon in Google Images.
How to Search Your Own Image Using Google Images on an iPhone or iPad
Open the Settings app
Scroll down and tap the Safari app
Scroll down and tap Request Desktop Website
Tap the slide to activate All Websites
Close the Settings app
Open Safari
Go to Google.com – if you’re signed into your account you can tap the apps icon (9 dots) and open Images or just google Google Images
Now you have the camera icon in your search bar ready to reverse search images!
How to Reverse Search a Web Image on an iPhone or iPad (Reverse Search Images)
When you find a photograph on a website in Safari, press and hold the image
Tap Copy
Go to Google Images (after changing your settings to Desktop Website)
Tap the camera icon
In the Paste URL field press and hold and tap Paste
The web image URL will appear in the search field.
Tap the Search by Image button to run your search.
RootsWeb is down! This important free genealogy platform hosts millions of names on hundreds of genealogy-related websites for locales, societies, and even individual family trees. Here’s what you should know about the situation–and how you may be able to...
(UPDATED May 22, 2020.) Is your head swirling with questions such as Evernote vs. OneNote? Or are you wondering about free vs. paid accounts? These are common questions and I have some uncommon, but very effective, solutions for you! Here’s an email I received recently from a Genealogy Gems Premium member on just these questions and the solutions I dished up to answer them.
Sherri’s Dilemma and Questions
Sherri wrote in with a question I frequently receive:
“I have been a very satisfied Genealogy Gems Premium member for a few years now. Given the recent limitations on the free version of Evernote only to be used on two devices, how does OneNote compare to Evernote?
I use Evernote on my desktop PC, my laptop, my iPad, and my iPhone. Now, I have to choose which two devices to use it on (to stay with the free version.)
Sometimes I use my laptop and sometimes I use my iPad when I am out. Other times, I might be somewhere unexpectedly and only have my iPhone with me. And of course, most of my computing is done at home on my desktop PC so I must have it loaded there. What a dilemma!
Since I am on a limited fixed income, I can’t afford to pay to add devices for my notes. Luckily for me, I have only begun to get “addicted” to using Evernote and only have 224 notes so far. If I need to transfer to another application, it would be much easier to do it now rather than later.”
A short while later I received this follow up email from Sherri:
“Hi, Lisa. Me again.
I do listen to you, but sometimes I panic and scream for help before calming down and remembering your advice. LOL
I took your advice and searched YouTube for “Onenote vs Evernote.” I found a couple of very good videos by dottotech. His comparison videos are “Evernote vs OneNote – 5 Key Differences” and “Evernote vs OneNote Follow Up Q&A – ADT 28.” I was hoping he would compare the free version of Evernote with the free version of OneNote. He made a big deal out of the searching capabilities of Evernote over OneNote, but the new basic Evernote doesn’t search text in PDFs or in Office docs (per Evernote’s feature comparison). Also, you really have to rely on having really good tags [to find what you are looking for.]
The new Basic plan only OCRs text in images. That being the case, it seems the searching on text capabilities are better in OneNote, but the tag feature in Evernote makes it more robust. Too bad OnNote doesn’t have tags or keywords or something to categorize the notes. It does, however, have the ability for more notebooks and sub-notebooks than Evernote does and lets you organize like you would paper. That would be an attractive feature for many.
He did give me a good idea in his video. He suggested we keep the Evernote app on our mobile devices and use Evernote in the browser on our PCs and laptops. That just might work for me, but I don’t like Evernote’s user interface on the browser. I don’t know if I can work with it that way.
My biggest concern with OneNote, however, is that it uses OneDrive for the cloud syncing part. I received an email from Microsoft that on August 10 [2016], my free OneDrive storage will be reduced from 30 GB to 5 GB!
I spent a lot of time reducing my used storage to 4.4 GB. The biggest thing I use it for is to store the media files that my RootsMagic file links to so that I will have them available from my laptop or iPad. I also keep my RootsMagic family file in Dropbox so that the RM app will always have the most current data, rather than having to remember to copy it to Dropbox after each use.”
Evernote vs. OneNote
I totally feel your pain and understand your dilemma. In the last decade of tech in particular, the “freemium” model has been used by many online services (websites and apps). The intent is to get folks to try their service, and hopefully love it, so they will want to pay for richer features. After several years, the pressure is on to pay back investors and sometimes just simply stay afloat. It is then that the right to change the terms gets invoked. You cited two great examples: Evernote and OneDrive.
As a small business owner myself, I can appreciate the need to stay afloat so that you can continue to provide quality services to people who need them. That’s why, with my top favorites in tech, I take the plunge and pay for the upgrade in service if I possibly can. I figure that I’m helping them to keep doing what they are doing and I will reap the benefits. But, we all have our economic limits and sometimes we have to get more creative in order to continue using the services.
One of the first things to consider when choosing between Evernote and OneNote is each company’s focus. Evernote is in the business of cloud note-taking. It’s all they do, and all of their resources are invested in the Evernote product. By comparison, OneNote is just one small program under the massive Microsoft umbrella. Cloud note-taking is not their core business. So on the score of company focus, Evernote comes out ahead.
The next thing to consider is whether or not your are a very heavy user of Microsoft products such as Word, Excel, and other programs. If you use these heavily in your research and work, then you might want to go with OneNote since it is built to coordinate with those products. If not, then again Evernote would be my choice, particularly if I already had my notes in Evernote. The good news is that in everyday use, you typically can’t go wrong with either.
You touched on something that differentiates Evernote from OneNote. Evernote limits how much you can upload each month (free=60MB, Premium=10GB), but there is unlimited storage. OneNote is connected to OneDrive with a free limit of 5GB total storage. Currently, you can get 50GB for around $2/month. (Of course plans can change, so check their websites for the most current pricing and limits.) I believe it may also be possible to connect OneNote to another storage service if you so desire. So, the way that you create notes could help you with the decision. A heavy note-taker would probably be better off with Evernote Premium with tons of monthly uploads and no storage limits. However, a lighter note-taker would probably save money with OneNote and the free storage of OneDrive. Check the current storage offering by Microsoft and OneNote here.
Free vs. Paid
If after careful consideration you decide to throw all your notes into the Evernote basket, then there is a decision to make: free vs. paid, and if paid, which plan? I bit the bullet and bought the Premium service which falls price-wise between free and Business. I want Evernote to stay around and considering how important my genealogy research notes and all the other notes in my life are, $7.99 a month seems like a bargain. With the Premium service, you get unlimited devices and your monthly upload soars from 60 MB to 10 GB. You just bought yourself a lot less stress and a lot more freedom to research genealogy.
If you feel it’s in your best interest to stay with the free version of Evernote, then I’ve got some creative solutions for you:
Creative Solution #1:
I suggest in my lectures that you can use your two allowed devices for those you use most often. For me, that would be my desktop computer and my phone. For you, it may be your phone and your laptop.
Remember, you can always use the website app at www.evernote.com in any web browser, both on a computer or mobile device, to access your notes. It does not count toward your device allowance. Like you, I prefer the desktop software and app over the website version, but it does do the job.
We’ve got you covered on Evernote for Genealogy
Creative Solution #2:
If you have a tablet and a phone you may be tempted to make them your two free devices and then use the web version of Evernote on your home computer. However, while you may carry your tablet with you much of the time, you probably always carry your phone with you. With a two device limit, having both of your mobile devices be the primary devices using the app is pretty redundant and unnecessary. Instead, consider having your phone (which you always carry,) and your home computer or laptop (which you likely use a lot) be your primary devices.
Click the Get Started button and follow the instructions.
Leave your computer one and connected to the internet. It’s OK if your computer goes to sleep when you’re not using it. When you remotely access it, it will “wake up.”
After setting it up on your computer, download the Chrome Remote Desktop app on your tablet or phone from the app store.
Connect the app to your home computer following the Chrome Remote Desktop instructions. (Your tablet will need to be connected to the internet for it to work.)
Now when you want to use the Evernote software on your home computer, you can gain remote access to it on your tablet using Chrome Remote Desktop. You’ll be able to do everything you want to do on the Evernote software from your tablet. You will also be able to access all of those notes later on your phone or through your tablet’s browser with evernote.com.
This handy solution is going to solve your challenge with the size of RootsMagic genealogy database files. Since you can now access your computer remotely with your tablet, there’s no reason to keep the file on OneDrive! (But please do be sure that your computer is backed up! I recommend and use Backblaze. Click here for more info on that.) You can now work directly on your RootsMagic software even from your tablet or smartphone. Isn’t technology fabulous?
I hope these ideas help you make the decision that is right for you and right for your family history. My personal goal, and our goal here at Genealogy Gems, is to help you succeed in the pursuit of your family history!
Are you researching German genealogy in the States? If so, you will love what we’ve dug up. German death lists are just the start. Also in this week’s new and updated genealogical record collections, Irish Quaker records, UK pensioners records, and a new product support announcement for Family Tree Maker software.
By Photos by Donna Hyatt (United States Army) [Public domain], via Wikimedia Commons.
German Genealogy in the States – Kentucky
You may not realize there was a large German population in Louisville, Kentucky, here in the United States. Our Book Club Guru, Sunny Morton, brought a new found website to our attention called German Genealogy Group. Among many other things, the German Genealogy Group has recently added newspaper death listings from the Louisville Anzeiger, a German newspaper from the Louisville, Kentucky area, to their website. The years covered are 1849-1865. Though only an index, the information provided will help you locate the newspaper itself.
Ireland – Quaker Birth Records
With over 302,000 new birth records from all over Ireland, you may finally find your Irish Quaker ancestors birth information. Ireland, Society of Friends (Quaker) births collection may help you uncover generations of your family tree. The amount of information listed on a birth record in this collection will vary, but most will include the child’s name, birth date, birth place, parish, and address. Most will also contain the parents’ names, addresses, and occupations.
Ireland – Quaker Marriage Records
Also at Findmypast, a collection titled Ireland, Society of Friends (Quaker) marriages has been updated. In fact, there have been over 20,000 new additions. These records will likely include data such as an occupation, parents’ names, and who attended the ceremony. As well as the names, address and marriage details of the newlyweds, parents’ names, an attendee list including names and dates of birth, and even details of the meeting may be found.
Ireland – Quaker Death & Congregational Records
By Holmes after Honthorst in 1654 [Public domain], via Wikimedia Commons. George Fox, Quaker founder.
The Ireland, Society of Friends (Quaker) deaths record collection at Findmypast has over 24,000 new additions. This database contains death records that date back to the 1600s. Because of the large time span, information will vary. In most cases, you will find the deceased’s name, when they died, when they were buried, where they were buried, and the names of those they left behind. Some records will also reveal parents’ and/or spouse’s names. Additional notations may be also included in images of the original documents, such as “a young child” or “widow” or “an aged woman.”
Findmypast collection, Ireland, Society of Friends (Quaker) congregational records offers a wealth of knowledge about the role your ancestor might have played within the Quaker community. An additional 250,000 Irish congregational records have been added. Details of meetings and activities are just a sampling of what you will find. These records include a transcript as well as an image of the original handwritten record.
Ireland – Quaker School Records
Over 9,000 new records have been added to the Findmypast collection titled Ireland, Society of Friends (Quaker) school records. This collection covers six different schools and dates back as far as the 1700s. The records are compiled from various Quaker school registers and lists. Each entry includes both a transcript and an image of the original document. Details contained in each record will vary, but most will list the pupils name, age at last birthday, school and department, admission year, leaving year, parents’ names, and their occupations.
British Newspaper Archive Announcement
The British Newspaper Archive has recently announced a major new milestone in their project to digitize up to 40 million newspaper pages from the British Library’s vast collection of historic British & Irish newspapers. Following the addition of a newspaper for the country’s smallest county, Rutland, the Archive now covers at least one title from each of the country’s 48 counties and is now available to search and explore.
As part of this push to improve the British Newspaper Archive experience, a new “In Pictures” feature has also been added.
The British Newspaper Archive now contains over 18.7 million pages from 747 titles from England, Wales, Scotland, and Ireland and spans nearly 300 (1709-2003) years.
United Kingdom – Chelsea – Pensioner Service Records
The collection contains records for British soldiers (not officers) who received a pension from the British Army. They typically do not include records for soldiers who died in service or who were discharged early and did not receive a pension.
Some records contain more information than others, and pension documents after 1883 typically have more details regarding the soldier such as, information about next of kin, details of marriage, and children. Common details may include age, birthplace, service details (including any decorations,) physical description, previous occupation on enlistment, and the reason for discharge to pension. Documents that are most common include:
discharge forms, which were issued when a soldier left the regiment
attestation forms, which are the documents signed by the new recruit
On Fold3, the records in this collection are organized as such:
For the period 1760-1872, the documents are arranged alphabetically by name within regiment, including militia to 1854.
From 1873-1882, the documents are arranged alphabetically under cavalry, artillery, infantry and corps.
From 1883-1913, two alphabetical sequences for the entire army for discharge papers are arranged by range of surname and date 1883-1900 and 1900-1913.
United Kingdom – Leeds – Cemetery Burial Registers
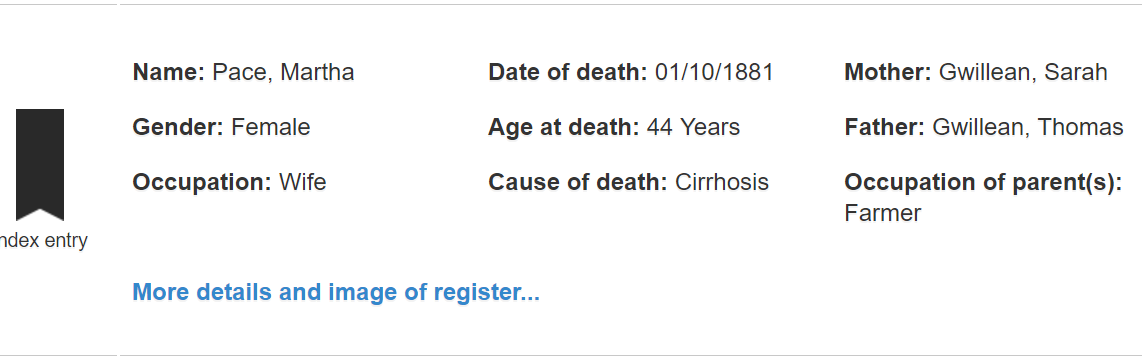
Not everything is on the Genealogy Giants (meaning Ancestry, Findmypast, FamilySearch, or MyHeritage.) The Leeds General Cemetery Burial Registers Index is free and available to search online. This database of transcriptions covers all entries in the burial registers of the Leeds General Cemetery and covers the years of 1835-1992. There are 97,146 entries in the index. Digital images of the registers are available to view alongside the transcribed data.
Search by surname of deceased or surname of the parents. Information found on the record will vary, but you are likely to find the name of the deceased, date of death, age at death, parents names, occupation, and cause of death. This is a great resource if you have been having trouble finding a civil death record.
United Kingdom – Sheffield
If you had ancestors who lived in the Sheffield area, you will find this next website a great help to your research. The Sheffield Indexers website provides full, online, searchable indexes to numerous collections, for free. These collections include, but are not limited to:
1841 Sheffield Census
Cemetery records
Burial records
School records
Directories
Be sure to check out their extensive indexes!
Family Tree Maker Announcement
Last year, Ancestry.com announced the purchase of Family Tree Maker desktop software by Software MacKiev. Their goal has always been to maintain the capability to share your family tree data between files on your computer and your personal Ancestry online trees. They’ve been working on a new Ancestry gateway with Software MacKiev to use in their Family Tree Maker 2017, which will be available soon.
What you should know (hat tip: Ancestry.com):
TreeSync will be replaced by Software MacKiev’s FamilySync™. In the new FamilySync, Ancestry’s search, merge, and Ancestry hints will all work as they do now for users who sync with their Ancestry trees.
FamilySync will be available only in Software MacKiev’s Family Tree Maker 2017 edition, which will be released on March 31, 2017.
The upgrade is free for all users who purchased a copy of a MacKiev Family Tree Maker edition since March 1, 2016. Those with previous Ancestry editions, or who got a free copy of Family Tree Maker 2014.1 or Mac 3.1, are eligible for discounted upgrades. The pre-order upgrade is $29.95 for those who sign up for Software MacKiev’s mailing list before March 29 and the upgrade will continue to be a discounted price ($39.95) for a limited time after March 29.
Between Wednesday, March 29 and Friday, March 31, there will be a short period where syncing functionality may be interrupted as Software MacKiev rolls out their new syncing technology.
As of March 29, 2017, Ancestry will no longer be supporting TreeSync, given the introduction of Software MacKiev’s FamilySync™. Software MacKiev will continue to handle all related customer questions for Family Tree Maker. Visit Software MacKiev’s Family Tree Maker Support Center at support.familytreemaker.com if you have questions.
More on German Genealogy in the States
German Newspapers in America is a virtual conference OnDemand video class by Jim Beidler. Stateside ethnic newspapers are a revealing resource for those searching their German ancestors. In this video you’ll learn:


 German Newspapers in America is a virtual conference OnDemand video class by Jim Beidler. Stateside ethnic newspapers are a revealing resource for those searching their German ancestors. In this video you’ll learn: