Beginning British Genealogy: What You Must Know to Start
With about 1/3 of Americans claiming British ancestry, chances are that at some point you will need to extend your research across the Atlantic Ocean. Genealogical research in the British Isles has some important differences when compared to the United States. Guest blogger Kate Eakman, a Senior Researcher for Legacy Tree Genealogists, clarifies confusing terms and helps you get your research started on solid footing!
Britain? England? The United Kingdom?
When beginning British genealogy research, it’s important to first talk about the difference between British and English research. There are several terms which get used interchangeably but which really refer to different locations.
Great Britain is an island, the largest island in the British Isles.
On the island of Great Britain are three of the four sovereign nations which make up the United Kingdom, or the U.K.: England, Wales, and Scotland. Northern Ireland on the island of Ireland is the fourth country of the U.K.
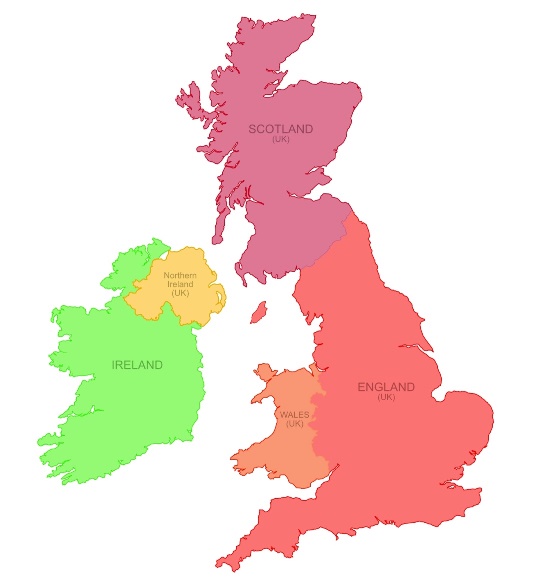
The four countries of the United Kingdom and the Republic of Ireland. Map courtesy Nate Parker.
Usually, when people talk about their British ancestors, what they really mean are their English ancestors. Although we Americans often treat the two words as interchangeable they really aren’t, and I suspect our English friends giggle a bit when they hear us misuse the words.
The four countries of the U.K. have some similarities but many important differences, and that is equally true for genealogical research. Rather than trying to explain all of those differences, this post will focus on English research.
One last thing to keep in mind when we talk about genealogical research in England is that today the country is divided into counties, which are sort of the equivalent of states in the U.S. Older records might refer to those counties as shires, and over time the borders have shifted, shires and counties were added, divided, or absorbed into each other. So a good map or two will be a useful tool to keep handy while you research your English ancestors.
Usually, when people talk about their British ancestors,
what they really mean are their English ancestors
What do you know?
Before beginning British genealogy research and making that leap across the pond, it is a good idea to consider what you already know about your English ancestors. Of course, you have a name, and you probably have an approximate date of birth.
- Were you fortunate enough to find the name of a town or county where that ancestor lived or do all of the census reports and vital records simply say “England”?
- If the ancestor arrived as an adult, what occupation did he pursue?
- When did he or she arrive in the U.S.? Are there any clues on the passenger list to tell you where to start looking?
- Once you have reviewed all of the information you have already acquired about your English ancestor, it’s time to start your research.
Beginning British Genealogy Research with the Census
The first step in most genealogical research is to study the existing census reports. Designed as a means to count the population for a variety of years, the census of Great Britain (including Scotland) is taken every ten years with the earliest records available in 1841. Due to very restrictive privacy laws, the most recent census available is from 1911, with one really valuable exception being the 1939 Register, available at FindMyPast.
Used for genealogical purposes, the census can give a snapshot of the family at the time the census was taken, as well as provide invaluable information such as the birthplace of the individual being recorded, occupation, birth year, and familial relationships. Elderly parents, or widowed mothers, aunts, or sisters, can be discovered living with younger members of the family.
Drawbacks of using the census for genealogical purposes include inaccurate name spellings, inaccurate age reporting, and inaccurate assumptions made by the enumerator. Another thing to keep in mind is that in the 1841 census the enumerated rounded down to the nearest five years the ages of people over 15. So a person who was listed as 25 could have been 25 through 29 years old.
It is important to remember that for the census reports through 1901 the enumerator copied the household information into books, and these copies are what we have today. Of course, when information is copied it is susceptible to error. The person who completed the census form may have had difficult-to-read handwriting, or the enumerator may have entered things on the wrong line. The individual reports have been kept for the 1911 census and offer a greater likelihood that the information they contain is very accurate.
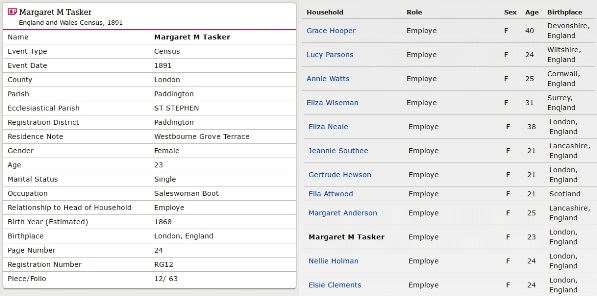
An example of a transcription from the 1891 English Census from Familysearch.org.
Detailed transcripts of English census records are available for free on FamilySearch and the images can be found for a fee at FindMyPast.
It is important to remember that for the census reports through 1901 the enumerator copied the household information into books, and these copies are what we have today.
Civil Registry of Vital Events
All English births, marriages, and deaths were required to be registered in a civil registration office beginning in July of 1837. In addition to the records themselves, there are indices which list the name of the person who was born, married, or died, the place where the event was registered, and the quarter and year in which the event occurred. Because the General Register Office (GRO) will only search one year on either side of the date provided, it is best, but not required, to include the index information when ordering documents from the GRO.
Free BMD is a free database which allows you the most freedom to search for the birth, marriage, and death index record of your relatives. You can enter whatever information you know including the place where the event happened, a specific year or range of years, age, and mother’s maiden name.
Depending on the time period, the index may be handwritten or mechanically printed. The information can then be used to order a copy of the actual record from the General Register Office (GRO) in England for about $10 per record.

An example of handwritten (left) and mechanically printed (right) birth index entries. Photos courtesy https://freebmd.org.uk.
The information contained in birth records includes:
- Name, date, and place of birth;
- Father’s name (if given at time of registration), occupation; and
- Mother’s name, maiden surname.
The parents’ places of birth were added after 1969, and the mother’s occupation is listed after 1984.
Marriage records include:
- Date and place of marriage;
- Name, age and marital status (spinster/bachelor, widowed, divorced) of the bride and groom;
- Occupation and usual address;
- Name and occupation of the fathers of the bride and groom, with a note if either man was deceased at the time of the marriage;
- Names of the witnesses;
- Name of the person who solemnized the marriage.
Death records in the United States are often relied upon to provide the names of the parents. English death records do not include that information and therefore are not as useful for genealogical purposes. Each death record includes:
- Name, date, and place of death;
- Date and place of birth (before 1969 a certificate only showed age of deceased);
- Occupation and usual address;
- Cause of death;
- The identity of the informant.
There are other records available, which we will talk about in a later post, which can be used to find and trace your English family members. The largest group are the religious records, and sometimes those can help you extend your family back in time to the 1600s – 400 years or more!
Beginning British Genealogy Important Take-Aways…
- “Great Britain” is an island. “The United Kingdom” is a country. And “England” is a country. Normally, when people are talking about their British ancestors they are referring to their English ancestors.
- England has counties, or what used to be known as “shires,” which function sort of like our states. The borders have changed over time, as have some of the names, so use a map when necessary to verify where you are researching.
- Census records are available from 1841 through 1911. Really good transcriptions are available for free at Family Search, or on the for-fee site Find My Past. And remember that age idiosyncrasy about the 1841 census.
- Finally, civil birth, marriage, and death records are available from the GRO. You can use the index listings to find the most likely match for your ancestor, and those can be found online at Free BMD.
Have fun and good luck finding your English ancestors!
 Kate Eakman is a Senior Researcher for Legacy Tree Genealogists, a worldwide genealogy research firm with extensive expertise in breaking through genealogy brick walls.
Click here to learn more about Legacy Tree services and its research team.
(Read our Disclosure and Affiliate Disclaimer on this page)
