We all have cookbooks in our kitchen, many of which were handed down to us by our mothers and grandmothers. In addition to be overflowing with delectable recipes, they are often brimming with family history. Today I’d like to share with you a recipe mystery that followed me for years, and the bit of genealogical serendipity that solved it.
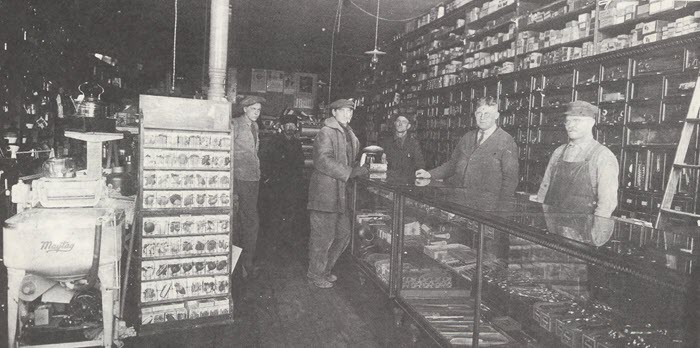
In it, I gave an example of some items I had found on Ebay from my husband’s Larson family. If you listen to the Genealogy Gems Podcast then you have heard me mention the Larson family. They hailed from Winthrop Minnesota and owned a hardware store and lumber business there for many years.
LJ Larson Hardware store
While I was taking questions toward the end of the presentation a woman in the front raised her hand. Her name was Harriet, and she said she was sure that she had a cookbook from Winthrop, Minnesota in her collection of books at home. She offered to send it to me and I gladly gave her my email address so we could connect.
Considering that Winthrop is such a small town, it make her statement surprising indeed! To provide perspective: Winthrop is about 1 square mile and the population hovers somewhere around 1300. So, I was surprised indeed to have someone in Pleasanton, California telling me that she had a cookbook that dated back to the early 20th century from this little town.
As promised, Harriett followed up with me by email. She asked for my address and told me that the book “looks a little worn but all of the pages are there. I hope it can be of some use to you. My sister taught either first grade or kindergarten there during World War 2 and that’s how it came in to her possession.”
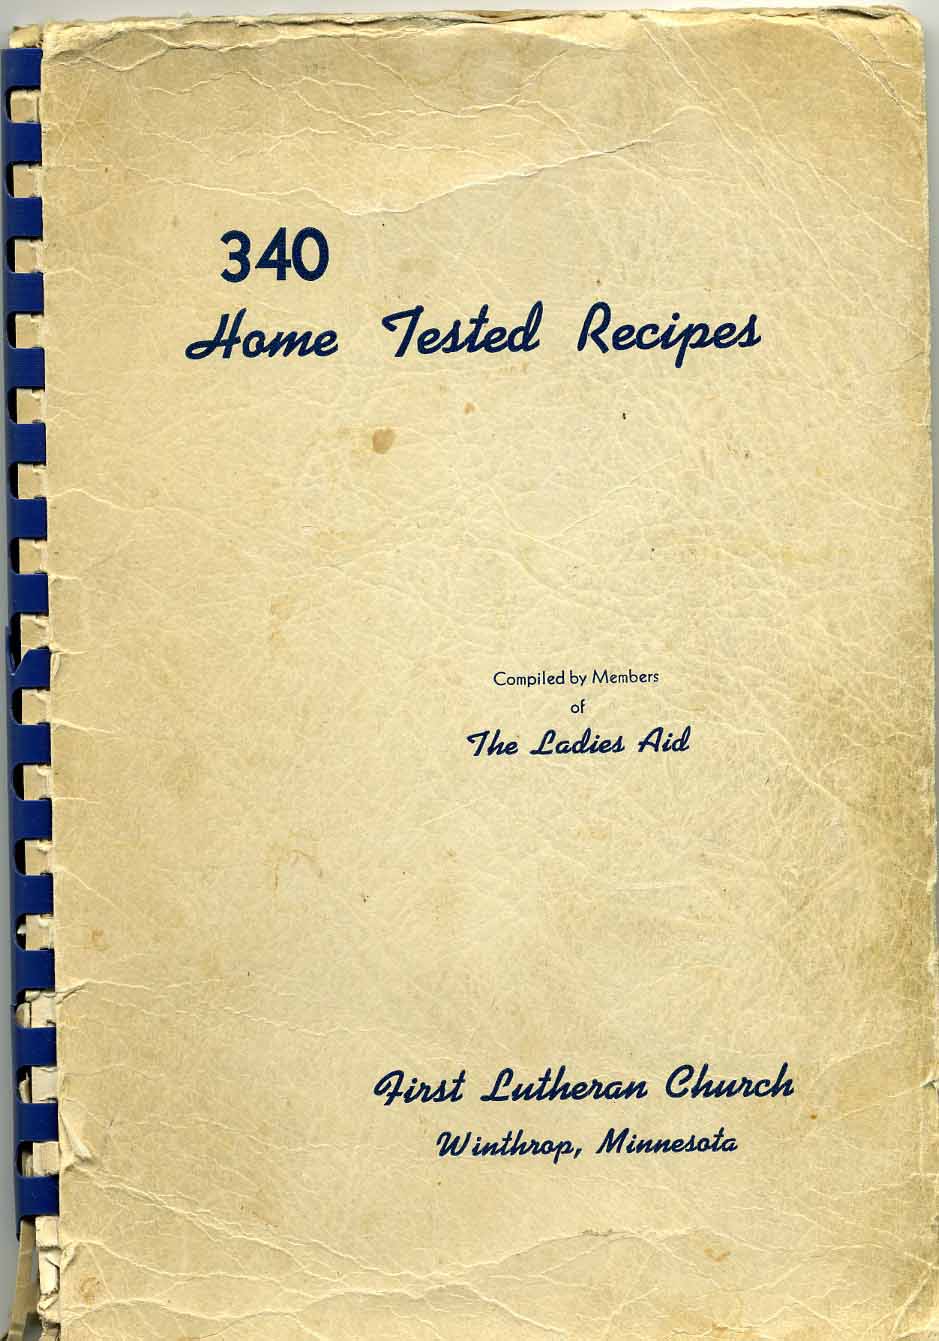
The Cookbook Filled with Family History
Harriett was a woman of her word because about a week later the 340 Home Tested Recipes cookbook compiled by members of The Ladies Aid of the First Lutheran Church of Winthrop, Minnesota was in my mailbox.
The Winthrop Cookbook
It continues to amaze and delight me how powerful just putting your family history “out there” is. By regularly mentioning real people and places in your own research, it so often leads to information and items that just seem to be waiting to be found. It’s what we call “genealogical serendipity” in genealogy circles.
But the genealogical serendipity didn’t end there. Not only did my husband’s ancestors contribute recipes to this little community cookbook, which of course I was thrilled to find – but there was a recipe in there that I had been in search of for over 25 years.
The Great Cookie Mystery
You see, when Bill and I got married, he shared his fond memories of a sour cream cookie his grandmother used to make. I’m an avid baker, so I checked with his mom to see if she had the recipe. Sadly, she didn’t.
Over the years I have tried to find a recipe for sour cream cookies in an attempt to recreate them. Every time I found one, I whipped up a batch. Bill would take a bite and shake his head saying they’ were good, but they weren’t like grandma’s cookies.
Bill enjoying baked treats with his Grandma Helen (Larson) Mansfield.
So as you can imagine, the first thing I looked for when I received this cookbook from the town where Bill’s grandma was born, was a recipe for sour cream cookies. There were many yummy-sounding treats to comb through like Pecan Sticks, Victoria Cookies, Father and Son Favorite Cookies, and Sorghum Cookies.
I got excited as I came across names I recognized from the family tree including Mrs. Sheldon S. Larson, the mother of a cousin we had the good fortune to finally meet two years ago when I presented a genealogy seminar in Minnesota at the Swedish Genealogical Society.
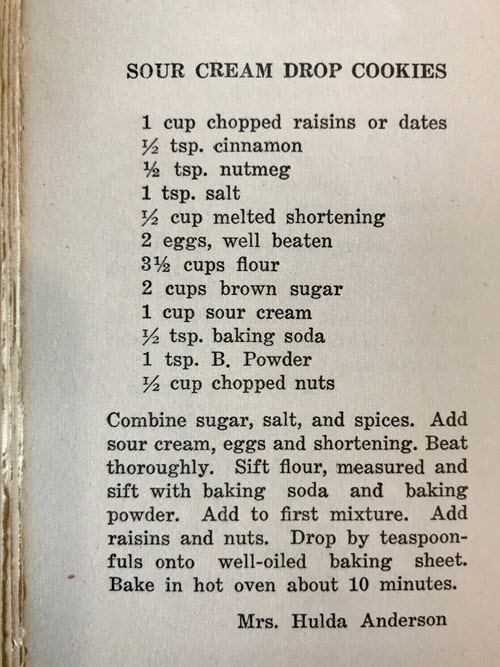
But the real thrill came when I made my way to page 42. There I found a recipe for Sour Cream Drop Cookies:
The infamous sour cream cookie recipe!
Surprisingly, the recipe wasn’t contributed by Bill’s grandma Helen (Larson) Mansfield or anyone named Larson. Instead it was submitted for inclusion in the cookbook by Mrs. Hulda Anderson. That fact didn’t deter me from trying it out. In a small town like Winthrop, recipes likely were regularly swapped and handed down through various families.
I immediately baked a batch and served them up to Bill. I’ll never forget his eyes as they lit up in excitement! He took a bite, and was ecstatic to once again be tasting Grandma’s sour cream cookies!
It may sound like a small victory in the scheme of thing, but for me it was a thrilling one, none the less!
I emailed Harriet and told her the good news and thanked her profusely.
I got a reply from her husband George. He wrote:
“I thought I would add a little amusement to the coincidence of the Sour Cream cookies. My father, George Anderson, Sr., was a salesman for American Steel and Wire, subsidiary of U. S. Steel, from the 1920s to the 1960s, traveling to every hardware store and lumber yard in southern Minnesota to sell fence, posts, nails etc. I don’t have any record of it, but I’m sure he would have called on your family’s hardware store in Winthrop. He knew all of his customers by first name, no doubt your in-laws included.”
Genealogy Serendipity never tasted so good!
A Genealogical Look at the Cookbook
I looked through the book carefully for a publishing date but none was to be found. However, there were several clues including the name of the church and the pastors name:
First Lutheran Church Lambert Engwall, Pastor
To put these clues to use, I headed to Google and searched the name of the church, the location and the name of the pastor: first lutheran church winthrop minnesota lambert engwall, pastor
Googling the church, location and pastor
The first result was just what I needed. The link to me to a Wikipedia page about the church:
The church in Wikipedia
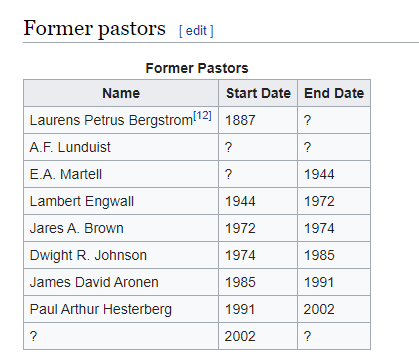
It was a fairly comprehensive page, and I was specifically looking for a list of pastors who had served at the church. To save time, I used Control + F (PC) to trigger a find on page search bar. I searched for “pastor” and was immediately take much further down the page to exactly what I wanted to know.
A helpful list of previous pastors
I quickly learned that Lambert Engwall served at this church in Winthrop, Minnesota from 1944 to 1972. Given that Harriett through it hailed from the World War II era when her sister lived there, and from the condition and style of the book, I feel confident it was published closer to 1944.
The next steps to learn more about the relationship between the Andersons and Larson include could include:
Reviewing the 1940 census for Winthrop, Sibley County, Minnesota, and mapping their homes in Google Earth.
conducting additional research into church and their available records include church meeting minutes.
A comprehensive search of the Winthrop News newspaper, with a particular eye on the social pages.
Share Your Genealogical Serendipity and Cookbook Stories
Have you experienced glorious instances of genealogical serendipity in your own family history quest? Do you have a cookbook that has been handed down to you that you treasure? Please leave a comment below and share your story!
Resources
Learn more powerful Google search techniques and ways to use Google Earth for genealogy in The Genealogist’s Google Toolbox by Lisa Louse Cooke (2020) available at the Genealogy Gems Store.
Book by the author
Learn more here about how to access the 50+ video classes that are a part of Genealogy Gems Premium membership.
Thinking about attending RootsTech in Salt Lake City, Utah in 2014? Then I’m guessing a trip to the Family History Library (FHL) is part of your plan. Here’s a great tip: bring your iPad or tablet computer and don’t make a single photocopy while you’re there!
Last year, I spent two days researching at the FHL before RootsTech got going. I was up and down a lot between floors, looking at all kinds of books, microfilmed and microfiched materials and even big old maps. On a previous trip, I would have spent a LOT of money on photocopying, even though the copy services there are very low priced. I would have wanted color copies of the maps, so that would have cost more. I would have wasted a lot of time in line to use the copiers–time I would have wanted to spend researching.
But I didn’t waste any time or money. I used my iPad. I have a generation 4 with the rear-facing, 5 megapixel camera, and I used it practically nonstop…
1. Copying material from books. Whenever I found a book page (or a few pages) I wanted to copy, I first imaged the cover pages with the source citation info. Then I imaged the inside pages, making sure the image captured the page number. When I needed to record that a book didn’t have anything on my ancestors, I put a sticky note on the inside front cover saying “checked for Johnsons, didn’t find” (or whatever), then imaged the page with the sticky note on it. This was easy and fast. I sometimes imaged books while standing right in the library stacks! I didn’t have a scanning app on my iPad at the time, but remember you can also use an app like Scanner Pro to scan multipage documents, convert them to PDFs and straighten out and enhance the images.
2. Copying material from microfilm. Okay, it’s not perfect quality, but you can take decent digital images of microfilmed material right from the microfilm reader. First, image the microfilmed page at the beginning saying what the source is (or a note with the source description or even the box with the microfilm number on it). Then stand just in front of the microfilm reader with the iPad. Point the camera down to the displayed image, taking care not to block the projection of the image from the reader above. Here’s an example of what it looks like. Like I said, it’s not perfect because of the angle and lighting. Glare can be a problem so you may want to take a few shots. But you can read these images and most of the time, you don’t need keepsake quality out of microfilm. You just need to capture data. I followed up with some cropping and enhancement editing right on my iPad.
3. Copying material from a map or other folio items. The same general idea applies to imaging maps and other oversized materials. First, image the source citation information, often found on a label at the bottom of the page or on the back. Image the map key, including which way is north, scale, and other details. Then image as much of the map as possible to get an “establishing shot.” Finally, zoom in to the areas of greatest importance to you. Again, it’s not perfect. Laminated items may have glare issues as you can see by the shot shown here. But you may get what you need out of your digital image, especially if you move around so the glare isn’t covering the important areas on the map.
Remember to organize all your images when you get back to your hotel room or home while your memory of the visit is still fresh. Keep source citation shots together with the images you took. Load them into Evernote, if you use it. Organize them as you would other computerized research materials: in surname files, etc.
Finally, remember that fair use and copyright laws still apply to all images you take, whether on a photocopier or your personal digitizing equipment. The Family History Library does allow people to take their own digital images, but not all libraries and archives do. Some repositories rely on the income from copying to fund their facilities. ASK before using your iPad at other libraries! But as you can see, you can save yourself time and money–and have all your research notes and copies already digitized and ready for use on-the-go.
This post was written by Genealogy Gems Contributing Editor Sunny Morton. (Just so you know, I’m not a longtime iPad pro. I learned everything I know about using an iPad for genealogy from reading Turn Your iPad into a Genealogy Powerhouse. Then I adapted what Lisa taught me for the way I research.)
Show Notes: The 1931 Canadian Census was released by the Library and Archives Canada on June 1 of 2023. These digitized images can (as of now) be browsed by general location. The challenge with this census, like with other census records when they first come online, is that there is no index. Creating the index that makes the census searchable by name and other identifying factors takes a while. So right now, the digitized images are available online to browse. Ancestry.com is partnering with the Library and Archives Canada and using its artificial intelligence technology to generate the index. Until that happens, I have four strategies for you that are going to help you find your ancestors right now. And you’ll be able to find them much faster than if you just browsed the images one by one. Once the index comes out, it’s not necessarily going to be perfect. They never are. So, these strategies can help you if you run into trouble finding someone in the 1931 Canadian census. And they’ll also help you better understand the information that you do see in the images.
My first strategy for finding your ancestors in the 1931 census of Canada is to check the earlier census records. Our goal is to identify the enumeration sub-district and the municipality where they lived. If we can find it in an earlier census, we can use that information to find them more quickly in the 1931 Canadian Census.
In my case, the person I’m looking for in the 1931 Canadian census is my husband’s great-grandfather, Harry Cooke. He emigrated to Canada in 1912, along with his second wife, Martha. I started my search for them by seeing if I could find them in a census record sometime after 1912, but prior to 1931.
Harry lived in Regina, Saskatchewan. So, I was able to use the Census of Prairie Provinces that was taken in 1926 in Saskatchewan, Alberta, and Manitoba. You can use the Census Search Tool at the Library and Archives Canada website to search those census records.
If your ancestors lived in other provinces, again, that Census Search Tool is going to help you find the most recent census records available for them.
In 1926 Harry Cooke was in sub-district number 8 and the municipality was Sherwood, so I made note of that. Also, while looking at that 1926 census, I found there is an area where it talks about where each household is located. They list the Township, Range and Meridian. So, I also made note of the township number listed, which in this case was 17. If your ancestors happen to live in a city, there may be a street address listed. Though many people came to Canada to work the land, so you may not be fortunate and find that information. But make note of the street address if it’s listed. Sometimes it’s written right across the Township, Range and Meridian columns.
Strategy #2 Check City Directories for Addresses
I really easy way to look for city directories is just to google it. I found the 1931 city directory for Regina by going to Google.com and typing in 1931, Regina city directory. The very first result was the city directory for Regina in 1931 at Internet Archive. I happen to have heard that there was a directory for 1931, so that’s why I searched for it specifically. If you don’t happen to know the year you can run a Google search for a time frame. Do this by entering the name of the town or the closest big city to where your ancestors lived in the search field. Add the phrase city directory, and then enter a number range. Google calls this search operator a numrange. Here’s an example:
Regina city directory 1912..1931
This type of search brings up links to web pages that mention Regina, the words city directory, and also a four-digit number that falls within the specified range, which for us would be the year that the city directory was published!
The Internet Archive has thousands of digitized and searchable city directories. Many genealogy record websites use The Internet Archive as their cloud hosting service for their records. They digitize everything and upload it to Internet Archive where they can host it, and then link to it on their website. So that is a great place to look.
However, it’s a good idea to run a Google search because that way you are going across the internet, and hopefully you’ll find the city directories that you need.
In my case, in 1931 Harry and Martha are still at 520 Osler Street. So that reinforces what I had found in the 1926 census.
Strategy #3 Search at the Library and Archives Canada website
At the time of this writing, without an actual index, we’re going to enter the province name, the city / district if you have it, and the sub-district.
In the case of Harry and Martha Cooke, I found them in 1926 in sub-district #8, so that was the first place I searched. However, in 1931 sub-district #8 was not associated with the municipality of Sherwood. In fact, it didn’t mention township 17 either, so it was very suspicious.
It is possible that enumeration sub-districts can change over time. This can happen because as a country grows, the population grows. District lines must be redrawn in a way that allows a single census taker (enumerator) to cover the area within a certain given amount of time. In a more populated city, that can mean that the sub-district actually shrinks a little bit, and there are more sub-districts added. However, the previous sub-district does give you a great starting point. It’s very possible that the person you are looking for is in a sub-district close to the original. So, you’ll just have to browse a little further. And that takes us to strategy number four.
Strategy #4 Browse the Records Faster Using Clues
You could go through each digitized page of the 1931 Canadian census one by one looking for your relatives. That took an especially long time when the records were first released on June 1 of 2023. On my computer each image took at least two hours to load…it was crazy! But it’s not surprising, because I’m sure everybody and their brother wanted to look at these records.
Thankfully, now it’s running much faster. But it could still take quite a long time to look page by page. There are a few more things that you can do to make the process much faster.
First, as you pull up each sub-district, keep track of your search with a research log. After checking the sub-districts before and after the one Harry Cooke was in in 1926, I went back to the beginning and started with sub-district #1. The very first image in each sub-district is going to be a title card that will include the township number, and the municipality covered in that sub-district. So, since you already located that in the earlier census record, you are going to be able to immediately tell if that group of images is worth going through.
If it doesn’t match, go on to the next sub-district. This is why a research log is important. Genealogy Gems Premium Members can download the worksheet in the Resources section at the bottom of these Show Notes. It’s just a really simple way to keep track of everything that you’re finding and make sure that you’re not covering the same base twice.
You might come across a title card that has the right municipality but not the right township number, or vice versa. I found that in one case while looking for the Cookes. Just make note of it on your worksheet, and keep moving, looking for an exact match.
If you find a sub-district that looks really promising, perhaps it includes the township or the municipality you need, take a quick look at image number two. This is the first page that shows people in the neighborhood. There are a couple of things to look for.
If you know that your ancestors were British, like Harry and Martha were, then you might expect them to be in a neighborhood with predominantly British people. That was really common. When our ancestors left their homeland and came to a new country, they oftentimes emigrated with other people from the country that they knew. They may have heard about the opportunity from those people. And once they arrived, they tended to congregate together. They lived together in communities and neighborhoods because they shared a culture and language. They could support each other and help each other.
One of the things that tipped me off that sub-district #8 wasn’t the right place to be searching for the Cookes was that it was comprised primarily of Russians, Austrians, Romanians, and Hungarians. Harry and Martha didn’t speak those languages, so I would not expect them to be there. Also, when I looked at the 1926 census, I made note of who his neighbors were. And indeed, it was a very predominantly British neighborhood. So that was a clue to me that even though I might have had the right township number, it didn’t mention the right municipality, and it certainly had a completely different makeup when it came to the neighborhood.
Also, as you’re reviewing the surnames and going down the list on the image, take a look at the township column. As you’ll recall, we made note of the township number and / or the address that we found in the earlier census. As you scan the surnames on the page, also check if the correct township number or address is showing up.
In my search, I saw a lot of different street names (not Osler St.). I don’t know Regina very well, so in another browser tab, I opened up Google Maps. I did a search for 520 Osler St., and then I selected “Directions” and entered one of the street names that I was seeing on the census. And sure enough, they were miles and miles apart. That’s another clue you’re not in the right area for browsing.
Our goal is to find our relatives as quickly as possible without spending hours reviewing pages that are not likely to include them. So, again, if you don’t find that exact match of Township and Municipality on the sub-district index card, look at these other factors to see if you’re in the right ballpark.
In the end, I am happy to say I found Harry and Marth Cooke pretty quickly. They were in sub-district number 11. The title card showed that it covered township 17 and the municipality of Sherwood. It was an exact match! They were on image number 18 residing in a very predominantly British neighborhood on Osler St., exactly where I would expect them to be.
1931 Canadian Census Search Wrap Up
The 1931 Canadian Census is full of valuable information about your Canadian relatives. While it take a little more time to search without an index, these strategies can help you do so faster. You can also apply (and tweak) these techniques to other types of searches where an index is unavailable, or your relatives aren’t showing up in the search results. And remember, if you find an address, look up the location in Google Maps to see it for yourself.
A ton of genealogy and family history research can be done for free. In this episode I’ll share 15 fabulous free websites and what I love about them. These are essential for everyone serious about saving money while climbing their family tree.
(Get your ad-free Show Notes Cheat Sheet at the bottom of this page in the Resources section.)
LISA’S SHOW NOTES: Get your ad-free downloadable handout in the Resources section at the bottom of this page.
Tip: Use the Tools button on the results page to reveal the filter menu. Filter your results down to just full digitized and searchable books by selecting Full View.
Snagit Clipping Tool: Here’s our link for purchasing your copy of Snagit (screen clipping tool) Thank you for using our link. Use coupon code GENEALOGY15to get 15% off. (We will be compensated at no additional cost to you, which makes the free Elevenses with Lisa show and notes possible.)
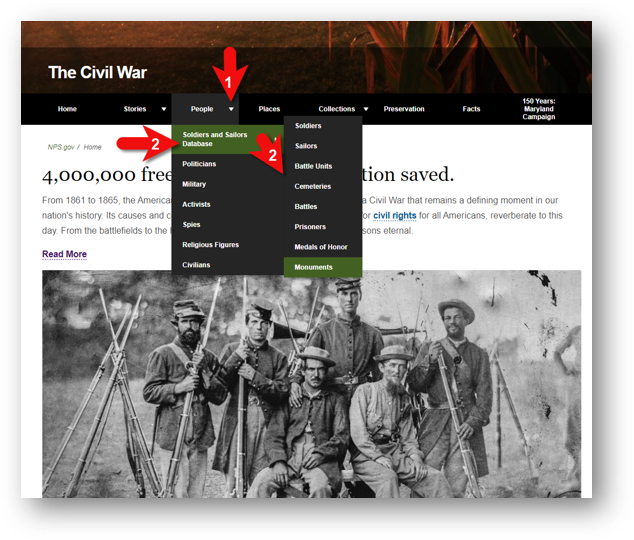
“Cooperative effort between the National Park Service and several public and private partners whose goal is to increase Americans’ understanding of this decisive era in American history by making information about it widely accessible.
11. Soldiers and Sailors Database
Features:
Men who served in the Union and Confederate armies during the Civil War.
Histories of Union and Confederate regiments.
Links to descriptions of significant battles.
Selected lists of prisoner-of-war records and cemetery records.
Doing genealogy research generates a wide variety of research notes: typed and handwritten, audio, photos, video, and screenshots of information on websites. If you want one tool to pull together your current research projects, Evernote might just be the answer. In this video and article you’ll learn the role that Evernote can play, what it is and how to set it up, and your options for using for free or as a subscriber.
Evernote for Genealogy Video Tutorial
In this video and article Lisa Louise Cooke will discuss:
What Evernote is and the role Evernote can play in your genealogy research
Use it for free or upgrade to get all the bells and whistles like OCR and use on all your devices. (We will be compensated if you use our affiliate link. Thank you for supporting this free show.)
Show Notes
In my recent videos on how to avoid research rabbit holes that keep you from your genealogy goals, I mentioned that I use Evernote to capture BSOs or bright shiny objects that are interesting but not what I’m working on at the moment. So in this video I’m going to explain what Evernote is, and how to get started using it.
Evernote puts all your notes in one place and offers an incredibly fast and easy way to retrieve them.
Evernote is a:
website
software program for your computer (Win & Mac) that you download for free from their website
mobile app (iOS & Android): search for Evernote in your device’s app store
a web clipper for your computer’s web browser
Benefits
Genealogy can get a big messy. Information can be gathered from countless sources and in a variety of forms. You could funnel things through a cloud service like Dropbox. However, because Evernote is a note taking app, it offers unique and super helpful features:
Create all types of notes
From all of your devices. Thanks to Cloud synchronization you can take a note on any device and always have access to the most current version. (Free mobile app)
Web clipping – It allows you to clip items from the Internet (rather than saving entire bulky web pages),
OCR technology makes notes (such as newspaper articles) keyword searchable (subscription)
Data like URLs and the date you created the note is automatically included
No total storage limit, just monthly upload
You can use it for free, and upgrade for all the bells and whistles.
Install the software on your desktop computer (Windows & Mac)
Download the web clipper to your browser (app store or Google it)
Download the free Evernote app to your mobile devices from the iTunes App Store or Google Play
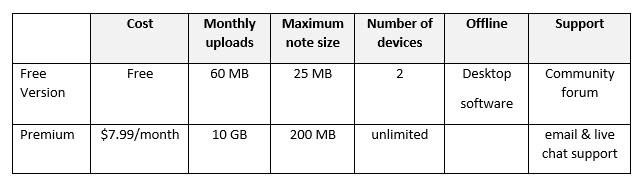
Features & Costs
(Subject to change. Visit evernote.com/compare-plans)
Evernote pricing plans comparison Sept. 2021 – See the website for the most current offer.
Software Home Layout
Evernote’s Home view gives you a summary of what you’ve got going on in Evernote. If Home is new to you and you don’t see it, simply head to the left Navigation menu and click Home.
Home gives you a place to sort of summarize what you’ve got going on in Evernote. It also allows you to add more personalization.
A fun way to personalize Evernote is by adding a background image. Click Customize in the upper right corner, and then click the Change Background button. Here you can add a preset image or add your own.
By default, Home comes with widgets such as:
Notes (highlighting your most recent notes, and Suggested notes based on your activity)
A Scratch Pad
Recently Captured items by type (web clips, images, documents, audio and emails)
While you’re in Customize mode, you’ll see additional available widgets like:
Calendar (allowing you to sync your Google calendar with Evernote)
Filtered Notes
Notebooks
Pinned Notes
An additional Scratch Pad
Shortcuts
Tags
Tasks
We’ll explore some of these further in a moment. But first, let’s create our first note!
All Notes View – SnippetView:
Left column = your files and organization
Center column = search for notes
Right column = the note you are currently working on
Change the layout by clicking the View Options icon (in SnippetView it appears at the top of the search column). This will give you a variety of layout options.
Change what appears or is hidden from view, and whether the view is dark or light by clicking View in the menu.
Notetaking 101
Create a note by clicking the New Note(+) button at the top of the screen.
Creating a new note is as simple as starting to type. Evernote saves your work instantly and without any extra effort on your part. Notes are saved in “the Cloud” on Evernote’s servers. This means all of your notes are automatically backed up. In addition, all of your notes will sync across all of your various computing devices. And Evernote facilitates sharing notes with others for research collaboration.
Click the Info icon at the top of the note to see the meta-data for that note. You can add and edit this information.
Types of Notes:
Typed
Sketched
Photos
Attachments
Video
Audio
Note Info has changed and can now be found by pressing Control + Shift + I on your keyboard, or clicking the More Actions (3 dots icon) in the upper right corner of the note and selecting Note Info.
Tagging is the Key to Organization
Add a tag based on important keywords associated with the note.
Examples of tags for genealogy:
Surnames (Cooke, Moore)
Record types (birth, census, land)
Locations (Indiana, Germany)
Time frames (1900-1909, 1910-1919)
Tasks (pending, add to database, follow up, etc.)
To tag a note, click Add Tag at the top of the note and select a tag from your list or add a new tag. Tags will appear in the left column. Click any tag in the left column to retrieve all notes with that tag.
Evernote Tasks
In June of 2021 Evernote added a Tasks feature. It operates just a little differently than how I’ve been using tasks. Evernote tasks are:
To Do Items
Note Specific (versus a tag which can retrieve all notes with that task)
Often Deadline Driven
Assignable to Others
Searchable
Where is the Trash?
You will find Evernote’s Trash bin at the bottom of the Navigation bar on the left.
Notebooks
Notebooks take organization a step further. I create notebooks sparingly. I use them to divide Evernote up into workspaces: Genealogy, Personal, Business, etc. I also use them for long-term and collaborative research projects that I may want to share with others. You can drag and drop notebooks on top of each other to create Stacks, although Evernote only allows one level of stacking.
How to create a new notebook:
In the menu select: File > New Notebook
Name the new notebook in the pop-up window
Select notebook type – usually you would set it up to synchronize, but you do have the option to have the notebook reside only on the computer it was created by selecting Local
The Cloud and Synchronization
Notes are saved on your computer and in the Cloud on Evernote’s servers. This means all of your notes are automatically backed up, and also accessible from your account on their website. Your notes will sync across all of your computing devices that have Evernote installed. There’s no need to manually sync with the new version. It happens automatically whenever you’re connected to the internet.
Web Clipping
As you visit webpages, you can clip just the portion of the page that you want to remember and keep rather than printing the page or bookmarking it. You can type the source citation directly into the note. Clippings appear as images in the note.
How to clip a screenshot using the computer software:
Right-click on the Evernote icon in your computer task bar.
Select Clip Screenshot.
Use the cross-hairs to draw a box around the desired content.
Release you mouse and you will see a quick flash on the screen indicating the content has been saved as a note in Evernote.
In Evernote click on the note to type additional information if desired.
How to download the free Evernote web clipper for your web browser:
Go to: evernote.com/webclipper
The download page will detect the browser that you are using and offer the correct web clipper. Click the download button.
The Evernote web clipper will install in your web browser (look in the upper right corner of your browser for the elephant icon.)
Sign into your Evernote account in the clipper.
Using the Browser Web Clipper:
When you visit a web page and find something that you want to clip, click the Evernote Web Clipper (elephant) icon in your web browser. The browser web clipper can save:
a full page (even the parts out of view)
an article
a simplified article (removing unwanted graphics and text not pertaining to the article)
a screenshot (where you precision clip with cross hairs)
a bookmark
As you clip you can select which notebook to file the note in and add any desired tags. It will also include the URL in the note header.
Search and Retrieval
Type a keyword into the search box and Evernote will locate and display notes that contain the keyword in the center column. This includes typed text from a website clipping or image, as in the example above. With a subscription, OCR technology makes it possible for you to search for words in Evernote to retrieve notes that include those words, both on the clipped image and in printed handwritten text.


 of your plan. Here’s a great tip: bring your iPad or tablet computer and don’t make a single photocopy while you’re there!
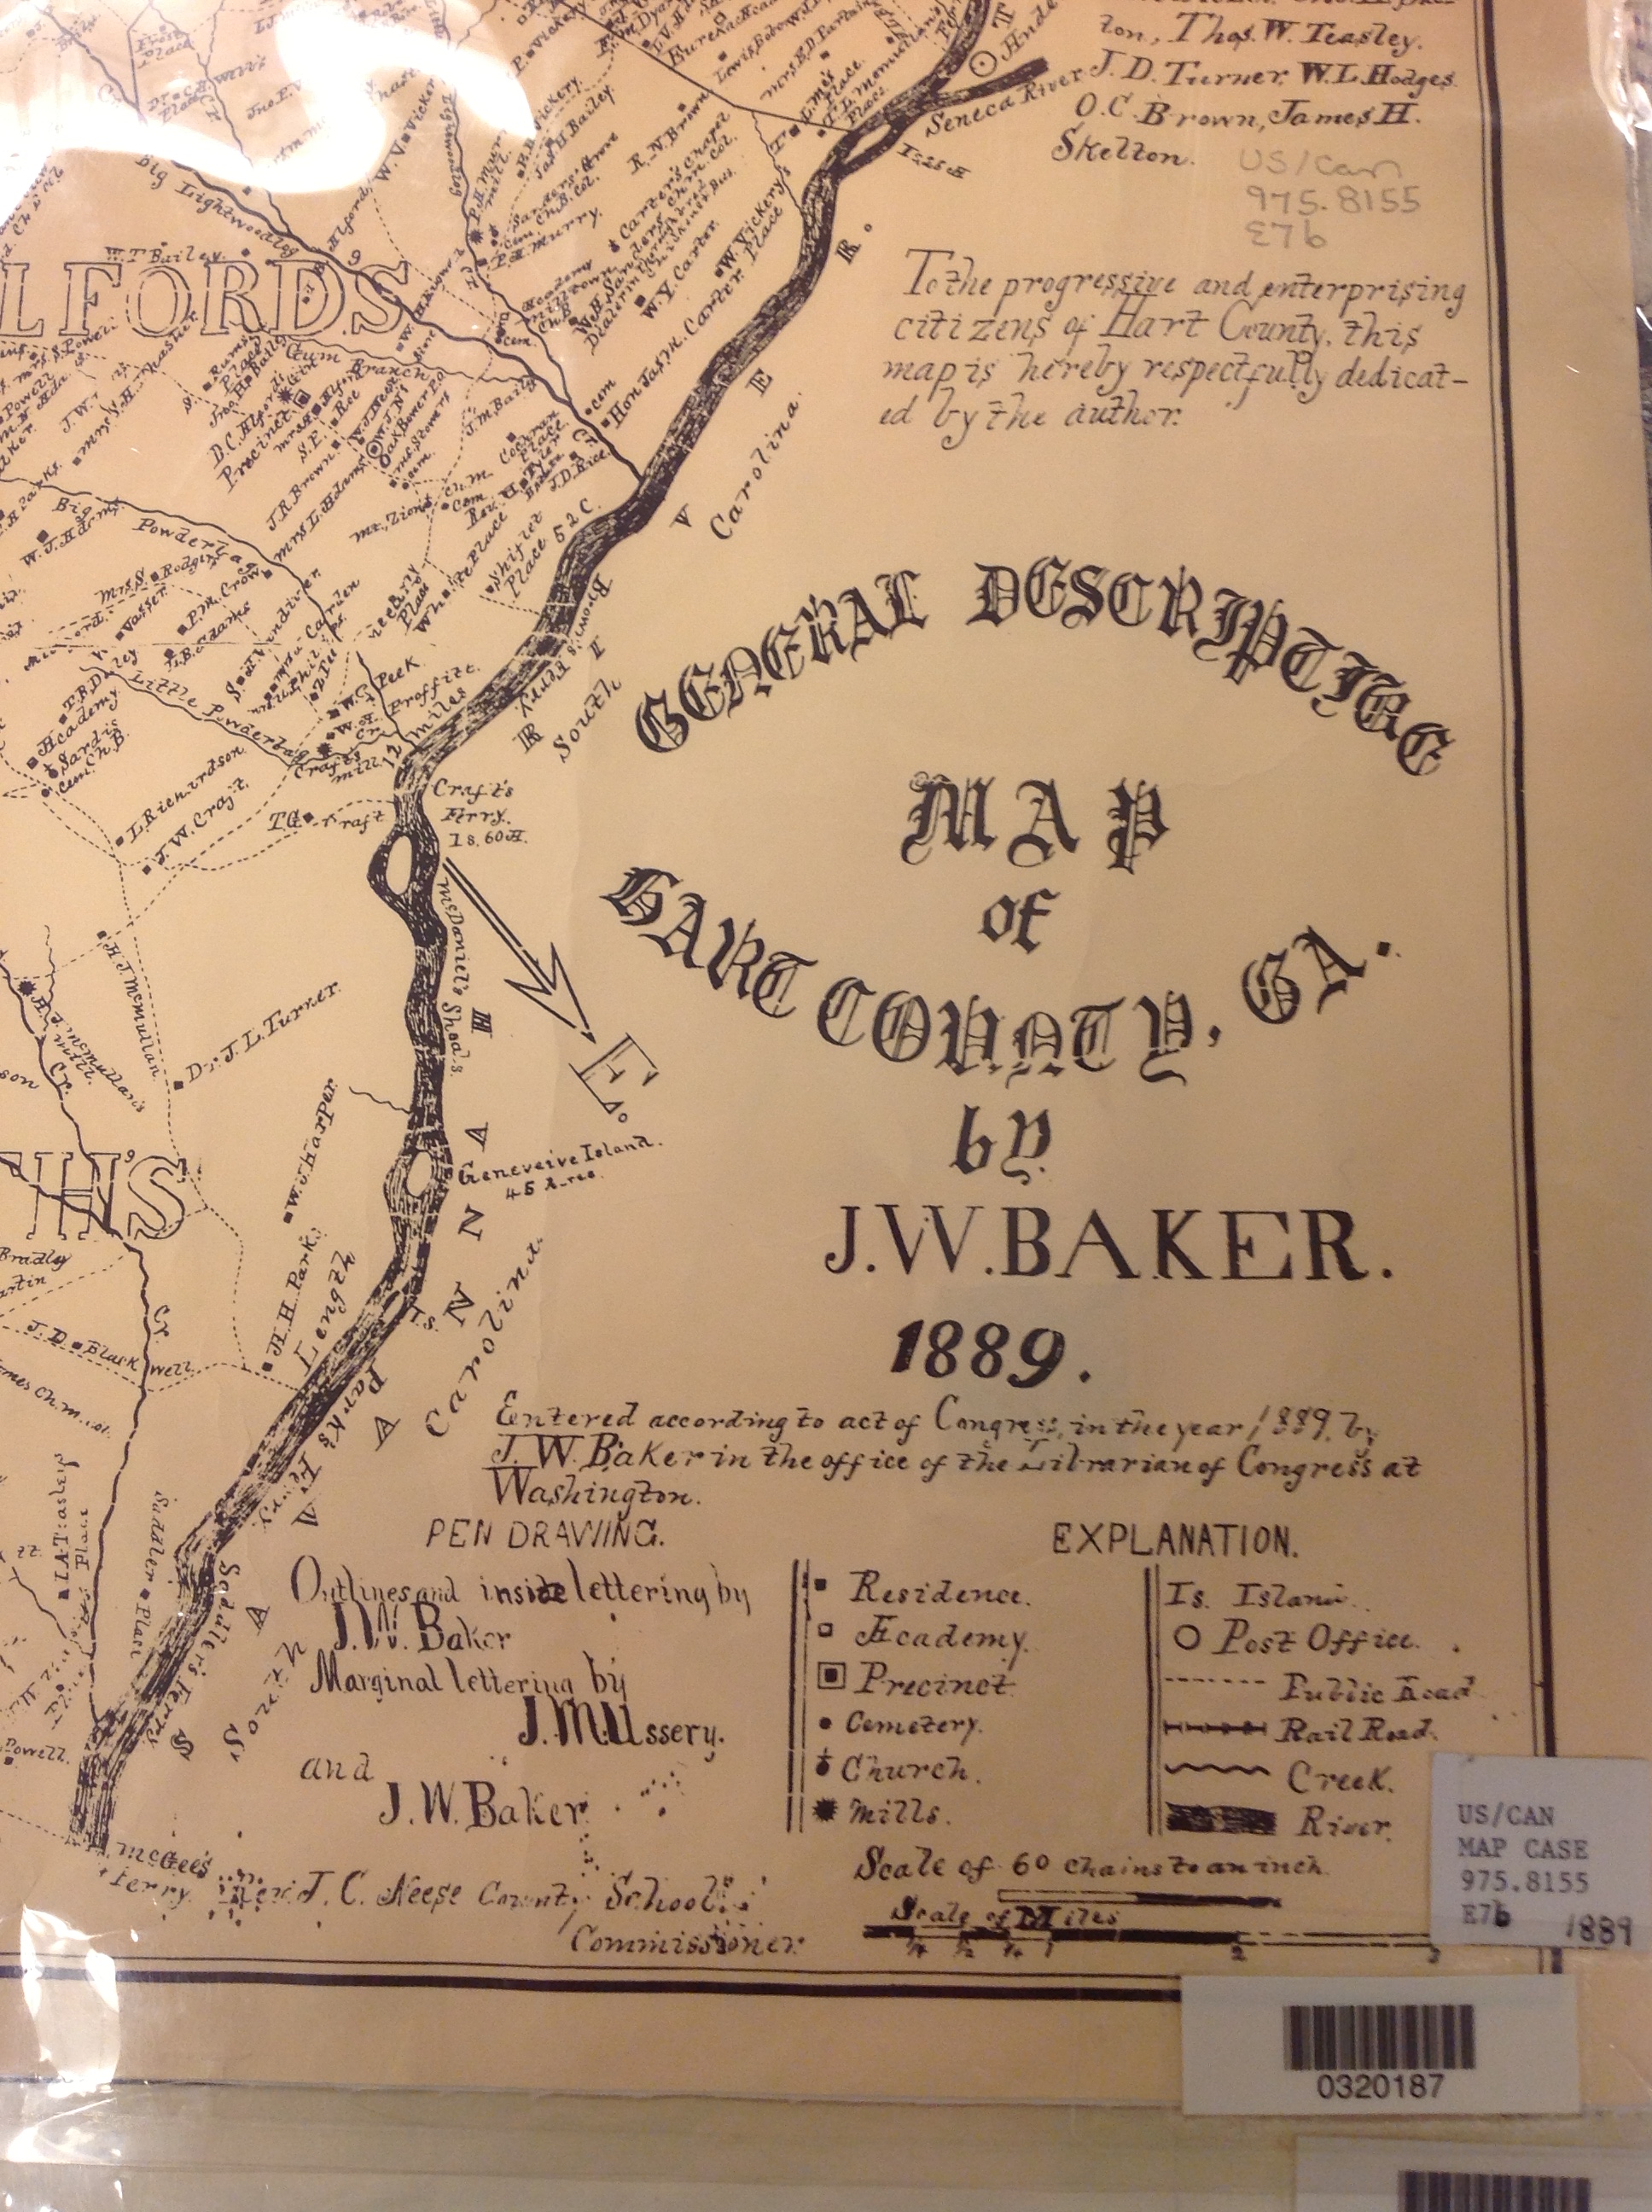 3. Copying material from a map or other folio items.