When it comes to digitized newspapers on genealogy websites, Findmypast is a clear headliner. The site already hosts millions of U.S., British, and Irish newspaper pages–and their British collection is about to DOUBLE. Extra, extra, read all about it!
It may surprise you to hear that digitized historical newspapers aren’t a big part of the collections at all four giant genealogy websites. In fact, only one site–Findmypast–offers access to millions of exclusive British and Irish newspaper pages and a major U.S. newspaper database (which is usually just available at libraries).
Why mention it now? Because a good thing just got better: Findmypast plans to double its British newspaper content over the next two years.
Digitized Newspaper Treasures at Findmypast.com
Findmypast’s enormous genealogy collections focus on the countries of England, Scotland, Ireland, and Wales. Findmypast and The British Library have been working together for several years on The British Newspaper Archive, now home to more than 22.5 million newspaper pages dating from the 1700s. But what many people might not realize is that these same newspaper pages are also available to Findmypast subscribers.
You can search newspaper pages on Findmypast by name (first and last) and by other keywords, such as an occupation, street address, event or another word that might be associated with your family in newspaper articles. You can narrow the date range of papers searched and even target specific newspapers:
Original bound newspaper volumes at the British Library. Image from The British Newspaper Archive.
And it gets better. Findmypast just announced that over the next two years, it will nearly double its digitized newspaper collections! It is scanning over 12 million pages from the largest private newspaper collection in the UK: the Trinity Mirror archives. Over 150 local papers from across the U.K. are included. These pages have never been made available online, but will be on both The British Newspaper Archive and Findmypast. The project is already underway and moving along rapidly: up to 100,000 pages per week.
According to a press release, “The program builds on an existing partnership that has already resulted in the digitization and online publication of upwards of 160 Trinity Mirror titles, including significant coverage of both World Wars. Published online for the very first time, these war-time publications also included the Archive’s first national titles, The Daily Mirror and The Daily Herald.”
TIP: If you are interested in accessing British newspapers, but not needing the full range of genealogy resources offered at Findmypast, consider purchasing PayAsYouGo credits from Findmypast. You can purchase 60-900 at a time and “spend” them to view individual search results, including newspapers. You can also subscribe separately to The British Newspaper Archive.
More Digitized Newspapers on Genealogy Websites
The other giant genealogy websites do offer some newspaper content–indexed, imaged, or both. Here’s a short summary of what you’ll find on Ancestry.com, FamilySearch, and MyHeritage:
FamilySearch: Millions of indexed obituaries are searchable by name on its free website, but it doesn’t generally offer any digitized newspaper pages. Of its billion+ historical record images, FamilySearch prioritizes more “core” genealogical records, such as vital records, censuses, and passenger lists.
MyHeritage.com: This site used to have access to NewspaperARCHIVE, the same U.S. newspaper database Findmypast currently offers, but it doesn’t now. It’s got new collections of Ohio (4.5 million pages from 88 sources) and New York (1.9 million pages from 56 sources) newspapers and access to the Jewish Chronicle [England]. But the bulk of its newspaper search results come from searching two other websites: Chronicling America and Trove, run by the national libraries of the United States and Australia, respectively. While it’s convenient to search them from MyHeritage if you are already using it, it’s not a reason to subscribe, as you can use those sites for free.
More Inside Tips on the Genealogy Giants
Genealogy Gems is your home for ongoing coverage and insight into the four ‘genealogy giants’ websites. Click here to learn more and to watch the RootsTech 2017 world premiere of my popular lecture that puts these big sites head-to-head. Genealogy Gems has published my ultimate quick reference guide, “Genealogy Giants: Comparing the 4 Major Websites.” It distills that hour-long lecture (and I was talking fast!) into a concise, easy-to-read format that will help you know which websites are best for you to use right now.
Disclosure: This article contains affiliate links and Genealogy Gems will be compensated if you make a purchase after clicking on these links (at no additional cost to you). Thank you for supporting the free Genealogy Gems podcast and blog!
Show Notes: Over the years I’ve talked a lot about how to use Evernote and Snagit. Both are amazing tools for research and make it easy to do web clipping. If you’ve been wondering what the difference is between these two powerful tools, or if you haven’t and you’re trying to figure out which one you should start using, you’re in the right place. Today we’re doing a head-to-head comparison of Evernote and Snagit (with a focus on web clipping) and figuring out which one is best for you and your genealogy research.
I got an email from one of our Premium Members named Nancy, and she says, “Can you help me understand why I would need Evernote and Snagit? I have both installed on my computer, but need to spend time becoming proficient in both. If they duplicate one another wouldn’t want to spend time learning both if Snagit is superior.”
This is a really smart question because like the old saying, time is money. And in the case of genealogy, time is ancestors! No one wants to stop and learn yet another tech tool if they don’t have to. So, let’s look at Evernote vs. Snagit, in a head-to-head comparison, and dig into their strengths and weaknesses. If you have both, this will also help you decide what to use in any given situation.
Evernote is a cloud-based notetaking tool that includes a web clipper.
Snagit is a screen capture / AKA web clipper tool.
So, first and foremost the thing they have in common is that they both can capture all or a portion of content that appears on your computer screen. You can clip exactly the part you want and save it as an image for future reference or use.
That’s a pretty simplified description – but essentially, web clipping is the common denominator. But from there, they diverge.
Evernote is primarily a note taking tool. It takes all kinds of notes (audio, photo, video, documents, web clipping, typed, handwritten.) All notes are added to it, and you work in it like a workstation where you can organize and quickly search and retrieve your notes. It can apply OCR to your screen captured notes, making them keyword searchable and editable. Evernote allows you to instantly access your notes from any device that you are signed into your account.
Snagit is primarily a screen capture tool. In fact, it’s screen capture on steroids compared to Evernote. It’s not a place to store notes, but it’s a fantastic way to web-clip or capture information, edit, annotate and manipulate it, save it, and use it in other programs (and we’ll talk more about that in a moment.) Snagit can capture both images and video of content on the web, and it can do other things like use OCR to convert the text that appears in the web content you’re clipping as an image and turn it into editable text. When you web clip with Snagit, you are creating an image. That image must be saved to a cloud service like Dropbox in order to be able to access the note from all your devices.
You can learn a lot more about what these two tools do in my other videos:
Another thing they have in common is that they are both software programs.
Evernote: In addition to being able to use it as a software program on your computer, you can also use Evernote on your mobile device by downloading the app from your app store. You can also use it on any computer by simply signing into your account at Evernote.com. That being said, the software is preferred over the website because it resides on your computer and is faster.
Cost: About $9/monthly or about $80 for the yearly subscription ($6.67 / MONTH).
There is a free version, but you can only use it on 2 devices, it doesn’t include OCR and there are very strict limits on storage, which we’ll address in just a moment. If you’re going to use Evernote for your research and other things, you’re going to need the yearly subscription.
Snagit: Snagit is software that you download to your computer (whether desktop or laptop.) You can buy it as a stand alone purchase, or you can also purchase an ongoing maintenance subscription which provides you with upgrades. There is not mobile app.
Cost: About $64 for one software license + 1 year maintenance (free upgrade). You don’t have to pay for ongoing maintenance.
Conclusion: Unless the free version of Evernote is adequate for your needs, Snagit it more economical. 10 months of Evernote on-going subscription would cover the cost of the one-time purchase of Snagit. However, if you need all the features of Evernote, then go for the yearly subscription to keep the cost down.
Storage and Retention
Because Evernote is a subscription, this brings up the question of whether you can use your notes after you stop subscribing. And storage limits are also a concern.
Snagit: No storage limits. All the content you capture is stored on your computer, not the cloud. It’s yours forever. There’s no limit to how much you can clip or create.
Evernote: Evernote does store your notes on your computer, but it also stores them in the Evernote cloud. While Evernote doesn’t have an overall storage limit, it does have limits on how much you can create each month. There is a free version that allows you to 60 MB of monthly uploads. This is talking about the size of your notes. If you add photographs to Evernote, you’re going to use that up very quickly. There’s also a 25 MB maximum note size limit. No note or clipping can be larger than 25MB. With the subscription you get 10 GB of monthly uploads (which would be pretty hard to max out) and the note size limit is 200 MB.
Conclusion: You’ll need the yearly subscription to really be able to use Evernote for genealogy. And while there are limits, you’re likely never to reach them. And you can use it offline because notes are on your computer.
Snagit has no limits and stores only on your computer unless you share your content to other sources. And that brings us to comparing how these tools allow you to export your content. In other words, can you get stuff out that you put into it?
Exporting Content
The necessity for an ongoing subscription to Evernote brings up to the next important comparison: how can you export and use your web-clippings and in the case of Evernote other types of notes?
Evernote: Not easy. You can export your notes as the Evernote file format called ENEX or as HTML, which is used in structuring web pages. Keep in mind that web clippings are image files, and we normally need image files in JPEG or PNG format to be able to use them in a variety of other programs.
In the menu click File > Export Note. Available file types are limited.
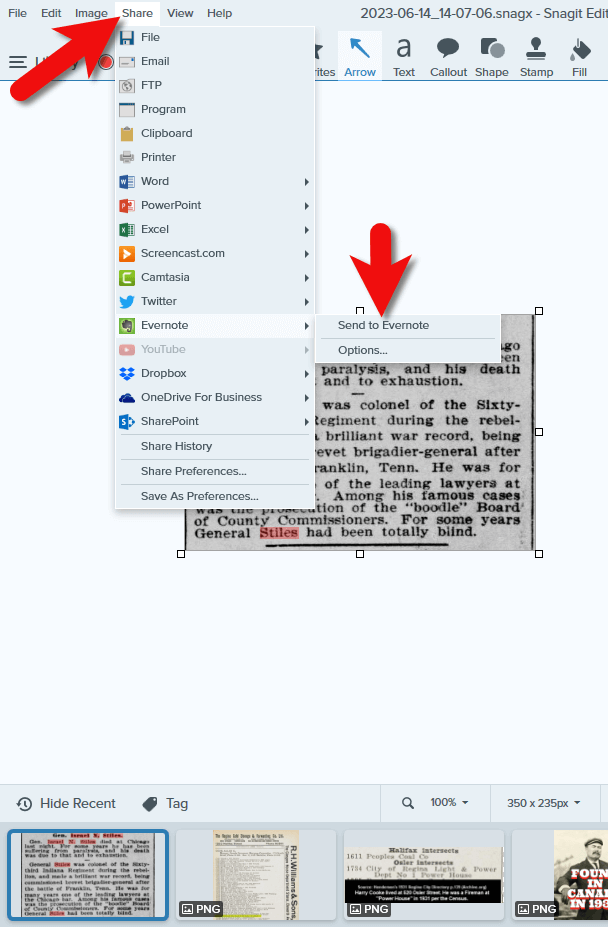
Snagit: Easy. You can export your clippings in countless ways. Pretty much all major file types are supported. You can easily add content directly to a large number of popular programs such as Word, PowerPoint and even Evernote! So, if you’re writing a family history story or book and you want to clip something on the web and include it, Snagit can send it right to your document with just a click.
Conclusion: If you need to be able to easily get web clippings and captured content out of the program and use it in other ways, use Snagit. If you want to keep your clippings and notes all in one place and be able to keep them organized and find them easily, use Evernote.
Sharing Content
When it comes to sharing content with other researchers or your family, both Evernote and Snagit do a great job in their own way.
Evernote: Each note has a convenient Share button that allows you to invite other people to view just that note. It also gives you a unique link to the note that can be shared. And you can email notes. You can also put a group of notes into a notebook and then share the entire notebook. You can control whether the person being shared with can just view the notes or if they can edit them. So, it does facilitate collaboration by allowing you both to edit the same note. That permission can also be turned off. That all being said, Evernote is really a tool for you, and it’s not focused on sharing as a priority, or on sharing in order to be able to publish the content in many other ways.
Snagit: With Snagit, if you want to share with someone else to collaborate, you’ll need to send it to them, either by email or shared cloud storage. They can then edit the item in their Snagit software and send it back. So, it doesn’t offer the ability to collaborate quite as easily as Evernote. However, Snagit’s sharing and publishing capability is one of its greatest strengths and priorities. Just click Share in the menu and you’ll have the ability to save the content as a file to your computer, email it to someone, upload it to your own website, your printer, a wide range of software programs and cloud storage services, and yes, even to Evernote!
Click Share in Snagit’s menu
Conclusion: If you want to share with other people, both tools can do the job, although Evernote inches ahead because it facilitates both people being able to edit the same note within Evernote. If you want to share your content for use in other programs and publish it in other ways, Snagit is the best choice.
Evernote vs. Snagit Conclusions
After a head-to-head comparison, we’ve discovered that your selection between these two tools depends on your task and your goals:
Use Evernote if you want to be able to:
keep all your work in one place organized and searchable
create a wide variety of notes such as audio, video, web clippings, PDFs, typed notes, etc.
have OCR automatically applied to web clippings and images
collaborate with other people on your notes
easily create notes on mobile
Use Snagit if you want to:
create high-quality web clippings and videos in universally usable file formats that are exportable
create web-clippings of hard to capture content like wide screen family trees, and information that appears further down a web page that you can’t see all on the screen at the same time
be able manipulate your content with annotations or drop it into project templates
easily export your captured content into a variety of other programs
not have to pay an ongoing subscription.
Another way of looking at it is that Evernote is more of a final destination for content you’re collecting, and Snagit is a content collector that makes it easy to use that content wherever you need it.
Conclusion
If you want to have one place to store and use a wide variety of notes including web clippings, Evernote is the best choice. If you want full flexibility in capturing and creating online content and using it in other programs and projects, Snagit is the best choice. I like to use them in combination. I keep my genealogy and other notes organized in Evernote, and then I use Snagit to capture web content exactly the way I want it and send it into Evernote as needed. And I use both programs for a whole lot more than just genealogy! I clip recipes, projects and ideas, and I use Snagit for all the images I create for Genealogy Gems.
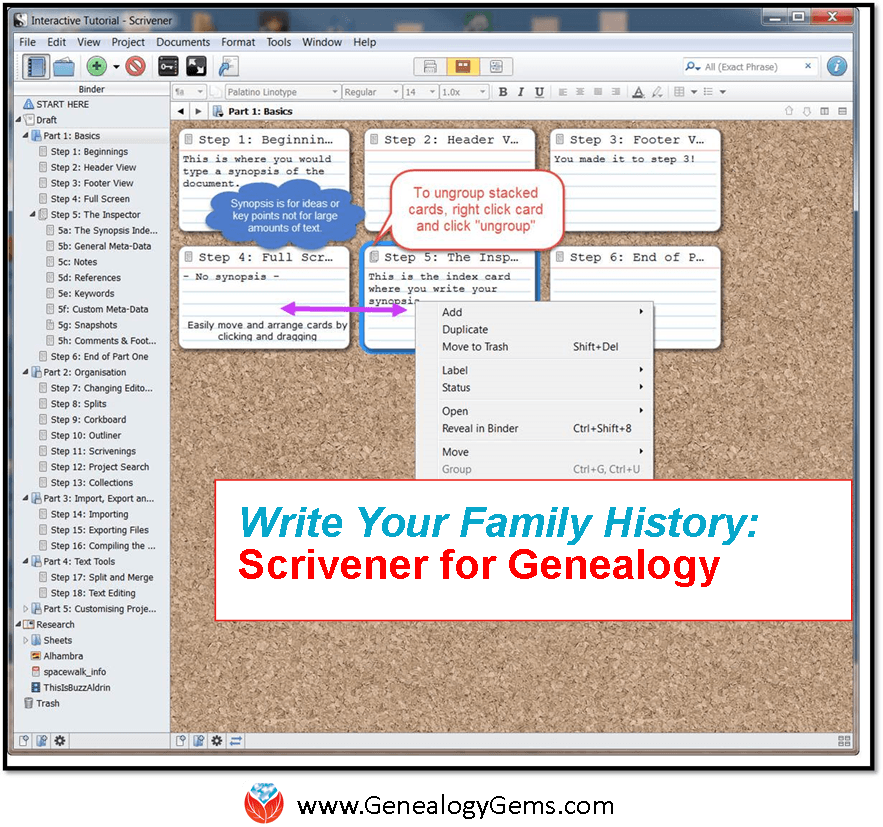
Scrivener software may be just what you need to write up your family history writing. Genealogist Lisa Alzo shares 4 steps for getting started.
What is the Scrivener Software Program?
Scrivener is a software program that offers templates for screenplays, fiction, and non-fiction manuscripts. After composing a text, you can export it for final formatting to a standard word processor or desktop publishing software.
Scrivener is much more than a word processor. Thanks to the wide range of interfaces and features it offers, it is valued as a project management tool for writers.
It’s little wonder that Scrivener has grown in popularity with family historians who want to tell their ancestors’ stories. Genealogical information can become unwieldy at times. Scrivener makes it much easier to organize your material and write.
At RootsTech 2016, Lisa Alzo introduced Scrivener to fascinated audiences in the Genealogy Gems demo theater in the Exhibit Hall. I invited her to follow up by sharing Scrivener for genealogy with you, too. Here’s what she has to say.
“It is no secret that I am an avid user of Scrivener, a multifaceted word processor and project management tool. I have been using this program for all of my personal and professional writing projects since 2011.
Here are four steps to get up and running with Scrivener so you can use it to organize and write your family history:
1. Download Scrivener
Scrivener is produced by Literature and Latte and is available for purchase for use on Mac ($45) and Windows ($40). (Pricing as of the writing of this article.) There is also a 30-day free trial available.
Double click the Scrivener “S” icon on your desktop to open the program.
Before you start your first project, take a few minutes to review the Scrivener manual for your and watch the helpful interactive tutorials.
2. Start your first project
Go to File and New Project.
The New Window allows you to choose from different project templates.
I highly recommend starting with the “Blank,” which is the most basic and creates a simple project layout you can build upon and customize later.
The “Save As” box appears for you to give your project a name (e.g. Alzo Family History) and tell Scrivener where you would like to save your project (e.g. a desktop folder, or you if you are a Dropbox user you can easily save your projects there so that you can easily access them from another computer or laptop). You will not be able to continue until you save your project.
TIP:Start small!
Begin with a smaller project like an ancestor profile or blog post rather than attempting to write a 200-page family history book your first time in.
3. Plot, plan, and outline away!
Whether you are a visual writer who likes to storyboard, or if you prefer text outlines, you can use Scrivener your way. When you start a new blank project, you will be see the “Binder” (located on the left-hand side), which is the source list showing all documents in the project.
By default you’ll see three folders:
The “Draft” board (called “Manuscript” in other Scrivener templates) is the main space where you type your text (you can compile everything in that folder for printing or export as one long document later on).
The Research folder is where you can store notes, PDF files, images, etc. (not included in your final compiled document). The Trash folder holds any deleted documents until you empty. You will have one Untitled Document showing.
Simply add a title and then start typing. You can move sections around by dragging and dropping.
Click the green plus sign (+) icon to add files or folders.
Scrivener also lets you import files that you already have prepared in Microsoft Word or text based formats.
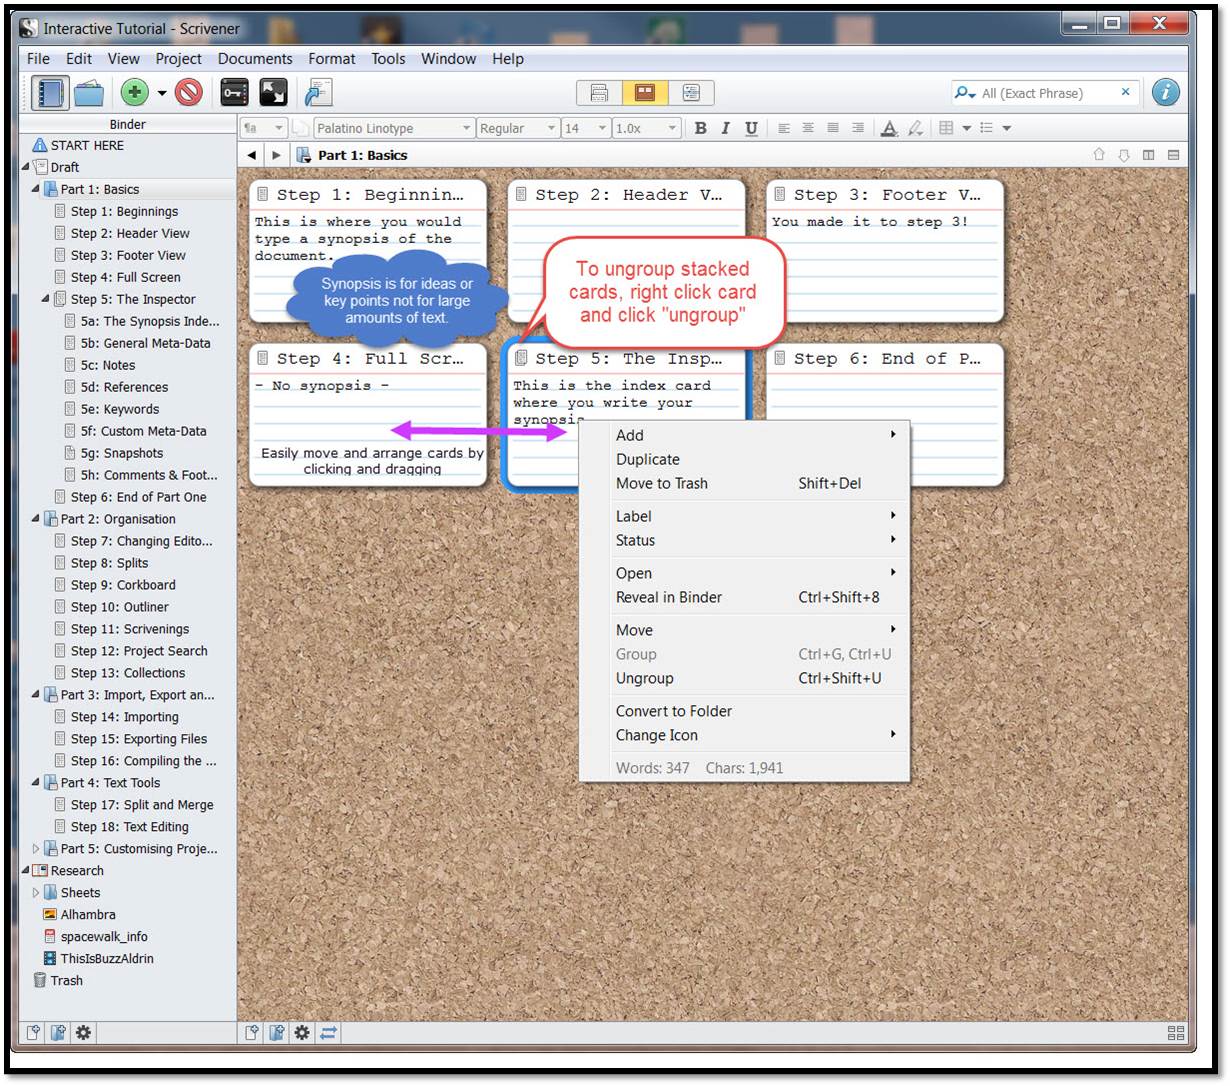
As you work, Scrivener allow to easily “toggle” between its key modes:
Corkboard (where you can summarize on “virtual index cards” the key points you want to cover—the virtual cards can easily be arranged in any order you like);
Outline (use it if you prefer to control the structure of your work; and
Scrivenings (this mode temporarily combines individual documents into a single text, allowing you to view some or all documents in a folder as though they were all part of one long text).
There is another pane called the “Inspector” that offers additional features to help you manage your project.
4. Finalize your project
The true power of Scrivener resides in its “Compile” feature. (Compile is just a fancy term for exporting your project into any number of final formats—print, eBook, Kindle, PDF, etc.). With Compile you specify what Scrivener does/does not include, and how it should look. Mastering Compile takes some practice, so you should refer to the Scrivener tutorials and forums for guidance.
Researching your Scots-Irish genealogy is easier if you can identify your ancestors as Scots-Irish! The Scots-Irish put down early roots in Virginia, the Carolinas, and the Appalachian “backcountry” and would likely have come from Northern Ireland or Scotland. Read...

 Findmypast’s enormous genealogy collections focus on the countries of England, Scotland, Ireland, and Wales. Findmypast and The British Library have been working together for several years on The British Newspaper Archive, now home to more than 22.5 million newspaper pages dating from the 1700s. But what many people might not realize is that these same newspaper pages are also available to Findmypast subscribers.
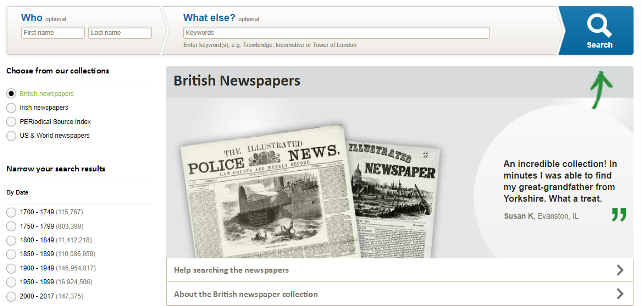

 TIP: If you are interested in accessing British newspapers, but not needing the full range of genealogy resources offered at Findmypast, consider purchasing PayAsYouGo credits from Findmypast. You can purchase 60-900 at a time and “spend” them to view individual search results, including newspapers. You can also subscribe separately to The British Newspaper Archive.
 Genealogy Gems is your home for ongoing coverage and insight into the four ‘genealogy giants’ websites. Click here to learn more and to watch the RootsTech 2017 world premiere of my popular lecture that puts these big sites head-to-head. Genealogy Gems has published my ultimate quick reference guide, “Genealogy Giants: Comparing the 4 Major Websites.” It distills that hour-long lecture (and I was talking fast!) into a concise, easy-to-read format that will help you know which websites are best for you to use right now.
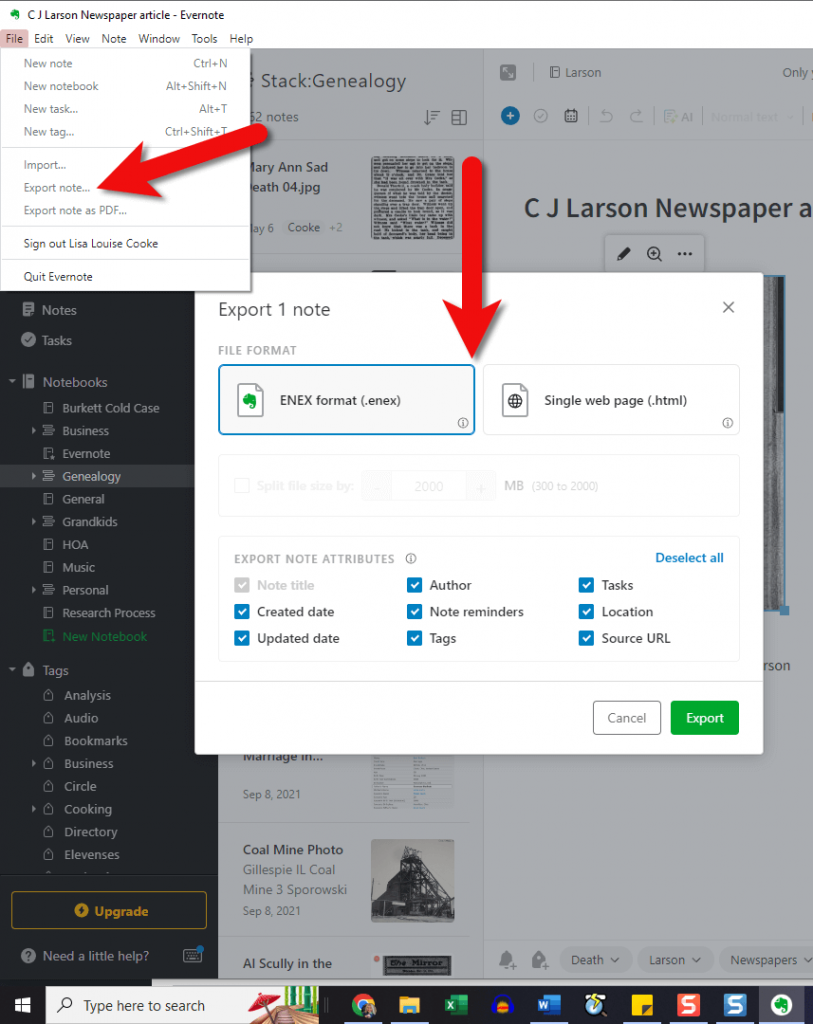

 By default you’ll see three folders: