How to Edit Home Movies

Show Notes: Getting your old home movies into shape so that they can be easily enjoyed by audiences today can seem daunting, but it doesn’t have to be. With the right video editing tool and  a little bit of know-how you can turn digitized home movies into family history fare for all your relations. It’s time to get your home movies out of the closet and onto a screen near you. 


how to edit old home movies

Video and show notes

In this video, I’ll show you how to edit digitized home movies in my favorite video editing software program, Get Camtasia and / or Snagit with our affiliate link and get 10% off for a limited time. (thanks for supporting our free content!) )

If you already have another program, you can still follow along and learn best practices for great edited home movies that are easy to share and enjoyable to watch. 

Don’t have old home movies? You can also use Camtasia to create videos using static images and photos.  

Discounts:

Larsen Digital: I got my family video (and audio) tapes digitized at Larsen Digital, a family-owned business that cares about family history. Click here to get 15% off on your Larsen Digital order when you use our exclusive coupon code GenGem.

Camtasia: Get Camtasia  with our affiliate link and get 10% off for a limited time. (thanks for supporting our free content!) . (Note: Maintenance and asset add-ons are optional and can be opted out of if desired during checkout. Discount applies to Snagit as well! )

Watch the video How to Edit Home Movies:

Show Notes

Have you gotten some of your old home movies digitized, only to have them just sit on your computer. It’s it can happen really easily. It’s certainly happened to me. And in this video, what I’m going to do is show you how easy it is to edit your old home movies yourself, so that you can get them cleaned up and ready to share with your family.

I had a ton of movies that I got digitized a couple of years ago, and they just sat on my computer. Now, all I can say is I’ve been busy making videos for this channel. I guess that’s my excuse for not getting around to them.

Larsen Digital Exclusive Discount on Digitization

Recently, I found another batch of videotapes. I found VHS, High 8, and I even had an audio tape that needed to get digitized. So, I sent it off to my favorite place, Larsen Digital, a family-owned business that cares about family history. Click here to get 15% off on your Larsen Digital order when you use our exclusive coupon code GenGem.

Larson has done an amazing job getting my tapes digitized in the past. They send them back quickly, and you get them on DVD as well as mp4. Larsen Digital is graciously offering all of us a great discount on digitization. If you haven’t gotten your tapes done yet, they will take care of it for you.

When you get those mp4 videos back, they can be fairly large files. That’s because some of those VHS tapes can be six hours long. Therefore, we need to do some editing. If we don’t, they’re going to be really unwatchable. Typically, we have lots of stops and starts and fingers in front of cameras and blank spots on our videos. On our tapes we had lots of chunks where we had filmed TV shows. Then we started filming home movies again! So, home movie videos typically need to be cleaned up because our relatives are not going to want to sit around and watch six hours of random, chaotic stuff.

As family historians it is our job to edit the video into something watchable and enjoyable. The good news is these days it’s not a hard job thanks to the great tools that are available. I’m going to explain how I use my favorite video editing tool called Camtasia. In the video, I’ll show you how easy this is to do. I think if you see it, you will feel like this is something you can do. I really enjoyed editing my own films.

Camtasia Software Discount 

Use this link to Camtasia and get 20% off now through 8/26/22. After that you can use our exclusive coupon code for 15% off: Gene15 (works on Snagit too!)

Camtasia is definitely a terrific product and easy to use. I use it to create my Genealogy Gems videos, and I also use it for home movies and all kinds of other projects. If you have your own video editing tool already and maybe you just haven’t gotten started working on your home movies, I think you’re still in the right spot because I’m going to show you how quick and easy it can be to get these tapes cleaned up and made usable. If you don’t happen to have home movies, you might still want to keep watching because Camtasia does a terrific job taking photographs, images, other pieces of content you can add narration and music and all kinds of stuff making your own version of home movies.

Step 1: How to Import video files into Camtasia

In Camtasia you will see the media bin, I’m going to import my media which is my mp4 video file.

You can see on the left side that there are lots of different things we can do. We’re going to touch on the most important for you for editing your home movies. Whatever you have selected, that’s what shows in this column just to the right of the menu. Make sure you’re in Media. (You can also import media through the menu at the top of the screen.) Click the Import Media button and navigate to your video file on your computer and open it. This will bring it into the Media bin.

Step 2: How to Select the Correct Project Size in Camtasia

The second step is to select your project size based on what it is you want to do. It’s really important to think about what is going to be the final purpose of the video. Do you want to be able to Airplay this up onto your TV screen on a big screen and be able to see it? If so, then you’re going to need a pretty high-resolution (large) file. Or are you really interested in getting lots of fun clips that you can share out on social media? If that’s the case, you don’t need as big of a file to be able to have it viewed on a mobile device or on the web.

Camtasia makes it super easy for you to find the right project size. At the top, click the down arrow next to the percentage number (called Canvas Options) and select Project Settings. Here you can see the current project size. What we want to do is pick from the standardized dimensions for the product (output) that we need. Here are some examples:

  • Social media: 1280 by 720 px. That’s a very standard size that would look great on anybody’s tablet or phone.
  • Full size computer screen or TV: 1920 by 1080 px (HD). That’s a very standard format

You probably don’t have 4k home movies. If you sent your tapes to a very specialized company, they might have the ability to give you 4k output. But it’s really overkill for what you’re trying to do. Typically, the 1080 HD is going to be what you want.

When you click to select the size, it is populated in width and the height. Click Apply. Now you have that exact project size. I think probably one of the biggest mistakes I made early on in my editing career was not checking project size as the first step.

Step 3: Drop the Video onto the Timeline

Next, we’re going to bring the whole movie onto the timeline where can then edit it.

When we hover our mouse over the video in the media bin, we can see all the different shots (this is called scrubbing,) When you start to drag the video out of the bin blue lines appear around the screen areas where the video can be place: the video canvas at the top of the screen and the Timeline at the bottom of the screen where the editing actually is done.

If when you drag the video into your project it looks smaller than the canvas, that means the film is a lower resolution (size) than the project size you selected. You don’t want to get too far apart in those two things. If I had a very small film (low quality) I might want to think about making my project size a little smaller because I don’t want it to look blurry when it’s done. Typically, I think you’ll find that your video file will be a standard size and will fit pretty nicely.

Using Multiple Tracks in Camtasia

I usually drop video directly onto the timeline. The reason is because usually I’ll end up adding stuff additional content to the timeline, and that’s where tracks come into play.

Your project will have two tracks at first. However, you can add many more by clicking the plus sign. Each track gives me the ability to have a piece of content on there. So, I might have my home movie on track one, narration audio on track two, annotations (text) on track three, etc. Each track gives me the chance to have different pieces of content so that I can edit them without cutting up the other items. It’s really convenient having each item on its own track.

Moving Content on a Track

You can easily move your video around on the timeline to position it exactly where you want it. Click on the content (in this case the home movie file) and drag it to the desired location. You’ll see that Camtasia will sort of allow you to “snap” items into the best position. For example, pushing the video up to the beginning of the timeline  (the zero mark).

Editing a Video in Camtasia

How do you know where you’re going to be editing? Well, that’s where the playhead comes into play. The playhead is the marker on the timeline that shows us where we are at any point in the video. You can drag the playhead across the video – called scrubbing – to review it.  

If you want to see your entire video on the timeline, you will likely need to zoom out. Click the minus sign to zoom out, and the plus sign to zoom in. Keep clicking until you can see the entire bar of video. Hover your mouse on the video and you can see how long it is. My video is 32 minutes, and seven seconds. So, this is the whole film that I’m going to work on. As we do our editing, we’re going to want to be zoomed in because we want to be really precise with our cuts and clean up.

Initial Types of Editing

So, what kind of editing would you be doing? Well, first and foremost, I like to go through and just clean up stuff that I don’t want things like blank spots, damaged footage, and mistakes in filming. As you scrub through the video look for these areas.  

Clean-up makes watching home movies much easier on the viewer. Everything comes back to the experience of the viewer that you want to share your videos with. If you want to share home movies with your family, you got to make them easy to watch, right? We want to make them enjoyable. We don’t want them getting seasick or bored. That way when they watch the finished films, they’re going to really enjoy them. And they’re going to want to see more and talk about family history.

Scrub very slowly until you see something you don’t want. Zoom in a little bit more if necessary to see exactly where you want to make your cut. On the playhead grab the red handle and drag it. Then drag the green handle. This identifies the area you want to cut. Press play and the grey playhead will jump to the beginning of the section you marked and play it for you so you can make sure it’s what you want to cut. Review and adjust the handles as needed.

To cut the section, click the Cut button with the scissors icon. (Control X) Review the section one more time to ensure you like the cut. You will see a stitch mark where you made you cut.

These small cuts may not seem like much, but when you do this throughout a 32-minute film, you may end up with a 20-minute film that’s much more watchable.

Adding Transitions to Video in Camtasia

One of the other things that you might want to do to make your video even more watchable is to create some transitions between scenes or clips. To do this, bring the playhead back to the stitch mark where you made your cut, and zoom in to make sure you’re right on top of it.  Click the video to select it so that Camtasia knows this is the content you are working on. In the menu on the left, click to select Transitions.

There are many to choose from, however most people don’t really enjoy watching lots of wild crazy transitions. It can actually make them feel seasick. It’s better to go with something simpler and smoother. The whole point is to make it enjoyable and watchable for your family members. I really like Fade, and Fade to black. You can add these to your Favorites bin by clicking the Star. That will save you time, so you don’t have to dig through all of the Transitions every time.

  • Use Fade when cutting within the same scene or clip.
  • Use Fade to black when cutting between two different scenes or clips.

Place the playhead on the stitched cut, and then click the Split button. Now you can drag the transition onto that spot on the timeline. Camtasia will create a standard-length transition, but you can adjust it by dragging the transition. Move the playhead to a spot just before the transition and press play (or tap your keyboard’s space bar) to review it.

You can change the transition by dragging and dropping a different transition onto it. It will turn red indicating that you are changing it.

Camtasia Undo / Redo

You can undo or Redo in the menu at the top of the screen under Edit.

How to Create a Video Clip

If your film is a hodge-podge of different scenes or a mix of TV shows and home movies (like some of my VHS tapes were) then you’ll want to create clips of just the sections you want so that you can use them in another project. It’s easy to Produce / Export clips from your full-length video without creating a new project.

How to create a clip:

  1. Zoom in on the desired area
  2. Drag the green and red playhead handles to identify the desired clip.
  3. Right-click on the area and select Produce As
  4. This brings up the Camtasia production wizard. Select the desired production size. In other words, you can export the clip at any resolution you choose. It doesn’t have to be the same as your project size that you selected when you started.
  5. Name the clip and save it to the desired location on your computer hard drive.
  6. Click The clip will display on your screen when it’s done.

Additional Content that can be Added to Your Home Movies

Music and Audio files

You can import audio files such as MP3 and WAV into your media bin and then drop them onto a new track in your project. These files can be edited much like you edit video. You can get free music MP3 files from YouTube. Sign in with a free YouTube (Google) account, click on your account icon in the upper right corner of the screen and select YouTube Studio. In the studio, scroll down the menu on the left side of the screen and select Audio Library. Here you can search for and download music tracks.

Voice Narration

If you have a microphone hooked up to your computer you can narrate all or just sections of your home movie. This is a great feature particularly when working with older silent home movies. Select Voice Narration from the menu on the left, and then click the Start Voice Recording button. The recorded narration will appear on a new track on the timeline. You can even write your script and then copy and paste it into the Voice Narration tool.

Annotations

Annotations are a great way to provide more information about what the viewer is watching. For example, you can add text boxes to the video. Choose from a wide range of annotations. Drag and drop the annotation on the timeline. Drag the edges of the annotation to make it the desired length. Click on it to select it and then you move it anywhere on the timeline. When selected, you will see the annotation Properties on the right side of the screen which allow you to customize it. (Font, color, line thickness, etc.)

Our final step here is going to be to export this video. Now, clearly, I haven’t finished on my editing, I’m going to finish up my editing and we’ll come back and we will export the video as a finished cleaned-up film.

Step 4: Save and Export (Produce) a Video in Camtasia

After my initial clean up my 32-minute video is now 19 minutes and four seconds. I’ve saved my family from 12 minutes of video that just wasn’t worth watching and might have gotten them discouraged about watching home movies.

Now it’s time to save your work. In the menu go to File > Save As. Hopefully, you have already created a folder on your computer where you know you’re going to keep your project and all your content. That way, you can work on it again later if you want to make more changes or export more clips.

Next, we’re going to produce the actual edited film. Another way to say it is that we are going to export the edited video. In the menu go to Export and then select where you want to send your video. You can upload directly to locations such as Vimeo or YouTube or Google Drive. If you want to export to your computer select Local File. You will again get the wizard. The wizard is going to remember the last export you did, so be careful to review that and change it if desired. Select MP4 and then click Next and select the folder on your computer and click Finish.  Depending on the size of your video, it may take several minutes to render.

Edit Your Home Movies: Wrap Up

I hope that helps you feel empowered to get started editing your home movies. It’s really worth doing and it doesn’t have to be that time-consuming. The trick is to just set aside a little bit of time every week and start doing it right away because they’re not doing anybody any good sitting on your computer where they can’t be seen. Let’s get him out in front of our family and share that family history.

Resources

Downloadable ad-free Show Notes handout for Premium Members


The 1950 Census for Genealogy

Countdown to the 1950 Census – Show Notes

The census is the backbone of genealogical research. Here in the United States it gives us a cohesive look at our ancestors every 10 years between 1790 and 1940. And now there is a new census on the horizon!
 
The 1950 census is an exciting one because it may include your great grandparents, grandparents, parents and perhaps even you! It will provide opportunities to confirm some of what we already know and clues for new research.
 
This week brings us to the one year mark before the release of the 1950 census in April 2022. Now is the perfect time to familiarize ourselves with it and start preparing. In this free webinar on the Genealogy Gems YouTube channel we’re going to do just that! In Elevenses with Lisa episode 51 you will learn:
  • the interesting and little known stories behind the 1950 census,
  • what it can reveal about your family, (and who you will NOT find!)
  • the important documents associated with it that you can access right now!

Get the HD version by clicking the gear icon in the video player. 

1950 Census Show Notes Cheat Sheet

Premium Members have access to the ad-free downloadable show notes cheat sheet in the Resources section at the bottom of the page. Click here to become a Premium Member.

What You Can Learn About Your Family from the 1950 Census

The 1950 Census may be able to answer all kinds of questions for you such as:

  • Where was your family living in 1950?
  • Did you have American relatives living abroad?
  • What did your relatives do for a living?
  • What was their household income in 1949?

The 1950 census also stands out because it ushered in some new features and data collection improvements with the goal of providing more complete and accurate information than ever before.

This census can help you confirm information you already have about your family while also providing new facts and clues for further genealogical research.

So, let’s dig into the 1950 US census. Oh wait…we better hold our horses! The 1950 census isn’t available yet!

When will the 1950 census be released?

The official census day in 1950 was April 1. So as of April 2021 we are one year away from the release of the 1950 Census. However, it’s never too soon to get acquainted with this important genealogical record. There’s a lot we can do to get ready to research when it’s released by the National Archives in April 2022. That will be 72 years after the official 1950 census day.
1950 census release date

So why don’t we get to see the 1950 census until 72 years have passed?

The “72-Year Rule” became law in 1978 (92 Stat. 915; Public Law 95-416; October 5, 1978). It restricts access to decennial census records to only the person named on the record or their legal heir.

Why is there a “72-Year Rule” for the Census?

It’s long been believed that the rule was based on the average life-expectancy at the time. However, that may not be the case at all. Letters at the National Archives dating back to 1952 from the census bureau director and the archivist of the U.S. support the rule, but don’t say what it’s based on. Joel Weintraub’s essay Why the 72 Year Rule for U.S. Census Privacy?  proposes that the rule evolved  for a variety of reasons when the National Archives was first created.

The bottom line: For now, we have to wait until 2022 for the 1950 U.S. Federal Census.

Who was counted during the 1950 census?

In addition to Americans living here in the States, for the first time Americans abroad were enumerated in 1950. This included:

  • members of the armed forces,
  • crews on vessels at sea,
  • and employees of the United States government and their families living in foreign countries.
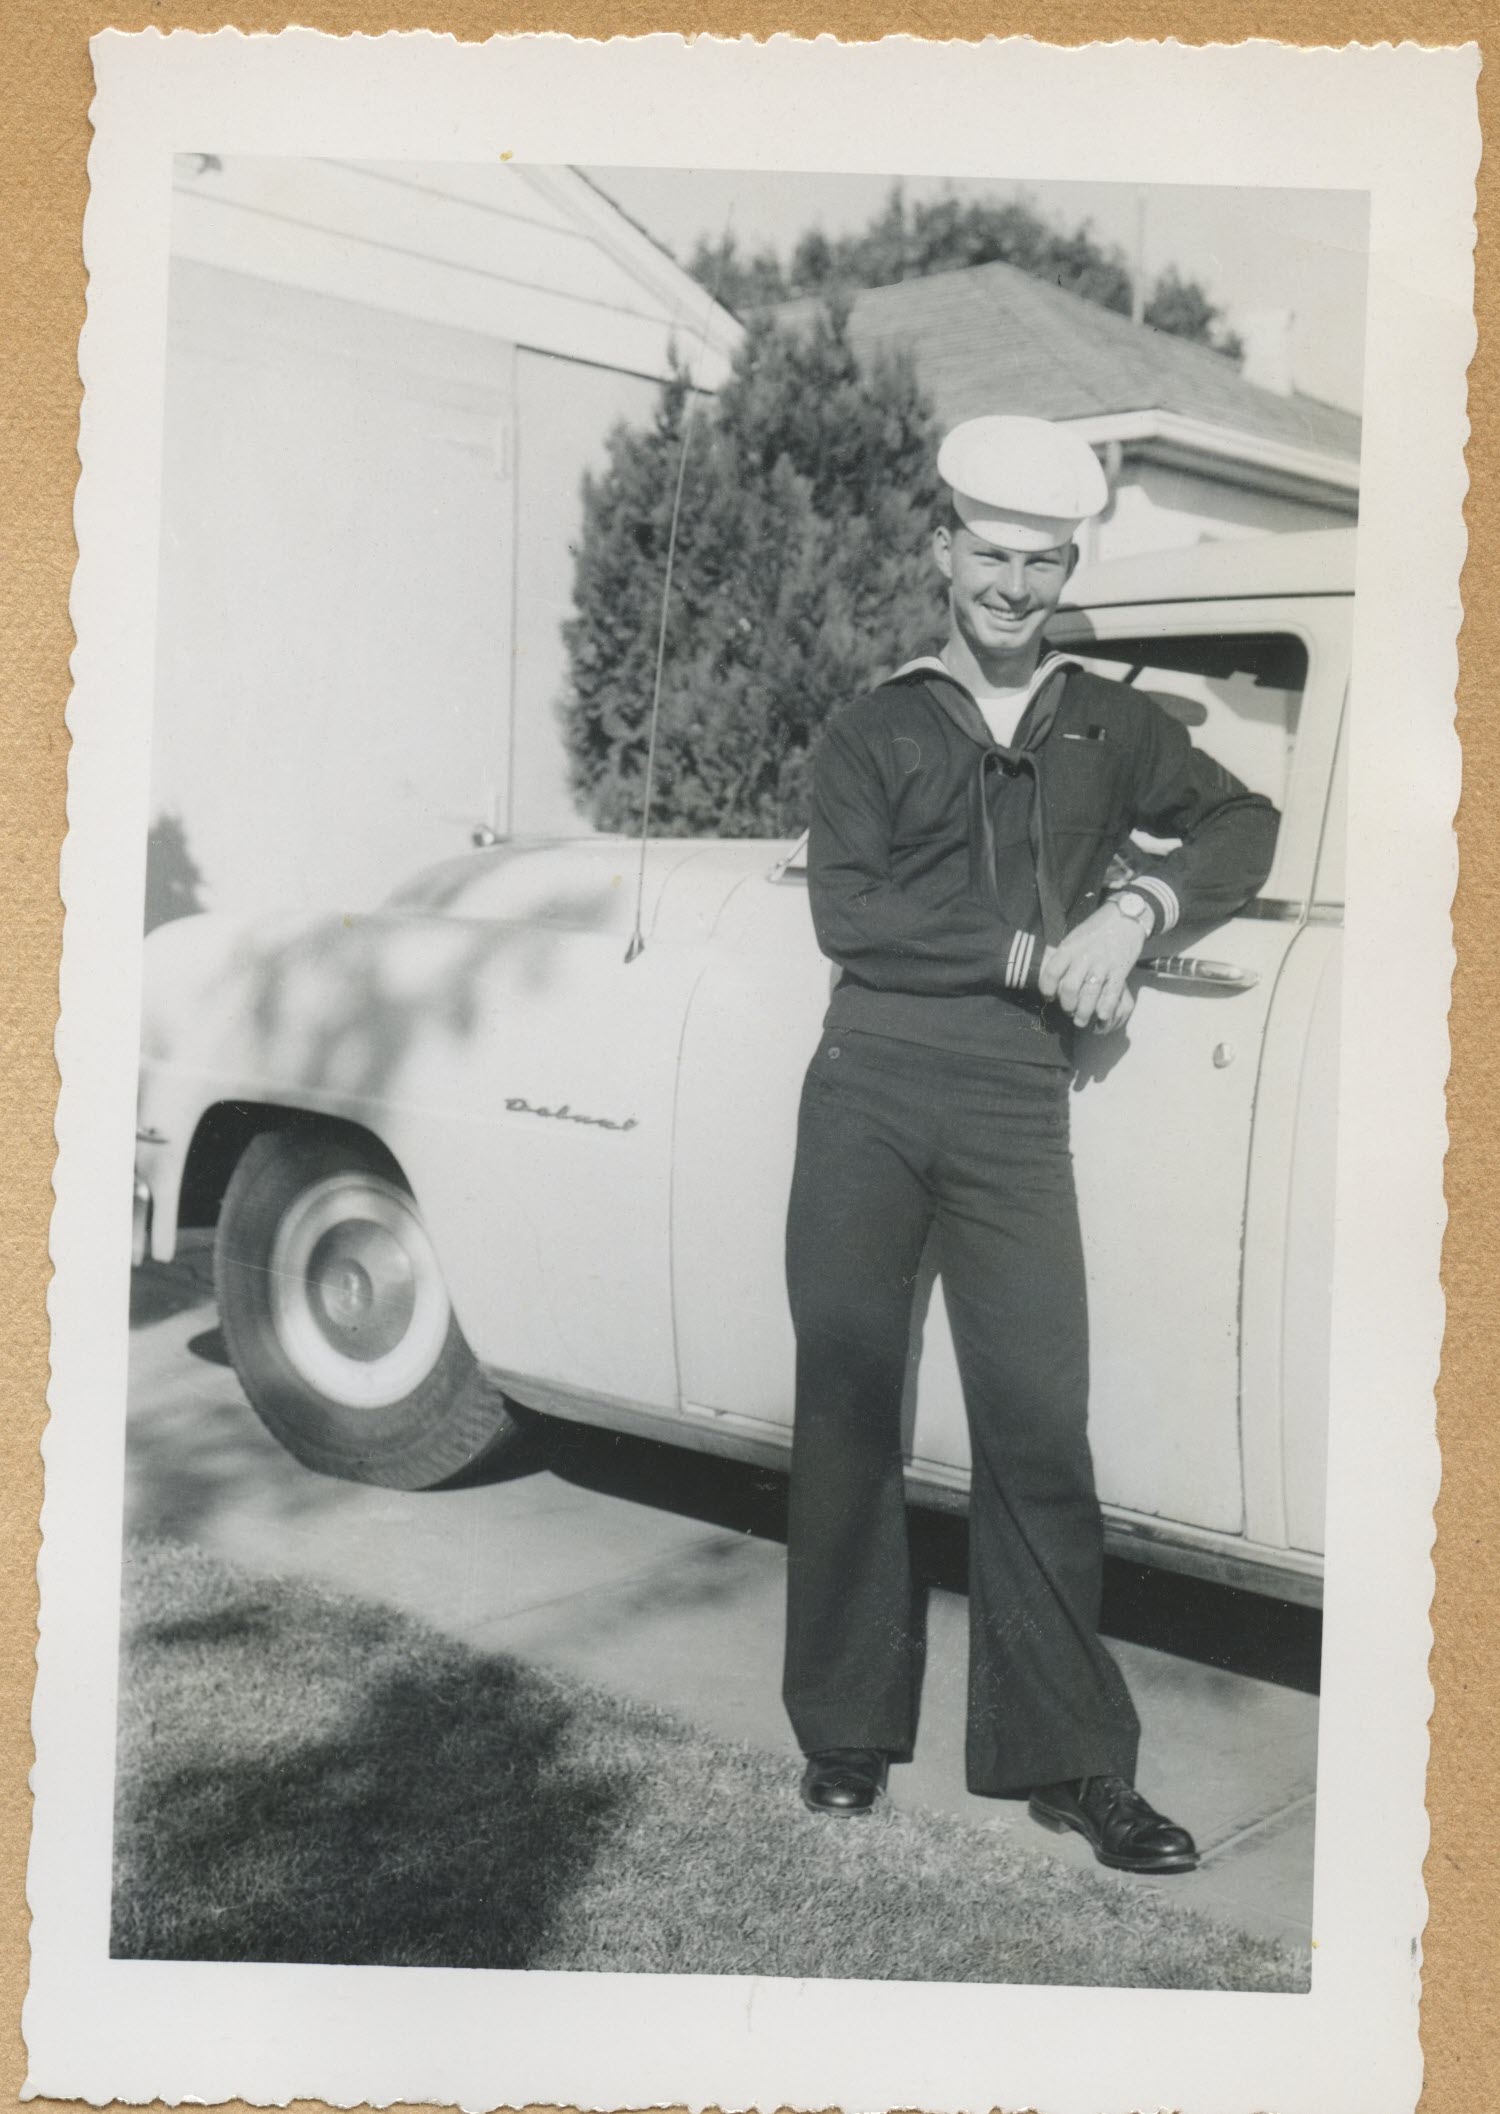
Sailors and soldiers serving overseas were counted in the 1950 census

Sailors and soldiers serving overseas were counted in the 1950 census.

Be aware that there were other people living abroad at that time who didn’t fall within these official categories. In those cases, they were to be  reported by their families or even neighbors who lived in the U.S. This was clearly second-hand information which means that the information wasn’t as reliable. In fact, so much so that these individuals weren’t included in the published statistics. Keep this possibility in mind if you have trouble locating a relative when the census comes out.

What Questions Were Asked in the 1950 Census?

The 1950 population census questionnaire asked for information such as:

  • Address;
  • whether their house was on a farm;
  • name;
  • relationship to the head of the household;
  • race;
  • sex;
  • age;
  • marital status;
  • birthplace if they were foreign born,
  • whether or not they were naturalized;
  • their employment status;
  • how many hours they worked in a week;
  • occupation,
  • industry,
  • and class of worker.

The information provided by your ancestors has the potential to lead you to more genealogical records.

Geographic Areas Covered in the 1950 Census

So where were all these people living? The 1950 census covered:

  • the continental United States,
  • the territories of Alaska and Hawaii,
  • American Samoa,
  • the Canal Zone,
  • Guam,
  • Puerto Rico,
  • the Virgin Islands of the United States,
  • and some of the smaller island territories.

1950 Census Enumerators

In 1950 the population of the United States was about ½ of the population today. But it still took a lot of people and organization to count 150 million people. The people doing the counting are called enumerators. These enumerators came from all walks of life and had to be trained so that everyone got counted with the fewest mistakes possible. A technical training program was developed to accomplish this goal. 26 chief instructors would teach a few hundred instructors to train 8300 crew leaders who would ultimately train over 140,000 census enumerators.
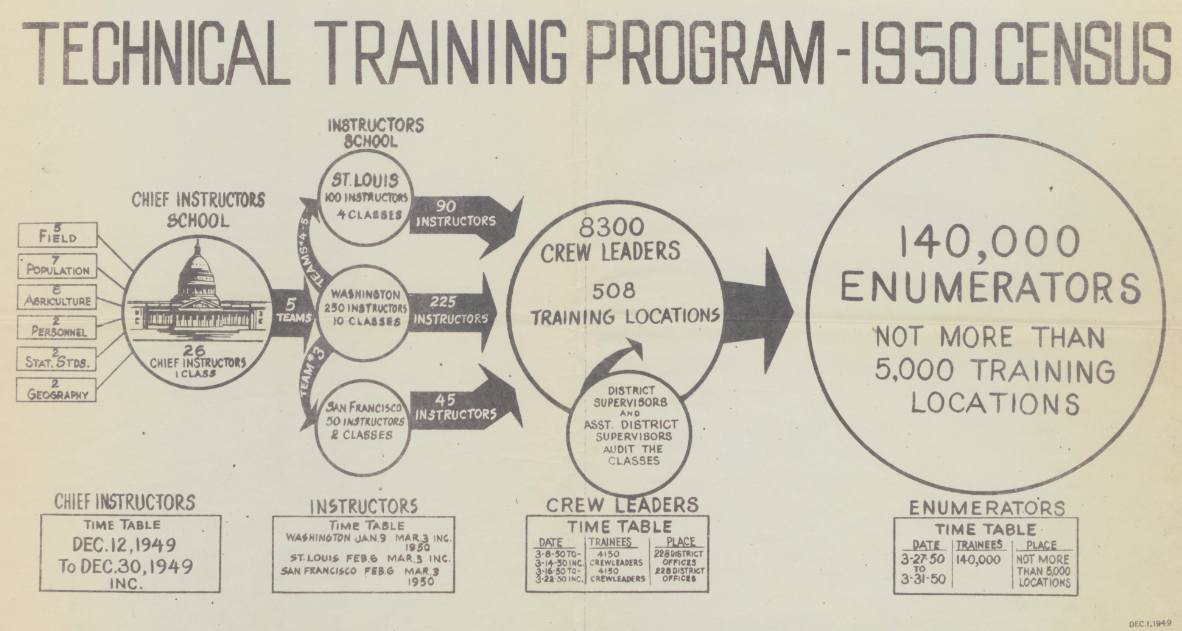
The 1950 census enumerator training program

The 1950 census enumerator training program. (Source: census.gov)

1950 Census Enumeration District Maps

You may be wondering ‘how did the enumerators know where to go to count people?’ The answer is Enumeration Districts or EDs.  The geographic area to be covered by the enumerator was divided up into Enumeration Districts. These ensured that enumerators were not crossing paths and duplicating efforts. EDs were just the right size so that the census taker could cover  the area in one census period, which was about 2-4 weeks.

Enumeration District maps were drawn for the 1950 census. These are important for your genealogy research because they:

  • describe your ancestors’ neighborhood in 1950
  • are essential for figuring out where to find your ancestor in the census.
  • don’t fall under the 72-year rule, which means that they are available now.

It takes time for the entire census to be indexed. If you want to start using it as soon as it’s released, you will need ED maps. You’ll need to know where your relatives lived so that you can find the address on the ED map. The map will provide you with the associated ED number. This number is needed to search the unindexed census. 

There are 8000 ED maps for the 1950 census that have been digitized. You can find them at the National Archives website in Record Group 29: in the series called Enumeration District and Related Maps 1880-1990.

An alternative place to find 1950 Enumeration District maps is the One-Step Webpages by Stephen P. Morse website. It’s not only an easier way to find the correct map, but it includes maps not found on the National Archives website. It’s also worth reading the essay on the website called Problems Using 1950 Enumeration District Maps. It will help you better understand how to use the maps.

Links to tools demonstrated:
Search 1950 ED Maps at One-Step.
Unified Census 1950 ED Finder search at One-Step.


1950 Census Enumerator Instructions

Up until 1870 the job of census taker fell to the U.S. Marshals. The U.S. Marshalls received very little in the way of instructions or training. It wasn’t until 1830 that they even got printed schedules to record the information given by each household! That all changed with an act of congress passed in 1879 that shifted the job to people specifically hired to be enumerators. This was just in time for the 1880 census.

By 1950, 140,000 census enumerators hit the field armed with their Enumeration District map showing them where to canvas, and a lengthy set of instructions that they received during their training. In fact, 1950 was the last time that the census was taken exclusively in person because in 1960 the Census Bureau started mailing out questionnaires.

The 1950 census enumerator instructions are available for free as a downloadable and searchable PDF file. It’s 24 pages of specific instructions designed to help enumerators record the information they gathered.

The enumerator instructions are important for you as a researcher because they explain what you’re seeing on the census page. If we see a mark or a notation, or a field left blank, the instructions will explain why the census did it that way. If we understand the why behind the information we find we will be much more likely to interpret it correctly.

An example of this can be found in the 1940 census. You’ve probably noticed X’s in circles scattered about the pages. On a map that could be misinterpreted as there’s buried treasure in that house! But alas, it doesn’t. Only the census enumerator instructions can help us really understand their true and important meaning. The 1940 census enumerator instructions state “Enter (X in a circle) after name of person furnishing information.” This helps us better determine the validity of the information provided for each individual in the household.

Who Was Not Counted in the 1950 Census?

The instructions for the 1950 census also includes a list of those people who were not to be enumerated, such as:

  • People temporarily visiting the household
  • Foreign citizens visiting embassies and similar facilities. Do enumerate foreigners who are studying or working here temporarily.
  • Students below college level who are boarding to attend school locally.
  • College students visiting but who live elsewhere to attend school.
  • People who eat with the family but don’t sleep there.
  • Domestic workers who don’t sleep in the household.
  • Household members who are currently an inmate in prison or other institution.
  • Ship crew members or people who live in lighthouses
  • Absent Soldiers and sailors

What are 1950 Census Infant Cards?

There’s also an entire page in the instructions devoted to explaining what Infant Cards were and the information they were to contain. If you have relatives who were born in January, February or March of 1950, they would have had a special Infant Card completed just for them. Learn more: Download the infant card PDF
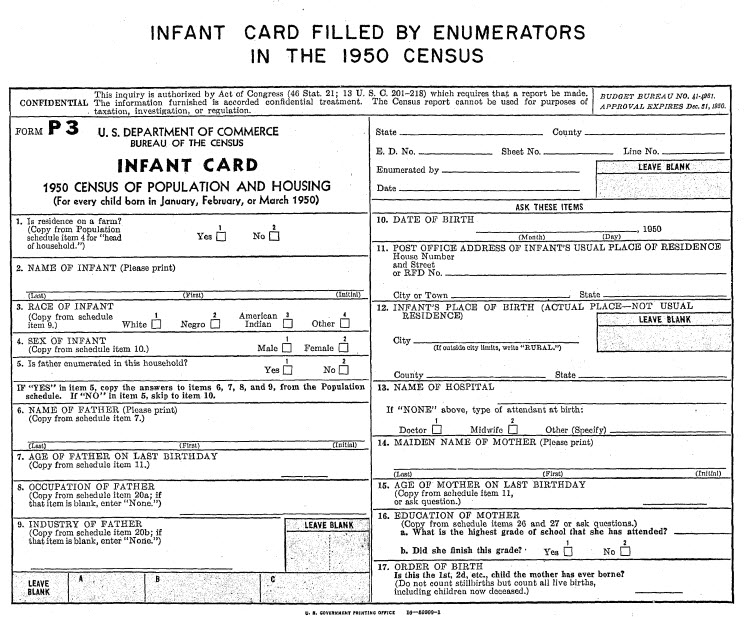
1950 census infant card.

1950 census infant card.

How Accurate is the 1950 US Census?

Several procedures were put in place in an effort to dramatically improve the accuracy and completeness of the 1950 census. These included:

  • improved enumerator training,
  • providing enumerators with detailed street maps of their assigned areas,
  • publishing “Missed Person” forms in local newspapers,
  • and setting aside specific days to conduct a special enumeration of people staying in hotels, motor courts, and other places frequented by transient people.

Also, in an effort to ensure greater accuracy and completeness, a post-enumeration survey was instituted for the first time. The Census Bureau recanvassed a sample of approximately 3,500 small areas and compared these to the original census listings. The goal was to identify households that might have been omitted in the original enumeration. They also took a sample of about 22,000 households and reinterviewed them to determine the number of people who might have been missed in the first count.

How Were Transient People Counted in the 1950 Census?

The challenge of counting people is that people can move around. This means they could be counted twice, or the genealogist’s nightmare: not counted at all!

The solution to counting transient people in the 1950 census was T-Night canvasses. The “T” stood for “transient” and they were held on Tuesday April 11 & Thursday April 13, 1950. They were designed to provide a more accurate count of people who did not have a fixed address or were temporarily away from home.
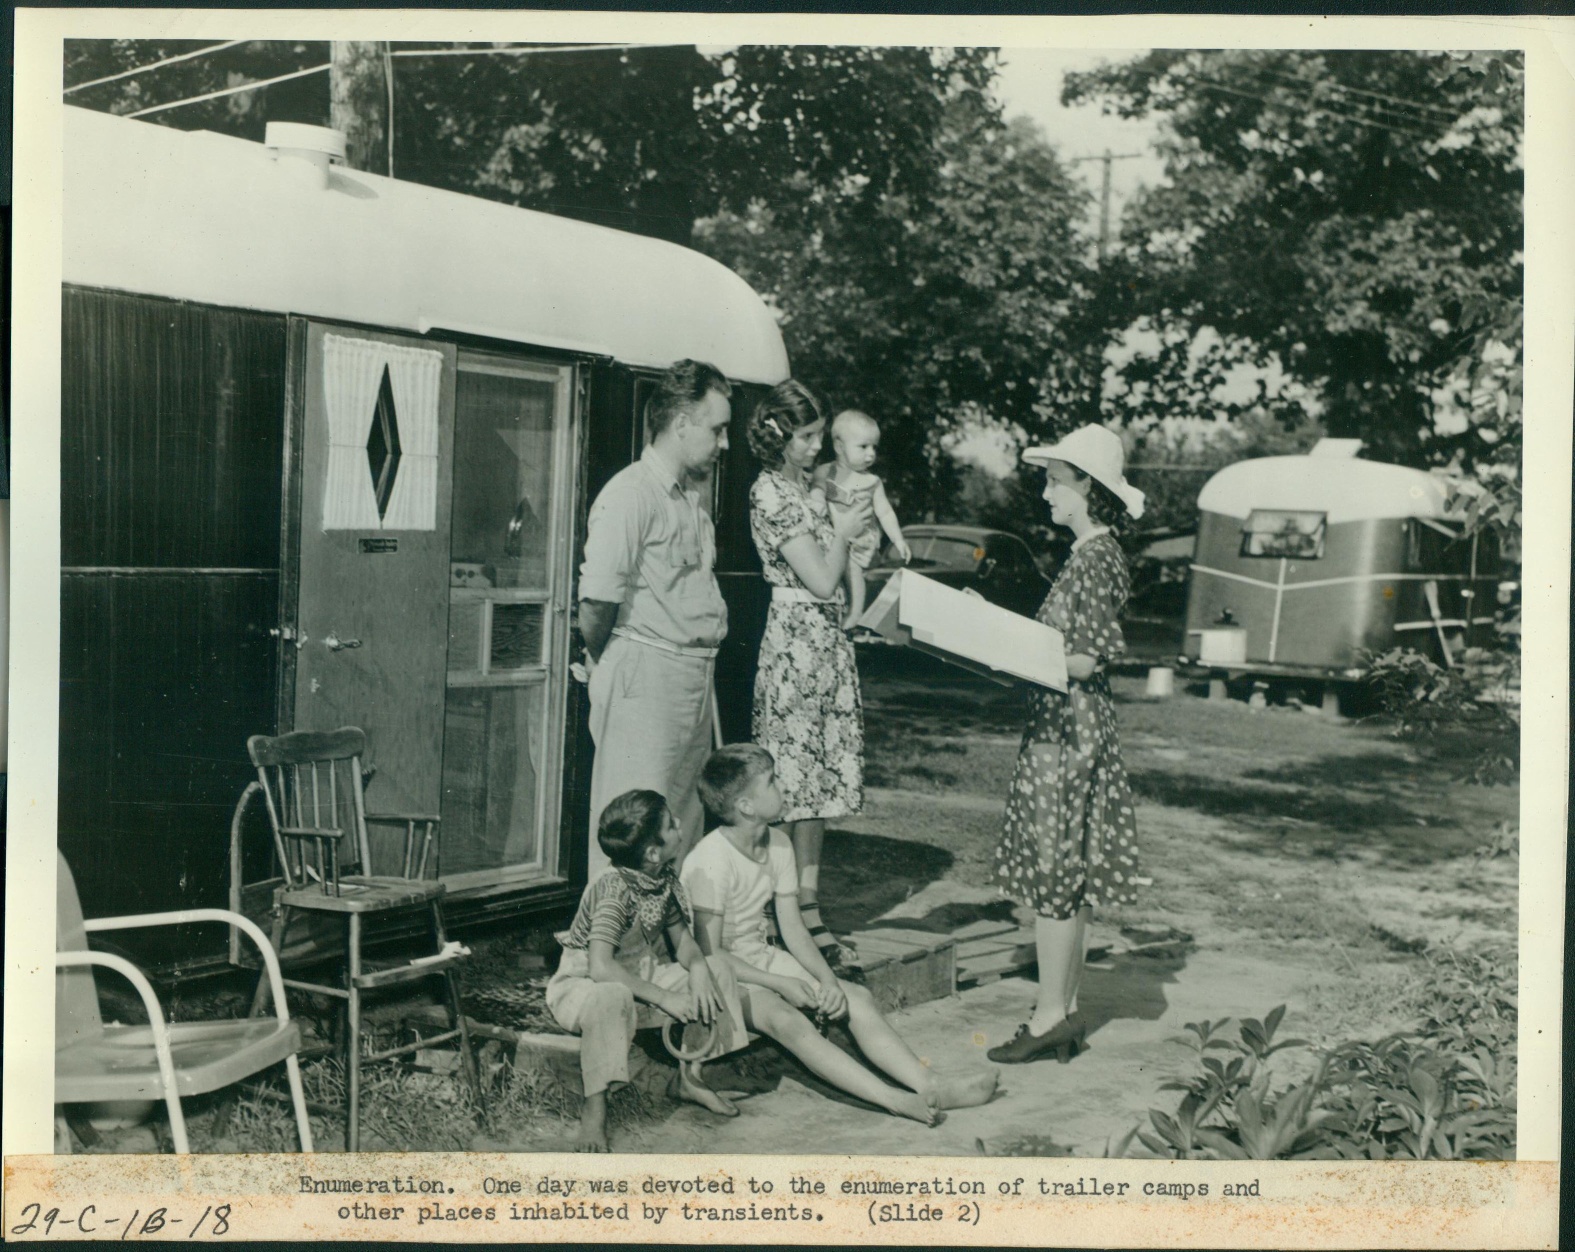
 

1950 census enumerator at Motor Camp

“Transient” enumerations were conducted on specially designated days in 1950. (source: census.gov)

Tuesday, April 11, 1950 was the date for “an intensive drive to cover in a single night the occupants of certain places usually devoted to transients” such as hotels, YMCAs, and tourist courts or camps (campgrounds).  Young men were moving to the city from rural areas, and the YMCA (Young Men’s Christian Association) was a popular, safe and affordable place to stay. By 1940 YMCA room across the country totaled more than 100,000.

According to the instructions, enumerators were to visit these facilities from 5 p.m. to 11 p.m. on Tuesday evening and again from 7 a.m. to 12 noon the next day. On Thursday, April 13, 1950 enumerators turned their attention to missions and flophouses.  T-Night enumerators assigned to these facilities were to “station themselves at the main entrance or the lobby of the place” and instructed to interview guests, resident staff and employees personally. 

Another unique feature of T-Nights was that enumerators used the Individual Census Report Form (ICR). In an unusual move, it was completed by the person being counted instead of by the census taker. This ensured privacy for the informant since census interviews often had to be conducted in hallways or a room with other roomers. Thanks to the 1950 census enumerators working the hotel lobby, asking guests passing through if they had already completed an ICR, calling up guests on the house phone and working with staff on identifying those checking in, there’s an even better chance that we will find our family members in the 1950 census.

What Does “REG” mean on the 1950 Census?

Even after all of this extra effort, some people never completed the ICR form. In those cases, the enumerator would fill out the ICR on information taken from the hotel register. The entry on the census would be marked “REG” indicating that the information came from the hotel register.

The 1950 Census Residential Survey

A new feature of the 1950 census was the Residential Survey. In a separate surveying effort, information was collected on a sample basis from owners of owner-occupied and rental properties and mortgage lenders.

1950 Census Technology Trivia

According to the National Archives, “The Census Bureau began use of the first non-military computer shortly after completing the 1950 enumeration. UNIVAC I (for Universal Automatic Computer), the first of a series, was delivered in 1951, and helped tabulate some of the statistics for the 1954 economic censuses. It weighed 16,000 pounds and used 5,000 vacuum tubes.”

5 Things to Do While Waiting for the 1950 US Federal Census

Looking for something to do now while you wait for the 1950 census? Here are just a few things you can do while you wait:

1. Review your family tree.
Make a list of those families you want to look up. And look for gaps and questions that might be able to be answered using the 1950 census.

2. Look for 1950 family addresses.

  • Old letters
  • Diaries
  • Scrapbooks
  • Ask Relatives
  • City directories
  • Vital Records
  • Occupational records
  • Newspapers
  • Social Security Records
  • 1940 census addresses

3. Use the One-Step website to find Enumeration District Numbers

Note: The One-Step website includes some maps not found at the National Archives!

4. Download the Enumeration District Map for your Ancestor’s Home
Again, you can access the maps through the One-Step website or the National Archives website. These are excellent research resources to have on hand. They can be used to create map overlays in the Google Earth Pro software. Step-by-step instructions for doing so can be found in my book The Genealogist’s Google Toolbox and my downloadable video tutorial series Google Earth for Genealogy.

5. Check out the 1790 through 1940 census records online at the National Archives.
Census records can be found at many popular genealogy websites. The National Archives has a great resource page listing each decennial census and the associated online resources including where census images are hosted and searchable for free or on subscription websites. It also includes additional resources and background on each census taken.

For more ideas on what you can do now to prepare, read How to Find Your Family History in the 1950 Census.

Watch Next: 1950 Census Questions
1950 US Census Questions

WATCH NEXT: Elevenses with Lisa episode 53 1950 Census Questions

Resources

Missing Census or Missing Family: Legacy Tree Genealogists Answer

So, you think there might be a missing census page? Whether it’s a missing census or a missing family, my special guest, professional genealogist Kate Eakman from Legacy Tree Genealogists has strategies to help you figure it out. She has just the answers you need to find your ‘missing’ family.

missing census

A Genealogy Gems reader doing genealogy research in New Jersey has lost her family! Well not literally, but she can’t find them in the 1940 U.S. Census. Here’s the email I recently received from her:

I am having a problem finding my mother and grandparents in the 1940 census. My grandfather, William Charles Opfer, was born on October 15 1900. I can find him in the 1930 census living in  Glouescter Township, (Unincorporated Grenloch) Camden County, New Jersey. He is living with his wife Kathryn (Katharine) Opfer and three children: William C Jr, Robert, and Nancy (my mother).

When I search the 1940 census on Ancestry nothing shows up. So I went to the government web site and converted the 1930 Enumeration District to the 1940 Enumeration District. The 1940 Enumeration Districts were 4-57, 4-58, and 4-61. I then went through all of the pages for each of the districts looking for William C. Opfer. I did this on Ancestry, Family Search, and NARA.  No William C. Opfer.

I then went back to the 1930 census and looked at his neighbors. I searched for each of the 13 heads-of-household neighbors from the 1930 census. Two had moved 1940 and I found them. I could not find the other neighbors in the 1940 census. I am wondering if a page from the 1940 census did not get scanned? Is there somewhere else I could look?

Missing Census Answers from Kate Eakman, Legacy Tree Genealogists

First, let me say how impressed I am with this Gem’s research and her dedication to finding this census report. She has made some very thorough searches and performed a number of advanced genealogical techniques in her quest for the 1940 U.S. Census page. It hardly seems fair that all that work didn’t yield the success she surely earned.

The government website she referenced is the National Archives 1940 Census page. The use of the page “1930 Records Search” allowed her to simply locate her grandfather in the 1930 U.S. Census. Then, by clicking a few buttons, discover the corresponding enumeration districts (ED) for the 1930 ED in which he and his family lived: 4-57, 4-58, and 4-61.

I, too, have scrolled through page after page searching for that one elusive name and we know how tedious that task can be! Using three different sites was a good strategy and one that we employ ourselves here at Legacy Tree Genealogists. Different images might be easier or more difficult to read, although in the case of these three EDs, the copies seemed to be uniformly easy to read.

The first two EDs were for Blackwood, an unincorporated part of Camden County, New Jersey. The third one was for the Lakeland Tuberculosis Hospital, unlikely to have housed the entire family, but certainly worth looking through in case one Opfer was a patient there.

ED 4-58 had an interesting variation at the end of the report. The last two pages were not 15A and 15B, as would be expected, but were 61A and 61B. This indicates these households were enumerated at a later date than were their neighbors. Because federal law requires every household to be counted, and because not everyone was at home when the enumerator arrived, the enumerator had to return on a different day and attempt to gather the necessary information for those families. They were recorded separately, beginning with page 61A.

People living in hotels, trailer camps, and other places normally designed for single-night stays were enumerated a week after the initial enumeration and those pages are numbered beginning with 81A. Not every ED has a 61 or an 81 page, but if you see one, now you know why the page numbers suddenly changed so dramatically.

The writer’s use of Elizabeth Shown Mills’ FAN Club was an excellent idea, too. FAN, an acronym for Friends, Associates, and Neighbors, takes advantage of the fact that people, in general, tend to remain geographically close to the people they know. [Read more about this in our post, “The Genealogy FAN Club Principle Overcomes Genealogy Brick Walls“] If a portion of a community moves, they tend to move together and relocate in the same general area of their new location. Her instincts to use this tool were excellent, even if they did not produce the desired results. This falls under the heading of “reasonably exhaustive research” and should always be included when someone, or in this case something, can’t be found, but should be there.

The fact that the researcher was able to locate only two of those neighbors could be explained, in part, by the fact that so many were in their 60s, 70s, and even 90s in 1930. They simply may have passed away in the intervening ten years. Another explanation, particularly for the working families, is that the Great Depression caused many families to move in order to find employment.

This may have been true for the Opfers. We noticed in 1930, William was employed as a supervisor for Reading Transportation. While supervisors were important to the operation of any transportation company, it is possible William found himself unemployed, as was true for millions of other Americans. If that happened, he and his family could have moved anywhere in the United States in an effort to find work. Alternatively, William may have left to find work while Kathryn and the children lived by themselves in reduced circumstances, or with family or friends.

To this end, I searched for William and Kathryn, and then each of the three children individually, in the hope of locating one or more family members. Using the “less is more” strategy which is often an important part of genealogical research, I searched with and without the family members’ ages, places of birth, and other family member’s names. Because the surname “Opfer” might have been misheard by the enumerator or grossly misspelled, I even searched for the various members of the family with no surname. Since we did not know where the family may have lived between 1930 and 1944, we included all of New Jersey, Delaware (the home state of Kathryn), as well as neighboring Pennsylvania and New York in our searches. The lack of positive results meant we needed to expand our search to the Eastern seaboard, and then the entire United States.

We also identified the names of William’s and Kathryn’s parents, William and Sallie Opfer and Raymond and Corrine Mason, and searched their households and neighborhoods for William and Kathryn. They were not there. Walter, William’s younger brother, was not hosting the family, either.

The writer had asked if it was possible that a page from the 1940 U.S. Census did not get scanned. Since the 1940 census has only been available for four years, it is still possible, although not probable, that there are one or more pages missing unbeknownst to anyone. Our research revealed only a few pages from a couple EDs in Ohio and South Dakota that were missing from the FamilySearch collection. There is no indication anywhere that there are missing pages from New Jersey. In addition, the pages in the three possible EDs for the Opfers were all included and in the correct numerical order, with no indication of any missing pages at the end. Therefore, I think we must conclude that missing pages do not explain the Opfer family’s disappearance.

Other Databases to Help

There are two other databases which might provide some insight into the location of the Opfer family. The first is the set of 1942 World War II draft registration cards. All men between the ages of 18 and 65 were required to register for this draft. The draft registration cards would have included the address at which William lived in 1942; however, there was no card for a man named William Opfer (or with only the surname “Opfer”) born between 1895 and 1905.

The final search was the database of city directories. A poorly-indexed city directory reported the Opfers lived in Haddonfield, New Jersey in 1943, but there are two directories contained in the same book, and the listing was actually for 1947. It reported William and Katherine lived at 209 Washington Avenue with their children William and his wife, Robert, and Nancy. William’s brother, Walter, and his wife Edith lived nearby. Unfortunately, the search for them in 1940 revealed that 79-year-old widower William Pape lived at that address with his household servants who were not the Opfer’s.

missing census alternative

The William Opfer family in Haddonfield, New Jersey in 1947.Photo courtesy Ancestry.

Although the turmoil and upheaval of the Great Depression meant families were scattered, and it would have been easy to miss enumerating many households in the mid-1930s, by 1940 the U.S. was recovering from the effects of the Depression. Some agencies, such as the Works Progress Administration (WPA) and the CCC (Civilian Conservation Corps), were in place to provide work for men. Many war-related industries on both coasts were revived by the Allies’ efforts to stop Hitler.

In other words, there should have been work and stability for the Opfer family by 1940, and they ought to have appeared in a census report. The evidence of the 1930 census and the 1947 city directory strongly suggest they remained in or close to New Jersey, but all of the efforts to locate them have failed to yield positive results.

One Last Scenario

One possible scenario which would explain the Opfers apparent absence from the 1940 census is a simple one: perhaps the family was in the process of moving from one location to another in the month of April when the census was enumerated. Although the census was supposed to be enumerated on 1 April, the reality is that it was simply impossible to knock on every door and obtain the necessary information in one day. Some enumeration districts were fully counted by the 4th of the month. Other places were not completed until the 30th. This was true even in the same town.

If the Opfers had moved across the street from 206 Washington Avenue to 209 Washington Avenue in Haddonfield, for instance, between the 5th and the 14th of April, they would have moved from one enumeration district to another. Because the 209 Washington Avenue address had been enumerated on 4 April, they would not have been counted in that new location. And, because the 206 Washington Avenue address was not enumerated until the 15th of the month, they would not have been included in that EDs census report. We have seen this happen in the reverse and a family was enumerated twice because they moved during the enumeration, so it certainly could have happened the other way around. This is the only explanation we can find to explain the absence of the Opfers from the 1940 U.S. Census.

More About Kate Eakman at Legacy Tree Genealogists and SAVE $100!

Kate Eakman grew up hearing Civil War stories at her father’s knee and fell in love with history and genealogy at an early age. With a master’s degree in history and over 20 years experience as a genealogist, Kate has worked her magic on hundreds of family trees and narratives.

Areas of expertise:

-Native American Genealogy

-U.S. Civil War & Victorian America

-Narrative Biographies

-Irish Genealogy

The team of expert genealogists at Legacy Tree Genealogists can help bust through your brick walls. They do the research and you enjoy the discoveries!

Beginning Genealogy with Archives.com – How to get started for free

VIDEO: Genealogy doesn’t have to take a lot of time and money. See how easy and affordable it is to quickly get started learning about your family history with Archives.com. Lisa Louise Cooke gives practical tips on how to start building a family tree, the importance of gathering information from relatives, and reviews the types of records available at Archives.com. (This is a sponsored video, however my views & content are my own.)

Watch the Video

Show Notes

Let’s start by reviewing the top beginner genealogy research strategies when using Archives.com.

Top Takeaways

  • You can start your family history research without a huge investment of time or money.
  • Archives.com offers a 7-day free trial to explore their genealogical records.
  • Before you search the website, begin by gathering information from family members.
  • Genealogy research typically works backwards from yourself to ancestors. Therefore, start by looking for death records and work your way back to the birth record for each family member.
  • U.S. Federal census records were created every 10 years starting in 1790 and are the “backbone” of genealogy. Start with the most recent (1950).
    • Keep in mind that each “relationship” listed is to the head of the household.
    • Addresses can often be found in the left columns. Use free tools like Google Earth to see the location today.
Addresses in the 1950 US Federal Census

Addresses in the 1950 US Federal Census

    • “Dwellings” is the order in which the enumerator visited the home. It is not the house number.
      Dwelling column US Federal Census 1950

      Dwelling column US Federal Census 1950

    • Don’t just rely on the index. Always check the information on the record.
    • City directories can help fill in gaps between census records. Start with the collection at Archives.com and then expand your search to other online and offline sources. Start with the free genealogy website FamilySearch.

Record Collections at Archives.com

 Census (federal and some states)
 Vital Records (Death, divorce, marriage and birth)
 Military
 Immigration and Passenger Lists
 Living People Search
 City & Telephone Directories
 Family Trees
 Newspapers
 Books
 Obituaries
 Cemetery Listings
 Memory Pages (from WeRemember)
 Surname Histories

Resources

Pin It on Pinterest

MENU