In Elevenses with Lisa episode 79 Lisa Louise Cooke explains:
How to find 1950 US Census Enumeration District (ED) Maps
The purpose behind them and how to interpret the maps
Ways to use the maps for your genealogy
This is a follow up to episode 51 on The 1950 Census for Genealogy. In that episode I discussed the importance of finding your ancestors’ enumeration district numbers in order to be able to find them when the digitized images are released (before the index is available.) In this episode I will walk you through how to locate the enumeration district (ED) number and then find the actual 1950 US Census ED map. We’ll wrap things up with a quick update on the release of the 1950 US Federal Census.
Episode 79 Show Notes
(Get your ad-free Show Notes Cheat Sheet at the bottom of this page in the Resources section.)
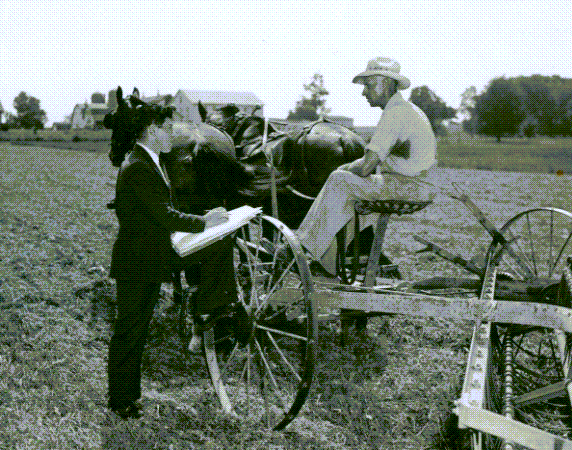
As I mentioned in Elevenses with Lisa episode 51 The 1950 Census for Genealogy, prior to 1880, U.S. Marshalls were the enumerators for the federal decennial census. Starting with the 1880 census enumerators were hired and they were each assigned an enumeration district, also known as an ED. These districts had to be mapped out so that the enumerators knew the area they were responsible for counting. Therefore, maps are drawn in anticipation of each census being taken, including the 1950 census.
Learn more by watching episode 51 on the 1950 census.
About the 1950 US Census Maps
It’s always important to understand the purpose of a record or source, and the 1950 Enumeration District maps (ED maps) are no exception. Unlike most maps where it’s all about accurately drawing up the current roads and geographical features, census ED maps are drawn up for the purpose of defining boundaries for the purpose of counting people. This means as we look at ED maps we need to keep a few things in mind.
The first thing to understand is that the 1950 ED maps were not necessarily up-to-date with the lay of the land in 1950. Not all streets, parks and features will be included. The reason for this is that the maps themselves were not created for this purpose. Existing maps were used and then enumeration district boundaries were drawn on them.
Maps came from a variety of sources including but not limited to county and City Planning Commissions, 1940 census bureau tract maps, and city engineers. In fact, from a mapping perspective the variety of maps in the collection are fascinating.
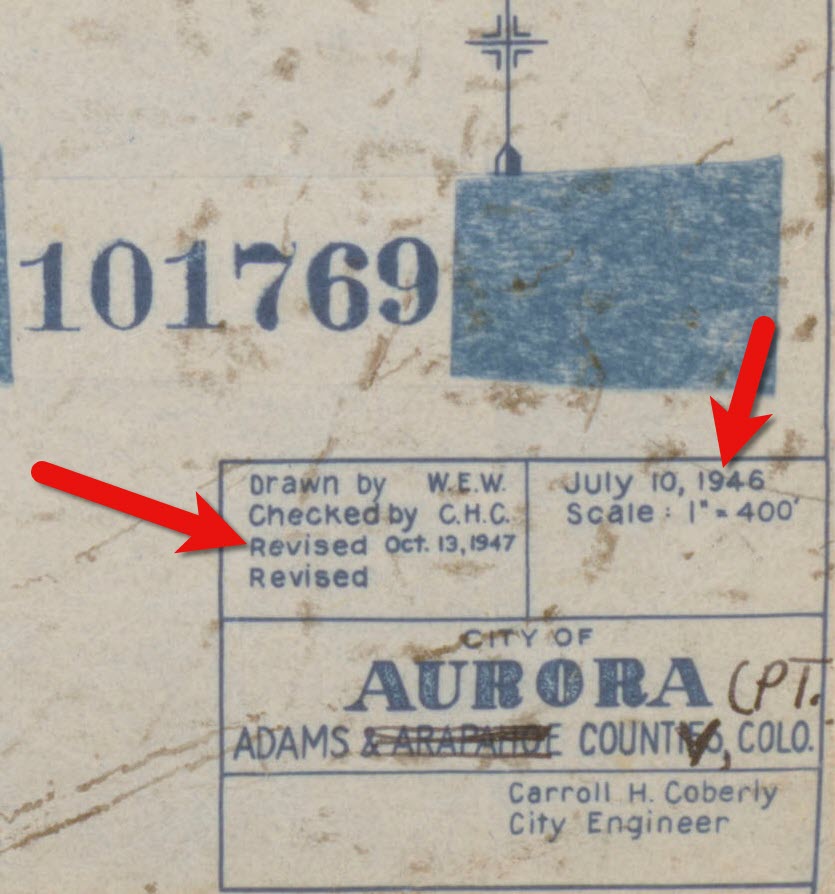
Look for the map title, description, legend and census stamps typically found in one of the corners. In this example (see image) from Aurora, Colorado the map used was originally created by the city engineer in 1946 and was revised in 1947.
1950 census map of Aurora, Colorado (Source: National Archives)
Following the end of World War II, the United States was growing at a quick pace in 1950. This is particularly true of the newly emerging suburbs. Therefore, if your ancestors built a new home in a new development in 1949, don’t be surprised if you don’t see the street on the 1950 census ED map. However, rest assured that the maps still hold value for your family history as they provide many interesting and unique details about the area surrounding your ancestors’ homes.
Each map was stamped with a small legend where the meaning for each of the colored lines drawn could be indicated. From my random sampling of 1950 census maps across the United States it appears that the coloring coding was consistent as follows:
Red = Township
Green = Corporate Limits/Ward
Orange = Enumeration District
Expect to see errors, inconsistencies and omissions in the maps. The more rural the area the more likely the map was compiled from several sources by the Census Bureau cartographers. This compilation created more opportunity for errors, and often used older maps.
Source: National Archives
The Meaning of Census Enumeration District Numbers
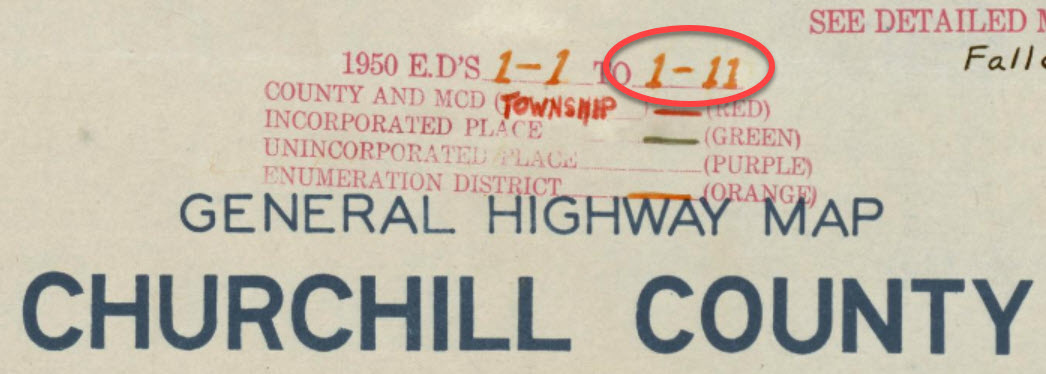
A census enumeration district number is made up of two numbers separated by a dash. The first number (in this example: 1) represents the county/region. The second number represents the area within the county that could be covered by an individual census enumerator within the amount of time provided for taking the census, about 2-4 weeks. The official start of the 1950 US Federal Census was April 1, 1950.
Census enumeration district (ED) numbers on a 1950 census map.
How to Find 1950 Census Maps
Some 8,000 census maps have been digitized and are available at the National Archives. However, the National Archives website can be challenging to navigate. I recommend using the Unified 1880-1950 Census ED Finder Tool at Steve Morse’s website.
1. Go to https:/stevemorse.org
2. In the menu in the upper left corner hover over US Census and in the secondary menu click Unified 1880-1950 Census ED Finder
3. Select the state from the first drop-down menu.
4. Next select the county.
5. Then select the city.
6. You will then see many enumeration district links listed. In order to find the right one for your ancestor’s home, enter the house number and select the street from the next drop-down menu. Don’t worry about directional parts of the address like west or east unless they are offered in the list of street names.
7. As soon as select the street name, the list of ED numbers should be reduced. In this example we are down to three.
8. To further reduce the possible ED numbers, we can select Cross or back street on same city block. If you’re not sure what the neighboring streets are, click the see Google Map This will plot the address you entered into Google Maps where you can then find the closest cross street, and the next streets over. If the address is not precisely marked on the map, check the address that appears in the Google Maps search box.
In my case, the One-Step tool didn’t allow me to specific W. Arcade, so Google Maps just gave me the general area, and not the address. By adding the W. to the address and pressing enter on my keyboard Google Maps was able to precisely plot the location. Now we can make note of the closest cross street (ex. N. Center), the street north of the address (E. Monterey Ave.) and the street south of the address (W. Noble St.)
9. Head back to the Unified 1880-1950 Census ED Finder page and enter each nearby street (you can enter multiple.) This should reduce the ED numbers one. This is the ED that includes your ancestor’s address.
How to Find 1950 Census Maps
1. Make note of the ED number, and then go back and click the button that says See ED Maps for ____________ County. You could have clicked this button without going through the process of locating the ED number, but the ED number makes it much easier to find your ancestor’s home street on the map. This number will also assist you in being able to find your ancestors in the 1950 census before it is indexed.
2. You will now be on the Viewing 1950 Enumeration District Maps in One Step Re-enter the city from the drop-down menu.
3. Click the Get ED Map Images You will receive two links. The first link is Links to NARA viewer will take you to the page on the National Archives website which includes all of the information about the map and the record hierarchy. Source citation information can be gathered from this page.
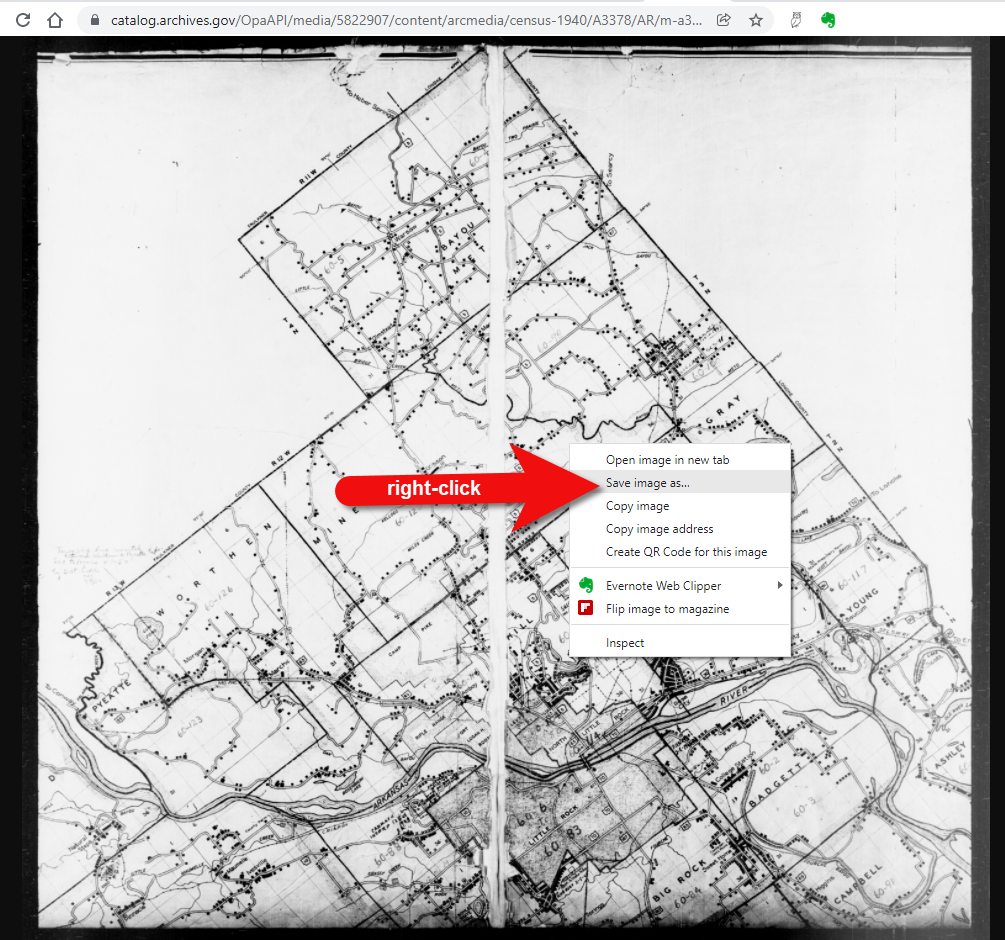
5. Click the second link called Direct links to jpegs on NARA server. This will take you to the image by itself as hosted on the National Archives website. I find this the easiest way to save the full resolution image to my computer hard drive. On my PC I right-click on the map and select Save Image As.
This page is also important if you want to use this image in another program such as Google Earth. The URL for this page is the direct URL to the image. Notice that it ends in .jpg. This means that it is the image alone, and this link can be used to create a custom map overlay in Google Earth. You can see an example of a custom map overlay in my video Create a Family History Tour with Google Earth Pro at the 06:13 mark.
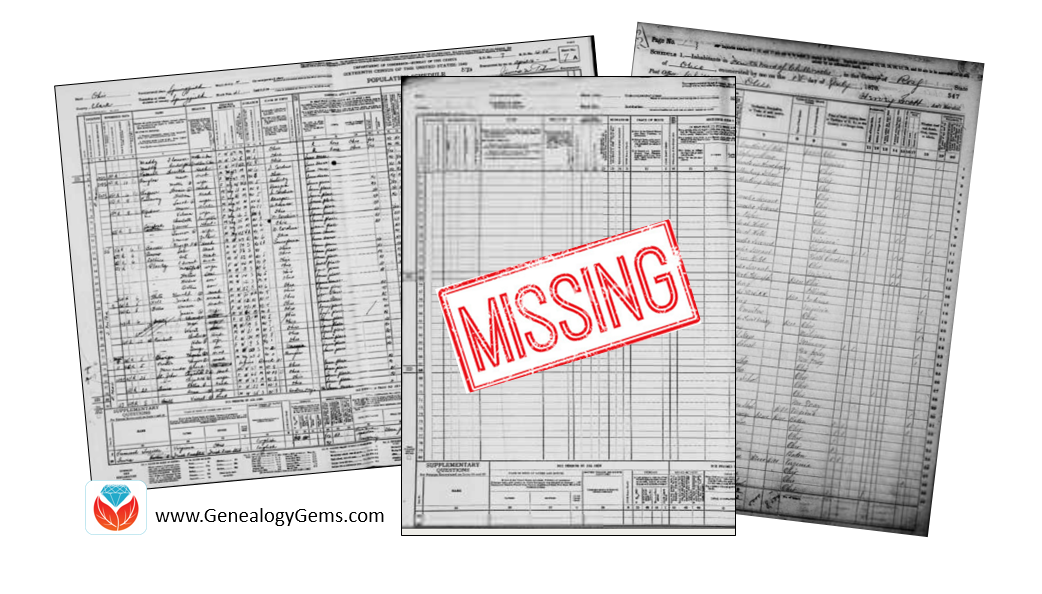
So, you think there might be a missing census page? Whether it’s a missing census or a missing family, my special guest, professional genealogist Kate Eakman from Legacy Tree Genealogists has strategies to help you figure it out. She has just the answers you need to find your ‘missing’ family.
A Genealogy Gems reader doing genealogy research in New Jersey has lost her family! Well not literally, but she can’t find them in the 1940 U.S. Census. Here’s the email I recently received from her:
I am having a problem finding my mother and grandparents in the 1940 census. My grandfather, William Charles Opfer, was born on October 15 1900. I can find him in the 1930 census living in Glouescter Township, (Unincorporated Grenloch) Camden County, New Jersey. He is living with his wife Kathryn (Katharine) Opfer and three children: William C Jr, Robert, and Nancy (my mother).
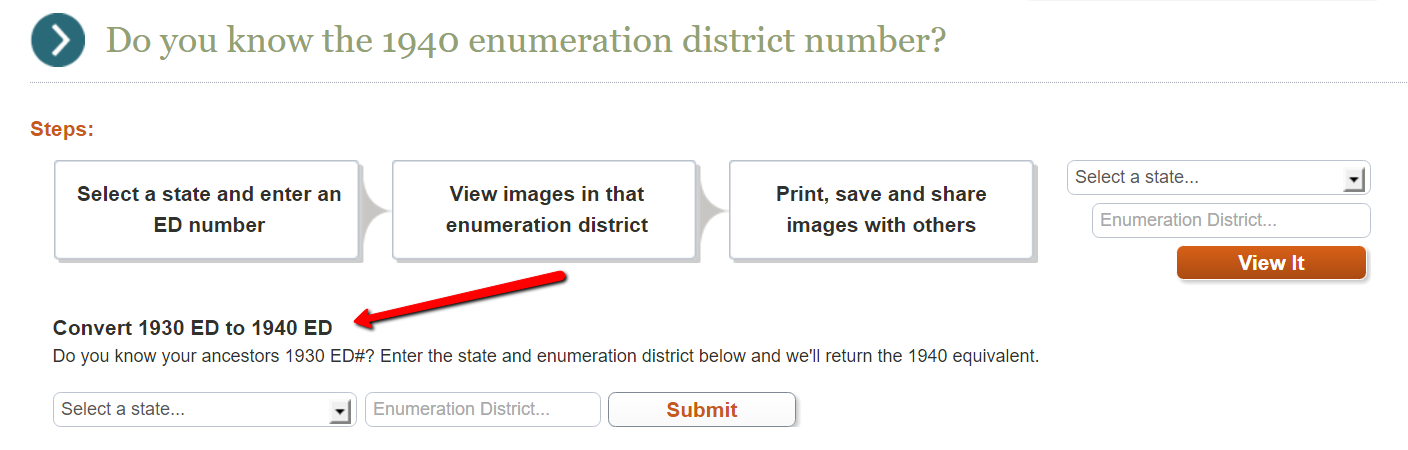
When I search the 1940 census on Ancestry nothing shows up. So I went to the government web site and converted the 1930 Enumeration District to the 1940 Enumeration District. The 1940 Enumeration Districts were 4-57, 4-58, and 4-61. I then went through all of the pages for each of the districts looking for William C. Opfer. I did this on Ancestry, Family Search, and NARA. No William C. Opfer.
I then went back to the 1930 census and looked at his neighbors. I searched for each of the 13 heads-of-household neighbors from the 1930 census. Two had moved 1940 and I found them. I could not find the other neighbors in the 1940 census. I am wondering if a page from the 1940 census did not get scanned? Is there somewhere else I could look?
Missing Census Answers from Kate Eakman, Legacy Tree Genealogists
First, let me say how impressed I am with this Gem’s research and her dedication to finding this census report. She has made some very thorough searches and performed a number of advanced genealogical techniques in her quest for the 1940 U.S. Census page. It hardly seems fair that all that work didn’t yield the success she surely earned.
The government website she referenced is the National Archives 1940 Census page. The use of the page “1930 Records Search” allowed her to simply locate her grandfather in the 1930 U.S. Census. Then, by clicking a few buttons, discover the corresponding enumeration districts (ED) for the 1930 ED in which he and his family lived: 4-57, 4-58, and 4-61.
I, too, have scrolled through page after page searching for that one elusive name and we know how tedious that task can be! Using three different sites was a good strategy and one that we employ ourselves here at Legacy Tree Genealogists. Different images might be easier or more difficult to read, although in the case of these three EDs, the copies seemed to be uniformly easy to read.
The first two EDs were for Blackwood, an unincorporated part of Camden County, New Jersey. The third one was for the Lakeland Tuberculosis Hospital, unlikely to have housed the entire family, but certainly worth looking through in case one Opfer was a patient there.
ED 4-58 had an interesting variation at the end of the report. The last two pages were not 15A and 15B, as would be expected, but were 61A and 61B. This indicates these households were enumerated at a later date than were their neighbors. Because federal law requires every household to be counted, and because not everyone was at home when the enumerator arrived, the enumerator had to return on a different day and attempt to gather the necessary information for those families. They were recorded separately, beginning with page 61A.
People living in hotels, trailer camps, and other places normally designed for single-night stays were enumerated a week after the initial enumeration and those pages are numbered beginning with 81A. Not every ED has a 61 or an 81 page, but if you see one, now you know why the page numbers suddenly changed so dramatically.
The writer’s use of Elizabeth Shown Mills’ FAN Club was an excellent idea, too. FAN, an acronym for Friends, Associates, and Neighbors, takes advantage of the fact that people, in general, tend to remain geographically close to the people they know. [Read more about this in our post, “The Genealogy FAN Club Principle Overcomes Genealogy Brick Walls“] If a portion of a community moves, they tend to move together and relocate in the same general area of their new location. Her instincts to use this tool were excellent, even if they did not produce the desired results. This falls under the heading of “reasonably exhaustive research” and should always be included when someone, or in this case something, can’t be found, but should be there.
The fact that the researcher was able to locate only two of those neighbors could be explained, in part, by the fact that so many were in their 60s, 70s, and even 90s in 1930. They simply may have passed away in the intervening ten years. Another explanation, particularly for the working families, is that the Great Depression caused many families to move in order to find employment.
This may have been true for the Opfers. We noticed in 1930, William was employed as a supervisor for Reading Transportation. While supervisors were important to the operation of any transportation company, it is possible William found himself unemployed, as was true for millions of other Americans. If that happened, he and his family could have moved anywhere in the United States in an effort to find work. Alternatively, William may have left to find work while Kathryn and the children lived by themselves in reduced circumstances, or with family or friends.
To this end, I searched for William and Kathryn, and then each of the three children individually, in the hope of locating one or more family members. Using the “less is more” strategy which is often an important part of genealogical research, I searched with and without the family members’ ages, places of birth, and other family member’s names. Because the surname “Opfer” might have been misheard by the enumerator or grossly misspelled, I even searched for the various members of the family with no surname. Since we did not know where the family may have lived between 1930 and 1944, we included all of New Jersey, Delaware (the home state of Kathryn), as well as neighboring Pennsylvania and New York in our searches. The lack of positive results meant we needed to expand our search to the Eastern seaboard, and then the entire United States.
We also identified the names of William’s and Kathryn’s parents, William and Sallie Opfer and Raymond and Corrine Mason, and searched their households and neighborhoods for William and Kathryn. They were not there. Walter, William’s younger brother, was not hosting the family, either.
The writer had asked if it was possible that a page from the 1940 U.S. Census did not get scanned. Since the 1940 census has only been available for four years, it is still possible, although not probable, that there are one or more pages missing unbeknownst to anyone. Our research revealed only a few pages from a couple EDs in Ohio and South Dakota that were missing from the FamilySearch collection. There is no indication anywhere that there are missing pages from New Jersey. In addition, the pages in the three possible EDs for the Opfers were all included and in the correct numerical order, with no indication of any missing pages at the end. Therefore, I think we must conclude that missing pages do not explain the Opfer family’s disappearance.
Other Databases to Help
There are two other databases which might provide some insight into the location of the Opfer family. The first is the set of 1942 World War II draft registration cards. All men between the ages of 18 and 65 were required to register for this draft. The draft registration cards would have included the address at which William lived in 1942; however, there was no card for a man named William Opfer (or with only the surname “Opfer”) born between 1895 and 1905.
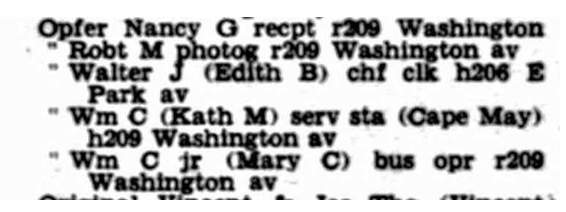
The final search was the database of city directories. A poorly-indexed city directory reported the Opfers lived in Haddonfield, New Jersey in 1943, but there are two directories contained in the same book, and the listing was actually for 1947. It reported William and Katherine lived at 209 Washington Avenue with their children William and his wife, Robert, and Nancy. William’s brother, Walter, and his wife Edith lived nearby. Unfortunately, the search for them in 1940 revealed that 79-year-old widower William Pape lived at that address with his household servants who were not the Opfer’s.
The William Opfer family in Haddonfield, New Jersey in 1947.Photo courtesy Ancestry.
Although the turmoil and upheaval of the Great Depression meant families were scattered, and it would have been easy to miss enumerating many households in the mid-1930s, by 1940 the U.S. was recovering from the effects of the Depression. Some agencies, such as the Works Progress Administration (WPA) and the CCC (Civilian Conservation Corps), were in place to provide work for men. Many war-related industries on both coasts were revived by the Allies’ efforts to stop Hitler.
In other words, there should have been work and stability for the Opfer family by 1940, and they ought to have appeared in a census report. The evidence of the 1930 census and the 1947 city directory strongly suggest they remained in or close to New Jersey, but all of the efforts to locate them have failed to yield positive results.
One Last Scenario
One possible scenario which would explain the Opfers apparent absence from the 1940 census is a simple one: perhaps the family was in the process of moving from one location to another in the month of April when the census was enumerated. Although the census was supposed to be enumerated on 1 April, the reality is that it was simply impossible to knock on every door and obtain the necessary information in one day. Some enumeration districts were fully counted by the 4th of the month. Other places were not completed until the 30th. This was true even in the same town.
If the Opfers had moved across the street from 206 Washington Avenue to 209 Washington Avenue in Haddonfield, for instance, between the 5th and the 14th of April, they would have moved from one enumeration district to another. Because the 209 Washington Avenue address had been enumerated on 4 April, they would not have been counted in that new location. And, because the 206 Washington Avenue address was not enumerated until the 15th of the month, they would not have been included in that EDs census report. We have seen this happen in the reverse and a family was enumerated twice because they moved during the enumeration, so it certainly could have happened the other way around. This is the only explanation we can find to explain the absence of the Opfers from the 1940 U.S. Census.
More About Kate Eakman at Legacy Tree Genealogists and SAVE $100!
Kate Eakman grew up hearing Civil War stories at her father’s knee and fell in love with history and genealogy at an early age. With a master’s degree in history and over 20 years experience as a genealogist, Kate has worked her magic on hundreds of family trees and narratives.
Areas of expertise:
-Native American Genealogy
-U.S. Civil War & Victorian America
-Narrative Biographies
-Irish Genealogy
The team of expert genealogists at Legacy Tree Genealogists can help bust through your brick walls. They do the research and you enjoy the discoveries!
Have you ever found an address for an ancestor but been disappointed that it is just a Route number and a town name? Have you wondered if it is possible to figure out where they actually lived? The good news is, it is! I’m going to show you how to take a rural “route” address from the early 20th century and find it on an old census enumeration district map.
(This article contains affiliate links for which we may be compensated. Thank you for supporting our free content.)
In a recent video I showed you how to find 1950 Census Enumeration District (ED) maps. These are super helpful and also free. In that video we used the address of an ancestor that we found by hunting through old letters and documents. But for many Americans in the early 20th century that address may have just been a route number and town.
That was the case for my viewer Lisa. She emailed me after she watched the video. She writes, “How can you find the E.D. number when you only have a Route number? My relatives lived in rural Arkansas.”
This is totally doable! Follow allow these steps of this case study and they will help you find the E.D. number and census enumeration district maps, and zero in on the location.
“Route 2” & Rural Delivery
A carrier route is basically the territory one letter carrier can cover on a daily basis. So, there could be a Route 1 or a Route 2 in thousands of places around the country. It just happens that your ancestor was on, say, Route 2 in a particular township area. Although it doesn’t tell us which house, it does dramatically narrow down the place because a daily route was the same and may not have been that large. Once we find that area we can then use other sources to help us try to get even more specific.
The first thing we need to do is gather some details. We need:
The ancestors’ names
The Route number address which includes the town
The county – which is something we can easily find online with a quick search
The year – in this case the address she has is from 1950.
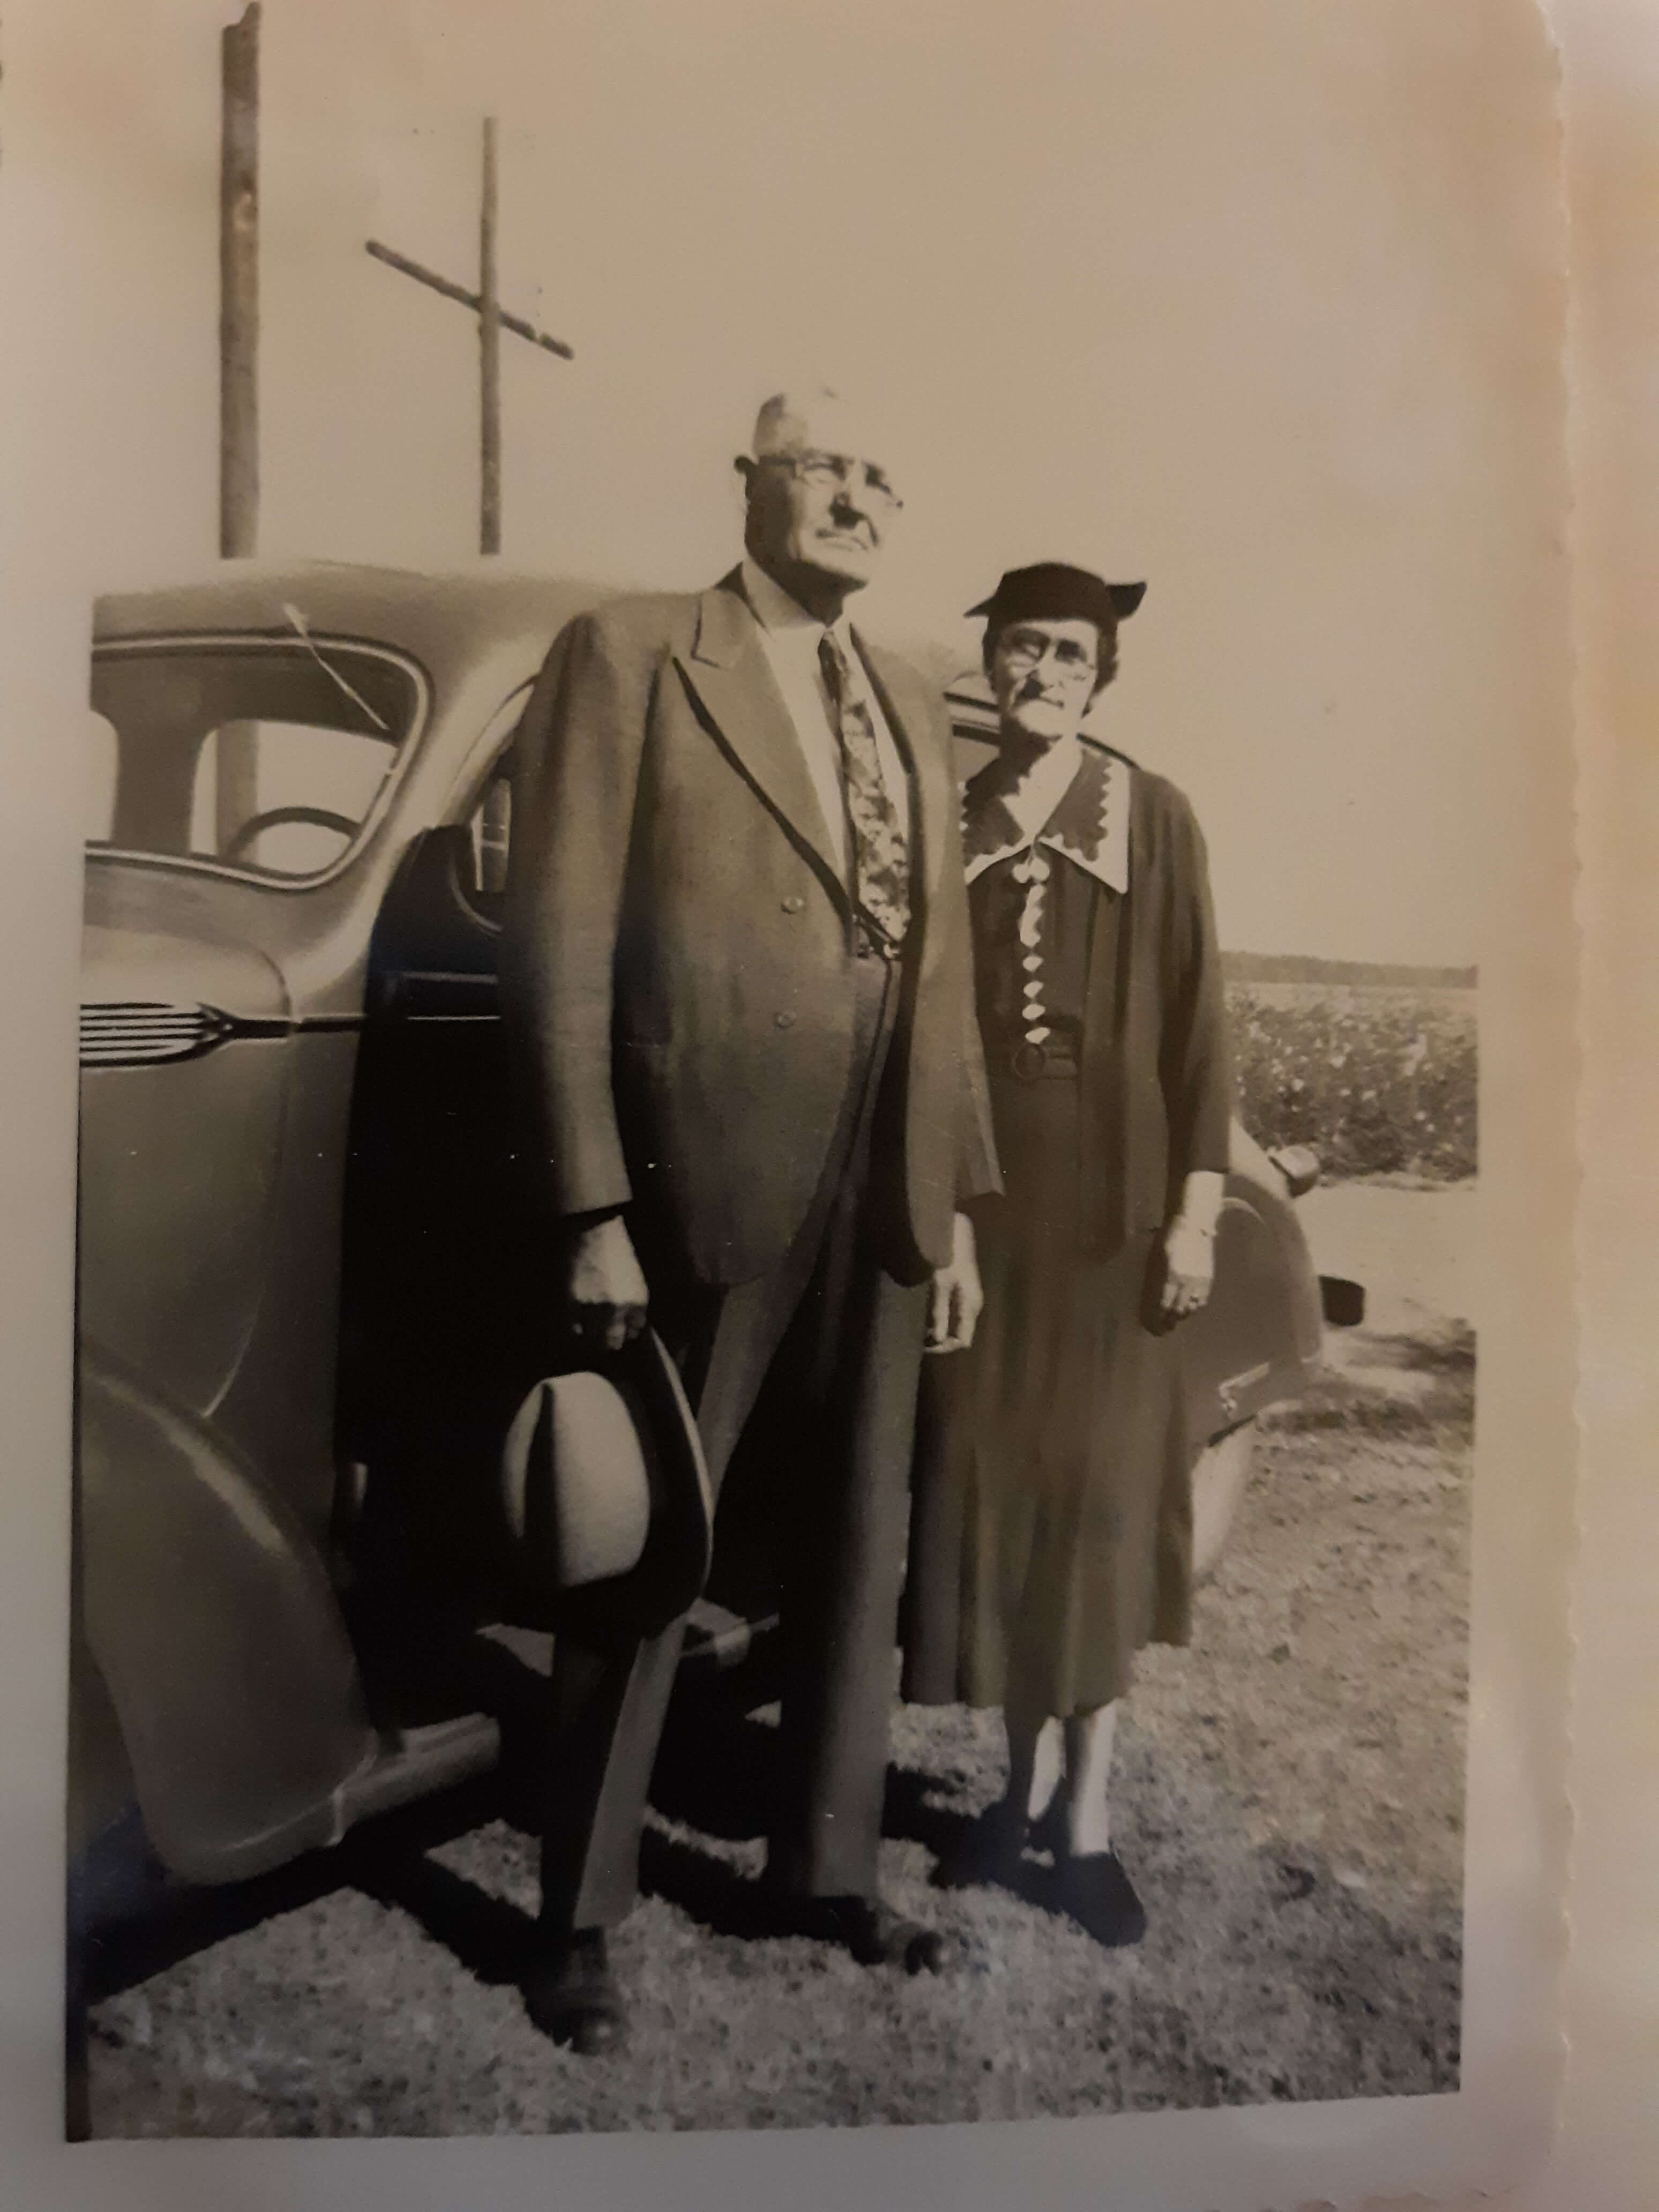
So, here’s what Lisa sent me about her ancestors, the Blazers:
Names: Joseph Madison Blazer and Minnie Blazer
Route number: Route 2
Address: Frazier Pike
County: Pulaski
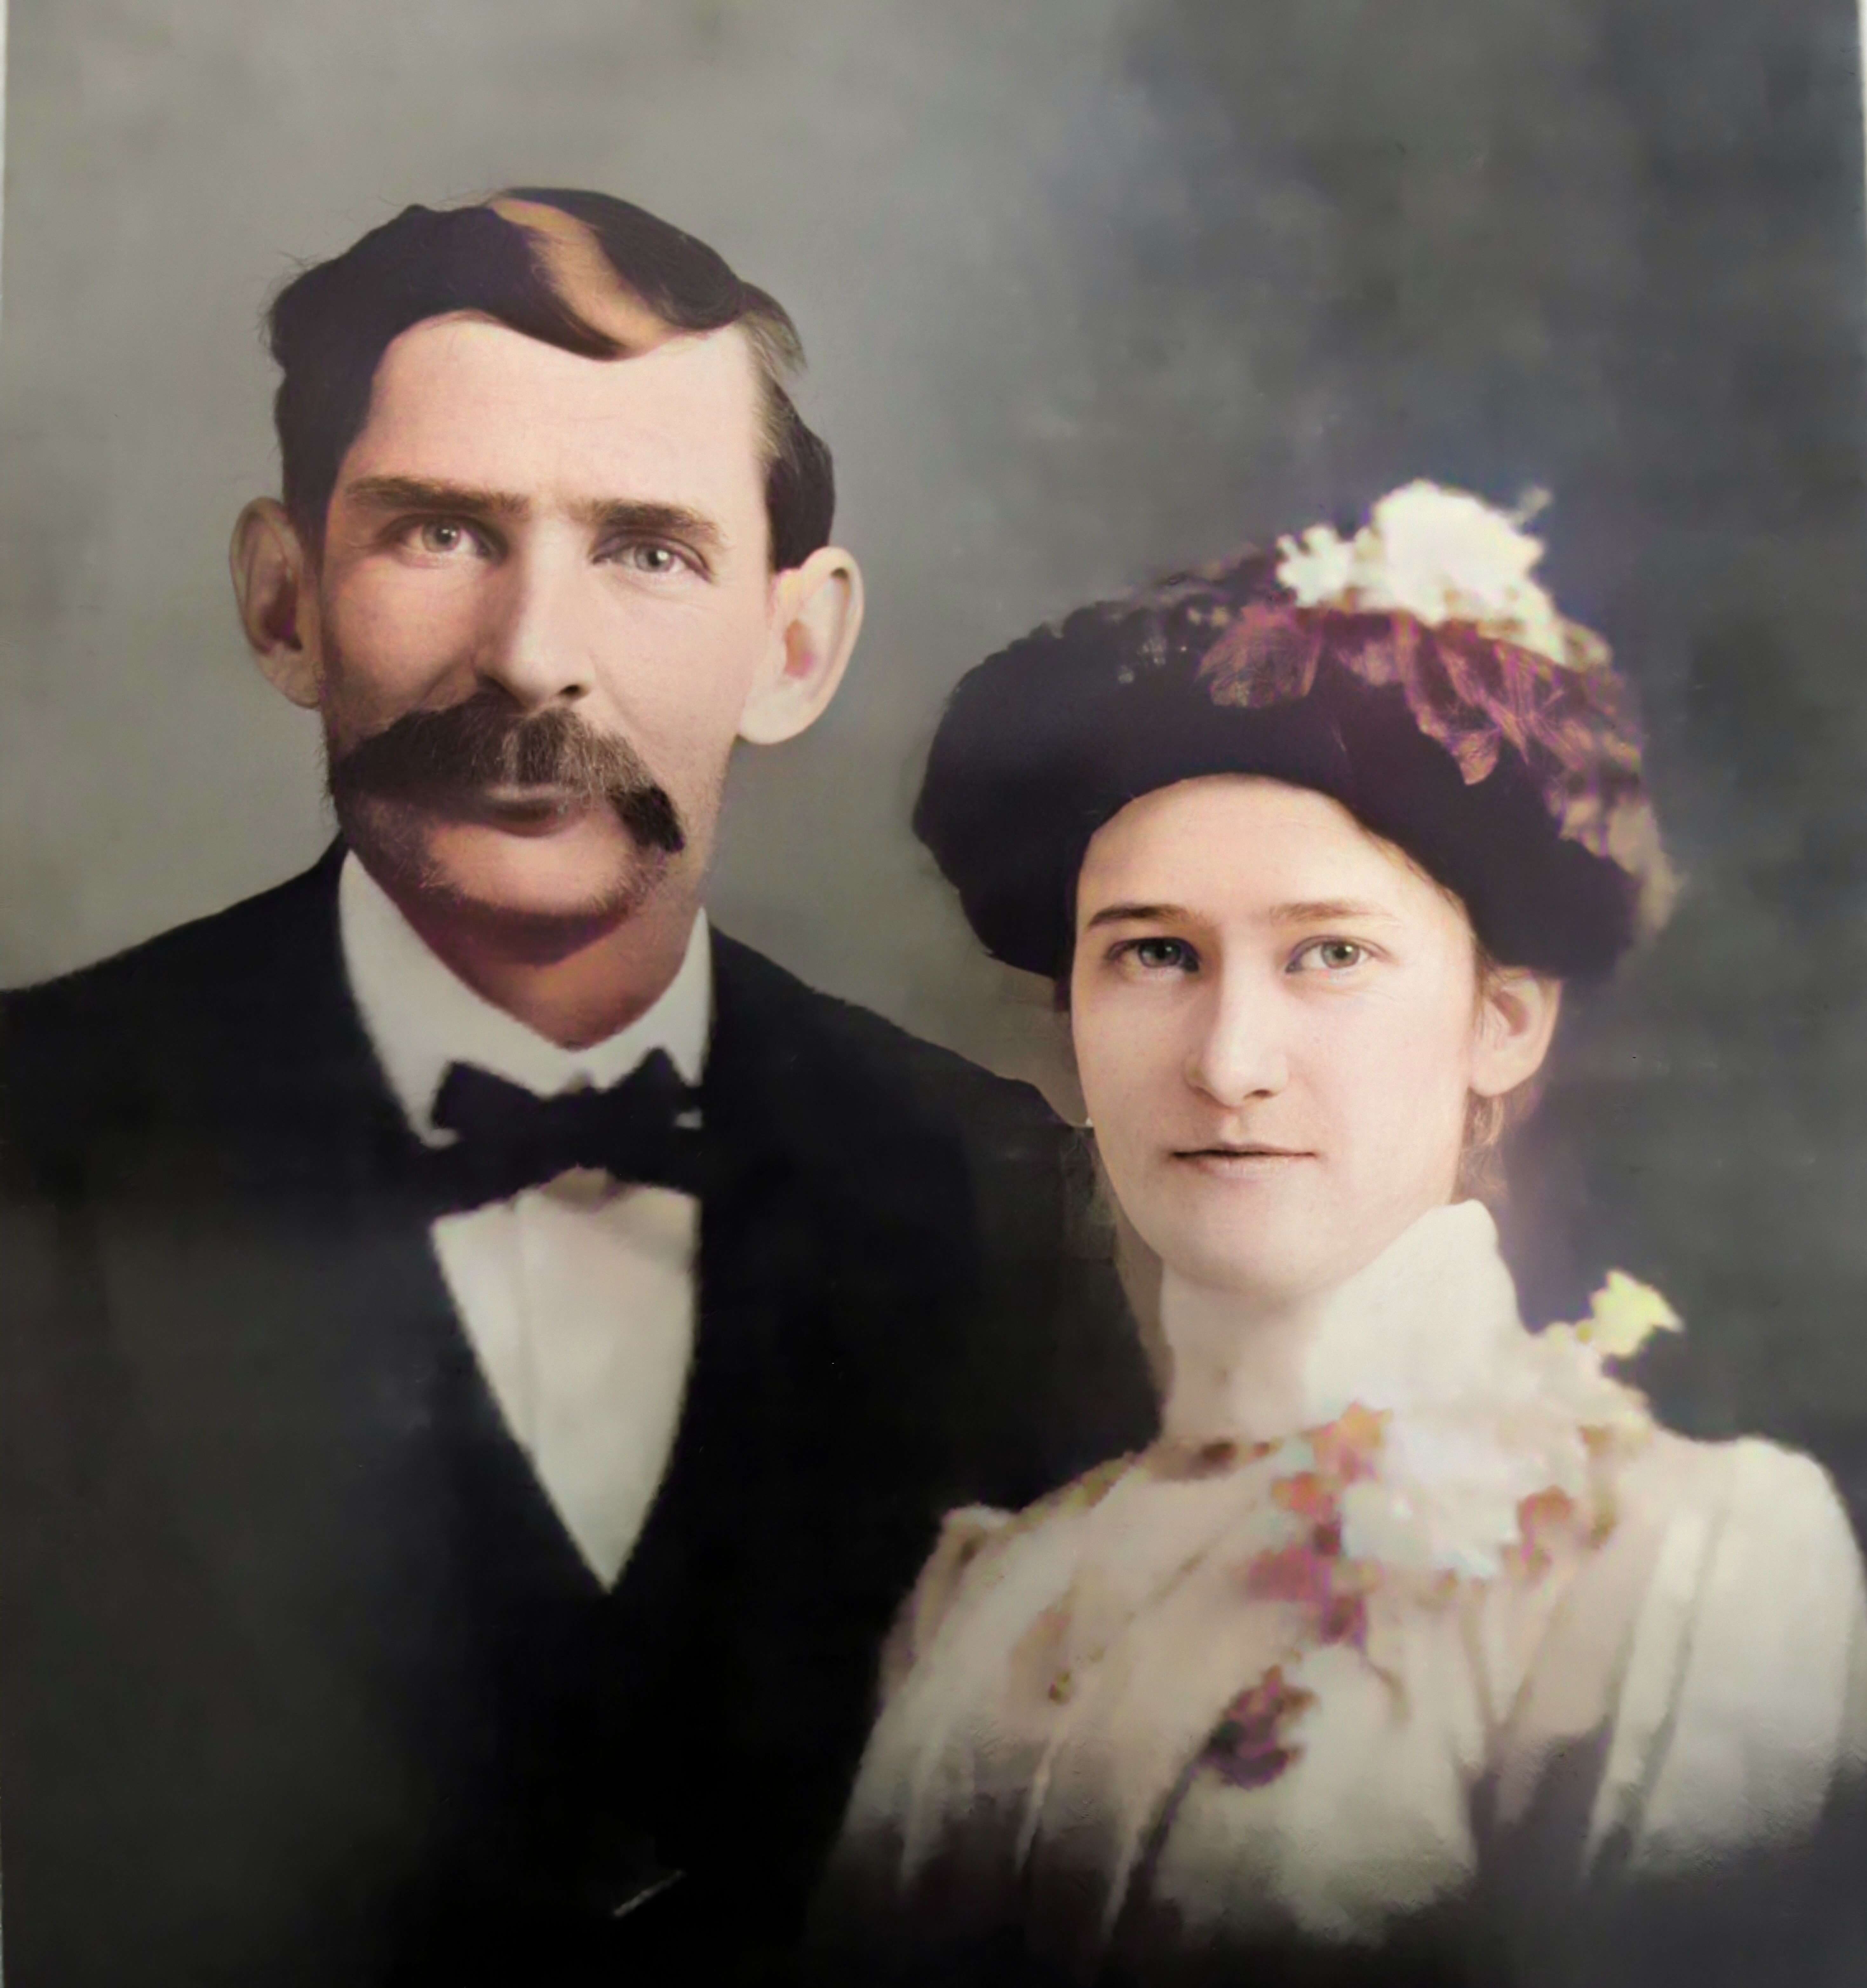
Joe and Minnie Blazer c1950 (Image courtesy of Lisa Egner.)
Step 2: Find the Family in the Census
Now we need to find the family in the census record closest to the date of the known address.
Since the 1950 census hasn’t been released yet because I’m recording this in Jan. of 2022, we can’t yet pull up their record. So, we’ll need to turn to the 1940 census. There’s a good chance that the family was in the same location since folks didn’t typically move around quite as much or as far as we do these days.
The 1940 census is available for free at many of the larger genealogy websites like FamilySearch and Ancestry.
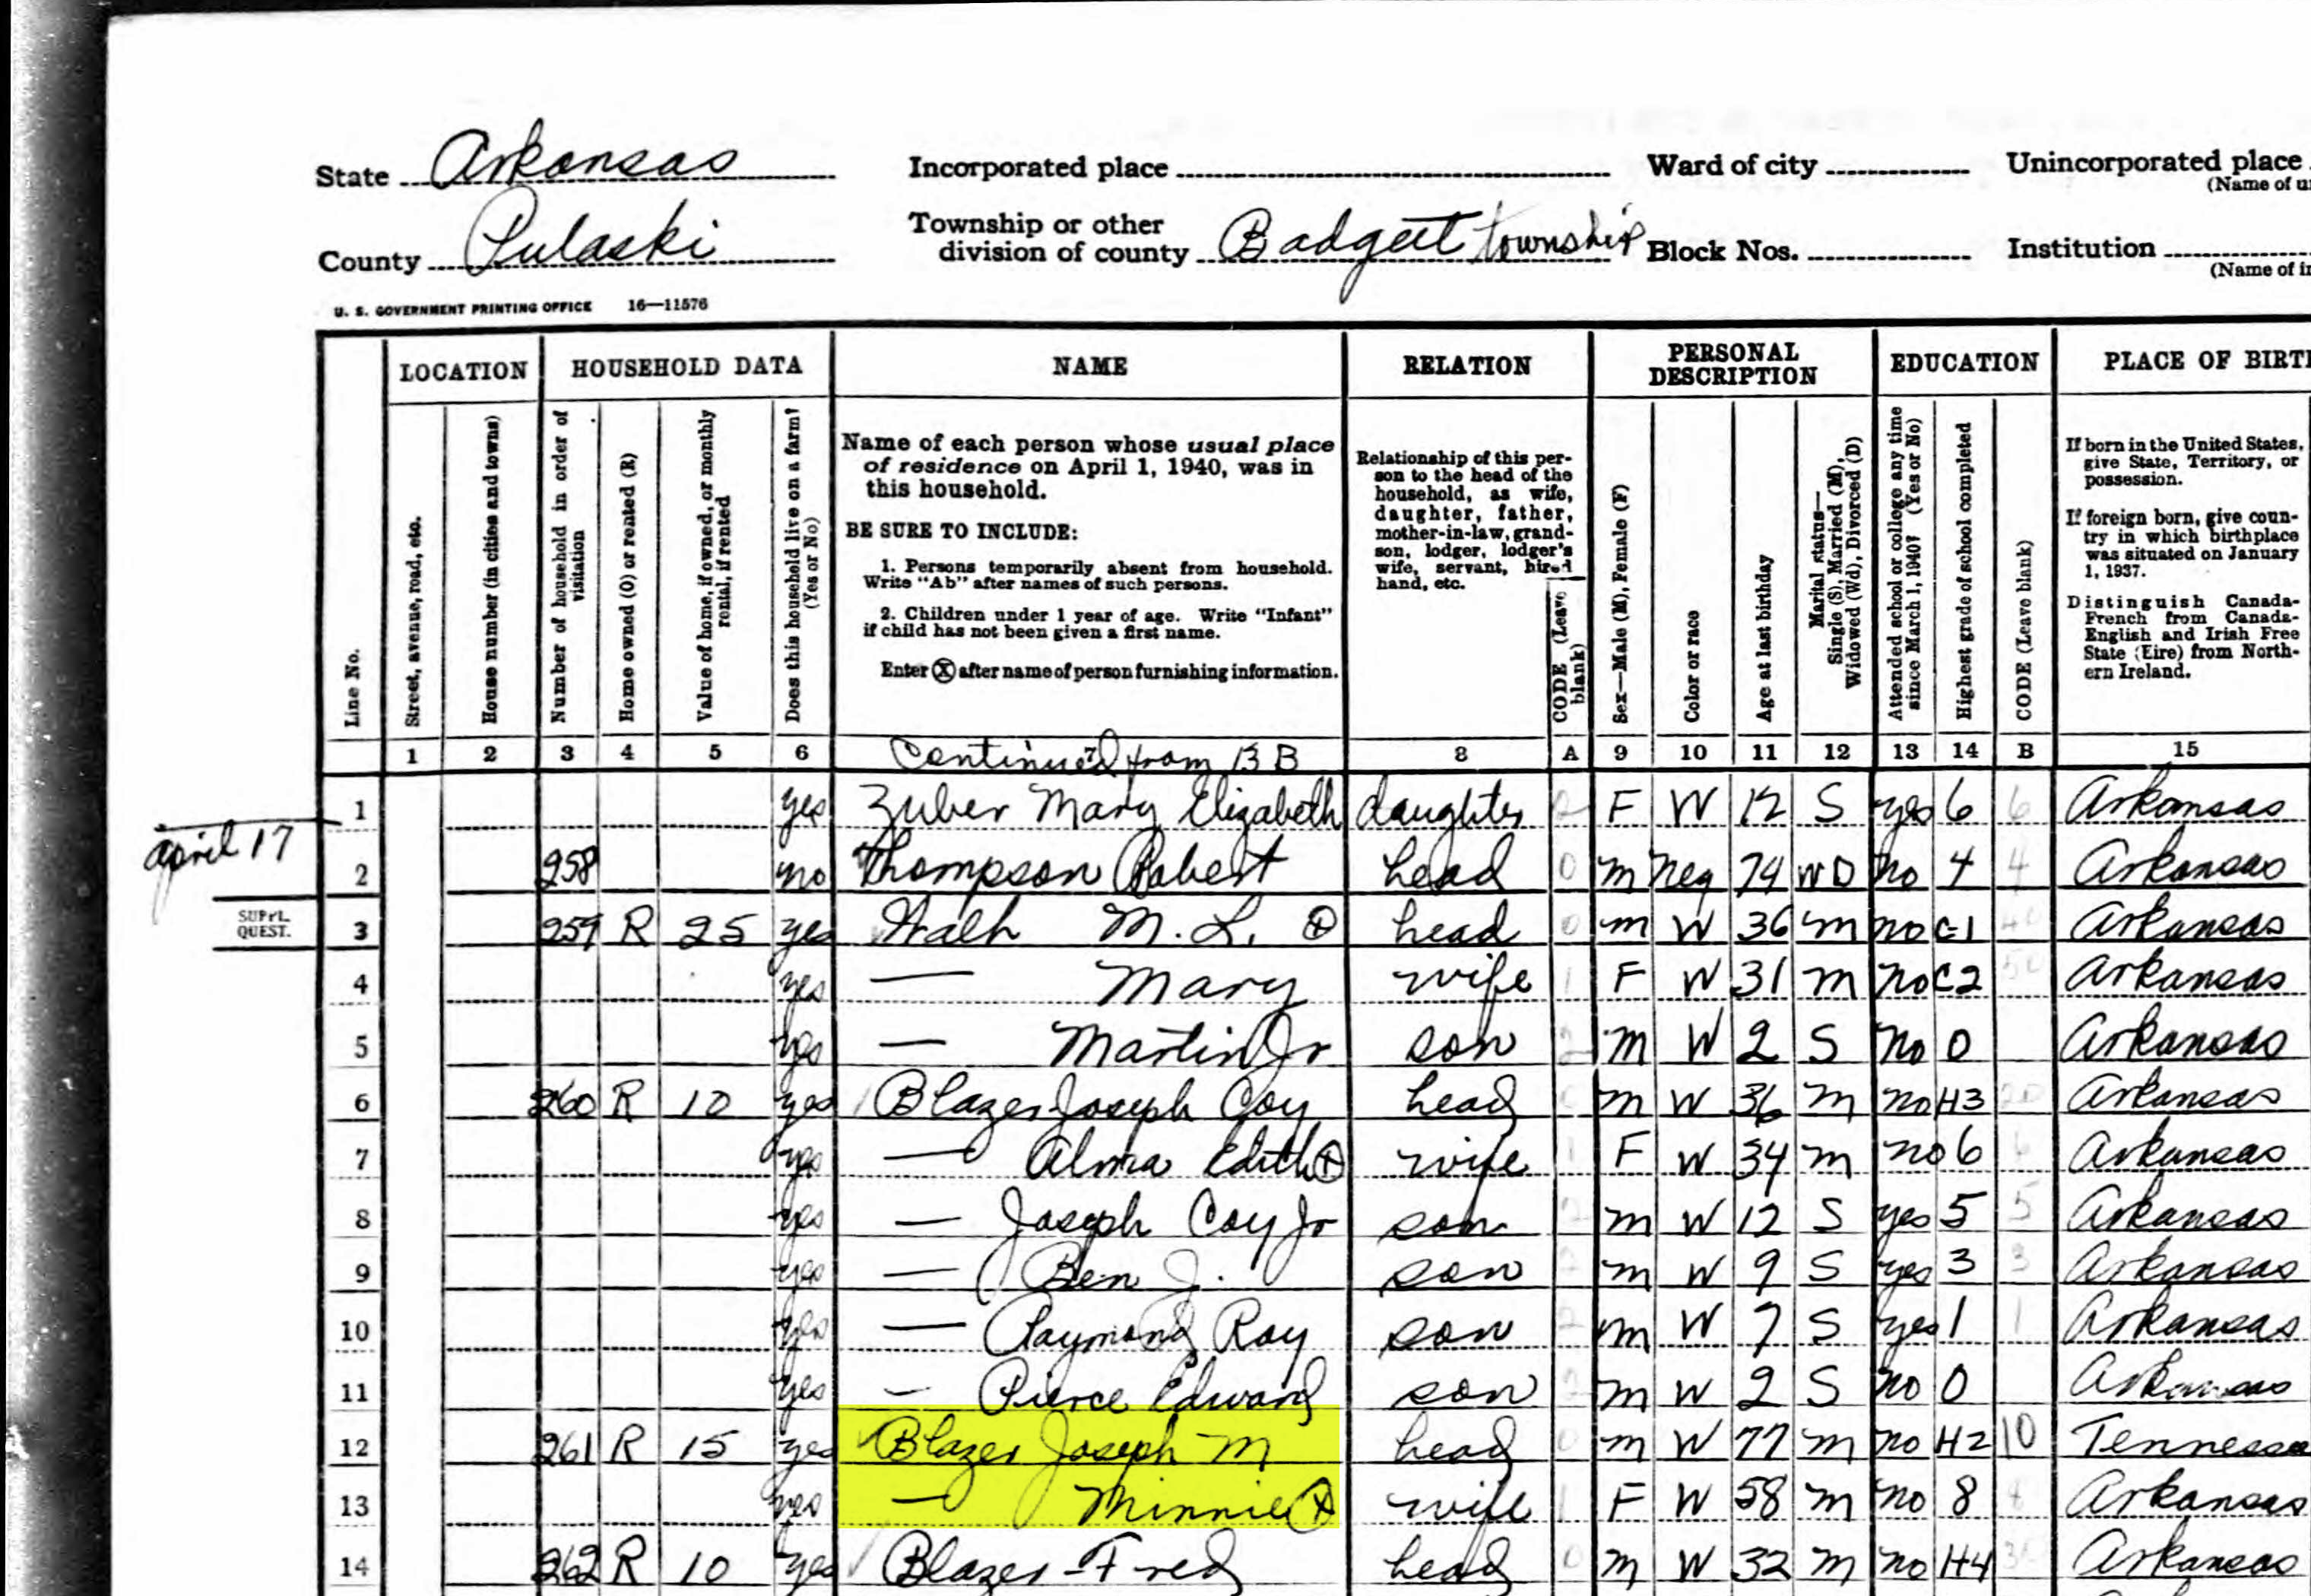
Here’s the Blazer family in the 1940 census, and Lisa confirmed that she believes this is the same place.
On the census record we are looking for three very important things:
the township (Badgett Township)
the ED number (60-2B)
and any address written along the left margin. If you don’t see anything, check the pages before and after that page. (Frazier Pike)
Step 3: Search for the Township
Once you have the location or township, search for them in an online map. I prefer to use Google Earth, but I often also use Google Maps. It doesn’t hurt to check both.
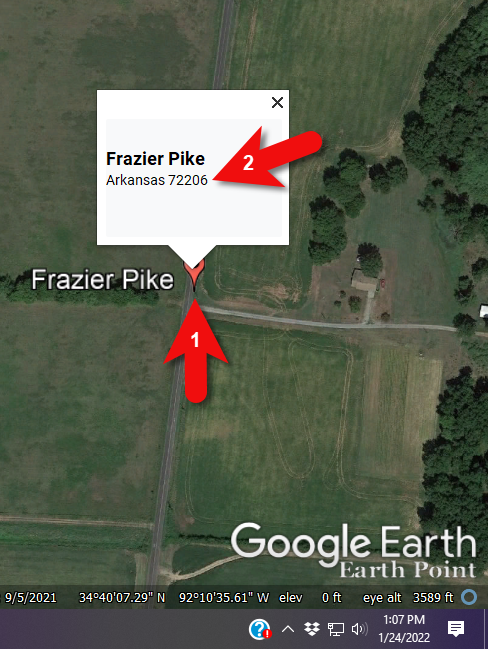
In this case we have two locations to look for: Badgett Township and Frazier Pike. We’ll start with the actual address which was Frazier Pike, Arkansas. Google Earth tell us that it’s a road just southeast of Little Rock, AR. When you click the pin it also tells you the current zip code for the Frazier Pike area, so we’ll make note of that. I’m like to create a project folder (Blazer Address) in my Places panel and then save the location pin in it. I will add additional items to the folder as I find them.
Click the pin to see the zip code.
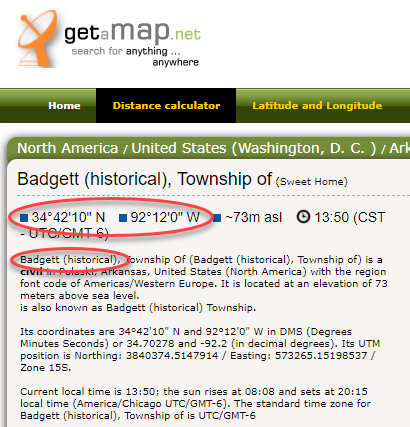
Next, I’ll search for the other location found in the 1940 census, Badgett Township. It doesn’t appear in either Google Earth or Google Maps. That’s probably because it’s been renamed or incorporated. Googling may be able to help so I googled: badgett township arkansas history.
This led me to a website that provided several helpful clues. It says that Badgett is “historical”, meaning that it’s the old name of the town which has since changed. It also provides us with the latitude and longitude of Badgett which we can use in Google Earth to confirm it’s location.
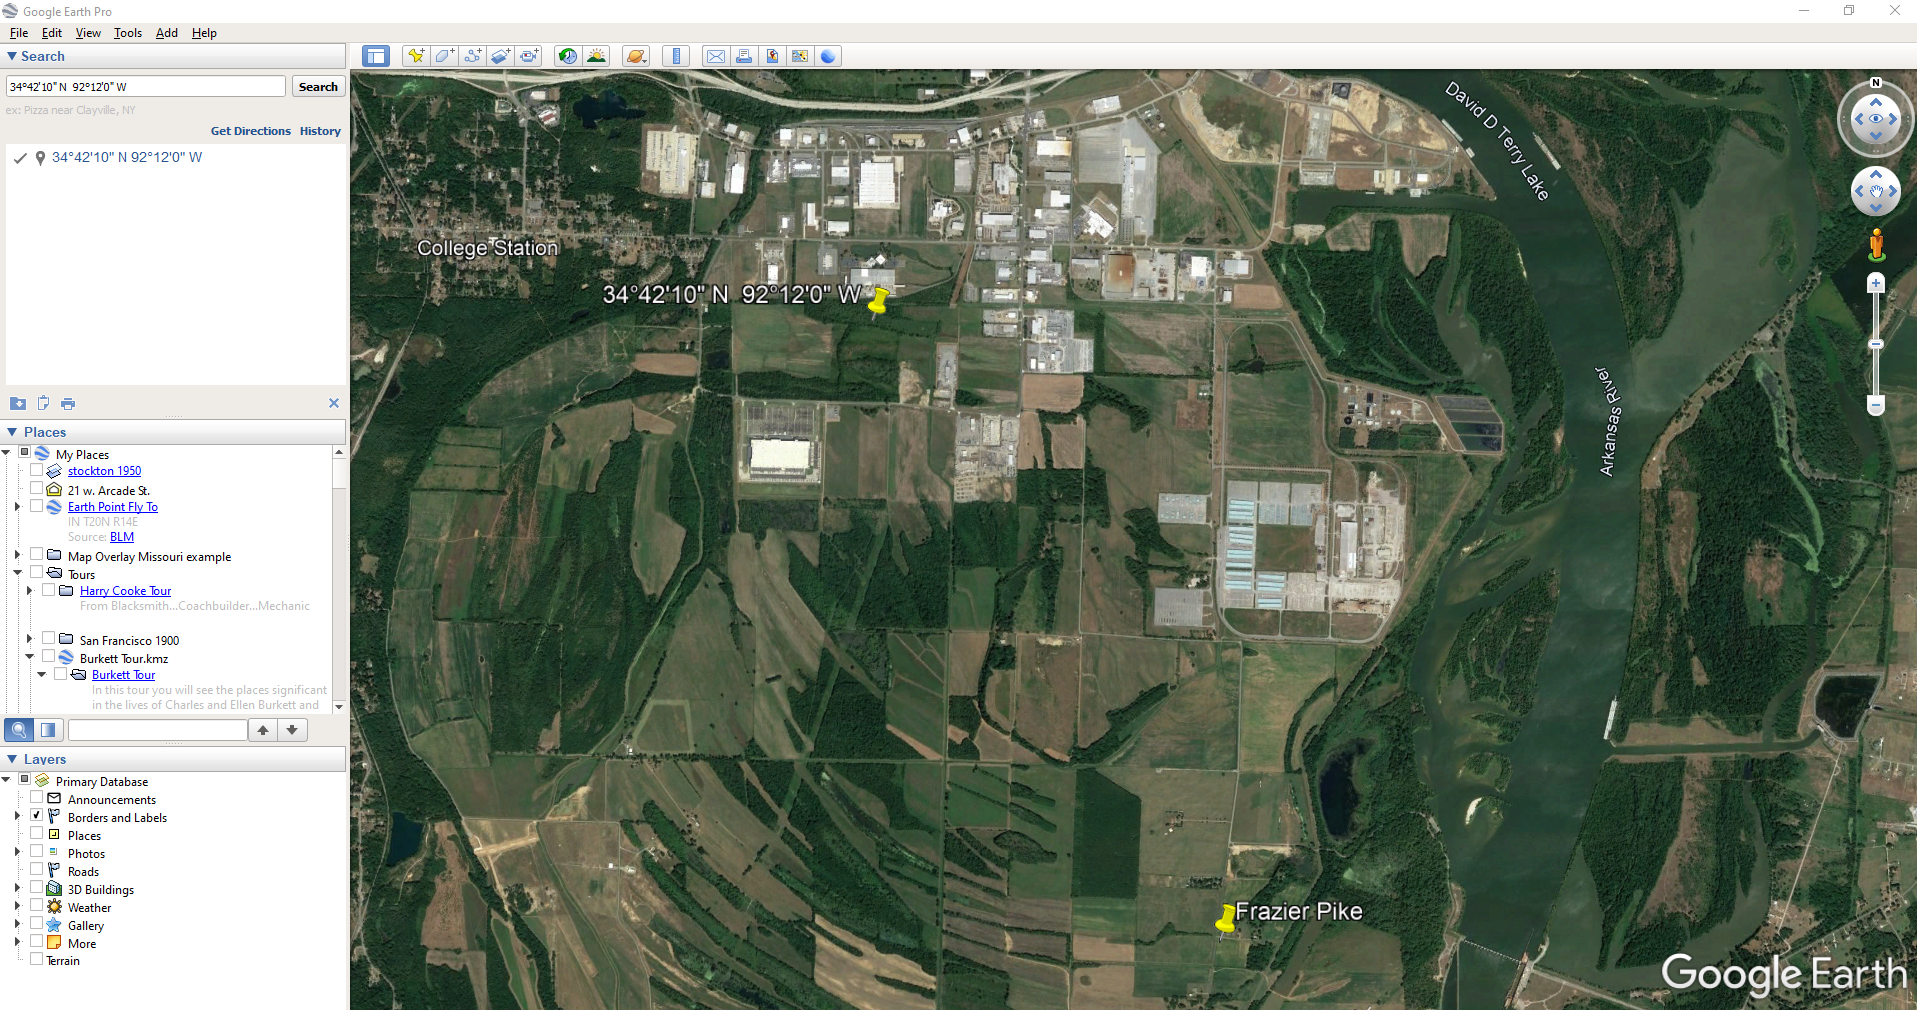
Go back to Google Earth and enter the coordinates (34°42’10” N 92°12’0″ W) in the search box and press ENTER on your keyboard.
The locations are very close.
And indeed, it’s very close to Frazier Pike. (image above)
I also like to look at the image results when googling. The website results are organized by the most relevant images. When I ran a search on Badgett, AR, and click Images on the results page, I see that the first one showed a map showing Frazier Pike. So, they are nearly one and the same.
Another search result was theHome Town Locator website. It says “the Township of Badgett (historical) is a cultural feature (civil) in Pulaski County. The primary coordinates for Township of Badgett (historical) places it within the AR 72206 ZIP Code delivery area.” This confirms that it is historical, the coordinates pin the same place on the map, and the current zip code is the same.
A quick Find on the page search (Alt + F) for Route 2 jumps me to a nice bit of history.
In the section discussing schoolhouses we get a description of the route: “…located in the main red-dirt road called Route 2 in Pulaski County. Route 2 is now known as Frazier Pike.”
Step 4: Find the ED Map for the Closest Census
Next, we turn our attention to the enumeration district or ED number we found on the 1940 census. As you’ll recall, 1940 is the closest available census record to the date of the address, and we found Lisa’s ancestors in that record in Badgett, AR which we now know is the Frazier Pike area in Pulaski county. On that record it says: Badgett Township. ED 60-2B.
We could google for the year of the census and the words enumeration district map. However, there’s a great free tool for finding them over at Steve Morse’s One-Step Tools website at stevemorse.org.
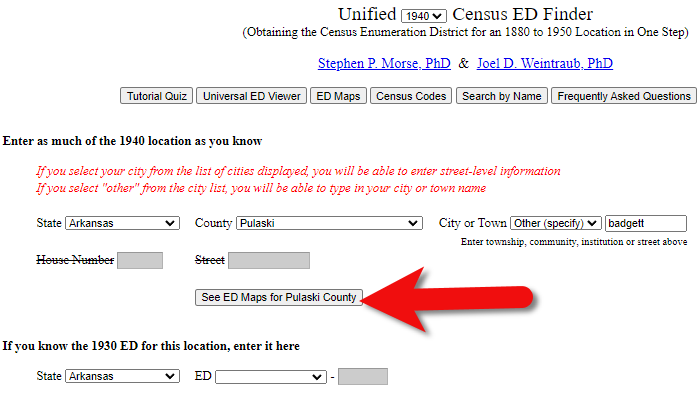
In the menu under U.S. Census select the Unified 1880-1950 Census ED Finder, select the year at the top of the page. In this case we will select 1940. Next, enter the state (Arkansas) and county (Pulaski). You can then select the city or town. However, in the case of rural addresses, don’t expect to find the town listed. If it offers you an “Other” option you can try and type the name of the town (Badgett) in the field provided. Don’t bother entering the route number (Route 2) because that’s not a street address, it’s a postal delivery address.
We could also run this same search on the 1950 census. Chances are you will see more ED numbers listed because the population was growing. Since an enumeration district had to be the size that one enumerator could cover in about a two week timeframe, they were often redivided as they decades went by.
Since we know from the 1940 census that township was in existence, we should receive a list of ED numbers as a result. In this case we got three: 60-2A, 60-2B. and 60-3.
Click the corresponding ED number.
Click the linked ED number that matches the one you found in the census record. In this case, the 1940 census record told us that the Blazer family was in ED 60-2B, so we click that link.
The next page lists each ED. Click the View link for the ED.
Click the View link.
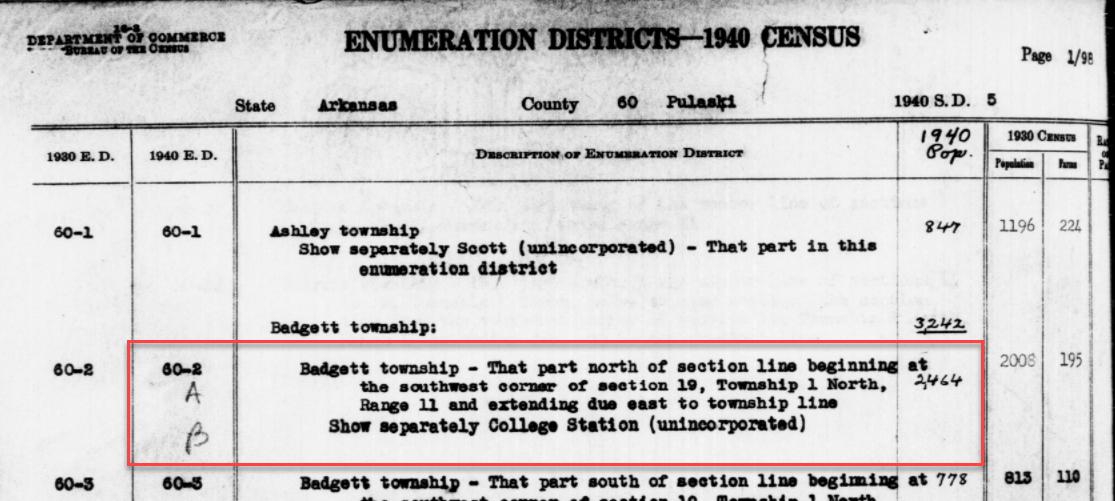
The View link will take you to the exact page for that ED in the ED Descriptions from the National Archives T1224 microfilm from Record Group 29. This description helps even further define the area.
1940 Census ED Description
60-2 A and B says, “Badgett Township – That part north of section line beginning at the southwest corner of section 19, Township 1 North, Range 11 and extending due east to township line. Show separately College Station (unincorporated.)”
This is perfect because its’ giving us the township, range and section! We can use this information to plot it in Google Earth.
How to plot a land description in Google Earth with Earthpoint:
Enter the state, principal meridian (in this case there’s only one choice here thankfully), township, range and section numbers from the census description.
Click the Fly to on Google Earth button.
This may open automatically in Google Earth or you may be prompted to save the file to your computer. Do that and then click it to open. It is a KMZ file so it will automatically open in Google Earth.
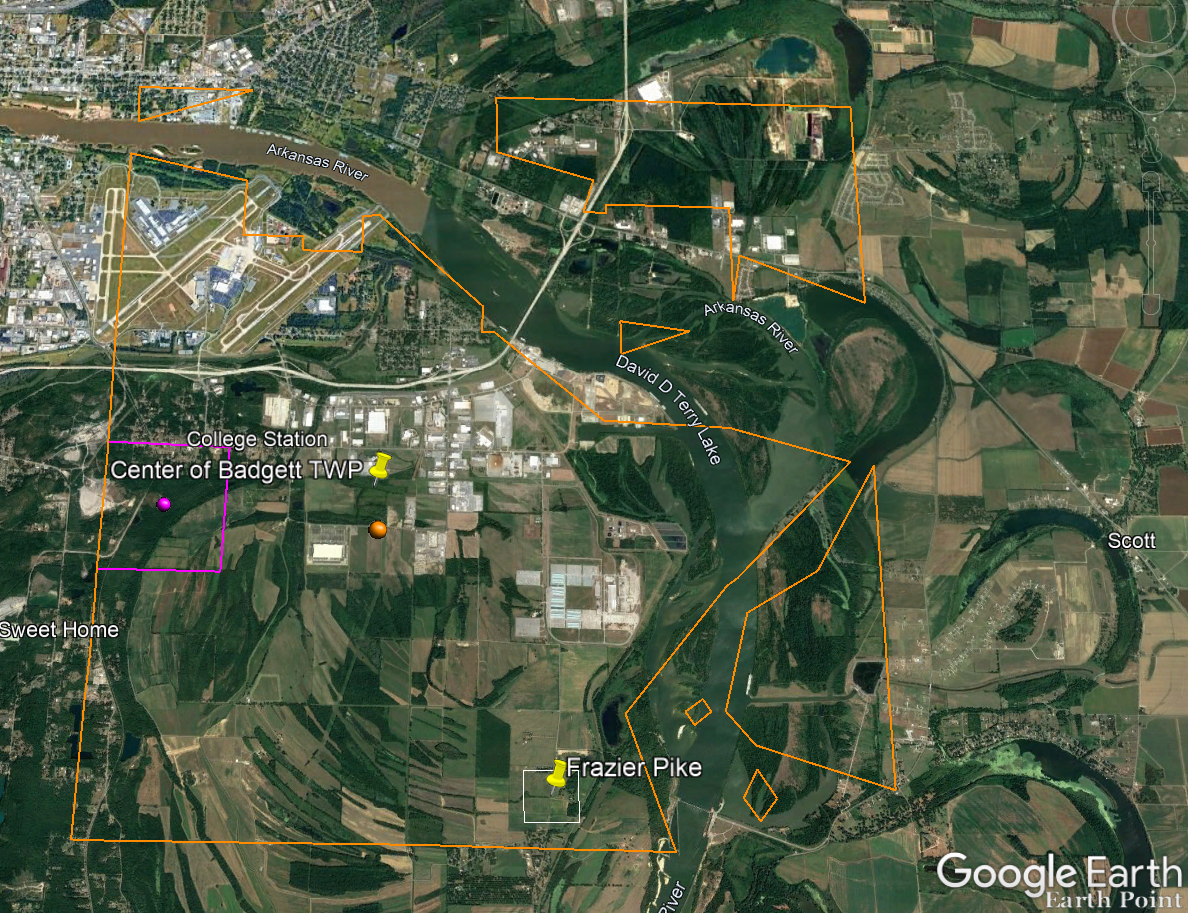
And here are the results! The location is mapped out for you.
Census description mapped in Google Earth.
Notice I still have my placemark pins for the approximate location of Frazier Pike, and the center of Badgett Twp which we got using the latitude and longitude coordinates. Section 19 is outlined in purple, and the township is outlined in orange.
Since Frazier Pike is a road, turn on Roads in the Layers panel. Now we can see that Frazier Pike is running north and south and our pin is right on top of it.
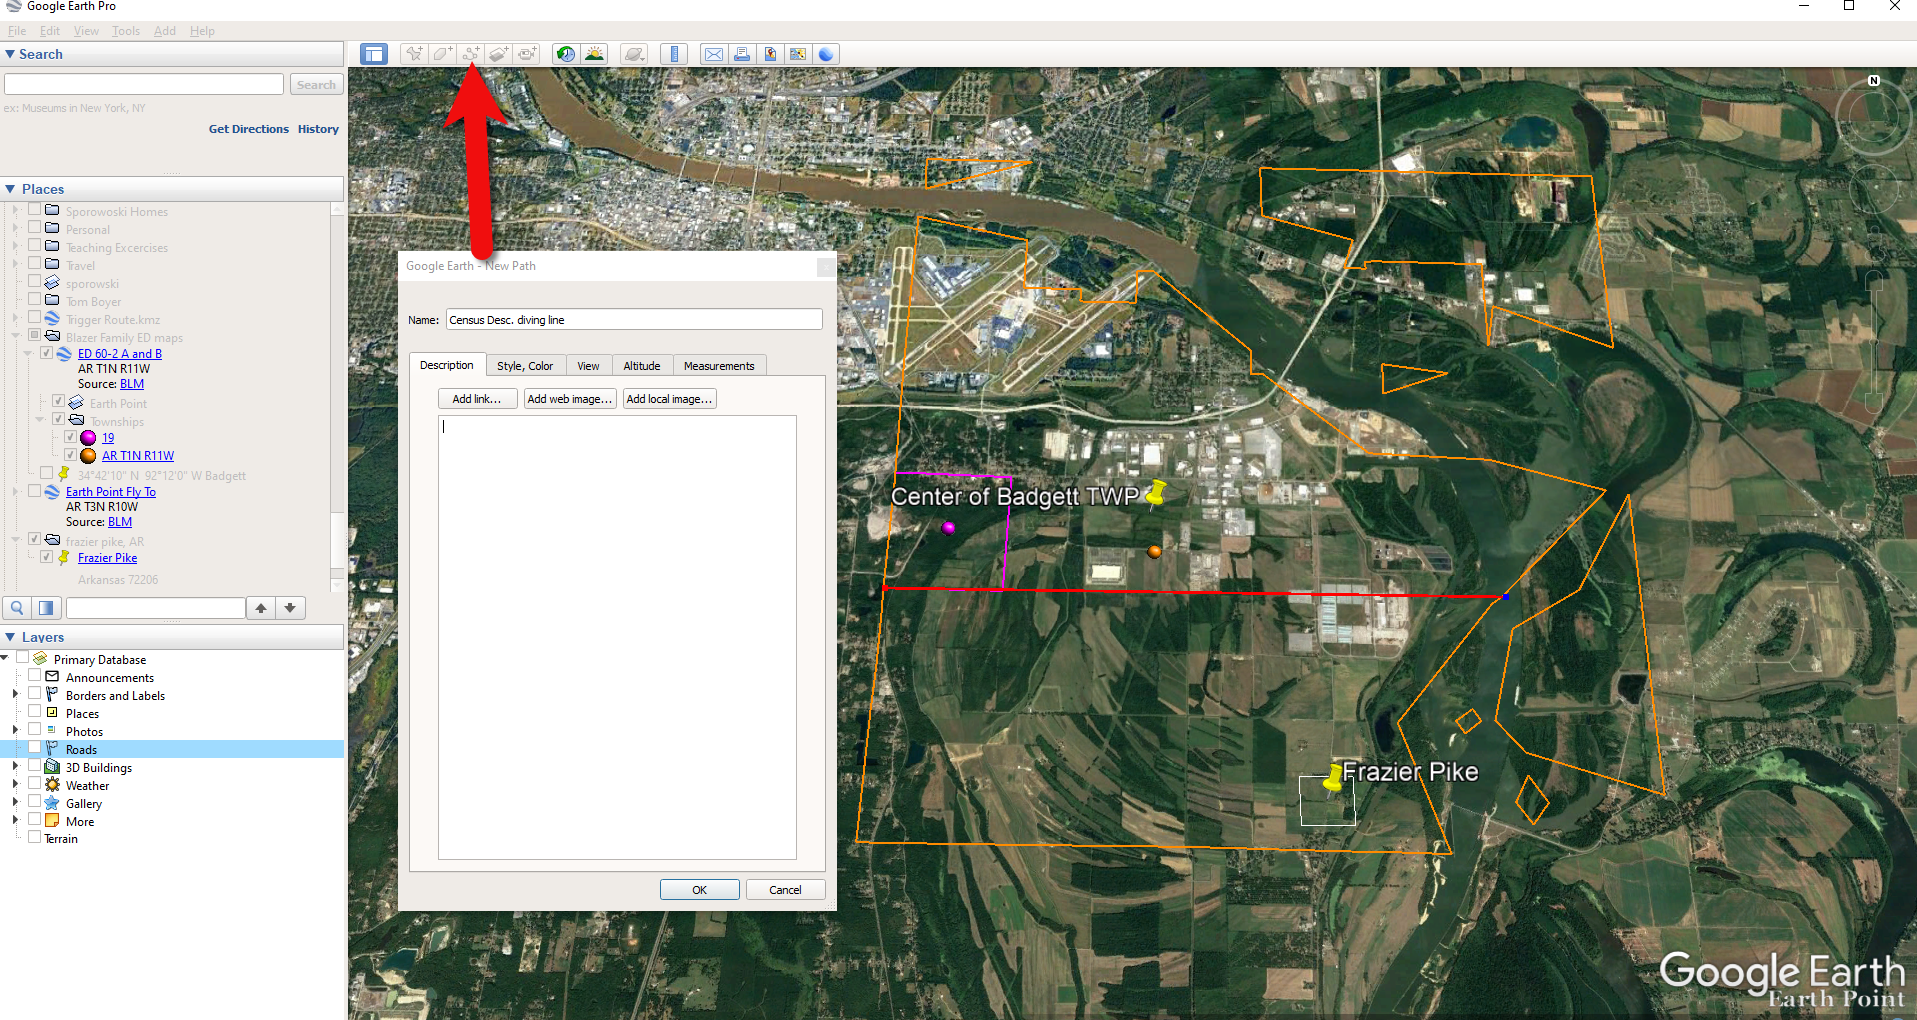
Now we can use the census description to further zero in on the area. “Badgett Township – That part north of section line beginning at the southwest corner of section 19 Township 1 North, Range 11 and extending due east to township line. Show separately College Station (unincorporated.)”
Mark that in Google Earth using the Path tool. Click the Path button in the toolbar at the top oof Google Earth. Click on the southwest corner of section 19 (outlined in purple) and then go east and click the township line (in orange.) Give your path a title and click OK.
Click the Path button in the tool bar.
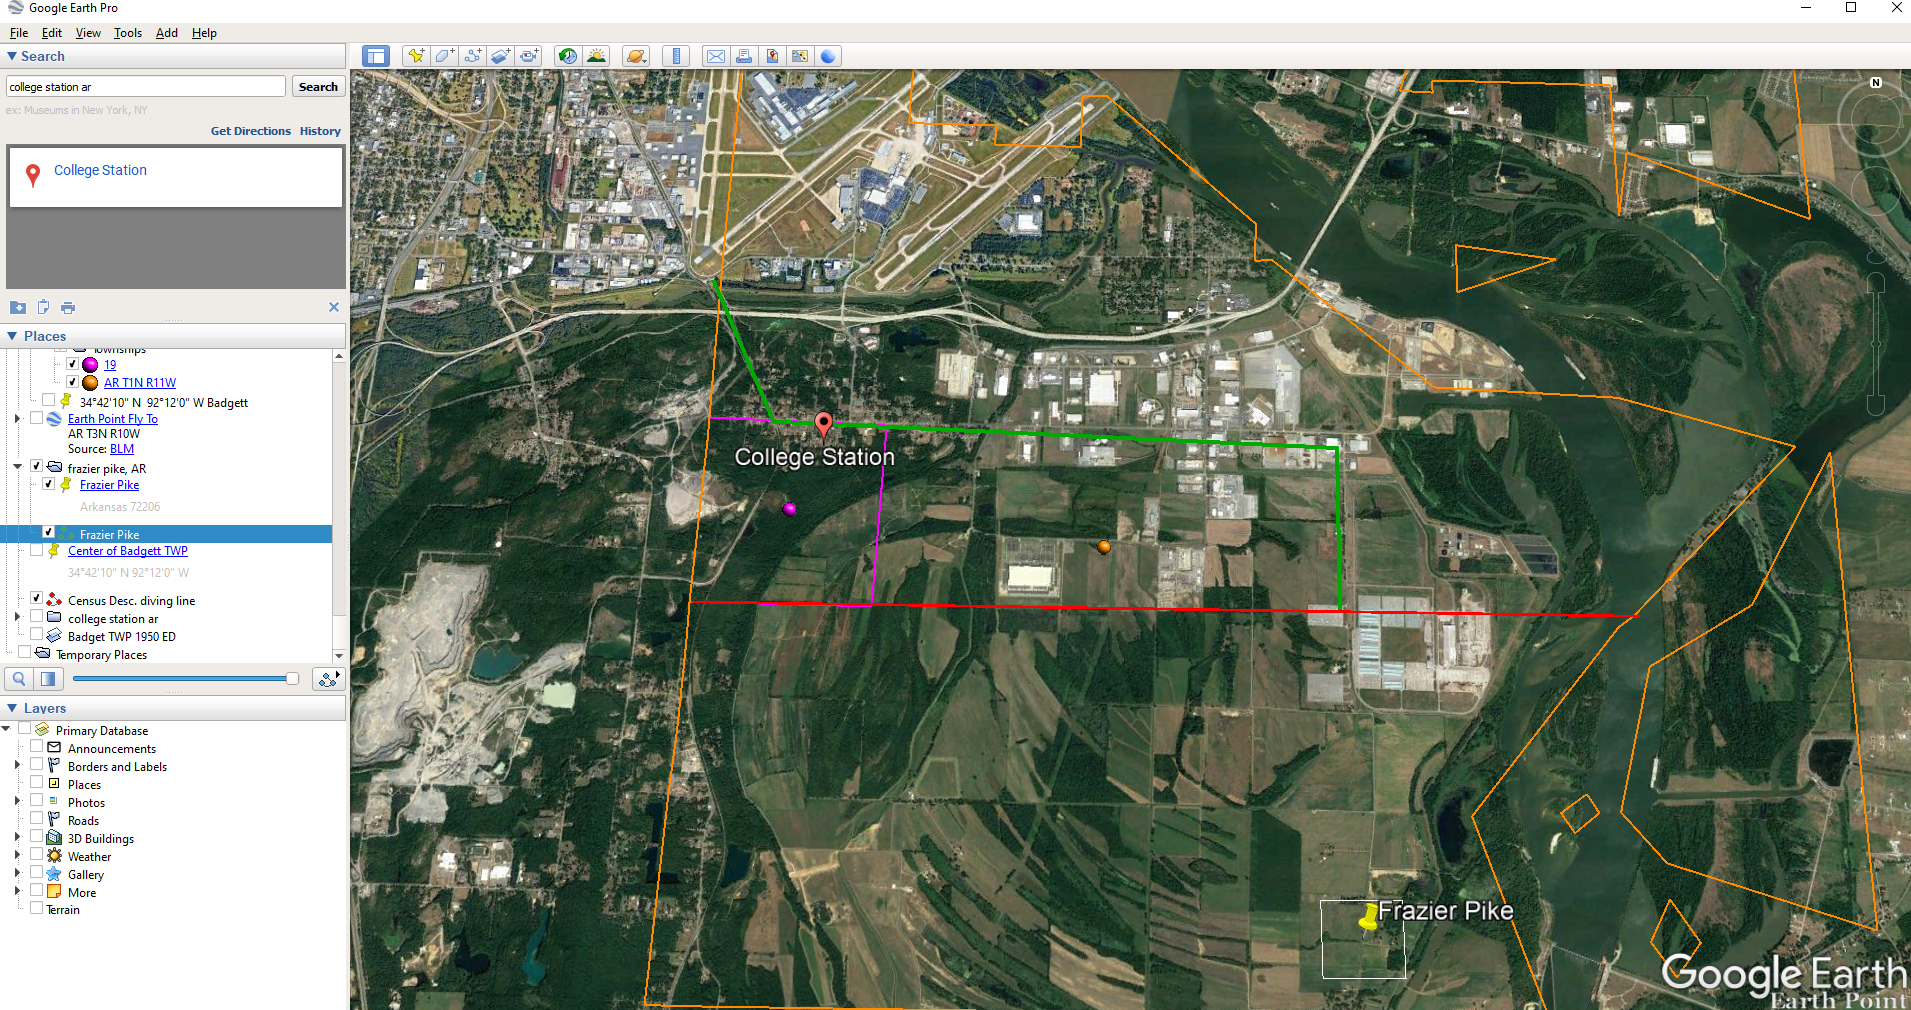
Next in the census description, on the same line as “B” it says “Show separately College Station (unincorporated.)” We can find College Park by searching for College Station, AR in the Google Earth search box.
Next, we want to follow Frazier Pike going north until we are above the section line that started in the southwest corner of Section 19. Use the Path tool again to mark it on the map.
Use the path tool to draw lines in Google Earth.
Get the Enumeration District Map
Now it’s time to head back to Steve Morse’s website and get the ED map for 1940. On the page you started your search, click the See ED Maps for… button.
Click the See ED Maps button.
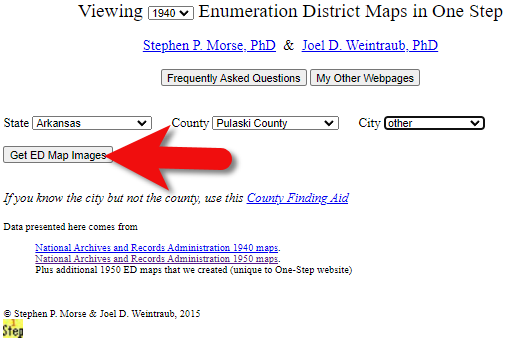
On the next page select the state, county and city again and click the Get ED Map Images button.
Click the Get ED Map Images button.
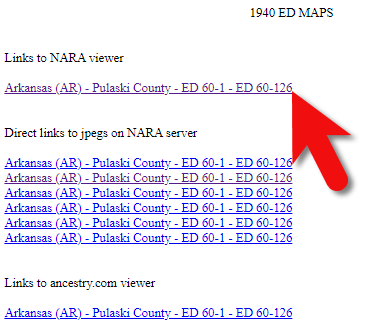
This will take you to a list of all of the available maps. The first link will take you to the National Archives webpage where you can look through all the maps for the area you selected. You could also look through all the individual maps by clicking each of the links listed under “Direct links to jpegs on NARA server”. However, I don’t recommend that will take longer because they are extremely large image files. It’s easier to quickly look through them on the NARA website.
Click the Link to NARA viewer.
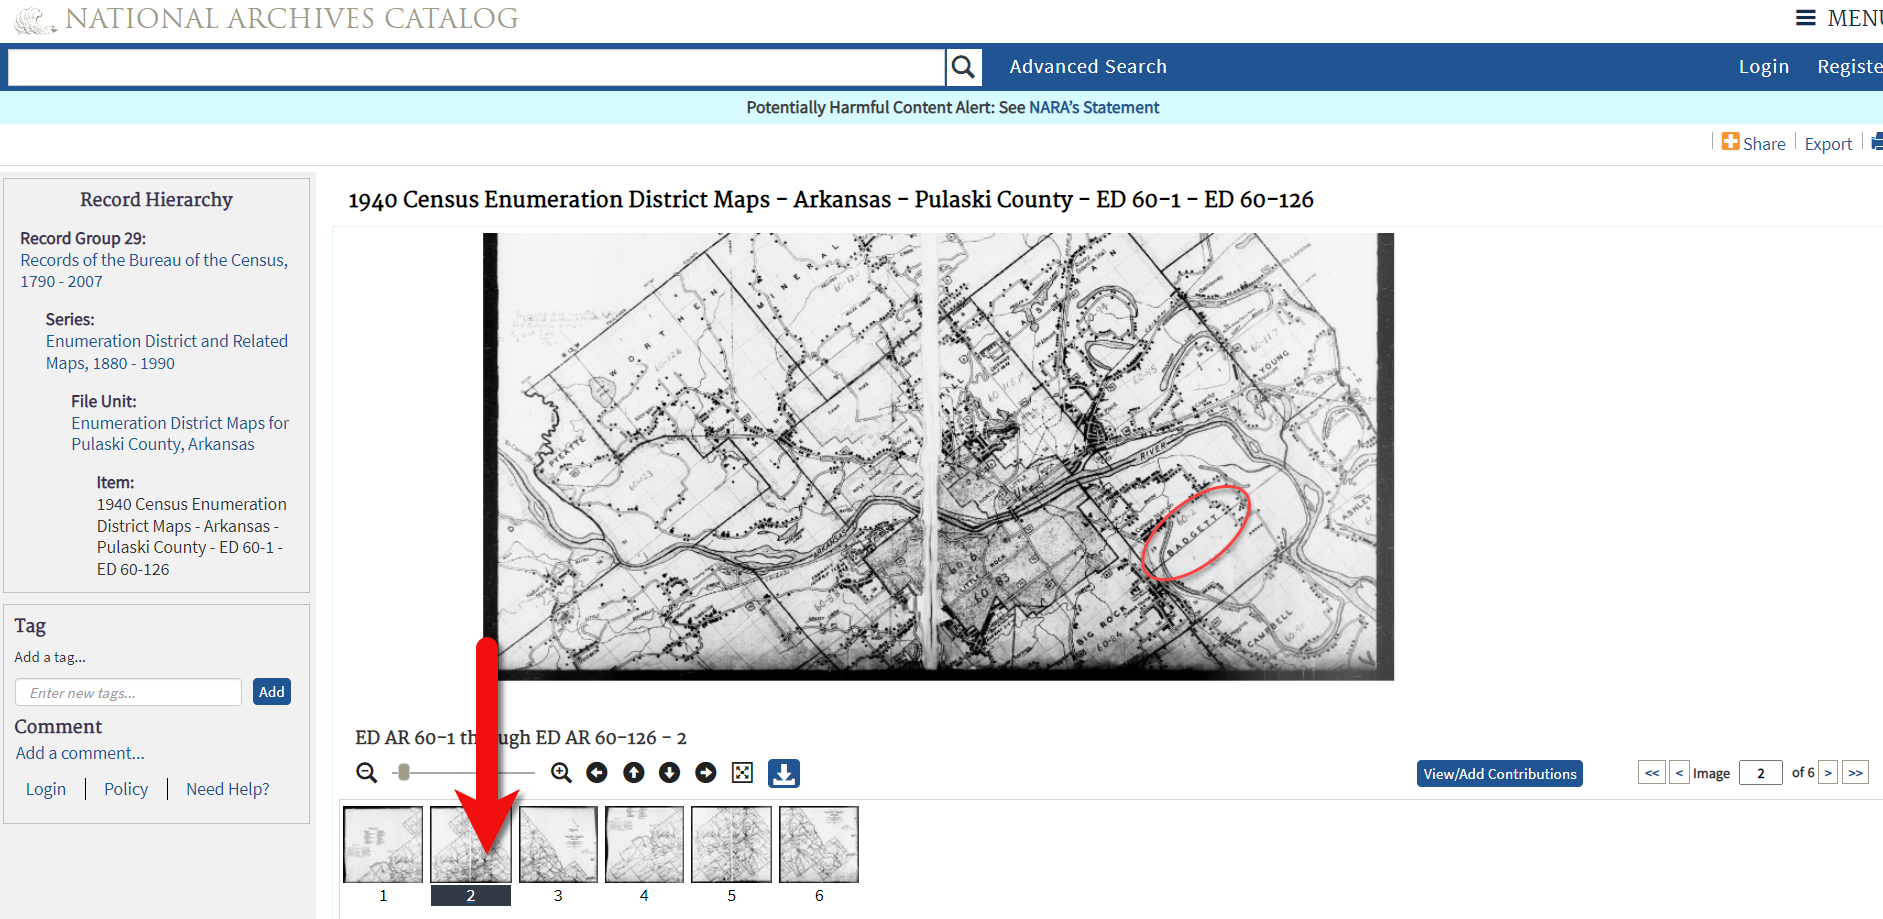
Click the link to the NARA viewer and look for the township name in the map thumbnail images. In this case I’m looking for Badgett. You can do this quickly by clicking each image and then drag the larger map in the viewer around with your mouse. I found Badgett Township in the second map.
Map images at NARA.
Download the full-sized map by selecting the thumbnail image and then clicking the download button (down arrow.) The full resolution map will load in your web browser. Right-click on it and Save Image As to save it to your computer.
Right-click on the map to save it to your computer.
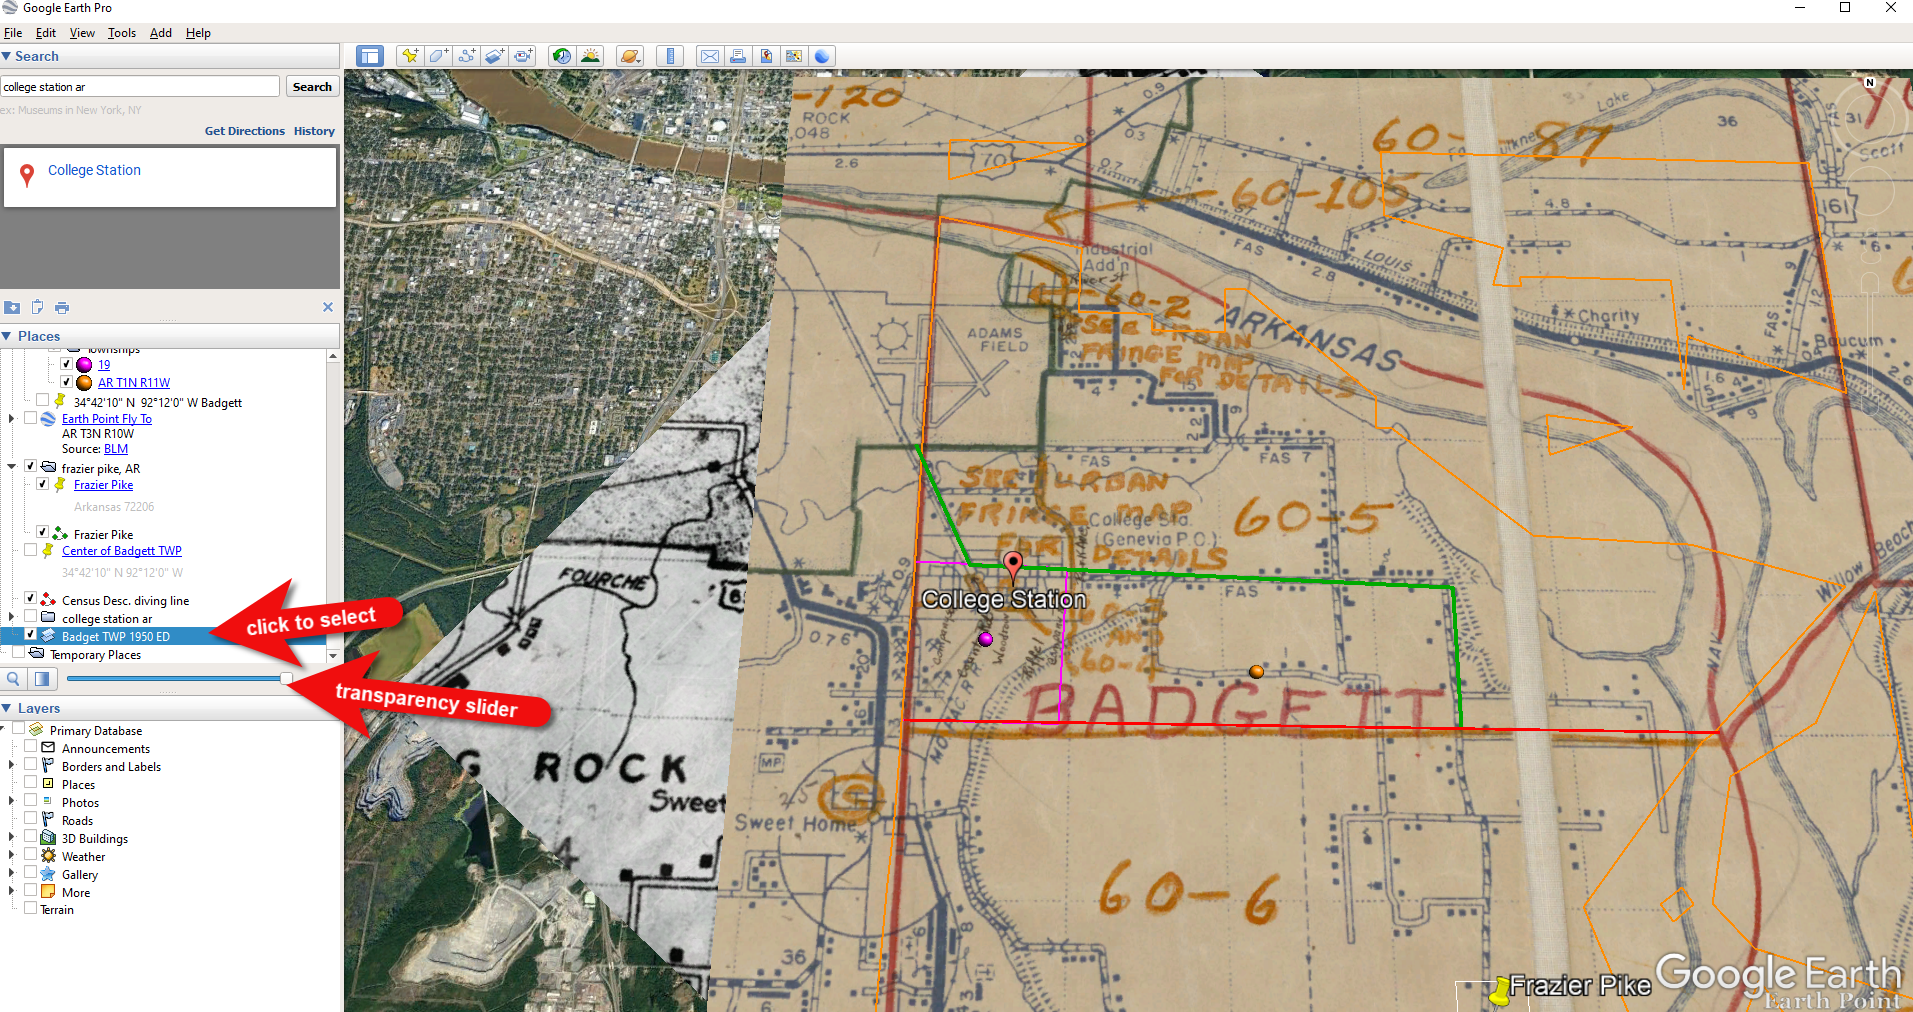
It can help to create a map overlay in Google Earth using this map. (Learn how to do this in the newest edition of my book The Genealogist’s Google Toolbox.) I cropped the image to just include Badgett Twp.
In fact, you can overlay both the 1940 and 1950 ED maps. Click to select a map in the Places panel and then you can use the transparency slide to fade it to reveal changes.
Select the map and use the opacity slider in Google Earth.
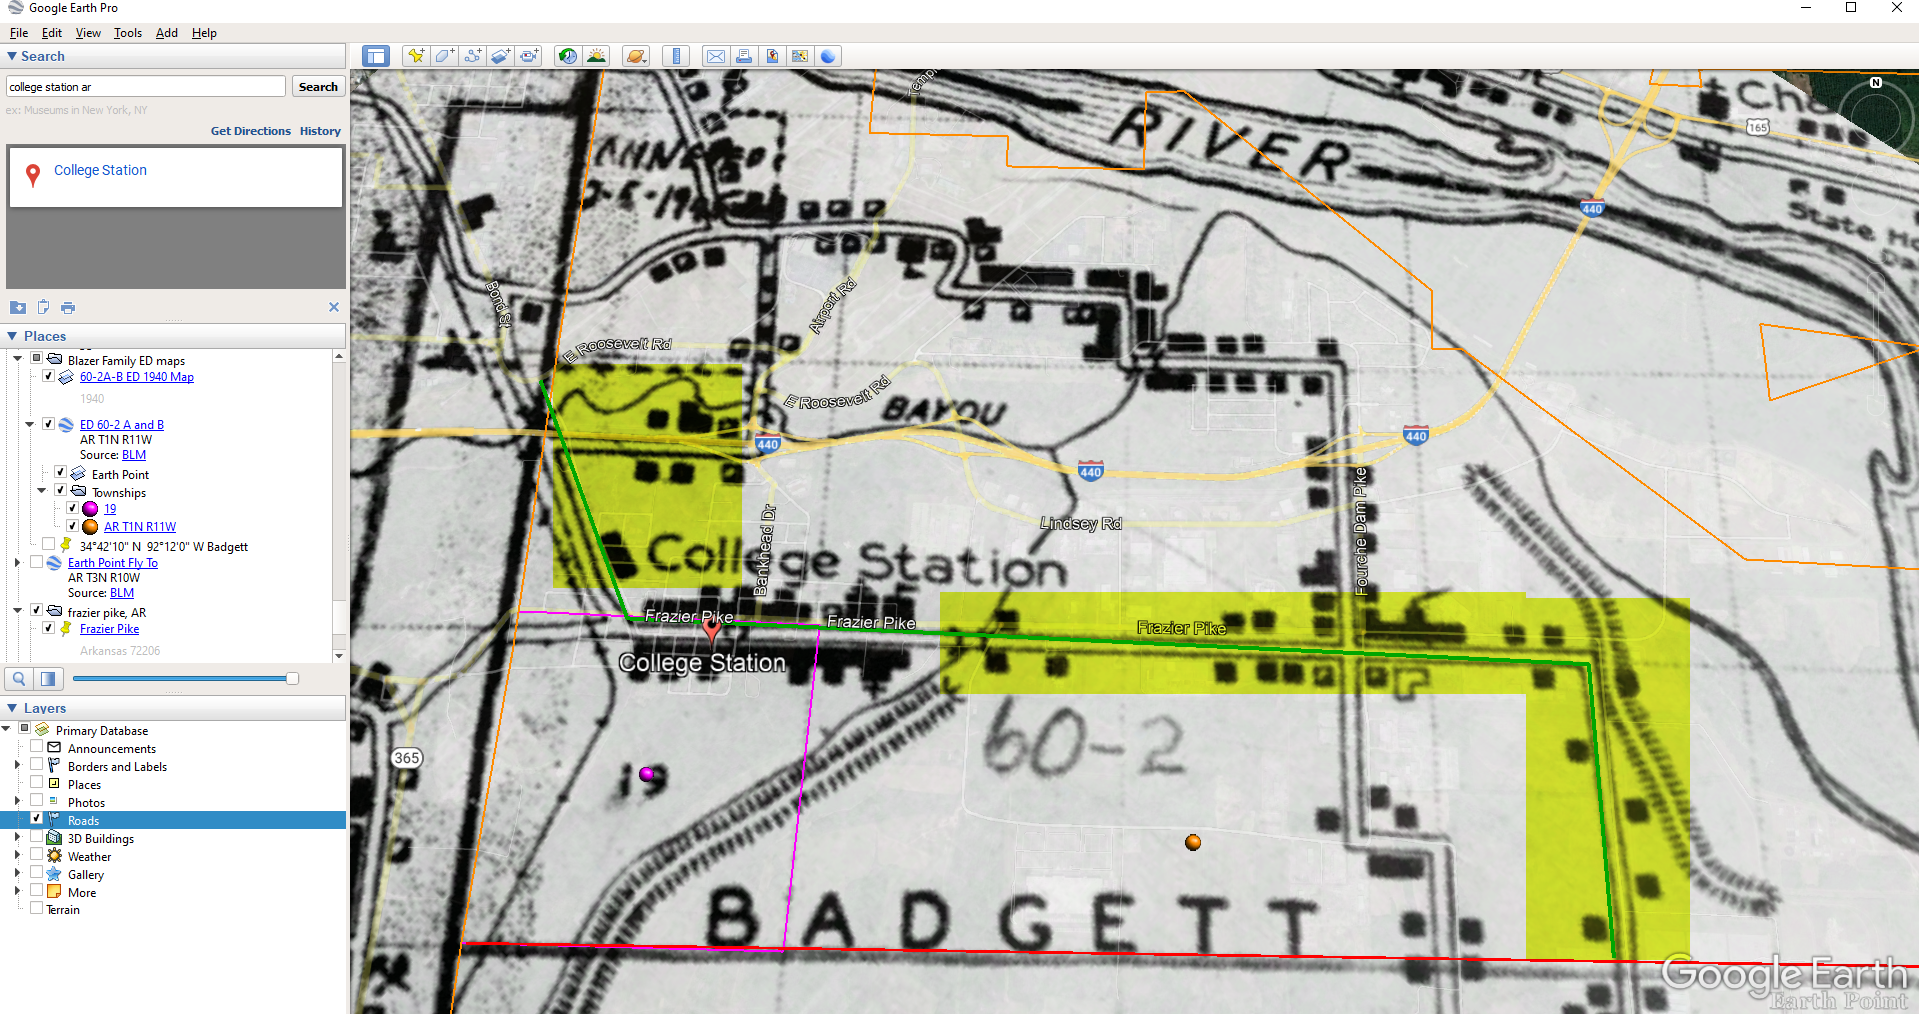
Step 5: Follow the Census
The census can provide even more clues about where in an enumeration district an address was located. Using the census record and the census description of the enumeration district, it can help to highlight the area of the map. In this case, ED 60-2 is “that part north of section line” which I marked with a red path line. The Blazers address was Frazier Pike (which I marked with a green line), so this eliminated the northern area and the Fourche Dam Pike road. To make sure that I could eliminate that area, I verified in the 1940 census that Fourche Dam Pike was enumerated separately by running a keyword search of the Pulaski County census records at Ancestry. And yes, indeed folks living along Fourche Dam Pike were enumerated separately and the road was written along the margin just as Frazier Pike was. This gives me a lot of confidence that I’m identifying the right area.
The route highlighted on the census ED map.
As you can see, there are little black squares and other markings on the map. To find out what each of those means we can turn back to the National Archives and download the page from this map collection that includes the map key.
The black squares are “Farm Units”. A farm unit square is not one family , it is the entire farm, including the owner and other families who may live and work on the farm. We also see businesses, churches, the town hall, school houses and more. We may not be able to find the exact home, but it’s possible to get very close. To do that, we need to head back to the census records themselves.
On Ancestry.com , the Blazers appear on Image 27. The filmstrip makes it easy to quickly scan through the images and browse them.
In this case, there are about 33 images or pages in ED 60-2B. The enumerator would start at one end of Frazier Pike and then make her way to the other. The enumerator wrote “College Station Pike” on pages 1 and 2. That isn’t a road today, and I couldn’t find any references to with a quick search. However, all of the other pages say, “Frazier Pike”. My guess would be that the census taker started on the west side – the hub of College Pike – and made her way east. Census enumerators visited homes and farms in a logical path, although they may have criss-crossed back and forth across the road. They listed the order in which they visited on the census form itself. In cities we might also see house numbers listed, but that’s not the case in a rural area. However, you may see pencil dots with visitation numbers written on the ED map. They were instructed to do this in rural areas in the census enumerator instructions in 1940. Unfortunately, the person enumerating 60-2B did not.
We could also look at the types of businesses and buildings shown on the map, and then look through the census records at occupations. We see a “factory/industrial” building to the east so we would look for people working in that environment in the census and see where they are living. We see a denser population in College Station along with a schoolhouse and two churches, so it would be worth looking through the census pages to see where the school teacher and pastors are listed. Folks may not have lived on the premises, but it would make sense they lived near their work.
Wedding photo Joseph Madison Blazer Minnie Mae Peters (courtesy of Lisa Egner)
And finally, we want to look for renters and owners. If a family rented, a capital “R” was entered on the census. Those who owned their property were listed with a capital “O”. Since the black squares are “Farm Units” we wouldn’t expect to see a square on the map for every house. If our hypothesis is that the enumerator started on the west side, we could count the number of owned dwellings listed in the census until we get to the family living in question. Then we would count them on the map, going east. Again, it’s not exact, but it’s a whole lot more than what we knew about the address Route 2 Frazier Pike when we started!
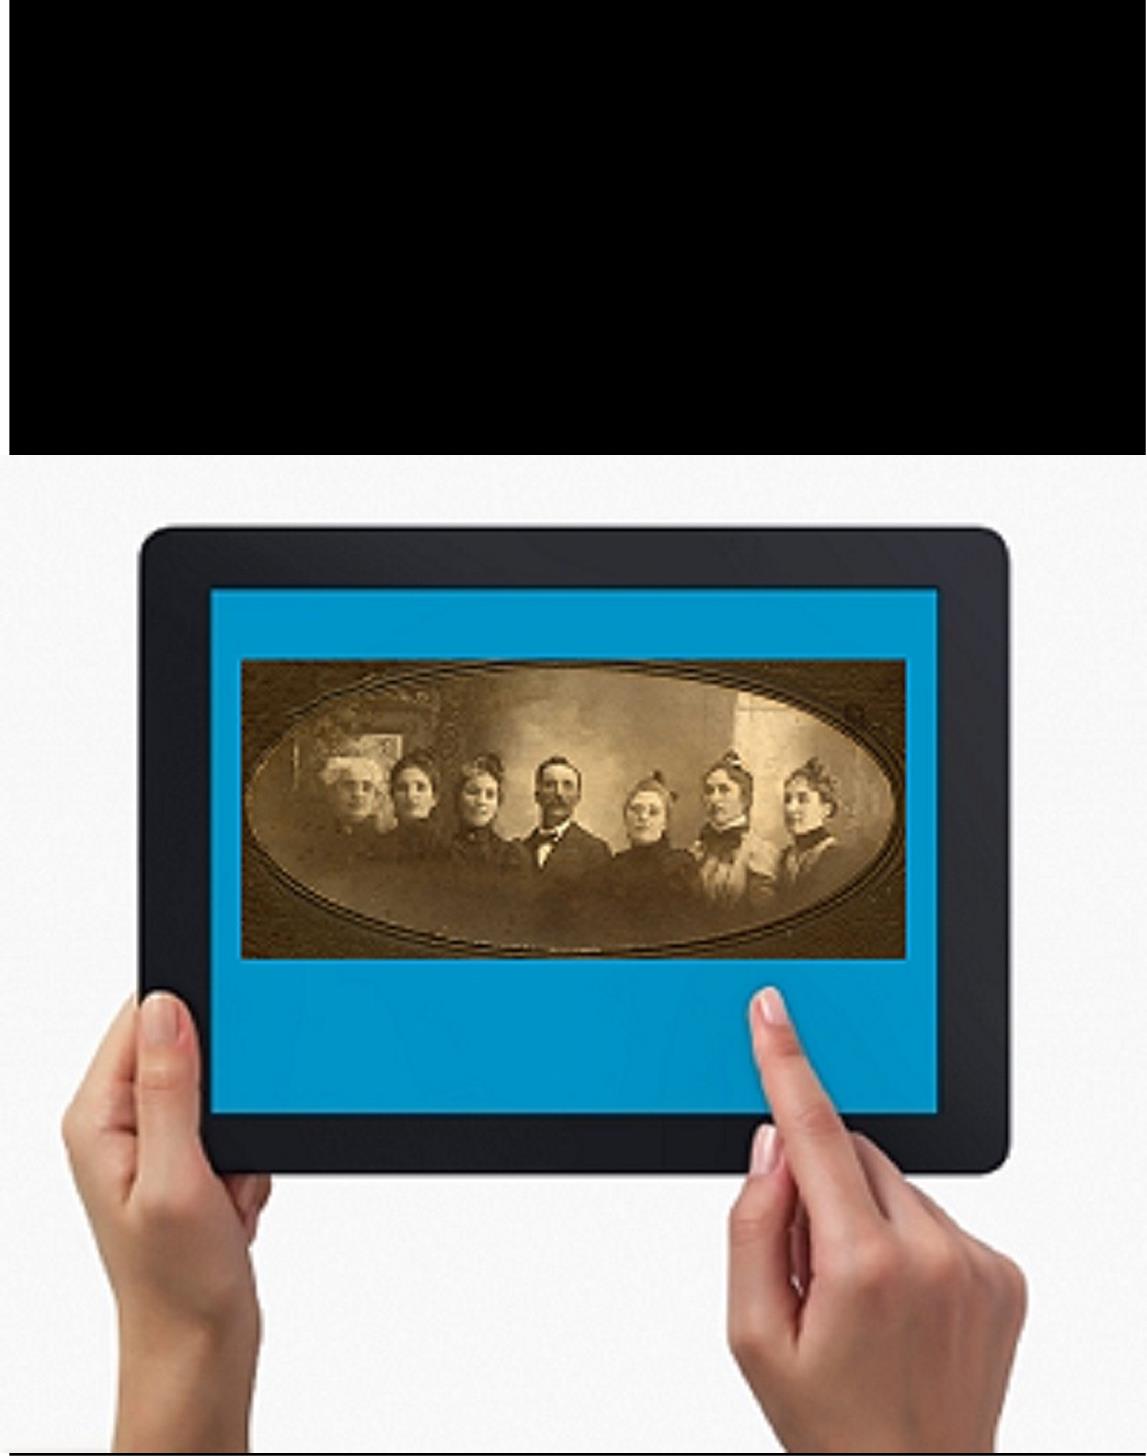
Thinking about attending RootsTech in Salt Lake City, Utah in 2014? Then I’m guessing a trip to the Family History Library (FHL) is part of your plan. Here’s a great tip: bring your iPad or tablet computer and don’t make a single photocopy while you’re there!
Last year, I spent two days researching at the FHL before RootsTech got going. I was up and down a lot between floors, looking at all kinds of books, microfilmed and microfiched materials and even big old maps. On a previous trip, I would have spent a LOT of money on photocopying, even though the copy services there are very low priced. I would have wanted color copies of the maps, so that would have cost more. I would have wasted a lot of time in line to use the copiers–time I would have wanted to spend researching.
But I didn’t waste any time or money. I used my iPad. I have a generation 4 with the rear-facing, 5 megapixel camera, and I used it practically nonstop…
1. Copying material from books. Whenever I found a book page (or a few pages) I wanted to copy, I first imaged the cover pages with the source citation info. Then I imaged the inside pages, making sure the image captured the page number. When I needed to record that a book didn’t have anything on my ancestors, I put a sticky note on the inside front cover saying “checked for Johnsons, didn’t find” (or whatever), then imaged the page with the sticky note on it. This was easy and fast. I sometimes imaged books while standing right in the library stacks! I didn’t have a scanning app on my iPad at the time, but remember you can also use an app like Scanner Pro to scan multipage documents, convert them to PDFs and straighten out and enhance the images.
2. Copying material from microfilm. Okay, it’s not perfect quality, but you can take decent digital images of microfilmed material right from the microfilm reader. First, image the microfilmed page at the beginning saying what the source is (or a note with the source description or even the box with the microfilm number on it). Then stand just in front of the microfilm reader with the iPad. Point the camera down to the displayed image, taking care not to block the projection of the image from the reader above. Here’s an example of what it looks like. Like I said, it’s not perfect because of the angle and lighting. Glare can be a problem so you may want to take a few shots. But you can read these images and most of the time, you don’t need keepsake quality out of microfilm. You just need to capture data. I followed up with some cropping and enhancement editing right on my iPad.
3. Copying material from a map or other folio items. The same general idea applies to imaging maps and other oversized materials. First, image the source citation information, often found on a label at the bottom of the page or on the back. Image the map key, including which way is north, scale, and other details. Then image as much of the map as possible to get an “establishing shot.” Finally, zoom in to the areas of greatest importance to you. Again, it’s not perfect. Laminated items may have glare issues as you can see by the shot shown here. But you may get what you need out of your digital image, especially if you move around so the glare isn’t covering the important areas on the map.
Remember to organize all your images when you get back to your hotel room or home while your memory of the visit is still fresh. Keep source citation shots together with the images you took. Load them into Evernote, if you use it. Organize them as you would other computerized research materials: in surname files, etc.
Finally, remember that fair use and copyright laws still apply to all images you take, whether on a photocopier or your personal digitizing equipment. The Family History Library does allow people to take their own digital images, but not all libraries and archives do. Some repositories rely on the income from copying to fund their facilities. ASK before using your iPad at other libraries! But as you can see, you can save yourself time and money–and have all your research notes and copies already digitized and ready for use on-the-go.
This post was written by Genealogy Gems Contributing Editor Sunny Morton. (Just so you know, I’m not a longtime iPad pro. I learned everything I know about using an iPad for genealogy from reading Turn Your iPad into a Genealogy Powerhouse. Then I adapted what Lisa taught me for the way I research.)


 of your plan. Here’s a great tip: bring your iPad or tablet computer and don’t make a single photocopy while you’re there!
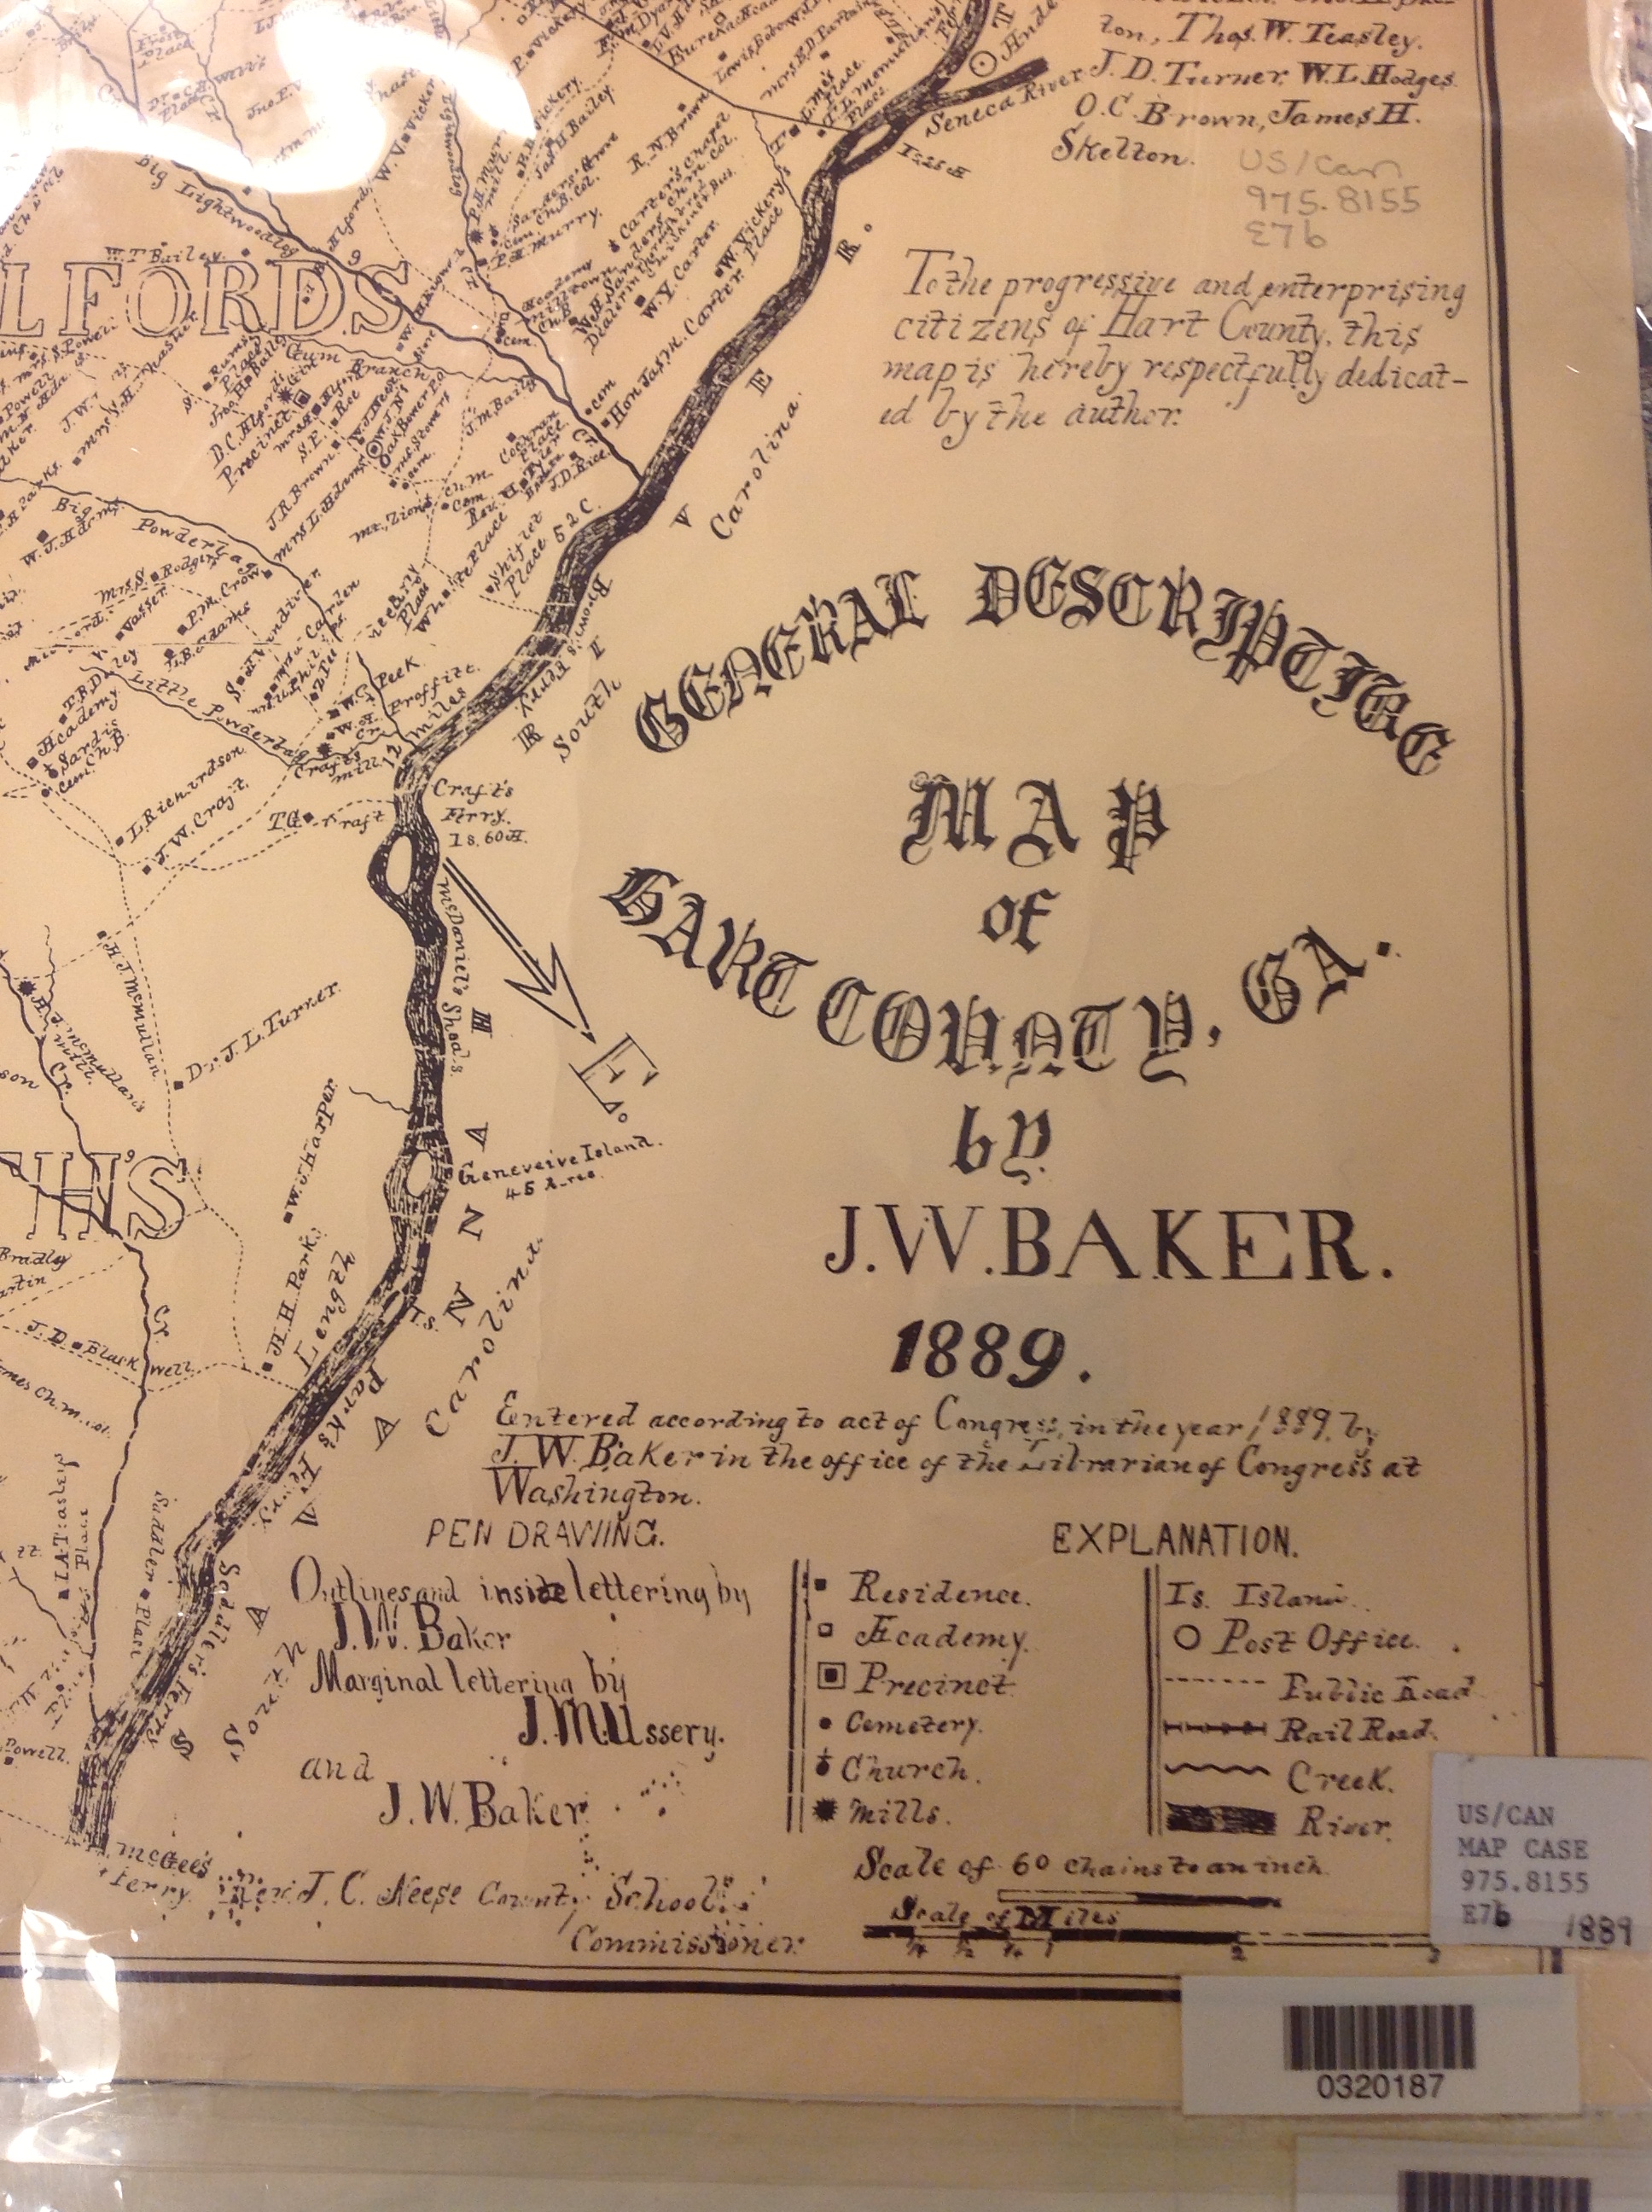 3. Copying material from a map or other folio items.