Backing up your genealogy with Backblaze is a critical move if you want to protect your family history. Let us answer your questions and share with you how the cloud backup service Backblaze can be the answer to effectively backing up and protecting all your genealogy data.
Recently, we received some great questions concerning the cloud-based computer backup service, Backblaze, one of our trusted sponsors of The Genealogy Gems Podcast. The answers to these questions will give you with the confidence to put a reliable cloud backup plan in place so that your family history remains safe and secure.
What is Backblaze?
Backblaze is an online back-up tool that stores copies of your computer files, and allows you to restore them in case your computer is lost, stolen, or destroyed. It offers unlimited storage and supports every type of file, including large video files and genealogy tree files.
Once installed, Backblaze works 24/7 through your internet connection to save every change you make. Backblaze also keeps your files safe offsite (at their data centers) with 24-hour staff, biometric security, and redundant power.
Unlike Evernote or Dropbox which are designed to allow you to work with your files across multiple devices, Backblaze is “set it and forget it” protection should the worst happen.
While you can sign-in and access your files from multiple devices, it’s primary purpose is to provide a back-up plan so you can restore your data if something happens to your computer. While external hard drives are great for when your computer crashes, they can’t help you if they are destroyed in a fire or flood along with your computer because they were both in the same location. Off-site backup and multiple copies (redundancy) are key when it comes to protecting your precious genealogy research.
Answers to Your Questions about Using Backblaze for Cloud Storage
Q: I am excited to begin using Backblaze for the first time! However, I am a bit uncertain of how to actually begin. Can you walk me through it?
A: Lots of our readers are a little uncertain when it comes to using something new. We have created a blog post titled “How to Download Backblaze in 4 Easy Steps” that will walk you through it!
Q: I have a number of computers at home and I also have a network drive. What does Backblaze cover? Will it back up everything?
A: No, and here are the details. You can have multiple computers backed up on your account, but each computer will require its own subscription (about $6/month). Backblaze can back up all file types and storage is unlimited, so large files from your hard drive are not a problem. It also backs up every time you make a change to a file and your backup will always have the most current version. You can view and restore your backed up files at any time via download, USB flash drive (mailed to you,) or USB hard drive (mailed to you.) Backblaze does not however support the backup of network drives.
Q: Does Backblaze also save earlier versions of my files like Dropbox does?
A: Yes. You can locate earlier versions of files or even files that have since been deleted. To learn how to do this, follow the step-by-step directions in this article from Backblaze.
Q: I live in a fairly remote location, and have a limited Internet data plan. Will Backblaze use a lot of data?
A: Backblaze, as with any Cloud backup service, does require a strong internet connection and could take days or weeks to completely back up your entire computer. This will depend quite a bit on how much data you have on your computer. If you have a limited data plan or slow internet, you could experience delays or what appears to be high data usage while the initial backup is occurring. Here is a link to a helpful page on the Backblaze website called “Bandwidth Speed Test to Backblaze”where you can test your internet speed. Backblaze is designed not to “throttle” or slow down the flow of uploads. It strives to use your full internet bandwidth. However, you do have the option to set it to slow down the backups. The “Bandwidth Speed Test to Backblaze” page provides instructions on how to throttle your download speed so that it doesn’t use up as much bandwidth. While this will cause your initial backup to take longer, it can clear help ease up on the data usage and allow for your other internet activity. You can also pause backups, or set them to start manually or at scheduled intervals. Once your initial backup is complete, the data usage should slow down.
Q: Because Backblaze backs up my computer automatically and instantly, what happens if I get a virus. Will that also be transferred to Backblaze?
A: From Backblaze blog
“Since Backblaze is…continuously running online backup solution and is not locally connected to your machine, all of your backed up files would be available for restore with minimal or no data loss (depending on the last backup time before the machine was infected).”
A Note from Lisa About Backblaze and Genealogy
“You’ve heard me talk about Backblaze on the podcast, and why it’s my first choice when it comes to backing up my precious genealogy research and personal files. I met their CEO Gleb Budman at Rootstech and after lots of research, I decided that Backblaze was the best cloud backup service out there! Maybe you’re still on the fence about it or maybe you’ve been putting it off, unsure of how complicated it is to set up or if it’s really worth the cost. So I got in touch with our friends over at Backblaze and we’ve set up a special offer for those of you have not yet begun protecting your data.”
If you are new to genealogy and family history, you are in the right place. Here’s a game plan for learning the ropes, getting inspired and making quick progress.
This article comes from a large collection of articles on our website just right for beginners. Our blog post articles are organized by topic.
All you need to do to find all of our past Beginning Genealogy articles is head to our website’s home page (image right) and use our Select Content by Topic menu.
You’ll find it at the top left just under the main red menu. Click the down arrow and select “Beginner” from the list. This will display all our past Beginner-friendly articles on your screen starting with the most recent. (Or simply click hereto go right to the Beginner article search results.)
Each episode is about 30 minutes long, and it will start you at the beginning and walk you through the genealogy research process.
You’ll find it not only educational but also inspirational. You’ll hear from expert genealogists about research strategies, as well as their own inspirational stories that will help motivate you to succeed in climbing your family tree!
Here’s where you can listen to the Family History podcast:
There are 45 episodes in the series. By the time you get to the end, you’ll be well on your way and ready to dig into to The Genealogy Gems Podcast. This is an ongoing monthly podcast with hundreds of episodes for your family history listening pleasure!
The Videos
The Genealogy Gems YouTube channelis packed with free videos on a wide variety of genealogical topics. We group them by category into “Playlists” for your convenience.
Below you can watch our Beginning Genealogy playlist of videos. Simply click the icon in the upper left corner of the video player and scroll through the list. As we add new videos we will continue to add videos to the playlist.
DNA – Genetic Genealogy
New to DNA?
Watch the video below which features our own DNA expert Diahan Southard. She explains DNA testing for genealogy is a wonderful, easy-to-understand way.
Want more from your DNA results?
If you have started your family history journey by getting your DNA tested, you will want to get the most from your results. Your results can match you with other relatives, but you will need to have a family tree built so that you can capitalize on those connections. Use the resources and suggestions already mentioned above on this page to accomplish that goal. Then get even more from your DNA results with our expert advice. First, watch the video below to be sure you are on the right track.
Double good news: AncestryDNA has made some improvements to the way they calculate your genetic matches, but they haven’t messed with the site format or layout. There is one downside–so keep reading.
While stability and predictability seem like honorable qualities in a company or product, when it comes to tech tools, in the ears of tech companies, those words sound more like dated and old. Of course, we are used to this by now. I had a client tell me recently that he wanted to be in touch sooner, but his grandson “upgraded” his computer to Windows 10 and then promptly left for college the next day, leaving him fighting with a new interface and operating system.
The good news is, you won’t have this problem with Ancestry’s new update. There aren’t any changes to the interface or the layout of the information. In fact, many of you will not even notice at first that your match list has changed. You’ll just see this notification when you log in:
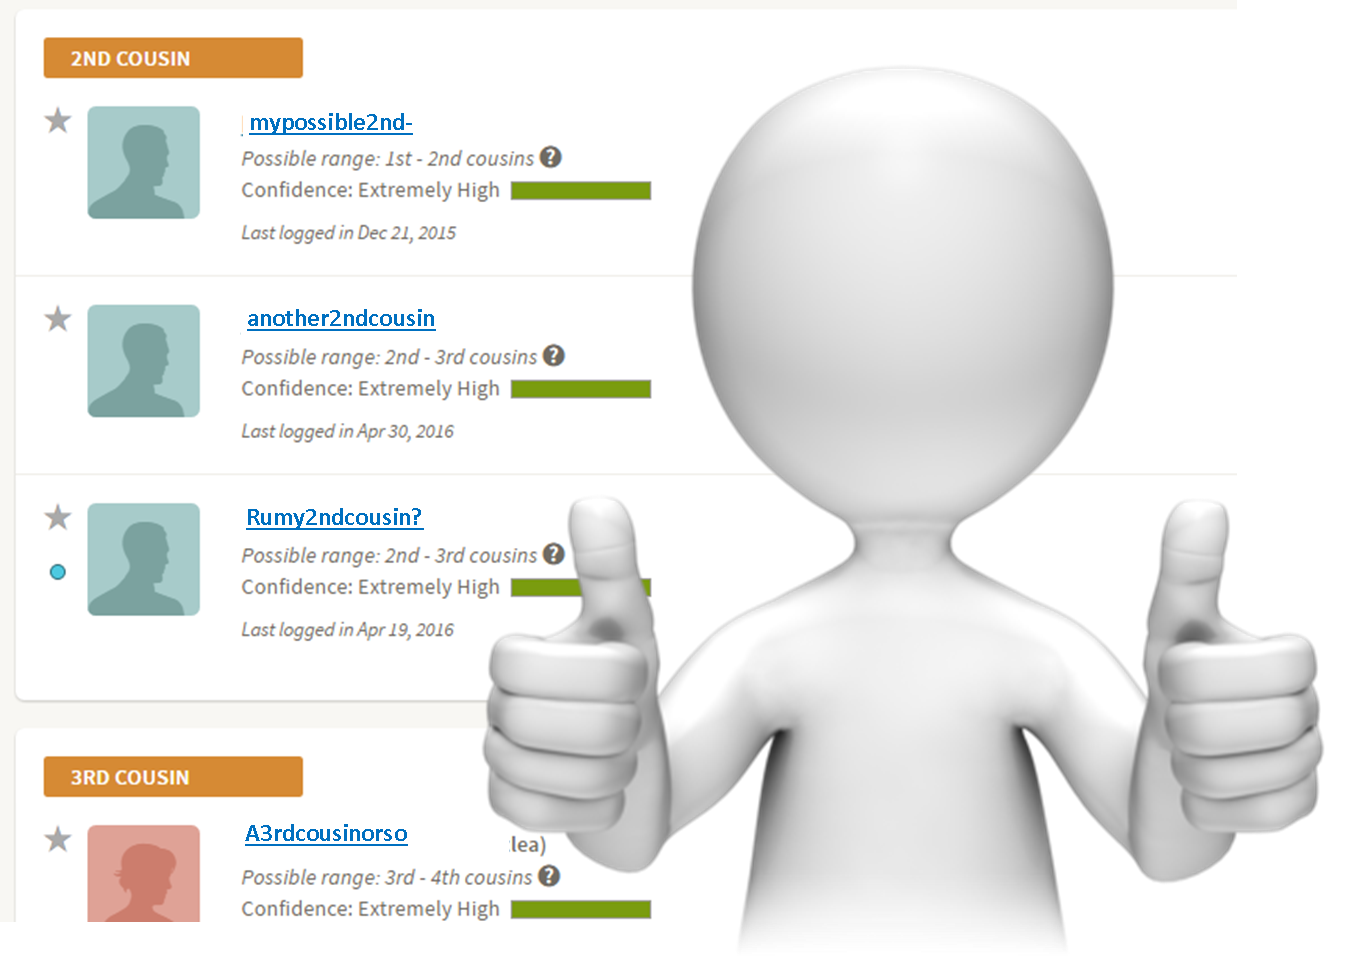
But in fact, there likely have been some adjustments made to your match results:
Some of your third cousins have been demoted to fourth cousins.
Some of your fourth cousins have been demoted to 5th-8th cousins.
Some of your Distant Cousins have disappeared off your match list
You have new cousins on your Distant Cousin match list.
In general, from what Ancestry has showed us, you gain more than you lose.
Changes in the dregs of your match list may not seem like that big of a deal. But Ancestry has made some big changes in the way that they are calculating matches. They are getting better at it. Which means you match list is now more representative of your ancestral connections, even at the very distant level.
There are two big pieces to this matching puzzle that Ancestry has tinkered with in this latest update: phasing and matching.
You will remember our discussion on DNA phasing and how it can impact your matching. Ancestry has developed a robust reference database of phased DNA in order to better phase our samples. Basically, they have looked through their database at parent-child duos and trios and noted that certain strings of DNA values often travel together. It’s like they have noticed that our DNA says “A black cat scared the mouse” instead of “The brown cat ate the mouse” and they can then recognize that phrase in our DNA, which in turn helps our DNA tell the true story of our heritage.
In addition to updating the phasing, Ancestry has revamped their matching method. In the past they viewed our DNA in small windows of information, and then stitched those windows together to try to get a better picture of what our DNA looked like. Now instead they have turned to a point-by-point analysis of our DNA. Again to use a sentence example, with the window analysis we may have the following sentence windows:
ack and J
ill went t
he hill t
etch a pai
l of water.
Of those windows, you may share the “etch a pai” with another individual in the database, earning that cousin a spot on your match page. However, the truth is, that bit could say “sketch a painting” or “stretch a painful leg” or “fetch a pail.” With Ancestry’s new method, they are able to see farther on either side of the matching segment, making this clearly “fetch a pail.” That means better matching, which means more confidence in your cousin matches.
The downside to this update is going to come in the reorganization of some of your relationships. Ancestry has tightened their genetic definition of your third and fourth cousins. Basically, that means that some of your true 3rd cousins are going to show up as 4th cousins, and some of your true 4th cousins are going to be shifted down into the abyss of 5th-8th cousins.
This brings us to the downside of this AncestryDNA update: changes to the Shared Matches tool. The shared matches tool allows you to gather matches in the database that are related to you and one other person, provided you are all related at the 4th cousin level or higher. This tightening of the belt on 4th cousins means that some of them are going to drop through the cracks of that tool, really limiting its ability. Grr. Hopefully, Ancestry will fix that, and expand this tool to include all of your matches. They have their fairly good reasons for this, but still….
So, as the winds of change blow yet another iteration of the AncestryDNA match page, I think we can see this as an overall win for doing genealogy with our genetics at Ancestry.
Disclosure: This article contains affiliate links and Genealogy Gems will be compensated if you make a purchase after clicking on these links (at no additional cost to you). Thank you for supporting Genealogy Gems!
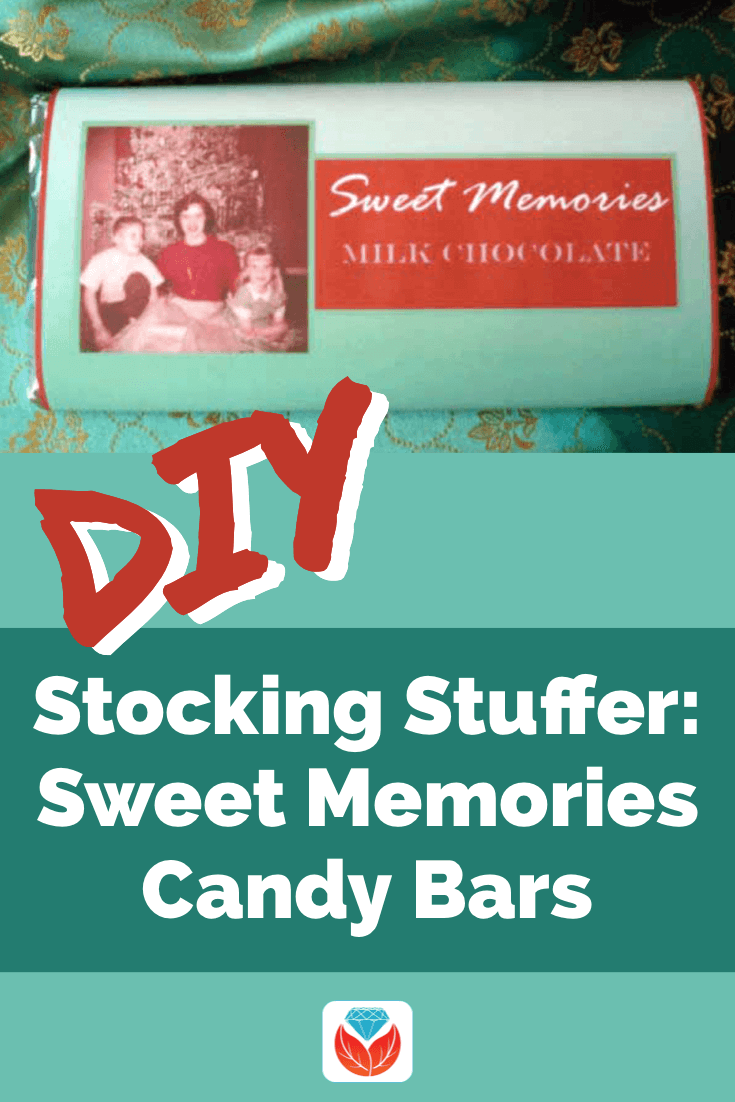
Are you looking for a fun, easy and downright delicious way to share some family history this Christmas? What better way to entice your family to have an interest in the family tree than wrapping that history around a luscious chocolate bar?
DIY: Stuff Their Heritage in Their Stocking
I firmly believe that family history should not sit on a shelf, but should be seen, touched, felt and even tasted!
Sometimes when a passionate genealogist shares the family history discoveries they have made, their relatives are less than enthusiastic to hear about it. (Sound familiar? I know I’ve experience this phenomenon.) This lack of interest may be more about the delivery of the information rather than the information itself. The trick is to serve up the family tree in an appealing and fun way.
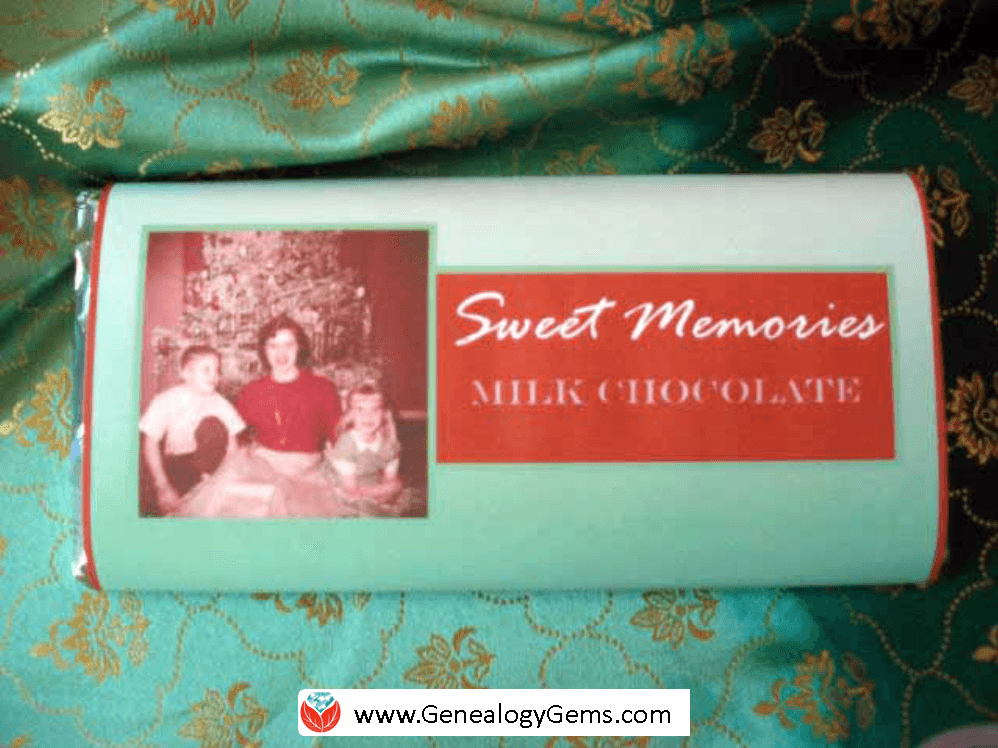
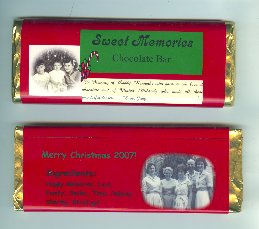
That’s why a few years ago I designed these customized candy bars which I call Sweet Memories. They’re basically your favorite chocolate bar wrapped in a custom label with your own sweet family history memory on it. What could be better than that?!
Here’s the first Sweet Memories stocking stuffer candy bar I made for Christmas.
They are really simple to make. The candy bars themselves are store bought. All you need is a computer, printer and some paper and you can whip some up in an hour or so.
What I especially love about these customized delectable delights is the conversation they stimulate. I loved seeing the surprises on the faces of my family, and then the reminiscing that soon followed. They loved seeing the old photos and the clever list of “ingredients” that provided insight into the character of their ancestors.
Don’t feel like you have to do exactly what I did on mine. Instead of a list of ingredients you could include a short funny story, favorite family quotes, or little-known fun facts about the ancestors in the photo. Use your imagination and have fun!
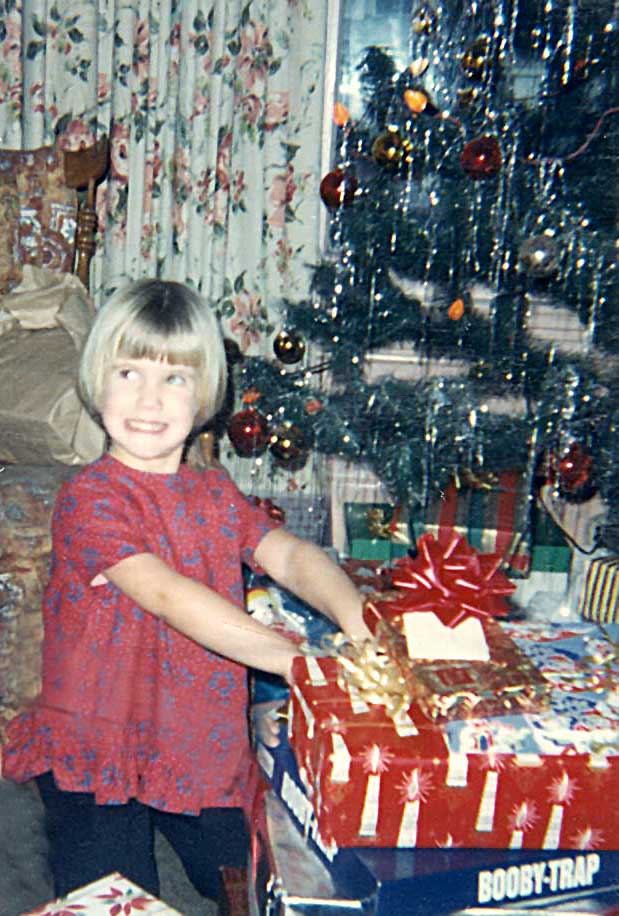
Me having fun at Christmas in 1966. Did you have the Booby-Trap game too? (Leave a comment)
Keep reading because after the step-by-step instructions below, I’ll share some more design ideas.
How to Make “Sweet Memories” DIY Stocking Stuffer Candy Bars
Here’s how to make your own custom labels and turn plain chocolate bars into wonderful holiday gifts for your loved ones.
Start by gathering up the following supplies:
A 3.67 oz approximately sized Chocolate Bar wrapped in foil with a paper wrapper. (Dove and Cadbury are some of my favorites. Hmmmm!)
Bright white printer paper
Computer and printer
A software publishing program that you can create your label in, like Microsoft Publisher. (Or try using a word processing programming using the text box feature.)
Scanned family photos, especially old holiday photos
These instructions are for creating the labels in Microsoft Publisher, but you could also do it in PowerPoint or any other design type software or app.
1. Create a Rectangle
On the blank page, create a 7 ¾” high and 5 ¾” wide rectangle using the Shape tool. This just gives you a nice outline to work in.
2. Add a Background
An easy way to add an interesting background is to scan a piece of scrapbook paper that you like. The scrapbook paper could be textured or have a repeating design. But you could also choose a favorite digital image.
Use the INSERT IMAGE function to get the image onto your page. Next, resize it to fit just over the rectangle that you created.
Another other option for the background is to select the rectangle and use the FORMAT FILL COLOR function to color the box with the color of your choice. I used green and then chose a gradient that went from light to dark for added interest.
3. Add an Old Photo(s)
You can add any digitized photo that you like. Dig through your old family photo albums to find Christmas photos from the past, or simply feature an ancestor or family. You can use the same photo for all your stocking stuffers, or surprise each member of your family with a candy bar featuring a different ancestor.
Use INSERT IMAGE to add your photos and resize them to fit.
For the front side image, I measured down approximately two inches from the top of the label, and that is where the top of the photo was placed. I set it ¼” from the left edge. Both photos are about 2” x 2”.
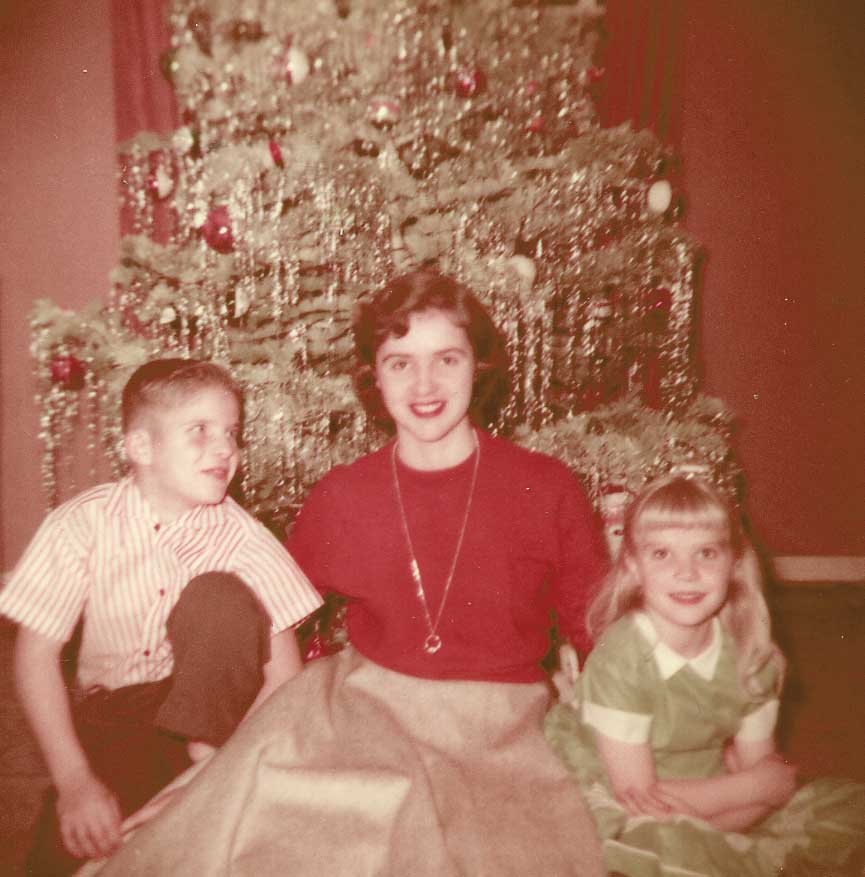
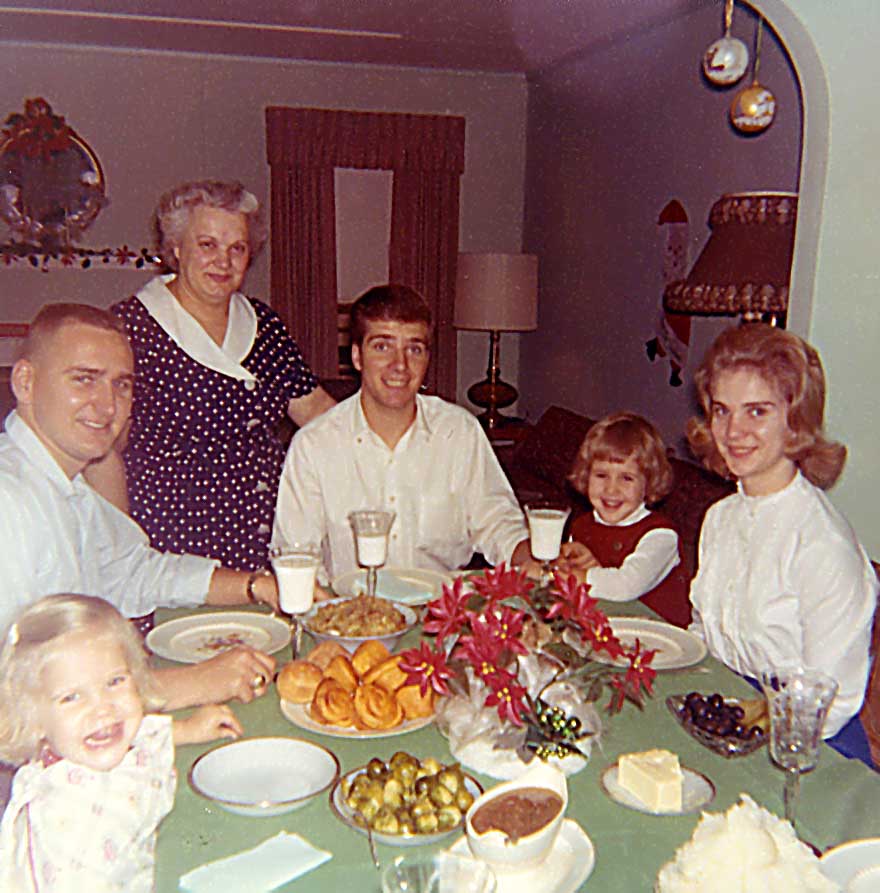
My uncle, mom and aunt in 1956. I used this photo for the front side of my stocking stuffer candy bar label.
4. Adding Photos to the Back of the Label
The backside photo begins 5” from the top of the label and is set ¼” from the left edge.
You may also want to include a small text box that states the date and location of the photos and the names of the people.
Christmas Dinner at Grandma’s House (I’m in the bottom left corner, mouth wide open as usual.) I featured this photo on the backside of my label.
5. Add Descriptive Text
The last step is to insert the text boxes.
Both the “Sweet Memories” text box and the “Ingredients” text box that I included are about 3” wide and 1 1/4” high. You can format them with the borders and colors that you want.
In my example, you’ll see that I took the color cues from the colors in the photos – the crimson red and soft green. Many apps have a color picker feature that will allow you to get an exact match.
6. Add the Ingredients List
Every food item has an ingredients label on it, and this bar is no exception. I had some fun with the ingredients list and played up the family theme. I thought about my memories of my Grandmother and the values and elements she poured into each holiday. So my ingredients list reads:
Love,
Family,
Attention,
Politeness,
Grandma’s Cooking,
Smiles,
Caring
and Time.
Feel free to reflect your own family values in the list.
7. Print Your Label
Once you’ve got everything laid out on the screen the way you want it, it’s time to print.
From the menu, click FILE then PRINT and then click the PROPERTIES button. From this window be sure to select “high resolution paper” or “high brightness” as the media type, and select HIGH for the print quality to make sure you get the best, most professional looking label.
Print the label, then carefully cut it out.
8. Fold the Label to Fit
Follow the folding guidelines shown above, but keep in mind that your candy bar is going to dictate your actual fold lines.
The first fold line for my standard size Cadbury chocolate bar (which you can buy in bulk here) was 1 ½” from the top of the label and the second fold line is 4 ¼” from the top of the label.
(Disclosure: Genealogy Gems is a participant in the Amazon Services LLC Associates Program, an affiliate advertising program designed to provide a means for sites to earn advertising fees by advertising and linking to Amazon.com. Thank you for supporting articles like these by using our links.)
9. Tape the Label Closed
Remove the original wrapper of the chocolate bar, being sure to keep the foil wrapper in place and undisturbed. Use a small piece of double sided tape to stick the label to itself on the backside snugly.
And there you have it, your own custom family history themed chocolate bar! It’s ready to tuck into a Christmas stocking, use at your next family reunion, or at any other time you want to tickle someone’s sweet tooth and share memories.
More DIY Stocking Stuffer Design ideas
I promised you more examples of these Sweet Memories candy bars. Here are some from my Genealogy Gems Podcast listeners.
I love the vignette styling Judy gave her family history photos.
Genealogy Gems Podcast listener Judy shared her version of the Sweet Memories stocking stuffer candy bar.
And this listener took this DIY idea and used it to create candy bar treats for her family reunion. What makes these SO unique is that she used a family heirloom crocheted blanket for her background image. (How clever is that?!) She spread the blanket over the bed of a scanner to make a digital image of that she could use on the label.
Get more DIY project here at Genealogy Gems. You’ll also find great heritage crafting ideas–including photo displays and heritage quilts–on my Pinterest boards. If you enjoyed this idea I’ll hope you’ll share via Pinterest or Facebook. Did you like this idea and do you have other suggestions for a new spin on it or a favorite DIY family history project? I’d love to hear it so please leave a comment below.
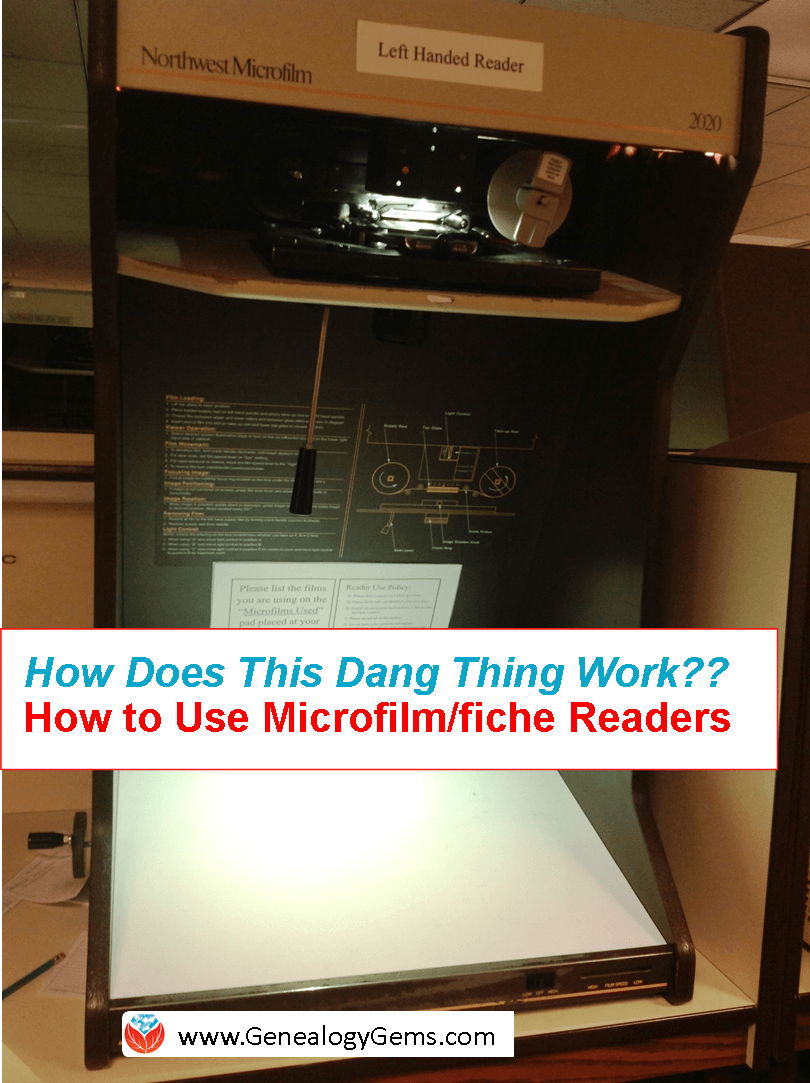
Not sure how to use microfilm or microfiche readers? Watch these quick video tutorials before your next trip to the library!
Recently I heard from a Genealogy Gems Premium member who is digging in deep to her family history. But she confessed that she left the Oklahoma Historical Center in Oklahoma City “in tears because I really didn’t know what I was doing” with the microfiche machine and with microfilms.
I totally understand. Microfilm and fiche readers are not my favorite part of genealogy research, either. But despite the wealth of digitized records that continue to appear online, microfilm is going to be around for a while! FamilySearch and other publishers of microfilmed data (like state archives) do not have copyright permissions to digitize all their microfilmed materials. Even if they can get it, it’s going to take a long time to make that happen.
Meanwhile, we will continue to need microfilm and microfiche readers!
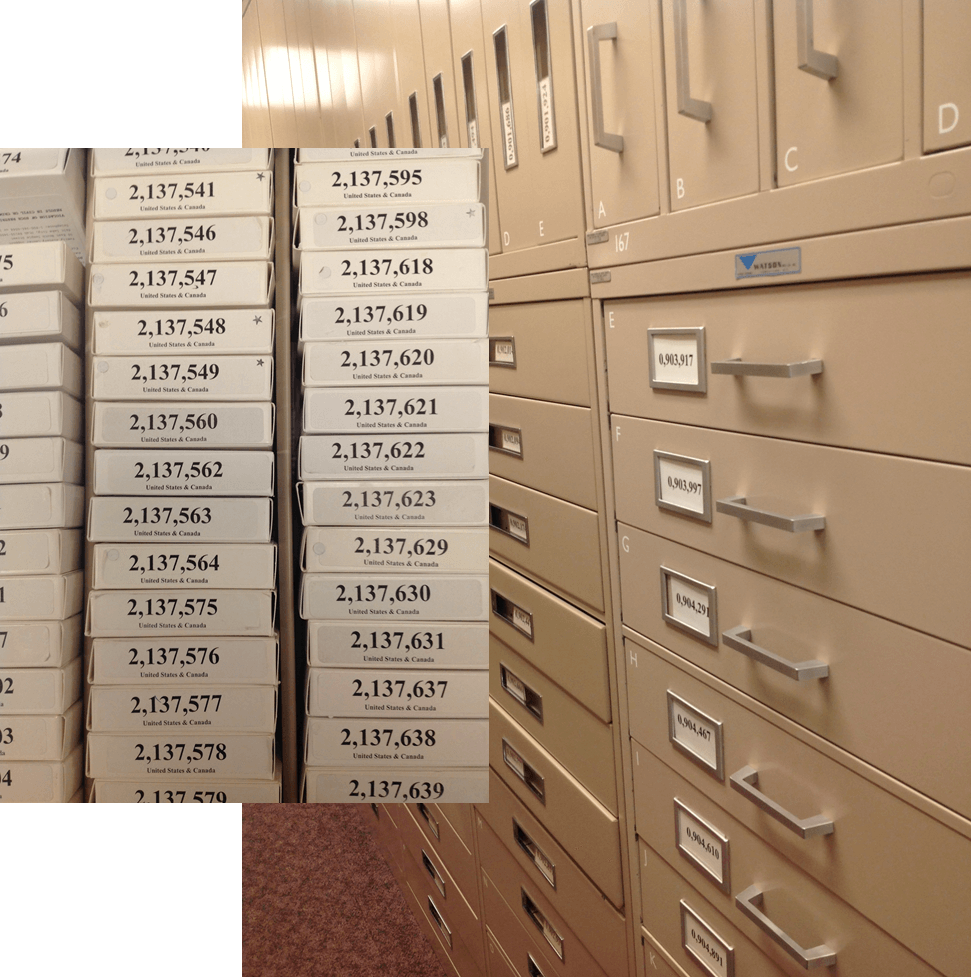
Microfilm is a long reel of film (up to 125 feet, I’ve heard) that are essentially page-by-page photos of a document collection, book, newspaper, etc.
Microfiche is a single sheet of film (about 4″ x 6″) that contains the same, only shrunk down so small you need a magnified reader to make sense of it.
These were standard technologies for duplicating records in the pre-digital era. The Family History Library in Salt Lake City alone has over 2.4 million rolls of microfilm. Yes, that’s million! (And yes, they will lend them out to a Family History Center or FamilySearch Library near you.)
To access these fantastic films and fiches, you will need to use microfilm readers and microfiche readers. It’s easy to walk into the library and think everyone knows how to use them but you. But that’s not true. In fact, every single genealogist has had to face their first encounter with a reader. Don’t be shy about asking politely for a tutorial (and help when you do it wrong and something gets stuck). And don’t be shy about watching these tutorials on YouTube before you go to the library again:
 “You’ve heard me talk about Backblaze on the podcast, and why it’s my first choice when it comes to backing up my precious genealogy research and personal files. I met their CEO Gleb Budman at Rootstech and after lots of research, I decided that Backblaze was the best cloud backup service out there! Maybe you’re still on the fence about it or maybe you’ve been putting it off, unsure of how complicated it is to set up or if it’s really worth the cost. So I got in touch with our friends over at Backblaze and we’ve set up a special offer for those of you have not yet begun protecting your data.”
 Start by reading
  The free
 The
The
 Double good news: AncestryDNA has made some improvements to the way they calculate your genetic matches, but they haven’t messed with the site format or layout. There is one downside–so keep reading.
 Of those windows, you may share the “etch a pai” with another individual in the database, earning that cousin a spot on your match page. However, the truth is, that bit could say “sketch a painting” or “stretch a painful leg” or “fetch a pail.” With Ancestry’s new method, they are able to see farther on either side of the matching segment, making this clearly “fetch a pail.” That means better matching, which means more confidence in your cousin matches.


 Not sure how to use microfilm or microfiche readers? Watch these quick video tutorials before your next trip to the library!