These show notes feature everything we cover in this episode. Premium Members: download this exclusive ad-free show notes cheat sheet PDF. Not a member yet? Learn more and join the Genealogy Gems and Elevenses with Lisa family here.

The places where your ancestors lived can tell you a lot about their lives. I’m going to show you a free and easy technique for plotting land in Google Earth.
episode 67
Would you like to be able to find your ancestor’s property on a map today? Keep reading and watch the video to learn how. We’re going to take U.S. government survey legal land descriptions found in sources such as Federal Land Patents and quickly and easily plot the boundaries in Google Earth Pro. I’ll also show you an easy way to do it for property in Canada too.
(PREMIUM MEMBERS: Get your ad-free PDF cheat sheet for this episode in the Resources section at the bottom of this page. Not a member yet? Click here to join the Genealogy Gems family and get all the benefits.)
In the video I show you how to plot the boundaries of a piece of land in Google Earth. We’re going to take U.S. government survey legal land descriptions found in sources such as Federal Land Patents and quickly and easily plot the boundaries in Google Earth Pro. I’ll also show you an easy way to do it for property in Canada too. These strategies come from my book The Genealogist’s Google Toolbox,
These days there are actually three versions of Google Earth:
All are free, but they are not the same. The app and web browser versions are sort of “Google Earth lite.” The software is what you want because it has all the bells and whistles that will allow you to do all the things I’m going to show you today.
Plotting legal land descriptions in Google Earth has its advantages. If you’re plotting the land of your ancestors, you’ll be able to see what the area looks like today and what the current street names are. In Google Earth you’ll also have access to additional tools that you can use in conjunction with the boundaries you’re going to create, such as historic maps, area photos, and a wide range of data sets that provide more information about the area.
The first thing to do is check to make sure you have the most current version of Google Earth on your computer. Again, we’re using the software so you need to do this on your desktop or laptop computer. You want to make sure you have Google Earth Pro – LINK – A tell tale sign that you don’t is if the Google Earth globe icon on your desktop is grey and not blue. Open it and in the menu go to Help > About Google Earth. Here it should say Google Earth Pro and you can see the version number.
Check the current version number here, and if you don’t already have the program, go ahead and download it.
Now that you have it on your computer, open it up and leave it running in the background. You’ll need a decent internet connection for it to run.
Next pull up the legal land description that you want to plot. Here’s one that I have for some property owned by George Burket. I found this at the Bureau of Land Management Government Land Office Records website. This free website is where you can search for land patent that your ancestors once held.
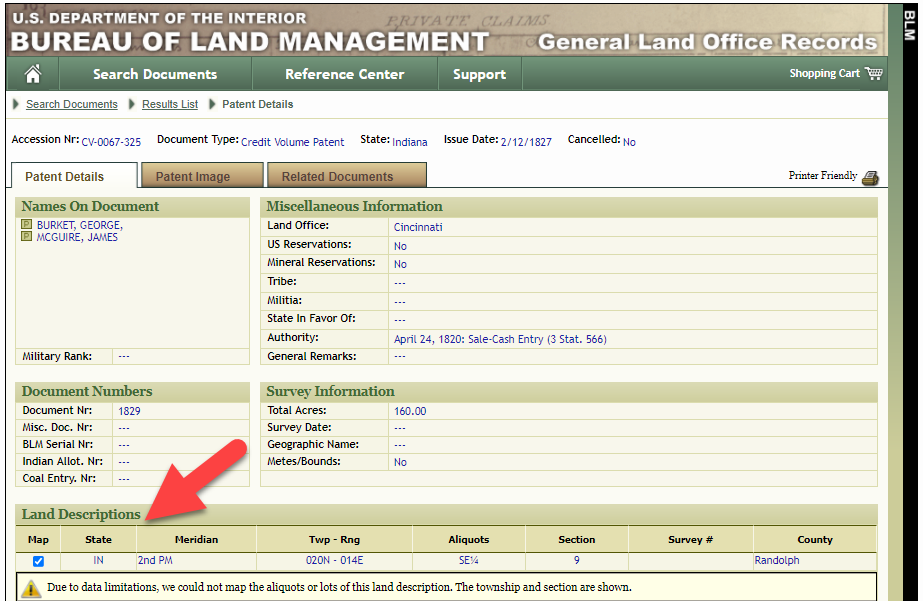
Legal land description at GLO
Even though the Bureau of Land Management places it on the map on their website, you can’t download this or add to it. The advantage of plotting this in Google Earth is that you will have access to much more geographic data, you can add many more details to the map, you can use it in conjunction with other related mapping work that you’re doing, and you can save and share it.
This description gives us the exact coordinates of the property. Jot down the land description or keep it open in your browser tab so you can refer to it.
In a new browser tab, we’re going to type in http://www.earthpoint.us. This will take us to the Earth Point website.
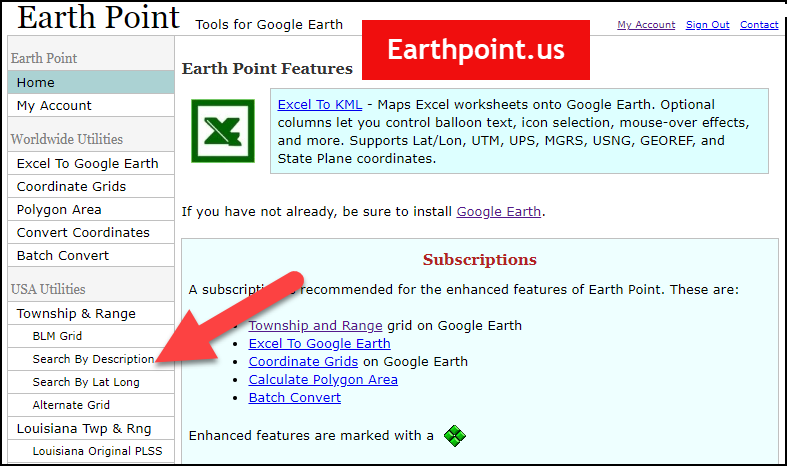
Search by legal land description at Earth Point
This website is free, although some of the features are available only with a paid subscription. Thankfully, the tool for plotting your ancestor’s land patent is free. Some of the free features do require that you sign up for a free account. The feature we are going to use currently does not.
On the Township and Range – Search by Description page you will see a field for each piece of information found in the land description. It’s important to enter this information in the order presented starting with the State. Select the state from the drop-down menu. Pause a moment to allow the fields to recalculate. This allows the appropriate data to be loaded into the next field based on your selection.
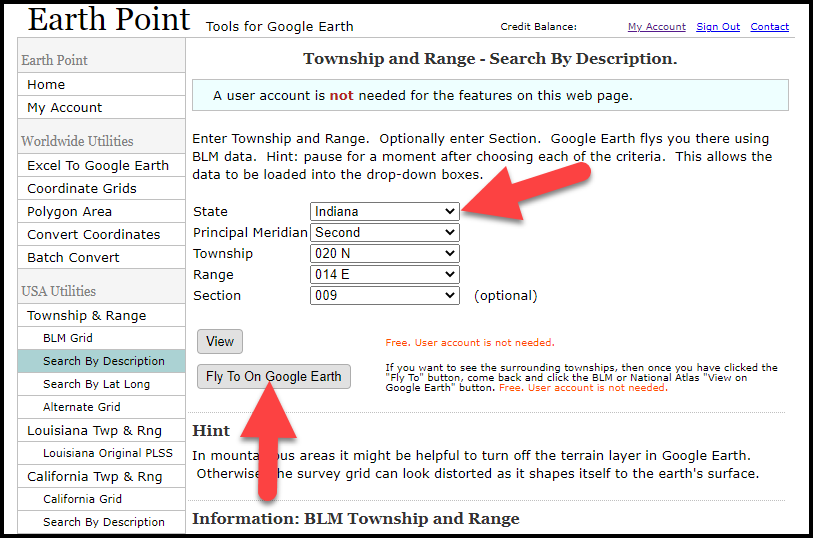
Entering data at Earth Point
After you have made each selection, click the Fly to on Google Earth button. This will generate a KML file which can be saved to your computer. KML stands for Keyhole Markup Language, which is the file type that Google Earth uses and understands. KMZ are zipped KML files which also are used by Google Earth.
Save the file to the desired location on your hard drive. Then click the file to open it. It will automatically open in Google Earth (which you already have open). The KML file is now located in your Temporary Places folder in the Places panel. The land is has now been automatically plotted on the map.
The orange outline is the township. In this example it is township T20N R14E. Click the orange ball in the center of the township for details. In the details you’ll find the total number of acres in the township, the latitude and longitude coordinates for the center of the township and corners.
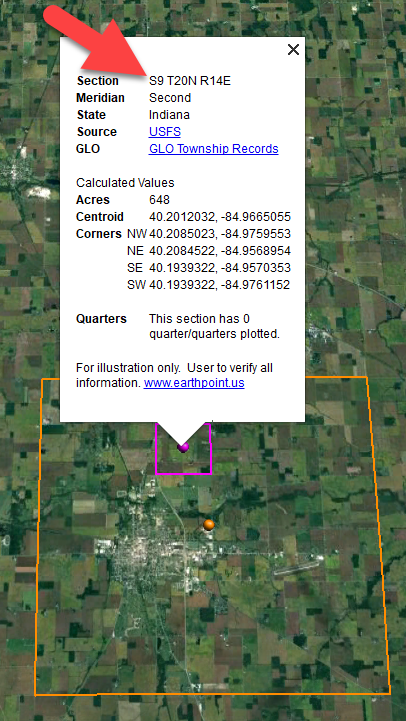
Township in Google Earth
The pink / magenta outline is the Section where the property is. Click the pink center dot for the details:
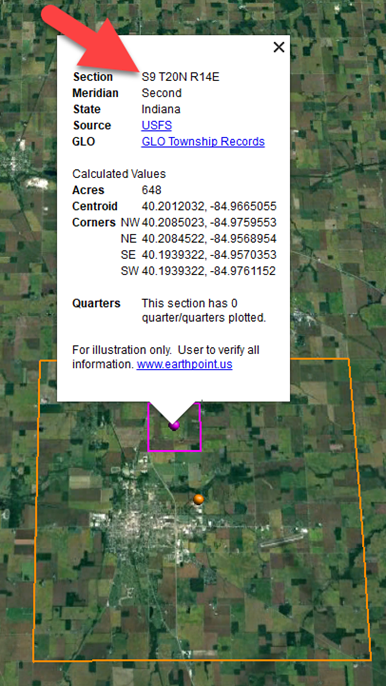
Land section in Google Earth
In this example Section 9 consists of 648 acres.
Notice that Earth Point was able to plot the land down to the Section level. However George Burket did not own the entire section. We must return to the land description for the Aliquots.
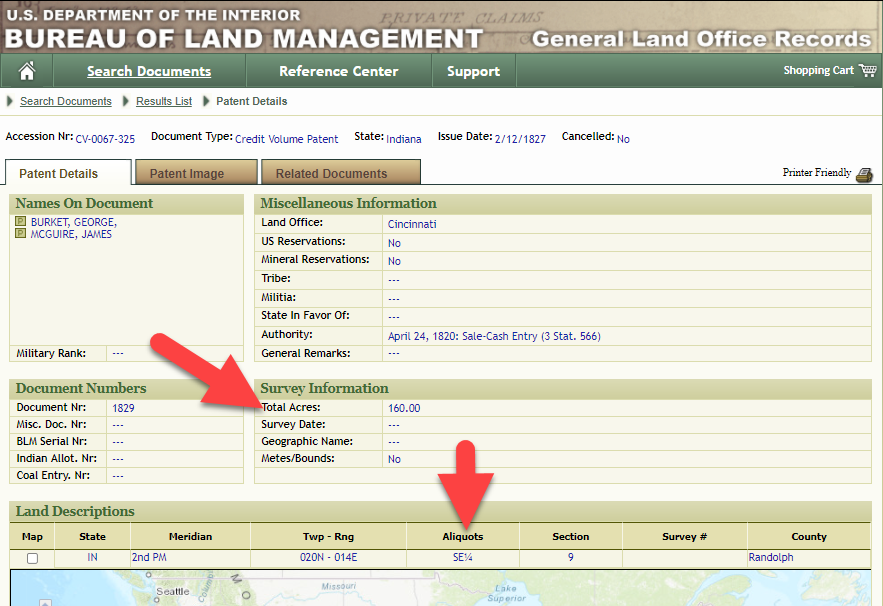
Aliquots in Legal Land Description
In this example, the land was the southeast quarter (SE1/4) of section 9. The land was a total of 160 acres.
We can use the Polygon tool in Google Earth to plot the 160 acres. In the toolbar, click the Polygon tool. This will open the New Polygon dialog box. Type a title, description and source citation.
As you hover your mouse over the map you will notice that the cursor is now a square shape. Click the screen on each of the four corners one at a time in order to set the four corners of the property – in this case the southeast quarter of the section. Once you have drawn the shape you can click on the handle on any corner to adjust precisely.
Click the Style / Color tab in the New Polygon dialog box to adjust the color and opacity of the acreage polygon. You can add color and thickness to the outline, and color and opacity to the fill of the shape. When you have it set the way you want it, click OK to close the New Polygon box. The Polygon is now set.
On the left side of the Google Earth screen you will see a series of panels: Search, Places and Layers. At the bottom of the Places panel is the Temporary folder. This is where the KML file was placed when it was opened. However, like its name implies, this is a temporary location. If you want to keep it, you’ll need to move it to a filed location within the Places panel. This will not change the position of the polygon on the map, only where it is filed and saved in the Places panel.
To file a polygon, click on the file in the Places panel, drag it to the desired location, and drop it. Next, go the main menu and click File > Save My Places. This will save your work so that when you close the program it will not be lost. Google Earth doesn’t auto-save.
The polygon plotting the acreage will be visible on the map when the box is checked in the Places panel. If you uncheck the box for the polygon it will still be there, but it will not be visible on the map. This allows you to create and save many items of interest without always having to have them displayed and cluttering up the map in Google Earth.
After your land polygon has been set, you may want to rename it. There are two ways to do this:
You can also restyle the polygon and edit the text. Start by going to the Places panel and click the arrow pointing at the Polygon’s globe icon. This will open it and show the nested content. Click to select the Polygon. Now you can right-click it (PC) and select Properties – OR – go to the menu under Edit > Properties. Either way it will reopen the Polygon dialog box so that you can make the desired changes. When you’re done, click the OK button to close the Polygon.
Snagit is the tool I used to capture the various views of the land I plotted in Google Earth. Learn more about Snag it by watching my videos and reading the show notes for episode 61 (for beginners) and episode 66 (advanced).
Although the Earth Point website doesn’t plot Canadian land, the Legal Land Description Converter website does. It can help you find land in Western Canada (British Columbia, Alberta, Saskatchewan & Manitoba) subdivided by the Dominion Land Survey (DLS) and the Alberta Township System (ATS).
These show notes feature everything we cover in this episode. Premium Members: download this exclusive ad-free show notes cheat sheet PDF. Not a member yet? Learn more and join the Genealogy Gems and Elevenses with Lisa family here.
Gwynn: I would like to know how to match plat with GPS coordinate/ current street address.
Answer: I cover how to overlay a plat map in Google Earth and discover the current street address in my book The Genealogist’s Google Toolbox.
Roger D: How exact do you need to be in picking points? Does Google snap to mid-points of lines?
Answer: Try to be as exact as you can, however as I showed in the video you can reposition them as needed. Google Earth doesn’t snap.
Lyn: Can I do this with English tithe maps?
Answer: There isn’t a website converter that I know of. However I do cover how to overlay digitized maps in Google Earth in my book The Genealogist’s Google Toolbox.
The manufacturer price is going up August 31, 2021. Now’s the perfect time to get your official Elevenses with Lisa mug.
You can also find them through the menu: Premium > Premium Videos > Elevenses with Lisa.
Elevenses with Lisa is our little slice of heaven where friends get together for tea and talk about the thing that never fails to put a smile on our face: Genealogy!
Are you ready for a year of successful genealogy? Learn how to develop an effective research plan, and preserve and protect your genealogy. Keep reading for the show notes that accompany this video.
I started learning how to play the guitar in 2020. I began with an online course to learn the basics, and I picked one song that I really wanted to learn how to play.
For three months I worked my way through the course and played that song over and over every day. This resulted in two things: I learned how to play the song, and my husband took a blow torch to my guitar! (Just kidding.)
At the end of those three months I had several weeks where I just didn’t feel I was making any progress at all. I practiced every day, but I wasn’t getting anywhere.
It turns out that I had reached my initial goals – I knew the most popular chords, had memorized the Pentatonic Scale and could play the song Crazy On You for a captive audience in my home. However, I had not stopped to identify my next set of goals. Therefore, stagnation set in.
In an effort to restart my learning and success trajectory, I spent an evening looking through my record collection and I made a list of 6 of my favorite songs. Then I put them in the order I wanted to learn to play them. Most importantly, I identified which one was my top priority to learn. Once I did that, I knew exactly how I was going to spend my practice time.
It sounds simple, but finding and deciding on the place to start (or restart) is really easy to miss. When it comes to genealogy there’s always a bright shiny object online ready to gobble up a few precious minutes, or hours, or days! Having a predetermined project goal in mind will help you get down to business faster and keep you from wandering aimlessly.
Once you know what your project will be, it is time to formulate the general question. In other words, what is the question you are trying to answer?
In this episode I shared the family story that had been handed down the McClelland family about their ancestor Washington McClelland. The story went like this: “He immigrated to the U.S. from England. He was working on the railroad when he met a girl in Idaho. She became pregnant. They married. He converted to the LDS church. They raised a family together.”
The general research question was “is this story true?” That’s a big question, and one that we’ll break down further in question #3.
Genealogy Gems Premium Members can learn more about formulating research questions by watching the segment How Alice the Genealogist Avoids the Rabbit Hole Part 1 in Elevenses with Lisa Episode 2. It’s available in the Premium Videos area of the Genealogy Gems website. Don’t miss the downloadable handout! You’ll find the link under the video. (Learn more about becoming a Premium Member here.)
The general project question can usually be broken down into several bite-sized actionable questions. In the example of “Is the story about Washington McClelland true?” we can break that question down into several questions:
And many of these questions can likely be broken down further. These more focused question help provide the framework for the project’s research plan. They can then be re-sorted so that they follow a logical progression of answers.
The next step will then be to identify and prioritize the sources (records) that are likely to provide the necessary relevant evidence. Then determine the order in which you will locate each identified record. Finally, add where you think you can find the records to the plan.
There are many different types of genealogy research forms: research logs, blank record forms, checklists, just to name a few.
Research logs are great for keeping track of your research plan progress. Blank record forms (such a blank 1900 U.S. Federal Census form) are very handy for transcribing the pertinent information for analysis. And checklists (such as a list of all types of death records) help ensure that you don’t miss and records, and you don’t look for the same record twice!
Free Genealogy Forms at Family Tree Magazine
Family Tree Magazine offers a plethora of free genealogy forms. You’ll need to register for a free website account to download the forms.
Free Genealogy Forms at Ancestry
Here you’ll find several common and helpful genealogy forms including:
Having an organizational system in place takes the guesswork out of where things should be filed, making it much more likely they will actually get filed. It also ensures that you’ll be able to put your hands on your records whenever you need them.
Here’s a secret: There is no one perfect filing system. The most important thing is that it makes sense to you and that you are consistent in how you use it.
In Elevenses with Lisa Episode 6 (available to Premium Members) I cover step-by-step the system I developed and have used for over 15 years. I’m happy to report I’ve never lost an item. (Whew, what a relief!)
As you work on your genealogy research you’ll find there are two important tasks you will be doing often:
Not having a way to store these two types of items leads to clutter and piles on your desk. Here’s my simple solution:
Make sure that you have a small quantity of all of the supplies you need for the filing and organization system you are using.
Here’s what my shopping list looks like:
How to name digital genealogy files is something we all struggle with. Good intentions don’t make the job any easier. Take a few moments to nail down the basic naming scheme you will commit to follow. I say basic, because there will be times when you’ll need to modify it to suit the file. That’s OK. But always start with the basic format.
Here’s what my basic file naming format looks like:
Example: 1920_robert_m_springfield_oh
Notice in my format I don’t usually include the surname. That’s because I file in surname folders. Notice that I said “usually.” That’s because we are always free to add on additional information like a surname if we think it will prove helpful. For example, if I anticipate that I will have a need to share individual files with other researchers or family members (rather than the entire folder) then I will add the surname so that the person receiving the file has the pertinent information.
Protecting and preserving our genealogy for generations to come is a top priority for most genealogists. All of us at some time have worried about what would happen if a website that we upload our content to goes out of business or sells out to another company. Now there is a new reason to take a few extra steps to ensure you don’t lose access to your genealogy data.
Recently, According to Buzz Feed, on Jan. 9 the largest cloud-hosting service notified a large social media network with millions of users that it would be cutting it off from its cloud hosting service. According to the Wall Street Journal, “other tech partners also acted, crippling operators.”
Now we must add to the list of concerns the possibility that a genealogy website we use might be cut off from web hosting. How might this type of action impact our personal family history that we share on websites? Many companies that provide access to millions of historical records and likely house a copy of your family tree and your DNA test results use the same cloud hosting service. In fact, it’s hard to find a company out there that isn’t tethered to it in some way.
My research showed that both Ancestry and FamilySearch have been featured on their website in case studies and blog articles:
The bottom line is that our family history is our responsibility to preserve and protect. While we can benefit from sharing copies of it online, putting all our genealogy eggs in only the online basket puts it at risk because we don’t have control.
While I love the idea of going paperless and I’ve been striving to do that in recent years, I’m changing my tune on this. For several years I’ve been strongly recommending that you get your own genealogy software on your own computer and use it as your master database. All online family trees are simply copies. Many people, particularly those who rely solely on FamilySearch often wondered why I was so concerned. The events of this week make my point and put an exclamation point on the end of it.
Making digital and paper copies of your data is a simple strategy you can put in place today. This means regular print outs of your tree, family group sheets, and the most important genealogical documents. I keep mine in a portable fireproof safe.
We can also make digital copies as well. For example, last year I had all my old home movies transferred to digital and they are stored on my computer. I went the extra step to get copies on DVD and I also copied the digital files onto a terabyte hard drive that is in the fireproof safe.
Remember, your computer is connected to the Internet. If you’ve ever woken up to a Windows update, then you know that tech companies can make changes to your computer. Having your own paper and digital copies are just extra insurance that certainly can’t hurt.
Here’s a checklist of things you can put in place today:
Ideas for saving paper and ink:
I use and recommend Backblaze for computer cloud backup. They have their own storage facility. Here’s what their storage pods look like:

Image courtesy of Backblaze.
I am also an affiliate of Backblaze so I appreciate when you use my link if you decided to make a purchase. I will be compensated at no additional cost to you, and that supports this free show. https://www.backblaze.com/landing/podcast-lisa.html
Learn more: Premium Members can watch the Premium video Your Guide to Cloud Backup and download the PDF handout. You’ll get answers to questions like:
Pick one area you want to improve your genealogy skills and knowledge and make time each week to learn something new about it.
Thank you for making Elevenses with Lisa and Genealogy Gems one of your places for genealogy learning, laughing and getting refilled!
On the Genealogy Gems YouTube channel:
Premium Member have exclusive access to all of the archived episodes and downloadable handouts. Visit the Elevenses with Lisa Archive.
Get My Free Genealogy Gems Weekly Email Newsletter
The newsletter is your guide to upcoming shows, articles, videos, podcasts and new Premium content.
Bonus Download exclusively for Premium Members: Download the show notes handout.
Become a Genealogy Gems Premium Member today.
Let us know if you found this video and article helpful. I’d also like to hear from you about the topics you would like to learn more about in future episodes. Thanks!