VIDEO & SHOW NOTES: Video #3 of our 25 Websites for Genealogy Playlist. In this video, my guest presenter Gena Philibert-Ortega covers digitzed newspaper websites that are must-haves for family history research. Even though some sound specific to a certain area, don’t be fooled. They have resources available for all genealogists including even more than newspapers.
Websites 13 through 17 of our 25 Websites for Genealogy
Some of these websites will be new to you, and others are going to be very familiar to you. In talking about the familiar websites, I want to get you thinking about them differently, explain a little bit more about what you can do at these websites, and how to get the most out of them.
In this series of 25 Websites for Genealogy, we’re going to be looking at websites in different categories. Our third category is the newspaper websites (#13 through 17).
Newspapers.com is a subscription service owned by Ancestry.com. The two websites are connected so that you can attach your Newspapers.com finds to your Ancestry tree. Newspapers.com includes newspapers found at Ancestry but all newly newspaper pages are added to Newspapers.com. They also offer a Publisher’s Extra subscription that expands your access to additional newspaper records.
GenealogyBank.com is a subscription service offering one of the largest collections of digitized U.S. newspapers, dating back to 1690. You’ll also find additional genealogy resources such as the Social Security Death Index, obituaries, government publications, and historical books.
The Library of Congress offers this huge free collection of digitized newspapers from across the United States. The papers range from 1756 to 1963. Expand your search with the U.S. Newspaper Directory 1690 to present.
Fultonhistory.com features over 1,000 New York newspapers, plus newspapers from other states and Canada. It’s a vast free collection curated by one man!
In this episode I’ve got another blast from the past for you. We have reached deep into the podcast archive and retrieved episodes 5 and 6.
In Episode 5 we touch on using the video website YouTube for genealogy, and then I walk you through how to Bring Sites Back From the Deadwith Google. Then we wrap things up with a cool little way to Spice Up Your Genealogy Database.
In episode 6 I have a gem for you called Cast a Shadow on Your Ancestors, and we cover the free genealogy website US GenWeb
Episode: # 05 Original Publish Date: March 25, 2007
MAILBOX
Email this week from Mike O’Laughlin of the Irish Roots Cafe: “Congratulations on your podcast! I am sure it will help many folks out there. I was glad to see the fine Irish families of Scully and Lynch on your latest show notes!”
GEM: You Tube Follow Up Note: The Genealogy Tech Podcast is no longer published or available.
YouTube in the news – the concern was raised by Viacom this month about YouTube benefiting from their programming without compensating them, which could mean copyright infringement. While the course of YouTube could change depending on the outcome of this suit, the attraction for family historians remains strong because of the nature of the content.
Software mentioned:
Pinnacle. Final Cut for MAC. Limits with Movie Maker
I posted 2 videos – A Nurse In Training Part 1 & 2
When you get a “File Not Found” error when clicking on a link, it doesn’t mean the information is always gone forever. You may be able to find it in the Cache version.
Google takes a snapshot of each page it examines and caches (stores) that version as a back-up. It’s what Google uses to judge if a page is a good match for your query. In the case of a website that no longer exists, the cache copy us a snapshot of the website when it was still active hidden away or cached.
Practically every search result includes a Cached link. Clicking on that link takes you to the Google cached version of that web page, instead of the current version of the page. This is useful if the original page is unavailable because of:
1.Internet congestion
2.A down, overloaded, or just slow website – Since Google’s servers are typically faster than many web servers, you can often access a page’s cached version faster than the page itself.
3.The owner’s recently removing the page from the Web
Sometimes you can even access the cached version from a site that otherwise require registration or a subscription.
If Google returns a link to a page that appears to have little to do with your query, or if you can’t find the information you’re seeking on the current version of the page, take a look at the cached version.
Hit the Back button and look for a link to a “cached” copy at the end of the URL at the end of the search result. Clicking on the “cached” link should bring up a copy of the page as it appeared at the time that Google indexed that page, with your search terms highlighted in yellow.
If you don’t see a cached link, it may have been omitted because the owners of the site have requested that Google remove the cached version or not cache their content. Also, any sites Google hasn’t indexed won’t have a cache version.
Limit: If the original page contains more than 101 kilobytes of text, the cached version of the page will consist of the first 101 Kbytes (120 Kbytes for pdf files).
Really looking for an oldie but a goody? Try the Wayback Machine
It allows you to browse through 85 billion web pages archived from 1996 to a few months ago.
To start surfing the Wayback, type in the web address of a site or page where you would like to start, and press enter. Then select from the archived dates available. The resulting pages point to other archived pages at as close a date as possible. Keyword searching is not currently supported.
GEM: Spice up your database
Search Google Images, then Right click and save to your hard drive.
Use Silhouettes
Find something that represents what you do know about that person. It really does help you see them more as a person and less as an entry in your database – their occupation, a reader, a sport, etc.
Episode: # 06 Original Publish Date: April 1, 2007
You can learn more about Jewish roots at the 350 Years of American Jewish History website JewishGen, The Home of Jewish Genealogy
GEM: Cast a Shadow on Your Ancestors
In the episode #5 I shared a little gem that would spice up your genealogical database – adding silhouettes and artistic images to the file of an ancestor when you don’t have a photograph.
Probably the most famous silhouette these days are the silhouettes used by Apple for advertising the iPod digital music and audio player. It may surprise your teenager or grandchild to learn that the first silhouettes were done hundreds of years ago.
Back then silhouettes (or shades as they were called), they paintings or drawings of a person’s shadow. They were popular amongst English royalty and the art form quickly spread to Europe. A silhouette can also be cut from black paper, and was a simple alternative for people who could not afford other forms of portraiture, which, in the eighteenth century, was still an expensive proposition.
The word took its name from Étienne de Silhouette, but it’s uncertain as to whether his name was attributed because he enjoyed this art form, or as the story goes because the victims of his taxes complained that they were reduced to mere shadows.
Either way, the popularity of Silhouettes hit new heights in the United States where they were seen in magazines, brochures and other printed material. But they faded from popularity as Photographs took over in the 1900s.
As a follow up, I want to share with you a simple technique for creating your own silhouettes. You can use ordinary snapshots to create a visual family record.
Take a photo of a person in profile against a neutral background.
Blanket the photo background with white acrylic or tempera paint
Fill in the image with a heavy black permanent marker, curing the shoulders down for a classical pose.
Add fun details like cowlicks, eyelashes, hats, and jewelry that express the person’s personality with a fine felt-tip pen.
Photocopy the doctored photos onto quality art paper. Since glossy papers work print best, you could also use your computer scanner to scan the image into your hard drive. From there you can add it to your database, or print it out onto glossy photo paper for mounting.
To represent folks in your family tree, create a silhouette of your father to represent his Great Great Grandfather, and add a farmer’s hat and rake to represent his profession of farming. Chances are dad has inherited some of his profile anyway. Have fun with it and be creative. But of course be very sure to label to silhouette appropriately as a creative interpretation rather than a literal rendering.
You can also do silhouettes of your family including extended family and arrange the portraits together on a wall. Use black painted frames in a variety of shapes and sizes and hang in a way that represents the family tree / relationships.
Silhouettes%20:%20Rediscovering%20the%20Lost%20Art<img%20src=”http:/www.assoc-amazon.com/e/ir?t=genegemspodc-20&l=as2&o=1&a=0970115105″%20width=”1″%20height=”1″%20border=”0″%20alt=””%20style=”border:none%20!important;%20margin:0px%20!important;”%20/>%20″ >Silhouettes: Rediscovering the Lost Art
Last year the website celebrated its 10th Anniversary. The USGenWeb Project consists of a group of volunteers working together to provide Internet websites for genealogical research in every county and every state of the United States. The Project is non-commercial and fully committed to free access for everyone. Organization within the website is by state and county.
You can go to the homepage of the website and click on the state of your choice from the left hand column. From the state page you can select the county you wish to search in. However, when I know they name of the county I want to search in, I’ve found it’s often quicker just to search at google.com and do a search like “genweb sibley county mn” The choice is yours.
Remember to use the Google search gem that I gave you in episode one (see episode #134 http://www.genealogygemspodcast.com/webpage/episode-145-a-blast-from-the-past ) to quickly search within the county website. Many don’t have search engines of their own, and so that’s when I first really started using that search technique. These county sites are often very rich though, and after a focused search, it’s rewarding just to wander the site. It will help you become more familiar with the county!
You’ll likely find databases of Births, Deaths, Marriages, townships histories, plat maps, surnames, and a host of other topics. Because each county has its own volunteer coordinator, the information you will find varies from county to county. And as always, info is being added regularly, so you need to book mark them and return on a regular basis to see what’s new.
Be sure and share your resources as well. That’s the power behind the GenWeb project – volunteers. Volunteering your county resources will enrich other’s experience and will likely lead to connections that will continue to further your own research.
Choose from our vast catalog of free and Premium genealogy video classes and tutorials. Start by selecting a topic below. Tip: On desktop use Ctrl F (Win) or Cmd F (Mac) to search the entire list of videos by keyword. Note: The search box and Categories menu on the right (desktop) or the bottom of the page (mobile) apply to audio podcast episodes and articles.
Ancestry.com is packed with all kinds of mostly-undiscovered genealogical treasures, and some of them you’ll never find from a search box.
Here, expert Nancy Hendrickson shares some favorite treasures, tips for finding those treasures, and helpful reminders for improving your genealogy research.
(We provide links for your convenience to the various online resources and some may be affiliate links for which we receive compensation at no additional expense to you. Thank you for your support.)
Ancestry.com is a “genealogy giant:” one of the four biggest global records resources. Whether you subscribe or have free access through your local library or Family History Center, you should not miss exploring this website for your family history.
Ancestry is also a financial investment. If you’ve been using the site for quite a while, you may be wondering if you are really getting all you can out of it’s vast genealogical record collections and many research tools.
Nancy Henrickson, author of the Unofficial Ancestry.com Workbook
4 Tips for Using Ancestry.com More Effectively
1. Verify what you learn.
Any single record can be wrong, incomplete, or misread by you or by the person how indexed it. Double check the assertions made in the record by looking for that same information in additional sources. Be careful to make sure your sources weren’t getting their information from the same person or place. Otherwise, they’ll naturally say the same thing!
Nobody wants to discover conflicting information, of course. But you do want to know if something is inaccurate before it leads you down a wrong research path.
The best thing about verifying facts in additional sources is that sometimes you find NEW or BETTER information such as:
parents’ names,
a middle name that proves key to someone’s identity,
or a burial place.
For example, let’s say you find an ancestor’s death date in the Social Security Death Index. While it’s a great source, don’t stop there!
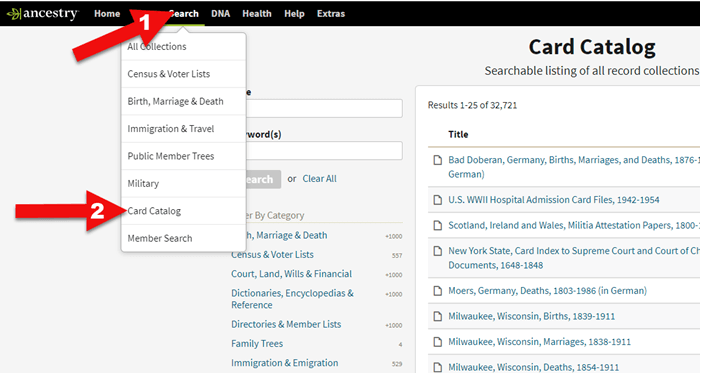
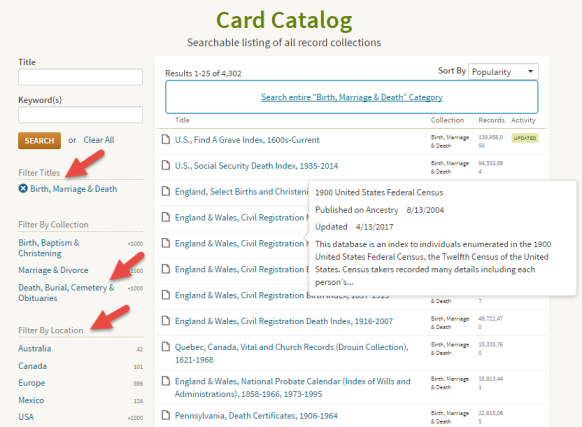
Like any record, the SSDI is sometimes wrong and the information it contains is definitely limited. Use the Ancestry.com Card Catalog to see what records about death may be on the site for that time and place. You’ll find the CardCatalog under Search in the main menu.
Ancestry Card Catalog
Use the filters on the left side to drill down to death records for the location you want. Remember that records collections have been created on a specific geographical level: try local, regional (such as state or province) as well as national levels.
Using the Card Catalog search filters
2. Don’t just repeat what other people’s trees say.
Seeing the same information over and over can provide a false sense of accuracy. Remember, just because seven different online trees name the same parents for one of your ancestors doesn’t mean those are the correct parents. Those Ancestry users may all be misquoting the same wrong source without actually verifying the information!
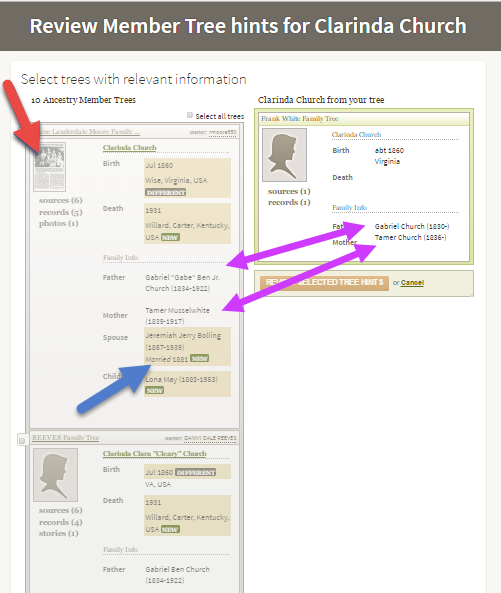
You often come across likely matches in others’ trees when you review Ancestry’s automated “leaf” hints, or when you run a general search on a name. When you do, it’s simply an indication that the tree may be worth exploring. Here’s an example:
Exploring Ancestry Hints
Let’s take a closer look at this example.
The purple arrows: You can see that multiple pieces of very specific information are the same on your tree and another one.
The red arrow: You see sources attached to that person’s profile, such as the news article thumbnail image. (Note the difference with the record shown below, with just an empty profile image.) Yes, you will definitely want to review that news article!
The blue arrow:In addition to either of the above, you also see specific information that is unknown to you.
This tree profile looks promising enough you might naturally consider reviewing the tree hint and attaching it to yours. But then you wouldn’t be able to see the news article or other sources attached to that tree.
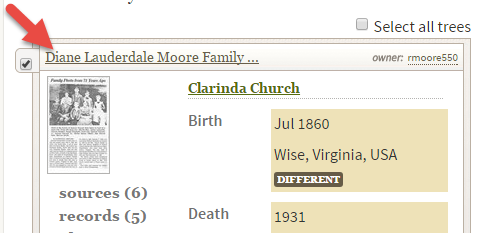
Instead, click the checkbox and then click the name of the tree to look at it and its attached sources:
Select the tree to review it more closely.
Then you’ll be able to check out the news article along with the other sources and records attached to this person’s profile. You won’t just see what that person thinks about your common ancestor – you’ll see evidence of why she thinks it.
3. Ancestry.com has more than indexed historical documents.
Nancy reminds us that “Ancestry.com is a fantastic resource for old maps, stories, photos, published county histories, and more. For example, looking at the old maps in their collections can reveal the true nature of an ancestor’s daily life, hardships, travels, and more. And your chance of finding early American ancestors is high in county histories: there were fewer people and early settlers were talked about, even if the family wasn’t wealthy or prominent.”
Here are some of Nancy’s favorite collections at Ancestry:
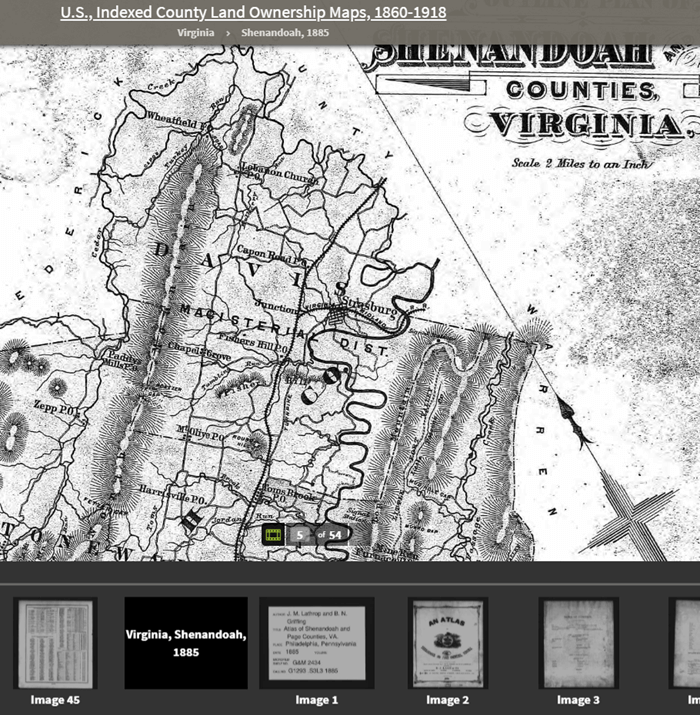
This collection includes nearly 7 million records extracted from about 1,200 county and land ownership maps from across the country. These are indexed by property owners’ names.
According to the collection description, “They also indicate township and county boundaries and can include photos of county officers, landholders, and some buildings and homes.”
Example: Shenandoah Counties, Virginia – included in U.S., Indexed County Land Ownership Maps, 1860-1918
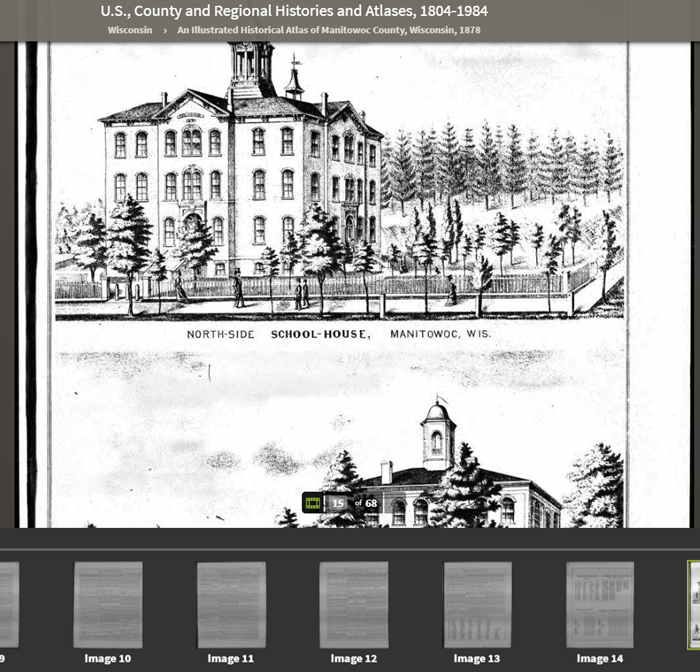
This is a browse-only collection of “more than 2,200 volumes of county and regional histories from California, Illinois, Indiana, Michigan, New York, Ohio, Pennsylvania, and Wisconsin.
An Illustrated Historical Atlas of Manitowoc County, Wisconsin, 1878 in the U.S., County and Regional Histories and Atlases, 1804-1984 collection
In them you’ll find history, biographical sketches, maps, business notices, statistics and population numbers, pictures, descriptions of industry and business, stories of early settlement and pioneers, colleges and universities, military history, geography, and plenty of other details.”
Reminder: you can’t search this database by an ancestor’s name. Instead, look for places, and then start reading.
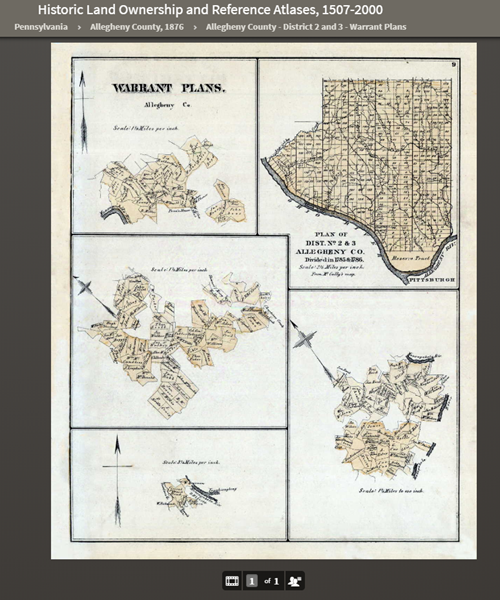
A collection of maps and atlases detailing land areas that comprise the present-day United States and Canada, as well as various other parts of the world. It contains a variety of maps and atlases created for different scopes and purposes, including land ownership atlases and bird’s-eye view maps.
Warrant Plan Records in the Historic Land Ownership and Reference Atlases, 1507-2000 Collection at Ancestry
Land ownership atlases usually show the names of contemporary owners or occupants of land and structures.
Some of the maps depict countries and wider geographical areas, while others depict counties, cities, towns, and smaller geographical areas.
4. Expand your search to the other Ancestry resources on the Web
Ancestry owns a lot of other web resources. Search these too!
Nancy says, “They include Find A Grave, Fold3, and RootsWeb, one of the oldest online genealogy communities around. Don’t give up! Keep looking in other places for the information you want to find.”
Find A Grave
Search results from Ancestry.com do include Find A Grave entries. Many of these contain additional information about the deceased and links to their relatives. As always, be sure to confirm the information you find here.
Fold3
Fold3 is home to millions of U.S. military records. Ancestry.com subscribers can upgrade their subscription to include Fold3 access, or you can subscribe separately.
RootsWeb
RootsWeb is a free and long-lived family history web resource, now hosted by Ancestry.
“The primary purpose and function of RootsWeb.com is to connect people so that they can help each other and share genealogical research,” says the site. “Most resources on RootsWeb.com are designed to facilitate such connections.” You can use RootsWeb in a variety of ways: search it, contribute records, upload your family tree, post your family surnames on a board others can see, and more.
Ancestry has changed one of the ways RootsWeb users have traditionally connected: Mailing Lists. According to the website:
“Beginning March 2nd, 2020 the Mailing Lists functionality on RootsWeb will be discontinued. Users will no longer be able to send outgoing emails or accept incoming emails. Additionally, administration tools will no longer be available to list administrators and mailing lists will be put into an archival state. Administrators may save the email addresses in their list prior to March 2nd. After that, mailing list archives will remain available and searchable on RootsWeb. As an alternative to RootsWeb Mailing Lists, Ancestry message boards are a great option to network with others in the genealogy community. Message boards are available for free with an Ancestry registered account.”
Learn More about Using Ancestry
Nancy Hendrickson’s Book
Nancy shares many more Ancestry tips and treasures in her Unofficial Ancestry.com Workbook. To get the most out of this book read the section on using the Ancestry.com Catalog. Nancy does 95% of her research in the catalog. The workbook is divided into topics, such as military records, so choose a chapter that fits your current goals. It’s also important to not just read the workbook, but also do the exercises. They teach you Nancy’s thought processes for how she finds specific answers or approaches certain types of problems. Then you can apply the same concepts to your own research. Don’t miss the chapter on social history. That’s where you’ll dig into everyday life. And finally, take advantage of the forms that are included. They will help you log your findings and analyze what you’ve learned.
Genealogy Gems Article
Browse-only collections at Ancestry and other genealogy websites are sometimes viewed as inaccessible, but they are actually a hidden treasure. Click here to read How to Find and Browse Unindexed Records at Ancestry – The Better Browsing Checklist. In this article you’ll learn how to access these browse-only collections at Ancestry and expand your family history research.
Read this article by Lisa Louise Cooke at Genealogy Gems
In this episode we take a look at a subject that is difficult, and yet ultimately faced by all genealogists: Downsizing. Whether you need to help a relative downsize, or it’s time for you to move into a smaller place or just carve out more room in your existing home, this episode is for you. You’ll hear specific action steps that you can follow to the make the job of downsizing easier and more productive.
Also in this episode we’ll cover the latest genealogy news, and take a quick look at the 1830 census.
Please take our quick podcast survey which will take less than 1 minute. Thank you!
Genealogy News
New and Returning genealogy-themed television Shows:
A New Leaf on NBC
A New Leaf will be included in the Saturday NBC morning programming block called The More You Know beginning October 5, 2019.
From the Ancestry Blog:
“Each week ‘A New Leaf’ will follow people on the cusp of key life inflection points, who using family history, genealogy, and sometimes AncestryDNA® analysis will go on a journey of self-discovery and learn from the past while looking to the future. In partnership with Ancestry, Fuentes will join families as they learn the importance of appreciating and understanding their family history and ancestors in order to make important life decisions. ”
“Genealogist-on-Demand: Legacy Tree Genealogists Launches Virtual Consultation Service Offering Access to Family History Experts, Any Time, Any Where.
Legacy Tree Genealogists announced today the launch of a new service—45-minute, virtual one-on-one consultations with a professional genealogist. At only 100 USD, these consultations provide users with a cost-effective resource to have their research questions answered in real-time by a professional genealogist, from the comfort of their own home.
Users have the option to schedule either a DNA Consultation with a genetic genealogist who can explain their DNA test results, or a Genealogy Consultation with access to one of their worldwide researchers with expertise in regions around the globe, including England, Ireland, Scotland, and Australia.
Tailored to your specific research questions, the one-on-one consultations are conducted utilizing screen sharing technology that allows the user to share documents, records, or DNA results with the genealogist in a secure, virtual environment.
Legacy Tree will continue to expand its consultation offerings to include additional regions in the near future in order to continue to serve the global genealogy community.”
In the past I’ve told you about the incredible work that Larsen Digital did for me getting some of my old home movies digitized. Well, they’ve just launched a new service where you can send them your old negatives and they will convert them into beautiful high-resolution digital images that you can use. We’re talking 4000 dpi images!
I’ve had boxes of negatives in my closet that I inherited from my paternal grandmother. She had negatives for all sorts of pictures that are either long since lost or the photo album went to someone else in the family.
I really had no idea what these old photos would turn out to be, but I ended up with wonderful images of my great grandmother, my grandparents, my Dad when he was a kid, and countless relatives.
The service is called Value because it’s less expensive than the Pro which includes restoration. It’s a great way to get all your old negatives digitized. Then you can decide if there’s further restoration you want done on select images.
DIY: You can do color correction and repairs yourself with a simple free app like Adobe Fix. See my book Mobile Genealogy for much more on using this and other apps for genealogy.
Negatives can deteriorate over time just like photos. The sooner you get them digitized the better condition images you will have.
Larsen Digital is offering Genealogy Gems listeners a great discount on both the new value service and the Pro negative digitization service, as well as 35mm negatives & 35mm Slides. Visit the Genealogy Gems page at Larsen Digital here and use the coupon code GENGEM.
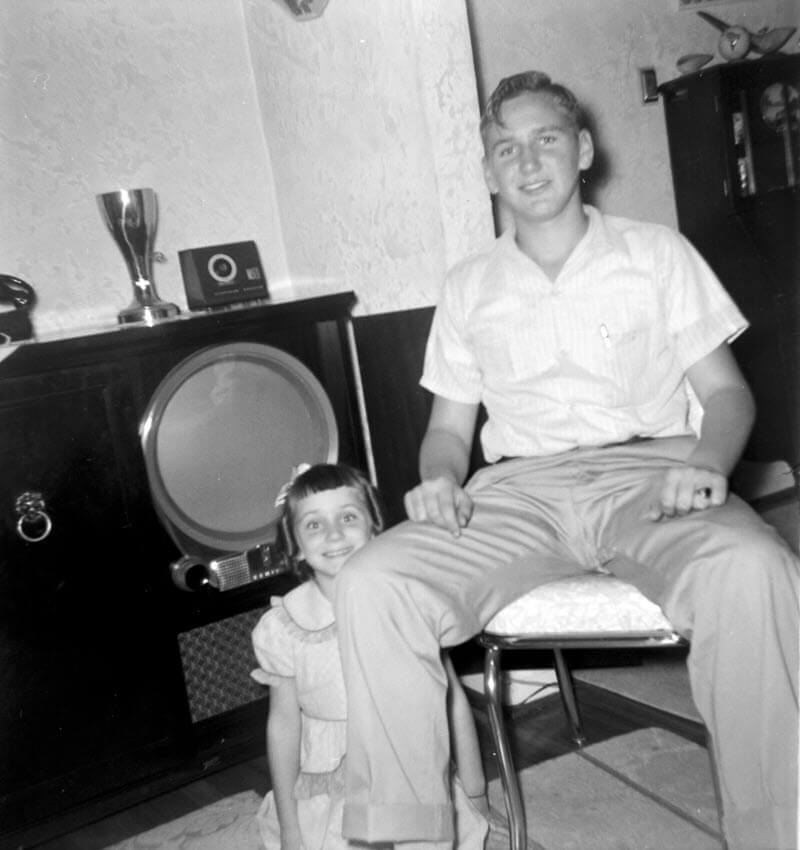
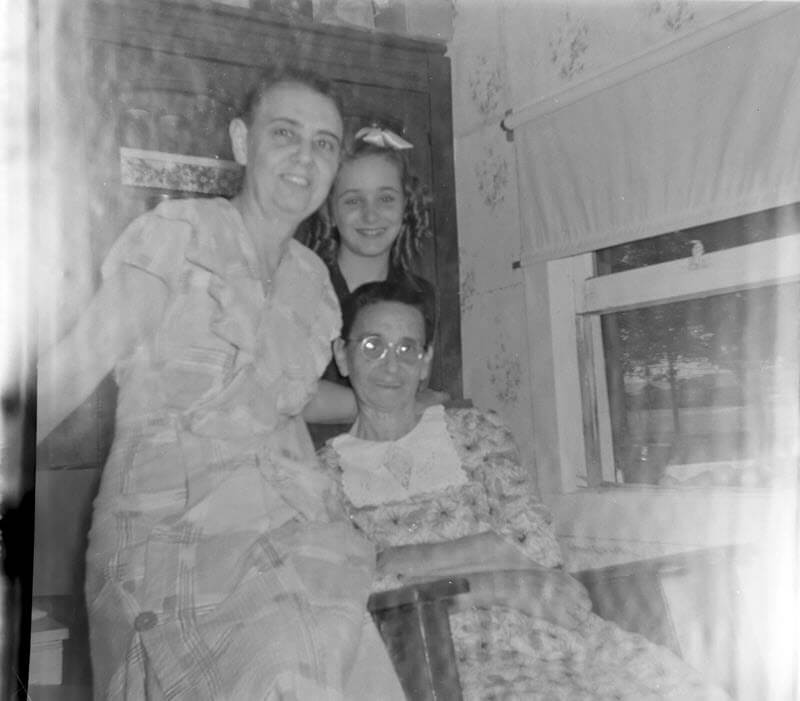
Here are a few examples of old negatives that I had digitized by Larsen Digital.
My Dad with this family’s first TV set!
Never before seen image of my great grandmother (seated), her daughter and grand daughter. Watch the video that autoplays on this page to see how I restored this photo after receiving the digitized image.
It’s really kind of amazing to think I’ve sat on these negatives for so long. I’ve been sending the pictures to my Dad and he’s been emailing me back not just the names and dates, but the stories behind many of these photos.
Findmypast Now Supports Tree to Tree Hints
Long gone are the days of having to search for genealogical records all alone. When you have any part of your family tree online on any of the “Genealogy Giants” websites (Ancestry, MyHeritage, Findmypast and FamilySearch) they do a lot of the hunting for you. They deliver hints that have a good chance of matching up with your ancestors. Your job is to carefully review them and determine if they are your ancestor’s records.
(Genealogy Gems Premium Members: Listen to Premium Podcast Episode #175 devoted to hints at Ancestry that includes a bonus download guide on Genealogy Hints at a Glance.)
Up until now, Findmypast offered hints on birth, marriage and death records. Now they are joining the other Genealogy Giants in offering hints based on other user’s family tree on their website.
Lisa Louise Cooke uses and recommends RootsMagic family history software for her master family tree. Visit www.RootsMagic.com
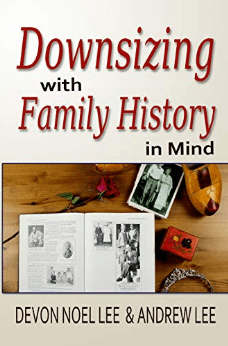
GEM: Downsizing with Family History in Mind with Devon Noel Lee
Get your copy of Downsizing with Family History in Mindhere. (We hope you enjoyed the interview. Disclosure: Genealogy Gems is a participant in the Amazon Services LLC Associates Program, an affiliate advertising program designed to provide a means for sites to earn advertising fees by advertising and linking to Amazon.com. Thank you for supporting our free podcast by using our link.)
Click the image to order your copy.
At some point we all face downsizing. Whether we are helping our parents downsize to a smaller house, or we need to downsize our own belongings to carve out a spare bedroom or just make room in a closet. it’s never really an easy task. And I think it’s safe to say it’s even more difficult for the family historian, because we collect a lot of paper, photos and other things that are often near and dear to our hearts.
Devon Noel Lee and her husband Andrew Lee of the Family History Fanatics YouTube channel have taken on this challenge themselves and they’ve written a new book called Downsizing with Family History in Mind. Here to help you make the tough choices and clear the clutter is Devon Noel Lee.
There are many reasons for downsizing:
To move to a smaller place
Absorbing inherited genealogy
Divorce
To free up space in your own home
Downsizing the sentimental items is the hardest part of downsizing.
Question: A lot of us just think, well it’s a Saturday morning, I think I’ll just do some decluttering. But you say in the book that decluttering doesn’t work. Why is that?
Devon’s Answer:
“There are three things that experts teach us that are absolutely wrong:”
We don’t give ourselves enough time for nostalgia.
We’re really bad at evaluating what’s going to last for the long term
We use the wrong boxes when decluttering – all the experts say to use Keep, Sell and Donate.
Devon recommends the following boxes:
Keep
Giveaway (combining sell and donate) – to family, societies, archive, university special collections, libraries, etc.
Trash (or recycle)
Process
How to “process”:
Digitize
Process the information in your binders and get rid of the binders if no one wants them.
Use it:
Sad to say, most people don’t want your family china. Give yourself permission to use it and enjoy it now. Make memories with it!
Let your children play with things.
Four Basic Downsizing Principles in the book:
Reduce: Divide things into the boxes.
Preserve: This is when you’re going to digitize the things in your process box. Photograph objects. Transfer your genealogy into software and online trees.
Reclaim: Take everything out of the process box after processing, and divide into Giveaway, Trash and Keep. Don’t put things into storage!
Showcase: Put on display what you found worth keeping so it can be enjoyed. Transform what you have into something that is easier to pass on like videos, podcasts, scrapbooks. Focus on story-based items.
From Lisa: It puts us back in control as to what happens to it. Making sure the right people get it.
I’m a big fan of displays. If we haven’t taken a moment to get something on the wall – to put a display together – how can we expect our family to appreciate it and embrace our family history values?
Question: Many downsizing projects are much more than a single day. When you’re faced with a really big job, where do you recommend that people start, and where should they put their primary focus?
The book includes action plans for folks who have:
just an hour
Weekend
3-6 months
6-12 months
Capture what is right now:
Photograph the outside of the home.
Photograph what’s inside.
Then focus on photographing the collections in their context.
Mentioned by Lisa:
Genealogy Gems Podcast episode #21 includes a Gem called Thanks for the Memories. In it, I share an example of mentally walking through my Grandma’s house and capturing all of my memories on paper.
Get a piece of paper or pull up a word document. Close your eyes for a moment and visualize a favorite memory from your childhood.
In my case I started with a favorite place, my maternal grandma’s house. But perhaps yours is the back alley where you and your friends played baseball, or your great uncle’s garage where he showed you how to work on cars. Whatever is meaningful to you.
Now, open your eyes, and write your thoughts one at a time. Just free flow it. They don’t have to be complete sentences.
Later you can try your hand at writing more of your actual experiences or memories of a person. Again, it doesn’t have to be a novel or sound really professional. It’s just the memories from you heart.
Family Photos:
Question: If we have piles and piles of family photos, particularly ones we’ve inherited, how to do we decide which to keep and which to toss? Or do you ever toss?
Devon’s answer:
Get rid of the duplicates!
Keep 1 of the biggest and best and throw the rest away. Don’t bog yourself down with hours spent trying to track down someone else to give them to.
Get rid of blurry, overexposed, underexposed, and meaningless photos.
Unlabeled photos:
There will be some circumstances where you will not be able to keep them. You can’t go into debt for unlabeled photos. You want to separate them from the labeled so that other family members don’t throw them all out together.
If you have time, try to identify them by asking relatives, and posting them to DeadFred.com.
If you can, donate the remaining unlabeled photos to orphaned photo collectors, or toss.
You did the best you can. Don’t feel guilty because your ancestors didn’t label their photos.
Question: What advice do you give your readers who are faced with what to do with their genealogy when they don’t have descendants or when no one in the family wants it? What encouragement can you offer when there is no one who descends from you, or there is no one who wants them.
Devon’s answer:
If you think you don’t have anyone in your family who is interested, you’re wrong.
Downsizing and organizing will increase the chances of someone willing to take it later.
If you don’t have anyone in your immediate family who wants your stuff, start looking for distant cousins actively working on a surname. They won’t want everything. You will have to divide the material. They want it organized.
Do it while you’re living – don’t leave it to someone else.
Digitize it and get it online where it can be shared.
From Lisa:
Getting your stuff in good condition makes it more desirable.
Our collection, broken up, may have much more value to other people.
Get your copy of Downsizing with Family History in Mindhere. (We hope you enjoyed the interview, and thank you for using our link.)
The free podcast is sponsored by:
MyHeritage.com is the place to make connections with relatives overseas, particularly with those who may still live in your ancestral homeland. Click the logo to learn more.
GEM: Profile America – The 1830 U.S. Federal Census
Saturday, October 5th.
The national census to be taken April 1 next year will be the 24th time this once-a-decade count has been conducted since 1790. The fifth census in 1830 profiled a quickly expanding nation, counting nearly 13 million residents — an increase of more than one-third in just 10 years.
New York remained the largest city, while second and third places were a near tie between Baltimore and Philadelphia. Also, among the 10 biggest cities were Charleston, South Carolina, and Albany, New York.
In the decade to follow, Cyrus McCormick invented the grain reaper, opening huge sections of the Great Plains to agriculture, and Texas declared its independence from Mexico.
Gain access to the complete Premium podcast archive of over 150 episodes and more than 50 video webinars, including Lisa Louise Cooke’s newest video The Big Picture in Little Details.
Stay Up to Date with the Genealogy Gems Newsletter
The Genealogy Gems email newsletter is the best way to stay informed about what’s available with your Premium eLearning Membership. Click below to sign up today.
Learn more about Backblaze computer cloud backup and get your computer backed up today at www.backblaze.com/Lisa