What questions were asked in the 1950 census? In this week’s video I’ll explain what was asked, and how the answers given can help provide clues for additional research about your family. You’ll also learn what was not asked and which questions were asked for the first time in 1950. Then we’ll wrap up with my Genealogy Pro Tip for the 1950 Census.
Episode 53 Show Notes
We’re all looking forward to the 1950 census coming out in April 2022, followed soon after by the searchable index. But before we dig into it, it’s helpful to know what kinds of questions were asked and what kind of information you can expect to find about you, your parents, your grandparents or even your great grandparents.
If you haven’t watched it already, check out Elevenses with Lisa episode 51 for an overview of the 1950 census.
And I’ll have that video link for you again at the end of this video. And of course the best way to find your own genealogy gems is to follow my genealogy gems channel, so click the YouTube Subscribe button and that will toss me and this channel into your favorites list on YouTube for safe keeping and happy viewing for years to come.
The U.S. Federal Census is taken every 10 years here in the United States. Typically in genealogy we see more and more questions being asked each decade, which is awesome for us as family historians. But did you know that the 1950 population questionnaire actually asked FEWER questions than its predecessor in 1940.
Yep, according to the U.S. Census bureau, in 1940 every household was asked 34 questions. However, in 1950 they were asked just 20 questions. As we go through the questions I’ll let you know what’s the same, what unfortunately you will NOT being seeing, BUT also the few NEW questions that were asked.
Questions Asked on the 1950 U.S. Federal Census Questionnaire
The following questions were asked of everyone in the household.
1. Name of street, avenue or road where the household is located
2. Home or apartment number
3. Serial number of dwelling unit
4. Is this house on a farm (or ranch)?
5. If no, is this house on a place of three or more acres? (New question for 1950 thanks to the expansion of suburbia.)
6. Corresponding agriculture questionnaire number
7. Name
8. Relationship to head
9. Race
Census takers were instructed to assume that all members of the related household were the same race. For unrelated people they were to ask. And if you see a description you are unfamiliar with, consult the 1950 census enumerator instructions.)
10. Sex
11. How old was this person on his last birthday?
It was expected that there would be some folks who either didn’t know their exact age or didn’t care to share it. Census takers were instructed to try to zero in and get as accurate as possible. If age wasn’t known, they were instructed to enter an estimate as the very last resort, and footnote that it was an estimate.
12. Is this person now married, widowed, divorced, separated, or never married?
Marriage codes found in this column:
MAR = married
WD = widowed
D = divorced
SEP = separated
NEV = never married. People under the age of 14 were automatically labeled as never married. Also, common-law marriages were reported as Married, so while marital status can be an indicator to look for marriage records, it is possible that there may not be any.
13. What State or country was the person born in?
It’s important to note that if the baby was born in a hospital across the state line, they were reported as being born in the state where the family lived. This is important to keep in mind when hunting for birth certificates.
14. If foreign born, is the person naturalized?
This will be a yes or no. But if you see “AP” it means the person was born of American parents abroad or at sea. Also, if born at sea they were an American citizen if their father was, or if they were born after 5/24/1934 and either parent was American.
Before we get to the last six questions which were asked only of people 14 years of age and older, let’s take a look at the questions you might have expected to see that were asked in the previous 1940 census but were not.
Questions Not Asked in the 1950 Census that Were Asked in 1940
These questions include:
Home owned (O) or rented (R)
Value of home or monthly rental if rented
Attended school or college at any time since March 1, 1940?
Highest grade of school completed
Residence, April 1, 1935
City, town or village having 2,600 or more inhabitants. If less, enter “R”
County
State (or Territory or foreign country)
Farm?
Questions Asked in the 1950 Census of People Over the Age of 14
You may be wondering why the last 6 questions of the 1950 census were only asked of people over the age of 14. It’s because these questions were about employment status. Not surprisingly, these questions vary a bit from what was asked about in employment in 1940, but they are pretty similar.
What was this person doing most of last week – working, keeping house, or something else?
Employment Codes used in questions 15:
WK = working
H = keeping house
U = unable to work
OT = other
16. If the person was “keeping house” or “something else” in question 15, did the person do any work at all last week, not counting work around the house? (Including work-for-pay, in his own business, working on a farm or unpaid family work)
17. If the person answered “no” to question 16, was he looking for work?
18. If the person answered “no” to question 17, even if he didn’t work last week, does he have a job or business?
19. If the person was working, how many hours did he or she work in the last week?
20. What kind of work does the person do?
What kind of business or industry is the person in?
Class of worker the person is.
Enumerators were to mark “P” for private employment, “G” for government employment, “O” for own business, or “NP” for working without pay
Here’s an example of an entry you might see for someone’s employment: Jewelry, Salesman, P. Armed forces was used for all types of military service.
The one glaring omission in 1950 is questions about whether the person worked for one of the government program such as the Works Progress Administration known as the WPA or The Civilian Conversation Corp known as the CCC. This actually makes sense because these employment programs were focused on helping the unemployed during the Depression. WWII had most Americans working and doing their part in some fashion creating low unemployment. Therefore, the WPA was ended in 1943.
Genealogy Clues in the 1950 Census
Let’s quickly recap what you will learn from the answers to the questions asked during the 1950 census that can help you learn more about your family history:
You’ll see the names of your relatives and ancestors, where they lived and the relationships within the family.
You’ll find out where they were living and get the actual address. You can then use this information to find old maps, search city directories and learn much more about their neighborhood and their lives.
If your relatives lived on a farm you’ve got another genealogy gem to find which is their listing in the Agricultural census. Remember the population enumeration, the one counting people, is just one of the enumerations that was conducted. The 1950 population enumeration will give you the number where you can locate them in the agricultural questionnaire.
You’re also going to learn your relative’s age which will get you even closer to determining their birthdate. This in turn will help you locate their birth records. You will also learn the state or country where they were born.
If they were foreign born you will find out if they were naturalized. It’s a little disappointing that it doesn’t tell us the year of immigration or naturalization. However, a “yes” in the “is the person naturalized” column does provide you with an excellent clue to go look for those naturalization records. Learn more about finding and using naturalization records for genealogy in my FamilyHistory: Genealogy Made Easy podcast:
Episode 29: Immigration and Naturalization Records for Family History, Part 1.
Genealogy lecturer and blogger Stephen Danko, PhD, begins a 3-part series on U.S. immigration and naturalization records. Learn about passenger arrival lists in the U.S., little-known certificates of arrival and naturalization records: how to find them and what’s in them.
And finally, you’ll not only find out if they were married and if they had any previous marriages.
Lisa’s Pro Tip for the 1950 U.S. Census
After my first video on the 1950 census I got this question from Suzanne: Will the 1950 census also have the children born to mother/children still living question?
The answer is, maybe.
Pro Tip: Keep an eye out for additional questions.
As in 1940, 5 percent of the population were asked an additional slate of questions. This was to provide sample data about the population. One of those questions asked was “If female and ever married, how many children has she ever borne, not counting stillbirths?”
Supplemental Questions Asked in the 1950 Census
Here are the additional questions that were asked of just 5% of the population in the 1950 U.S. Federal Census. (Note: They were asked of all ages.)
21. Was the person living in the same house a year ago? If the answer was no, then…
22. If no to question 21, was the person living on a farm a year ago?
23. If no to question 21, was the person living in the same county a year ago?
24. If no to question 23…
What county (or nearest place) was he living in a year ago?
What state or foreign country was he living in a year ago?
25. What country were the person’s mother and father born in?
26. What is the highest grade of school that the person has attended?
Enumerators were to mark “0” for no school; “K” for kindergarten; “S1” through “S12” depending on the last year of elementary or secondary school attended; “C1” through “C4” depending on the last year of undergraduate college education attended; or “C5” for any graduate or professional school.
27. Did the person finish this grade?
28. Has the person attended school since February 1st?
Enumerators could check a box for “yes” or “no” for those under thirty; for those over thirty, they were to check a box for “30 or over.”
For members of the household who were 14 years and older, they also answered these questions centered around employment details, money, military service previous marriages and the question Suzanne is hoping to have answered – children born to women in the household.
1950 census supplemental questions asked of 5% of the population.
29. If the person is looking for work, how many weeks has he been looking for work?
30. Last year, how many weeks did this person not work at all, not counting work around the house?
31. Last year, how much money did the person earn working as an employee for wages or salary?
32. Last year, how much money did the person earn working at his own business, professional occupation, or farm?
33. Last year, how much money did the person receive from interest, dividends, veteran’s allowances, pensions, rents, or other income (aside from earnings)?
34. If this person is the head of the household: last year, how much money did his relatives in this household earn working for wages or salary?
35. If this person is the head of the household: last year, how much money did the person earn working at his own business, professional occupation, or farm?
36. If this person is the head of the household: last year, how much money did the person receive from interest, dividends, veteran’s allowances, pensions, rents, or other income (aside from earnings)?
37. If male: did he ever serve in the U.S. Armed Forces during…
World War II
World War I
Any other time, including present service
38. To enumerator: if the person worked in the last year, is there any entry in columns 20a, 20b, or 20c?
39. If yes, skip to question 36; if no, make entries for questions 35a, 35b, and 35c.
What kind of work does this person do in his job?
What kind or business or industry does this person work in?
Class of worker
40. If ever married, has this person been married before?
41. If married, widowed, divorced, or separated, how many years since this event occurred?
42. If female and ever married, how many children has she ever borne, not counting stillbirths?
The 1950 U.S. Census – A Valuable Genealogical Record
So now you know all the details on what you can look forward to learning about in the 1950 census. If you would like to learn more about the 1950 census, watch The 1950 Census for Genealogy. You can watch the video and get the complete show notes here.
WATCH NEXT: episode 51 and get the show notes here.
Yakety Yak – Talk Back in the Comments
Elevenses with Lisa is a genealogy community, and discussion is a big part of the experience. In the Comments below please share on one of these topics:
What question are you most looking forward to getting an answer to in the 1950 census?
Who you’re hoping to find in the 1950 census?
What question do you have for me about the 1950 census?
Welcome to this step-by-step series for beginning genealogists—and more experienced ones who want to brush up or learn something new. I first ran this series in 2008. So many people have asked about it, I’m bringing it back in weekly segments.
Episode 4: Attending Genealogy Conferences and Vital Records Requests
In our first segment, our guest is the longtime online news anchorman of genealogy, Dick Eastman, the author of Eastman’s Online Genealogy Newsletter. He talks about the changing industry and the benefits of attending genealogy conferences.
Next, you’ll learn the ins and outs of using some “vital” sources for U.S. birth and death information: delayed birth records, Social Security applications (SS-5s) and death certificates.
Genealogy Conferences Conversation: A Few Updates
Dick and I talk about Footnote.com as a relatively small site. Has that ever changed! Footnote.com is now Fold3.com and it’s a go-to site for millions of online American military records.
Family History Exposstill offers an exciting conference, especially for first-timers. But there are others as well: In the United States, there’s RootsTech, the National Genealogical Society and many state and regional conferences (like one near my home, the Southern California Genealogical Society’s annual Jamboree). Find a nice directory at Cyndi’s List. Many conferences are starting to offer live streaming sessions for people who can’t attend: check websites for details. In addition, Family Tree University offers regular virtual conferences—where sessions and chat are all online! If you live outside the U.S., look for conferences through your own national or regional genealogical societies. If you can get to London, don’t miss Who Do You Think You Are Live.
Dick now writes all of his Plus content himself. If you haven’t already checked out Eastman’s Online Genealogy Newsletter, you should! Both his free and Plus newsletters are great insider sources on what’s new and great (or not-so-great) in the family history world.
The SS-5
You can order a copy of the application that your ancestor filled out when they applied for a Social Security Number: the SS-5. I have done this, and they really are neat, but they aren’t cheap. So let’s talk about the facts you’re going to find on them so you can determine if it is worth the expense.
The SS-5 has changed slightly over time, but may include the applicant’s name, full address, birth date and place and BOTH parents’ names (the mother’s maiden name is requested). If your ancestor applied prior to 1947 then you will also very likely find the name and address of the company they worked for listed, and possibly even their position title.
Here’s an example of a Social Security application form:
In the 1970s, the Social Security Administration microfilmed all SS-5 application forms, created a computer database of selected information from the forms, and destroyed the originals. So it’s important to order a copy of the microfilmed original, rather than a printout or abstract from the Administration’s database. And luckily now you can request a Social Security Application SS5 Form online under the Freedom of Information Act.
It will help to have your relative’s Social Security Number (SSN) when you apply for a copy of their SS-5. First, it gives you greater confidence that their SS-5 exists. Second, it’s cheaper to order the SS-5 when you have their SSN. Third, the Social Security Death Index, in which you’ll find their SSN, usually has death data that makes your application for their SS-5 stronger. Privacy concerns have caused some genealogy websites to pull the SSDI, but you can still search it (in many instances for free) at the links provided in Episode 3.
Finally, here’s a little background on the Social Security Number itself. The nine-digit SSN is made up of three parts:
The first set of three digits is called the Area Number. This number was assigned geographically. Generally, numbers were assigned beginning in the Northeast and moving westward. So people whose cards were issued in the East Coast states have the lowest numbers and those on the West Coast have the highest numbers.
Prior to 1972, cards were issued in local Social Security offices around the country and the Area Number represented the state in which the card was issued. This wasn’t necessarily the state where the applicant lived, since you could apply for a card at any Social Security office.
Since 1972, when the SSA began assigning social security numbers and issuing cards centrally from Baltimore, Maryland, the area number assigned has been based on the ZIP code of the mailing address provided on the application for the card. And of course, the applicant’s mailing address doesn’t have to be the same as their place of residence. But in general the area number does give you a good lead as where to look for an ancestor.
The next two digits in the number are called the Group Number, and were used to track fraudulent numbers.
The last set of four digits is the Serial Number, and these were randomly assigned.
UPDATE: The website for ordering Social Security applications (SS-5s) has changed since the podcast first aired. For current ordering instructions, including online ordering, click here. The cost is still $27 to order a deceased relative’s SS-5 if you know the Social Security number and $29 if you don’t know it.
Delayed Birth Certificates
After 1937 folks who qualified to apply for social security had to have proof of their age. If they were born prior to official birth certificates being kept in their state, they applied for a delayed birth certificate.
Anytime someone needs a birth certificate for any reason, they have to contact the state—and often the county—in which the birth occurred. If a birth certificate exists, they can simply purchase a certified copy. But if there were no birth certificates issued at the time of the person’s birth, they could have a “delayed birth certificate” issued by that state or county.
In order to obtain a delayed certificate, they had to provide several pieces of evidence of their age. If these are considered satisfactory, the government would issue the certificate and it would be accepted as legal proof of birth by all U.S. government agencies.
Originally people turned to the census for proof of age. But eventually the Social Security Administration began to ask for birth certificates. For folks like my great grandmother who was born at a time and place where birth certificates were not issued, that meant they had to locate documents that could prove their age and allow them to obtain a delayed birth certificate. Delayed just meaning it was issued after the time of the birth.
Delayed birth certificates are not primary sources. (Remember we talked about PrimarySources in Episode 2. Since the delayed certificate was based on other documents, and not issued at the time of the event by an authority, such as the attending physician, then it is not a primary source. This means that while it’s great background information, it is more prone to error. In order to do the most accurate genealogical research you would want to try to find a primary source if possible. Chances are your ancestor used another primary source, such as an entry in the family bible, to obtain the delayed birth certificate.
The process for ordering a delayed birth certificate is likely going to be the same as ordering a regular birth certificate. You would start with the checking with the county courthouse, and then the Department of health for the state you’re looking in. Let them know that the birth record is a delayed birth certificate. Also the Family History Library card catalogue would be a place to look as many were microfilmed. Go to www.familysearch.org and search for delayed birth records by clicking on Search from the home page. Then click Catalog and do the keyword search just as the episode instructs, using “delayed birth” as your keyword. (Within that search, you can also add parameters for the place name.)
So the lesson here is that even though your ancestor may have been born at a time or in a location where births were not officially recorded by the state, they may very well have a delayed birth certificate on file.
Ordering Death Certificates
The Social Security Death Index is just one resource for getting death information. But in the end you’re going to want the primary source for your ancestor’s death, and that’s the death certificate. While many of your ancestor’s born in the 1800s may not have a birth certificate, there is a much better chance that they have a death certificate since they may have died in the 20th century. Each state in the U.S. began mandating death certificates at a different time, so you have to find out the laws in the state, and probably the county, since death certificates were filed at the county level.
As I said before, the death certificate is going to be able to provide you with a wealth of information. Of course you’ll find the name, date of death and place of death, and possibly their age at death and the cause and exact time of death, place of burial, funeral home, name of physician or medical examiner and any witnesses who were present. The certificate is a primary source for this information.
You may also find information such as their date and place of birth, current residence, occupation, parent’s names and birthplaces, spouse’s name, and marriage status. But because this information is provided by someone other than the ancestor themselves it is really hearsay, and the certificate is considered a secondary source for that information.
And lastly you may find a name in the box that says Informant. This is the person who reported the death to officials. Informants are often spouses, children, and sometimes, depending on the person’s circumstances, just a friend or neighbor. But the informant is almost always someone that you want to investigate further because they obviously were close to your ancestor.
Once you think you know the location where your ancestor died, and the approximate if not exact death date, you’re ready to order a certificate. If the person died in the last 50 years you’ll probably have really good luck at the county courthouse Department of Vital Records. The older the record, the more likely it may have been shipped off by the county records department to the state Department of Health. Look for helpful links to death records at Cyndi’s List Death Records.
Here are some tips that will ensure that you don’t get bogged down in bureaucratic red tape:
Get the appropriate request form – this is usually available online.
Print neatly and clearly – if they can’t read it, they will send it back to be redone.
Provide as much information as you have.
Provide a self addressed stamped envelope.
Make one request per envelope.
Include a photocopy of your driver’s license to prove your identity.
Be sure to include your check for the exact amount required.
Make a copy of the request form for your records and follow up.
Lastly, keep in mind that county offices have limited personnel and are often swamped with paper work. So my best advice is that the more courteous and thorough you are the more success you’ll have.
Online Death Indexes
In the case of very old death certificates, as well as birth certificates, some state agencies have opted to hand them over to state Archives and Historical Societies, or at least make them available for digitizing.
And there you have it, lots of different avenues for tracking down your ancestor’s death records providing you with key information for climbing your family tree.
Not sure how to use microfilm or microfiche readers? Watch these quick video tutorials before your next trip to the library!
Recently I heard from a Genealogy Gems Premium member who is digging in deep to her family history. But she confessed that she left the Oklahoma Historical Center in Oklahoma City “in tears because I really didn’t know what I was doing” with the microfiche machine and with microfilms.
I totally understand. Microfilm and fiche readers are not my favorite part of genealogy research, either. But despite the wealth of digitized records that continue to appear online, microfilm is going to be around for a while! FamilySearch and other publishers of microfilmed data (like state archives) do not have copyright permissions to digitize all their microfilmed materials. Even if they can get it, it’s going to take a long time to make that happen.
Meanwhile, we will continue to need microfilm and microfiche readers!
Microfilm is a long reel of film (up to 125 feet, I’ve heard) that are essentially page-by-page photos of a document collection, book, newspaper, etc.
Microfiche is a single sheet of film (about 4″ x 6″) that contains the same, only shrunk down so small you need a magnified reader to make sense of it.
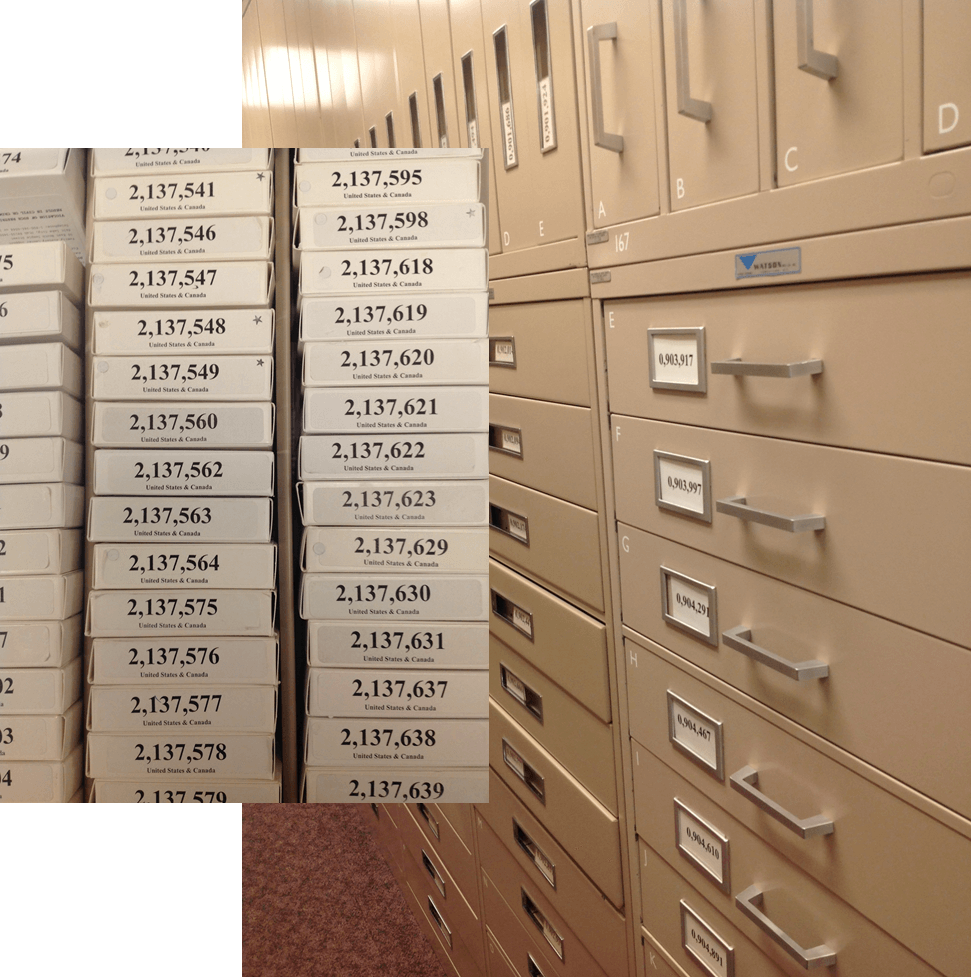
These were standard technologies for duplicating records in the pre-digital era. The Family History Library in Salt Lake City alone has over 2.4 million rolls of microfilm. Yes, that’s million! (And yes, they will lend them out to a Family History Center or FamilySearch Library near you.)
To access these fantastic films and fiches, you will need to use microfilm readers and microfiche readers. It’s easy to walk into the library and think everyone knows how to use them but you. But that’s not true. In fact, every single genealogist has had to face their first encounter with a reader. Don’t be shy about asking politely for a tutorial (and help when you do it wrong and something gets stuck). And don’t be shy about watching these tutorials on YouTube before you go to the library again:
Adding Source Citations is our third post in the Inherited Genealogy Files series, and in this post, we answer a listener’s question.
We recently received this letter from a Genealogy Gems Podcast listener, Cristy. She says:
Thank you for your tip about starting from the present and working backwards. I was having a hard time knowing where to start. I had inherited a tree passed from my mom and my great-grandmother, that when combined with the information my husband’s aunt gave me [I had a] tree with almost 1200 names. But the information from my great-grandmother and my aunt does not have any sources and all of my mom’s sources got lost in our various moves over the years. She only had her old school database that just had the facts and no sources.
I determined that a genealogy book my mom used as a source for one of our lines [had been] copied [from] an older genealogy line that has been proven incorrect. So, my goal has been to re-find my mom’s sources and document everything. I didn’t know where to start. I have now made a second tree in my database keeping the original as a place to start and only putting what I have proved using actual sources and attaching the documentation as I go. Your episode on the Genealogical Proof Standard was really helpful. It will be a big help as I clean up my tree.
Finding Source Citations for Your Inherited Family Tree
Let’s first give a brief definition of source citation.
Source Citation: the information that tells your reader where you obtained a particular piece of genealogical data.
For example, a family tree should include a source citation for the birth date and place, the death date and place, and the marriage date and place…and that’s just the start.
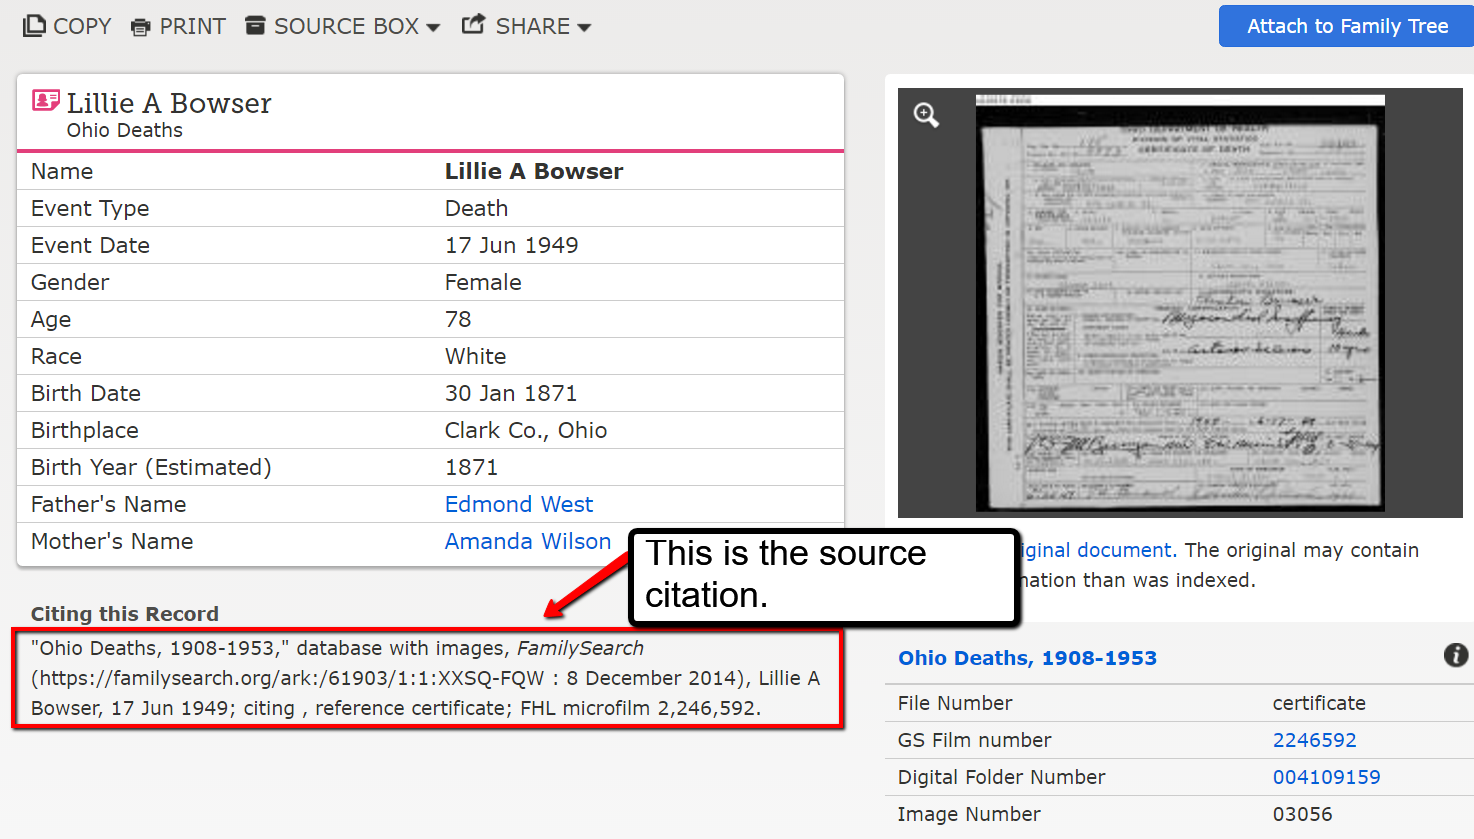
Finding source citations is really easy if you are using FamilySearch. Let’s say I used a death record I found online at FamilySearch as the proof of my ancestors death date. What is so wonderful about using FamilySearch.org for finding records is that it includes a source citation for you to copy and paste. Take a look.
You can highlight the source citation text and copy it into your genealogy software. A bonus is knowing that FamilySearch is free and easy to use.
Adding Source Citations for Genealogy to RootsMagic Software
As I mentioned above, you can take the source citation you found on FamilySearch and copy and paste it into your genealogy software. RootsMagic is the genealogy software we here at The Genealogy Gems Podcast use (and we are proud that they sponsor our free Genealogy Gems Podcast.) It is an easy-to-use and effective software for both PC and Mac users. (To learn more about using RootsMagic, read here.)
Using RootsMagic, let’s add a source citation to an event in a family tree:
In this example above, we have double clicked on Clarence’s name and opened up the Edit Person window. We would like to add a source citation for Clarence Bowser’s death date and place. In the line for death, we click on the box in the source citation column. The source citation column is indicated by that little icon that looks like a record.
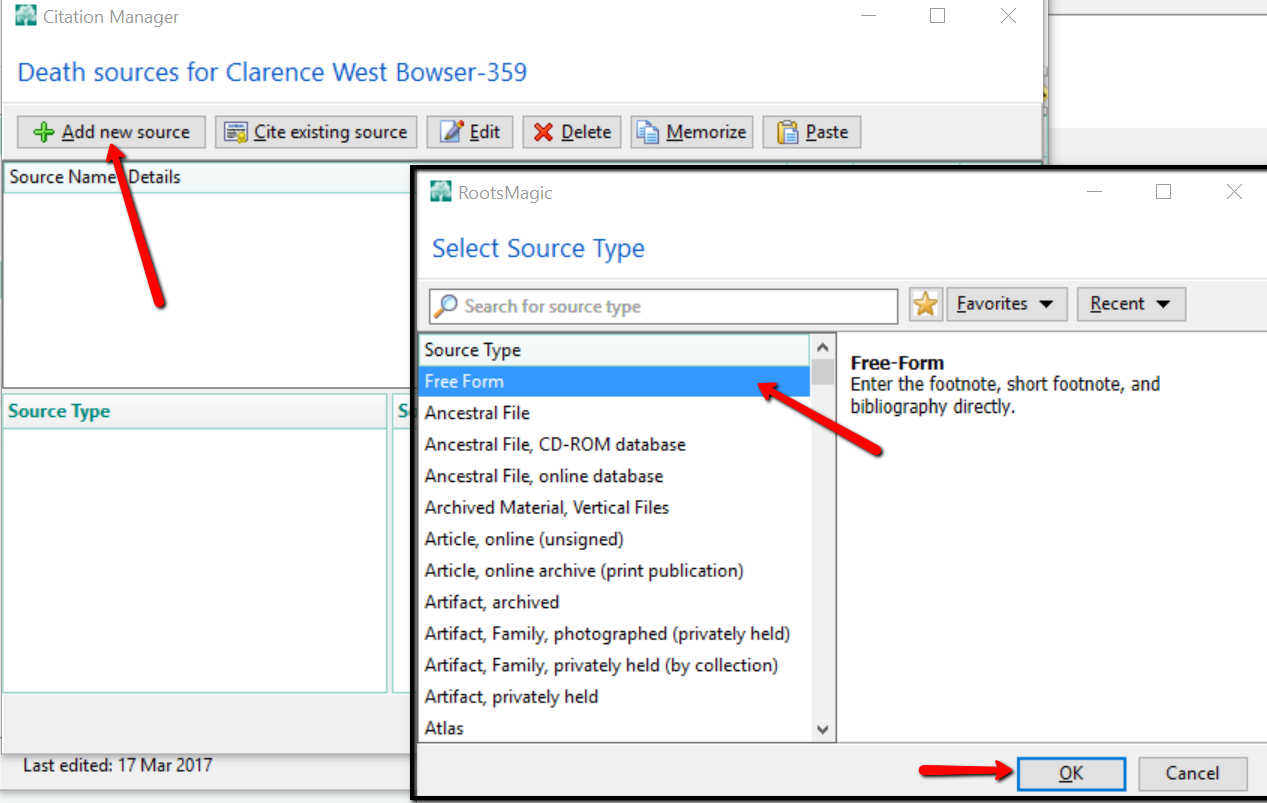
At the pop-up window, we click Add new source and from the options, choose Free Form and click OK.
Now, let’s assume you copied the following source citation from a record you found at FamilySearch.org:
“Ohio Death Index, 1908-1932, 1938-1944, and 1958-2007,” database, FamilySearch (https://familysearch.org/ark:/61903/1:1:VKBM-BKN : accessed 8 December 2014), Clarence W Bowser, 09 Nov 1958.
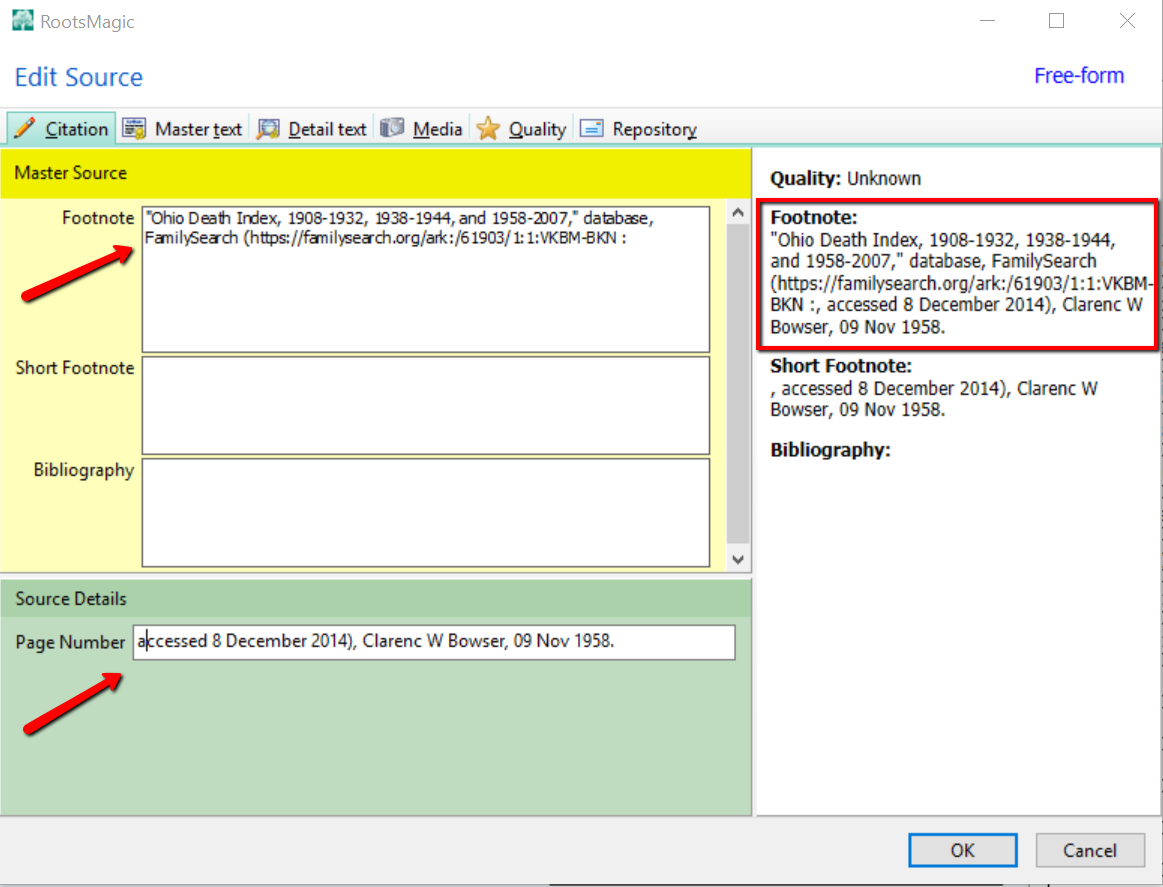
The first part of the citation is the title of the collection and the location you found it. “Ohio Death Index, 1908-1932, 1938-1944, and 1958-2007,” database, FamilySearch (https://familysearch.org/ark:/61903/1:1:VKBM-BKN. That front half of the citation is going to go in the Footnote area of the next pop-up window. The remainder of the citation you copied is going to go in the Page field. Then click, OK.
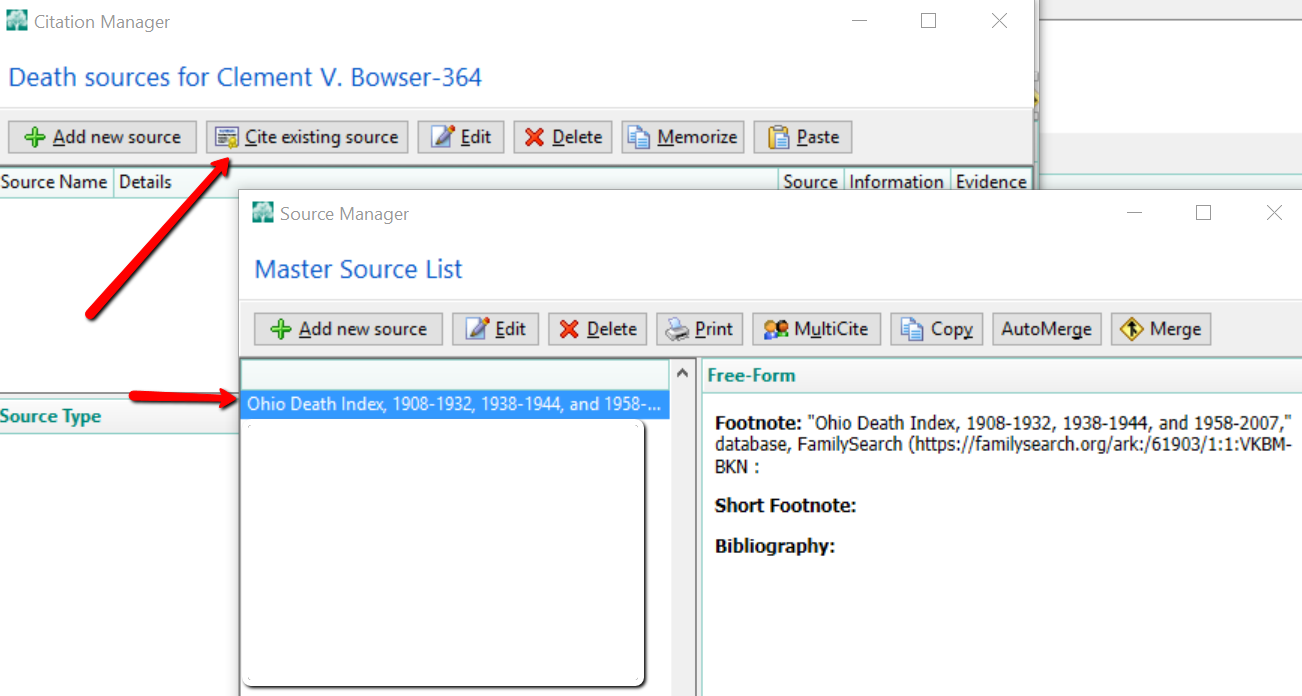
Notice, the entire footnote at the right of the screen looks like the one you copied from FamilySearch. You may wonder why on earth we separated the citation. Because, RootsMagic is going to remember you have a source citation from Ohio Death Index, 1908-1932, 1938-1944, and 1958-2007. The next time you find an ancestor’s death record in this index, you will not need to click Add new source. Rather, you will click Cite existing source, and choose the Ohio Death Index, 1908-1932, 1938-1944, and 1958-2007.
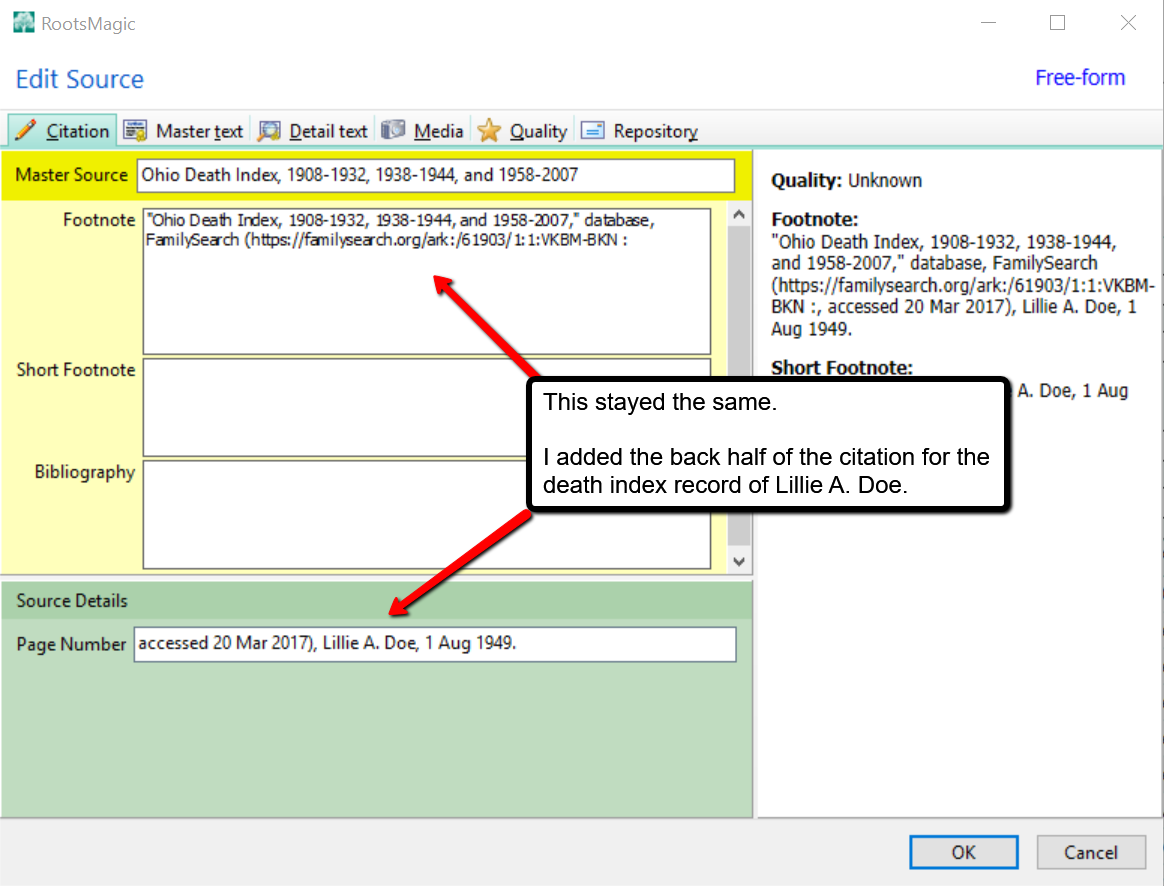
At the next screen, the Footnote field will already be filled out for you. All you need to do is fill in the Page field with the back-half of the new source.
More on Adding Source Citations for Genealogy
In addition to keeping your source citations on a genealogy software program, you may wish to clip the citation and add it to Evernote. Lisa Louise Cooke explains just how to do this in her article titled, “Cite Your Sources from FamilySearch with the Evernote Web Clipper.”
You can get loads more tips and tricks in our helpful Evernotefor Windows for Genealogists quick reference guide (also available for Mac users). Also, get a quick overview about this amazing product from this video clip on our YouTube Channel.


 Not sure how to use microfilm or microfiche readers? Watch these quick video tutorials before your next trip to the library!