Here’s an inspiring example of a quick and easy way to tell your story. Every one of us is deeply connected to history through our family stories. In fact, exploring your family history story can help you learn more about your place in history and what makes you, you.
Tell Your Family History Story with Animoto
Were you one of those kids sitting in history class bored to tears? Was the common teenage mantra “what’s this got to do with me?” running through your brain? While the teacher’s lecture may have seemed disconnected, nothing could have been further from the truth. Every one of us is deeply connected to history through our family stories. In fact, exploring your family history story can help you learn more about your place in history and what makes you, you.
(Full disclosure: This post contains affiliate links and I will be compensated if you make a purchase after clicking on my links. Thank you for supporting the Genealogy Gems blog!)
We all have a story to tell about our place in history and Animoto is an easy and powerful way to tell that family history story. I’ve been sharing my thoughts on creating family history stories on my Genealogy Gems Podcast and in videos on my Genealogy Gems YouTube channel. One of my listeners and viewers, Doug Shirton, has enthusiastically embraced the idea of video storytelling and recently shared his video with me.
Doug says “I have been wanting to do a video for a long time…Animoto was so easy.” Take a few minutes and get inspired by watching Doug’s video Genealogy Journey; Doug Shirton by clicking here.
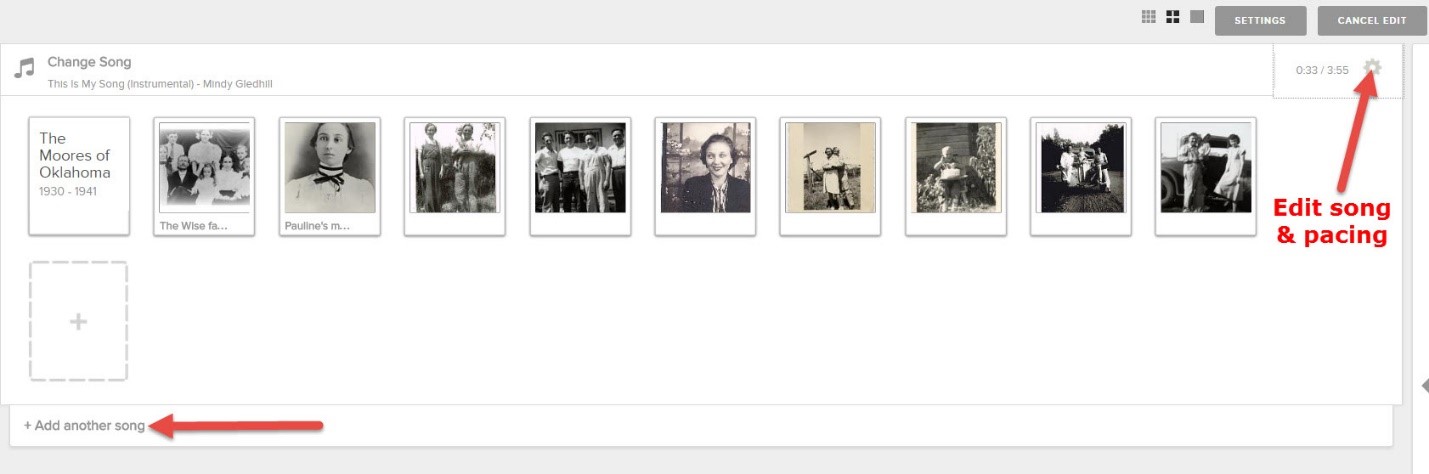
I love the elements that Doug wove into his video. Not only did he include individual photographs of himself and his ancestors, but he also dragged and dropped into his Animoto timeline a full page family tree chart. Doug used the “Rustic” video style (one of my favorites) which is perfectly suited for his old-timey photos.
He also used music in an innovative way to tell his family history story. Rather than settling on just one song, he used portions of multiple tracks. This technique moves the viewer through the emotional levels he was striving to convey.
Adding Music to Your Family History Story
All great movies have a soundtrack! Animoto allows you to choose from their music library or add your own. Adding music to your family history video is very simple. To add additional songs, simply click the plus sign under the timeline. Animoto’s “edit song and pacing” feature makes it easy to get everything to fit perfectly.
MUSIC SEARCH TIP: In addition to being able to upload your own songs, Animoto’s robust music library is brimming with songs that will help you hit just the right note. In addition to the filter boxes, don’t miss the handy search field at the very bottom of the list of filters. Enter a keyword to suit your mood and then scroll back up to the top of the page to pick from the results.
Choosing the Focus of Your Family History Story
Family trees are very far-reaching indeed. So many direct line and collateral lines, often spanning the globe. Doug was wise to select one family history story within his tree: his Ontario, Canada pioneer ancestors.
Focusing on a particular line of your family, or a single story makes creating your video more manageable for you and, frankly, more enjoyable to watch for your viewer. Keeping your video fairly short is also a good idea. Doug’s is just 4 minutes and I recommend going no longer than five. This is particularly important when you plan to share it on social media where attention-spans are short.
Family History Story Ideas
Here are a few ideas of stories you could explore:
The story of your most recent immigrant ancestor
A family history story that runs through your family tree, such as three generations of musicians
How one of your ancestral families survived a natural disaster like the Johnston Flood or the Great San Francisco Earthquake
The history of a first name that was used over multiple generations in your family
The idea here is to select a family history story that is short, thematic, and compelling to watch.
Need More Ideas?
Visit my How to Create Family History Videos page for more ideas and step-by-step instructions for videos with Animoto, There’s no better time than now to tell your story! We would love for you to share your family history story video on our Facebook page.
Disclosure: This article contains affiliate links and Genealogy Gems will be compensated if you make a purchase after clicking on these links (at no additional cost to you). Thank you for supporting Genealogy Gems!
Show Notes: Marriage records are essential to building your family tree. Here are the 5 steps you need to in order to find an ancestor’s marriage record.
A really good Spring cleaning task is to look through your family tree, starting with yourself and working backwards, and just checking to see if you have all the vital records for everyone. Vital records include birth, marriage and death records. Civil marriage records are typically some of the oldest vital records, and offer valuable information.
Step 1: Determine the time and place.
Time and place are critical to marriage record searches. Records like census records can help you get within 10 years of a marriage, and can also help you narrow in on the location of the wedding. Thankfully, all U.S. Federal Census records are free and online at FamilySearch.
Marriage records are typically filed at the county level. However, they can sometimes be found at the town level, particularly in New England.
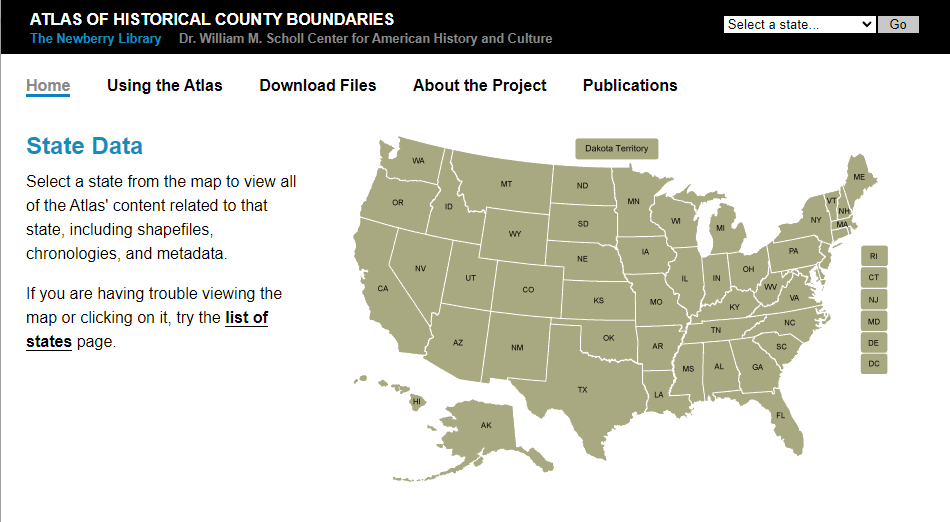
It’s very important to identify the correct county at the time of the estimated marriage. You can do that using the Newberry Library’s Atlas of Historical County Boundaries. Click on the state and then select the time frame.
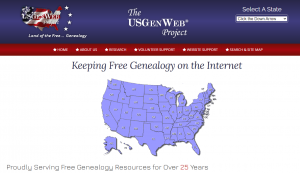
Genealogy “guidance” websites pull together information from a variety of sources to aid you in your research in a particular area. Here are two of my favorites:
Click on North America > United States > State. Scroll down the state page and click on the county. Use Alt + F to quickly search for the word marriage.
The wiki will likely also provide you with links and clues as to where to find the records. Remember, it’s not always a comprehensive list, but it’s a great place to start.
If civil marriage records had not yet started when your ancestors married, look for church marriage records. Learn more with my video: How to Use Church Records for Genealogy (Premium)
If those leads don’t pan out, next turn to major genealogy websites. Start with the free FamilySearch, then if you have subscriptions to sites like Ancestry or MyHeritage, use those. (Note: These are affiliate links and we are compensated if you make a purhcase.) Only a fraction of these website’s record collections are included in their hints and suggestions. This means that the card catalog is essential if you want to scour all the records.
Step 4: Contact the jurisdiction that originally created the records
If you don’t get the record that way, you’ll need to do it the old-fashioned way: contact the county or town clerk.
Early vital records are often moved to the state level. That contact information can likely be found on the FamilySearch Wiki page you found, or you can Google: County name, state “marriage records”
Check the following repositories:
State Library
State Archive
State Historical Society
County Historical Society
Other: _________________________________________
Step 5: Google Search
If all else fails, turn to Google to see if there are any other repositories or online resources outside of the largest genealogy websites and archives. Use search operators to focus your search.
Example: Randolph County Indiana “marriage records” 1880..1900
The quotation marks ensure that the exact phrase (Marriage records) is included on each web page result you get.
Two numbers separated by two periods is called a Numrange search. This instructs Google to also ensure that each web page result includes a number (in our case, a year) that falls within that range. It’s a great way to target marriage records from a particular time frame.
Learn more about marriage record research with these two instructional videos:
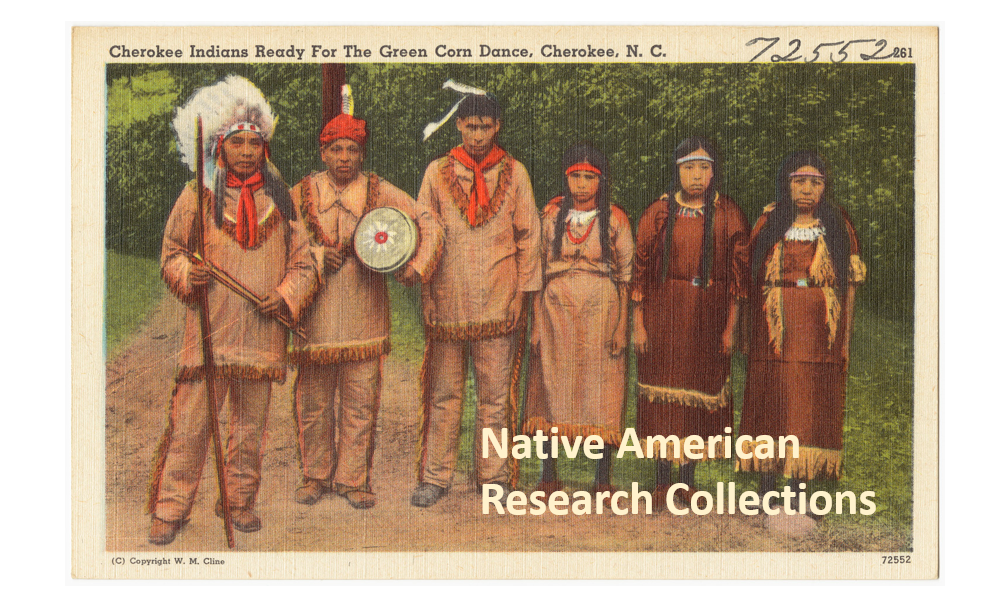
Many American families have a tradition of Native American ancestry. Now, Fold3.com has made access to their Native American records collections free between November 1 and 15th. Here are the step-by-step instructions you need to know to effectively navigate the Eastern Cherokee Applications collection at Fold3.com.
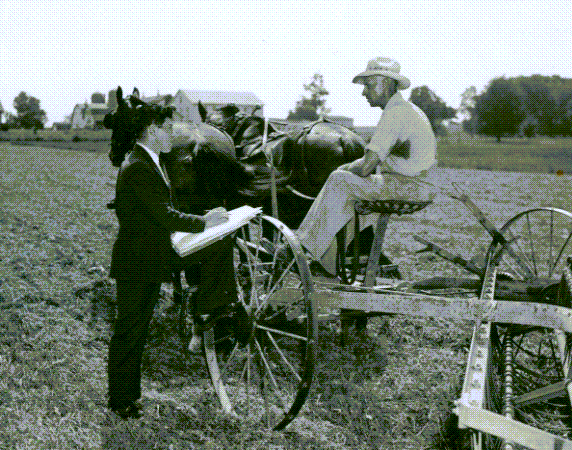
Original image provided by Boston Public Library via Flickr at https://www.flickr.com/photos/24029425@N06/5755511285.
Our Purpose
Our goal is to open the doors to using all types of available genealogical records, and provide you with the skills to explore them with confidence. Our Genealogy Gems team is excited to share with you the opportunity to utilize the free access to Native American records on Fold3.com. While it can be difficult and confusing to know how to navigate these important records, this post will provide you with information to get you started and to feel a little more comfortable jumping in! Now, let’s get started.
Eastern Cherokee Applications Collection for Native American Research
The Eastern Cherokee tribe sued the United States for funds due them under the treaties of 1835, 1836, and 1845. [1] Applicants, or claimants, were asked to prove they were members of the Eastern Cherokee tribe at the time of the treaties, or descended from its members. [To learn more about the lawsuits and allocations, read “Eastern Cherokee Applications of the U.S. Court of Claims, 1906-1909,” in .pdf form provided by the National Archives and Records Administration.]
The courts ruled in favor of the Eastern Cherokees and the Secretary of the Interior was tasked to identify the persons entitled to distribution of funds. The job of compiling a roll of eligible persons was given to Guion Miller.
It is interesting to note that the funds were to be distributed to “all Eastern and Western Cherokee Indians who were alive on May 28, 1906, who could establish the fact that at the time of the treaties, they were members of the Eastern Cherokee tribe or were descendants of such persons, and that they had not been affiliated with any tribe of Indians other than the Eastern Cherokee or the Cherokee Nation.” [Source: page 4, 3rd paragraph of NARA document Eastern Cherokee Applications of the U.S. Court of Claims, 1906-1909.]
The collection at Fold3 titled “Eastern Cherokee Applications” contains these applications submitted to prove eligibility. [Important: Because this act was about money allocation and individuals filling out these applications would have received money if approved, this may raise the question, “Did our ancestor have a reason to lie or exaggerate the truth so that they might be awarded funds?” Further, the Genealogy Standards produced by the Board for Certification of Genealogists (BCG) reminds us: “Whenever possible, genealogists prefer to reason from information provided by consistently reliable participants, eyewitnesses, and reporters with no bias, potential for gain, or other motivation to distort, invent, omit, or otherwise report incorrect information.” [2] In this case, those filling out the Eastern Cherokee Applications did have potential for gain. So, be sure to take any genealogical data, like names, dates, and places, with a grain of salt and find other documentation to back-up the facts.]
The first step in locating whether your ancestor applied is to check the index. If you are not a member of Fold3.com, you will first need to go to www.fold3.com. Click in the center of the homepage where it says, “Free Access to Native American Records.” Next, on the left you will see “Records from Archives.” Go ahead and click that.
From the list now showing on your screen, choose “Eastern Cherokee Applications.” Then click “learn more” at the bottom right of the collection description.
From the new screen, choose “Browse by title.”
Notice, there are two general indexes. The first choice is for surnames between the letters of A and K, and the second general index is for the letters between L and Z. The index is alphabetical by surname.
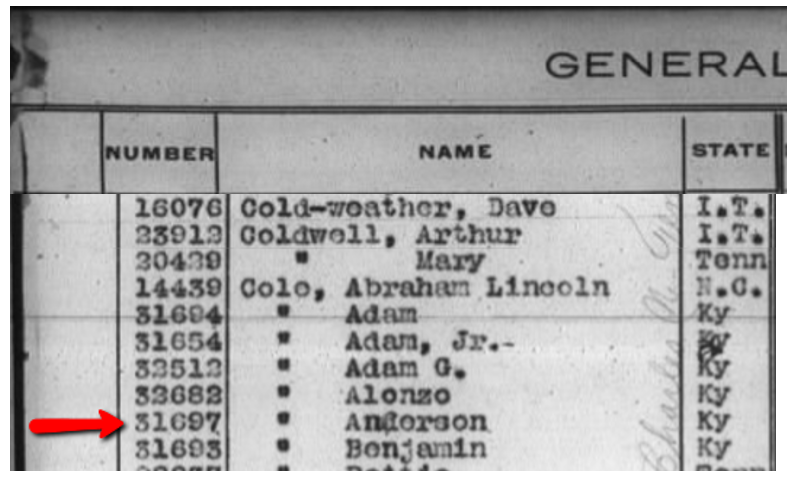
Scroll through the digital images of the index and find the surname of your targeted ancestor. For example, my ancestor’s last name is Cole.
You will see the state they were currently living in and a number listed to the left of each name. This number is what you will need to find the application of your ancestor. In the example here on the left, Anderson Cole’s number is 31697. Though the step of using this index could be omitted, I wanted you to know how to use it.
Anderson Cole’s name appears on the General Index of the Eastern Cherokee Applications.
Armed with this number as confirmation, let’s go back to the list of options and this order medication online for pain time, choose Applications.
Applications are broken down by the first letter of the surname, so in my case, I would click on the letter C and then from the new options list, click the appropriate indicator until I reach Anderson Cole.
Anderson’s application is eight pages, however applications vary in size from fewer than eight to several more.
From Fold3.com, you can see each page of the application. Some of the information you may find on the applications include, but is not limited to: name, birth date and location of applicant, names of parents and siblings, name of spouse and marriage date and place, tribe affiliation, Cherokee name, grandparents names, and residences.
The application was sent in to the Commissioner of Indian Affairs and then it was decided whether the applicant was eligible or not.
Lies and Rejection
Anderson Cole’s Eastern Cherokee Application was rejected but held genealogical data.
In Anderson Cole’s case, he was rejected. This is found on the very first page of the application. In other words, the commission did not find him able to prove his relationship with known members of the Eastern Cherokee tribe and therefore, he was not given any allotment of money. This rejection neither proves or disproves whether Anderson was of Native American descent. However, it does suggest that something in his lineage was questioned.
Further, when reviewing the information recorded on any genealogy record, we must ask the question, “Did this person have any reason to lie?” When money is on the line, lying is always a possibility. According to further research, it appears Anderson either lied, omitted details, or was seriously mistaken about many names and dates of close family members. Even then, there are some great hints within the pages of his application and I was happy to find it.
Additional Information in the Eastern Cherokee Applications
In addition to an application being filed for our ancestor, if the ancestor had children under the age of 21, they may have also applied in behalf of the child as a Cherokee Minor.
Anderson’s son, W.T. Cole, applied under the same application number as Anderson. I found his application in the last pages of Anderson’s file. This type of record is direct evidence of a parent/child relationship and can be a wonderful substitute when other vital records can not be located. However, direct evidence (which is anything that directly answers a specific question…like ‘who are the parents of W.T. Cole?’) does not have to be true. In this case, just because Anderson says his son is W.T. Cole, doesn’t mean it is absolutely true. We should always find other records or evidence to back up our findings.
How is the Roll of Eastern Cherokees Different from the Eastern Cherokee Applications?
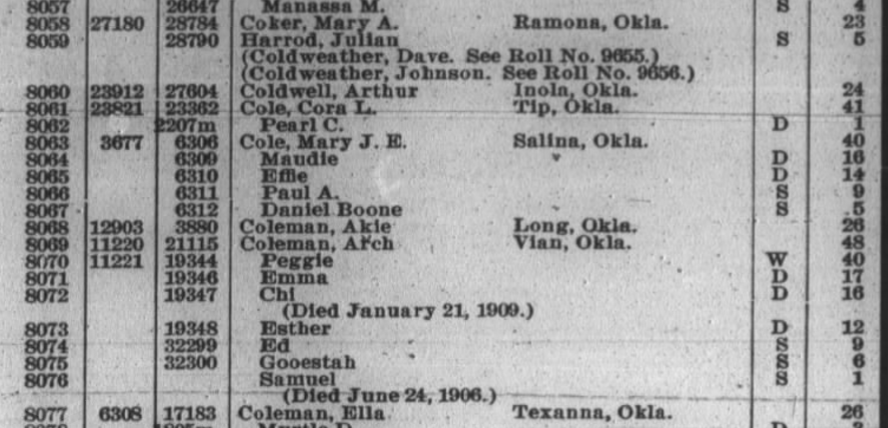
You may have noticed that besides the Eastern Cherokee applications and general index, there is also a record set titled “Roll of Eastern Cherokees.” Another name for this roll is called the Guion Miller Rolls. This is a roll, or list, provided by commissioner Guion Miller of all those who were approved to receive the allocated money. [We will be discussing the Guion Miller Roll Collection from Fold3 in a later blog post. Be sure to sign-up for our free newsletter so you don’t miss it!]
Anderson Cole and his son do not appear on this Roll of Eastern Cherokees. If however, your ancestor does, additional information on this roll could include application number, the names of minor children, ages of all parties, current residence, and a death date.
A partial page of the Roll of Eastern Cherokee found online at Fold3.com.
More on Native American Research
Using Native American collections for genealogy research can be challenging. We hope this has helped you to better understand the ins and outs for using the record collections at Fold3. For even more helpful tips, read:
Stay tuned as we bring you additional instructions for exploring the Guion Miller Roll and Indian Census Rolls at Fold3.com in the days to come. Sign up for our free Genealogy Gems newsletter for our upcoming posts on this important subject.
Article References:
[1] “The U.S. Eastern Cherokee or Guion Miller Roll,” article online, FamilySearch Wiki (https://familysearch.org/wiki/en/The_U.S._Eastern_Cherokee_or_Guion_Miller_Roll : accessed 1 Nov 2016).
[2] Genealogy Standards, 50th anniversary edition, published by Board for Certification of Genealogists, 2014, standard 39, page 24.
Disclosure: This article contains affiliate links and Genealogy Gems will be compensated if you make a purchase after clicking on these links (at no additional cost to you). Thank you for supporting Genealogy Gems!
In Elevenses with Lisa episode 79 Lisa Louise Cooke explains:
How to find 1950 US Census Enumeration District (ED) Maps
The purpose behind them and how to interpret the maps
Ways to use the maps for your genealogy
This is a follow up to episode 51 on The 1950 Census for Genealogy. In that episode I discussed the importance of finding your ancestors’ enumeration district numbers in order to be able to find them when the digitized images are released (before the index is available.) In this episode I will walk you through how to locate the enumeration district (ED) number and then find the actual 1950 US Census ED map. We’ll wrap things up with a quick update on the release of the 1950 US Federal Census.
Episode 79 Show Notes
(Get your ad-free Show Notes Cheat Sheet at the bottom of this page in the Resources section.)
As I mentioned in Elevenses with Lisa episode 51 The 1950 Census for Genealogy, prior to 1880, U.S. Marshalls were the enumerators for the federal decennial census. Starting with the 1880 census enumerators were hired and they were each assigned an enumeration district, also known as an ED. These districts had to be mapped out so that the enumerators knew the area they were responsible for counting. Therefore, maps are drawn in anticipation of each census being taken, including the 1950 census.
Learn more by watching episode 51 on the 1950 census.
About the 1950 US Census Maps
It’s always important to understand the purpose of a record or source, and the 1950 Enumeration District maps (ED maps) are no exception. Unlike most maps where it’s all about accurately drawing up the current roads and geographical features, census ED maps are drawn up for the purpose of defining boundaries for the purpose of counting people. This means as we look at ED maps we need to keep a few things in mind.
The first thing to understand is that the 1950 ED maps were not necessarily up-to-date with the lay of the land in 1950. Not all streets, parks and features will be included. The reason for this is that the maps themselves were not created for this purpose. Existing maps were used and then enumeration district boundaries were drawn on them.
Maps came from a variety of sources including but not limited to county and City Planning Commissions, 1940 census bureau tract maps, and city engineers. In fact, from a mapping perspective the variety of maps in the collection are fascinating.
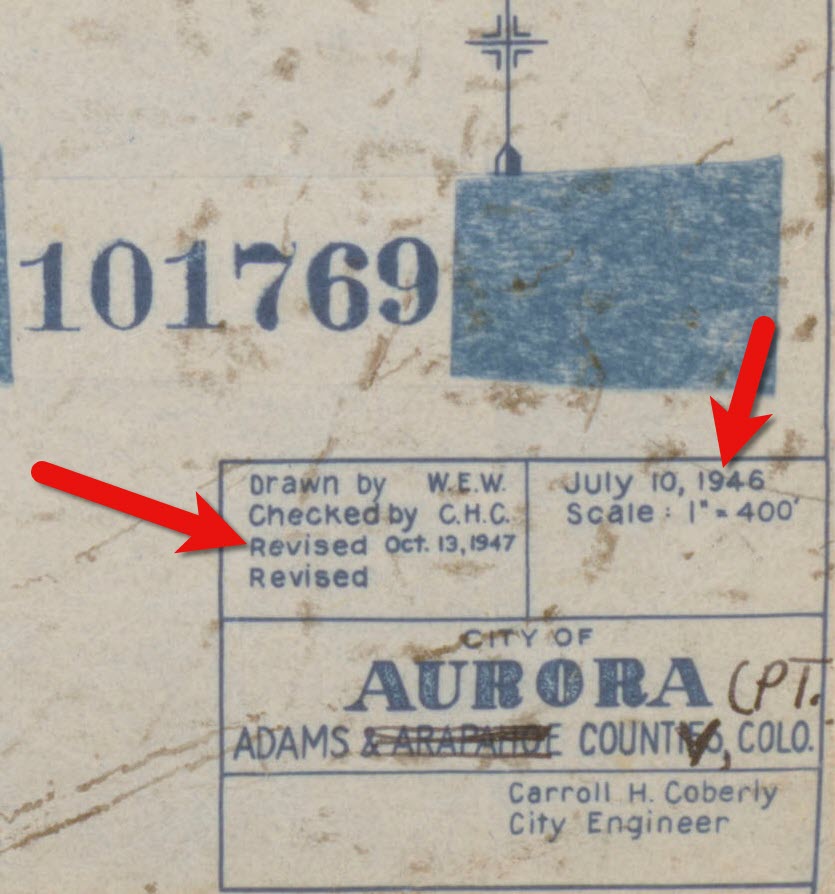
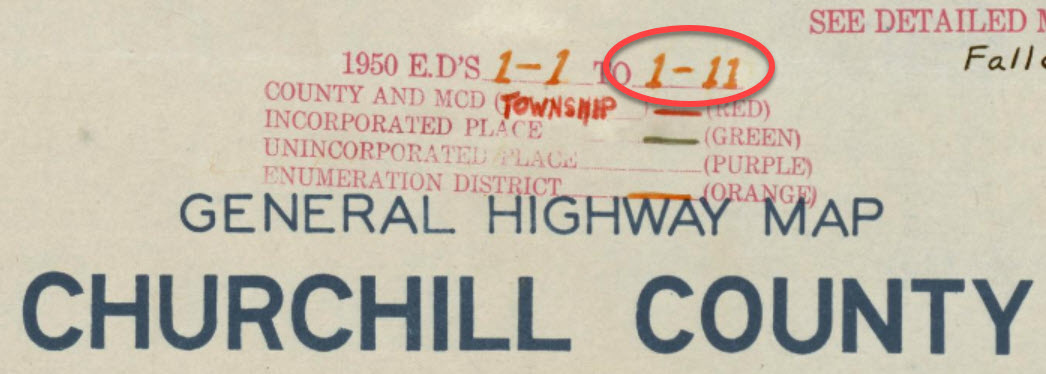
Look for the map title, description, legend and census stamps typically found in one of the corners. In this example (see image) from Aurora, Colorado the map used was originally created by the city engineer in 1946 and was revised in 1947.
1950 census map of Aurora, Colorado (Source: National Archives)
Following the end of World War II, the United States was growing at a quick pace in 1950. This is particularly true of the newly emerging suburbs. Therefore, if your ancestors built a new home in a new development in 1949, don’t be surprised if you don’t see the street on the 1950 census ED map. However, rest assured that the maps still hold value for your family history as they provide many interesting and unique details about the area surrounding your ancestors’ homes.
Each map was stamped with a small legend where the meaning for each of the colored lines drawn could be indicated. From my random sampling of 1950 census maps across the United States it appears that the coloring coding was consistent as follows:
Red = Township
Green = Corporate Limits/Ward
Orange = Enumeration District
Expect to see errors, inconsistencies and omissions in the maps. The more rural the area the more likely the map was compiled from several sources by the Census Bureau cartographers. This compilation created more opportunity for errors, and often used older maps.
Source: National Archives
The Meaning of Census Enumeration District Numbers
A census enumeration district number is made up of two numbers separated by a dash. The first number (in this example: 1) represents the county/region. The second number represents the area within the county that could be covered by an individual census enumerator within the amount of time provided for taking the census, about 2-4 weeks. The official start of the 1950 US Federal Census was April 1, 1950.
Census enumeration district (ED) numbers on a 1950 census map.
How to Find 1950 Census Maps
Some 8,000 census maps have been digitized and are available at the National Archives. However, the National Archives website can be challenging to navigate. I recommend using the Unified 1880-1950 Census ED Finder Tool at Steve Morse’s website.
1. Go to https:/stevemorse.org
2. In the menu in the upper left corner hover over US Census and in the secondary menu click Unified 1880-1950 Census ED Finder
3. Select the state from the first drop-down menu.
4. Next select the county.
5. Then select the city.
6. You will then see many enumeration district links listed. In order to find the right one for your ancestor’s home, enter the house number and select the street from the next drop-down menu. Don’t worry about directional parts of the address like west or east unless they are offered in the list of street names.
7. As soon as select the street name, the list of ED numbers should be reduced. In this example we are down to three.
8. To further reduce the possible ED numbers, we can select Cross or back street on same city block. If you’re not sure what the neighboring streets are, click the see Google Map This will plot the address you entered into Google Maps where you can then find the closest cross street, and the next streets over. If the address is not precisely marked on the map, check the address that appears in the Google Maps search box.
In my case, the One-Step tool didn’t allow me to specific W. Arcade, so Google Maps just gave me the general area, and not the address. By adding the W. to the address and pressing enter on my keyboard Google Maps was able to precisely plot the location. Now we can make note of the closest cross street (ex. N. Center), the street north of the address (E. Monterey Ave.) and the street south of the address (W. Noble St.)
9. Head back to the Unified 1880-1950 Census ED Finder page and enter each nearby street (you can enter multiple.) This should reduce the ED numbers one. This is the ED that includes your ancestor’s address.
How to Find 1950 Census Maps
1. Make note of the ED number, and then go back and click the button that says See ED Maps for ____________ County. You could have clicked this button without going through the process of locating the ED number, but the ED number makes it much easier to find your ancestor’s home street on the map. This number will also assist you in being able to find your ancestors in the 1950 census before it is indexed.
2. You will now be on the Viewing 1950 Enumeration District Maps in One Step Re-enter the city from the drop-down menu.
3. Click the Get ED Map Images You will receive two links. The first link is Links to NARA viewer will take you to the page on the National Archives website which includes all of the information about the map and the record hierarchy. Source citation information can be gathered from this page.
5. Click the second link called Direct links to jpegs on NARA server. This will take you to the image by itself as hosted on the National Archives website. I find this the easiest way to save the full resolution image to my computer hard drive. On my PC I right-click on the map and select Save Image As.
This page is also important if you want to use this image in another program such as Google Earth. The URL for this page is the direct URL to the image. Notice that it ends in .jpg. This means that it is the image alone, and this link can be used to create a custom map overlay in Google Earth. You can see an example of a custom map overlay in my video Create a Family History Tour with Google Earth Pro at the 06:13 mark.
This week we’re going to revisit two more early episodes of Elevenses with Lisa that will help you be more productive and organized no matter what device you using for your genealogy research. I’m bringing these episodes out from behind the Premium Membership paywall and making them available for free this week. These will be presented back-to-back as Live Video Premieres on my Genealogy Gems YouTube channel. Part 1 and part 2 of this short series can be found in episode 68. In part 1 we covered what makes us vulnerable to getting distracted, and how a research plan can help. In part 2 we talked about how to deal with BSOs (bright shiny objects!) In this episode 69 we will cover parts 3 (Mobile Organization) and 4 (Online Productivity Strategies).
How Alice the Genealogist Avoids the Rabbit Hole Continued…
Part 1 and part 2 of this short series can be found in episode 68. In part 1 we covered what makes us vulnerable to getting distracted, and how a research plan can help. In part 2 we talked about how to deal with BSOs (bright shiny objects!)
Part 3
In episode 68 we covered:
1. Use a Cloud-Notetaking Service
Get a free Cloud note-taking tool and use it consistently. (Examples include Evernote, OneNote, and Google Keep.)
Use the website, software, and/or app to capture unexpected finds while researching. Both Evernote and OneNote work on all platforms.
Your notes in your account will synchronize between your devices (depending on the program and plan you choose.) You can add to your notes or work with them anytime, anywhere.
2. Schedule BSO Time
I use Google Calendar to stay organized and schedule my BSO time. Create a BSO calendar, and then schedule BSO time on your calendar. These will help you remember to follow up. Knowing you have set aside time in the future to explore the BSO helps you mentally let them go and stay on track with your research plan.
In this episode:
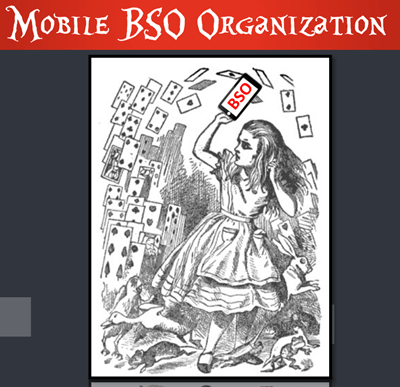
3. Mobile BSO Organization
Success comes from pairing your research plan and process with a great supportive research environment. We have a variety of “environments” we work within such as:
On paper at our desk
On our mobile devices
On our computer
Mobile Genealogy Organization
Let’s look at how we can set up a workflow for BSOs while mobile computing. My two favorite methods for capturing BSOs on a smartphone or tablet are 1) Cloud Notetaking, and 2) Home Screen “Bookmark Apps”.
Option 1: Cloud Notetaking
I’ll be using Evernote on an iPhone as an example. (You may see slight variations in the instructions depending on the service you use and your device.)
Evernote is a great choice if you want to easily sync and use your notes on all devices including your desktop computer and / or laptop computer.
Before you begin, you’ll need a free Evernote account at evernote.com. You’ll also need to download the free Evernote app from your device’s app store, and log into your account.
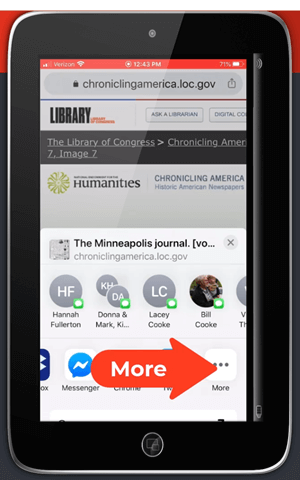
When you come across a BSO while researching online in a web browser (such as the Chrome or Safari app), here’s how to capture it:
Tap the Share icon on the web page.
Select Evernote from the menu. If you don’t see it tap More for the complete menu of available apps. If you still don’t see it, make sure you have downloaded the app.
Tap More to find the Evernote app
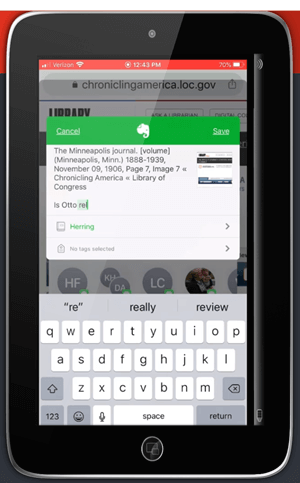
The app will open and should open a new note. Edit the note as desired.
Edit the BSO note
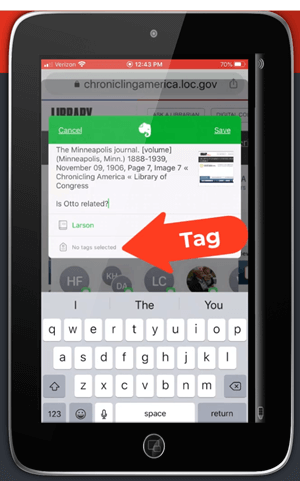
Tag the note with the “BSO” tag, as well as any other tags you find helpful.
Tag with the BSO tag
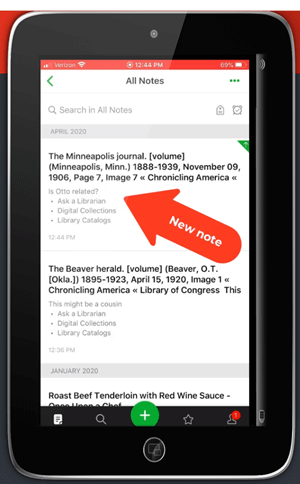
Tap Save.
The note is now saved to Evernote. If you are on WiFi, Evernote will synchronize so that the note will be available from any device signed into your Evernote account.
The BSO tagged note
Option 2: Home Screen “Bookmark Apps”
Keep in mind that these aren’t the same as “Bookmarks” found in your web browser apps. I call them “Bookmark Apps” because they do save a particular web page, and they look just like apps. In the menu this feature is called “add to home screen.” (see image)
Bookmark Apps are best for when you plan to do your BSO follow up on the same mobile device.
How to capture a BSO as a Bookmark App:
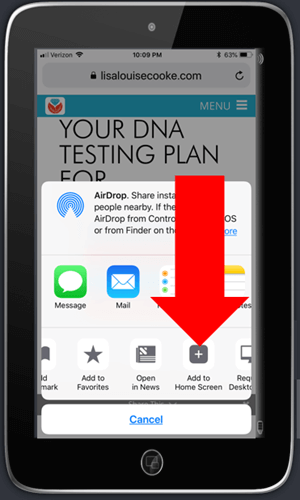
In your browser app, when you come across a BSO web page, tap the share icon.
Tap Add to Home Screen.
Tap Add to Home Screen
Edit the title so it will be easy to remember why you wanted to follow up on it.
Tap Add (iOS – this may be different on Android, or different browsers)
The web page “bookmark app” is now on your home screen.
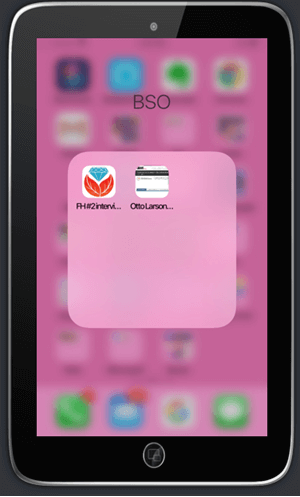
Once you have created at least two BSO bookmark apps, you can then create a folder.
How to create a folder:
Move the bookmark app by pressing and holding it until it shakes.
Keep your finger on it and drag it onto the other BSO bookmark. This will create a folder.
Name the folder “BSO”.
Press the home button to save.
Bookmark apps in the BSO folder
Now whenever you have some spare time you can tap the BSO folder and get back to one of those items that previously caught your eye.
How Alice the Genealogist Avoids Falling Down the Rabbit Hole Part 4
Creating a Supportive Computing Environment
The following tools are available for your computer desktop or laptop.
Restore Tabs
In addition to using Ctrl+Shift+T (Win) or Cmd+Shift+T (Mac) to restore a closed browser tab, you can also right-click on the new tab plus sign and select Reopen closed tab from the pop-up menu. You can do this multiple times and web pages will continue to open in the reverse-order that they were closed.
Turn Multiple Tabs into One and Save Memory with OneTab
Online genealogy research can leave you with a lot of open web browser tabs. While using multiple tabs allows you to jump back and forth between web pages and records, they can take up valuable computer memory.
You can dramatically reduce your memory usage with the OneTab extension available for both the Chrome and Firefox browsers. With one click, OneTab will combine your open tabs into a clickable list in one browser tab. You can even export the list for future reference.
Get OneTab in the Chrome Web Store here.
Get OneTab in the Firefox Web Store here.
Reduce Email Distractions
Gmail now has a Snooze feature which allows you to temporarily file an email until the date and time you select.
Snoozed emails will reappear in your Inbox at the scheduled time.
Retrieve snoozed emails at any time by clicking “Snoozed” in the menu on the left.
Get Back on Track with MyActivity
When you are signed into your Google account, MyActivity tracks the searches you conduct and the websites you visit. By visiting your MyActivity, you can search for and return to any previous activity. You can also turn it off. Go to MyActivity and click Activity Controls from the menu. Switch the slider to the off position. Visit MyActivity at https://myactivity.google.com/myactivity
Save Time by Previewing Your Google Search Results
Rather than clicking on each search result and loading the page (which also takes you away from the rest of your search results), use the Google Results Previewer web extension for Chrome. Once installed you can simply hover your mouse over a result link to reveal a preview of the page. Then you can decide whether to click through or preview additional results.
Click here to get the Google Results Previewer web extension for Chrome.