When it comes to chocolate my general rule of thumb is that more is usually better! The same is true with DNA testing. With this big DNA test upgrade sale, now is the perfect time to get MORE! I love being Your DNA Guide here at Genealogy Gems, and today I’ll walk you through how to get the best deal and the right tests. Take my hand, and let’s get upgrading!
This month, Family Tree DNA is running this Family Tree DNA’s Friends & Family sale, which means that all of the kits and upgrades are on sale! This sale is the perfect time to upgrade your DNA tests. (By clicking our link above you are supporting the free Genealogy Gems Podcast. It doesn’t cost you anything extra, and we will receive compensation from the affiliate link. Thank you!)
Once in your account, click the Upgrade button. In very basic terms, to Upgrade means that they are going to go back to your DNA sample that they have on file, and do more testing.
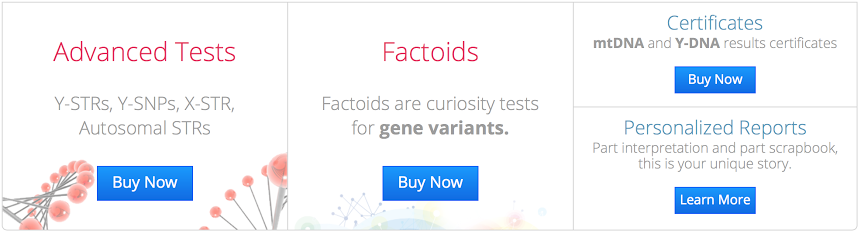
Depending on the tests you have already had completed at Family Tree DNA, you will see several different options in the Upgrade menu. Most of you will see this box, listing the option to do more advanced testing, find gene variants, or order certificates.
If you’re testing for general genealogy purposes, you can most likely ignore all of those options. The advanced testing is aptly named as it is only for very specific, very, advanced problems. The gene variant report can be interesting, but you can get a similar report for only $5 from Promethease.com. As for the certificates, that is up to you. It is a printed report of your DNA values for either your YDNA or your mtDNA test. These are nice to give to relatives that have tested for you that might want something tangible to hold as evidence of their participation in your genetic genealogy efforts.
The last option in this box is to have a personalized report written. This will be several pages of information about the DNA testing you have had completed, but don’t expect them to find your ancestors or do much interpretation of the results.
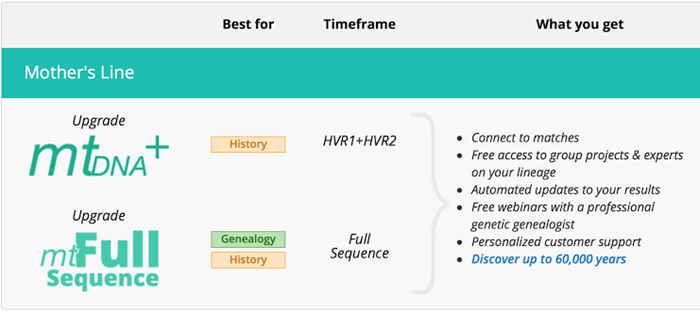
Beyond those options, if you have not had mitochondrial DNA testing completed, or if you have only had the lower mtDNAPlus test completed, you will see options to evaluate your mtDNA. If you are going to try to do family history with your mtDNA test, you need to have the Full Sequence test completed. For the most part, using mtDNA in your family history won’t get you very far, but it is a good record of your direct maternal line.
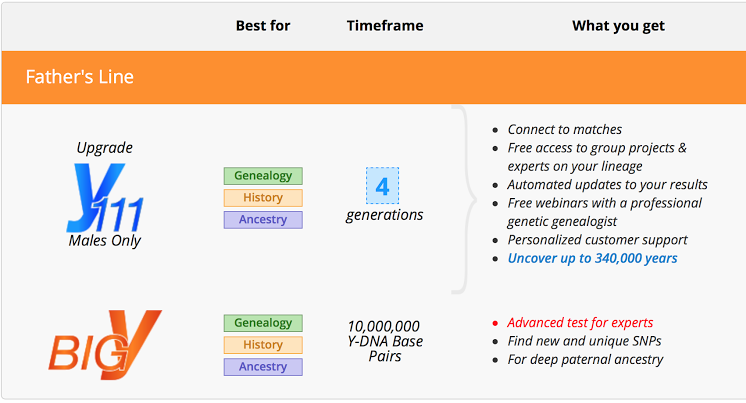
If you are a man with the YDNA test, you will also see options to upgrade your YDNA test to a higher number of markers. You will want to upgrade from 37 to 67 or 111 if you have other matches on your match page who have also tested at those higher levels and you would like to get a better comparison. You can check to see if they have tested at a higher level by looking at your match page under their name. In general, the 67 marker test will help you better decide if you are or are not related to someone, while the 111 marker test will help you better determine how you are related to known connections on your match list.
If you have not yet taken the Family Finder test at Family Tree DNA, that option will present itself as well. If the person tested is still available for testing, you should actually start their autosomal DNA testing experience with AncestryDNA, then transfer for free into their FTDNA account. If your family member is deceased, then you can get permission from their closest living relative, or whoever is administrating their account, to have them tested on the Family Finder test at Family Tree DNA.
So remember my general rule of thumb when it comes to chocolate and DNA testing, more is usually better. Click here to shop the Family Tree DNA Friends & Family!
Are you having a hard time coming up with the perfect gift for someone special on your list? The gift of video gives all year round, and doesn’t require you to buy the correct size. Make your video about family history, or the memories of the recipient, and get ready for hugs and smiles of appreciation for your thoughtfulness.
Do you remember the first Christmas that you realized it was better to give than to receive? It’s an amazing feeling when your heart swells at the thought of snagging the perfect present for the people you love the most. But if you’re like me, there are always one or two relatives who present daunting challenges. Perhaps it’s the elder members of your tribe who seem to want for nothing; or a Aunt who quietly returns everything.
My challenge this year is my Dad. He seems to want for nothing, and having an Amazon Wish List isn’t even on his radar. Last year Dad passed his high school scrapbook on to me. It’s brimming with some of his fondest memories: his Boy Scout membership card, newspaper clippings of his football prowess, and the cardboard glasses he wore to his very first 3D movie. I’m pretty sure his heart was swelling when he handed this treasure chest of beloved memories to his daughter, the family historian.
And that’s when I was struck with an inspiration: give it back to him in the form of a video.
Video: Gift Perfection
Here’s why video makes a perfect gift:
It doesn’t take up precious space on the shelf
It can be enjoyed from any computing or mobile device again and again
It can be shared easily with others
If you have been in search of the perfect holiday gift, follow along with me, and give the gift of video.
Creating a Video Gift
If you’re short on time, consider making a video of an old family scrapbook. All you will need is a smartphone and 30-60 minutes. Pull a scrapbook off the shelf, and dust it off because it’s about to get a new life!
Step 1 – Photograph the album
You could use a flatbed scanner to scan each page and the individual items you want to highlight. But you can save a ton of time by putting your smartphone or tablet to use. For me, this was the ideal solution also because so many of the items in the scrapbook had become loose, and I wanted to be able to show the pages as they were originally laid out. By setting the book on a table I could just snap photos rather than turning it upside down on the scanner glass. And don’t worry about snapping the perfect pics because we’ll get them all snazzy in step 3.
Save the images to a free cloud service like Dropbox so that you can easily retrieve them on your home computer.
Step 2 – Head to Animoto.com
(Full disclosure: This post contains affiliate links and I will be compensated if you make a purchase after clicking on my links. I appreciate you using these links because that compensation helps make the Genealogy Gems blog possible. Thank you!)
Although Animoto does have an mobile app, I like using the web version on my computer which provides the advantage of a bigger screen. Click here to go to Animoto, and sign in to your account. Then, just click the Create button to start a new video project.
Choose a Video Style, which will include a music soundtrack. If the music isn’t quite what you had in mind, click Change Song and pick from a robust list of tunes. Animoto’s secret sauce optimizes and paces your slides to jive with the music. If the music is faster, the slides are faster, and if it’s slower, yep, the slides are slower. In the end though, you always have the final choice in the pacing of your slides and your entire video. Need a little extra time? Then just add a second music sound track.
Step 3 – Add Your Photos
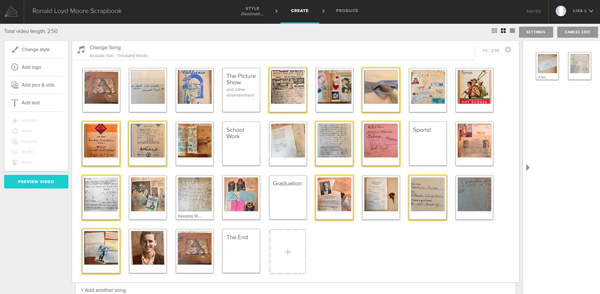
Now it’s time to add your photos. Click Add Image, select Dropbox, and navigate your way to the folder where you saved your photos. Click the first one in the list, and then holding down the Shift key on your keyboard, click the last photo in the list, and click the Choose button. There you go: you’ve added all your images in one fell swoop! Imagine the time you saved over adding one item at a time.
I snapped all the full page photos first, and then I went back and snapped some of particular items I wanted to highlight with closeup images. That meant that when I added my photos they weren’t in exactly the right order. Thankfully, all I had to do was drag and drop them in the desired order. Easy peasy!
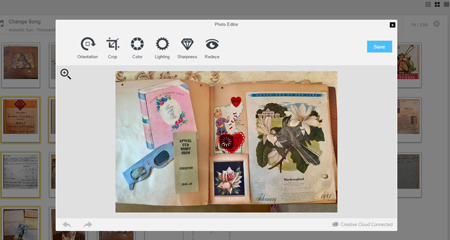
Edit your photos within Animoto.
Another reason I adore using Animoto is that I can do all my editing right there in the dashboard. With a few clicks you can apply a quick crop, slight rotation, and image enhancement with a great result. (Image right)
You even have the option to add video clips with Animoto. So if I had a fancy to add my original video of turning the pages of the scrapbook (above) I would just drag and drop it onto the timeline. And it is that ability to drag images and video from your hard drive straight into Animoto that makes it so quick and easy to use.
Step 4 – Add Title Slides
Although my Dad’s scrapbook really speaks for itself, I decided to add a few title cards to help guide the viewer like:
The Picture Show
School Work
Sports
Graduation
And title cards are great for “The End” and any other message or credits you want to add.
If you want to add text within your project, click to select the item that your text will follow, then click Add Text from the menu, and it will appear immediately after the previous item. To add text at the end, just click the plus sign in the last box and again type your text. And remember, nothing is set in stone. If you change your mind you can drag the text to a new location, edit it, or delete it all together.
Step 5 – Preview & Publish Your Video
At any time during the process you can click the Preview Video button to see your work. If you like what you see, then click the Produce button in the Preview window to create the final product. And speaking of final products, here’s mine:
Learn More
Are you ready to start creating memorable videos for the loved ones on your list? Click here to learn even more and give Animoto a whirl. (And just think: no wrapping required. You’re welcome!)
When the recent press release from the Unclaimed Persons project crossed my desk, it jumped out at me in a very personal way. I majored in Forensic Anthropology (the study of human remains) in college, and was no stranger to coroner’s offices. I’ve witnessed first-hand what happens when a decedent enters a morgue, and it’s a very cold (literally!) and lonely experience. My passion for forensics stemmed from a desire to ensure that families wouldn’t be left wondering what happened to their loved ones. The Unclaimed Persons project focuses on the other side of that mission: ensuring that the loved one is reunited with their family and laid to rest with dignity.
From an Unclaimed Persons project press release:
Alone in death and tucked away on dark shelves or cold gurneys in morgues across the country, thousands of deceased individuals whose names are known to coroners, medical examiners, and a handful of friends have no known family members to claim their remains. Homelessness, mental illness, long-term estrangement, deaths of all apparent next of kin, and other circumstances have severed familial connections. Ever-increasing caseloads and shrinking budgets make it nearly impossible for medical examiners, coroners, and investigators who cannot quickly identify family to find deceased individuals’ relatives without help.
Unclaimed Persons project uses genealogy skills
Many people are aware that it can be a real challenge when a coroner obtains a John or Jane Doe, an unidentified person. It presents the difficult task of identifying the person. But few people know that in fact the even bigger problem consuming morgues today is unclaimed persons, rather than unidentified ones: individuals who have passed but with no trace of living relatives to come and claim them. Thus, the Unclaimed Persons project was born! In 2008, genealogy author, speaker, consultant, and on-air expert Megan Smolenyak Smolenyak started this organization online. She shares how she got started working with these cases in this video:
“My first time that I worked with a coroner’s office was actually sort of an accident. I was just reading the newspaper and I tripped across this article about the situation of these people who are essentially unclaimed people, people whose next-of-kin just can’t be found. And I was reading about a couple of the actual examples they gave, and one of them made a fleeting reference to a particular case where they actually had the fellow’s family bible. And that’s what made the connection for me that ‘Aha! Maybe I can use the genealogical sleuthing skills to find these families as well.” -Megan Smolenyak Smolenyak
After assisting two coroners with unclaimed persons cases, Megan founded a Facebook group with the goal of solving even more unclaimed persons cases. The online community of volunteer researchers joined forces with medical examiners, forensic investigators, and coroners to help reunite families and bring closure so that the dead can finally be laid to rest.
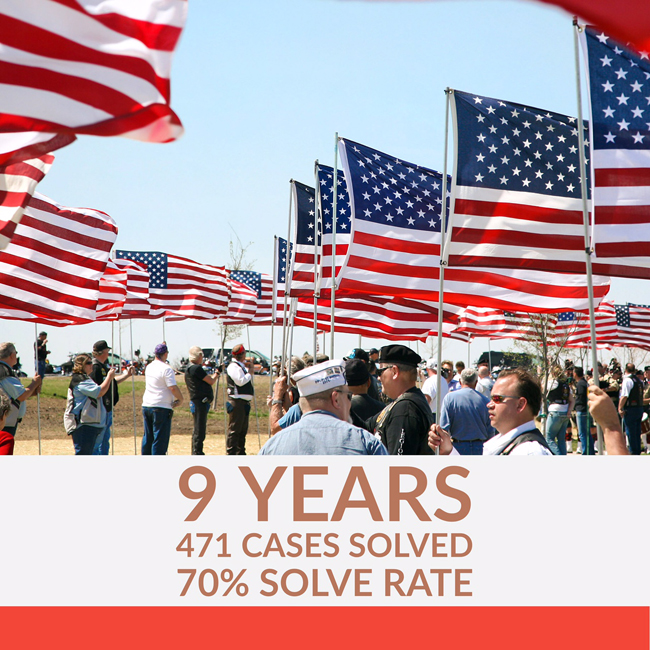
Unclaimed Persons is now celebrating their 9th anniversary with the launch of their new website, and to date have solved 471 cases with a 70% solve rate! But the unclaimed epidemic in morgues persists, and Unclaimed Persons is always recruiting more volunteers. As it turns out, family history enthusiasts make some of the best detectives in these cases! Genealogists combine classic sleuthing skills with their knowledge of family record keeping to track down even the most elusive relatives. This is a wonderful opportunity for genealogists to use their specialized training for an even greater good.
500+ veterans escorted the unclaimed remains of seven Iowa veterans to their final resting place at the Iowa Veterans Cemetery, Van Meter, Iowa, in 2009. U.S. Navy photo by Senior Chief Petty Officer Gary Ward
How you can help the Unclaimed Person project
You don’t have to be a seasoned genealogist to be a volunteer! Anyone with an interest is welcome to join. Visit https://unclaimed-persons.org/ to register as a member. You will need to complete a member profile with your basic information, and agree to Unclaimed Persons Forum Rules. Unclaimed Persons encourages researchers to have access to tools such as Ancestry.com, GenealogyBank.com, historical newspaper archives, and other online subscriptions related to genealogical research. However, there are many publicly available online databases that can also help with your research.
As an Unclaimed Persons volunteer, one of the most important things to know and adhere to is that researchers should not contact identified family members, nor should they contact coroners directly. Each case is assigned a case manager, and all discoveries should be sent directly to them. This may seem like an unnecessary step, but in fact it ensures that coroners, medical examiners, and investigators are not inundated or hindered with duplicate information and can continue to manage their daily workloads.
And Unclaimed Persons feels very strongly that contacting even one family in error would jeopardize the high standards and reputation of the organization. While the ultimate goal is bring closure for family members, the primary focus of Unclaimed Persons is to assist these agencies with the difficult task of locating them, rather than to be the ones delivering the news directly. But for your own sense of closure, Unclaimed Persons will announce on their Facebook group page and their online forum when a case has been solved so you and the other volunteers can celebrate together!
If you don’t have time or resources to help with research, you can still help Unclaimed Persons by ‘Liking’ their Facebook page and sharing the cases among the genealogy community. You can also follow Unclaimed Persons on social media for announcements of new cases where you may have information or experience that can help (specific locations, surnames, etc.).
Click here to learn more about how to become a volunteer member.
The new MyHeritage Collection Catalog is making the site even easier to use. Read our 3 favorite uses for the new MyHeritage Collection Catalog, and a description of how MyHeritage counts its records.
The new MyHeritage Collection Catalog has just been released, and is dedicated to searching records collections on the site. It’s a public catalog, available whether you are a subscriber or not, so now you can easily see whether MyHeritage may have the historical records you need.
It’s a public catalog, available whether you are a subscriber or not!
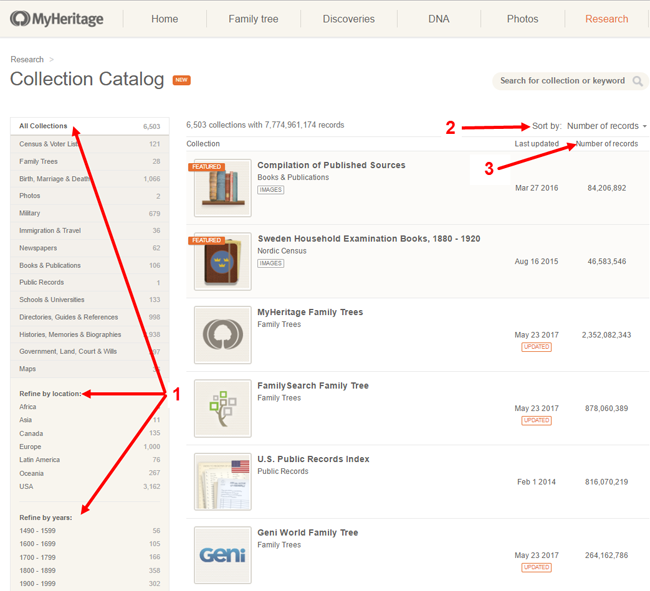
“The new Collection Catalog provides a useful listing of the collections on SuperSearch and is a gateway to the vast historical treasure trove of 7.8 billion records currently offered by MyHeritage,” says a MyHeritage press release. “The catalog lists our 6,503 main collections and excludes tiny collections that have fewer than 500 records each.” (Those may be added to the catalog later on.)
Here are 3 top uses we see for the new MyHeritage Collection Catalog:
1. Look for specific record types for a particular place and time period. Use the left side menu to select record types, locations and time periods. Within many of those, you’ll be able to choose more specific subcategories. You can also do keyword searches if you’re generally looking for particular kinds of records (“newspaper” or “church”).
2. See what’s new on the site, or what collections have been recently updated. To see what’s been added or updated lately, roll over Sort by and select “Last updated.” You’ll also see a little tag on any collections that are new or have been recently updated. This helps you to know whether you’re seeing the most recent data available, particularly in collections they index from other websites, such as the FamilySearch Tree or Geni World Family Tree.
3. See how many records are in a collection. This may help you determine how comprehensive a particular database might be, and compare how many records for a particular place are on their site.
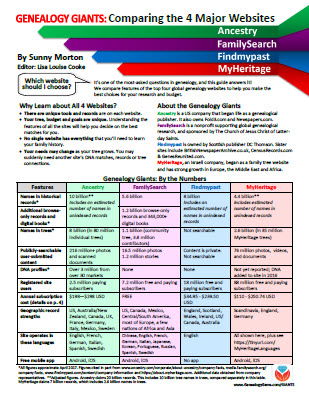
Speaking of record counts, MyHeritage also shared a description of how they count records. I’m really encouraged to see a major records site do this and I hope this trend continues! In our newest quick reference guide, Genealogy Giants: Comparing the 4 Major Websites, we talk about how difficult it is to compare record content on different genealogy websites because there’s no uniform standard for counting them, and they don’t all define their counting methods alongside their site statistics. Here’s MyHeritage’s description of how they count records:
“In structured collections, such as census records, birth, and marriage records, each individual name is counted as one record. For example, a marriage document naming both the bride and groom is counted as two records. Nicknames or aliases are not counted as additional records. In family trees, each tree profile is counted as one record, even when it is available in more than one language. Each photo is counted as one record. In unstructured collections, such as newspapers or yearbooks, each page is counted as one record even though it may include hundreds of names. We count each page as a single record because we don’t want to inflate the record count by guessing.” (MyHeritage previously published this information in a 2014 blog post.)
Getting the Most from MyHeritage
Here at Genealogy Gems we strive to help you get the most out of the genealogy websites you choose to use in your research. In the case of MyHeritage, we’ve got two jam-packed quick reference guides like no others on the market:
One-Step Webpages by Steve Morse helps genealogists find relatives faster in the U.S. federal census. Steve Morse explains how to use his one-step tools for the 1950 census.
The 1950 US federal census is going to be released on April 1 of 2022. And getting the records fully indexed, and therefore searchable is going to take a little bit of time.
If you’re anxious to get digging into the records, you’re going to need to know a couple of things like where your ancestors lived. You’ll also find the enumeration district, or what’s called the ED number.
Thankfully, Steve Morris has developed a terrific free online tool at his One-Step Webpages website that can help you find those ED numbers.
00:54 Lisa: Wow, it’s a really big year for you! I imagine it is every 10 years or so when a new census record comes out, right?
01:03 Steve: Well, yes, we’re doing what we can to get ready (for the release of the 1950 U.S. Federal Census.) I’m trying to get the interfaces to tie into the actual census pages when they come online. So that’s been a big activity right now.
01:17 Lisa: Let’s talk about that. I want to talk about the website and how people can use it. And of course, I’d love to know even more about you. First of all, why do you call it One-Step Webpages?
The History of One-Step Webpages
01:33 Steve: That goes back to the origins of the site back in 2001.
The first major tool that I put up on the site was (designed for) researching the Ellis Island database. That database had just come online at that time. I was anxious to use it because there was some real answers that I had not been able to find up until then.
But when I got into it, I realized it was very difficult to use. And I saw that I could do everything they were doing in one step many steps on their website. So, without giving it too much thought, I put up my own tool, which was called Searching the Ellis Island Database in One-Step. I didn’t realize that by choosing that name, I become branded. All tools hereafter have that One-Step name now, and it became known as the One-Step website.
If I realized the significance of that choice of name, I might have gone with my second choice which was Searching the Ellis Island Database with Fewer Tears. And in which case, we would now have the Fewer Tears website! But we have the one we’re stuck with, the One Step website.
02:37 Lisa: Well, I’d say the One-Step site certainly does mean fewer tears, that’s for sure! I remember when you first launched it, I use it to find my great grandmother’s passenger list. Using your site I found that she was listed twice in 1910. The first time was in first class, and then also in second class. I have a feeling they found her in first class and moved her down to second class! But really, I found it because of your site and not the Ellis Island site. So, thank you.
And now of course, you’ve been creating One-Step tools for census records. I’d love to have you give us an overview of those tools. Tell us a bit about what’s on the website. And how can it help genealogists accomplish their goals?
Genealogy Tools at One-Step Webpages
03:24 Steve: Well, it’s whatever strikes my fancy!
I got started with Ellis Island passenger lists records because I was trying to find a particular relative, my wife’s great grandfather. A year later, the website was used quite a bit, and the census was coming out. I got notified by a fellow that I worked with that he was working on the 1930 census. He was he was a volunteer at the National Archives, and he realized that people were going to be coming into find their records, and he wasn’t going to be able to help them. The census was not indexed. It had to be accessed by enumeration district. And these Eds were not easy to obtain.
I realized that would be a fun thing to get into. So instead of being known as a one trick pony – you know, I had the Ellis Island stuff – what if I could do two things? Maybe the site would be a little more important. So, I got involved with the census work then.
Through this fellow that contacted me who I’d worked with, he found Joel Weintraub. So, then the three of us started working on this together.
There are other sections as well. Again, it’s whatever strikes my fancy. I have the vital records section. I have a section for creating your own One-Step search application. I have things that have nothing to do with genealogy at all. They’re all on the website.
So, over all there are 300 tools. I tell people just go through them and see which ones strike your fancy and use them. I know nobody’s going to like all 300 tools, that’s impossible. But hopefully each person will like a certain subset of them. And all those subsets together will be the entire website.
05:12 Lisa: Wow, I didn’t realize there were 300 tools on the website. That’s amazing!
About Steve Morse of One-Step Webpages
So, what’s your background? Are you a computer programmer? Do you do all the programming for the website?
05:26 Steve: Well, I have a PhD in electrical engineering, specializing in computer science. It was not computer science in those days. So, I been in the field ever since – my entire career. I’ve done research, development, consulting, writing, so forth.
The 1950 US Census Project at One-Step Webpages
05:42 Lisa: The 1950 census is just about here. When did you first start working on that?
05:48 Steve: Well, we finished the 1940 census in 2012. When the 1940 census went online, it was about a year later that we first started putting out the call for volunteers. By 2013, we started fetching volunteers to do the work for the 1950 census.
It involved looking at the various cities that we were going to support. We needed to have a list of all the streets in that city, and the EDS that each street pass through. And we did that by looking at the ED maps and using other tools as well.
Working with Joel Weintraub, we’ve had our team about 60 volunteers over the years. They weren’t all working at once, but in total, we had about 60 volunteers.
We set our sights a little higher for 1950 than for preceding years. I forget what the criteria was. But for 1950 we wanted to get every rural area that had a population of more than 5000. And we have succeeded in doing that.
So, we have all those cities index on the One-Step website. You can search any of those cities, by streets. Giving the streets and cross streets, you can get down to the enumeration district.
07:05 Lisa: Oh, that is fantastic!
You know, I just did a video (How to Find Old Rural Addresses on a Map) where we talked about how to take these rural addresses and using your tools, trying to help people figure out where their rural ancestors once lived.
I didn’t realize that there were so many people involved in creating the website. Is the National Archives pretty cooperative and kind of helping you gain access ahead of time?
07:36 Steve: No, we don’t have any access to the National Archives. We’ve had some questions from them. They’ve been very tight-lipped with the 1950 census. They’re keeping it very secret. Of course, the census pages are secretive, but even getting information as to how the census is organized or what have you. We’ve not been able to get much information out of them. We had a lot of cooperation with the 1940 census, but not so much with the census.
08:01 Lisa: Okay, interesting.
How to Find Enumeration District (ED) Numbers in One-Step
Well, we’ve talked a lot here on the Genealogy Gems channel about enumeration districts, or Eds, and the ED maps. But I would love to hear it from the one step man himself, how do we go about finding ED numbers?
For the large cities, use our tool and put in the street. That will give you all the enumeration districts that that street passes through.
Then, you put in the cross streets. That will narrow it down to just those EDs that are common to the street and cross street that you entered. Hopefully you can get down to one ED.
Rural areas are different. We used to have two separate tools, one for large cities and one for rural areas. And that was sort of cumbersome to explain to people, but we had the two different tools. So, I’ve since merged them into one tool with one user interface. (The Unified Census ED Finder)
If you put down the streets in the streets, you’re using it in a large city mode. And there’s a drop-down list of the cities. In the state you select the state. And under City if the city is not on that list, it means we don’t have the tables for that city. So, then you select Other and you type in the name of the of the city. In that case, we’re going to search the ED definitions instead of the street to ED maps. We have the ED definitions, and we search those to see which definitions mentioned the name of that city. And for all of those that are mentioned, we report back. Hopefully there won’t be too many these for a small town. And then you know where to search.
Enumeration District Definitions
How do we give you these ED definitions? Well, the National Archives has them on microfilm, but you can’t go searching on microfilm. So, we’ve had our volunteers actually transcribe all the ED definitions for 1940 and 1950 prior to 1940. For 1940 we did transcribe all the EDs, all the definitions from the microfilm. NARA came to us for 1940 and asked if they could have our transcriptions. They, of course, had the microfilm, but they didn’t have it transcribed. So, we said, ‘sure, absolutely.’ We were glad to give that to them. They haven’t come to us for 1950. I keep saying “yet”, but at this late date, I’m sure they’re not going to. I’m sure they’ve done their own transcriptions.
I haven’t seen their transcriptions. But I’d venture to say that ours are going to be better for the following reason. Since we’re using the transcriptions to search for small towns, and we want to get as many towns in the ED as possible. More Eds than are mentioned in the on the microfilm. So, what Joel has done with the volunteers, is to go through the ED maps and see what other towns are in each ED and add that to the definitions. So, I believe in that case, our ED definitions would be more robust than the ones that the National Archives is going to have on their website.
11:00 Lisa: It sure sounds like it. That’s an amazing undertaking, and what a difference it makes!
Using ED Numbers to Search the Census
So, the genealogist is really going to benefit by knowing the actual address because then they can use the cross streets that you have to really zero in on the exact enumeration district that the address falls within. Please tell folks how that helps when the records are released, and they want to start searching. How do they use that number?
11:33 Steve: Well, of course, we don’t have it up and running yet. But what we plan on doing is, once the census does come out, you would click on the ED number that you just found, and that will take you right to the census pages.
The pages are hosted on some other website, either on NARA’s website, or FamilySearch’s, or one of the large commercial websites whose name I’m not going to mention, because I’m not advertising for them, but you know what I’m talking about.
11:59 Lisa: So how long would that take you? I mean, when the records first get released, and everybody gets access to them? It sounds like kind of a manual job to link up digitized records with the website. Is that going to take a while?
12:16 Steve: You have to know what the structure of their site is, and how you can get onto their site with the ED number.
We’ve been talking with FamilySearch, and they’ve been very cooperative. We’re getting information from them as to how we can link into their site.
So, on opening day, they’ll be very busy ingesting all the material from the National Archives. And so hopefully, we’ll have that information ready before opening day. So, an opening day we can link right into their website. And then at the same time, I’ve also been trying to figure out the structure on the National Archives website and the large commercial website and link into those as well. But we anticipate FamilySearch will be the first one that we will link into.
Enumeration District (ED) Maps
12:58 Lisa: And of course I noticed that right now there are many different kinds of links that do work that are on the website. Tell folks about some of the extra items, the collateral items that they can actually access right now with the links from your website.
13:15 Steve: ED maps sounds like it’d be the best thing if you can get an ED map. Look at the ED map and see what the ED definition is what ED boundaries are so you know exactly what the correct ED is. Problem is the maps are not that easy to use. For one thing, they’re on the National Archives website. But it’s pretty hard to get to them from the National Archives website. You have to go to the catalog on their website, and then type in the correct string that will get you to the ED maps. And it’s not obvious what the string would be. And you can’t really navigate through them by from state to state.
What I’ve done on the One-Step website, is that I put up a tool to get the ED maps from NARA. But you get to it by entering a state and then the county, and then probably a town within the county. Entering all that information will then bring up the maps from NARA for that particular locality. Yes, it’s coming from NARA’s website, but it’s hard to get to from the NARA website. That’s why you can do it in “One-Step.”
14:18 Lisa: Yes, and I can attest to that. It’s much easier and absolutely wonderful to use.
How to Find Census ED Definitions
Maybe this is what you were discussing before, but I came across digitized pages on your website of the book that was describing each enumeration district in more detail. Is that what you were talking about when you mentioned the Census Definitions?
14:41 Steve: Yes, when he’s talking about the definitions, we have a tool that gets you to the microphone definitions. And another tool that gets you to the transcribed definitions. That’s what our volunteers did in transcribing what’s on the microfilm. So, we have tools for doing both of those.
Meaning of Census Occupation Codes
14:57 Lisa: Tell us a little bit about the codes. I know I saw occupational codes. And these are numbers that show up on the census records. If we’re wondering what they mean or the details behind those, your site can help us learn that as well. Tell us about that.
15:17 Steve: Well, for the most part, those codes don’t really tell you that much, although they do in certain cases.
They are codes that were added later by the Census Bureau to group different occupations together so they could get statistics as to how many people did various kinds of work. But you know, what your grandfather’s occupation was, it’s on the census page. So, the code will not tell you anything new, except for the following.
What if you couldn’t read what was written. It’s legible on the original, but on the microfilm copies you might not be able to read the occupation code. But, if you knew the code, you can then look up from the code to see what kind of occupations fell into that code. I have a tool that lets you decode the number that they added.
The census taker wrote down what the person said. The Census Bureau clerk’s later added a code to put people in certain categories. And then the One-Step tool lets you take that code and get back to what the actual occupation was.
You just might be curious to see what the Census Bureau thought about your ancestor if he had an unusual occupation. The example I give in my lectures is Donald Duck. His occupation was he was a trained duck. So, there’s no category “well-trained duck”. So, they had to put him in one of the standard categories. They assigned a number for that occupation. If you then decode that number it says, “hucksters and peddlers”. You now see what the census taker thought about your ancestor’s occupation.
16:59 Lisa: So, are there any other elements of the census or census records that you wish you had more time to work on or that you feel like you would want to add to your website? Or do you really feel like the One-Step webpages has reached the pinnacle of what’s possible with searching these records?
17:20 Steve: I can’t think of anything else. I think if I could, I would have done it.
17:24 Lisa: Exactly!
How to Prepare to Search the 1950 Census
17:27 Steve: With just one month ago (as of this recording), I think we’re in a good position right now. We’re ready to provide the tools that people will need on opening day.
I should mention, people should be using this before opening day to get their ED. They should have a list of the people they want to look up and get their addresses and then get the ED. Don’t leave that for opening day.
On opening day there will be an onslaught. In 2012 for the 1940 census, my website didn’t crash, but the National Archives website did. My website didn’t crash, but it flickered. I typically get between 100 and 250,000 hits a day, which is good considering this is a private website, it’s not a company, that’s a very respectable number. But in 2012, we got two and a quarter million hits! Obviously things have slowed down. So don’t leave it for opening day. Do it now. Get your ducks in a row, get all your ED numbers so on opening day, you can just dive in with the ED number and get right to the census page.
18:31 Lisa: Exactly. And in fact, in the video description for this video, here at the Genealogy Gems YouTube channel, I have some links to a few other videos we have here at the channel to help people get ready. I mean, there is so much that we can do even before the records get released to be prepared and get the most use out of them.
More Uses for the One-Step Webpages Tools
And of course, even after the records get indexed, and are fully searchable, the One-Step tools can still really help us, can’t they? I mean, particularly if you can’t find somebody or you’re just wondering if there are other entries for a person. They can still really prove to be helpful, right?
19:13 Steve: Yeah, even after it is indexed, the Location tools we have will still be very important. I’ll give you several examples as to when you would want to use the Location tools in spite of having a name index.
Your ancestor, your grandfather, came from a foreign country, spoke with a thick foreign accent, and had a long unpronounceable name. Well, the census taker probably got it wrong when he wrote it down. In that case, he had to take his best guess as to what he thinks your ancestor said. And then they had to transcribe all this. Then, another transcriber had to take their best guess as to what he thinks that the census taker wrote down. The census takers’ handwriting were sometimes of questionable quality. So, the chances of getting this right here are less and less. It’s like the game of telephone.
In most cases, you will find your ancestor by doing a name search. But there will be those cases and you’re going to run into them, when no matter how creative you are with the name search, you just won’t be able to find him. You have to do a location search. And that’s where the ED and other location tools come into play.
The other example that I give is when searching by location is useful. Let’s say you just bought a brand-new house and you’re very proud of your house. You want to find out who else lived in this house in prior years. We don’t know the names, but you do know the address. So, you want to find your house in the 1950 census, the 1940 census, 1930 census, and location tools are the only way you can do that.
20:41 Lisa: That’s fascinating. And it’s so true. I remember looking through the 1940 census at my Nikolowski family. The census taker had a hard time spelling Nikolowski but they also got the first name as “Vaulter” because my great grandmother’s saying “Vaulter” (in her accent) not “Walter”. And that’s exactly how he recorded it!
I just want to thank you, on behalf of all genealogists really, for making these kinds of tools available to us. You help us in so many ways be more successful.
More About Steve Morse and One-Step Webpages
We don’t get a chance to talk every day, so while I have you here, I just want people to get to know you. Is there something about you that maybe they don’t know? Or would be interested to know? Perhaps what you do in your spare time when you’re not creating One-Step tools.
21:33 Steve: My hobbies or electronics. My degree is in electrical engineering. It’s really computer science. So, I’ve always loved electricity and electronics, and I play around with that. And I’m a gadgeteer, I build things.
21:48 Lisa: Oh my gosh, well, I can only imagine what’s down in your basement…the kinds of things that you must be coming up with, how interesting!
Steve Morse, thank you so much. I encourage everybody to go visit https://stevemorse.org/. Thank you for being here on the show. It’s been an absolute pleasure!
22:07 Steve: Thank you for having me. It’s been a pleasure speaking to you as well.
 This month, Family Tree DNA is running this Family Tree DNA’s Friends & Family sale, which means that all of the kits and upgrades are on sale! This sale is the perfect time to upgrade your DNA tests. (By clicking our link above you are supporting the free Genealogy Gems Podcast. It doesn’t cost you anything extra, and we will receive compensation from the affiliate link. Thank you!)
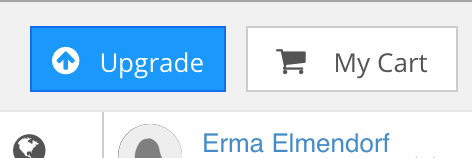
![Unclaimed Persons Project - image By P.J.L Laurens (Own work) [CC BY-SA 3.0 (http://creativecommons.org/licenses/by-sa/3.0)], via Wikimedia Commons](https://lisalouisecooke.com/wp-content/uploads/2017/07/unclaimed-person-2.jpg "By P.J.L Laurens (Own work) [CC BY-SA 3.0 (http://creativecommons.org/licenses/by-sa/3.0)], via Wikimedia Commons")
 If you don’t have time or resources to help with research, you can still help Unclaimed Persons by ‘
 The new MyHeritage Collection Catalog is making the site even easier to use. Read our 3 favorite uses for the new MyHeritage Collection Catalog, and a description of how MyHeritage counts its records.