These show notes feature everything we cover in this episode. Premium Members: download this exclusive ad-free show notes cheat sheet PDF. Not a member yet? Learn more and join the Genealogy Gems and Elevenses with Lisa family here.

Big records updates at the Genealogy Giant website Ancestry.com! Brand new collections of birth, marriage, death, and census records for Canada were added this week, along with a Remembrance Book for the 100th anniversary of the Halifax explosion. Additionally, new vital records are now available for Germany.
This year, December 6th marks the 100th anniversary of the Halifax explosion, which was a devastating maritime disaster in Nova Scotia, Canada. Ancestry has recently made available the ‘Halifax Explosion Remembrance Book,’ an online searchable database with detailed information for 1,946 casualties – more than 300 of whom are recently-confirmed and identified victims.
Ancestry also had a huge update of vital and census records this week for Canada:
AncestryDNA for Canada is on sale for just $99! Reg. $129 CAD. Sale ends 12/24/17. Excludes tax & shipping.
Alberta. Explore the new Births Index, 1870-1896, the Deaths Index, 1870-1966, and the Marriages Index, 1898-1942. Note that the marriage index is slightly irregular, in that each image only includes either the bride or the groom and their marriage year.
Newfoundland. Search baptisms and marriage records in the new collection of Church Records, 1793-1899. You’ll also find records from various churches in Newfoundland in the Births, Marriages, and Deaths, 1757-1901 collection, and the Births, Marriages, and Deaths, 1850-1949 collection. Also available are the 1921 Census, the 1935 Census, and the 1945 Census. Those databases originate from the Newfoundland Department of Tourism, Culture, and Recreation.
New Brunswick. New vital records collections start with Births and Late Registrations, 1810-1906. Then you’ll find Marriages, 1789-1950, which include registers, certificates, delayed registrations, and returns. And Deaths, 1888-1938 is also now online.
Prince Edward Island. Baptisms, Marriages, Burials, 1780-1983 is comprised of church records for Prince Edward Island. The Marriage Registers, 1832-1888 collection was created from newspapers, church records, and other sources that may or may not be provided. The Death Card Index, 1810-1913 contains pictures of the index cards from the Prince Edward Island Provincial Archives.
Nova Scotia. Lastly, Antigonish Catholic Baptisms, Marriages, and Burials, 1823-1905 are now available for Nova Scotia. The earlier registers are written in paragraph format, while later registers are typically pre-printed forms with information filled in by hand.
Lots of new vital records collections for Germany recently became available, starting with Waldshut-Tiengen, Births, Marriages, and Deaths, 1870-1945. This collection of civil registers includes records from 9 additional communities which are today boroughs of Waldhut-Tiengen.
Next are Erfurt, Germany, Births, 1874-1901 and Marriages, 1874-1900. Additional events from the life of the child or the couple were sometimes recorded later on in the margins, but have not been indexed.
You’ll also find Zschopau, Germany, Births, 1876-1914, Marriages, 1876-1920, and Deaths, 1876-1958 now at Ancestry. It may be helpful to note that during the time period of these collections until 1918, Zschopau belonged to the Kingdom of Saxony.
Finally, Traunstein, Germany, Births, 1876-1905, Marriages, 1876-1934, and Deaths, 1876-1978 are also online, where you’ll find names, dates of birth, dates of deaths, witnesses, informants, parents, signatures, and other information.
 Getting started on Ancestry.com can be a little daunting. As one of the world’s top genealogy websites, it’s packed with information about millions of people–perhaps including your ancestors. These step-by-step instructions will help you start building your family tree and learning more about your heritage. Click to read our recent article Getting Started on Ancestry.com.
Disclosure: This article contains affiliate links and Genealogy Gems will be compensated if you make a purchase after clicking on these links (at no additional cost to you). Thank you for supporting Genealogy Gems!
Show Notes: Over the years I’ve talked a lot about how to use Evernote and Snagit. Both are amazing tools for research and make it easy to do web clipping. If you’ve been wondering what the difference is between these two powerful tools, or if you haven’t and you’re trying to figure out which one you should start using, you’re in the right place. Today we’re doing a head-to-head comparison of Evernote and Snagit (with a focus on web clipping) and figuring out which one is best for you and your genealogy research.
I got an email from one of our Premium Members named Nancy, and she says, “Can you help me understand why I would need Evernote and Snagit? I have both installed on my computer, but need to spend time becoming proficient in both. If they duplicate one another wouldn’t want to spend time learning both if Snagit is superior.”
This is a really smart question because like the old saying, time is money. And in the case of genealogy, time is ancestors! No one wants to stop and learn yet another tech tool if they don’t have to. So, let’s look at Evernote vs. Snagit, in a head-to-head comparison, and dig into their strengths and weaknesses. If you have both, this will also help you decide what to use in any given situation.
Downloadable ad-free Show Notes handout for Premium Members.
BONUS: Evernote vs. Snagit Comparison Cheat Sheet for Premium Members.
Evernote is a cloud-based notetaking tool that includes a web clipper.
Snagit is a screen capture / AKA web clipper tool.
So, first and foremost the thing they have in common is that they both can capture all or a portion of content that appears on your computer screen. You can clip exactly the part you want and save it as an image for future reference or use.
That’s a pretty simplified description – but essentially, web clipping is the common denominator. But from there, they diverge.
Evernote is primarily a note taking tool. It takes all kinds of notes (audio, photo, video, documents, web clipping, typed, handwritten.) All notes are added to it, and you work in it like a workstation where you can organize and quickly search and retrieve your notes. It can apply OCR to your screen captured notes, making them keyword searchable and editable. Evernote allows you to instantly access your notes from any device that you are signed into your account.
Snagit is primarily a screen capture tool. In fact, it’s screen capture on steroids compared to Evernote. It’s not a place to store notes, but it’s a fantastic way to web-clip or capture information, edit, annotate and manipulate it, save it, and use it in other programs (and we’ll talk more about that in a moment.) Snagit can capture both images and video of content on the web, and it can do other things like use OCR to convert the text that appears in the web content you’re clipping as an image and turn it into editable text. When you web clip with Snagit, you are creating an image. That image must be saved to a cloud service like Dropbox in order to be able to access the note from all your devices.
You can learn a lot more about what these two tools do in my other videos:
You’ll find many more videos on Evernote and Snagit at Genealogy Gems Videos page under Technology.
Another thing they have in common is that they are both software programs.
Evernote: In addition to being able to use it as a software program on your computer, you can also use Evernote on your mobile device by downloading the app from your app store. You can also use it on any computer by simply signing into your account at Evernote.com. That being said, the software is preferred over the website because it resides on your computer and is faster.
Cost: About $9/monthly or about $80 for the yearly subscription ($6.67 / MONTH).
There is a free version, but you can only use it on 2 devices, it doesn’t include OCR and there are very strict limits on storage, which we’ll address in just a moment. If you’re going to use Evernote for your research and other things, you’re going to need the yearly subscription.
Snagit: Snagit is software that you download to your computer (whether desktop or laptop.) You can buy it as a stand alone purchase, or you can also purchase an ongoing maintenance subscription which provides you with upgrades. There is not mobile app.
Cost: About $64 for one software license + 1 year maintenance (free upgrade). You don’t have to pay for ongoing maintenance.
Conclusion: Unless the free version of Evernote is adequate for your needs, Snagit it more economical. 10 months of Evernote on-going subscription would cover the cost of the one-time purchase of Snagit. However, if you need all the features of Evernote, then go for the yearly subscription to keep the cost down.
Because Evernote is a subscription, this brings up the question of whether you can use your notes after you stop subscribing. And storage limits are also a concern.
Snagit: No storage limits. All the content you capture is stored on your computer, not the cloud. It’s yours forever. There’s no limit to how much you can clip or create.
Evernote: Evernote does store your notes on your computer, but it also stores them in the Evernote cloud. While Evernote doesn’t have an overall storage limit, it does have limits on how much you can create each month. There is a free version that allows you to 60 MB of monthly uploads. This is talking about the size of your notes. If you add photographs to Evernote, you’re going to use that up very quickly. There’s also a 25 MB maximum note size limit. No note or clipping can be larger than 25MB. With the subscription you get 10 GB of monthly uploads (which would be pretty hard to max out) and the note size limit is 200 MB.
Conclusion: You’ll need the yearly subscription to really be able to use Evernote for genealogy. And while there are limits, you’re likely never to reach them. And you can use it offline because notes are on your computer.
Snagit has no limits and stores only on your computer unless you share your content to other sources. And that brings us to comparing how these tools allow you to export your content. In other words, can you get stuff out that you put into it?
The necessity for an ongoing subscription to Evernote brings up to the next important comparison: how can you export and use your web-clippings and in the case of Evernote other types of notes?
Evernote: Not easy. You can export your notes as the Evernote file format called ENEX or as HTML, which is used in structuring web pages. Keep in mind that web clippings are image files, and we normally need image files in JPEG or PNG format to be able to use them in a variety of other programs.
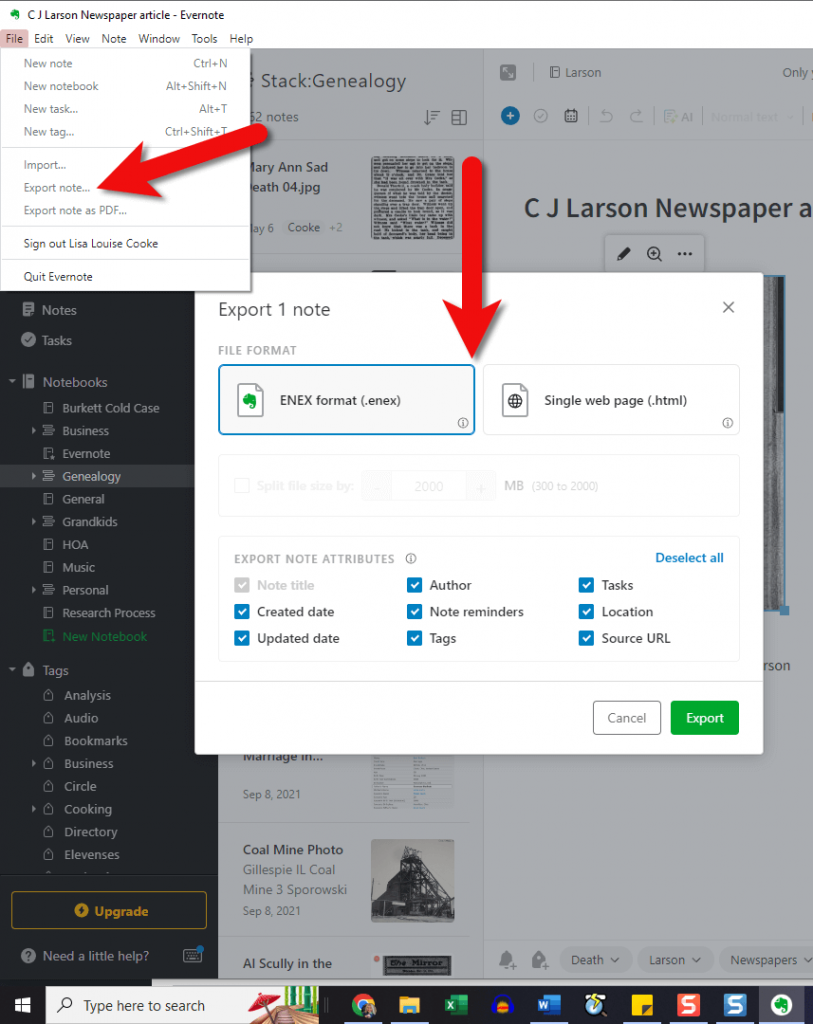
In the menu click File > Export Note. Available file types are limited.
Snagit: Easy. You can export your clippings in countless ways. Pretty much all major file types are supported. You can easily add content directly to a large number of popular programs such as Word, PowerPoint and even Evernote! So, if you’re writing a family history story or book and you want to clip something on the web and include it, Snagit can send it right to your document with just a click.
Conclusion: If you need to be able to easily get web clippings and captured content out of the program and use it in other ways, use Snagit. If you want to keep your clippings and notes all in one place and be able to keep them organized and find them easily, use Evernote.
When it comes to sharing content with other researchers or your family, both Evernote and Snagit do a great job in their own way.
Evernote: Each note has a convenient Share button that allows you to invite other people to view just that note. It also gives you a unique link to the note that can be shared. And you can email notes. You can also put a group of notes into a notebook and then share the entire notebook. You can control whether the person being shared with can just view the notes or if they can edit them. So, it does facilitate collaboration by allowing you both to edit the same note. That permission can also be turned off. That all being said, Evernote is really a tool for you, and it’s not focused on sharing as a priority, or on sharing in order to be able to publish the content in many other ways.
Snagit: With Snagit, if you want to share with someone else to collaborate, you’ll need to send it to them, either by email or shared cloud storage. They can then edit the item in their Snagit software and send it back. So, it doesn’t offer the ability to collaborate quite as easily as Evernote. However, Snagit’s sharing and publishing capability is one of its greatest strengths and priorities. Just click Share in the menu and you’ll have the ability to save the content as a file to your computer, email it to someone, upload it to your own website, your printer, a wide range of software programs and cloud storage services, and yes, even to Evernote!
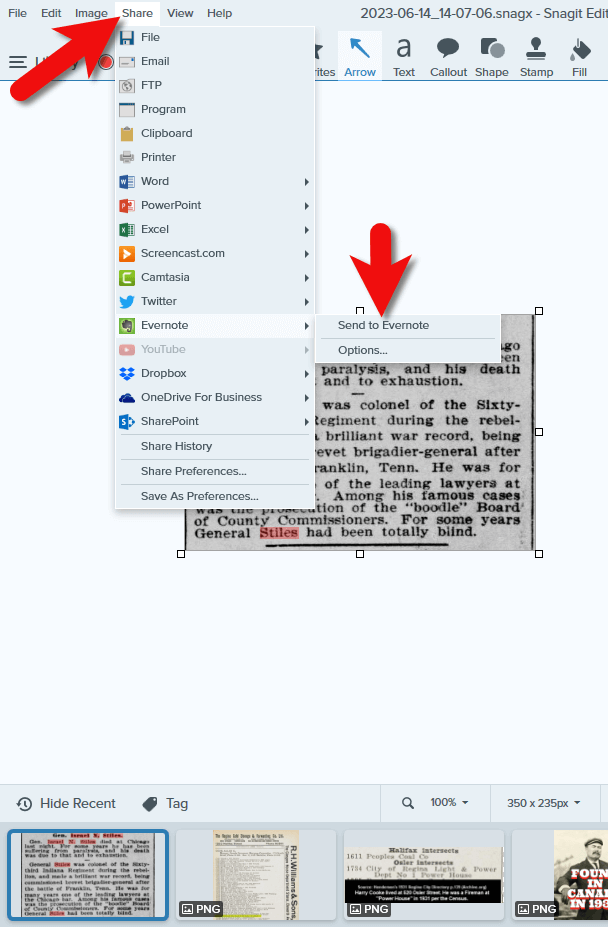
Click Share in Snagit’s menu
Conclusion: If you want to share with other people, both tools can do the job, although Evernote inches ahead because it facilitates both people being able to edit the same note within Evernote. If you want to share your content for use in other programs and publish it in other ways, Snagit is the best choice.
After a head-to-head comparison, we’ve discovered that your selection between these two tools depends on your task and your goals:
Use Evernote if you want to be able to:
Use Snagit if you want to:
Another way of looking at it is that Evernote is more of a final destination for content you’re collecting, and Snagit is a content collector that makes it easy to use that content wherever you need it.
If you want to have one place to store and use a wide variety of notes including web clippings, Evernote is the best choice. If you want full flexibility in capturing and creating online content and using it in other programs and projects, Snagit is the best choice. I like to use them in combination. I keep my genealogy and other notes organized in Evernote, and then I use Snagit to capture web content exactly the way I want it and send it into Evernote as needed. And I use both programs for a whole lot more than just genealogy! I clip recipes, projects and ideas, and I use Snagit for all the images I create for Genealogy Gems.
Please leave a comment below.
The places where your ancestors lived can tell you a lot about their lives. I’m going to show you a free and easy technique for plotting land in Google Earth.
episode 67
Would you like to be able to find your ancestor’s property on a map today? Keep reading and watch the video to learn how. We’re going to take U.S. government survey legal land descriptions found in sources such as Federal Land Patents and quickly and easily plot the boundaries in Google Earth Pro. I’ll also show you an easy way to do it for property in Canada too.
(PREMIUM MEMBERS: Get your ad-free PDF cheat sheet for this episode in the Resources section at the bottom of this page. Not a member yet? Click here to join the Genealogy Gems family and get all the benefits.)
In the video I show you how to plot the boundaries of a piece of land in Google Earth. We’re going to take U.S. government survey legal land descriptions found in sources such as Federal Land Patents and quickly and easily plot the boundaries in Google Earth Pro. I’ll also show you an easy way to do it for property in Canada too. These strategies come from my book The Genealogist’s Google Toolbox,
These days there are actually three versions of Google Earth:
All are free, but they are not the same. The app and web browser versions are sort of “Google Earth lite.” The software is what you want because it has all the bells and whistles that will allow you to do all the things I’m going to show you today.
Plotting legal land descriptions in Google Earth has its advantages. If you’re plotting the land of your ancestors, you’ll be able to see what the area looks like today and what the current street names are. In Google Earth you’ll also have access to additional tools that you can use in conjunction with the boundaries you’re going to create, such as historic maps, area photos, and a wide range of data sets that provide more information about the area.
The first thing to do is check to make sure you have the most current version of Google Earth on your computer. Again, we’re using the software so you need to do this on your desktop or laptop computer. You want to make sure you have Google Earth Pro – LINK – A tell tale sign that you don’t is if the Google Earth globe icon on your desktop is grey and not blue. Open it and in the menu go to Help > About Google Earth. Here it should say Google Earth Pro and you can see the version number.
Check the current version number here, and if you don’t already have the program, go ahead and download it.
Now that you have it on your computer, open it up and leave it running in the background. You’ll need a decent internet connection for it to run.
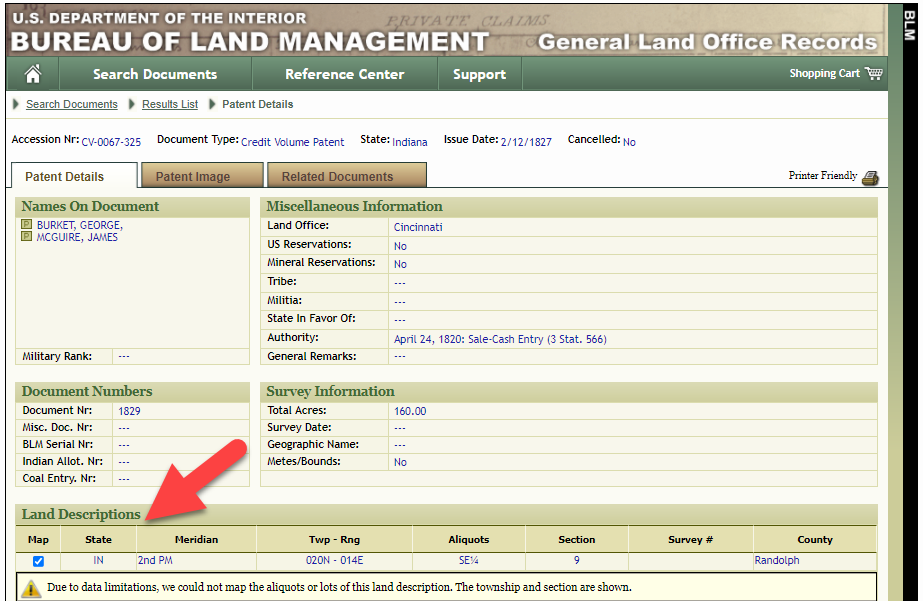
Next pull up the legal land description that you want to plot. Here’s one that I have for some property owned by George Burket. I found this at the Bureau of Land Management Government Land Office Records website. This free website is where you can search for land patent that your ancestors once held.
Legal land description at GLO
Even though the Bureau of Land Management places it on the map on their website, you can’t download this or add to it. The advantage of plotting this in Google Earth is that you will have access to much more geographic data, you can add many more details to the map, you can use it in conjunction with other related mapping work that you’re doing, and you can save and share it.
This description gives us the exact coordinates of the property. Jot down the land description or keep it open in your browser tab so you can refer to it.
In a new browser tab, we’re going to type in http://www.earthpoint.us. This will take us to the Earth Point website.
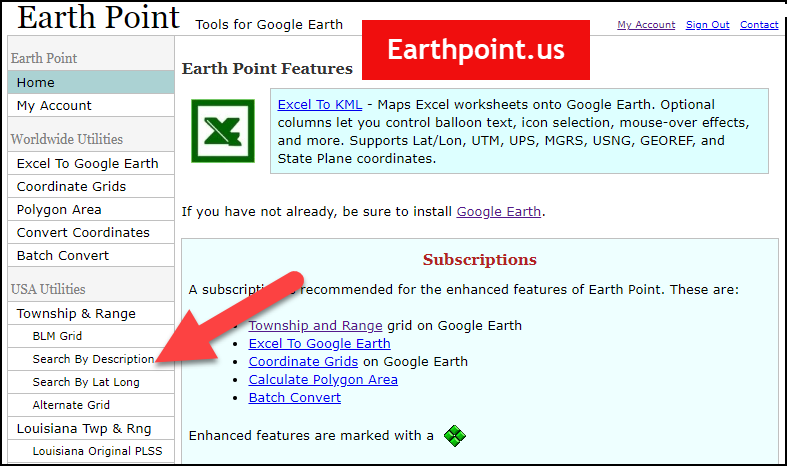
Search by legal land description at Earth Point
This website is free, although some of the features are available only with a paid subscription. Thankfully, the tool for plotting your ancestor’s land patent is free. Some of the free features do require that you sign up for a free account. The feature we are going to use currently does not.
On the Township and Range – Search by Description page you will see a field for each piece of information found in the land description. It’s important to enter this information in the order presented starting with the State. Select the state from the drop-down menu. Pause a moment to allow the fields to recalculate. This allows the appropriate data to be loaded into the next field based on your selection.
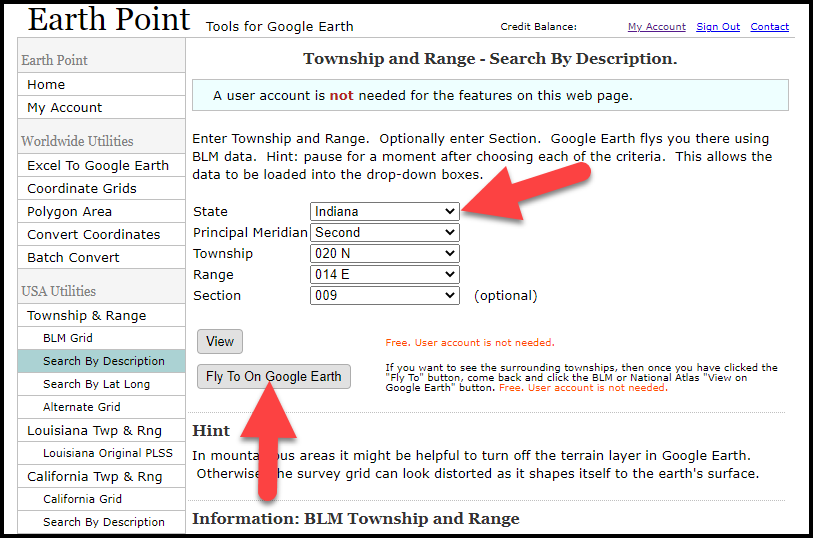
Entering data at Earth Point
After you have made each selection, click the Fly to on Google Earth button. This will generate a KML file which can be saved to your computer. KML stands for Keyhole Markup Language, which is the file type that Google Earth uses and understands. KMZ are zipped KML files which also are used by Google Earth.
Save the file to the desired location on your hard drive. Then click the file to open it. It will automatically open in Google Earth (which you already have open). The KML file is now located in your Temporary Places folder in the Places panel. The land is has now been automatically plotted on the map.
The orange outline is the township. In this example it is township T20N R14E. Click the orange ball in the center of the township for details. In the details you’ll find the total number of acres in the township, the latitude and longitude coordinates for the center of the township and corners.
Township in Google Earth
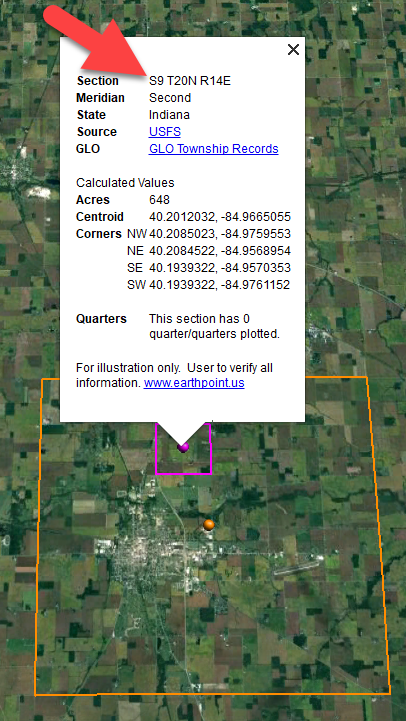
The pink / magenta outline is the Section where the property is. Click the pink center dot for the details:
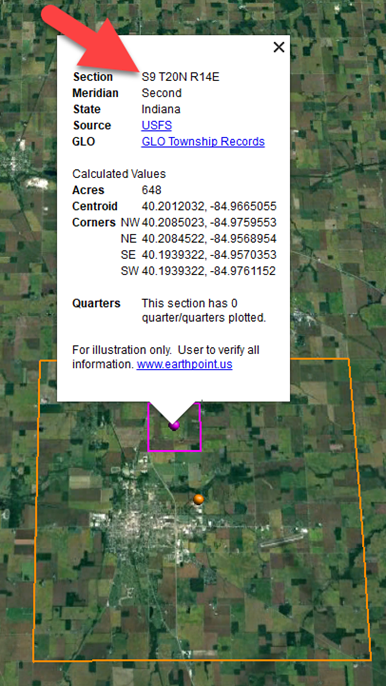
Land section in Google Earth
In this example Section 9 consists of 648 acres.
Notice that Earth Point was able to plot the land down to the Section level. However George Burket did not own the entire section. We must return to the land description for the Aliquots.
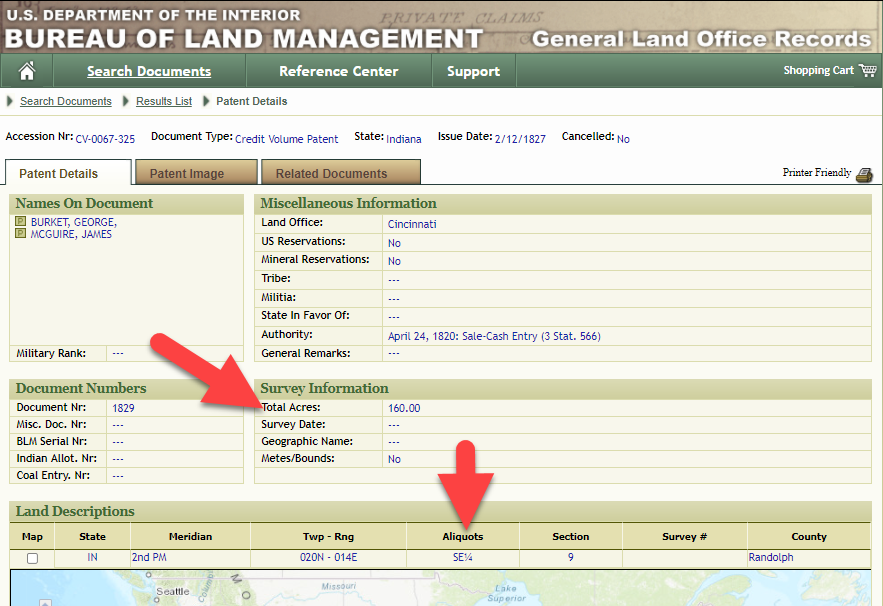
Aliquots in Legal Land Description
In this example, the land was the southeast quarter (SE1/4) of section 9. The land was a total of 160 acres.
We can use the Polygon tool in Google Earth to plot the 160 acres. In the toolbar, click the Polygon tool. This will open the New Polygon dialog box. Type a title, description and source citation.
As you hover your mouse over the map you will notice that the cursor is now a square shape. Click the screen on each of the four corners one at a time in order to set the four corners of the property – in this case the southeast quarter of the section. Once you have drawn the shape you can click on the handle on any corner to adjust precisely.
Click the Style / Color tab in the New Polygon dialog box to adjust the color and opacity of the acreage polygon. You can add color and thickness to the outline, and color and opacity to the fill of the shape. When you have it set the way you want it, click OK to close the New Polygon box. The Polygon is now set.
On the left side of the Google Earth screen you will see a series of panels: Search, Places and Layers. At the bottom of the Places panel is the Temporary folder. This is where the KML file was placed when it was opened. However, like its name implies, this is a temporary location. If you want to keep it, you’ll need to move it to a filed location within the Places panel. This will not change the position of the polygon on the map, only where it is filed and saved in the Places panel.
To file a polygon, click on the file in the Places panel, drag it to the desired location, and drop it. Next, go the main menu and click File > Save My Places. This will save your work so that when you close the program it will not be lost. Google Earth doesn’t auto-save.
The polygon plotting the acreage will be visible on the map when the box is checked in the Places panel. If you uncheck the box for the polygon it will still be there, but it will not be visible on the map. This allows you to create and save many items of interest without always having to have them displayed and cluttering up the map in Google Earth.
After your land polygon has been set, you may want to rename it. There are two ways to do this:
You can also restyle the polygon and edit the text. Start by going to the Places panel and click the arrow pointing at the Polygon’s globe icon. This will open it and show the nested content. Click to select the Polygon. Now you can right-click it (PC) and select Properties – OR – go to the menu under Edit > Properties. Either way it will reopen the Polygon dialog box so that you can make the desired changes. When you’re done, click the OK button to close the Polygon.
Snagit is the tool I used to capture the various views of the land I plotted in Google Earth. Learn more about Snag it by watching my videos and reading the show notes for episode 61 (for beginners) and episode 66 (advanced).
Although the Earth Point website doesn’t plot Canadian land, the Legal Land Description Converter website does. It can help you find land in Western Canada (British Columbia, Alberta, Saskatchewan & Manitoba) subdivided by the Dominion Land Survey (DLS) and the Alberta Township System (ATS).
These show notes feature everything we cover in this episode. Premium Members: download this exclusive ad-free show notes cheat sheet PDF. Not a member yet? Learn more and join the Genealogy Gems and Elevenses with Lisa family here.
Gwynn: I would like to know how to match plat with GPS coordinate/ current street address.
Answer: I cover how to overlay a plat map in Google Earth and discover the current street address in my book The Genealogist’s Google Toolbox.
Roger D: How exact do you need to be in picking points? Does Google snap to mid-points of lines?
Answer: Try to be as exact as you can, however as I showed in the video you can reposition them as needed. Google Earth doesn’t snap.
Lyn: Can I do this with English tithe maps?
Answer: There isn’t a website converter that I know of. However I do cover how to overlay digitized maps in Google Earth in my book The Genealogist’s Google Toolbox.
The manufacturer price is going up August 31, 2021. Now’s the perfect time to get your official Elevenses with Lisa mug.
You can also find them through the menu: Premium > Premium Videos > Elevenses with Lisa.