Many American families have a tradition of Native American ancestry. Now, Fold3.com has made access to their Native American records collections free between November 1 and 15th. Here are the step-by-step instructions you need to know to effectively navigate the Eastern Cherokee Applications collection at Fold3.com.
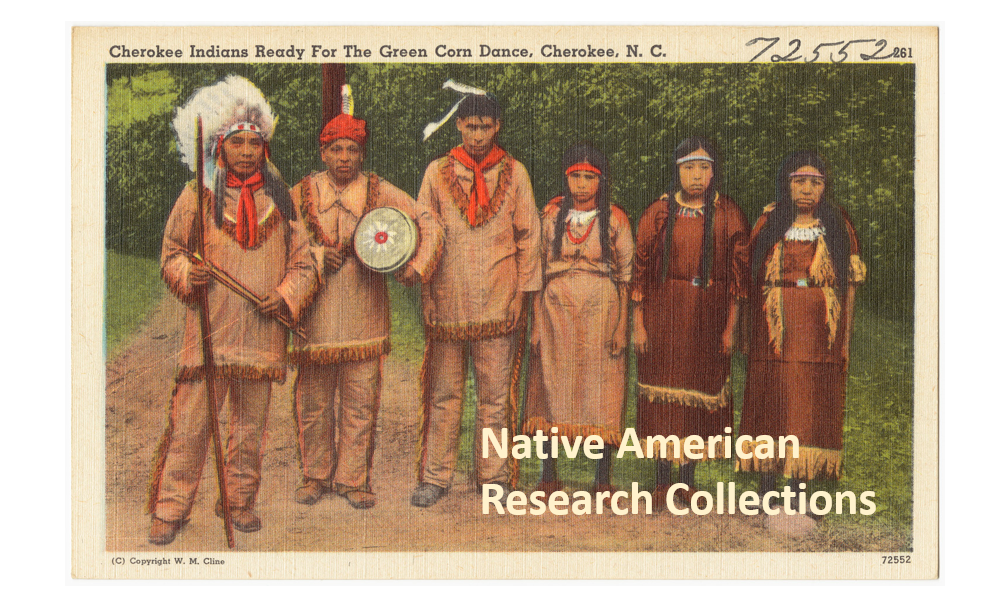
Original image provided by Boston Public Library via Flickr at https://www.flickr.com/photos/24029425@N06/5755511285.
Our Purpose
Our goal is to open the doors to using all types of available genealogical records, and provide you with the skills to explore them with confidence. Our Genealogy Gems team is excited to share with you the opportunity to utilize the free access to Native American records on Fold3.com. While it can be difficult and confusing to know how to navigate these important records, this post will provide you with information to get you started and to feel a little more comfortable jumping in! Now, let’s get started.
Eastern Cherokee Applications Collection for Native American Research
The Eastern Cherokee tribe sued the United States for funds due them under the treaties of 1835, 1836, and 1845. [1] Applicants, or claimants, were asked to prove they were members of the Eastern Cherokee tribe at the time of the treaties, or descended from its members. [To learn more about the lawsuits and allocations, read “Eastern Cherokee Applications of the U.S. Court of Claims, 1906-1909,” in .pdf form provided by the National Archives and Records Administration.]
The courts ruled in favor of the Eastern Cherokees and the Secretary of the Interior was tasked to identify the persons entitled to distribution of funds. The job of compiling a roll of eligible persons was given to Guion Miller.
It is interesting to note that the funds were to be distributed to “all Eastern and Western Cherokee Indians who were alive on May 28, 1906, who could establish the fact that at the time of the treaties, they were members of the Eastern Cherokee tribe or were descendants of such persons, and that they had not been affiliated with any tribe of Indians other than the Eastern Cherokee or the Cherokee Nation.” [Source: page 4, 3rd paragraph of NARA document Eastern Cherokee Applications of the U.S. Court of Claims, 1906-1909.]
The collection at Fold3 titled “Eastern Cherokee Applications” contains these applications submitted to prove eligibility. [Important: Because this act was about money allocation and individuals filling out these applications would have received money if approved, this may raise the question, “Did our ancestor have a reason to lie or exaggerate the truth so that they might be awarded funds?” Further, the Genealogy Standards produced by the Board for Certification of Genealogists (BCG) reminds us: “Whenever possible, genealogists prefer to reason from information provided by consistently reliable participants, eyewitnesses, and reporters with no bias, potential for gain, or other motivation to distort, invent, omit, or otherwise report incorrect information.” [2] In this case, those filling out the Eastern Cherokee Applications did have potential for gain. So, be sure to take any genealogical data, like names, dates, and places, with a grain of salt and find other documentation to back-up the facts.]
The first step in locating whether your ancestor applied is to check the index. If you are not a member of Fold3.com, you will first need to go to www.fold3.com. Click in the center of the homepage where it says, “Free Access to Native American Records.” Next, on the left you will see “Records from Archives.” Go ahead and click that.
From the list now showing on your screen, choose “Eastern Cherokee Applications.” Then click “learn more” at the bottom right of the collection description.
From the new screen, choose “Browse by title.”
Notice, there are two general indexes. The first choice is for surnames between the letters of A and K, and the second general index is for the letters between L and Z. The index is alphabetical by surname.
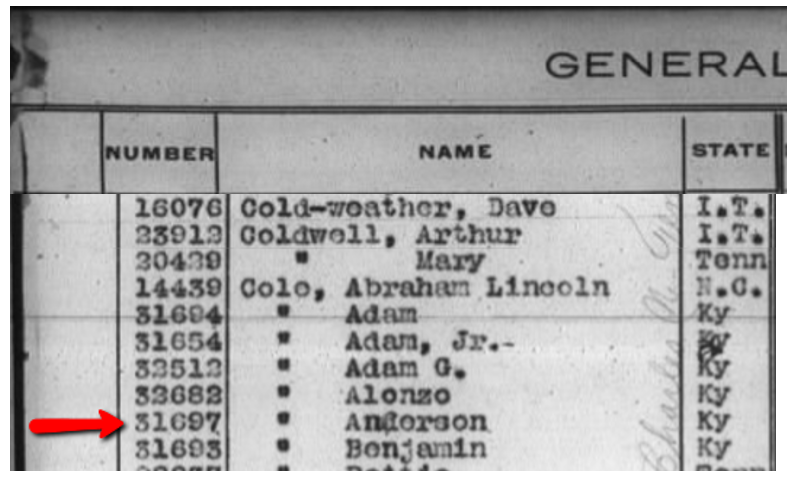
Scroll through the digital images of the index and find the surname of your targeted ancestor. For example, my ancestor’s last name is Cole.
You will see the state they were currently living in and a number listed to the left of each name. This number is what you will need to find the application of your ancestor. In the example here on the left, Anderson Cole’s number is 31697. Though the step of using this index could be omitted, I wanted you to know how to use it.
Anderson Cole’s name appears on the General Index of the Eastern Cherokee Applications.
Armed with this number as confirmation, let’s go back to the list of options and this order medication online for pain time, choose Applications.
Applications are broken down by the first letter of the surname, so in my case, I would click on the letter C and then from the new options list, click the appropriate indicator until I reach Anderson Cole.
Anderson’s application is eight pages, however applications vary in size from fewer than eight to several more.
From Fold3.com, you can see each page of the application. Some of the information you may find on the applications include, but is not limited to: name, birth date and location of applicant, names of parents and siblings, name of spouse and marriage date and place, tribe affiliation, Cherokee name, grandparents names, and residences.
The application was sent in to the Commissioner of Indian Affairs and then it was decided whether the applicant was eligible or not.
Lies and Rejection
Anderson Cole’s Eastern Cherokee Application was rejected but held genealogical data.
In Anderson Cole’s case, he was rejected. This is found on the very first page of the application. In other words, the commission did not find him able to prove his relationship with known members of the Eastern Cherokee tribe and therefore, he was not given any allotment of money. This rejection neither proves or disproves whether Anderson was of Native American descent. However, it does suggest that something in his lineage was questioned.
Further, when reviewing the information recorded on any genealogy record, we must ask the question, “Did this person have any reason to lie?” When money is on the line, lying is always a possibility. According to further research, it appears Anderson either lied, omitted details, or was seriously mistaken about many names and dates of close family members. Even then, there are some great hints within the pages of his application and I was happy to find it.
Additional Information in the Eastern Cherokee Applications
In addition to an application being filed for our ancestor, if the ancestor had children under the age of 21, they may have also applied in behalf of the child as a Cherokee Minor.
Anderson’s son, W.T. Cole, applied under the same application number as Anderson. I found his application in the last pages of Anderson’s file. This type of record is direct evidence of a parent/child relationship and can be a wonderful substitute when other vital records can not be located. However, direct evidence (which is anything that directly answers a specific question…like ‘who are the parents of W.T. Cole?’) does not have to be true. In this case, just because Anderson says his son is W.T. Cole, doesn’t mean it is absolutely true. We should always find other records or evidence to back up our findings.
How is the Roll of Eastern Cherokees Different from the Eastern Cherokee Applications?
You may have noticed that besides the Eastern Cherokee applications and general index, there is also a record set titled “Roll of Eastern Cherokees.” Another name for this roll is called the Guion Miller Rolls. This is a roll, or list, provided by commissioner Guion Miller of all those who were approved to receive the allocated money. [We will be discussing the Guion Miller Roll Collection from Fold3 in a later blog post. Be sure to sign-up for our free newsletter so you don’t miss it!]
Anderson Cole and his son do not appear on this Roll of Eastern Cherokees. If however, your ancestor does, additional information on this roll could include application number, the names of minor children, ages of all parties, current residence, and a death date.
A partial page of the Roll of Eastern Cherokee found online at Fold3.com.
More on Native American Research
Using Native American collections for genealogy research can be challenging. We hope this has helped you to better understand the ins and outs for using the record collections at Fold3. For even more helpful tips, read:
Stay tuned as we bring you additional instructions for exploring the Guion Miller Roll and Indian Census Rolls at Fold3.com in the days to come. Sign up for our free Genealogy Gems newsletter for our upcoming posts on this important subject.
Article References:
[1] “The U.S. Eastern Cherokee or Guion Miller Roll,” article online, FamilySearch Wiki (https://familysearch.org/wiki/en/The_U.S._Eastern_Cherokee_or_Guion_Miller_Roll : accessed 1 Nov 2016).
[2] Genealogy Standards, 50th anniversary edition, published by Board for Certification of Genealogists, 2014, standard 39, page 24.
Disclosure: This article contains affiliate links and Genealogy Gems will be compensated if you make a purchase after clicking on these links (at no additional cost to you). Thank you for supporting Genealogy Gems!
Google offers a variety of ways to help you find and search for images. In fact, there are so many different ways it can get a little confusing. In this video and article I’m going to show you how to find images and photographs that apply to your family history. Who knows, we may even find an ancestor’s photo. I’m also going to show you how you can use Google Images to even help identify some of the images and photos you have in your family scrapbooks. These are my best image search strategies and they come my book The Genealogist’s Google Toolbox.
Follow along in the show notes below. The step-by-step instructions are available in an ad-free show notes cheat sheet which is downloadable in the Resources section at the end of these show notes. (Premium Membership required.)
How to Find Photos and Images with Google Images
When it comes to searching for images, part of the confusion comes from the fact that the search experience on desktop and mobile are a bit different. So, let’s start with running a basic image search on computer desktop. There are actually two ways to do that.
#1 Google search for images at Google.com on desktop:
Go to Google.com
Run a search
Click Image results
#2 Search for images at Google Images on desktop:
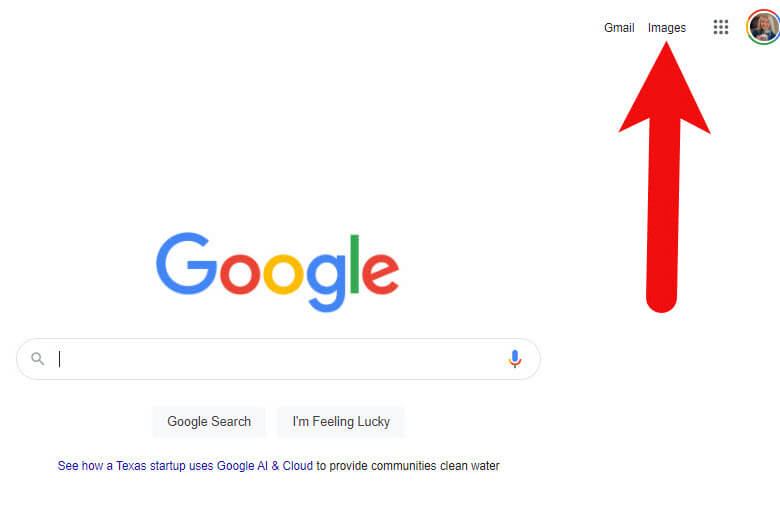
Go to https://images.google.com or go to Google.com and click Images in the top right corner (Image 1)
Image 1: How to get to Google Images from Google.com
Run a text search: Example: John Herring
Images results will be presented
If I’m in a hurry, I’ll usually just search from Google.com because I’m probably over there anyway. But if I really want to find the best image, or I expect to do some digging, I go directly to Google Images.
How to Get the Best Google Images Results
Searching for a name is fine, but chances are there are and have been many people with that name. You’ll need to narrow things down and provide Google with more specific information about what you want.
There are a several excellent ways to refine and dramatically improve your results. The best place to start is by using a few powerful search operators.
The first search operator is quotation marks. By putting quotation marks around a word or a phrase you are telling Google that it must:
Be included in each search result,
Be spelled the way you spelled it,
And in the case of a phrase, the words must appear in the order you typed them.
You can also use an asterisk to hold the spot for a middle initial or middle name. This is important because without it, Google may pass over these since the name was presented in quotation marks which means its to be searched exactly as typed.
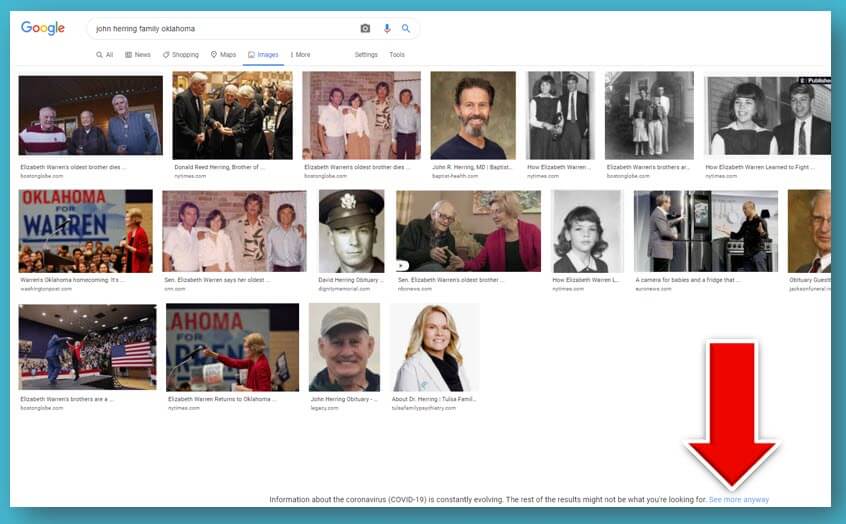
Notice in the following screen shot how this refined search appears. The search operators have made quite an improvement in the image results. I’ve located four photos of my great grandfather! (Image 2)
(Image 2) Google Images found photos of my great grandfather
Google might restrict how many images it shows you. Click See more anyway at the bottom of the screen to reveal all the results. (Image 3)
(Image 3) Click to see more image results
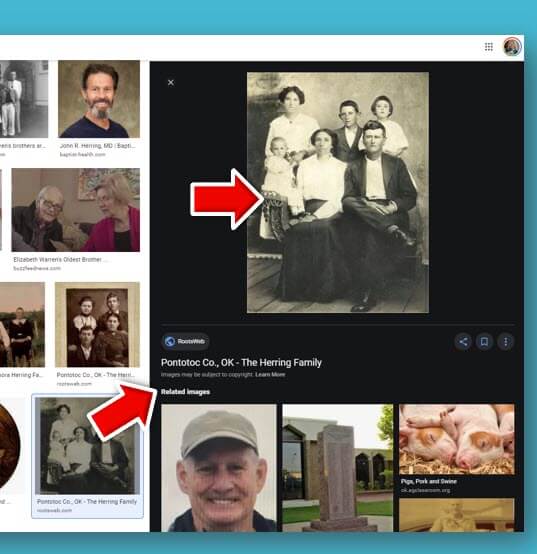
You may need to scroll down to see even more results. Click an image to preview it. (Image 4)
(Image 4) Click to preview Google Image results
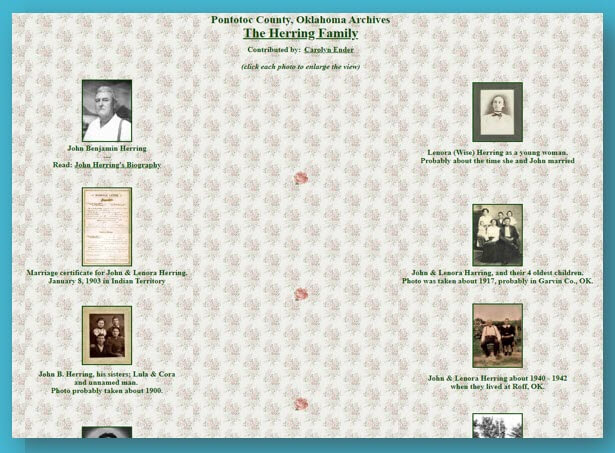
Click the enlarged preview image again to visit the website where it is hosted. I’ve got my fingers crossed that since this website is hosting a photograph of my ancestors, it just might have more. And indeed, it does – genealogy happy dance! (Image 5)
(Image 5) Old family photos found on this web page
How to Narrow Down an Image Search to Old Photos
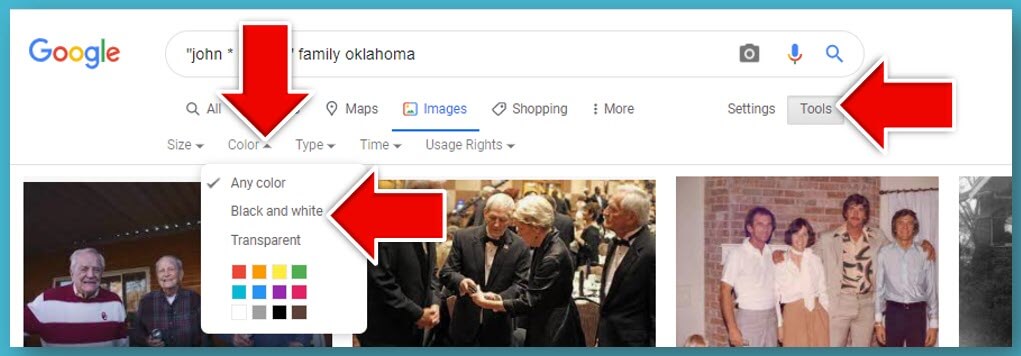
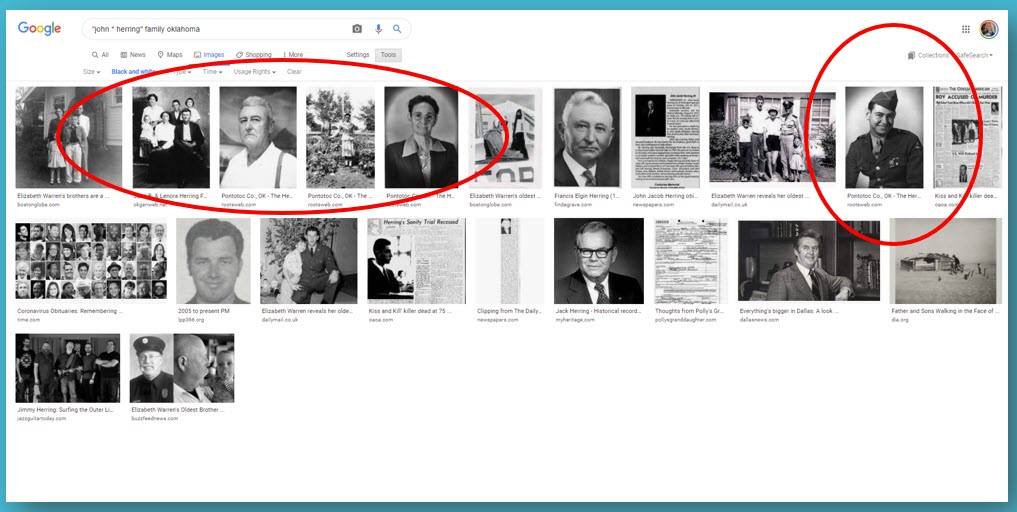
One of the ways you can zero in on old photos is by filtering down to only Black and White images. This makes sense because most of our older family photos are black and white.
On the Google Images search results page click the Tools button. This will cause a secondary menu to drop down. Click the Any Color menu and select Black and White. (Image 6)
(Image 6) How to filter Google Image results
Now all of your image results will be black and white. It’s easy to tell that most of these are older photos. (Image 7)
(Image 7) Filtered image results
Permission to Use Images Found with Google Images
If you want to use any of the photos you find, you’ll need to ensure that you have permission to do so. Start with the FAQ at Google Search Help. This page will help guide you through issues like Fair Use and how usage rights work. In the end, the best thing to do when in doubt is to contact the person who posted the photo and explore any requirements they may have regarding use of the image.
How to Use Google Images to Identify Images and Photos
Do you have unidentified photographs, old postcards or other images in your family scrapbooks or photo albums? Google Images just might be able to help!
Start by first digitizing the image (I use a flatbed scanner) and saving it to your computer hard drive. Then head to Google Images on your computer and click the camera icon in the search field. This will give you two options:
Paste URL (we’ll get to that in just a bit)
Upload an image (this is the one you want – click it)
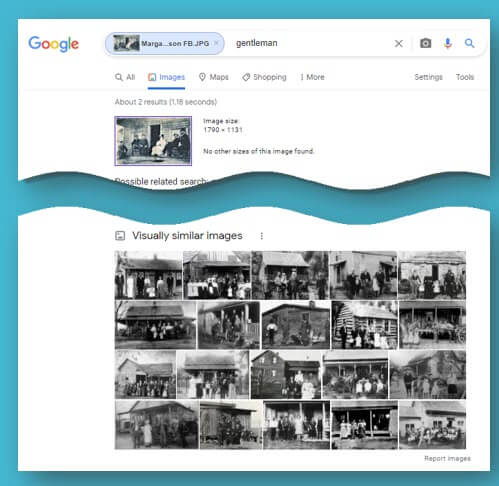
Click Choose File and grab the photo you saved to your computer. Google Images will search the Web for that image. It may find an exact copy, or it may deliver visually similar images.
Notice on the Google Images search results page that Google has added keywords to the search field at the top of the page. You’ll also see a tiny version of the image you searched. The keywords may be rather generic such as gentleman, family, etc. Try replacing these words with more specific words about the photos and what you are looking for. For example, you could replace the word gentleman with your ancestor’s name in quotation marks, or replace the word family with the family surname and the town where they lived. Experiment and try different variations to see what provides the best results.
How to Upload an Image to Google Image Search (Reverse Search):
Navigate to and select the digitized photo you saved to your computer.
Google will attempt to find that exact image. If not the closest visually. You will see words in the search field along with your photo. These words describe what Google AI noted about the photo. For example, when I upload a photo of Margaret Scully sitting in her rocking chair, Google note “sitting” and delivered old photo of people sitting. When I upload a photo of the John Herring family Google notes “family” and provides old photos of family groups. Neither Margaret nor the Herrings are well-known, so this isn’t a surprise. If I upload a postcard from an ancestor’s scrapbook of a well-known or famous location, Google will likely find additional copies on the web and provide background information on the location and a website address for it if there is one.
You can revise this search by replacing the words that Google noted (i.e. family) with the person’s name of the surname. In the case of the John Herring group photo, I replaced family with Herring and then John Herring.
Remember the option to Paste URL? Use this when you find a photo on a website, (or if you have posted a photo on your own website or blog) and you want to find more like it. Right-click (PC – or Control Click on a Mac) on the image and Copy Image Address. Next, head back to Google Images, click the camera icon and paste the URL. Google will use that image to run your image search.
How to Search an Online Photo with Google Images (Reverse Search):
Right-click on a PC (Control Click on a Mac) on the image on the web page.
In the pop-up menu select Copy Image Address.
Go to Google Images.
Click the camera icon in the search field.
Paste the image URL that you copied to your computer clipboard (on a PC use Control V on your keyboard.)
Click the Search by Image button to run your search.
Searching with your own image or an image you find online can help you discover many more website that have the visual content you need. In this episode I searched using an Elevenses with Lisa viewer’s old photo and revised the search with the name of the town. This resulted in a wonderful assortment of websites to look at that also hosted photos from the same town and timeframe.
The initial Google Image results added the keyword gentleman to the search field. But you can see by the visually similar images it found that it was able to target photos that included more similarities than just gentleman. These photos also matched in other important ways (Image 8):
House
Porch
Multiple People
White dress
Old photo
(Image 8)
Who might have photos online of your family? Here’s just a short list of possibilities:
Archives
Libraries
Historical Societies
Newspapers
Genealogy Websites
Cousins
Social Media
How to Use Google Image Search on Mobile
The Google Images camera icon allows you to conduct reverse image searches. However, whether you use a browser app like Safari or Chrome to go to Google Images or you use the Google search app, you won’t find the Google Images camera icon in the search field. Google Images is different on mobile than it is on computer desktop. The main difference is that there is no camera icon for uploading images to search. However, there’s a little secret for getting around that problem.
On an iPhone / iPad you can switch your settings for the Safari app so that it behaves more like a desktop computer. And for our purposes, that means getting the camera icon in Google Images.
How to Search Your Own Image Using Google Images on an iPhone or iPad
Open the Settings app
Scroll down and tap the Safari app
Scroll down and tap Request Desktop Website
Tap the slide to activate All Websites
Close the Settings app
Open Safari
Go to Google.com – if you’re signed into your account you can tap the apps icon (9 dots) and open Images or just google Google Images
Now you have the camera icon in your search bar ready to reverse search images!
How to Reverse Search a Web Image on an iPhone or iPad (Reverse Search Images)
When you find a photograph on a website in Safari, press and hold the image
Tap Copy
Go to Google Images (after changing your settings to Desktop Website)
Tap the camera icon
In the Paste URL field press and hold and tap Paste
The web image URL will appear in the search field.
Tap the Search by Image button to run your search.
Today is the last day that the Native American records collections is available for free on Fold3.com. Many American families have a tradition of Native American ancestry. Here are some helpful tips when researching the Guion Miller Roll at Fold3.com.
Pub. by Standard Souvenirs & Novelties, Inc., Knoxville, TN. Courtesy of Boston Public Library via Flickr.com.
Purpose of the Guion Miller Roll
In our most recent post, “Eastern Cherokee Applications for Native American Research,” we shared how to find and use the Eastern Cherokee Applications at Fold3.com. Today’s post is on the Guion Miller Roll. It is a list of those who were eligible after having filled out the Eastern Cherokee Application. These eligible persons were made into a list and that list, or roll, is called the Guion Miller Roll.
Looking to see if your ancestor is found on the Guion Miller Roll is important because information on this roll is later than the information in the Dawes Rolls. New information (like names of additional family members) in the Guion Miller Roll may not have been on the Dawes Rolls. Additionally, not finding a targeted ancestor listed with their family on the later Guion Miller Roll could also narrow down a date of death.
Fold3.com has the Guion Miller Roll online and has titled it Guion Miller Roll. Ancestry.com also has this list, but at Ancestry it is called U.S., Records Related to Enrollment of Eastern Cherokee by Guion Miller, 1908-1910.
Insights into the Guion Miller Roll Publication
Take a look at the titles under the publication of Guion Miller Roll at Fold3.com.
If you are not a member of Fold3.com, you will first need to go to www.fold3.com. Click in the center of the homepage where it says Free Access to Native American Records. Next, on the left you will see Records from Archives. Go ahead and click that.
From the list now showing on your screen, choose Guion Miller Roll.
Scroll to the bottom and click Learn more at the bottom right. You will be directed to a new screen. At this new screen, click Browse by title, over to the right.
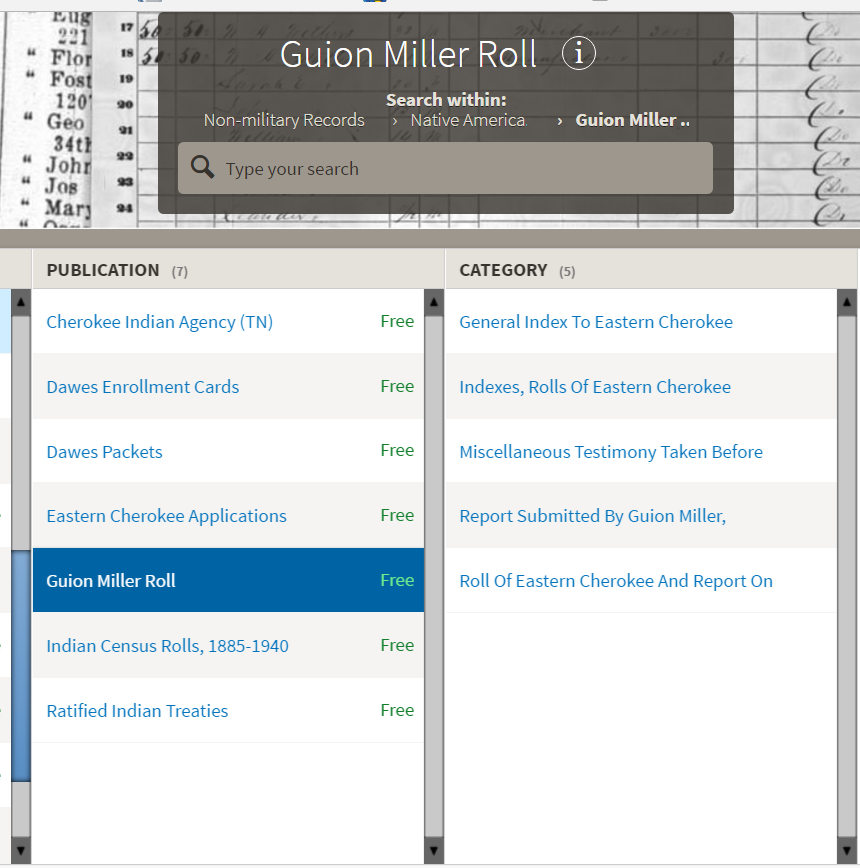
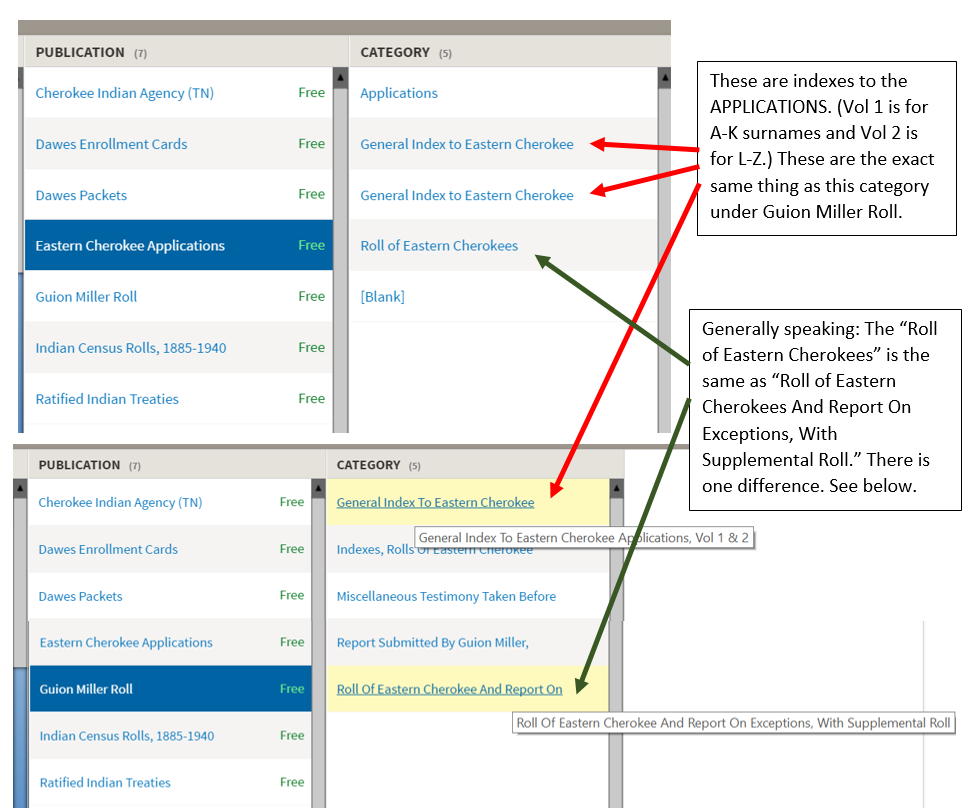
You are directed to the publication titled Guion Miller Roll, and there is a list of five categories.
Let’s take a look at the list:
The categories under the Guion Miller Roll publication are:
General Index to Eastern Cherokee
Indexes, Rolls of Eastern Cherokee
Miscellaneous Testimony Taken Before
Report Submitted by Guion Miller
Roll of Eastern Cherokee and Report On
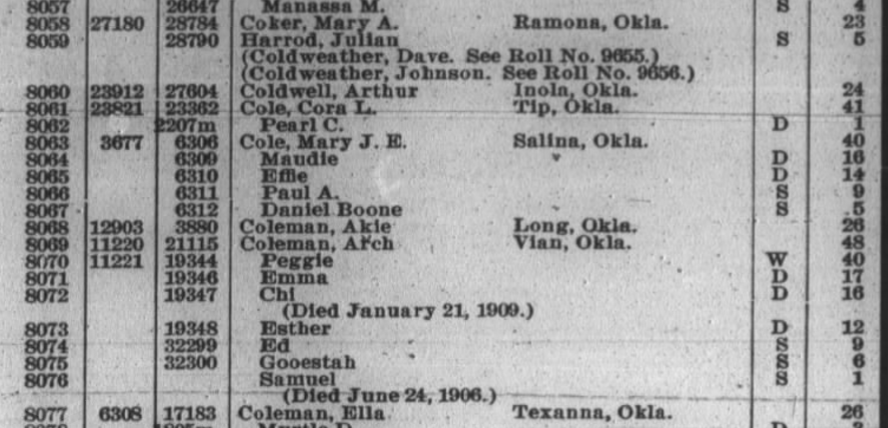
Some of these publication titles are duplicates of other publication titles on Fold3. See this helpful image below:
Duplicates can actually be beneficial. As an example, in the last title called the Roll of Eastern Cherokee And Report on Exceptions, With Supplemental Roll (the title has been shortened on your screen, but that is the full name) there is something you may not have realized. This title is the same thing as the title Roll of Eastern Cherokees in the Eastern Cherokee Applications publication. Why would Fold3 have two of the same thing? There is one exception between these two nearly buy prescription medication online uk identical groups of records. The exception is: Eastern Cherokee Applications>Roll of Eastern Cherokees indicated in the top part of the image, has the roll numbers cut off in some of their digital images. In other words, if you had only looked at that one and not the Roll of Eastern Cherokee and Report on Exceptions, With Supplemental Roll under the Guion Miller publication, you would have missed that.
From time to time, a digital copy will be made of a record set that ends up being too dark, too blurry, or too crooked. When this happens, some of the information on the record will be cut off or simply not readable. It’s great when there is a second set of digital images because hopefully the second copy will not have these problems. As in all things, if there is ever more than one copy of something, check them both! You never know how they may differ in quality of copy.
Miscellaneous Testimony Taken Before
This title, Miscellaneous Testimony Taken Before, under the publication of Guion Miller Roll is filled with hints and clues for your genealogy story. I think it has been my most important find in the Guion Miller Roll publication.
Testimony relating to the Guion Miller Roll.
The testimonies are broken up into ten volumes. Within these volumes are short (or long) testimonies from the applicant, friends, family, or acquaintances regarding their belief that someone was or was not of Indian descent. Many of the testimonies include names and dates of vital events, as well as residences. Even though we must take these records with a grain of salt because individuals may have had something to gain financially, the information would be considered valuable clues. Each testimony indicates which application it attached to.
How to Find a Testimony Record Related to an Eastern Cherokee Application
There is no index by name for testimony volumes 1-9 at Fold3, so you would have to go volume-by-volume, then page-by-page to find your ancestor. That would take a very long time! But if you go to Ancestry.com to U.S., Records Related to Enrollment of Eastern Cherokee by Guion Miller, 1908-1910, you can search by name and you will find the image of the testimony there.
[Note: Volume 10 is broken down into three subcategories. These are Creek Testimony which includes an index on the fourth page of the roll, Poindexter Testimony with no index, and Sizemore Testimony, also with no index. The Poindexter testimonies and the Sizemore testimonies are those testimonies claiming their Native American heritage through those surnames.]
More on Native American Research
Using Native American collections for genealogy research can be challenging. We hope this has helped you to better understand the ins and outs for using the record collections at Fold3. For even more helpful tips, read:
Disclosure: This article contains affiliate links and Genealogy Gems will be compensated if you make a purchase after clicking on these links (at no additional cost to you). Thank you for supporting Genealogy Gems!
Original air date: 10/1/20 Join me for Elevenses with Lisa, the online video series where we take a break, visit and learn about genealogy and family history.
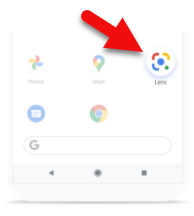
Google Lens with Lisa Louise Cooke
What is Google Lens?
Google Lens is a free technology that Google says helps you ”search what you see.” It uses the latest in Optical Character Recognition (OCR) and artificial intelligence to accomplish tasks.
In this video and article we’ll discuss where you can get Google Lens and how to use it for a wide variety of tasks.
Hang on tight to your phone and let’s jump in!
Google Lens is in Google Photos
Google Lens is doing much of the work in Google Photos. It can detect the faces in your photos, and allow you to search by face. It can also detect objects and text, making it a super fast way to search the photos and images you store in Google Photos.
If you’re not interested in storing all of your photos on Google Photos, that’s OK. As a genealogist, you could still use it for more strategic purposes. You could use it just for family history photos and related genealogical images like documents and photos of tombstones. All of the content you add can then be quickly and easily searched for and found. It can even help you identify a known ancestor in other photos where you may not have recognized it was the same person.
We will talk about specific ways to use Google Lens in Google Photos. But first, let’s talk about all of the ways you can get your hands on Google Lens.
Where can I find Google Lens on my phone or tablet?
Google Lens is available on most mobile devices but not all. Some Samsung devices don’t currently support it. Here’s where you can find Google Lens.
Google Lens is built into Google Photos – Download the Google Photos app to your phone. Pull up one of your photos and look for the Lens icon at the bottom of the screen. If it is there, your phone supports Google Lens.
Google Lens in the Google Search app – You will see the Lens icon in the search bar if your phone supports Google Lens.
The Google Lens app – On Android devices look for the Google Lens app in the Google Play app store.
Where can I find Google Lens on my computer?
Google Lens is primarily a mobile tool although Google Lens is built into the functionality of Google Photos. (It works behind the scenes – you won’t find a Google Lens icon.)
However, you can use your phone to user Google Lens to capture text and then send it to the Chrome browser on your desktop computer.
Using Lens in the Google Photos App
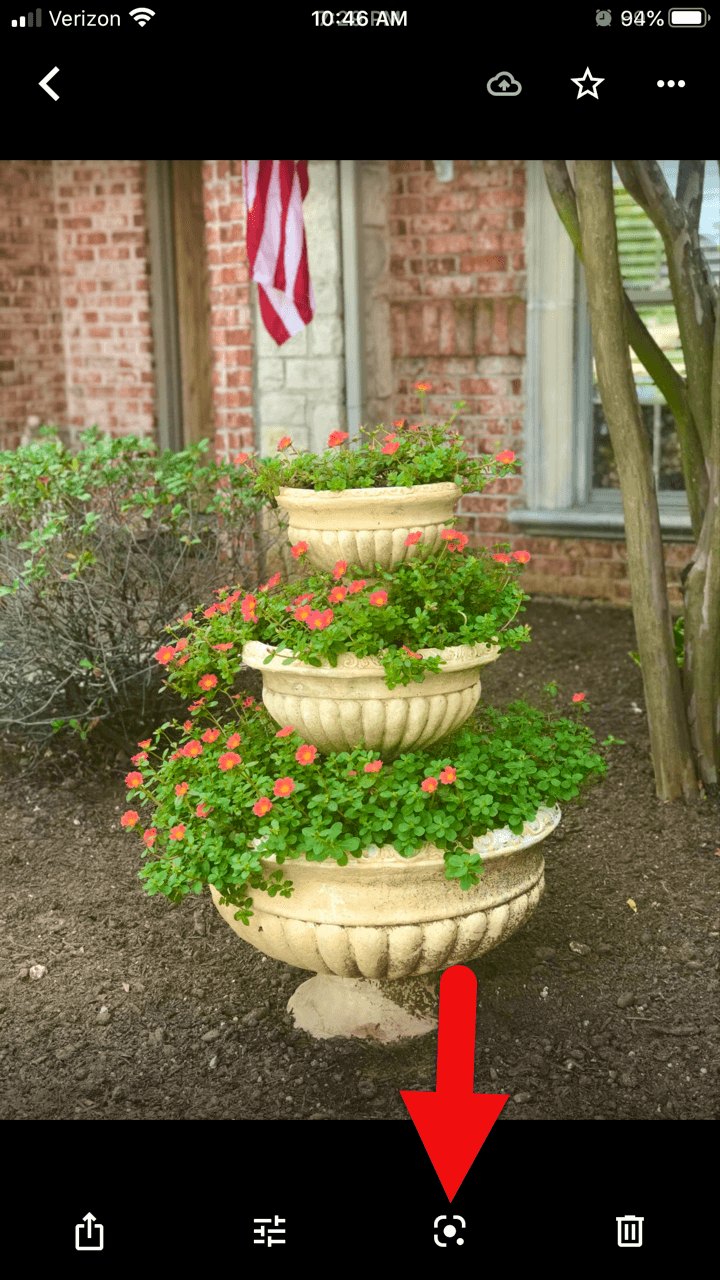
To use Google Lens on your photos in the Google Photos app, you’ll first need to give the app permission to receive the photos you take with your phone. You can then open the Google Photos app and select a photo. In this episode I used the example of a potted plant (Image A below).
(Image A) Google Lens in the Google Photos app
Tap the Google Lens icon at the bottom of the screen and you will receive search results that include the name of the plant, photo examples of the same plant, possible shopping options, and web pages providing more information about that plant.
Here’s another way you can use the Google Lens feature in the Google Photos app:
Take a photo of a business card. (I used Google’s PhotoScan app to do this. The app does a great job of removing glare and other distortions that can occur when you photograph something with your phone. You can download the free Google PhotoScan app from your device’s app store.)
Access the photo in the Google Photos app.
Tap the Google Lens icon.
Lens turns the information on the card into actionable buttons:
Add to contacts
Call now
search on the web
go to the website
Google Lens is in the Google Search app
On many mobile devices such as the iPhone (but not all devices) the Google Lens icon will appear in the search bar. If you’re not sure if you already have the Google Search app on your phone, go to the app store app on your phone and search for “Google Search.” You will see the app listed with a button that either says “Open” (because it is already on your phone) or “Install” (because it is not yet on your phone.)
You can also check to see if they app is on your phone by searching for “Google Search” in the search bar of your phone.
Here’s what the Google Search app looks like on a phone (Image B below):
(Image B) Look for the Google Search app on your phone.
The Google Lens App
If you have an Android phone, search the Google Play store for the Google Lens app. Here’s what the app looks like (Image C below):
(Image C) Android users with phone’s supporting Google Lens will find the app in the Google Play app store.
What Google Lens Can Do
Once you start using Google Lens the possibilities for its use can seem endless. Here’s a list of the kinds of things Google Lens can do:
Shopping
Identify Objects
Copy Text from printed materials or objects
Search for Text on printed material or objects
Solve math problems
Read text to you
Translate text
How to Use Google Lens to Read a Book
Before you buy that next history book or go through the trouble of requesting it through inter-library loan, why not let Google Lens determine if it is already available for free online? This next tip works really well for old books that are likely to be in the public domain or printed before 1924.
Open the book to the title page
Open the Google Search app on your phone
Tap the Google Lens icon
Hold your phone over the title page
Tap the search button
If the book is available on Google Books, the title will appear along with a blue “Read” button
Tap the “Read” button to access, read and search the book on Google Books for free!
(Image D) Point your phone’s camera or Google Lens at the QR code
Open the camera on your phone and point it at the QR code above (Image D) to be taken to the book in the Genealogy Gems store. Use coupon code LENS to get 20% off!
One of the advantages of tuning into the live broadcast of each Elevenses with Lisa show is participating in the Live Chat and asking your questions.
From Rosalyn: Lisa are the old photos hanging on your wall the originals or copies? They are very nice. Lisa’s Answer: I always put copies in frames when I hang them on the wall because light can fade originals. They are all my family.
From Jn Rollins: Does it do the same identification for birds? Lisa’s Answer: I haven’t snapped a photo of a bird, but I’m sure it could. I used it on a photo of a bird, and it identified it perfectly.
From Susan: I have to download an app to get the lens icon? Lisa’s Answer: If you have an Android phone, you may be able to download the free Google Lens app from your app store. Otherwise, you will find the icon in the Google Search app or the Google Photos app on supported devices.
From Patriva: Is Google Go the same as Google Search? Lisa’s Answer: Google Go is a “lighter faster” search app. I think it may be geared more toward Samsung devices. I have a Samsung Tab and it doesn’t support Google Lens.
From Carrie: Does this work with the Google Chrome app? Lisa’s Answer: The Chrome app doesn’t have the Google Lens icon.
From Jn Rollins: I installed Lens a while ago on my Android phone, but when I open Google search the lens icon doesn’t appear next to the microphone icon. How can I change that? Lisa’s Answer: Some Android devices (like Samsung phones) don’t support Google Lens so you won’t see the icon. Check the app store to see if they offer the Google Lens app for your phone. However, I’m guessing it probably won’t be offered since it sounds like your phone doesn’t support Google Lens.
From Christine: I love this technology for speeding up research! But I have some reservations—what privacy are we giving away? How will Google use our search history? Lisa’s Answer: I would not use Google Lens for anything I consider “sensitive.” Go to the privacy settings in your Google MyActivity to learn more.
From Lynnette: Can you put the text into Evernote easily? Lisa’s Answer: Absolutely! Tap to copy the detected text, open an Evernote note, press your finger in the note and tap Paste to paste the text.
From Colleen: I see you are google searching. Does doing this with photos allow others to access my google photos when searching for an item? For example, the example you used with the purse? Lisa’s Answer: To the best of my knowledge your photos are not searchable by others online. However, it is possible that Google uses the image internally to “train” the machine learning. Go to the privacy settings in your Google MyActivity to learn more.
From Christine: Lisa, can this be used to compare photos to determine if they are the same person? Thanks for sharing all your wisdom! Lisa’s Answer: Yes! Watch my Premium membership video called Solving Unidentified Photo Album Cases.
From Caryl: Don’t know what a symbol is on a headstone? Now this would be oh so helpful!! Lisa’s Answer: Yes, indeed!
From Susan: I quickly took a photo of the book cover, so now I can get your book! Is it better to buy directly from you or go to Amazon? Lisa’s Answer: The book is available exclusively at my website: https://www.shopgenealogygems.com
From Debbie: Will FamilySearch’s app be independent, or will it work / integrate with Google? Lisa’s Answer: FamilySearch would not be integrated. However, as handwriting technology is developed I’m sure you’ll find it in use in both places.
Please Leave a Comment or Question
I really want to hear from you. Did you enjoy this episode? Do you have a question? Please leave a comment on the video page at YouTube or call and leave a voice mail at (925) 272-4021 and I just may answer it on the show!
If you enjoyed this show and learned something new, will you please share it with your friends? Thank you for your support!


 Stay tuned as we bring you additional instructions for exploring the Guion Miller Roll and Indian Census Rolls at Fold3.com in the days to come. Sign up for our free Genealogy Gems newsletter for our upcoming posts on this important subject.