by Lisa Cooke | Sep 24, 2016 | 01 What's New, Apps, Photographs |
Every where we go, we are snapping pictures. Whether you are interested in capturing your current family history or want to preserve the past through pictures, photo editing apps and software are a must! Read more to learn what software and apps are out there for the active genealogist who loves to take pictures.
A Gems reader recently asked if we have any suggestions on photo editing software and apps for family history. Our Genealogy Gems team members are each active in their personal family history and are quite savvy when it comes to some of the best photo editing apps and software out there.
Lisa Louise Cooke’s Favorite Photo Editing Software and Apps
Lisa shares:

I think one of the best photo editing software programs out there is Adobe Photoshop Elements, the consumer version of the high-powered Photoshop CS/CC software. On my mobile device, Photoshop Express is my go-to photo editing app which I discuss in Chapter 8 of my book Mobile Genealogy. In fact, I use the app far more for the photos I’m actively taking with my iPhone 6 Plus than the software on my computer. 
Adobe Photoshop Elements is an ideal editor for entry-level photographers, image editors and hobbyists. You’ll find most of the features of the more expensive professional version, but with fewer and simpler options. It allows you to create, edit, organize, and share your images to social media sites. Use the built-in Guides to quickly accomplish your goals.
Adobe’s Photoshop Express app can be downloaded to your mobile device for free from Google Play (for Android) or the Apple Store (for iPhones.)
In her book Mobile Genealogy: How to Use Your Tablet and Smartphone for Family History Research, Lisa explains how the Blemish tool can be used to restore old family photos.
Using the Photo Express Photo Editing App for Photo Restoration
If you want to restore old family photos, this app is now also capable of doing a lovely job with the new Blemish Removal tool. The app allows you to access your photos straight from Dropbox, as well as Adobe Creative Cloud, and Facebook. You can copy the old photos you want to edit to a dedicated folder in Dropbox. Remember, always leave your master digital photos where they are on your computer, and make sure your computer is backed up. (The Genealogy Gems Podcast uses and recommends Backblaze.)
How to add photos to Adobe Photoshop Express:
- On the computer where your photos are stored, go into Dropbox (either your Dropbox desktop application, or sign in to your account at www.dropbox.com)
- Create a folder called “Photos for Editing”
- Save copies of the photos you want to edit into the folder you created, leaving the originals where they are on your hard drive
- On your tablet, tap the Adobe Photoshop Express app
- Tap Dropbox. (See the chapter on File Sharing and Storage for more information on Dropbox)
- Tap the “Photos for Editing” folder
- Tap the photo you want to edit
- The photo is now on your screen and ready to edit and embellish
- When editing is complete, tap Close, then Save
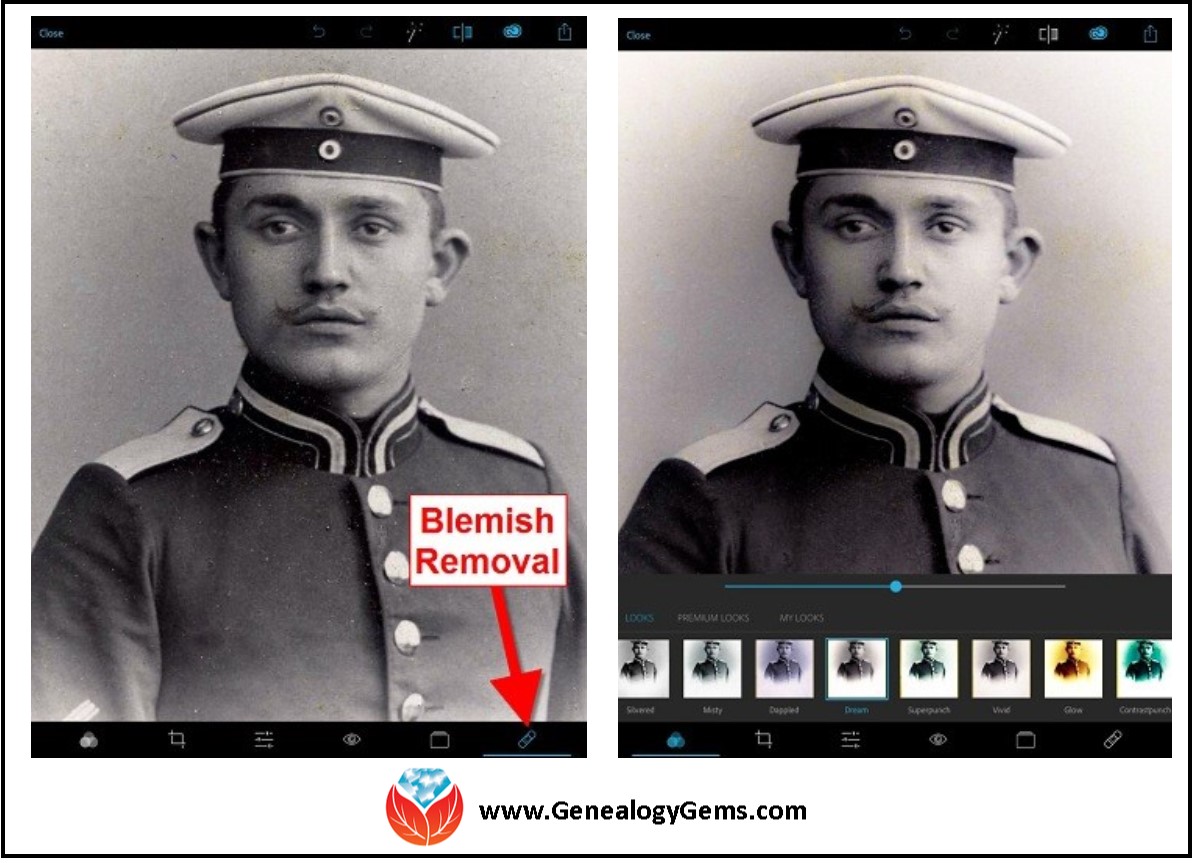
Above is a photo of Lisa’s great-grandfather. On the left is the original scan, and on the right is restoration with the Blemish Removal tool (the icon looks like a band-aid.) After the touch up, Lisa applied the Dream filter which provided a bit more clarity and softened the rough spots in the background. Dream is one of the many free “Looks” available in the app, in addition to “Premium Looks” filters that you can purchase. She loves the fact that if she finds a certain combination of filters is working well, she can save it under “My Looks.” This saves time in the future because with one tap, you can apply your own special mix.
Amie’s Favorite Photo Editing Software and Apps
Amie says:
“One of my favorite photo editing tools is Pixlr Express. It is easy to use without having to read through the ‘instructions.’ It is a web-based tool or a mobile app. It makes correcting and enhancing my old photos a breeze.”
Using Pixlr Express
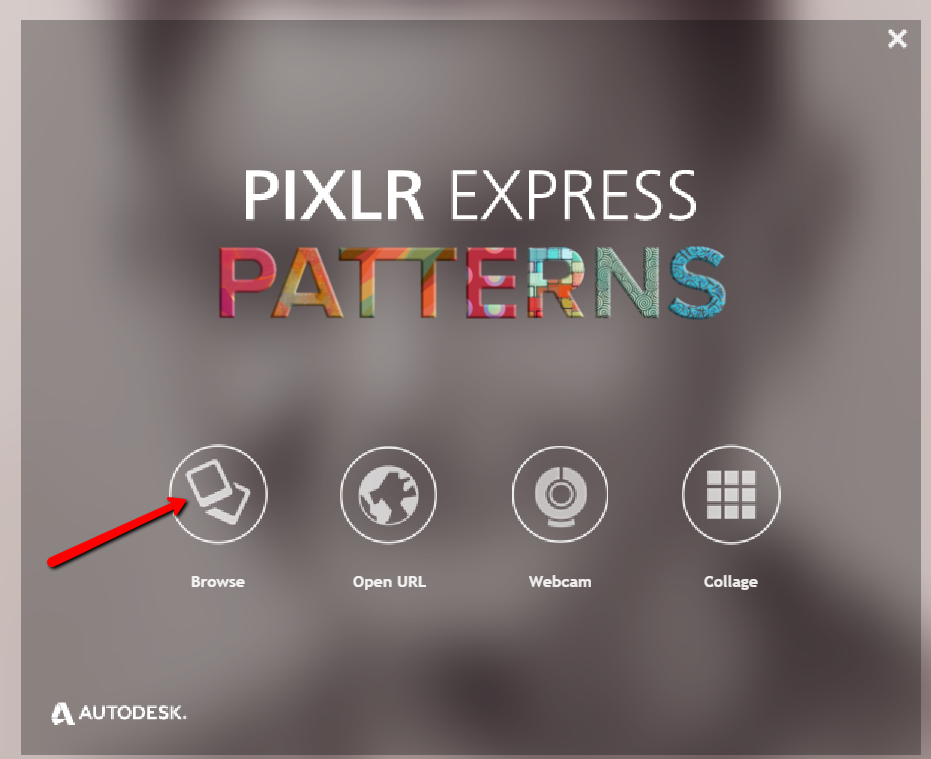
Pixlr Express is a web-based tool and a mobile app. Resize, rotate, filter, correct, and even add borders and text. Pixlr Express is free to use, which is always a plus. On your laptop, simply go to www.pixlr.com/express. Click on Browse.
Choose the photo you wish to edit. The example below is a cute little picture of Amie’s dad in the fourth grade.

It could use some more color definition, maybe a new border to clean up the edges, and a caption on the front so that when shared, others will know who it is. To begin doing these edits, first click Adjustment.
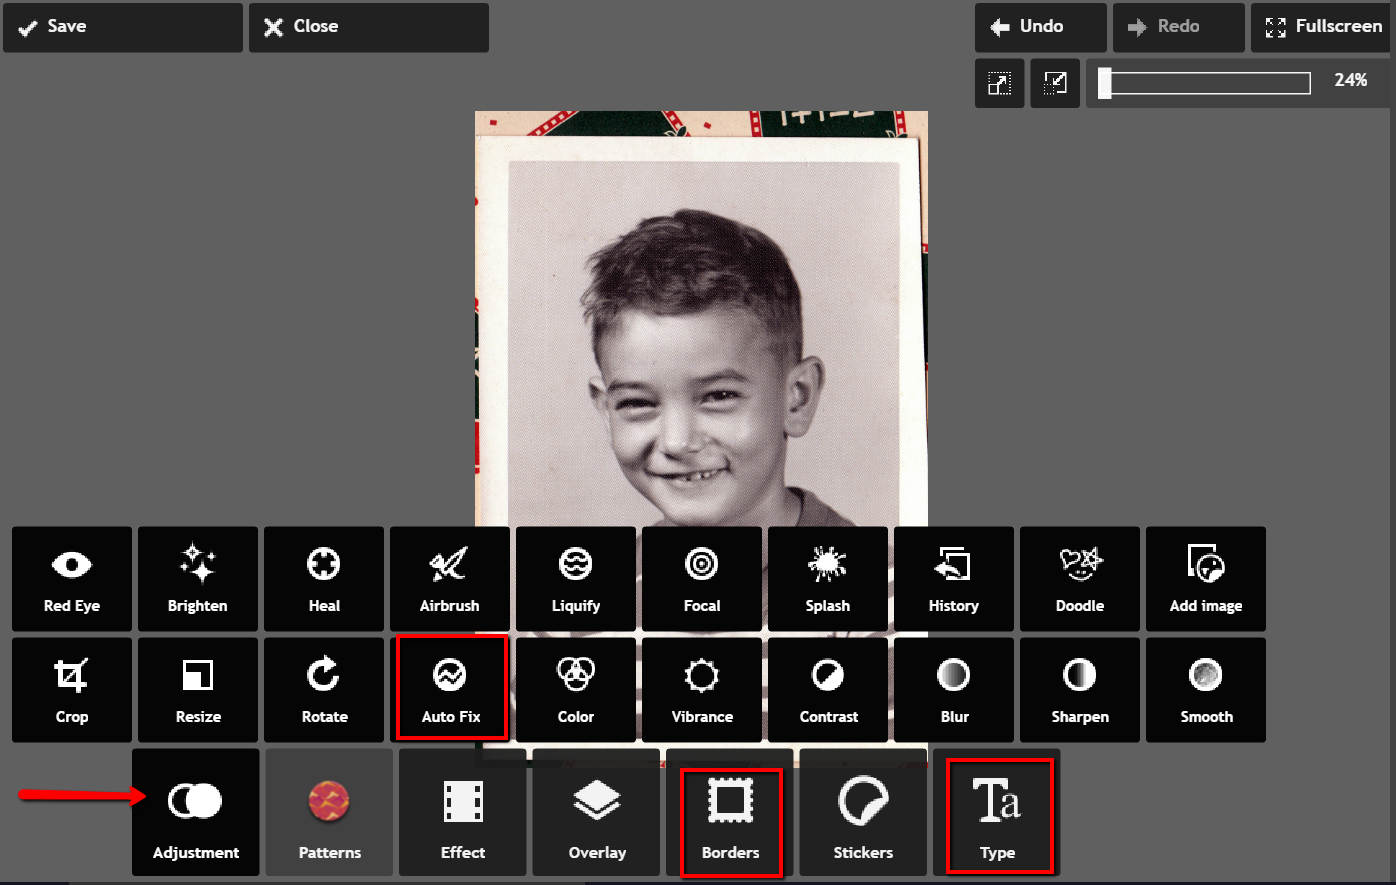
From the icons that pop-up, choose Auto Fix. It really looks great with just the click of one button! Add a fun border if you wish and click Type to add the text you want. Here’s the finished product in less than 3 minutes:
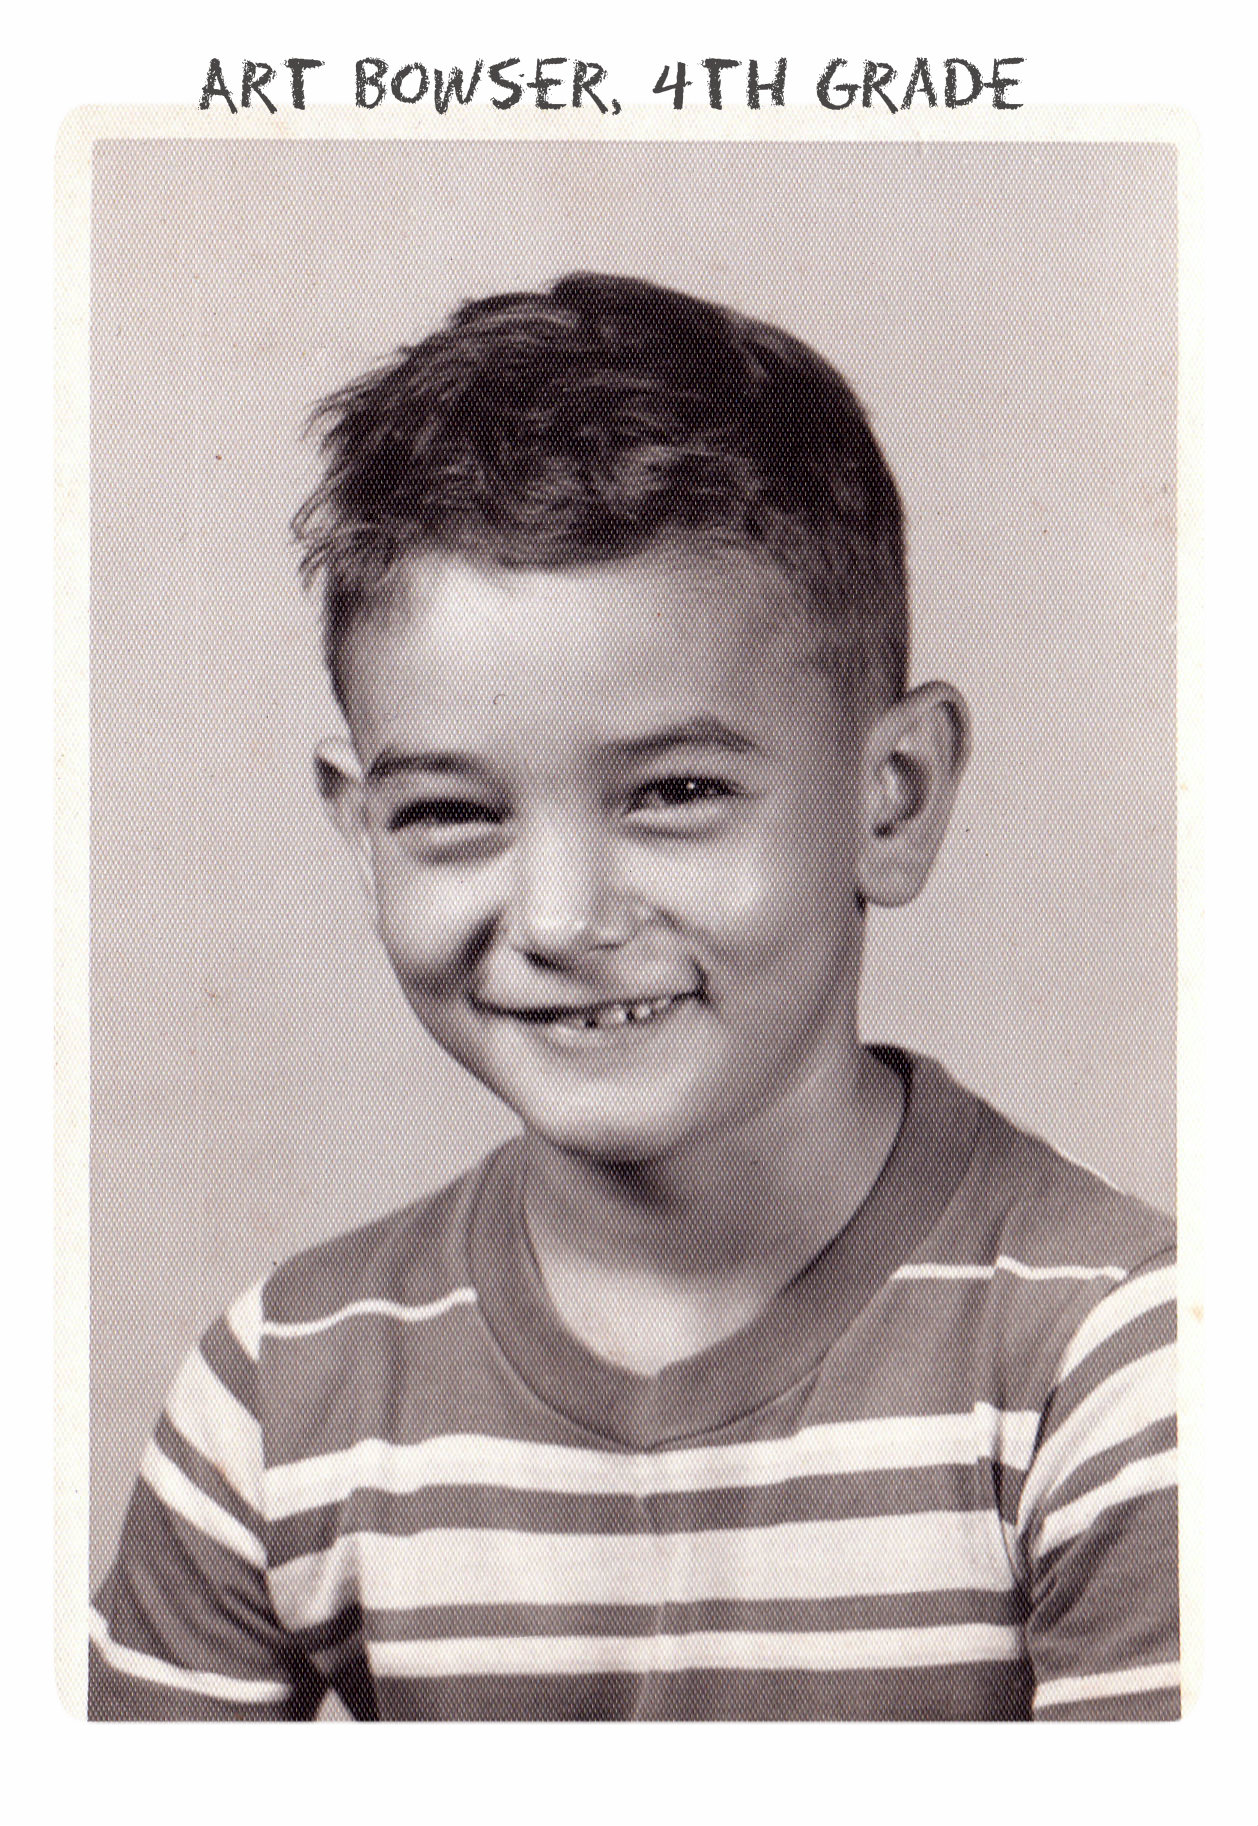 Don’t you just love it!
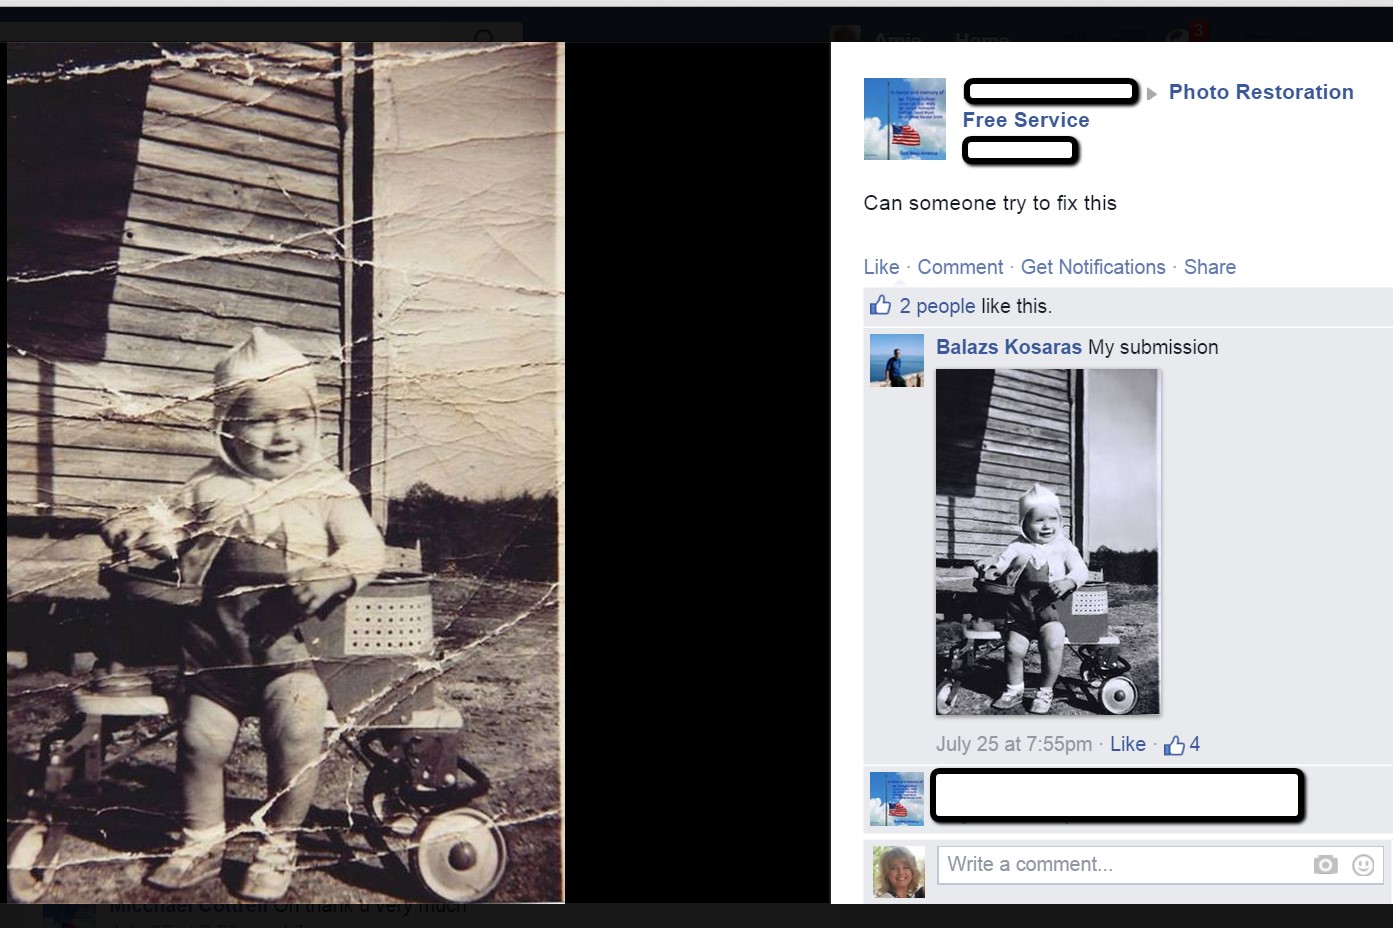
Enlisting the Help of Others
In some cases, our old photos are in seriously bad shape. We could pay to have a professional doctor it up, but I enlist the help of others at one of my favorite Facebook groups. Photo Restoration Free Service group on Facebook is dedicated to fixing images for free. Many of the people offering their talents are truly amazing. One man in particular caught my attention and gave me permission to use a before and after shot of his work. Thank you to Balazs and others who gave their permission for the before and after screenshot you see here.
What are your favorite photo editing apps? Do you use a different app for your mobile device? We’d love to hear from you and what you are doing to make the most of your treasured family photos. Please leave a comment in the comment section below.
Sunny’s Tips for Restoration of Digital Documents
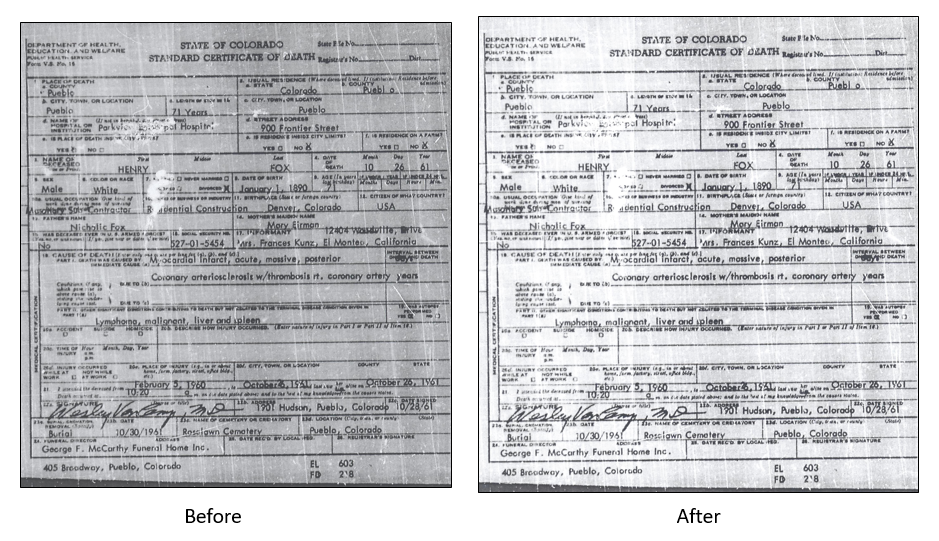
It’s not only the pictures of ancestors we sometimes need to restore, but it can also be those hard-to-read images of documents. When dealing with this problem, Sunny says:
“I do most editing on my laptop. This is where the nearest free software is and the default photo editor for Microsoft 2010. Most of the time, I just want to tweak the lighting: brighten up a scanned image or heighten the contrast in the image. To do this quickly, I open the image, then click Edit Pictures > Brightness and Contrast. In the Before/After images shown here, I just adjusted the midtones (+22) to make the gray areas lighter, then upped the contrast (+43).”
With so many photo editing apps available, it is hard to know what is going to work best for your needs. We hope that our experiences might help you to decide! We would love to see some of your before and after photos of a remarkable restoration. Will you share with us on our Facebook page? We’d love to hear from you!
More Gems on Photo Restoration and Preserving
“I Lost My Photos on My Phone!!” Here’s What You Need to Do
Tips for Digitizing Old Home Movies and Photographs
How to Use Google Image Search to Identify Old Photos on Smartphones and Tablets – Free Video
by Lisa Cooke | Sep 10, 2013 | 01 What's New

Listen to my Free Podcast in iTunes or at www.GenealogyGems.com
I always enjoy being a presenter at the cutting-edge Family Tree Magazine Virtual Genealogy Conference. This time around I’m teaching Best Apps for Genealogy! And today I am giving away one free virtual conference registration to a lucky Genealogy Gems reader. Read through the following article about the Virtual Genealogy Conference to learn how to enter. And do it today because you must be entered by midnight (Pacific) tonight Sept. 10:
8 Great Reasons to Attend a Virtual Genealogy Conference
Family Tree University’s Fall 2013 Virtual Conference Sept. 13-15 offers unique benefits
Have you ever missed a genealogy conference session you wanted to attend because the room was too full, or because the time conflicted with another session of interest? Or heard how great a session was after the fact, and lamented that you didn’t choose it?
That’s just one of the problems solved by Family Tree University’s Virtual Conferences. These three-day online workshops are the only genealogy conferences where attendees can completely customize the program to suit their schedule. Attendees can watch 16 pre-recorded 30-minute classes at any time, in any order they choose.
Attendees of the Winter 2013 Virtual Conference, Sept. 13-15, will enjoy the following unique benefits:
» All sessions can be downloaded for later viewing—allowing you to watch favorite sessions again or save certain classes to view after the conference ends, so you can make the most of the real-time interaction during the weekend.
» PDFs of the presentation slides from each class are available to download, too, eliminating the need to take copious notes or copy down website URLs.
» The conference takes place entirely online, allowing attendees ultimate flexibility for participating. It’s the only conference where you can show up at 2 a.m. in your pajamas if you want to! Log in anywhere you have a computer and an internet connection, from your favorite armchair to your favorite coffee shop. You can even squeeze in a live chat during Daughter’s soccer game.
» An FTU Virtual Conference also provides programming from nationally known genealogy presenters, including D. Joshua Taylor, Lisa Louise Cooke and many more. You don’t have to miss out if you can’t afford a hotel room or have physical limitations that make an in-person conference impractical.
The Virtual Conference also offers perks provided by in-person conferences:
» An exhibit hall with booths showcasing genealogy products and services
» A virtual swag bag of free downloadable genealogy goodies
» Daily contests for great genealogy prizes
» Opportunities to chat with and ask questions of experts, as well as make new friends of genealogy buffs just like you
To view the program and register for the Fall 2013 Virtual Conference, visit http://www.familytreeuniversity.com/virtual-conference (save 20% on registration with coupon code FTU0913 at checkout!). Enter my giveaway by sharing this blog post on Facebook or Twitter by midnight tonight with hashtag #GENEALOGYGEMS. You’ll find social media sharing buttons at the top of the post, or just copy and paste the URL address of this specific post (click the post title to be sure and grab the specific address) and include #GENEALOGYGEMS. The winner will be announced here on this blog on Wed. Sept. 11 and must email their contact information to me as instructed in the post. Good luck, and I hope to see you at the Virtual Conference!
No purchase necessary. Void where prohibited. Entries must be received by midnight Sept. 10, 2013 as directed.
by Lisa Cooke | Sep 3, 2016 | 01 What's New, Evernote, Mobile |
(UPDATED May 22, 2020.) Is your head swirling with questions such as Evernote vs. OneNote? Or are you wondering about free vs. paid accounts? These are common questions and I have some uncommon, but very effective, solutions for you! Here’s an email I received recently from a Genealogy Gems Premium member on just these questions and the solutions I dished up to answer them.
Sherri’s Dilemma and Questions
Sherri wrote in with a question I frequently receive:
“I have been a very satisfied Genealogy Gems Premium member for a few years now. Given the recent limitations on the free version of Evernote only to be used on two devices, how does OneNote compare to Evernote?
I use Evernote on my desktop PC, my laptop, my iPad, and my iPhone. Now, I have to choose which two devices to use it on (to stay with the free version.)
Sometimes I use my laptop and sometimes I use my iPad when I am out. Other times, I might be somewhere unexpectedly and only have my iPhone with me. And of course, most of my computing is done at home on my desktop PC so I must have it loaded there. What a dilemma!
Since I am on a limited fixed income, I can’t afford to pay to add devices for my notes. Luckily for me, I have only begun to get “addicted” to using Evernote and only have 224 notes so far. If I need to transfer to another application, it would be much easier to do it now rather than later.”
A short while later I received this follow up email from Sherri:
“Hi, Lisa. Me again.
I do listen to you, but sometimes I panic and scream for help before calming down and remembering your advice. LOL
I took your advice and searched YouTube for “Onenote vs Evernote.” I found a couple of very good videos by dottotech. His comparison videos are “Evernote vs OneNote – 5 Key Differences” and “Evernote vs OneNote Follow Up Q&A – ADT 28.” I was hoping he would compare the free version of Evernote with the free version of OneNote. He made a big deal out of the searching capabilities of Evernote over OneNote, but the new basic Evernote doesn’t search text in PDFs or in Office docs (per Evernote’s feature comparison). Also, you really have to rely on having really good tags [to find what you are looking for.]
The new Basic plan only OCRs text in images. That being the case, it seems the searching on text capabilities are better in OneNote, but the tag feature in Evernote makes it more robust. Too bad OnNote doesn’t have tags or keywords or something to categorize the notes. It does, however, have the ability for more notebooks and sub-notebooks than Evernote does and lets you organize like you would paper. That would be an attractive feature for many.
He did give me a good idea in his video. He suggested we keep the Evernote app on our mobile devices and use Evernote in the browser on our PCs and laptops. That just might work for me, but I don’t like Evernote’s user interface on the browser. I don’t know if I can work with it that way.
My biggest concern with OneNote, however, is that it uses OneDrive for the cloud syncing part. I received an email from Microsoft that on August 10 [2016], my free OneDrive storage will be reduced from 30 GB to 5 GB!
I spent a lot of time reducing my used storage to 4.4 GB. The biggest thing I use it for is to store the media files that my RootsMagic file links to so that I will have them available from my laptop or iPad. I also keep my RootsMagic family file in Dropbox so that the RM app will always have the most current data, rather than having to remember to copy it to Dropbox after each use.”
Evernote vs. OneNote
I totally feel your pain and understand your dilemma. In the last decade of tech in particular, the “freemium” model has been used by many online services (websites and apps). The intent is to get folks to try their service, and hopefully love it, so they will want to pay for richer features. After several years, the pressure is on to pay back investors and sometimes just simply stay afloat. It is then that the right to change the terms gets invoked. You cited two great examples: Evernote and OneDrive.
As a small business owner myself, I can appreciate the need to stay afloat so that you can continue to provide quality services to people who need them. That’s why, with my top favorites in tech, I take the plunge and pay for the upgrade in service if I possibly can. I figure that I’m helping them to keep doing what they are doing and I will reap the benefits. But, we all have our economic limits and sometimes we have to get more creative in order to continue using the services.
One of the first things to consider when choosing between Evernote and OneNote is each company’s focus. Evernote is in the business of cloud note-taking. It’s all they do, and all of their resources are invested in the Evernote product. By comparison, OneNote is just one small program under the massive Microsoft umbrella. Cloud note-taking is not their core business. So on the score of company focus, Evernote comes out ahead.
The next thing to consider is whether or not your are a very heavy user of Microsoft products such as Word, Excel, and other programs. If you use these heavily in your research and work, then you might want to go with OneNote since it is built to coordinate with those products. If not, then again Evernote would be my choice, particularly if I already had my notes in Evernote. The good news is that in everyday use, you typically can’t go wrong with either.
You touched on something that differentiates Evernote from OneNote. Evernote limits how much you can upload each month (free=60MB, Premium=10GB), but there is unlimited storage. OneNote is connected to OneDrive with a free limit of 5GB total storage. Currently, you can get 50GB for around $2/month. (Of course plans can change, so check their websites for the most current pricing and limits.) I believe it may also be possible to connect OneNote to another storage service if you so desire. So, the way that you create notes could help you with the decision. A heavy note-taker would probably be better off with Evernote Premium with tons of monthly uploads and no storage limits. However, a lighter note-taker would probably save money with OneNote and the free storage of OneDrive. Check the current storage offering by Microsoft and OneNote here.
Free vs. Paid
If after careful consideration you decide to throw all your notes into the Evernote basket, then there is a decision to make: free vs. paid, and if paid, which plan? I bit the bullet and bought the Premium service which falls price-wise between free and Business. I want Evernote to stay around and considering how important my genealogy research notes and all the other notes in my life are, $7.99 a month seems like a bargain. With the Premium service, you get unlimited devices and your monthly upload soars from 60 MB to 10 GB. You just bought yourself a lot less stress and a lot more freedom to research genealogy.
If you feel it’s in your best interest to stay with the free version of Evernote, then I’ve got some creative solutions for you:
Creative Solution #1:
I suggest in my lectures that you can use your two allowed devices for those you use most often. For me, that would be my desktop computer and my phone. For you, it may be your phone and your laptop.
Remember, you can always use the website app at www.evernote.com in any web browser, both on a computer or mobile device, to access your notes. It does not count toward your device allowance. Like you, I prefer the desktop software and app over the website version, but it does do the job.
We’ve got you covered on Evernote for Genealogy
Creative Solution #2:
If you have a tablet and a phone you may be tempted to make them your two free devices and then use the web version of Evernote on your home computer. However, while you may carry your tablet with you much of the time, you probably always carry your phone with you. With a two device limit, having both of your mobile devices be the primary devices using the app is pretty redundant and unnecessary. Instead, consider having your phone (which you always carry,) and your home computer or laptop (which you likely use a lot) be your primary devices.
If you don’t want to use your browser on your tablet, I have a solution for you straight out of my book Mobile Genealogy: How to Use Your Smartphone and Tablet for Family History Research. You can use the free Chrome Remote Desktop to remotely access and use your home computer from your tablet and smartphone. Get it here for Android, and here for Apple devices.
How to set up Chrome Remote Desktop access:
- Start on the computer that you are going to access remotely.
- Open the Chrome browser.
- Go to https://remotedesktop.google.com/
- Click the Get Started button and follow the instructions.
- Leave your computer one and connected to the internet. It’s OK if your computer goes to sleep when you’re not using it. When you remotely access it, it will “wake up.”
- After setting it up on your computer, download the Chrome Remote Desktop app on your tablet or phone from the app store.
- Connect the app to your home computer following the Chrome Remote Desktop instructions. (Your tablet will need to be connected to the internet for it to work.)
Now when you want to use the Evernote software on your home computer, you can gain remote access to it on your tablet using Chrome Remote Desktop. You’ll be able to do everything you want to do on the Evernote software from your tablet. You will also be able to access all of those notes later on your phone or through your tablet’s browser with evernote.com.
This handy solution is going to solve your challenge with the size of RootsMagic genealogy database files. Since you can now access your computer remotely with your tablet, there’s no reason to keep the file on OneDrive! (But please do be sure that your computer is backed up! I recommend and use Backblaze. Click here for more info on that.) You can now work directly on your RootsMagic software even from your tablet or smartphone. Isn’t technology fabulous?
I hope these ideas help you make the decision that is right for you and right for your family history. My personal goal, and our goal here at Genealogy Gems, is to help you succeed in the pursuit of your family history!
Resources
Book: Mobile Genealogy by Lisa Louise Cooke available at the Genealogy Gems Store.
Book by Lisa Louise Cooke
Video: Evernote for Genealogy: What It Is, & Why You Would Use It at the Genealogy Gems YouTube channel.
Genealogy Gems Premium Video Classes by Lisa Louise Cooke:

Members have access to hundreds of videos, downloadable handouts, and exclusive podcast episodes.
All of these videos are available to Genealogy Gems Premium Members. Sign up and gain access here.
