by Lisa Cooke | Jun 13, 2016 | 01 What's New, Adoption, Brick Wall, Health History, Trees |
 Use an “alternate family tree” to emphasize unique or interesting patterns in your family history, such as eye or hair color, birthplace, age at death, or adoption. Here’s how to do it–and WHY.
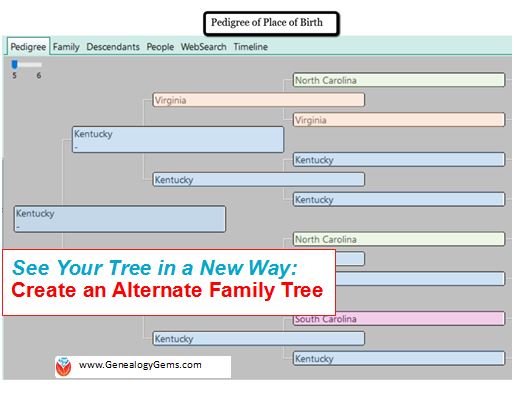
Alternate family trees are popping up all over social media and genealogy blogs. Have you seen them? Some trees emphasize the age at death, cause of death, or birthplace for each individual.
There can be tremendous value to creating trees like these. Recognizing patterns can help tear down brick walls. Imagine a pedigree chart with birth places instead of names. It’s a new way to see migration patterns. I also love the a-ha moments I have! For example, the time I realized my hair and eye coloring likely came from my maternal great-grandmother who I have a special connection with.
I can share these quick “did you know” revelations with my relatives on social media (totally shareable images!) or at family reunions. Images are often more powerful than words because they are easy to glance over. Your family won’t be able to resist taking a look, and most importantly, sharing your tree images with other family members. Shared images can generate new information when shared with the right relative. Hey, here’s an idea: you could even blow up your alternate family tree to poster size for the next family reunion!
Take a look at these examples of my own alternate family trees for age at death (left) and birthplace (right).
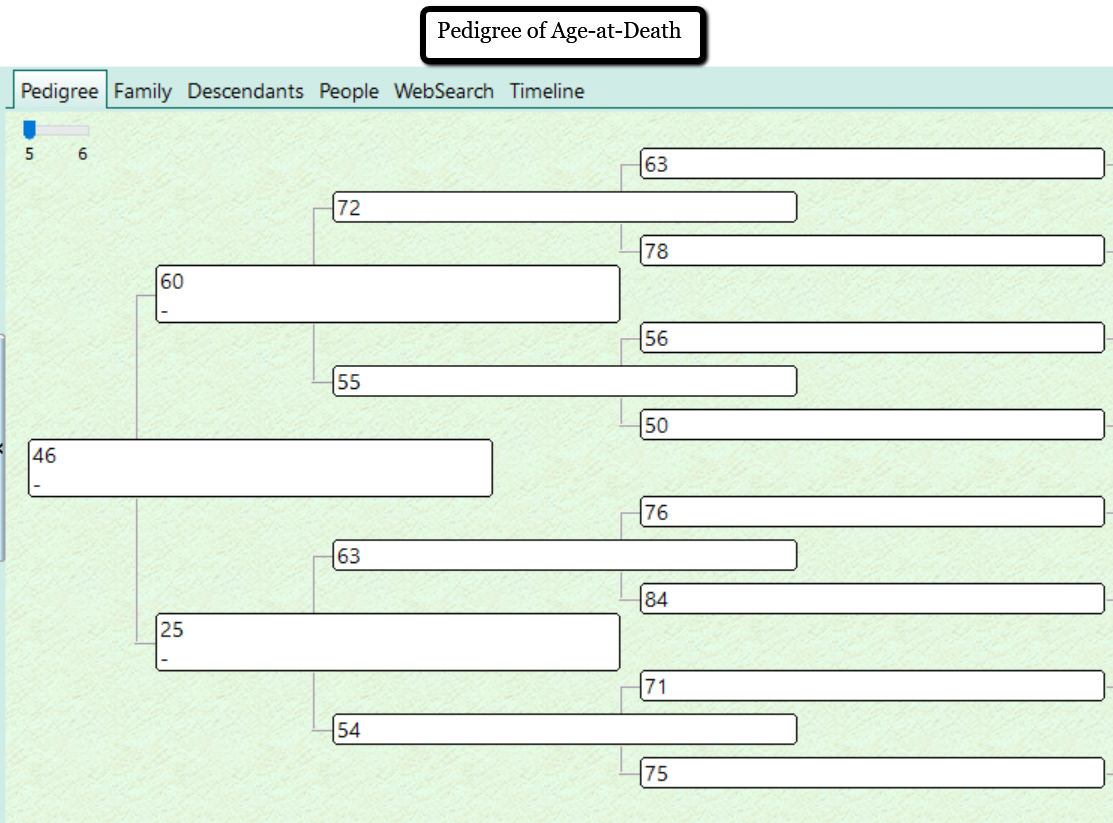
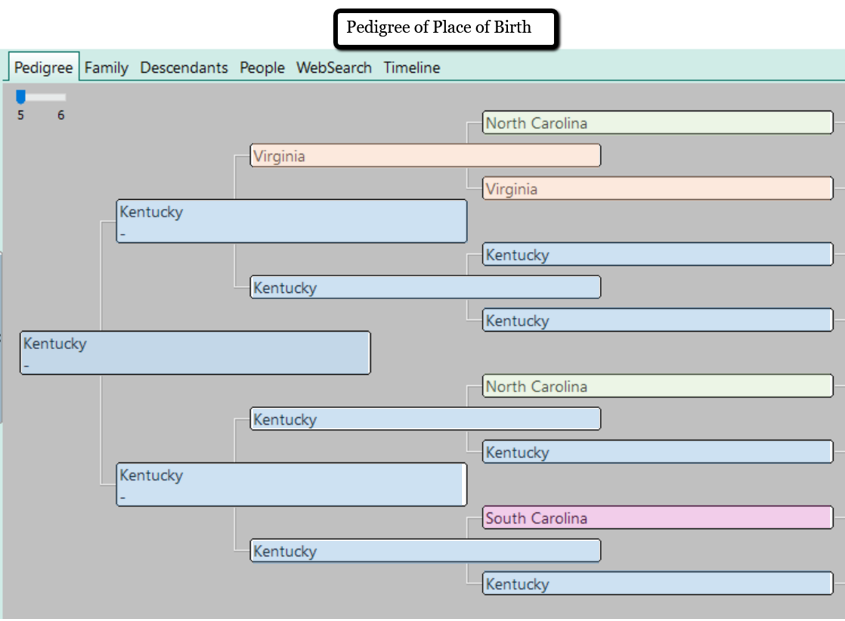
Other alternate family trees may focus on occupations, schooling, or color of eyes or hair.
I was inspired to create an alternate family tree that had significance to my own immediate family. We have a lot of adoption in our family tree. My three children are adopted, my husband is adopted, and several of my great-grandparents were raised by other family members. This is a unique perspective. Blood lines are important, but even more important are those people who influenced my family the most as caregivers.
I created a pedigree that indicates who, if anyone, the father and mother figures were. Take a look:
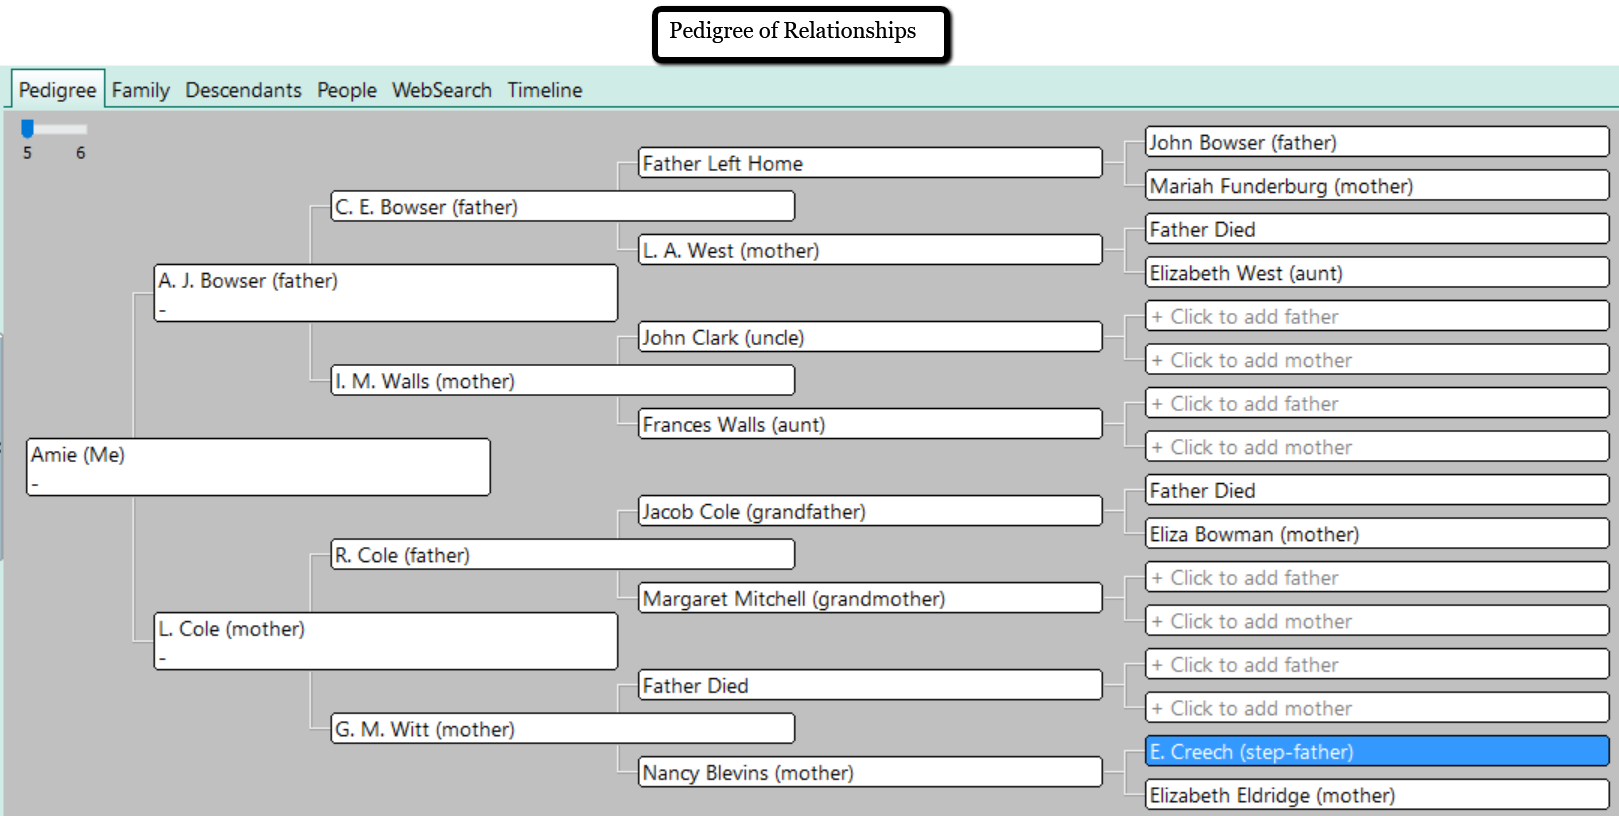
Did you notice that every set of my great-grandparents had one or more parent die or abandon them? I was shocked to see this significant ancestral dynamic. I had never considered the likely effect of such a family tree. It was fascinating!
How to Create an Alternate Family Tree
The easiest way to create an alternate family tree is to use a genealogy software program. I use RootsMagic. RootsMagic is a genealogy software program for PC and Mac computers. (Note: To use RootsMagic on your Mac computer, you will need to use the MacBridge add-on.) You can purchase the full version of RootsMagic for $29.95 or you can use the RootsMagic Essentials for free!
There are two ways to make an alternate family tree using RootsMagic. You can start from scratch or use the wall chart report.
Starting from Scratch
To start a new pedigree:
- click the “blank sheet of paper” icon at the top left. Name your tree with a title that will indicate its purpose. (Example: Age-at-Death Tree)
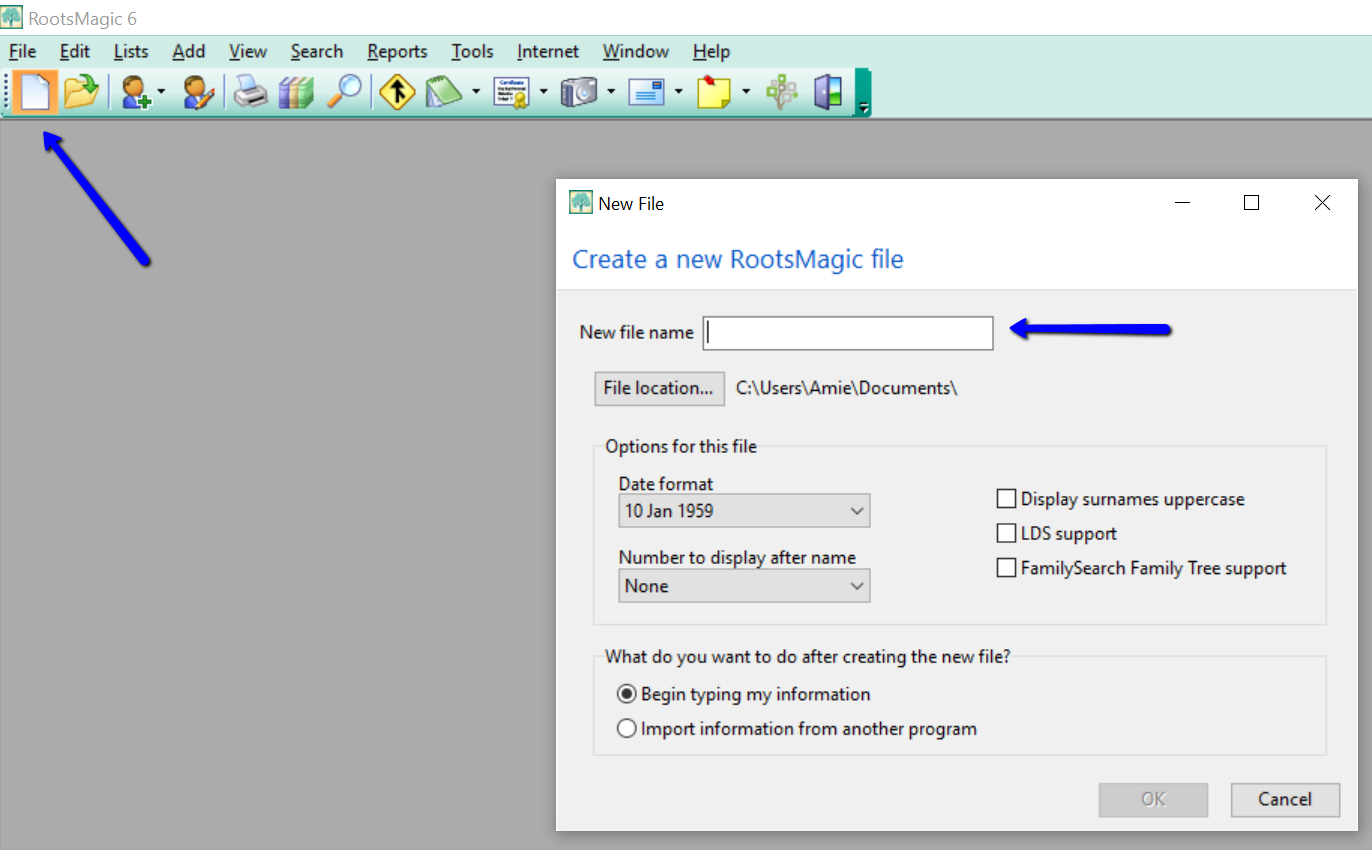
- Instead of using the names of your ancestors, use whatever alternate pieces of information you wish in the name fields.
- Now, you simply click “Reports” across the top and choose “Pedigree.” You can generate the report and print out your new alternate tree.
Using an Existing Tree
If you already have your tree on RootsMagic, you can use the Wall Chart feature to create trees with unique data.
As an example, if I wanted to create an occupation family tree, I would first need to enter that data for each person by clicking on the individual and then “Add a Fact.” From the drop-down list, choose “occupation.” Type in the occupation in the description field at the right and click “Save.”
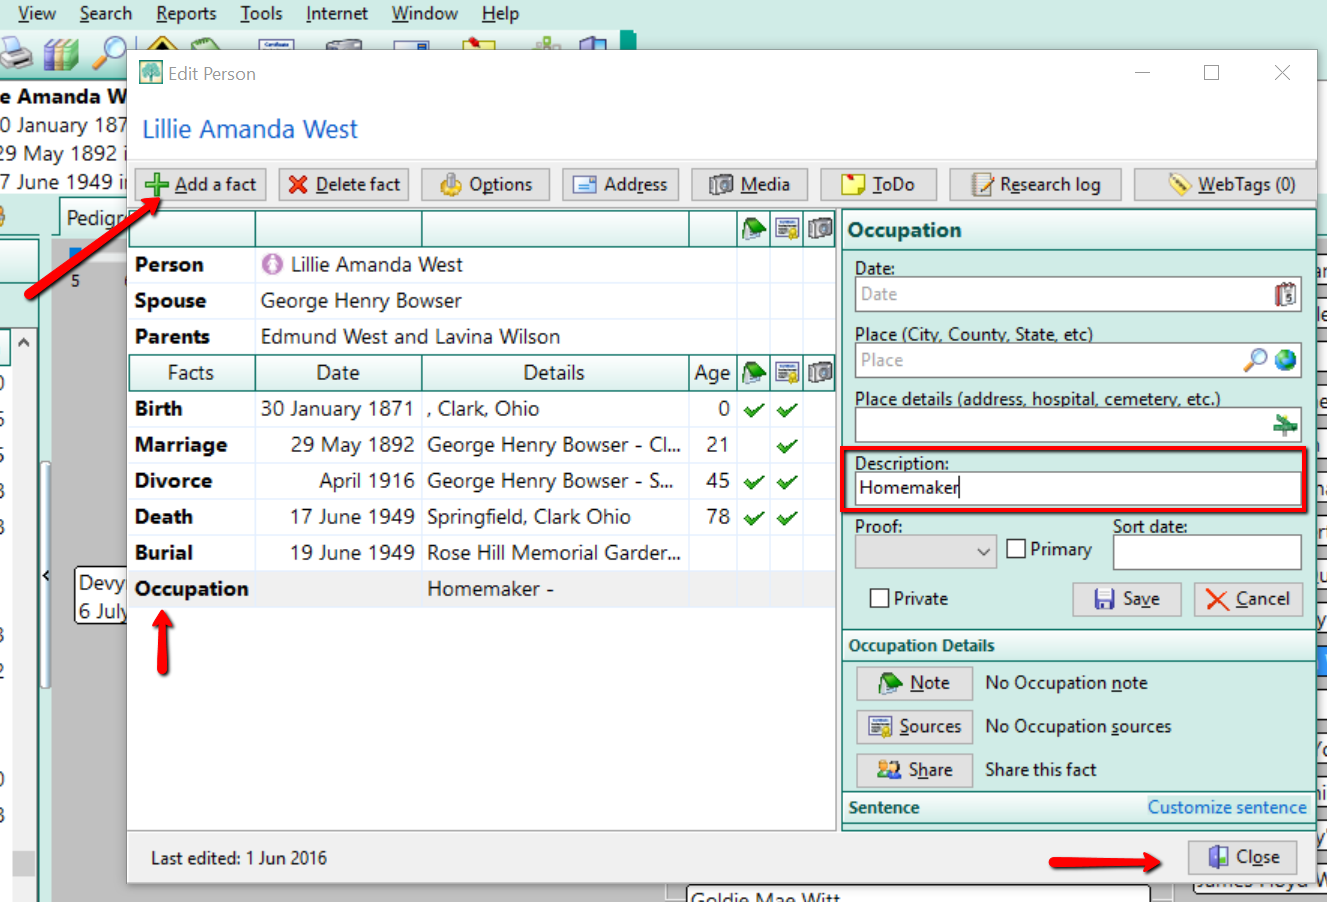
Add the occupation to each individual and when you are ready to print your alternate family tree, simply take the following steps in the image below.
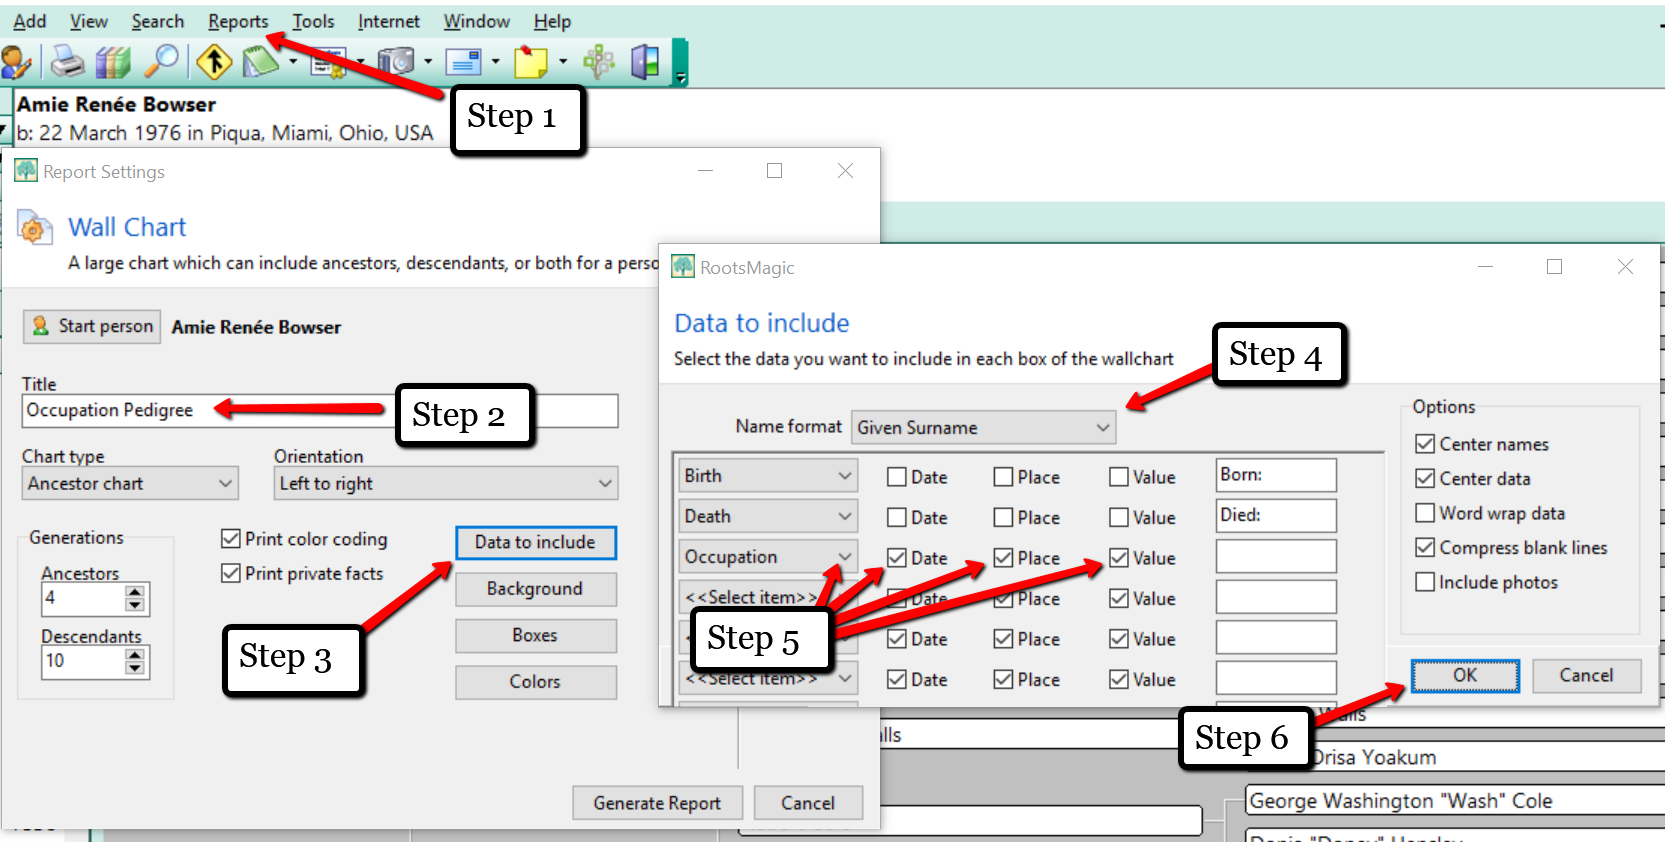
After taking these six steps, it is time to “Generate Report.” You will be taken to a new screen where you will see your creation.
Once you have completed your alternate tree, it’s a great idea to print it and lay it out in front of you. You might ask yourself, “What does this information tell me?” The interpretation of the data will be unique for everyone. Maybe your “Cause of Death Tree” will make you think, “Oh no! I should really be watching my heart health!”
I hope that you will take the opportunity to create an alternate family tree or two today. Genealogy Gems Premium website members who like this idea will also want to listen to Genealogy Gems Podcast #136, due out later this month. In that episode, Your DNA Guide Diahan Southard goes in depth on the value of gathering family health history.
How does this view of your family tree make you feel?
We love to hear from you so leave your feelings or comments below,
and please feel free to share your alternate family tree on our Facebook page!
More Family Tree and RootsMagic Gems
by Lisa Cooke | Nov 29, 2017 | 01 What's New, Ancestry, DNA
A new AncestryDNA opt-out option allows DNA test takers to not participate in DNA match lists: they do not receive matches or show up in others’ match lists. Your DNA Guide Diahan Southard weighs on in the implications for genealogy researchers who may worry about cousin matches they may miss.
New AncestryDNA Opt-Out Policy
 Ancestry.com recently announced an update to their privacy policy. Current and future AncestryDNA users now have the option to opt out of the DNA matching feature.
When you take a DNA test, you receive two different kinds of results from the DNA sample that you submit to your testing company:
- information about your ancestral origins and
- a list of your DNA cousins.
Opting out of matching essentially cuts the value of this product in half. You only get the ancestral origin information, and you forfeit access to your list of genetic matches. Opting out doesn’t just mean you can’t see them: it means that they can’t see you either.
AncestryDNA joins 23andMe in providing this option to their clients. You can look at this move as Ancestry’s response to an ever-expanding global audience, many of whom are not genealogists or are reluctant to have their DNA compared to others for a variety of reasons. It is important for them as a company to provide options for their clients to experience their product in a way that works best for them.
What the AncestryDNA Opt-Out Policy May Mean for You
 What does this new opt-out option mean for genealogists? Hopefully, not much will change. Ancestry reports that overwhelmingly, people are opting in.
There has been quite a bit of push-back to this announcement, especially from the adoption community. DNA testing has been a tremendous source of information for those seeking out their biological relatives, and many fear that this change will limit access to quality DNA matches. But we will all still be able to do good genetic genealogy work, even as we are each allowed to choose whether to participate in the matching feature. To understand this better, it is important to see this issue from the other side, from the side of a person who might want to opt out. Here are two possible scenarios:
Scenario #1: Susan would really like to explore her heritage. She hasn’t tested before because she didn’t want to see cousin matches for a variety of personal reasons. But now she does test and opts-out. The community hasn’t lost anything because Susan would never have tested in the first place. But after exploring her ethnicity results and noticing membership in a couple of Genetic Communities, she begins to wonder more about her ancestors and decides to opt-in to matching, after all. In this scenario, the Opt-Out policy offers users a way to comfortably give DNA testing a try.
Scenario #2: Ryan heard about AncestryDNA while watching TV last year and ordered a kit. But then last week he heard about the ability to opt out, and went in and changed his account settings. So one day you could see Ryan on your match list, and the next you didn’t. We as a community would certainly see that as a loss. However, consider the circumstances that might have caused Ryan to hit that opt-out button. Perhaps Ryan had no idea how to use the match list, no interest in using it, and found it a bother to get correspondence from people. Perhaps Ryan found something unexpected, like that he wasn’t his father’s child, and he needed some time to deal with it. Maybe Ryan is under pressure from his sister, who didn’t want him to test in the first place (perhaps she knows something he doesn’t about their family tree, or she’s afraid of how any results and revelations might impact her). The short of it is: It doesn’t matter why Ryan opted out, it is his personal right to do so. Just as an adoptee has the right to seek out their heritage, others have the right to keep their family secrets to themselves. This scenario does support the idea that you should review your DNA matches frequently and record information about them in your own master match list, which I talk about in my quick reference guides, Organizing Your DNA Matches and Breaking Down Brick Walls with DNA. By promptly recording matching results, you will have them to work with even if the tester decides later on down the road to opt out.
As a genealogy community, we can educate others about the value of the match list, while at the same time cautioning them that unexpected connections may appear. So in everyday conversations, share your own experiences—whatever these may be. Maybe it was affirming for you to see that the dad you grew up knowing is indeed your biological father. Perhaps you can share a story about the power of using a list of fourth cousins to discover information about your third-great-grandfather. Maybe you’ve discovered a new connection—and maybe that connection isn’t yet comfortable or fully explained, but you’re glad to know about it.
Learn More about AncestryDNA Testing
Get the most out of your AncestryDNA testing experience with my quick reference guides! I recommend:
- A Guide to AncestryDNA How to find your best DNA matches, interpret ethnicity results, link your tree, understand relationship ranges and DNA Circles, and work with Shaky Leaf hints.
- Autosomal DNA for the Genealogist. What autosomal test can tell you, who can be tested, how to interpret your ethnicity results, and more.
- Organizing Your DNA Matches. How to keep track of your matches and apply what you learn from them to your family history.
- Breaking Down Brick Walls with DNA. What to do next to maximize the power of DNA testing in genealogy. Take your DNA testing experience to the next level and make new discoveries about your ancestors and heritage!
Disclosure: This article contains affiliate links and Genealogy Gems will be compensated if you make a purchase after clicking on these links (at no additional cost to you). Thank you for supporting Genealogy Gems!
by Lisa Cooke | Apr 12, 2017 | 01 What's New, Heirloom
Some of us are using heirloom research for genealogy. A new exhibit traces the history of interesting heirlooms using genealogical research strategies. Be inspired by these examples and tips to research heirlooms and more fully discover their stories.
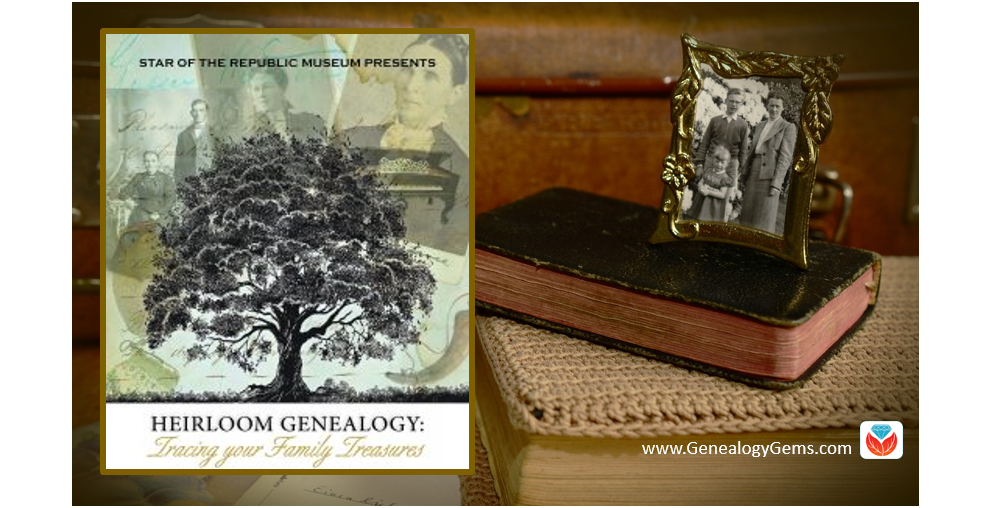
A new exhibit called Heirloom Genealogy: Tracing your Family Treasures has opened at The Star of the Republic Museum in Texas. You better believe it caught our interest! We know our readers are looking for unique and different ways to continue their genealogy journeys. We wanted to find out more about how family historians are using heirloom research for genealogy. Curator Shawn Carlson was kind enough to answer some questions about it and share the touching stories the heirlooms held.
Q: What an unusual exhibit idea! How did you think of it?
A: I had been researching artifacts at the museum for several years by tracing the genealogy of the families who donated the artifacts. The best exhibit text usually comes from real stories about artifacts—and doing the genealogy was where I found the stories. When I started thinking about this latest exhibit, I thought maybe there was a way that I could use the genealogical research I already had, and that’s when I came up with the idea of “heirloom genealogy.”
Q: Who was involved in the research and how long did it take?
A: I did all of the research. Some of it had previously been done, but some was new. I usually spend the summer researching for an exhibit, and then write the text and begin production in the fall for a March opening during the Texas Independence Day celebration at Washington-on-the-Brazos.
 Q: Can you share a couple of examples and images of artifacts and the documents that told their stories?
A: One of the artifacts I researched was a red-on-white appliqué quilt. It was made in 1805 in Vermont and donated by the quiltmaker’s 3X great-granddaughter who lived in Houston. It should have been easy to figure out the lineage by the inscription on the quilt—but it wasn’t. There were two Cynthia Tuckers and two Pearl Browns in the family and one quilt owner had been married a couple of times and used a nickname. So, it took a bit of sorting out. The research was all done using census data, but it all came back to the inscription on the quilt for final verification.

Another item in our collection is a small buckskin suit that belonged to a little boy named Edward Clark Boylan. He was born in New Orleans in 1840 and died three years later near Galveston, probably from yellow fever. We knew his birth and death dates from his sister’s descendant who donated the suit, but not much else. I found some cryptic notes in our files taken by a previous curator and was able to trace Edward to Captain James Boylan who was captain of the ship Brutus during the Texas Revolution.
I found a passenger list from 1839 with Captain Boylan, his wife, and daughter traveling from Puerto Rico to New York. Mrs. Boylan would have been pregnant with Edward during that voyage:

The year that Edward died, his father was mentioned frequently in the newspapers as he led a flotilla of ships out of Campeche. He was probably not present when little Edward died.
Q: What was an especially interesting story you came across while researching this exhibition?
A: One of the most interesting items we’ve received in recent years is a slave birth record that was part of a family collection:

The donor’s ancestors were early settlers of Washington County. The slave record was interesting because it listed birth dates from 1832 to 1865. Out of curiosity, I tried tracking some of the slaves to see if I could find living descendants. I started with the 1870 census—looking for African-Americans with the surname of the plantation owner and first names that matched the slaves in the birth record. I was able to follow through on one of the names to find a living descendant. She and her family came to visit the museum and see the birth record of their ancestor. While the family was visiting during last year’s Texas Independence Day celebration, the donor of the slave record also visited the museum and the two families were able to meet.
Q: What advice do you have for family historians with heirlooms?
A: Learn about the artifacts you have and match them to their owners. There is plenty of information online that will help you identify and date artifacts. Knowing the date of an artifact helps you determine who had it in the past.
More on Heirloom Research for Genealogy
 Connect your heirlooms with their stories and bring the past to life!
Get Denise Levenick’s popular book How to Archive Family Keepsakes: Learn How to Preserve Family Photos, Memorabilia and Genealogy Records. This book will help you sort, identify, and preserve your own treasured family artifacts and memorabilia.
Disclosure: This article contains affiliate links and Genealogy Gems will be compensated if you make a purchase after clicking on these links (at no additional cost to you). Thank you for supporting Genealogy Gems!
by Diahan Southard | Nov 2, 2015 | 01 What's New, British, Census, Findmypast, Records & databases
The 1939 Register–the most comprehensive population survey EVER of England and Wales known–is finally searchable online!
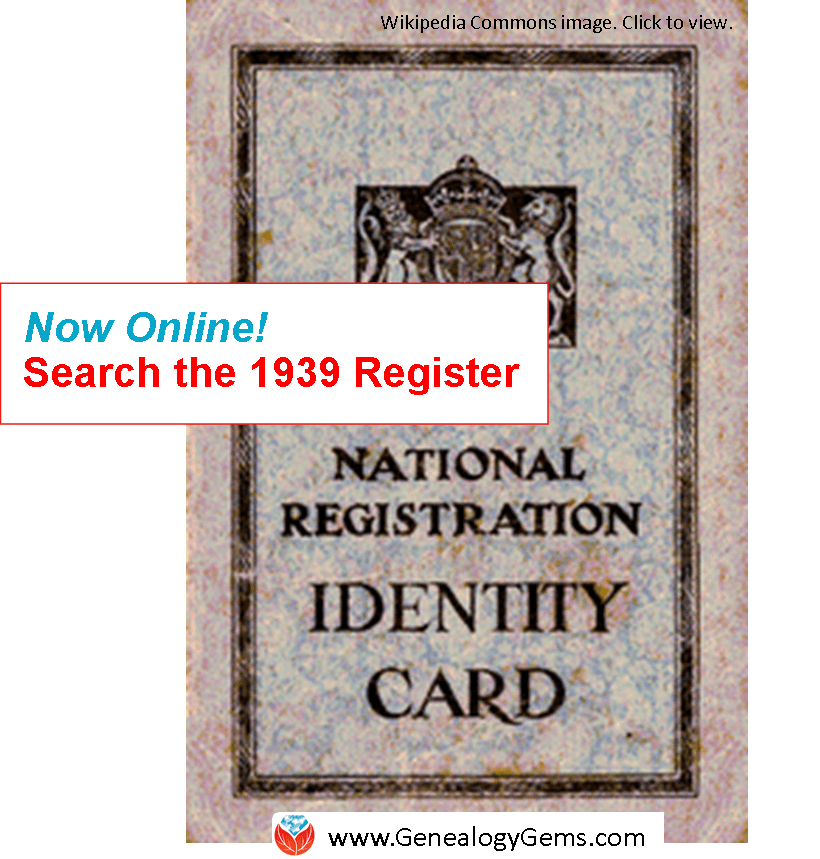
Today FindMyPast, in association with the U.K.’s National Archive, has launched a digitized, searchable version of the 1939 Register. This major record set fills a major gap at a pivotal time in history.
“Anyone can now discover their family, their home and their community on the eve of WWII,” states a FindMyPast release. “Until now, the most recent information available was the 1911 census. Owing to the 100 year rule, the 1921 census will not be released until 2022, while the 1931 census was destroyed in the war and the 1941 census was never taken. The 1939 Register therefore bridges an important 30-year gap in history.”
“In September 1939, WWII had just broken out,” explains Findmypast. “65,000 enumerators were employed to visit every house in England and Wales to take stock of the civil population. The information that they recorded was used to issue Identity Cards, plan mass evacuations, establish rationing and co-ordinate other war-time provisions….
“Each record includes the names of inhabitants at each address, their date of birth, marital status and occupation….Comprising 1.2 million pages in 7,000 volumes and documenting the lives of 41 million people, the 1939 Register opens a window to a world on the brink of cataclysmic change.” Some of the records even include changes made clear up to 1991.
Additionally, Findmypast has added unique period photographs, infographics, regional newspaper articles and maps “personally tailored to each record.” They are promoting a “rich and unique user experience unrivaled by any other family history research tool to date.”
What about privacy concerns? This is a relatively recent record set: more recent than national censuses that DO have privacy restrictions on them. About 28 million records have been cleared of privacy restrictions. The remainder will remain temporary closed, “either because the individual recorded is still living and less than 100 years old or proof of death has not been verified….The Register will be updated weekly….Records will also be opened as people reach the age of 100 years+1 day.”
Interestingly, it appears individuals may have the ability to show proof of death to have records released: “Findmypast, working with The National Archives, will have an ongoing process to identify records which can be opened on proof of death provided either by matching against robust data sets or supplied by users.”
The Register is free to search on Findmypast. Charges apply to view the records, with discounts for subscribers and pay-per-view packages starting at £6.95.
More Research Gems for English Genealogy
by Lisa Cooke | Nov 26, 2019 | 01 What's New, Photographs |
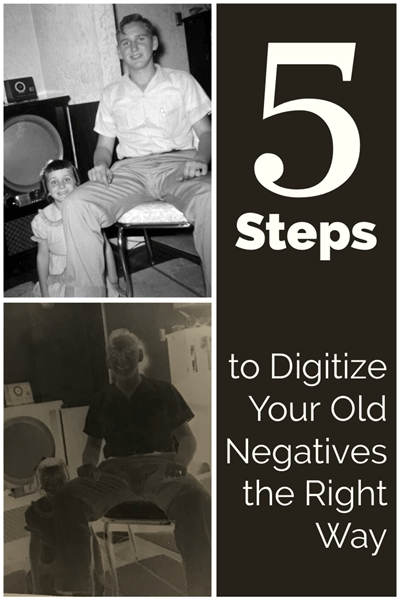
Do you have old family photo negatives in your closet? You may be wondering, “can I still get my old negatives printed into photos? What should I do with these old negatives?” To answer questions like these, we’ll need to think through your goals, budget and resources. Follow these 5 steps to digitizing old negatives and soon you may be looking at your family history in a new way!
Don’t Let Your Old Negatives Languish Like I Did
Having just gone through the process of getting my old family negatives digitized, I’m excited to share with you what I learned along the way.
In my case, I inherited photos and negatives from my paternal grandmother. I’m embarrassed to say how long they’ve been languishing in the guest room closet.
After having amazing success getting my maternal grandmother’s old home movies digitized (you can read more about that and listen to the podcast episode here), I became determined to finally address these items. It was time to see just what these negatives were and get them digitized and preserved. I couldn’t be happier that I did!
Here’s just one example of the negatives. This one is actually two photos in a medium size format. Though I’ve never seen these images before, I was pretty sure that the bottom picture was my dad and his little sister in the 1950s.
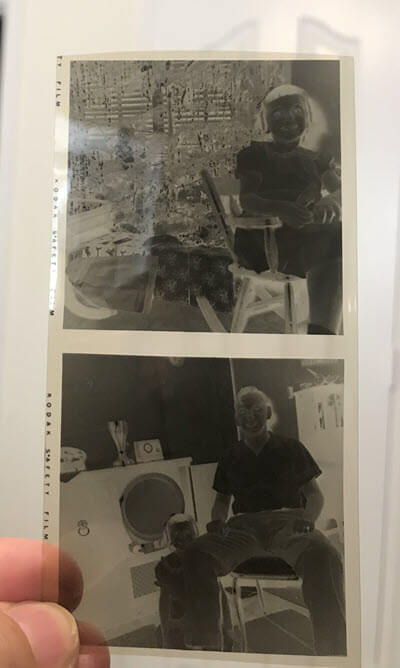
After professional scanning, I can fully enjoy this image:
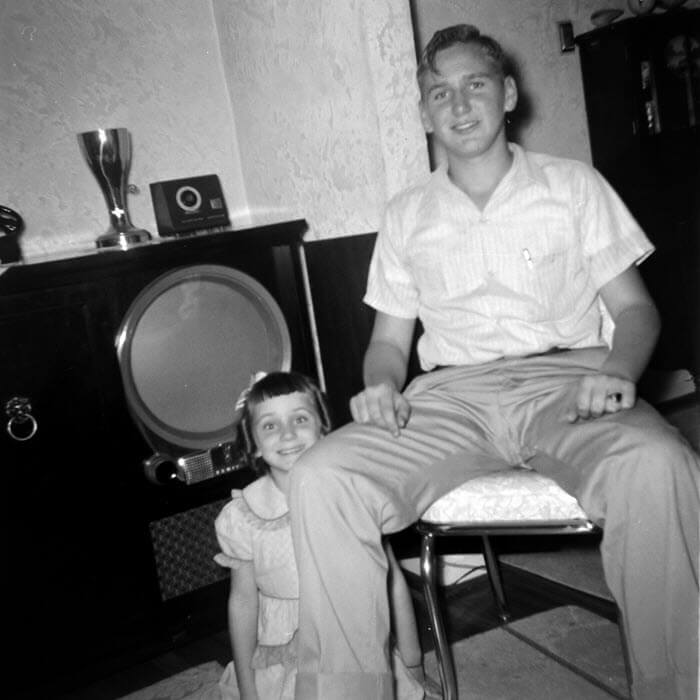
Getting these photos digitized has given me the opportunity to collect so many more family stories, like the one my Dad told me about the photo above when I emailed it to him:
“That was our FIRST TV, my mom had to have the large cabinet, I’m sure you understand that. Black and white only of course. I was about 12 years old, so that’s about 1951. First TV I ever saw was when my dad took me to his friend’s house and we watched wrestling. We got one not long after that. The first kids program I recall was Howdy Doody.”
Are you ready to finally digitize your old negatives? Here are my 5 Steps to Digitizing Your Old Negatives:
1. Consider Your Budget Before Digitizing Old Negatives
If you’re on a limited budget, you might be tempted to just do the scanning yourself with a home desktop scanner. While that may sound like a cost-effective option, it may turn out to be problematic in the long run. Here are several reasons why:
Home film scanners are an investment.
If you have an older scanner, it may not be suited to digitizing negatives. This means you’ll need to invest in a new flatbed scanner. While these days scanners like mine (the Epson Perfection V600) can scan film as well as documents, you still may not get the clarity and quality a professional service can deliver.
Scan quality can vary.
Scanning on your own puts your images at risk for being unclear. It can also be difficult to get them to a high enough resolution that they can be enlarged beyond their original size.
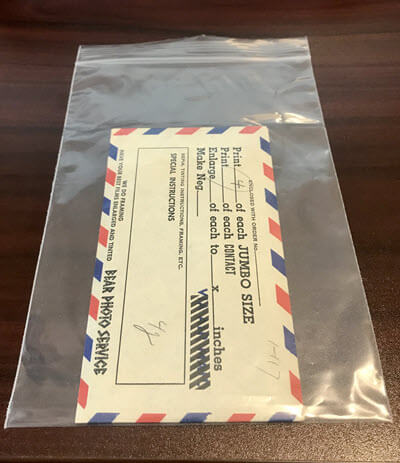
Negatives should be scanned between 1500-4000 dpi, with 4000 being optimum. Professional services like the one I used can reach these numbers, but it’s very important to ask exactly what the output will be when ordering. I get all my negatives digitized by Larsen Digital where I can select the desired scan size and I know I’ll consistently get the highest quality scan possible. Visit Larsen Digital here where you’ll also find their latest discounts exclusive to Genealogy Gems readers. For a limited time negatives are discounted with the coupon code: GenGem.
Digitizing negatives can be deceivingly time consuming.
Time spent carefully scanning is time not spent doing other things you love. And digitizing your negatives can only go as fast as your scanner can scan. Confirm the scanning time of any scanner you’re considering using and evaluate the quantity of negatives you have.
In my case, I have a fair number of negatives of various ages and sizes. Once they are digitized I don’t anticipate that I’ll have a need to scan more negatives in the future. Therefore buying a new scanner and dedicating desk space to it was not appealing.
Since my negatives were old family photos, I wanted to ensure that they were done right, so I opted for professional digitizing. In the end the financial investment was about the same. However professional scanning won hands down when it came to the quality of the scans and the time and space I saved. I would rather spend time researching my ancestors than scanning their negatives!
Keep reading because our next steps will help you keep your costs down while still getting your negatives professionally digitized.
2. Make Three Piles to Separate Your Negatives
Since we want to get our negatives digitized in the most cost-effective way it’s important to take a moment to identify which negatives are worth digitizing. We’re going to sort our negatives into three piles:
Pile #1: Digitize
These are the negatives you are going to send to the professional scanning service.
Pile #2: Archive
These are the negatives you want to keep, but don’t plan to digitize.
Pile #3: Throw / Give Away
These are the negatives not worth keeping. (Yes, there are some you don’t need to keep!) It certainly couldn’t hurt to send out an email blast to your family members to see if anyone is interested in keeping them. If not, toss!
As you can see, not all negatives are alike. So let’s head to step three and let’s start sorting in a discerning way.
3. Determine if You Already Have Photographic Prints of Your Negatives
Since digitizing photographs is generally less expensive than digitizing negatives, you will want to check to see if you already have a photo printed from the negative. This means it’s time to take a closer look at your negatives.
Here are just a few easy and low-cost options for viewing your negatives:
Do it the old-fashioned way.
Hold the negative up to a lamp.
Use your phone or tablet.
Here are two simple options:
1) Turn on your phone’s flashlight feature and then turn your phone around to face you and hold the negative in front of it.
2) Use a free app to turn your phone’s screen into a light box.
I downloaded the free Screen Light to my iPhone which is also available on Android. Open the app and adjust the setting to maximum “White” and “Light.” You can then hold your negative in front of it or even lay it on the screen.
I reviewed my pile which included negatives from my own family as well as the ones my grandmother gave me. I knew I had prints of all the color negative strips of the family I raised. In fact, in many cases I had double prints! (Remember the days of the double print developing?)
In the case of the negatives I inherited from my grandmother, I wasn’t so sure that I had photos of everything. The photos were probably printed when the negatives were developed, but I didn’t necessarily inherit all of the photos.
I carefully combed through my collection, making sure that I didn’t lose the context of the order in which they came to me. I knew there was a good chance that they may have been at least somewhat in chronological order. That can be valuable information when it comes time for labeling the digitized files.
Consider purchasing some acid-free negative sleeves or envelopes like these so that you not only have a place to safely store them but you can also make notes about important details you notice and whether or not you have prints, etc. (Disclosure: We include affiliate links in our posts for the products we suggest. The compensation we receive if you make a purchase helps support articles like this one and the free Genealogy Gems Podcast. Thank you!)
In the end you will have a pile of negatives that you do have prints of, and a pile that you do not.
4. Select the Best Negatives and Photos to be Scanned
Now that you have reviewed your negatives, let’s make decisions about which negatives and photos will be scanned.
If you do have a photograph of the negative:
Determine if the photo is in better condition than the negative for digitizing. Again, photos are usually less expensive to digitize than negatives.
Typically, the negative will be in better condition, however over the years they may have been smudged or scratched, so a careful review is worth the effort.
If the photo happens to be in better condition than the negative, your next decision will be what to do with the negative that you will not be digitizing.
If the negative is in good condition and is an image of particular importance to you, put it in the Archive pile.
If the negative is not in good condition, and therefore not likely to ever need to be reprinted from the negative again, drop it in the Throw /Give Away pile. I know it’s hard to do, but the storage space you save can be used for other more important things.
If the photo has some flaws and the negative is in better condition, put the negative in the Digitize pile. You may still want to keep the photo for an album or display, but your digitized image will be created from the better quality negative.
If the printed photo is the item in better shape, but it still has some flaws, don’t fret. These days you can dramatically and easily improve the digitized scan of the photo with the free Adobe Fix app on your phone or tablet. Click the play button on the video player below to watch my short demonstration video:
Learn more about photo restoration on mobile devices in my book Mobile Genealogy available in the Genealogy Gems store.
My book “Mobile Genealogy” includes step by step instructions on using Adobe Fix.
5. Send Your Old Negatives in for Professional Scanning
Now that you have organized a pile of negatives ready for digitization, it’s time to send them out to a professional scanning company.
I sent mine to Larsen Digital. I’ve met them in person and have been impressed with the quality of their work, and the incredibly wide variety of digitization work they can do.
Visit the Larsen Digital website here. This page has special discounts specifically for Genealogy Gems readers. Click on Negatives and you’ll find many options. I was thrilled to see that they could accommodate the variety of negatives I have like:
Medium format black and white negative
You may be a little nervous about mailing your negatives. At first, I was too, but the Larsen staff assured me that their customers safely and routinely mail their negatives. The key is to use a shipping service with tracking. I picked up a small priority box at my local post office. It gave me a little room for a little extra padding inside and I received a tracking number so that I could follow it on the journey. FedEx is another reliable way to go. Larsen was excellent about tracking the incoming and outgoing order.
When the order is complete, you will first receive a link where you can instantly download your digital files. Soon after your original negatives will arrive in the mail exactly as you sent them. Mine even came back in my grandmother’s original envelopes!
Digitized old negatives returned in their original envelope safe and sound!
The Results that Open Up a World of Family History
Needless to say, I am thrilled with the results of my digitization project! Many of the negatives are photos I have never seen before. (What in the world took me so long to get this done?!)
I just have to share a few examples with you. Here’s a photo of my great uncle proudly posing with his taxi cab in Ada, Oklahoma:
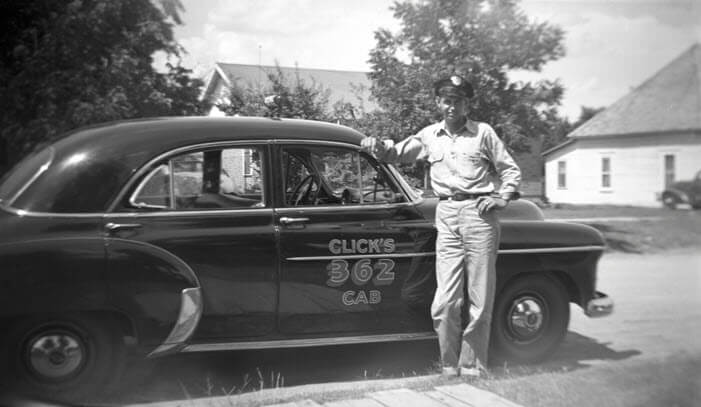
My great uncle next to his taxi cab in Oklahoma
My grandmother was an avid doll collector, so I wasn’t surprised to see my aunt in this photo with dolls. I was surprised and delighted though to spot an important artifact on the wall that held a significance to my grandparents. The framed photo of a ship commemorates one of the many ships produced at the Kaiser shipyards during World War II. Both of my grandparents worked there during the war: my grandfather helped build the ships, and my grandmother worked in in the office assisting with hiring the men and women who worked alongside him.
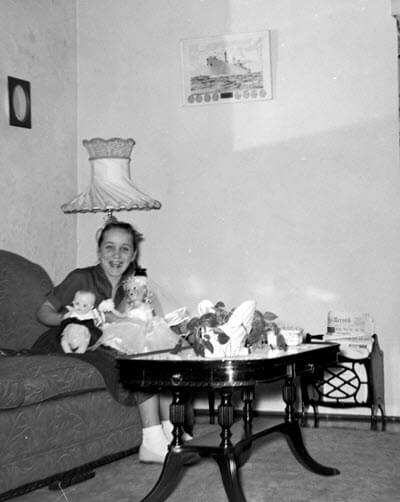
My aunt at home in the 1950s.
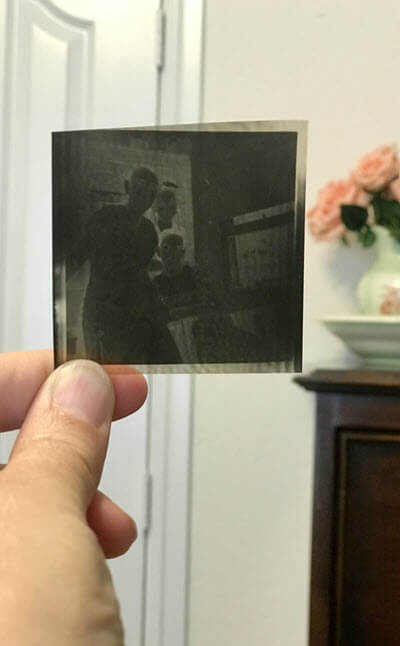
Although this next one has some blurring around the edges due to the person who took the photo, I treasure this rare shot of my great grandmother, my grandmother and her siblings.
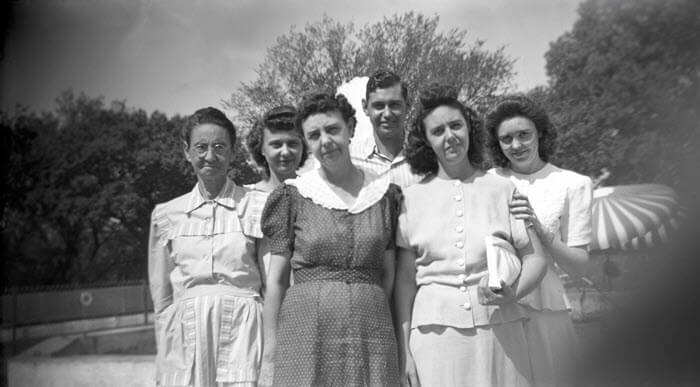
The Herring Family: My great grandmother is on the far left, and my grandmother is next to and just behind her.
A New View of Your Family History
Following these 5 steps for digitizing your old negatives will not only lead to new views of your family history, but ensure that your family history photos are preserved for generations to come.
If you found this article helpful, please share it with your friends. I can’t wait to hear in the Comments below the discoveries you make in your closets!
.png)