Episode 196
The Genealogy Gems Podcast
Episode 196
with Lisa Louise Cooke
In this episode, expert Kate Eakman from Legacy Tree Genealogists joins us with some tips for those starting to trace their Irish ancestors into Ireland. She shares some great websites for Irish research and places to look for that elusive Irish home county;and an exclusive coupon code for anyone who could use some expert help on a tough research problem.
Listen now – click the player below
In this episode, expert Kate Eakman from Legacy Tree Genealogists joins us with some tips for those starting to trace their Irish ancestors into Ireland. She shares some great websites for Irish research and places to look for that elusive Irish home county;and an exclusive coupon code for anyone who could use some expert help on a tough research problem.
Additional episode highlights:
- Gems listeners respond with strong opinions on sharing gossip about our ancestors;
- Genealogy Gems Book Club surprises: a past featured author has a new book out?and something different for the new Book Club pick;
- Mark your calendars and make some plans for big conferences in 2017;
- Organize your DNA test results and matches to help you get the most out of them, now and in the future.
BOOK CLUB NEWS: NEW FROM NATHAN DYLAN GOODWIN
British author Nathan Dylan Goodwin, featured in the past on the Genealogy Gems Book Club with his novel The Lost Ancestor has a NEW novel out in same forensic genealogy mystery series.
The Spyglass File: Hero Morton Farrier is back, and he’s on the trail of his client’s newly-discovered biological family. That trail leads to the fascinating story of a young woman who provides valuable but secret service during World War II?and who unknowingly became an entry in the mysterious Spyglass File. The connection is still so dangerous that Morton’s going to have bad guys after him again, and he may or may not be kidnapped right before he’s supposed to marry the lovely Juliette. Meanwhile, you’ll find him anguishing over the continuing mystery of his own biological roots?a story that unfolds just a little more in this new book.
MAILBOX: School Records Suggestion
Responding to Genealogy Gems Podcast episode #194:
“For those that have these old school records, consider donating them (even a digitized image) to the school from whence they originated. I shared class photos taken in the 1940s with my parents’ grade schools. The school was so appreciative! I hope another researcher down the road benefits from the pictures as well.” – Laura
MAILBOX: Passing on the Gossip
Blog post with Jennifer’s letter, my response, and several more comments
Here’s a link to a post about the stamp pendant Jennifer sent me
Lisa Louise Cooke uses and recommends RootsMagic family history software. From within RootsMagic, you can search historical records on FamilySearch.org, Findmypast.com and MyHeritage.com. In the works: RootsMagic will be fully integrated with Ancestry.com, too: you’ll be able to sync your RootsMagic trees with your Ancestry.com trees and search records on the site.
 Keep your family history research, photos, tree software files, videos and all other computer files safely backed up with Backblaze, the official cloud-based computer backup system for Lisa Louise Cooke’s Genealogy Gems. Learn more at http://www.backblaze.com/Lisa.
INTERVIEW: Kate Eakman and Getting Started in Irish Genealogy
GENEALOGY GEMS EXCLUSIVE OFFER: Go to www.legacytree.com/genealogygems and use coupon code SAVE100 to save $100 on your purchase of research services.
Legacy Tree Genealogist specialist Kate Eakman shares tips about getting started in Irish genealogy. Here are the highlights:
Q: Where would you recommend the hobbyist start their Irish search?
A: Not a lot of Irish records are available online for free. Top sites for Irish records include: FamilySearch.org (click here for their Ireland landing page), National Archives of Ireland, Irishgenealogy.ie and Findmypast.com (click here for their Ireland page).
Q: What does a researcher need to know before crossing the pond?
A: Where the person was born in Ireland. The county. Find out if they were Protestant or Catholic. Click here for an interactive map of Irish counties, including those of Northern Ireland.
Q: Where do you recommend they look for that info in the U.S. crossing the pond?
A: Death records, marriage records, church records (keep an eye on extended family), passenger lists, naturalization papers. Keep an eye out for extended family members who may have come from the same place. Be aware of traditional Irish naming conventions and patterns.
Q: At what point in the Irish research process do hobbyists usually get stuck?
A: Common names regularly recycled, so it can be tough to sort out who is who. Also, a huge fire at the Public Records Office in Dublin in 1922 destroyed the bulk of government records. Click here for a description of what was lost and what surviving fragments are coming soon to Findmypast.com.
Q: How does it work to work with a professional genealogist at Legacy Tree Genealogists?
 A: Here’s the process. A manager calls or emails the client to discuss their needs and parameters. They identify the goals and determine what the client already knows. A goal is settled on and then a researcher is assigned to the client. A written report of the research conducted is provided.
GENEALOGY GEMS EXCLUSIVE OFFER: Go to www.legacytree.com/genealogygems and use coupon code SAVE100 to save $100 on your purchase of research services.
The Legacy Tree Discovery package provides for 3.5 hours of preliminary analysis and research recommendations. It’s a great way to get started if you’ve hit a brick wall in your research and could use some expert guidance. Click here to learn more.
 This episode is sponsored by MyHeritage.com. the place to make connections with relatives overseas, particularly with those who may still live in your ancestral homeland. Click here to see what MyHeritage can do for you: it’s free to get started.
DNA GEM with Your DNA Guide buy bv medication Diahan Southard: Organizing Your DNA
I can tell whose turn it is to unload the dishwasher by the state of the silverware drawer. If either of the boys have done it (ages 13 and 11), the forks are haphazardly in a jumble and the spoon stack has overflowed into the knife section, and the measuring spoons are nowhere to be found. If, on the other hand, it was my daughter (age 8), everything is perfectly in order. Not only are all the forks where they belong, but the small forks and the large forks have been separated into their own piles and the measuring spoons are nestled neatly in size order.
Regardless of the state of your own silverware drawer, it is clear that most of us need some sort of direction when it comes to organizing our DNA test results. Organizing your matches entails more than just lining them up into nice categories like Mom’s side vs. Dad’s side, or known connections vs. unknown connections. Organizing your results involves making a plan for their use. Good organization for your test results can help you reveal or refine your genealogical goals, and help determine your next steps.
The very first step is to download your raw data from your testing company and store it somewhere on your own computer. I have instructions on my website if you need help.
Once that is complete, we can get to the match list. One common situation for those of you who have several generations of ancestors in the United States, you may have some ancestors that seem to have produced a lot of descendants who have caught the DNA testing vision. This can be like your overflowing spoon stack, and it may be obscuring some valuable matches. But identifying and putting all of those known matches in their proper context can help you realize these abundant matches may lead to clues about the descendant lines of your known ancestral couple that you were not aware of. In my Organizing Your DNA Matches quick sheet I outline a process for drawing out the genetic and genealogical relationships of these known connections to better understand their relationship to each other and to you. It is then easier to verify that your genetic connection is aligned with your known genealogical paper trail and spot areas that might need more research.
This same idea of plotting the relationships of your matches to each other can also be employed as you are looking to break down a brick wall in your family tree, or even in cases of adoption. The key to identifying unknowns is determining the relationships of your matches to each other, so you can better see where you might fit in.
Another helpful tool is a trick I learned from our very own Lisa Louise Cooke, and that is Google Earth. Have you ever tried to use Google Earth to help you in your genetic genealogy? Remember that the common ancestor between you and your match has three things that connect you to them: their genetics, surnames, and locations. We know the genetics is working because they are showing up on your match list. But often times you cannot see a shared surname among your matches. However, by plotting their locations in the free Google Earth, kind of like separating the big forks from the little forks, you might be able to recognize a shared location that would identify which line you should investigate for a shared connection.
So, what are you waiting for? Line up those spoons and separate the big forks from the little forks, your organizing efforts may just reveal a family of measuring Spoons, all lined up and waiting to be added to your family history.
GENEALOGY GEMS BOOK CLUB: Sarah A. Chrisman

Author spotlight: Sarah A. Chrisman, living icon of the Victorian age.
Sarah and her husband Gabriel live like it’s about 1889. They wear Victorian-style clothing and use a wood-burning stove and antique ice box. Sarah wears a corset day and night Gabriel wears 19th century glasses. No TV, no cell phones?and Sarah isn’t even a licensed driver.
For this Book Club, you can take your pick of Sarah’s books! Which would you like to read?
This Victorian Life: Modern Adventures in Nineteenth-Century Culture, Cooking, Fashion and Technologies, a memoir Sarah’s everyday life. The Book Club interview in December will focus mainly on this book.
Victorian Secrets: What a Corset Taught Me about the Past, the Present and Myself;
True Ladies and Proper Gentlemen: Victorian Etiquette for Modern Day Mothers and Fathers, Husbands and Wives, Boys and Girls, Teachers and Students, and More;
First Wheel in Town: A Victorian Cycling Club Romance. This is from her series of light-hearted historical fiction set in an era she knows well!
In honor of the Book Club theme, Genealogy Gems is going Victorian! From now through the end of the year, you’ll find Victorian-inspired crafts, recipes, décor, fashions and more on our Instagram and Pinterest sites, which of course we’ll link to regularly from the Genealogy Gems website, newsletter, podcast show notes and Facebook page. Nobody does sumptuous holiday traditions quite like the Victorians, and we look forward to celebrating that.
BONUS CONTENT for Genealogy Gems App Users
 If you’re listening through the Genealogy Gems app, your bonus content for this episode is a PDF with instructions on accessing the new free Guild of One-Name databases on FamilySearch.org.
The Genealogy Gems app is FREE in Google Play and is only $2.99 for Windows, iPhone and iPad users.
Receive our FREE Genealogy Gems Newsletter:
Subscribe to the Genealogy Gems newsletter to receive a free weekly e-mail newsletter, with tips, inspiration and money-saving deals.
Disclosure: This article contains affiliate links and Genealogy Gems will be compensated if you make a purchase after clicking on these links (at no additional cost to you). Thank you for supporting Genealogy Gems!
Scandinavian Genealogy Records – New & Updated Record Collections
Scandinavian genealogy records for this week pique the interest of researchers all over the world. Large collections of records for Sweden and Finland are among the list of new and updated genealogical records. Other collections include records for London, Ireland, and the United States. Oh! One last thing. We’ve added a Google search strategy you won’t want to miss!
Sweden – Church Records
FamilySearch recently updated a collection of church records for Sweden titled “Sweden, Gävleborg Church Records, 1616-1908; index 1671-1860,” this week. The collection includes church records from the county of Gävleborg. These church records include clerical surveys; registers of birth, marriages, and deaths; move-in and move-out lists; confirmations; and church accounts.
The digital images span the years of 1616-1908, however the records that are searchable by index (at this time) only include the years between 1671 and 1860. When browsing through the digital images that have not been indexed, you will want to search by parish, then by record type, and lastly, the volume and year.
Finland – Church Records
MyHeritage has published an impressive collection of 33 million Finnish historical records! This collection of church census books and pre-confirmation books were kept by the Lutheran Church in Finland. The reason these records are so important is that the Lutheran Church was the state religion for hundreds of years. Because of that, the church records essentially cover the entire population of Finland.
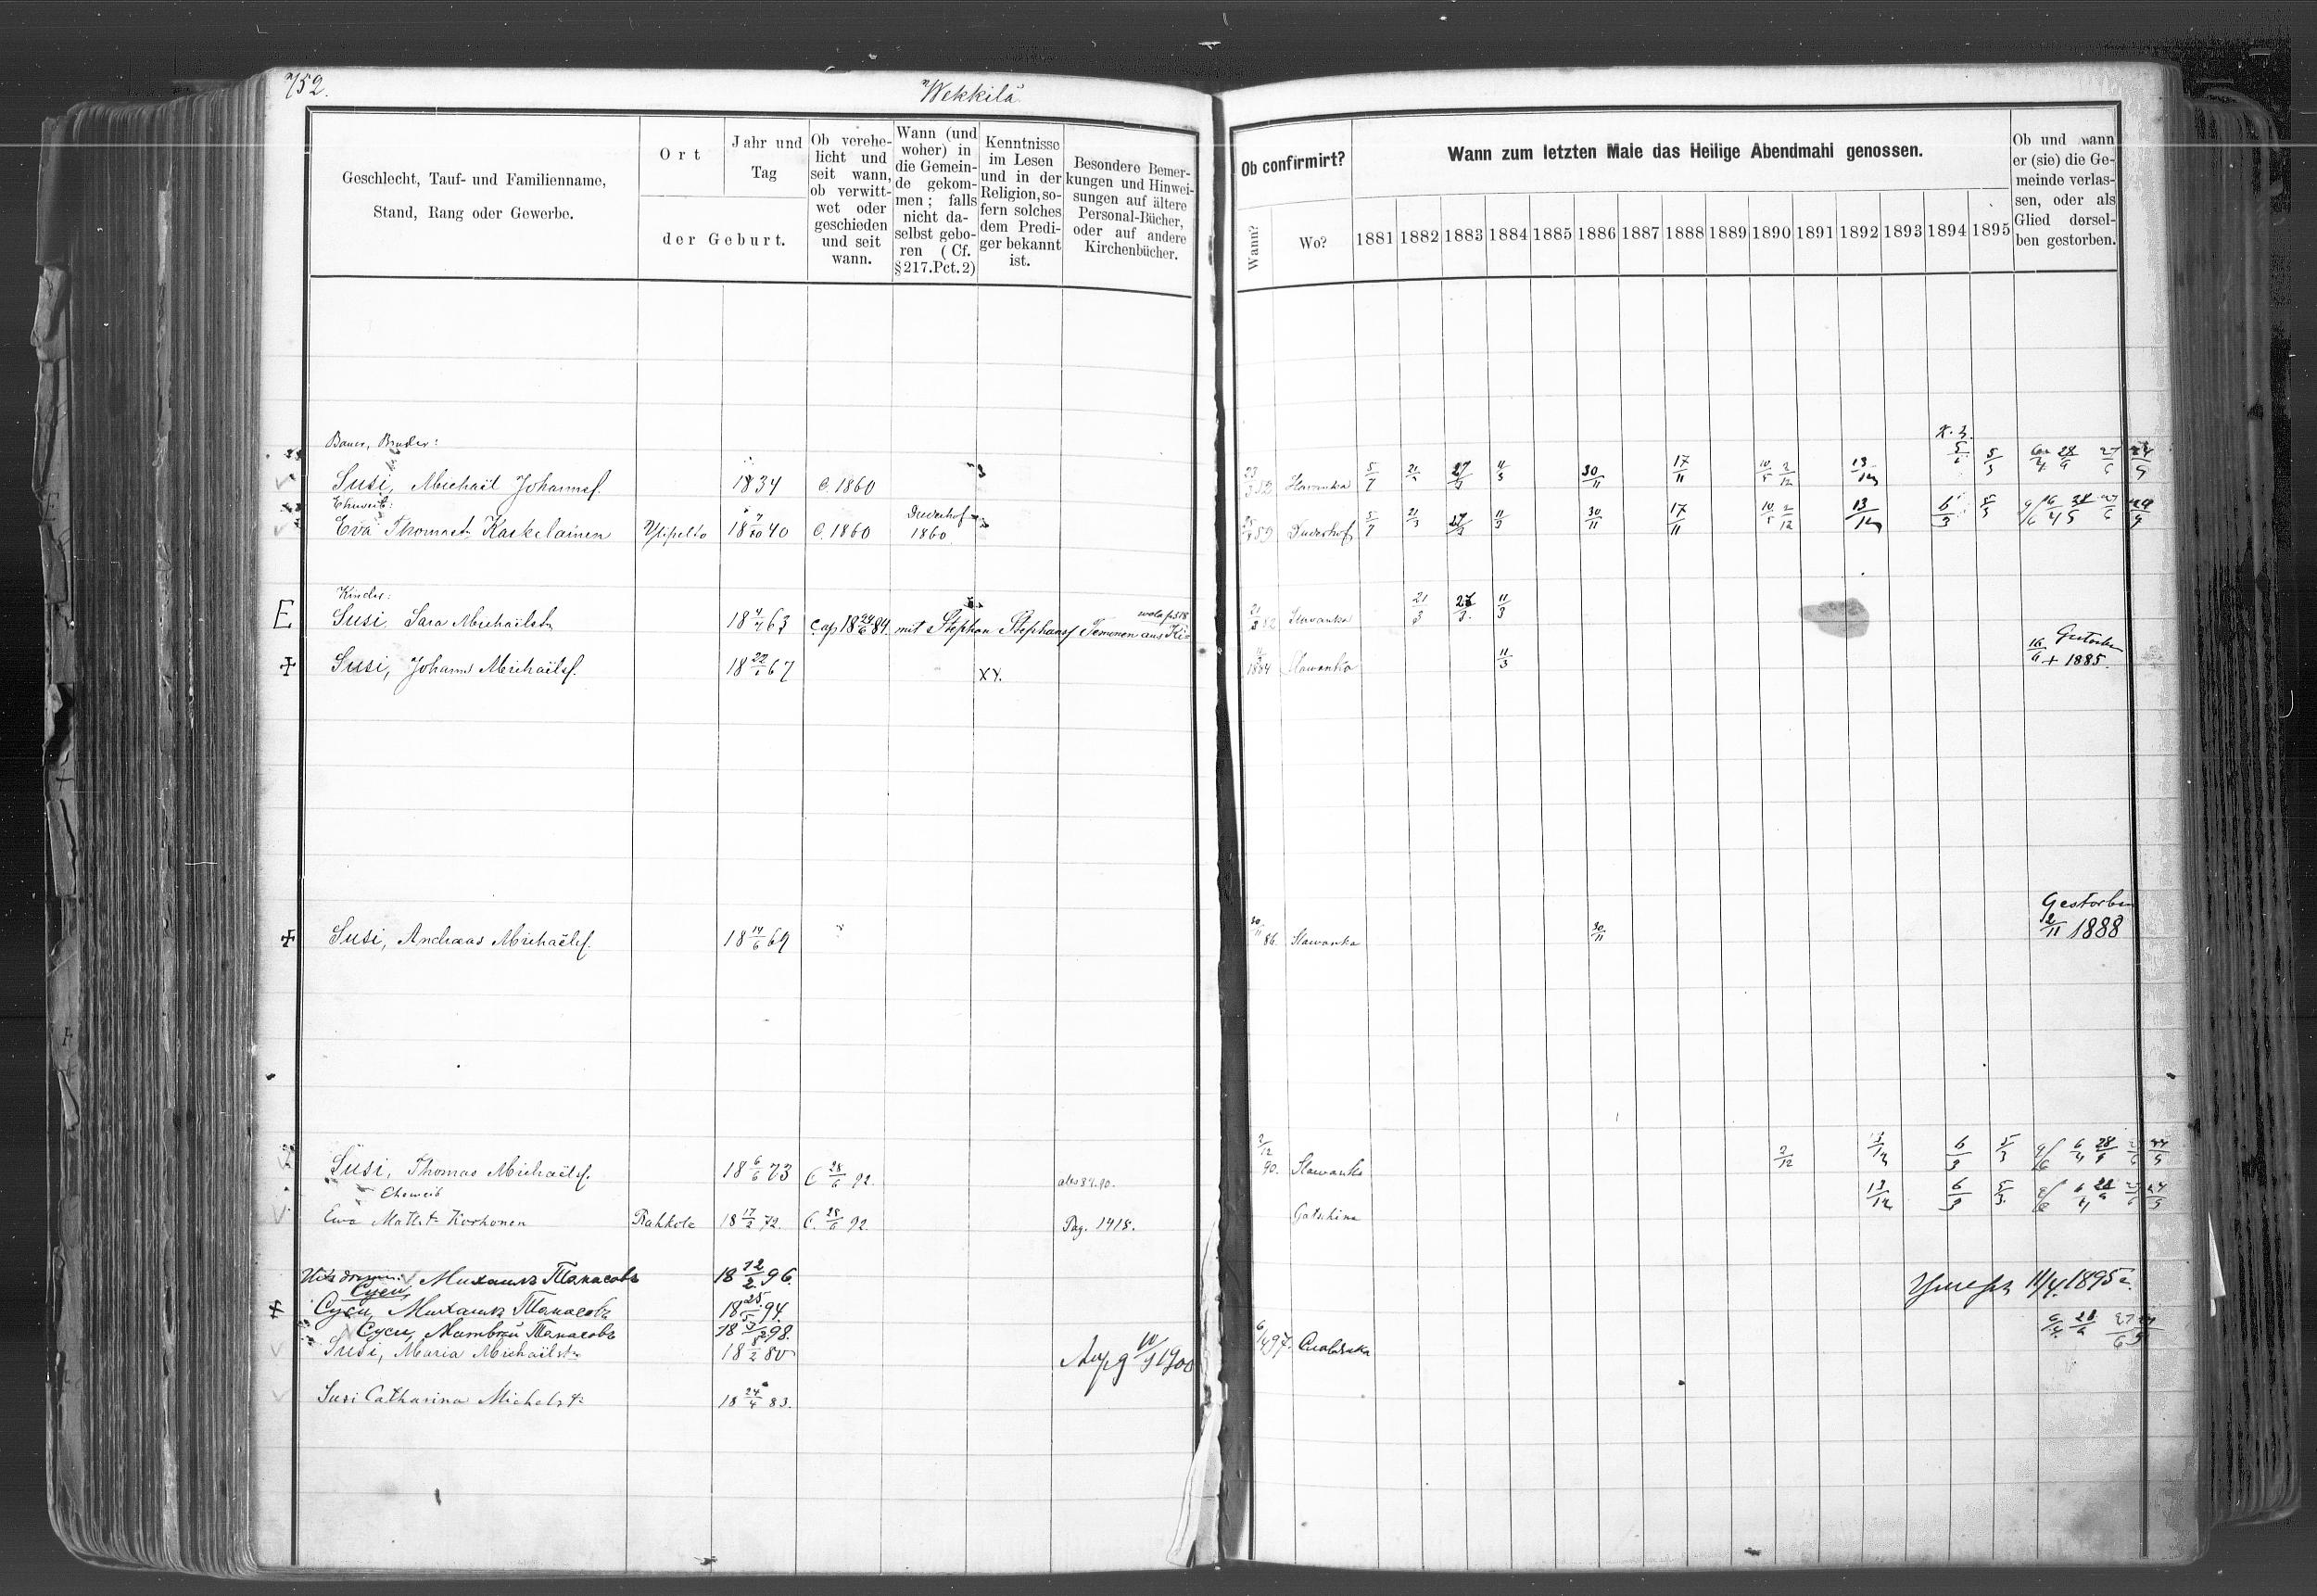 In rural areas, the church book records are organized by village, farm, and household. Within the cities these records were organized by quarter or street.
It is important for researchers to realize that Finland was part of Sweden until 1809. Church census records and pre-confirmation records were consequently written in Swedish until the mid-to-late 1800s. Don’t forget – FamilySearch wiki will give you a language cheat-sheet so you can get help with translating!
United Kingdom – London – Post Office Directories
London Post Office Directories 1842, 1851 and 1861, a browse only database at this time, is now available at Findmypast. You can browse over 1.5 million records from three London Post Office Directories. These directories include lists of traders, bankers, people employed by the crown, lawyers, and other officials. Though not indexed, they list names alphabetically by surname. You may be able to find your ancestor’s occupation, business address, or even their home address!
United Kingdom – Westminster
This collection from Westminster, Poor Law and Parish Administration includes over 1.7 million records. The parish administration was over several commissions and these records include bastardy papers, admissions, examinations, pauper records, valuations, and work house records.
Because there are so many different types of records in this collection, the amount of genealogically valued data will vary. Transcripts and digital images of the original documents are provided and can be searched by name, year, place, and record type.
Ireland – General Register Office Records
Irish Genealogy.ie has just released millions of personal records online for free! Births, marriages, and deaths are from the General Register Office. The expanded database includes the Birth Records Indexes from 1864 to 1914, the Marriage Records Indexes from 1845 (1864 for Roman Catholic Marriages) to 1939, and the Death Records Indexes from 1864 to 1964. To search these records, click here. You will find them under the Civil Records menu heading.
United States – New York City, Philadelphia, & Washington D.C. Newspapers
18th-century newspapers from three early capitals of the U.S. are new on the Chronicling America website. Browse through these digital newspapers for information about your ancestors. Nearly 15,000 pages have been added from The Gazette of the United States (New York, N.Y. and Philadelphia, Pa., 1789-1801), the National Gazette (Philadelphia, Pa., 1791-1793), and the National Intelligencer (Washington, D.C. 1800-1809). For even more information on how to boost your genealogy success using newspapers, check out Lisa’s book, “How to Find Your Family History in Newspapers,” in a digital e-book or traditional book form.
More Gems on Scandinavian Genealogy Records
Our Genealogy Google Guru Lisa Louise Cooke has a few more ideas for gaining access to more records and information about your Scandinavian ancestors. Here’s what Lisa says:
“You’ve probably already tried searching with Google to find more on your ancestors. But have you searched in Swedish, Finnish, or Norwegian? Start by going to Google Translate and entering your search query in English.
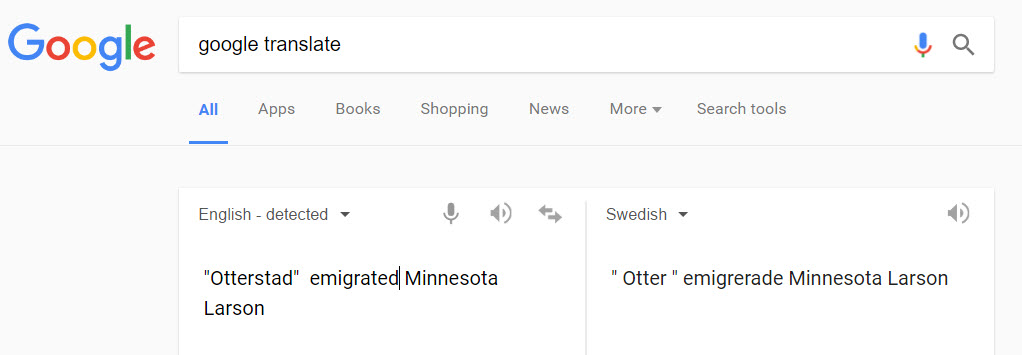
Google Translate will detect that you have typed in English. You’ll need to select the desired language from the drop-down menu in the box on the right. Above, I’ve selected Swedish. Google Translate has now translated my query. Highlight and copy the translated text.
Next, go to the Swedish version of Google, which you’ll find at https://www.google.se/. Paste the translation in the search box. I’ve changed “Otter” back to the actual name of the town “Otterstad,” because I didn’t need that to be translated! Here are my search results:

Notice, each webpage search result has a link you can click to “Translate this page.” Click it and you’ll go to that page, but it will appear in English!
I’m thrilled to see my husband’s great-great-grandfather’s name in this bottom result. I’m off to work on this family…have fun with Google Translate and the Scandinavian Googles!” – Lisa
Isn’t th at an awesome search strategy?! This is exactly the kind of outside-the-box thinking Lisa is known for which she covers more in-depth in her book The Genealogist’s Google Toolbox Second Edition. In fact, there’s an entire chapter in the book about how to use Google Translate in exciting, innovative ways for genealogy.
Here are the links Lisa sent me for the various Scandinavian Googles:
And finally, here’s more on Scandinavian research from our website:

