In this episode I’ve got another blast from the past for you. We have reached deep into the podcast archive and retrieved episodes 5 and 6.
In Episode 5 we touch on using the video website YouTube for genealogy, and then I walk you through how to Bring Sites Back From the Deadwith Google. Then we wrap things up with a cool little way to Spice Up Your Genealogy Database.
In episode 6 I have a gem for you called Cast a Shadow on Your Ancestors, and we cover the free genealogy website US GenWeb
Episode: # 05 Original Publish Date: March 25, 2007
MAILBOX
Email this week from Mike O’Laughlin of the Irish Roots Cafe: “Congratulations on your podcast! I am sure it will help many folks out there. I was glad to see the fine Irish families of Scully and Lynch on your latest show notes!”
GEM: You Tube Follow Up Note: The Genealogy Tech Podcast is no longer published or available.
YouTube in the news – the concern was raised by Viacom this month about YouTube benefiting from their programming without compensating them, which could mean copyright infringement. While the course of YouTube could change depending on the outcome of this suit, the attraction for family historians remains strong because of the nature of the content.
Software mentioned:
Pinnacle. Final Cut for MAC. Limits with Movie Maker
I posted 2 videos – A Nurse In Training Part 1 & 2
When you get a “File Not Found” error when clicking on a link, it doesn’t mean the information is always gone forever. You may be able to find it in the Cache version.
Google takes a snapshot of each page it examines and caches (stores) that version as a back-up. It’s what Google uses to judge if a page is a good match for your query. In the case of a website that no longer exists, the cache copy us a snapshot of the website when it was still active hidden away or cached.
Practically every search result includes a Cached link. Clicking on that link takes you to the Google cached version of that web page, instead of the current version of the page. This is useful if the original page is unavailable because of:
1.Internet congestion
2.A down, overloaded, or just slow website – Since Google’s servers are typically faster than many web servers, you can often access a page’s cached version faster than the page itself.
3.The owner’s recently removing the page from the Web
Sometimes you can even access the cached version from a site that otherwise require registration or a subscription.
If Google returns a link to a page that appears to have little to do with your query, or if you can’t find the information you’re seeking on the current version of the page, take a look at the cached version.
Hit the Back button and look for a link to a “cached” copy at the end of the URL at the end of the search result. Clicking on the “cached” link should bring up a copy of the page as it appeared at the time that Google indexed that page, with your search terms highlighted in yellow.
If you don’t see a cached link, it may have been omitted because the owners of the site have requested that Google remove the cached version or not cache their content. Also, any sites Google hasn’t indexed won’t have a cache version.
Limit: If the original page contains more than 101 kilobytes of text, the cached version of the page will consist of the first 101 Kbytes (120 Kbytes for pdf files).
Really looking for an oldie but a goody? Try the Wayback Machine
It allows you to browse through 85 billion web pages archived from 1996 to a few months ago.
To start surfing the Wayback, type in the web address of a site or page where you would like to start, and press enter. Then select from the archived dates available. The resulting pages point to other archived pages at as close a date as possible. Keyword searching is not currently supported.
GEM: Spice up your database
Search Google Images, then Right click and save to your hard drive.
Use Silhouettes
Find something that represents what you do know about that person. It really does help you see them more as a person and less as an entry in your database – their occupation, a reader, a sport, etc.
Episode: # 06 Original Publish Date: April 1, 2007
You can learn more about Jewish roots at the 350 Years of American Jewish History website JewishGen, The Home of Jewish Genealogy
GEM: Cast a Shadow on Your Ancestors
In the episode #5 I shared a little gem that would spice up your genealogical database – adding silhouettes and artistic images to the file of an ancestor when you don’t have a photograph.
Probably the most famous silhouette these days are the silhouettes used by Apple for advertising the iPod digital music and audio player. It may surprise your teenager or grandchild to learn that the first silhouettes were done hundreds of years ago.
Back then silhouettes (or shades as they were called), they paintings or drawings of a person’s shadow. They were popular amongst English royalty and the art form quickly spread to Europe. A silhouette can also be cut from black paper, and was a simple alternative for people who could not afford other forms of portraiture, which, in the eighteenth century, was still an expensive proposition.
The word took its name from Étienne de Silhouette, but it’s uncertain as to whether his name was attributed because he enjoyed this art form, or as the story goes because the victims of his taxes complained that they were reduced to mere shadows.
Either way, the popularity of Silhouettes hit new heights in the United States where they were seen in magazines, brochures and other printed material. But they faded from popularity as Photographs took over in the 1900s.
As a follow up, I want to share with you a simple technique for creating your own silhouettes. You can use ordinary snapshots to create a visual family record.
Take a photo of a person in profile against a neutral background.
Blanket the photo background with white acrylic or tempera paint
Fill in the image with a heavy black permanent marker, curing the shoulders down for a classical pose.
Add fun details like cowlicks, eyelashes, hats, and jewelry that express the person’s personality with a fine felt-tip pen.
Photocopy the doctored photos onto quality art paper. Since glossy papers work print best, you could also use your computer scanner to scan the image into your hard drive. From there you can add it to your database, or print it out onto glossy photo paper for mounting.
To represent folks in your family tree, create a silhouette of your father to represent his Great Great Grandfather, and add a farmer’s hat and rake to represent his profession of farming. Chances are dad has inherited some of his profile anyway. Have fun with it and be creative. But of course be very sure to label to silhouette appropriately as a creative interpretation rather than a literal rendering.
You can also do silhouettes of your family including extended family and arrange the portraits together on a wall. Use black painted frames in a variety of shapes and sizes and hang in a way that represents the family tree / relationships.
Silhouettes%20:%20Rediscovering%20the%20Lost%20Art<img%20src=”http:/www.assoc-amazon.com/e/ir?t=genegemspodc-20&l=as2&o=1&a=0970115105″%20width=”1″%20height=”1″%20border=”0″%20alt=””%20style=”border:none%20!important;%20margin:0px%20!important;”%20/>%20″ >Silhouettes: Rediscovering the Lost Art
Last year the website celebrated its 10th Anniversary. The USGenWeb Project consists of a group of volunteers working together to provide Internet websites for genealogical research in every county and every state of the United States. The Project is non-commercial and fully committed to free access for everyone. Organization within the website is by state and county.
You can go to the homepage of the website and click on the state of your choice from the left hand column. From the state page you can select the county you wish to search in. However, when I know they name of the county I want to search in, I’ve found it’s often quicker just to search at google.com and do a search like “genweb sibley county mn” The choice is yours.
Remember to use the Google search gem that I gave you in episode one (see episode #134 http://www.genealogygemspodcast.com/webpage/episode-145-a-blast-from-the-past ) to quickly search within the county website. Many don’t have search engines of their own, and so that’s when I first really started using that search technique. These county sites are often very rich though, and after a focused search, it’s rewarding just to wander the site. It will help you become more familiar with the county!
You’ll likely find databases of Births, Deaths, Marriages, townships histories, plat maps, surnames, and a host of other topics. Because each county has its own volunteer coordinator, the information you will find varies from county to county. And as always, info is being added regularly, so you need to book mark them and return on a regular basis to see what’s new.
Be sure and share your resources as well. That’s the power behind the GenWeb project – volunteers. Volunteering your county resources will enrich other’s experience and will likely lead to connections that will continue to further your own research.
Google search expert Lisa Louise Cooke advises a genealogist on three ways to improve Google search results. See how these little improvements can make a big difference in your own Google searches!
This Genealogist Wants to Improve Google Search Results
Gene from Phoenix recently watched a free webinar in which I talked about improving Google search results for genealogy and then sent me this follow-up email:
“Lisa, I enjoyed the free webinar, Thank you!
I tried your suggestions for searching Google but still can’t get what I want.
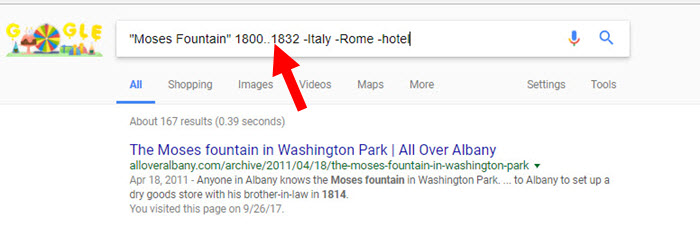
My ancestor was Moses Fountain (possibly from NY but can only find him in IN)
I put in “Moses Fountain” 1800-1832 -Italy -Rome -hotel
When my search comes up the first page is all of the hotel & fountain in Rome, Italy. There is no genealogy (all my inquiries) until page 2. I cannot -New York as he may have come from there, so I’ll continue to get Albany fountain (like the water fountain.) Thanks for any suggestions you might have.” -Gene in Phoenix, AZ
3 Powerful Techniques that can Improve Google Search Results
Kudos to Gene for jumping onto Google and giving it a go after the webinar. Getting started is the most important part of achieving genealogical success! In order to improve Google search results, Gene needs to make a few adjustments to tell Google more specifically what is wanted:
1. Use the Google search operators correctly
First, Gene will need to fix the numrange search. If you haven’t watched the webinar yet (what are you waiting for?) a numrange search is when you give Google two four-digit numbers and specify that you only want webpages included in your search results that have a four-digit number that falls within that range. And of course years are expressed in four-digit numbers, so this is incredibly useful for genealogists. Gene has a dash between the two numbers (a very logical approach since this is how we are used to expressing a range), but a numrange search requires two periods instead, like this:
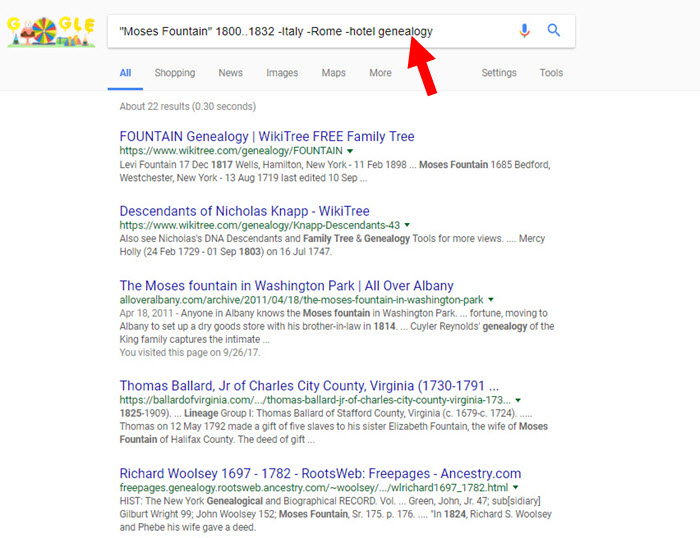
2. Add a Google search term to narrow results.
Gene didn’t see genealogical search results until page 2 of the results. An easy way to bring pages related to genealogy to the forefront of the results is to add the word genealogy to your search query:
As you can see above, this improves things quite a bit. Isn’t it amazing what a difference one well-chosen keyword can make to improve Google search results?
3. Consider carefully which Google search terms to remove
Gene removed some irrelevant search results by placing a minus sign directly in front of the search terms Italy, Rome, and hotel. This tells Google to subtract all pages from search results that contain these words. This is a very powerful tool, particularly when it comes to ancestors who have common surnames. (For instance, if you were researching an ancestor named John Lincoln, your results would be inundated with results for President Abraham Lincoln, simply due to the volume of pages that mention him. If John was not related to this famous president, you could add -Abraham and -president to your search query, and his footprints on your results would be dramatically reduced.) By the way, notice that the minus sign touches the word it is removing. There should be no space between the minus and the word.
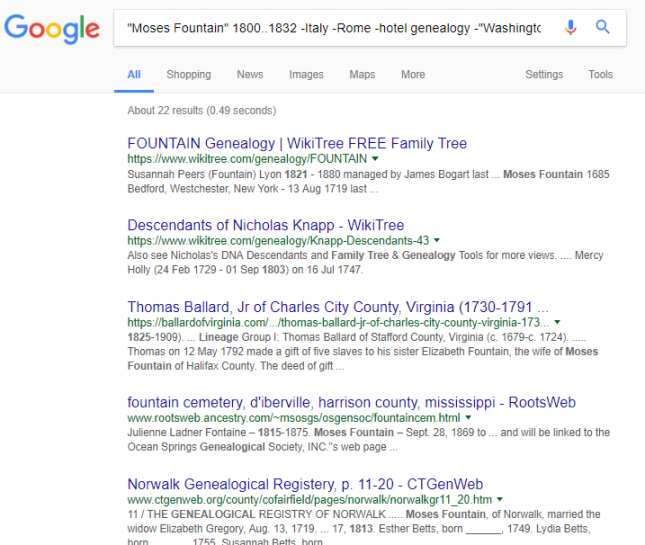
But Gene continues to get irrelevant search results relating to a Moses Fountain in Washington Park, Albany, New York. The concern expressed here is that removing New York may inadvertently remove good search results, since this ancestor may have been from New York. Instead of removing New York, why not subtract a more targeted search term, such as Albany or Washington Park? Since it’s also possible that Moses Fountain was from Albany, I’d start by removing Washington Park.
How can you subtract a whole phrase? Put quotation marks around it so that Google understands it is a phrase and not two separate words that are unconnected. Then put a minus sign right in front of it. In Gene’s case, it would look like this: -“Washington Park.” The resulting search results eliminate the reference to the fountain in Albany:
Improve Google search results even more dramatically
Watch this free 90-minute webinar and learn more about improving your Google searches for genealogy, along with other powerful strategies for reconstructing your family history. While you’re watching, subscribe to the Genealogy Gems YouTube channel to keep up with the many free video tutorials we publish there!
As you can imagine, I only had time to scratch the surface of how to improve your searches in the webinar. My book The Genealogist’s Google Toolbox is dedicated to the topic, and I have included several in-depth Google search for genealogy video classes in Genealogy Gems Premium Membership.
Tracing your ancestors’ occupations can be one of the best ways to learn more about their everyday lives, skills, financial status and even their social status. Follow these tips and record types into the working lives of your relatives to enrich your family...
Welcome to this step-by-step series for beginning genealogists—and more experienced ones who want to brush up or learn something new. I first ran this series in 2008. So many people have asked about it, I’m bringing it back in weekly segments.
Episode 3: Working Backward and the SSDI
In our first segment in this episode my guest is Miriam Robbins Midkiff, a well-known genealogy blogger and teacher. She shares her best research tips, what motivates her to delve into her family history and how that discovery has enriched her life.
Then in our second segment we answer the question, “Why do we work backwards in genealogy?” and then fire up the Internet and go after your first genealogical record. Below, find current links to the record sources I talk about in the show. Also, when I recently checked, the Social Security Death Index was no longer free at WorldVitalRecords as I mention in the podcast and some of the site features I mention may have changed. I’ve given you links below to more options for searching, including plenty of FREE options!
Working Backward
When it comes to tracing your family history, there are standard methods that will help you build a solid family tree. Starting with yourself and working backwards is a cornerstone of genealogical research. It will be tempting to start with a great grandparent that you just got some juicy information on after interviewing Aunt Martha, but resist the temptation to start with that great grandparent, and go back to the beginning – and that’s YOU!
There’s a very good reason why working backward is so effective. Let’s say you have filled in info on yourself, and then recorded everything about your parents and now it’s time to work on one of your grandfathers and all you have is the date he died and the date he was born. If you are lucky enough to have his birth date and birthplace and you get his birth certificate it will tell you who his parents were, but it can’t predict his future can it? Where he went to school, where he lived over the years, etc. Documents can only tell you what has occurred in the past, not what will occur in that person’s future.
But if you get his death certificate it will give you key information at the end of his life that can lead you to the various events throughout his life. If you don’t have his birthdate and birthplace, you’ll probably find it on the death certificate. It will also likely name his parents and his spouse. A birth record can’t tell you who he will marry, but a death record can tell you who he did marry. You can start to see how starting at the end of someone’s life and working backwards will be the most efficient and accurate way to research.
Records are like the bread crumb trail of your family tree! If you don’t work systematically backwards, it will be very easy to miss a crucial piece of evidence, and you might end up relying on guesswork and end up building a false history on it. Believe me you don’t want to invest time in a tree that you’re going to have to chop down and replant!
So now that you understand and are committed to following this cornerstone concept of systematically starting with yourself and working backwards, it’s time to fire up the Internet and put it into practice by finding your first record. What type of record will we be looking for? A death record of course!
Is one of your parents deceased? If so, you’re going to start with them. If they are still living, and you’ve got their information entered into your genealogy database choose one of their parents, your grandparents, who is deceased – or if you’re lucky enough to be starting at a young age you may have to go back to a deceased great grandparent! (And good for you for starting now while you’re young!)
The SSDI
Chances are the person that you’ve chosen, for this example let’s say it’s your grandfather, he most likely had a social security card. And there is a wonderful free database online in the United States called the Social Security Death Index, what is commonly referred to as the SSDI, that you can use to find that grandparent.
In 1935 the Social Security Act was signed into law by President Franklin Roosevelt, and consequently more than thirty million Americans were registered by 1937. Today, the Death Master File from the Social Security Administration contains over 89 million records of deaths that have been reported to the Social Security Administration and they are publicly available online.
Most of the information included in the index dates from 1962, although some data is from as early as 1937. This is because the Social Security Administration began to use a computer database for processing requests for benefits in 1962. Many of the earlier records back to 1937 have not been added.
The SSDI does not have a death record for everyone; and occasionally you may find an error here and there if something was reported inaccurately, but overall it’s a terrific resource! As with all records it provides clues that you should try to verify through an additional record source.
There are many websites that feature this database, as seen in the UPDATED links below. This database is free at most sites, even sites that charge for access to other data.
On the Search page, enter your grandparent’s given name which is their first name, the family name which is their last name or surname, the place of their death – this could just be the state – and the year they died, and click the Search button. Hopefully you will get back a result that includes your grandparent.
Now remember you’re looking at an index, not an original record or primary source. We talked about sources in Episode 2. A primary source is a document that was created at the time of the event by an authoritative source, usually someone with direct personal knowledge of the event that’s being documented, like a death certificate is completed at the time of death by the attending physician. These are the best and usually most accurate types of sources you can find. And that’s what we want!
The really key information in this search result is the county information. In order to get an original death certificate which would be your primary source you have to know which county they died in. You may already know that for your grandparent, but keep this in mind because the further back we go, the more crucial it will be to know the county involved since that’s where death certificates are recorded.
By any chance did your grandparent not show up in the results even though you know they worked after 1937 when the Social Security got rolling, and you know they have passed away? Don’t fret – We have other ways to try and find the info!
This brings us to what I think is a really important concept to keep in mind whenever you’re researching your family on the Internet. Each search is conducted at a specific moment in time. Running an SSDI search or a Google search tomorrow might give you results different than the one you ran today. The Internet is being updated second by second, and the SSDI has been updated several times over the years.
In the case of the SSDI database, you can’t be absolutely sure that the website you are using to search the SSDI has the most current version available. Look in the database description on the site to see how recently it was updated.
Here’s a perfect example of that: When I searched for my grandfather on my dad’s side from the Family Tree Legends website, I got no results. Now I KNOW he died in 1971 and I KNOW he worked his entire life so he had to have been registered with Social Security. Then I went to Ancestry.com and searched for him in their SSDI database and he popped right up.
On the other hand, my maternal grandmother shows up on all three websites I’ve mentioned. In most cases, you’ll find who you’re looking for, but occasionally, like with my grandfather, you may have to dig in your heels and try the SSDI on a couple of different websites to find who them. Never give up, never surrender. That’s my motto!
And of course, each website offers just a little different variation on the terms that you can search on.
So just in case you have a stubborn ancestor who eludes your first SSDI search, try finding them at several of the SSDI databases. If you do have luck on World Vital Records, be sure and click the More Details link next to your search results because it includes some fun extras like a link called Historical Events next to their birth year and death year that will take you to a list of important historical events that were happening those particular years. It’s kind of fun to see what was going on in the world when your grandparent was born.
You’ll also find a link called Neighbors which will take you to a listing of folks who lived in the same county as your ancestor and died in within a year or two of them.
But most helpful is that your research results on World Vital Records will include a listing of nearby cemeteries which are good possibilities for where your ancestor may have been buried. (Again, just clues to hopefully send you in the right direction.) But as I said, the death certificate is going to be your best and primary source and almost always includes the name and address of the cemetery where the person was buried.
Here are a few more search tips if you don’t find your ancestor right away:
1. Make sure that you tried alternate spellings for their name. You never know how it might have been typed into the SSDI database.
2. Many SSDI indexes allow you to use wildcards in your search. So for example you could type in “Pat*” which would pull up any name that has the first three letters as PAT such as Patrick, Patricia, etc.
3. Try using less information in your search. Maybe one of the details you’ve been including is different in the SSDI database. For example it may ask for state and you enter California because that’s where grandpa died, when they were looking for Oklahoma because that’s where he first applied for his social security card. By leaving off the state you’ll get more results. Or leave off the birth year because even though you know it’s correct, it may have been recorded incorrectly in the SSDI and therefore it’s preventing your ancestor from appearing in the search results.
4. Leave out the middle name because middle names are not usually included in the database. However, if you don’t have luck with their given name, try searching the middle name as their given name. In the case of my grandfather his given name was Robert but he went by the initial J.B. But in the SSDI his name is spelled out as JAY BEE! Go figure!
5. Remember that married women will most likely be listed under their married surname, not their maiden name. But if you strike out with the married name, go ahead and give the maiden a try. She may have applied for her card when single, and never bothered to update the Administration’s records. Or if she was married more than once, check all her married names for the same reason.
6. Don’t include the zip code if there is a search field for it because zip codes did not appear in earlier records.
While most folks will appear in the SSDI, there are those who just won’t. But knowing where information is not located can be as important down the road in your research as knowing where it IS located, so I recommend making a note in your database that you did search the SSDI with no result. This will save you from duplicating the effort down the road because you forgot that you looked there. I admit it, in the past I’ve managed to check out books I’ve already looked through and order a record or two that I already had. Lesson learned!
So here’s your assignment for this week: Go through your genealogy database and do a Social Security Death Index search on every deceased person who was living after 1937. Hopefully you will be able to fill in several more blanks in your genealogy database and family tree!