This episode’s got a bit of holiday sparkle! Lisa Louise Cooke welcomes Genealogy Gems Book Club author and Victorian lifestyle expert Sarah Chrisman to the show to talk about Victorian holiday traditions, some of which may still live on in your own life. Following that conversation, Lisa shares a fun description of Victorian-era scrapbooking: how it’s different than today’s scrapbooking hobby but also how it reminds her of modern social media.
More episode highlights:
Three success stories from Genealogy Gems listeners: a Google search with great results, a brick-wall busting marriage record and yet another YouTube find for family history (people keep telling us about those!).
Your DNA Guide Diahan Southard chimes in with what she likes so far about MyHeritage’s new DNA testing service.
An internationally-themed German research conference and a makeover for the Scotland’s People website.
The newly-relaunched ScotlandsPeople website has several exciting new features:
Mobile-friendly web design and an enhanced search function;
A quick search option for searching indexed records by name and an advanced search for specific types of records;
Free access to several records indexes;
More than 150,000 baptism entries from Scottish Presbyterian churches (other than the Old Parish Registers of the Church of Scotland) have been added and more are coming, as well as marriages and burials;
More types of records held by National Records of Scotland are coming, including records of kirk sessions and other church courts;
Explore the site for free, including handy how-to guides for using Scottish records such as statutory records, church registers and census returns.
MAILBOX: GOOGLE SEARCH SUCCESS STORY
From Joan: “I used one of the handy hints from your presentation at the South Orange County California Genealogical Society’s all day seminar in Mission Viejo, CA. I entered some of my common named ancestors, used the quotes, added a time frame and included some key words, like locations. Most of what I found were my own queries and posts. That shows it works!….
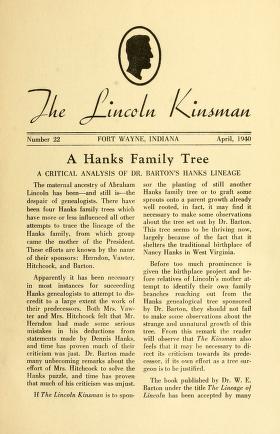
One thing I was amazed at was a multi-page article I found: ‘The Lincoln Kinsman,’ written in 1938. It included a lot of information on the Bush family [which is another of her family lines]. The article even included what I think is my ancestor Hannah Bush Radley.” (Click here or on the image above to see a copy of “The Lincoln Kinsman” at Internet Archive.)
Listen to a free 2-part series on cold-calling distant relatives or others as part of your genealogy research: “Family History: Genealogy Made Easy podcast, episodes 14 and 15.”
BONUS CONTENT for Genealogy Gems App Users:
A handy cheat sheet with 14 tips from that series on cold-contacting distant relatives. It’s updated with brand-new suggestions, including ways to find potential relatives’ names during the research process. The Genealogy Gems app is FREE in Google Play and is only $2.99 for Windows, iPhone and iPad users.
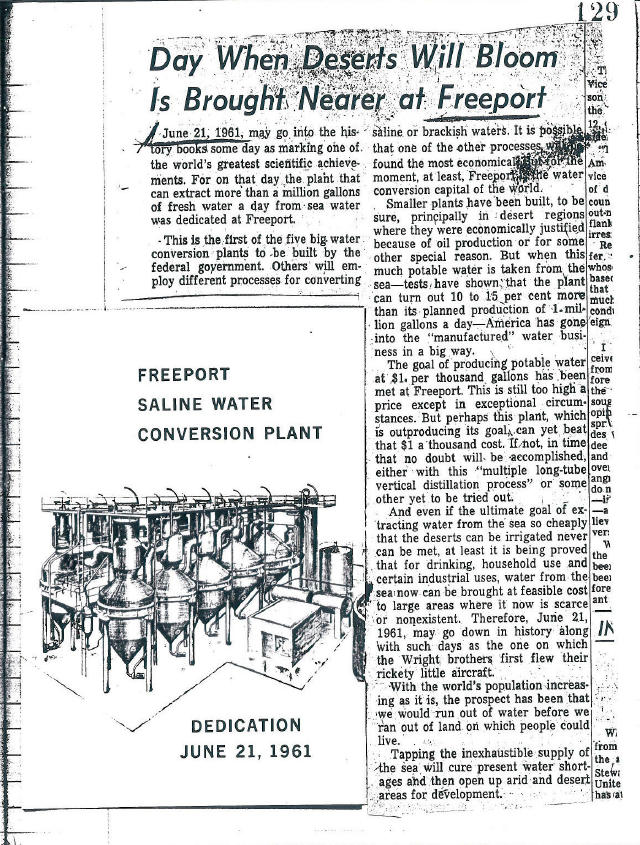
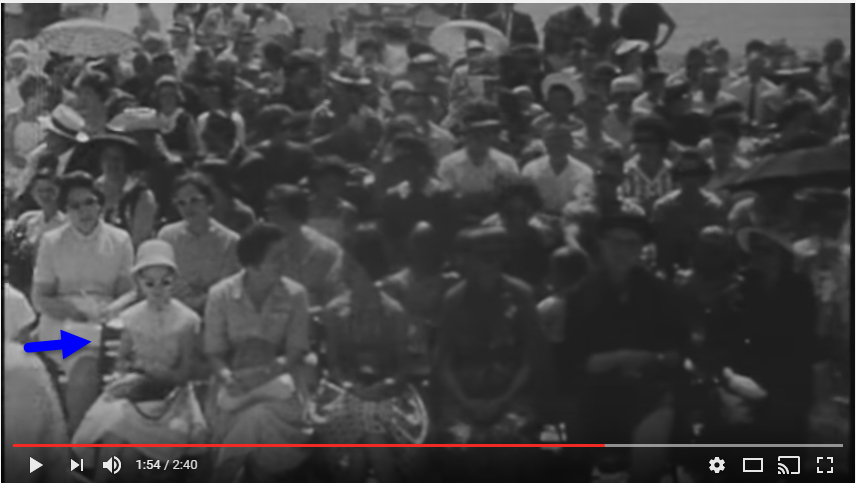
Gay entered “Freeport Texas history” in YouTube and found historical newsreel footage of the opening ceremony of a local water treatment plant. She and the women in her family were seated on the front row. Here’s a screenshot from that footage: maybe this is a stylish young Gay in sunglasses? (Watch the video here.)
Lisa Louise Cooke uses and recommends RootsMagic family history software. From within RootsMagic, you can search historical records on FamilySearch.org, Findmypast.com and MyHeritage.com. By the end of 2016, RootsMagic expects to be fully integrated with Ancestry.com, too: you’ll be able to sync your RootsMagic trees with your Ancestry.com trees and search records on the site.
Keep your family history research, photos, tree software files, videos and all other computer files safely backed up with Backblaze, the official cloud-based computer backup system for Lisa Louise Cooke’s Genealogy Gems. Learn more at http://www.backblaze.com/Lisa.
INTERVIEW: VICTORIAN CHRISTMAS WITH SARAH CHRISMAN
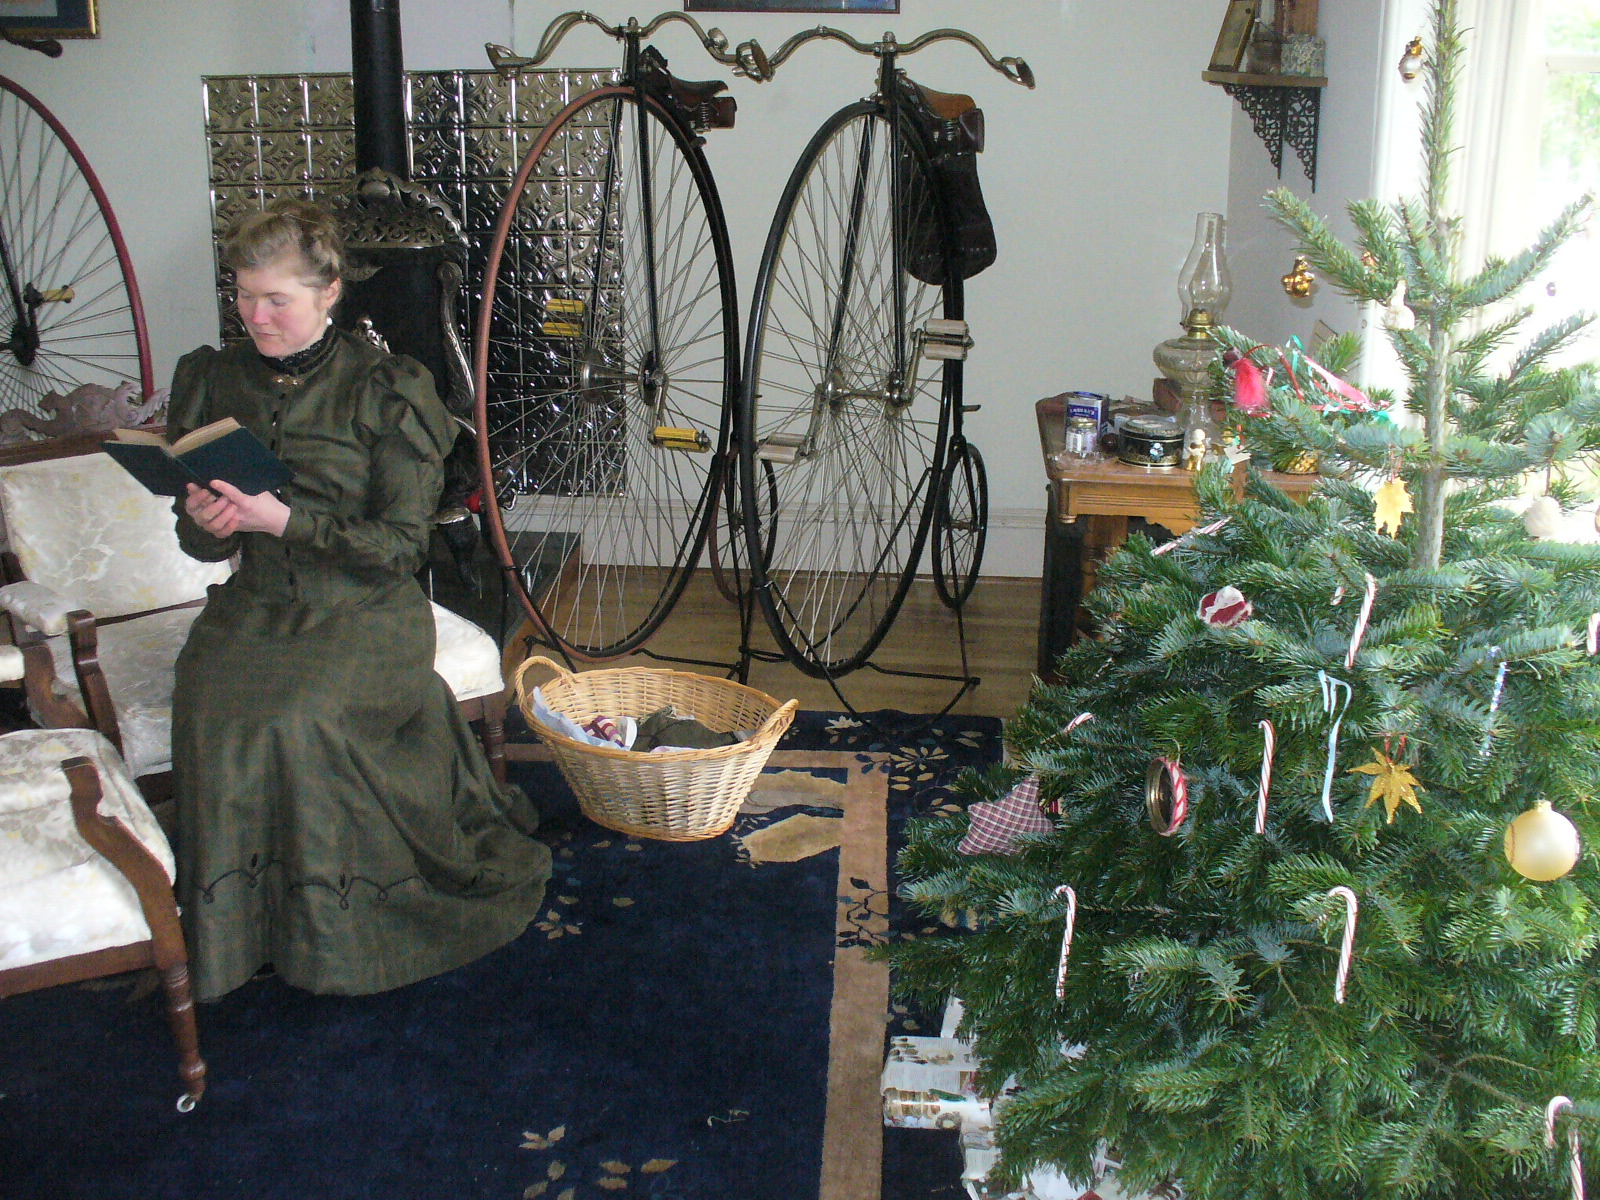
Sarah Chrisman lives her life every day as if it’s the Victorian era. Her clothing, household, pastimes, chores and more all reflect the time period.
Listen as Lisa and Sarah talk about the Victorian Christmas tree; gift-giving, crafts, decorating and things that might surprise us about holiday celebrations during that time.
First Wheel in Town: A Victorian Cycling Club Romance. This is from her series of light-hearted historical fiction set in an era she knows well!
Sarah Chrisman joins me again later this month on the Genealogy Gems Premium podcast episode 142 to talk about what it’s like to live every day like it’s the late 1800s. Don’t miss it! Not a Premium member? Click here to learn more about the perks of membership!
Legacy Tree Genealogists provides expert genealogy research service that works with your research goals, budget and schedule. The Legacy Tree Discovery package offers 3.5 hours of preliminary analysis and research recommendations: a great choice if you’ve hit a brick wall in your research and could use some expert guidance. Click here to learn more.
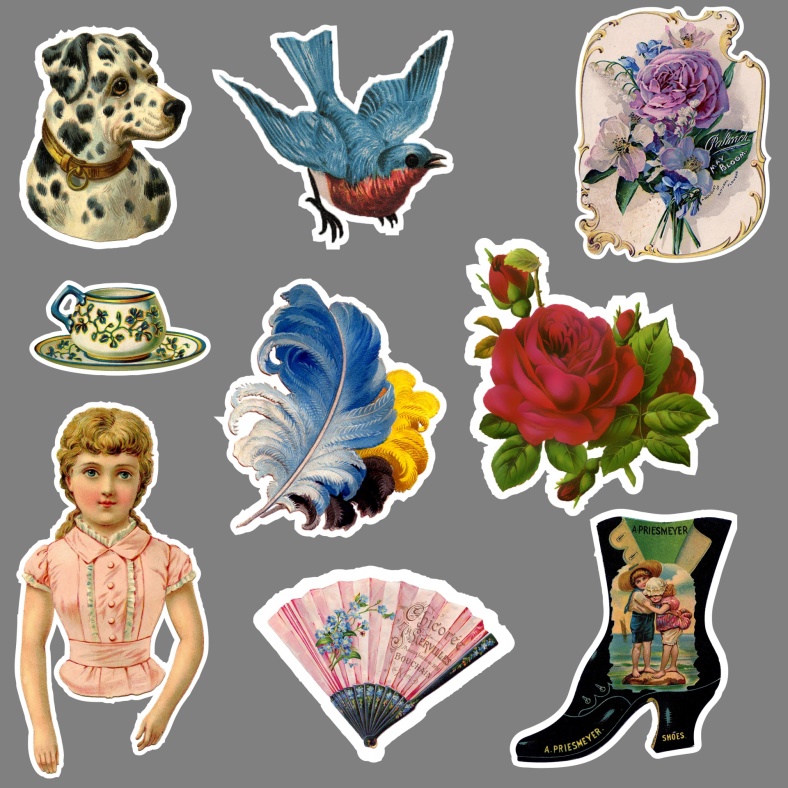
The Victorians coined the phrase “scrapbooking:” they literally pasted paper scraps into books. As an embellishment, those who could afford to bought “relief scraps,” such as the ones shown here. These were like the precursors of modern sticker sheets or die cuts, printed just for the scrapbooking hobby. You could buy colorful images of everything from flowers or children to animals, or angels or Father Christmas. These images were raised or embossed on the paper, which is why they called them reliefs.
Relief scraps could be used as embellishments around other items on scrapbook pages, but sometimes they were the only decoration on a page, arranged in pretty patterns.
I don’t think there is any dispute that the four major online resources for genealogy include Ancestry.com, FamilySearch.org, Find My Past, and My Heritage. Of those four, only Ancestry.com has attempted any real integration of DNA test results into traditional genealogy.
That is, until recently. On May 19, 2016 MyHeritage announced that they will be adding a DNA matching service to their offering, and then on November 7th announced they would be conducting DNA tests themselves. Now, MyHeritage has enjoyed partnerships with 23andMe and Family Tree DNA for quite some time now, but those partnerships have been woefully underutilized and are little more than an affiliate service, where MyHeritage provides a discounted rate to test at those companies.
There is no question that the launch of DNA Heritage fully into the genetic genealogy market is exciting news. In fact, it is something I have been pushing for ? we absolutely need someone to challenge AncestryDNA. Competition is good.
In September they began to provide matching results for individuals who had uploaded their results. As of today, uploading your results is still free, so if you have been thinking about it, you may want to take advantage sooner rather than later. As expected, the matches are only as good as the depth of the database, and it is early in the game, so their database is small, but even now we can get an idea of what to expect from MyHeritage as they take their first steps into genetic genealogy.
One of the most exciting elements of their November 7th announcement is their development of a Founder Population project where they have handpicked individuals to represent their reference population for calculating ethnicities. They plan to launch with 25 population groups, but will likely increase to 100 in a fairly short amount of time. This is a far more advanced ethnicity report than is currently offered anywhere else.
After you have figured out how to download your raw data from your testing company (see my instructions here: http://www.yourdnaguide.com/transferring), and then managed to add it to My Heritage (you have to add a family tree to MyHeritage to do this, see further instructions in their May press release), and waited the requisite time to process, you will receive a notice that you have new DNA matches.
For a full review of the features and ins and outs of where to click and what to look at, please refer to the September blog post from MyHeritage.
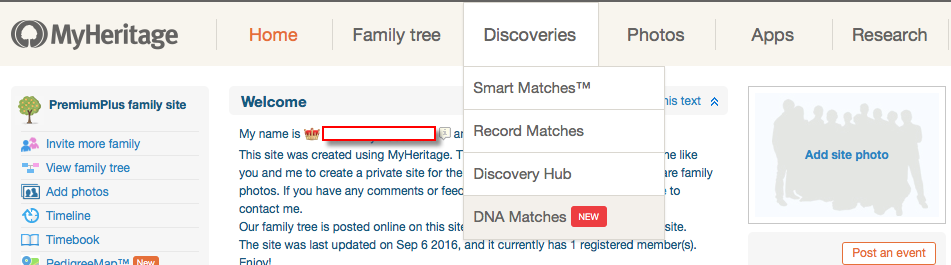
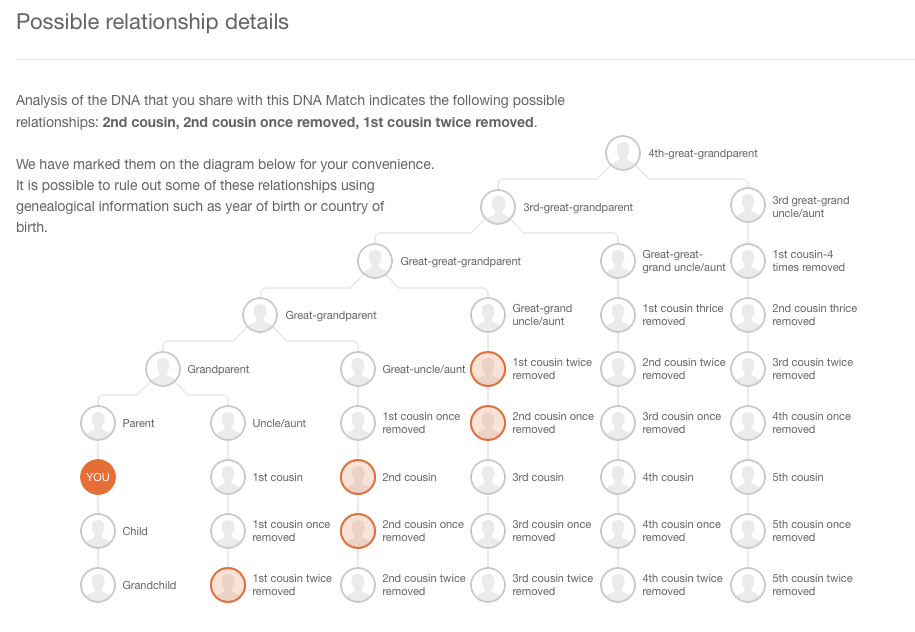
As for my favorite features, I like how they list all the possible relationships that make sense between you and your match taking into account multiple factors like your age, gender, and your genetics instead of a simple, generic range like 2nd-4th cousins. The accompanying chart that visually shows you all possible relationships is also very helpful. You can access it by clicking on the little question mark icon next to the relationship suggestions. I like that these suggestions remind us that our genetic relationships have different genealogical interpretations. Meaning that genetically, a 2nd cousin once removed, a first cousin twice removed, and a second cousin, all fall within a similar genetic range and it is impossible to determine your exact relationship based on the genetics alone.
I also like that they are providing all three genetic descriptors of your relationship: total amount of shared DNA, how many segments are shared, and the size of the longest piece of shared DNA. While this more of an intermediate to advanced piece of your results, it can be important as your relationship analysis becomes more involved.
One unique claim made by MyHeritage in their press release about their matching feature addresses a main concern that genetic genealogists have: the lack of pedigree information provided by their matches. MyHeritage claims that 95% of their DNA samples have pedigrees attached. That is remarkable! However, from my own quick calculation of my matches, the number with pedigrees is more like 60%.
They also indicated that they will soon be doing a bit of pedigree analysis for you by providing a list of shared surnames and locations between you and your match based on the pedigrees you have both submitted. This will certainly be a welcome addition.
According to the November 9th Q and A they haven’t decided yet if the ethnicity features will be available to those who only transfer, and they hint at many more features they have in the works that may only be offered to those who purchase their test.
In short, the MyHeritage site is currently functioning much like the top three genetic genealogy sites (Ancestry, Family Tree DNA, and 23andMe) and like the free tool Gedmatch, offers a meeting place for those who have been tested at one company to meet those who have tested at another, with the added bonus of a promise of new features on the horizon.
Disclosure: This article contains affiliate links and Genealogy Gems will be compensated if you make a purchase after clicking on these links (at no additional cost to you). Thank you for supporting Genealogy Gems!
The Genealogy Gems Podcast Episode 199 with Lisa Louise Cooke
Click the player below to listen:
In this episode, Lisa celebrates Canada’s 150th anniversary with Claire Banton from Library and Archives Canada. You’ll also hear how Lisa will be marking another anniversary in 2017: the 10th year of this Genealogy Gems podcast.
More episode highlights:
An inspiring follow-up email from Gay, whose YouTube discovery Lisa shared in episode 198, and a great conference tip from Barbara just in time for RootsTech.
Genealogy Gems Book Club Guru Sunny Morton announces the new Book Club title.
Your DNA Guide Diahan Southard shares thoughts about DNA testing with kids.
JOIN THE CELEBRATION! 10th ANNIVERSARY AND 200th EPISODE
You’re invited to send in well-wishes and win a chance at a prize!
Share a memory of listening to this podcast, such as: When did you start listening? What’s one of your favorite things you’ve learned from this show?
Lisa will randomly select one response to receive a free year of Genealogy Gems Premium membership. Thanks for helping all of us here at Genealogy Gems celebrate 10 years of doing something we love!
NEWS: ROOTSTECH 2017
RootsTech will be held on February 8-11, 2017 in Salt Lake City, UT: learn more and register.
Lisa will be live-streaming FREE sessions the marked session via the free Periscope app. Get it in Apple’s App Store or Google Play. Sign up for a free account and follow Lisa Louise Cooke to tune in. Sign up for notifications in Periscope, and your phone will “ping” whenever Lisa starts streaming! Broadcasts stay in the Periscope app for 24 hours. Like and follow the Genealogy Gems Facebook page to hear about more streaming sessions!
NEWS: FAMICITY KICK-STARTER
Famicity is a free, private website for families to share pictures, videos, memories, family activities and the family tree. The company has been very successful in France where it was launched, and the founder is working to bring the new English platform to the United States. He’s launched a Kickstarter campaign to support their U.S. launch. Click here to support it.
BONUS CONTENT FOR GENEALOGY GEMS APP USERS If you’re listening through the Genealogy Gems app, your bonus content for this episode is a tutorial on Feedly, an easy way to consume just the online content you want. The Genealogy Gems app is FREE in Google Play and is only $2.99 for Windows, iPhone and iPad users
Lisa Louise Cooke uses and recommends RootsMagic family history software. From within RootsMagic, you can search WebHints on FamilySearch.org, Findmypast.com and MyHeritage.com. Soon RootsMagic will also be able to search records and even sync your tree with Ancestry.com, too.
Keep your family history research, photos, tree software files, videos and all other computer files safely backed up with Backblaze, the official cloud-based computer backup system for Lisa Louise Cooke’s Genealogy Gems. Learn more at http://www.backblaze.com/Lisa.
MAILBOX: YOUTUBE DISCOVERY FOLLOW-UP
Remember the YouTube success story from Genealogy Gems Podcast episode 198? Gay as a young woman attended a dedication ceremony for the saline water treatment in Freeport, Texas?and with Lisa’s tips she found video footage on YouTube.
Gay wrote back to send us more about that, including this page from her diary that day and this news clipping. Check out the news clipping to see why that plant was so important, Pres. John F. Kennedy gave the dedication speech. (See what newspapers can tell you?!)
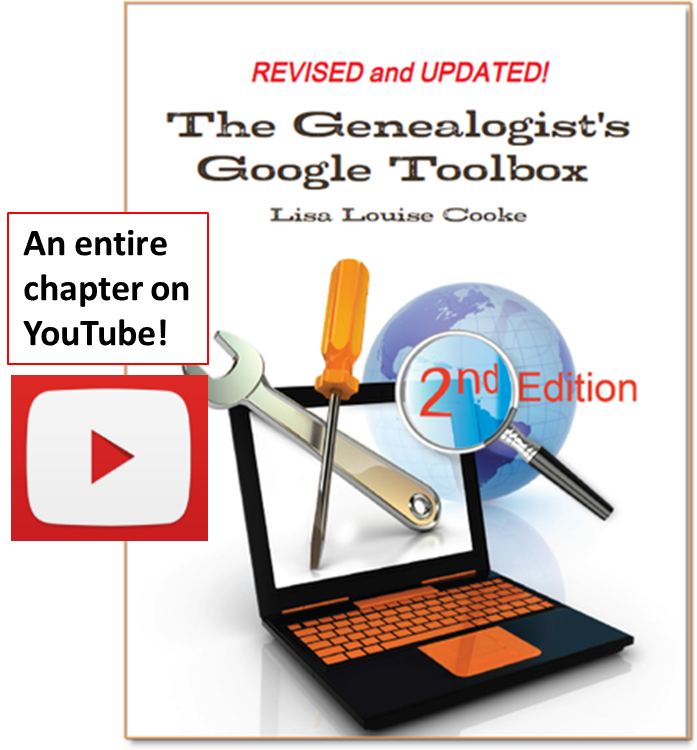
Find your own family history on YouTube. Click here to learn how or read an entire chapter on YouTube in Lisa Louise Cooke’s book, The Genealogist’s Google Toolbox, 2nd revised edition.
Click here to learn how to turn family stories and artifacts like these into videos to share with relatives.
Learn to find articles such as this one that can put your family’s story in context?locally and even nationally. Read How to Find Your Family History in Newspapers by Lisa Louise Cooke.
INTERVIEW: CLAIRE BANTON, LIBRARY AND ARCHIVES CANADA (LAC)
Claire Banton obtained her Masters of Library and Information Studies degree in 2006. She has worked in Reference Services at LAC for 10 years, where she has enjoyed learning something new every day. She is currently Chief, Orientation Services, where she works with an awesome team who help people search for information. She loves being an information detective and helping people overcome their research challenges.
Start with the LAC website (genealogy resources page) whether you are visiting in person or not. There are loads of free databases and some unindexed digitized records. The Topics page will tell you what they do and don’t have.
There was no border control from the US to Canada prior to 1908, so there are no Canadian records of earlier crossings. [Tip: see border crossings to the US, 1895-1956 at FamilySearch.org and Ancestry.com.]
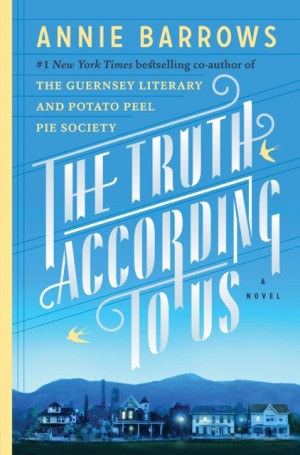
It’s the summer of 1938, and wealthy young socialite Miss Layla Beck is now on the dole as a WPA worker, assigned to write a history of the small town of Macedonia, West Virginia. As she starts asking questions about the town’s past, she is drawn into the secrets of the family she’s staying with?and drawn to a certain handsome member of that family. She and two of those family members take turns narrating the story from different points of view, exploring the theme that historical truth, like beauty, is often in the eye of the beholder.
Click here to read an introduction to using WPA records for genealogy.
I was talking with a fellow mom the other day about all the demands that are placed on kids’ time today. They have school and homework, many have after school sports and clubs, religious meetings, some have jobs or at least chores at home, not to mention all the time required to text, check social media, and hang out with friends. As parents and grandparents, we want our children to spend time on things that matter, things that will prepare them for their future lives and mold them into their future selves.
According to a 2010 study out of Emory University, if we want to encourage kids toward an activity that will positively impact them, we should steer them toward family history. The researchers reported that “children who know stories about relatives who came before them show higher levels of emotional well-being.”
Now, I know I don’t need to convince you of this. You are already sold on genealogy. But I share this in the hope that it will push you over the edge and this will erase any hesitancy you have about sharing this love with your children and grandchildren.
Now, since you know this is me, the genetic genealogist talking, you can probably guess what I’ll suggest for getting kids interested in family history. DNA testing is a great way to personally and physically involve them. First of all, there is the tangible process of taking the sample at home, and the marvel at how such a simple act can produce the amazing display of our ethnicity results.
Since each of us is unique, it will be fun for them to compare with you and other relatives to see who got what bit of where. This will naturally lead to questions about which ancestor provided that bit of Italian or Irish, and wham! You’ll be right there to tell them about how their 5th great grandfather crossed the ocean with only the clothes on his back, determined to make a new start in a new land.
If there are parts of the ethnicity report that you can’t explain, use that as a hook to encourage them to start digging and to find out why you have that smattering of eastern European or south east Asian. Taking them for a tour of the DNA match page you can show them how they share 50% of their DNA with their sister (whether they like it or not!) and how they share 25% with you, their grandparent!
DNA test results give kids a totally unique look at their personal identity with technology that is cutting edge. Looking at their DNA test results can turn into a math lesson, a science lesson, a geography lesson, a lesson on heredity or biology, a discussion on identity?wherever you want to go with it! DNA is the perfect introduction to the wonders that genealogy can hold, especially for children who are so good at wondering.
Click here to learn more about Diahan’s series of how-to videos, available to Gems fans for a special price. Or start your DNA journey with the guide that will help you get started with kids’ genetic genealogy:
Disclosure: This article contains affiliate links and Genealogy Gems will be compensated if you make a purchase after clicking on these links (at no additional cost to you). Thank you for supporting Genealogy Gems!
Show Notes: When you find family history information online you MUST make every effort to find the original genealogy record so that your family tree will be accurate! There are 5 reasons to find original records. I’ll explain what they are, and what to look for so that you get the most information possible for your family tree.
If you’re a genealogy beginner, this video will help you avoid a lot of problems. And if you’re an advanced genealogist, now is the time to fix things.
Records come in many forms. Many genealogy websites consider that each name that appears on a document is a “record” when they’re counting records. So, when you hear that 10 million records have been added to a website, it doesn’t necessarily mean that 10 million genealogical documents have been added. It oftentimes means that that’s the number of names that they’ve added.
One document could have a lot of names. In the case of a death certificate, it could have the name of the deceased, the name of the spouse, the name of the informant, and the names of the parents. Each one of those gets counted as a record.
Recently, MyHeritage announced they’ve added 78 million new records to their website. However, many of these records are simply transcriptions, they’re extracting the information from whatever the original source was. That information becomes searchable, and that’s terrific because they are great clues. So, sometimes when you go and look at the records themselves, it turns out that record really is just a transcription. There is no digital record to look at.
Sometimes the website doesn’t even tell you what the original record was. There will be clues, though. You can use those clues and run a search on those words. So, if it talks about a particular location, or type of record, or the name of the record, you could start searching online and find out where are those original records are actually held. Sometimes they are on another genealogy website. But a lot of times, and I’ve seen this more recently, they are publicly available records, oftentimes from governmental agencies. Very recently, we’ve been seeing more recent records that are just selected text. They may be records for people who just passed away a year or two ago.
There are a wide range of places where these types of records can come from. But if that genealogy website got its hands on the record, chances are you could too. And it’s really important to do that.
#2 What’s important to you might not have been prioritized for indexing.
The indexer is a person, or perhaps even an artificial intelligence machine, who has gone through the documents and extracted information and provided it in text form. Sometimes when you search on a genealogy website, all you’re getting is just that typed text, that transcription, of some of the key data from the original document.
I’ll tell you about one example in my family. I was looking at a 2x great grandmother back in Germany. Her name was Louise Leckzyk. She’s listed as Louise Nikolowski in the Ancestry record hint. Technically, that’s true, she was Louise Nikolowski at the time of the birth of her child. But if you pull up the original record, what you discover is she’s not listed as Louise Nikolowski on the record. She’s listed with her maiden name, which was usually the case in those old German church records. So that’s huge. We’ve talked about how challenging it can be to find maiden names here on the Genealogy Gems channel. So, we don’t want to miss any opportunity to get one. But if we had taken this record hint at face value, and just extracted that information, put it in our database, or attached it to our online family tree, and never looked at the original document, we would have completely missed her maiden name. And that maiden name is the key to finding the next generation, her parents.
#3 Not all information on a record is indexed.
It’s very common for large portions of information on a document not to be indexed. Here’s the reason for that: Indexing costs money. When a genealogy company takes a look at a new record collection they have some hard decisions to make. They have to decide which fields of information will be included in the indexing. Oftentimes, there will be several columns, as in a church record or a census record. The 1950 census was an example of this. There’s so much data that the company has to look at that and say, what do we think would be of the most value to our users? They then index those fields. They’ve got to pay to not only have them indexed, but potentially also reviewed human eyes, or AI. That all costs money.
So, there will inevitably be information that gets left off the index. That means that when you search the website you’re going to see the record result, and it can give you the impression that that is the complete record. But very often, it’s not the complete record. Tracking down and taking a look at the original digital scan of the record is the only way to know.
It’s possible that the records have not been digitally scanned. In the case of public government records, that information may have been typed into a database, not extracted from a digital image. There may not be a digital scanned image. It may be very possible that the only original is sitting in a courthouse or church basement somewhere. It’s also possible that the digital images are only available on a subscription website that you don’t subscribe to.
We need to do our best to try to track down the original document and take a look at it to see if there’s anything else that’s of value to us in our research that the indexers or the company just didn’t pick up on or didn’t spend the money to index.
#4 Different websites potentially have different digital scans of the same record.
Websites sometimes collaborate on acquiring and indexing records. In those cases, they might be working with the same digital images. But oftentimes, they create their own digital scans. That means that a record may be darker or lighter, or sharper or blurrier from one website to the next. So while you found the record on one website, another might have a copy that’s much easier to read.
Digital scanning has also come a long way over the years. Many genealogy sites now are looking at some of the earlier scans they did. They’re realizing that some are pretty low quality by today’s standards. They might determine that it’s worth going back and rescanning the record collection. This happened with some of the earliest census records that were digitized many years ago. It makes a lot of sense, because a lot of time has passed, and technology has certainly changed.
So even though you found information many years ago, it might be worth taking a second look if you have any questions about what’s on that document. You may find that that record is actually a newly digitized image on the same website, or you might find that it’s also available somewhere else.
A lot of the partnerships out there are with FamilySearch which is free. So, while you may have a paid subscription to a site like Ancestry or MyHeritage, if there’s anything that you’re questionable on, or you didn’t actually see the original document from one of those paid websites, head to FamilySearch.org. Run a search and see if they happen to have the digitized images. There’s a good chance they might, and it’s worth taking a look.
Sometimes the genealogy website will have tools that allow you to get a better look at the digitized document. Ancestry is a great example of this. On the digitized image page click the tool icon to open the Tools menu. One of my favorite tools is “Invert colors”. Click that button, and it will turn it into a negative image. Sometimes this allows words to pop out in a way that they were not as clearly visible in the normal view.
I downloaded a digital scan from a website several years ago, and it was hard to decipher. I did some searching and was able to find a clearer copy on another website.
#5 You can verify that the words were indexed accurately.
Reviewing a scan of the entire document provides you with a lot of examples of the handwriting of the person who made the entry. If you have any doubt about words or spelling, making comparisons with other entries can be extremely helpful.
When I first looked at a baptismal record of my 2x great grandmother’s son, I thought her surname was Lekcyzk. However, after seeing a different digital scan, I started to question that. Having the original record allows me to review the handwriting of the person who wrote these records. Comparing the handwriting of other entries on the page helped me determine that the swish at the top is the dotting of an eye that just had a bit more flourish. I also reconfirmed that the Z in the name is definitely a Z by comparing it to other Zs on the page.
Bonus Reason: You may have missed the second page.
Some records have more than one page, and it’s easy to miss them. If the indexer took information primarily off of the first page, it may not be obvious when you look at that page, that in fact, it’s a two-page (or more) document. More pages potentially means more valuable information!
It’s also possible that if you downloaded a document years ago when you first started doing genealogy, you might have missed the additional pages. Now that you’re a more experienced researcher, it would be worth going back and looking at particular types of records that are prone to having second pages. Examples of this are:
census records,
passenger list,
passport records,
criminal records,
and probate records.
If you have single page records that fall in one of these categories saved to your computer, you might want to go back and do another search for them and check the images that come before and after that page to see if there are more gems to be found.
I hope I’ve convinced you to always make the effort to obtain and review original records for the information that you find while doing genealogy research online.
I’ll bet there’s even more reasons to do this, so I’m counting on you. Please leave a comment and let me know what you’ve found following these 5 reasons, and any additional reasons that you have.


 First Wheel in Town: A Victorian Cycling Club Romance. This is from her series of light-hearted historical fiction set in an era she knows well!