Here’s how to make a family history interview video. We’ll walk you through an easy and quick process that will result in a professional quality video that you’ll be proud to share with your family and generations to come.
My husband Bill does not enjoy being on camera, and if I add an interview to the scenario, I have an even bigger challenge on my hands. Does that sound like anyone in your family?
Getting a family member to sit down and answer questions about their life or an ancestor they remember can be an uphill battle, but the climb is worth it. Each one of us has a very unique view of the world. Even though we may remember the same person, our memories and feelings will be distinctly individual, and therefore are worth capturing.
Father’s Day is just around the corner, and we have a new granddaughter joining our family next month. Now seemed like the perfect time to quickly cobble together an interview video with Bill sharing his memories about his dad. I shared some old photos with him and captured his memories. Take a look:
Maybe you’ve been thinking to yourself, ‘Right now just isn’t a good time.’ But guess what! ‘Right now’ is always the ideal time to capture the memories of living relatives. Don’t wait for the opportune moment to present itself, because it might never come. Right now is the perfect time for you to ask questions and record memories that might otherwise have been lost forever.
If you’ve got a few extra minutes to prep for a more polished interview, follow my recipe for creating a video your family will savor for generations to come.
Even though we may remember the same person, our memories and feelings will be distinctly individual, and therefore are worth capturing.
Ingredients for a Family History Interview Video
(Note: I only endorse products that I love and that’s why I’ve accepted Animoto as a sponsor. That means I was compensated for this post. This post also contains affiliate links and I will be compensated if you make a purchase after clicking on my links. Thank you, because they help support the free Genealogy Gems Podcast.)
To create a video like mine, which in total took me about 1 hour from start to finish to create, you’ll need:
a smart phone or tablet (I used my iPhone 7 Plus to capture video of Bill answering my questions. The iPhone has a terrific camera built in, but any mobile device with a camera will do.)
old family photos (I saved mine to a Dropbox folder that I could access on my iPad)
an Animoto slideshow subscription (test drive Animoto with a free trial if you want to get the feel of it before subscribing.)
a short list of questions pertaining to the photos
a willing interviewee (that was my hubby, although I use the term “willing” loosely here)
Pull together everything before you bring in your interviewee. That way, they won’t start off the interview bored or frustrated while you get things ready. We definitely want to get this off on the right foot!
Setting the Stage
Find a comfortable chair for your interviewee and then place it in front of an attractive background in the room. To get a feeling of depth and a nice focus on my subject, I placed my chair in the center of the room so that the background was in the distance. This setup puts the focus on the person you are interviewing and not the items right behind him.
Lighting can make a big difference in the feel of your video, but it doesn’t have to be fancy. Notice that I kept the background fairly unlit, and then turned on a nice soft lamp on one side of Bill. On the other side, out of camera view, I brought in a second light so that both sides of his face would be lit.
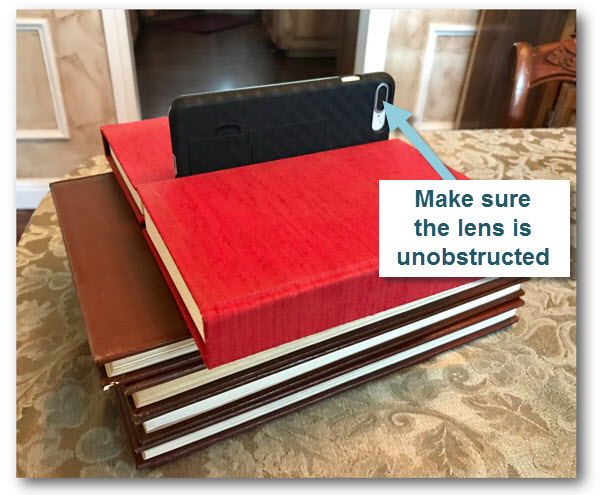
Set up a small, portable tripod on our coffee table in front of my subject and mounted my smartphone (I like this one, which was less than $12). If you don’t have a tripod, just stack up a couple of books on the table to get to the right height, and then use a book on either side of the camera to keep it stable.
The video viewer side facing you as the interviewer
The lens side facing your interviewee
Position a chair for yourself behind the camera, and off to one side. Stay within reaching distance of your camera so that you can turn it on and off between questions. You will want to be off to one side so that your subject is looking at you and not the camera when they answer your questions during filming.
‘Right now’ is always the ideal time
to capture the memories of living relatives.
Start the Interview
Bring your subject in, and get them comfortable in their chair. Have a glass of water nearby for them. Chat with them for a moment about how they are doing, the weather, or whatever else comes to mind (except family history – save that for the video) to sort of warm them up. Explain that they don’t need to worry about the camera, but instead should just focus on talking to you.
To ensure an easy to understand video, encourage them to repeat back the question in their answer because your audio won’t be part of the interview. For example:
You: “What was your mom like when you were a child?” (showing a photo of them and their mom)
Them (OK) : “She took great pride in her home, and she insisted we take our shoes off before entering.”
Them (BETTER) : “When I was young, my mom took great pride in her home, and she insisted that we take our shoes off before entering.”
Folks usually get the hang of it after a couple of tries. Finally, ask them to wait just a beat before they begin talking and to avoid talking over you. Again, the goal is to only capture the audio of the interviewee.
Armed with your list of questions, bring out the first family photo (I did this on an iPad where I had the photos saved in my Dropbox app). On your phone, tap the Camera app to open it, set it to Video, and pressed the big round record button. Move back to your off camera position, and show the first photo and ask your question. Don’t worry about the beginning or the end of the Q&A being messy with getting situated because you will trim that off later in Animoto. After they complete their answer, press the button on the screen to stop recording. It is much easier to work with short video clips rather than one long continuous recording for a number of reasons:
It’s easier to move small video clips from your phone to your computer
Video clips up to 450 MB can be uploaded to Animoto (that’s typically just a little over 4 continuous minutes of video)
One question per clip makes it much easier to move them around in your project to get the exact order you want
It’s easier to interject photos between clips when the questions are individual video clips
Pull up the next photo, press Record, and ask your second question. Repeat for each question and answer. If you go longer than about 20 minutes total, it’s a good idea to stop and ask them how they are doing. Ask if they are agreeable to continuing. Be sensitive to their time and comfort. Remember, people before genealogy.
Post Production of Your Family History Interview Video
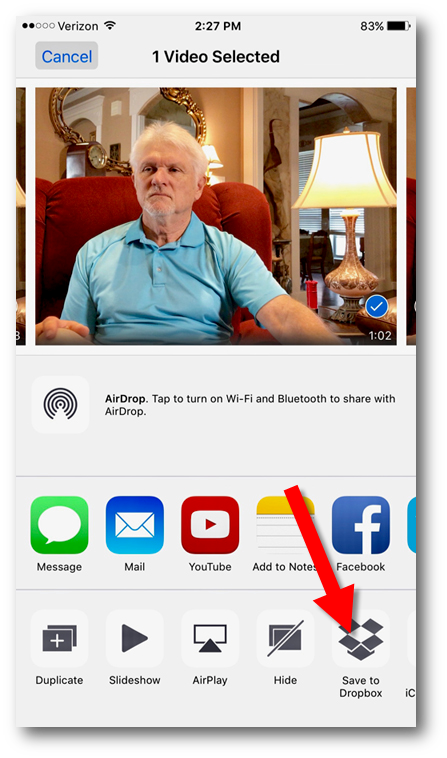
Step 1: In the Camera app, tap Share and Save to Dropbox
As a podcaster, pre- and post-production takes up much more of my time than recording. But with Animoto, your post-production time will be really quick. Here are the steps to creating your finished video:
Step 1: In the Camera app, Share your videos to your computer via a cloud sharing service.
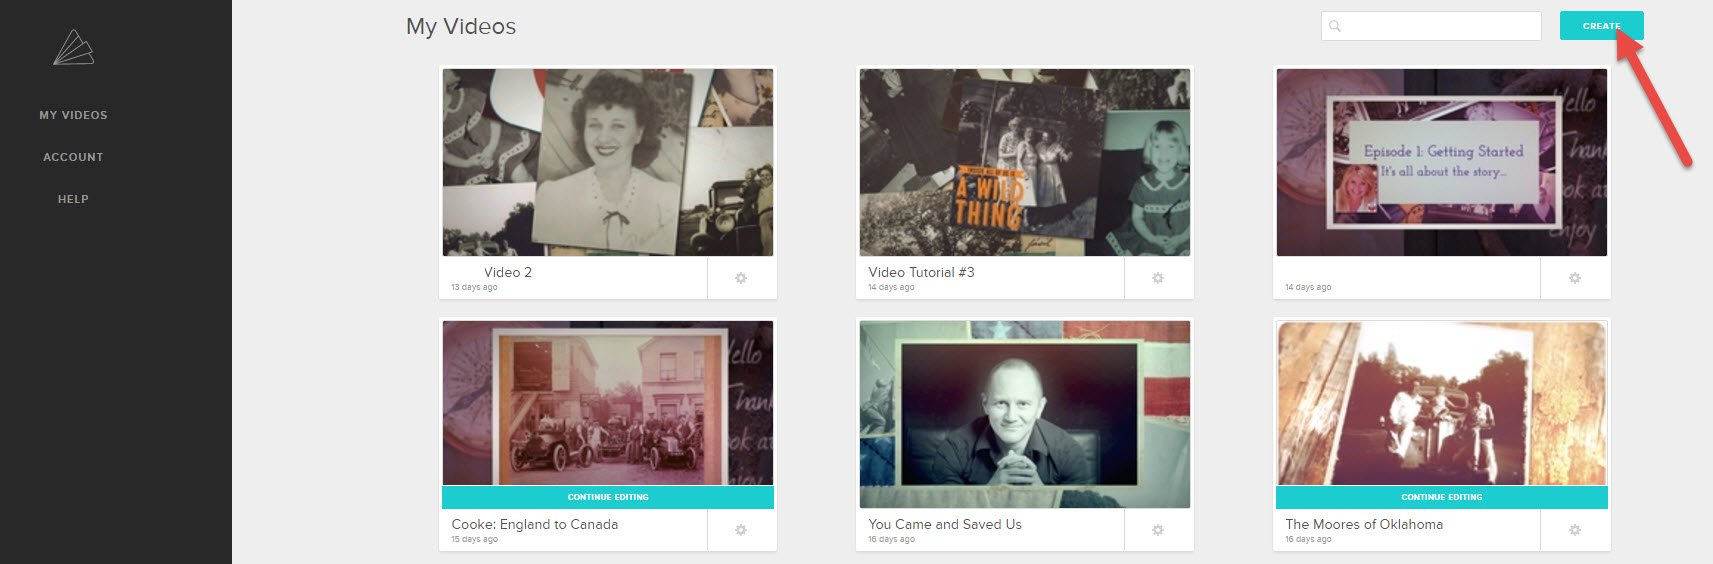
Step 2: On your computer go here to Animoto, sign in and click the Create button to start a new Slideshow video project. (For 10 seconds or shorter video clips you can create your video right on your phone in the Animoto app. But in the case of this type of interview, answers will be longer and you’ll want to use the website.)
Step 3: Select a Style and the Song that will play in the background.
Step 4: On the project page, click Add pics & videos, and upload the video clips and photos. Adjust the length of each video clip as desired, eliminating unwanted portions.
Step 5: Arrange the content in the desired order. I chose to show the answer first, and follow it up with the photo.
Step 6: Add Text if desired. You can add text to photos, or individual ‘title cards’ at the beginning, middle, and end of your video.
Step 7: Click Preview to review your video and make any needed adjustments.
Step 7: Preview one last time and click Produce to render your finished video.
Step 8: Download a copy of the video to your computer, and make sure your computer is backed up! (I use Backblaze.) The ability to download HD quality videos from Animoto for archiving is a HUGE reason why I love it so much.
I’ve got three quick tutorial videos here for you to watch if you feel like you need some help with your first project.
Remember, people before genealogy.
Need more inspiration?
I’ve been having a blast creating Animoto videos about my husband’s family. It’s been a great way to get my non-genealogist husband involved and really interested in family history. Here are two more videos I created about his family:
It’s the last day of March, so it must be time to start thinking about Christmas, right?
OK, so you may not be thinking about your next Christmas craft project or gift-giving. But March has been Women’s History month and I’ve got a fun and easy craft project for you that will honor your female ancestors, help you do a bit of Spring cleaning of your stashes of left over fabric, and put you well ahead of the game when it comes to holiday prep.
Follow along with me in the video below as I piece together a crazy quilt Christmas stocking.
Familiar Female Faces
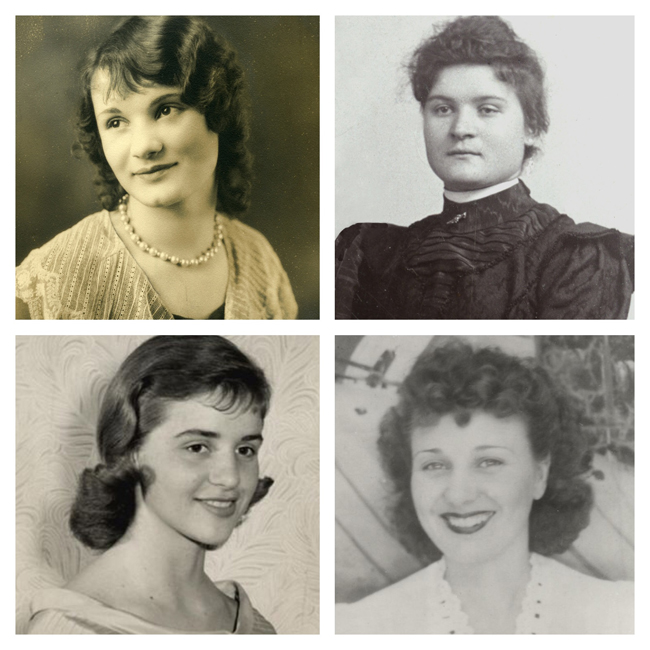
This stocking not only possesses a nostalgic flare with its Victorian-era crazy quilt design and embroidery, but it’s also brimming with familiar female faces from my family tree. Gathering together as many photos as I could of the women that I directly descend from was a fun challenge. I scoured old photo albums, searched online family trees, and put the word out to family members to make sure I had every available image. I was pleasantly surprised at how many I came up with.
Not Just for Stockings
This crafty idea certainly isn’t limited to Christmas stockings. You could translate this into a wall hanging, or even a full-size bed quilt. Make one as a gift, and it will surely be handed down the family lines for generations as a treasured heirloom.
Create a Video Story of Your Creation
I made this video with Animoto, a web and mobile app that makes this job of video creation oh, so easy! And it got me to thinking how lovely it would be to give a “bonus” gift of video to the recipient of this family history present.
Re-purpose the Photos – since you’ve already pulled out the photos to create the transfer images, why not drop them into Animoto? Add your memories, poems they wrote, and any other tidbits that help their legacy shine through. Sprinkle with a bit of music (Animoto has loads of songs to choose from), and in minutes you can create a short tribute video to the women in your tree.
Document the Project– Grab your smartphone and snap pictures and videos during the process of creating the stocking (or other form of this project). Toss your photos and videos into Animoto, add personalized comments, and you’ll have a sweet video to accompany the gift. It will show how you poured love into every stitch! (Ah! What I wouldn’t give for such a video of my Grandma sewing the lovely items I treasure today!)
(Full disclosure: This post contains affiliate links and I will be compensated if you make a purchase after clicking on my links. I appreciate you using these links because that compensation helps make the Genealogy Gems blog possible. Thank you!)
Animoto is a trusted sponsor of the Genealogy Gems Podcast.
In this blog and video series I’m showing you how you can create captivating videos about your family history quickly and easily with Animoto.
In the First Episode
In episode 1 we laid a foundation for the family history video that you are going to create. Doing this will save you time and ensure a cohesive, well-told story. We also:
defined your audience
identified and outlined the story that you want to tell
collected the content that you will include in your video
If you missed episode 1, you can watch it below:
Get a Free Animoto.com Account
The first thing to do is to go to Animoto here and sign up for a free trial account, which gives you the full power of Animoto Pro. No credit card is required. This trial period is the perfect opportunity to test drive Animoto and see just how easy it is to use. As I’ve said before, if you can click, drag, and drop, you can make videos with Animoto.
The videos you create during the trial will be watermarked, but still downloadable and shareable. If you decide to use Animoto beyond the trial period, there are several pricing plan options. You can purchase as little as one month for around $16 (check their site for current pricing). If you’ve done your prep work like we did in episode 1, you can create several videos in that time period.
OK, I know you’re anxious to get going, so let’s create a video!
Create!
It’s super easy. Once you’re signed into your account, click the Create button.
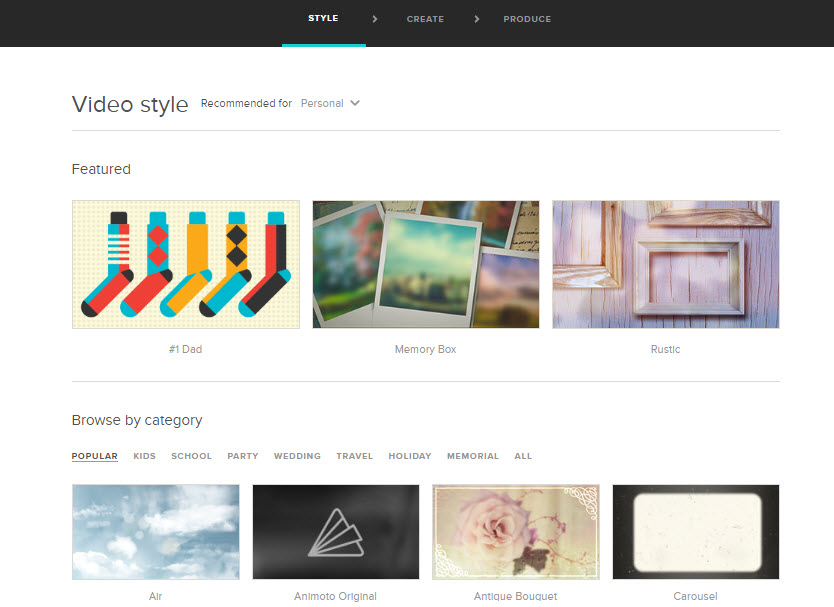
Style
First up, select a style that fits your story. Here are some of my favorites for family history:
Memory Box
Antique Bouquet
Remembrance
Vintage Voyage
Rustic
You’ll notice that some styles have a Premium banner. Those require a Premium subscription. However, if you’ve opted for a Personal level subscription you still have lots of wonderful styles to choose from.
Click on a style that catches your fancy and watch a preview of what it will look like. When you find the one you want, click the Create Video button on that style page. This will load the Video Creator.
Music
The style you chose will include a song, but you can change that if you want to. To select a new song, click Change Song, and you can pick a song from the Animoto library.
You can also upload your own music mp3 file from your computer. (Remember to keep copyright in mind, and make sure you have the rights to use the song.)
But wait, you can add more than music! You can also upload an audio file, such as a family history interview, or even an mp3 file that you created that includes both music and words.
Adding Pictures & Video
Now it’s time to add your photos, images, and video clips. Of course that’s easy because in episode 1 of this series you created an outline for your story, and you copied the files you wanted to use to illustrate that story into a folder on your computer. So you’re all set to go!
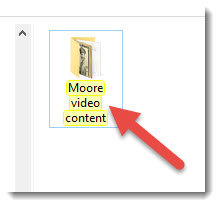
There are two ways to add files. From the menu, click AddPics & Vids, or on the timeline click the plus sign in the empty box. In the pop up window you’ll find lots of options for imagery, including stock photos from Animoto. But for now, let’s add the images you put in the folder on your drive (see episode 1).
Under Your Computer click Upload Pictures and Video. Navigate your way to your content folder on your computer’s hard drive. Click to select the first image, and then you can select them all by holding down the shift key on your keyboard, and clicking the last image in the folder. Press Enter on your keyboard to add them to your project.
You can rearrange the order of your images and videos by dragging and dropping them with your mouse. If you decide to eliminate an image, simply click to select it and from the menu click Delete.
Text
Next, we’re going to add text to your videos, creating title cards. Again you can do this from the menu, or just click the plus sign in the empty box on the timeline, and then click Add Text.
In the pop up box you’ll type a title (or the main text) and then you have the option to add a subtitle. This is where the outline we created in Video 1 comes in so handy! When you’re done, click Save. And don’t worry because you can always go back and change any text at any time.
Title cards are great for the beginning and ending of your video and also for transitioning to different parts of the story.
Simply click and drag the cards into the order that you want them.
You can also add text captions to each of your images. Hover your mouse over the image and click Caption under the image. In the pop up window containing your image, click to place your cursor in the text area, type in the desired text, and then click Save.
Spotlighting an Item
You may have a few images or title cards that you want the “camera” to spend a little more time on, thereby spotlighting it. To create that effect, just click to the select the image or title card, and then click Spotlight in the menu. I particularly like to Spotlight title cards so that the viewer has plenty of time to read them.
Previewing
So let’s see how this looks so far, and to do that we’re going to click PreviewVideo. You can preview your video at any time during the production process.
A low resolution version of your family history video will be created in about 15 seconds. Then you can watch and see what little tweaks and changes you want to make. Click Continue Editing to head back to the timeline and keep working.
Next Steps
I hope you’re getting excited about your video projects. Next time we get together, we’re going to bring our projects down the homestretch and produce them into glorious shareable videos.
Welcome to this step-by-step series for beginning genealogists—and more experienced ones who want to brush up or learn something new. I first ran this series in 2008. So many people have asked about it, I’m bringing it back in weekly segments.
In this episode, I chatted with Margery Bell, Assistant Director of the Oakland, California Family History Center. Her own family history journey started in her 20s with a visit to a relative’s house. She didn’t even know what to talk about! But it was a start. Years later, she visited the Northern Ireland home of her great-grandmother, and felt like she’d come home. Learn her tips for getting started and two inspiring stories of “genealogy serendipity.”
In the second half of the show, you’ll learn why choosing a database for your family tree is your first essential step. Hear about some of my favorite databases—both free resources and products you can pay for. Don’t spend too much time fussing about software: I’ll tell you why you should just pick something and go with it.
Choosing a Genealogy Database
Whether you want to build an elaborate family tree, or just want to know who your direct ancestors were and some of the stories about them, the place to start is to get yourself a family history database. You don’t have to be highly computer savvy to use one. They are VERY intuitive and user friendly. Basic data entry skills is all you need.
Now I know you’re anxious to get started finding out about the folks who came before you and contributed to putting you on this planet. But this step is key to long term success and enjoyment. I know too many people who have gotten all excited and jumped in, getting all kinds of information about their family, but without a database they very quickly end up with huge stacks of paper and stickie notes. With all this chaos they often end up duplicating efforts they forgot they already did which is a waste of precious time. And worst of all, when someone shows an interest in what they are doing, it’s impossible to coherently pull out the information from the jumbled stacks in order to share it.
Having a family history database will keep all of your findings organized, with proper background information on where you found the data, as well provide a place to pull together photographs, documents and everything else you discover along the way. It’s like painting a piece of furniture. A little prep work goes along way to a really nice finish.
Now there are lots of family history software programs out there, but you only need ONE, and all of them will serve your basic needs. So I’m going to give you my top choices. It’s you’re decision how much you want to spend and how sophisticated you want your database to be.
If FREE is your price range, and you’re looking for a place to stay organized with streamlined screens to work in without a lot of startup time, then Family Tree Legends Online is perfect for you. (Family Tree Legends Online is now Family Tree Builder by MyHeritage.
Don’t let FREE fool you into thinking it won’t do the job. Legends offers lots of family history charts; custom reports; helps you share your data and pictures on a CD or DVD; allows you to back up your files to CD or DVD; and includes genealogy programs for Palm handheld devices and the Pocket PC. I’ve used it and it’s great. You can download the software FREE at the above link.
If you’re a PC user and are willing to spend $30-40 dollars, there are several really good and easy to use options available. You can order the product or purchase a digital download which will save you some money. And frankly, I really don’t think you need to the physical boxed product. All the help you need is online. And all of these products offer a free demo that you can download to try it out before you buy.
The top seller is Family Tree Maker which is from the folks at Ancestry.com which is the largest online records website which we’ll be talking a lot more about in future episodes. Click on its name to learn more about Family Tree Maker. This is probably the most commonly used database out there.
If you’re looking for great printed reports that you can share then RootsMagic is a great choice. It’s available as a digital download from their website at RootsMagic.
Some of the differences you’ll find between these products is the types of reports and charts they produce. So if that’s important to you, you can try the demos and see which you like. But again, I really don’t think you can go wrong with any of these products. They are all well established and fully supported.
And I want to stress, it’s just important that you take the steps and get started. Don’t get bogged down in analyzing software forever. If you really want to change to a different program down the road you can always do that. But the important thing here is that you have a place to put the information that you find and be able to retrieve that information so you can share it with others.
Now if you’re a Mac user I have two solid programs you could use. Again, both of these programs offer free demos if you want to test drive them:
Reunion 9 is fairly pricey at $99.95. If you’re interested in Reunion 9, I highly recommend that you listen to Episode 51of my more advanced Family History show called The Genealogy Gems Podcast. In that episode you can listen to a review of Reunion 9 by my contributing partner Ben Sayer, the MacGenealogist, who’s an expert on everything Mac for family historians. And if you want to compare iFamily against Reunion to see what you’re getting for your money, you can also listen to Ben’s review of iFamily in Genealogy Gems Episode 53.
Now when you fire up your new software database it’s going to ask you to fill in information about yourself, then your parents and so on. In family history we always start with ourselves, and then work our way backward. So enter everything you know. By just enter data on you and your parents, you’ll very quickly get a feel for how the program works. And once you get everything in there that you know, go ahead and try and print out a pedigree chart.
And there’s our first family history term: “pedigree chart.” You’ve probably heard the term used for pure bred dogs, but pedigree just means lineage or ancestral line. It shows your parents, grandparents, great grandparents, etc. No aunts, uncles or siblings. Just the folks you directly descend from.
Another type of chart your database can print is a descendant chart, which shows all the people who descend from one person. So if you had two kids, your descendant chart would show you at the top, and two children directly under you. This comes in real handy when you want to have a reunion of all the descendants of let’s say your great grandpa Marvin. You would go to Marvin’s card in the database, and then print the descendant chart from there. It would then include Marvin, all his kids, his grandkids, his great grandkids and so on. But it wouldn’t show the kids spouses, or Marvin’s parents. It’s just going to tell you who was born directly as a result of Marvin.
So enter what you know, and once you’ve got all that in there, play around with your new database by printing out a pedigree chart and a descendant chart. And next week we’ll start uncovering more clues to your family history.
Here’s a final thought for today: A famous idea taken from one of Shakespeare’s plays is that what is Past is Prologue. It seems to me that a key to moving forward in your life is to look back and see what’s come before. How things were done. What worked, and what didn’t. It can inspire you to continue family traditions or give you the motivation to create something new for the next generation.
Hands up, who wants to help prep the 1950 U.S. census for us all to explore?
The 1950 census won’t be released to the public for seven more years, but it took just longer than that to create the locational tools that millions of researchers have used to find their families on the 1940 census.
The dynamic duo of Steve Morse and Joel Weintraub, who produced the locational tools for the 1940 census on the Morse One-Step site, are recruiting 200+ volunteers to help transcribe enumeration district definitions and create urban area street indexes for the 1950 census.
Their “job description” for these volunteers sounds really meaty and hands-on: “These projects aren’t for everybody. Volunteers should have basic computer skills, typing skills, have access to the Internet, be detail people but not perfectionists, be independent workers and able to follow instructions, be patient enough to handle large amounts of information, and be comfortable with projects that may take weeks or months, not hours, to accomplish. You should be able to handle and manipulate images (jpgs) of maps and Enumeration District (ED) definition scans. A large computer monitor would be desirable but not essential. We will provide instructions for carrying out the work, and a place to ask questions. Volunteers may use some free programs to help speed up the entry process. We expect volunteers to make steady progress on their assignments, and we have the luxury of time right now to do it well.”
Learn more about the project here, and try the 1940 One-Step locational tools here.
 (Note: I only endorse products that I love and that’s why I’ve accepted Animoto as a sponsor. That means I was compensated for this post. This post also contains affiliate links and I will be compensated if you make a purchase after clicking on my links. Thank you, because they help support the free Genealogy Gems Podcast.)
 Find a comfortable chair for your interviewee and then place it in front of an attractive background in the room. To get a feeling of depth and a nice focus on my subject, I placed my chair in the center of the room so that the background was in the distance. This setup puts the focus on the person you are interviewing and not the items right behind him.

 It’s the last day of March, so it must be time to start thinking about Christmas, right?