by Lisa Cooke | Nov 9, 2012 | Genealogy Gems Podcast
[iframe src=”http://html5-player.libsyn.com/embed/episode/id/2121515/height/100/width/480/thumbnail/yes” height=”100″ width=”480″ scrolling=”no”]
Today’s gem focuses on a challenge that we all face as family historians – getting organized, archiving all of our stuff, and digitizing materials an d photos. I know that’s biting off a big chunk, but it’s such an important one. And in this episode I’m going to start to break it down for your with the help of the Family Curator, Denise Levenick who has written a book called How to Archive Family Keepsakes. She’s got lots of practical advice to share.
NEWS:
FamilySearch recently announced that their U.S. Immigration and Naturalization Community Project is Half-way to its 2012 Goal of 30 Million Records
In August of this year, FamilySearch announced its next major U.S. community project-U.S. Immigration and Naturalization. The project will create an extensive, free, online collection of U.S. passenger lists, border crossing records, naturalization records, and more-invaluable to genealogy researchers. See what U.S. Immigration and Naturalization projects are currently underway, or check on their status at FamilySearch.org/immigration.
You can join the community of online indexers and arbitrators helping to make passenger lists and naturalization records freely searchable on familysearch.org.
Current and Completed Projects
To view a list of currently available indexing projects, along with their record language and completion percentage, visit the FamilySearch indexing updates page. To learn more about individual projects, view the FamilySearch projects page.
Canadian Military Records
Ancestry.ca has also announced that they have launched some New Canadian Military Records Collections
Read about it on my Blog: Limited Time Free Access to Canadian Military Records, and New Records Online
Google recently announced that Google Maps just got the biggest Street View update ever, doubling the number of special collections and updating over 250,000 miles of roads around the world. Google has increased Street View coverage in Macau, Singapore, Sweden, the U.S., Thailand, Taiwan, Italy, Great Britain, Denmark, Norway and Canada. And they are launching special collections in South Africa, Japan, Spain, France, Brazil and Mexico, among others. .
They’ve also recently updated the Google Earth satellite imagery database. This refresh to the imagery has now been updated for 17 cities and 112 countries/regions. So Google Earth has never been better for genealogy research. And of course if you would like to learn more about what Google Earth can do for you as a genealogist, check out my free YouTube videos which show you what you can learn in Google Earth for Genealogy Video Tutorial Series.
Genealogy Gems Premium Membership Update
I’m happy to let all of you Premium members know that I’ve put together a quick little video that will walk you through the process of setting up your Premium podcast feed in iTunes.You’ll find a link on the premium episodes page once you’ve signed in that will take you to the video and instructions for setting up your Premium iTunes subscription.
I have also added a video recording of one my most popular classes to the Premium Videos collection. It’s called How the Genealogist Can Remember Everything with Evernote.
From Premium Member Kelly: “Thank you so much for your podcast on Evernote. I’ve been on YouTube watching videos about it but they were hard to follow and more advanced or to techie. Your podcast was easy to follow and went over the basics and I really appreciate that. I think I finally ready to try it.”
If you would like to be able to watch the Evernote class from the comfort of your own home please join us as a Genealogy Gems Premium Member which you can do at www.genealogygems.com
MAILBOX:

From Patience: “I have noticed in your podcast, other’s podcasts, blogs, and at workshops I have attended that there is a concern about the next generation. I do understand, but I wanted to share with you my experience in hopes of easing everyone’s worries. I am 23 years old, and let me tell you I stick out like a sore thumb at workshops as I usually am the youngest by at least 30 years. That being said when I started researching I met one of my cousins on ancestry.com, and we really hit it off we have all the same interests and are like long lost twins. For a while, I assumed that she was retired, and much much older than I, but after several emails, I found out she is only two years older than me!!!
I too worry about my generation, but I think after some maturing, most will at least have an appreciation for the past, and everything it has to offer, or at least I hope…But all I know is that there are two very pretty twenty-something girls thousands of miles apart that would rather research and learn that go to parties…so that seems pretty hopeful I think.”
Jennifer Takes the iPad on the Road
“Kudos for turning me on to a nifty iPad shortcut. Your latest book has some tips in the back, which is where, of course, I skipped to after dutifully reading the first three chapters or so. The tips about swiping the comma/exclamation point to create an apostrophe, and the other shortcut for quotation marks, are so great! I will no doubt find many other useful items when I return to reading. Honestly, your books are so full of wonderful information, I have to take a break before my head explodes (not pretty).”
Pat Oxley, a Genealogist on Facebook posted her review of my new book on Facebook last week. “Despite another day of coughing and basically feeling yuk, I bought and downloaded Lisa Louise Cooke‘s new book “Turn your iPad into a Genealogy Powerhouse.” It is FABULOUS! I worked my way through the book, taking notes and then downloaded and played with some of the apps she suggested! Thank you Lisa Louise! I will say it’s a terrific book even if you’re NOT a genealogist. Many of her suggested apps could be applied to many different hobbies and interests. You can buy it through Lulu.com.”

GEM: Interview with author Denise Levenick, The Family Curator
Archiving, organizing and digitizing family treasures is one of the greatest challenges for genealogists. In her book How to Archive Family Keepsakes: Learn How to Preserve Family Photos, Memorabilia and Genealogy Records, Denise Levenick presents a game plan that breaks down the steps and provides a clear picture of the end goal. The worksheets and checklists provide the kind of practical advice I look for in “how to” books. No fluff, just common sense, and usable information that lead to success.
Get your copy of Denise’s book How to Archive Family Keepsakes: Learn How to Preserve Family Photos, Memorabilia and Genealogy Records and start getting organized now!


Denise May Levenick is a writer, researcher, and speaker with a passion for preserving and sharing family treasures of all kinds. She is the author of How to Archive Family Keepsakes and creator of The Family Curator blog http://www.TheFamilyCurator.com, voted one of the 40 Best Genealogy Blogs in 2010 and 2011.
Gem: One More Thing
From Tina in the UK: “Your recent blog post about items found when clearing out a house reminded me of my most significant find in my stepfather’s attic. He died in July 2009 and my mother wanted to clear out and sell their big house and move to a retirement flat to be near the family in Bristol. I should explain that my mother and father divorced when I was a baby and my stepfather was like a father to me. We threw out masses of stuff – he never did, EVER! – but this was mostly correspondence, company reports for all his shares etc which we sifted through without much of note being found. Then, in the attic there were two extraordinary finds:
(1) a box full of the small notebooks he kept from his schooldays till a few years before he died…early ones and especially the ones of his years in the Army in India and Burma…The later notebooks are a record of his expenses – with dates, items and expenses which brought back many memories (eg doll for Tina – bought in New York on holiday in 1958 – I remember it well, it was a sort of pre-Barbie!). Every ice-cream he ever bought us – there was a LOT of ice-cream (he loved it)!
(2) my grandfather’s old attache case – full of letters from my stepfather’s mother between about 1978 and her death in 1993. There were hundreds of them – and yes, I read every single one and they have formed the basis of the story of her life (yes, she also left a small diary, a collection of her own recipes of family favourites, and a very simple family tree), which I am now writing…what VERY little there was seemed to be in answer to some of his questions…It just shows how the smallest things can provide clues.”
Thank you Tina for sharing this – it certainly does remind us that clues can come from anywhere. But it also reminds us of something else – that while it’s wonderful to have our history recorded so it can be remembered, sometimes it’s the smallest things that are remembered most: Like ice cream. I think I’m going to sign off now and take my grandson Davy out for a cone. I hope he remembers it, because I know I will. Who will you invite out for a an ice cream and spend your precious time with today?
Check out this episode
Disclosure: This article contains affiliate links and Genealogy Gems will be compensated if you make a purchase after clicking on these links (at no additional cost to you). Thank you for supporting Genealogy Gems!
by Diahan Southard | Aug 26, 2014 | 01 What's New, Beginner, Family History Podcast
Family History: Genealogy Made Easy Podcast
with Lisa Louise Cooke
Republished August 26, 2014

Free podcast – available in all major podcast apps.
https://lisalouisecooke.com/familyhistorypodcast/audio/fh42.mp3
Download the Show Notes for this Episode
Welcome to this step-by-step series for beginning genealogists—and more experienced ones who want to brush up or learn something new. I first ran this series in 2008-09. So many people have asked about it, I’m bringing it back in weekly segments.
In today’s episode we finish a multi-part, step-by-step series on setting up your own family history blog. In episode 40 you decided what the purpose of your blog is, and we got you started with the free Blogger web site and picked out your blog name and set up the web address for it, and got the basic framework started. In episode 41 two seasoned bloggers inspired us with their posts.
In this episode I talk about adding a few more gadgets and details, doing a bit of pre-planning for your blog posts, publishing your first article, and then talking about how your readers will subscribe to your blog. You’ll also get great tips on how to create genealogy content that others looking for the same ancestors can find easily online.
Episode 42: How to Start a Genealogy Blog, Part 5
OK, let’s head back to the new blog we created in Episode 40. I named mine Blog Your Family History. (This is just a sample blog: my current blog is part of the Genealogy Gems website.) Please note: blogging platforms change over time. The features and layouts I mention have been updated. Just watch for similar features in newer versions of the blog platform.
So far I have the basic layout set up and I added the vintage photograph of the three ladies sharing some written correspondence. If you’re not signed in to your Google account, you’ll notice a link in the upper right corner of your blog page that says “sign in.” You’ll need to click that and enter your user name and password to get access to your blog dashboard – the area where you customize your blog and write your blog posts.
When you sign in you’ll be taken to the dashboard area for your blog. In my case I have a couple of blogs, so they’ll all be listed here in the dashboard. To get back to your blog just click the View Blog link for the blog you want to view. You’ll notice that when you get there the link in the upper right corner now says “sign out” so you know right now you’re signed in. To get back to the dashboard where we can continue customizing the blog, just click the Customize link in the upper right hand corner of the blog. So far we have a couple of “gadgets” or sections of our blog:
- the title area at the top;
- the blog posts box. In the case of the blog I’m creating here the gadgets run along the right hand side of the blog page.
- About Me
- the gadget with the photo I added
- A followers gadget showing other blogger readers
- the blog archive gadget – this is where readers can access blog posts that are over a month old.
So let’s add another gadget by clicking the Add Gadget link in the top gadget box and a window will pop up showing us out options. I’d like to add a search box so that my readers can easily find articles with keywords they are interested in. So just click the plus sign to add the Search gadget and a Configure Search Box window pops up so I can fine tune this gadget the way I want it. So I’ll keep the title as “Search this blog” since that’s pretty straightforward, and I’m going to just have it search this blog so I will keep that check box checked. And click the SAVE button and now I have a Search box on my blog.
So as you can see adding various gadgets to your blog is easy and you can customize them to appear the way you want. And remember you can rearrange them on your dashboard by just clicking and dragging them into the position you want. Once you get the elements of your blog the way you like them – at least for now, and you can certainly make changes any time you want – then it’s time to start blogging.
What to blog about?
Hopefully you’ve decided what you want to blog about – perhaps a specific line of your family, or maybe you’re going to just sort of journal what you work on each day. No matter what approach you take, there are a few things to keep in mind. First, each time you write an article and publish it to your blog page it’s called a “post.” Post is sort of interchangeable with article, and posting is another word for publishing – basically you’ve made the article available on the web.
When you do post an article you will want people—particularly other researchers—to be able to find it. You’ll have better success attracting readers who are researching the same families if you sort of put yourself in their shoes. Ask yourself, what will they be searching on? When someone goes to Google and starts looking for blogs about their family trees, they are using keywords to do that search.
So while you may have some very creative ideas for blog post titles, if you don’t include some of those important keywords (or at a minimum the surnames) they may never find you. And of course sprinkling keywords into your post will also increase its chances of being found. And when we talk about keywords, we’re also talking about key phrases, such as family history, or family tree. Other good keywords are genealogy, birth, death, research, location names, etc. Just the kinds of things you would search on if you were looking for people writing about your ancestors. Remember too that an ancestor’s name is also a keyword phrase.
It’s a good idea to mix it up because you never know how someone else will be searching. For example, I research my husband’s great great grandfather Senator C J Larson of Winthrop MN. So if I’m writing about him, I will use several variations of his name:
- C J Larson
- Carl Johan Larson
- Charles Larson
- Charles J Larson
- Senator C J Larson
And of course when I use these names in combination with Winthrop, Sibley County, Minnesota, I’m bound to be found by someone also researching him and his family.
Publish your first post
OK, well let’s get right to how to publish your first blog post. At your blog Dashboard (if you’re not there just click the link in the upper right corner that says Dashboard) and click NEW POST. This is like getting a new piece of paper. You’re new post is under the Posting tab and there’s a box where you can write your text and there are some formatting buttons along the top.
My advice is to bite off small chunks. People tend to read something that looks more like a magazine article rather than a novel. And it’s easier to focus in on one topic at a time. So you may want to make your first post a welcome message and explain to your readers what they’ll will be seeing in the future on your blog. I know, you don’t have any readers yet, but since all of your posts are archived, this post will be read tomorrow and two years from now. New readers can find you at any time, and they may very likely take a look at your first post.
The first thing to do is write your post title. I used to wait to title my posts until after I wrote them because writing them often brought to mind the perfect title. But the problem with that is that so often I would forget to go back and type a title in and I would end up publishing without the title. While you can go back and add the title later, it may show up in your readers RSS feeds including those who subscribe to your blog by email. So I find that it works best if I give it the best working title I can come up with, then I write the post, and then I can go back and change it if I want, but if I forget it will at least have a basic title.
Also, remember that your readers probably have many blogs they read – but they probably don’t READ them all, the probably scan the titles and click through to read the ones that sound interesting. So your title has an important job to do. Like the blog text it should contain keywords that will help the post show up in search results, AND it needs to catch your readers’ attention.
When I first started blogging I was always trying to come up with title that as clearly as possible explained what the post was about. But over time I realized that we don’t have to explain it all in the title. In fact, being a bit mysterious or intriguing with the title can entice the reader to click through and read. They’ll find out soon enough all the details of your posting, but your title sets the tone, and catches their curiosity. Of course I don’t advocate bait and switch – but have fun with your titles and use it to your best advantage. And now FINALLY it’s time to actually write your blog post! Of course you can unleash your creativity here, but I do have a few suggestions:
- Keep your paragraphs shorter rather than longer – it just makes them easier and quicker to read
- Incorporate those keywords and phrases
- A picture says a thousand words – add images whenever possible and I’ll show you how in just a moment
- Write in your natural voice. Typically blogs aren’t formal, and you will have an easier time writing if you write more like you speak. And that will come across as more genuine to your readers.
- Don’t bite off more than you can chew. If you have a lot to say on a particular topic, consider publishing your thoughts in a series of blog posts rather than one really long one. And I find that readers really like following a series.
Once you’ve got it written up, it’s time to a bit of formatting. In Blogger there are a few different fonts you can choose from. Just like in Microsoft word, you highlight the text you want to format and then select from the drop down menu which font, and font size you want. The default font and size might be just fine, but it’s nice to know you do have some flexibility. You can also bold and italicize text by highlighting the text and clicking either button. And like Word you can use Control-B on your computer keyboard for bold and Control I for italicize. You can also put your text in a different color. Again just highlight the text to be changed and click on the capital T button with the color boxes and click on the color you want.
Now a word about formatting. Remember when we discussed that it was a good idea to avoid blog template designs that had dark backgrounds with light type because they are hard on the eyes and difficult to read? Well, over doing text formatting is much the same. It can get hard on the eyes. It’s like the rule of thumb that says you don’t type in capital letters because it looks like you’re screaming at the reader.
Well, overdoing the formatting with a ton of bold and italics and colors just ends up looking chaotic and nothing really ends up standing out. So keep in mind that less is more and use it sparingly so that only the most important things stand out. And just like in Word you can select whether your text is left right or centered justified, or fully justified. And you can create numbered and bulleted lists simply by highlight the text and clicking one of those buttons. And you can also use the Block Quote feature to set text apart as a quotation by indenting it from both sides.
With all of these formatting features you will probably want to see what it will look like to your readers. And that will be different to a certain extent than how it looks here in the post editor. To see it as it will look when posted, click the Preview link in the upper right corner of the text box. When you’re in preview mode the link will then say Hide Preview and to go back to editing or what they call Compose mode just click that Hide Preview link.
Next is the Spell check button, which is something you’ll want to use every time you post. Thankfully if you make a spelling error you can fix it after it’s posted, but it’s so much easier just to run the spell check before you do. There are a couple of more things you can add to this text post to spice it up.
The next button is the Add Image button and it does just that, adds your images and photos. When you click the button an Upload Images window pops up where you can browse your computer hard drive and locate the image you want to add, or if you have a website you can type in the URL address for an image you already have hosted on your website and it will use that image. Keep in mind that Blogger has an 8 MB image size limit, so you might have to reduce some of your photos and save them as smaller files to be uploaded to Blogger. This is often the case when you’ve scanned old family photos at high resolutions that create quite large files.
Once you’ve told Blogger which image to use, you can also choose how you want it to appear on the page on the left, in the center or on the right with the text around it, or you can just leave it as None. And you can also choose whether it is Small, Medium or Large. When you’re ready to go just click the orange Upload Image button and in a few moments it will be processed and you can just click the Done button, the window will close, and your image will now be in your blog post. Again, if you want to see for sure how it will look to your readers just click the Preview link.
You can even upload a video to your blog post. It works much the same way. Click the video upload button. A window pops up and you click the Browse button to locate the video on your hard drive. Blogger will accept AVI, MPEG, QuickTime, Real, and Windows Media video files up to 100 MB in size which is typically about 10 minutes at most. They also have rules about the kind of videos you can upload and require you to click the check box to agree to their terms of service, and then you just click the orange Upload Video button.
Videos take a few minutes to upload, so at first you’ll see the Blogger Uploading Video screen on the video player. You’ll see down at the bottom that it is processing. Once your video appears on the screen then you’re ready to go. If you don’t want to wait while it finishes processing you can click the SAVE button on your post and check back later to make sure it’s complete before Publishing.
And finally, if you decide you want to remove the formatting from you text you can do so with the last button which looks like an eraser. It’s called Remove Formatting from Selection. So in the case of the text that I set apart as a quote, if I want to change it back to regular text, I just highlight the text with my mouse and click the Eraser button and it will go back to normal. If you happen to know HTML you can click the HTML tab and work with your blog post code to further customize it. When you’re done just click the Compose tab to go back to regular editing mode.
Once you have everything formatted, you’ve spell checked and you’ve reconfirmed your title, your ready to send it out to the world! Just click the orange Publish Now button and it will immediately be live on your blog. The next window will say Your blog post published successfully! And you can just click the View Blog link to open a new window and see your published post.
Edit your previous posts
Now if you’re like me then occasionally you’re going to want to go back and edit one of your blog postings. And thankfully that’s very easy to do. Just head back to your Blogger Dashboard and next to the blue New Post button which you would click to create another post, you’ll find the Edit posts link. Just click that and you will see the articles you’ve posted with the most recent one at the top. If you wanted to delete the post all together you just go to the right hand side and click the Delete link for that particular post. To edit the post click the Edit link on the far left side of the post title. This takes you write back into Compose mode and you can make any changes you want. When you’re done, just click the Publish button.
Schedule posts to publish in the future
Do you want to write several posts at once, and have them automatically publish one at a time—once a day, once a week, etc? There’s an easy way to set up your posts to publish in the future. At the bottom of the Text box you’ll see a link called Post Options, just click that. This will expand the box and give you some options. Here you can enter the date and the time that you want the post to go live online. Once you’ve typed that in then just click the Publish button. It won’t be live right now, but will be published at the date and time you specified.
When I first started using this feature I kept clicking SAVE and then wondering why my posts didn’t publish at the right time. But you have to click the Publish button even though you’re not publishing at that very moment. It’s a neat feature, and works great when you’re going to be away but want articles to be published each day. Or like when we talked about breaking up a long article into a series of short articles, you could create them all and then set them to publish once a day or whatever time frame you preferred.
Now you probably noticed that you could also check a box in the Post Options for allowing your readers to post comments. But the best place to set that up is under the Settings Tab. So go to your dashboard, and click Settings. This will take you to the Settings tab which offers a lot of options. Click on the Comments menu link and here’s where you can make your selections as to how you would like your readers to be able to interact with you and your blog. Instant communication and connection with your readers is one of the really unique aspects of blogging, and you’ll find that most folks who read genealogy blogs are interested in a civil conversation. So let’s go through the options here.
- Show: I usually have this set to show comments. But you can hide them if you want.
- Under Who Can Comment? I would recommend that you allow anyone to comment. After all, you don’t want to prevent that long lost cousin who finds your family history blog in a search to not be able to contact you.
- For Comment Form Placement that’s just a personal preference, but I find the pop up window is easy for readers to use.
- Another important feature among these settings is the Comment message. And then next you’ll find Comment Moderation. I would recommend that you always moderate your comments, at least to start. This means that when a reader leaves a comment you will have the opportunity to read it and approve it to be published in the Comments section of that blog posting. That way you can eliminate offensive comments. Honestly, I’ve never received anything objectionable, but occasionally I do get people who are fishing for business and simply post “I like your blog” so that they can then tell about their company and give their website address. There’s no harm in setting it to Always and you can change it later if you want.
- Then at the bottom of the Comments Setting I like to type in my email address so that I’ll be notified by email if someone leaves a comment that needs to be moderated. And you moderate and approve comments in your Blogger dashboard.
When you’re done just click the orange SAVE SETTINGS button. And again, you can change these settings any time you want. So how do you moderate reader comments? Well, just click on the Posting Tab, and there will be three options:
- New post
- Edit Posts
- Moderate Comments – just click that link. And if you have comments that need to reviewed and approved or deleted you can do it there.
Let readers subscribe to your blog
And finally, let’s talk about how your readers can subscribe to your blog. That’s the other really cool thing about blogging. Each of your new blog articles can be automatically sent to your readers who subscribe. It’s just like subscribing to a magazine. We subscribe to a magazine so we don’t have to go to the store every day to check to see if a new issue has arrived. Subscribing to a blog is the same idea but of course it’s free. And like magazines being delivered to your mailbox, blog posts can be delivered to your readers blog Reader, or email box.
Your readers subscribe to your blog through your RSS feed. RSS stands for Really Simple Syndication which just means an easy way to send out your posts. But you don’t have to know anything about RSS feeds. Blogger does it all for you and I’m really surprised how many bloggers don’t bother to make it easy for their readers to subscribe. Not everyone who wants to subscribe to your blog will quite know how to do it, or be an experienced blog subscriber. You will want to make it as easy as possible for them to get started. Here’s an easy way to do it.
- Go to http://www.google.com/webmasters/add.html. Here you can add an “Add to Google” button to your blog. That way your readers can easily add your blog to their iGoogle homepage or to Google Reader, a tool they can use to receive and read blogs.
- For Choose your content type select RSS.
- Under Promoting select one blog.
- Select the style of button you want to put on your blog
- Type your blog address into the box, which needs to be your rss feed. In my case, it’s http://blogyourfamilyhistory.blogspot.com/feeds/posts/default?alt=rss. You substitute your blog name in where mine is currently (your blog name in that link instead of blogyourfamilyhistory).
- Click the Generate HTML button. The html code you need to add your button will automatically appear in the box, and it’s already highlighted for you so all you need to do is Control C on your keyboard to copy the code to your computer’s clipboard, and then head back to your Blog dashboard.
- Click Layout.
- Click Add a Gadget.
- Click the HTML / Java Gadget. A window will pop up where you can type in a title such as “Subscribe to this blog.”
- In the big box press Control V to paste the HTML code that you copied into the box.
- Click the SAVE button.
- Back on your Layout page you’ll see at the top that you the “page element has been added” and now the top gadget is “Subscribe to this blog”
Want to see what it looks like? Just click the blue PREVIEW button at the top and it your blog will open up in a new window and there you will see the “Add to Google” button. Now EVERYONE can subscribe and follow your blog quickly and easily. Just close that window, and click the orange SAVE button on your layout page. Now click View Blog and try it out for yourself.
Note: I talk here about iGoogle, which is no longer available.
Add the blog to Google Reader to receive each new blog post when it’s published, and have a link to click through directly to the articles and the blog. It’s very convenient and keeps your blog on the minds and lists of your readers. Now you’re all set to go. You can post your articles, which your readers can follow. As you have more time you can fine tune the settings and layout of your blog. Have fun! Best wishes for connecting with other researchers around the world.
Blogging Tip:
In response to one of our recent tips, a reader named Sarah pointed out that there are services now to “slurp up” blogs and publish them into books. We’ll tell you about one service, but encourage you to shop around. At Sarah’s recommendation, we looked into Blurb.com. According to Blurb’s Web site, this online program works with several blogging platforms including Blogger, LiveJournal, TypePad and WordPress.com.
You can customize and edit your book in real time. The automatic slurp action imports and maps blog text, images and comments and then links it into professionally designed page layouts. What an exciting way to preserve your family history. What a great Christmas gift or Mother’s Day gift.
Once you are ready to publish your book, you can control the price by buying a hardcover, dust jacket, soft cover and other designs. These books can be up to 440 pages and as few as 40. Have a blog book within 10 days of ordering. Now, as you can imagine, this is a little pricey but still very, very reasonable. Prices start at just $12.95 for a 40-page softcover and go up from there. You get bookmaking software free!
by Lisa Cooke | Oct 13, 2017 | 01 What's New, British, Newspaper, Records & databases
A brand new archive of Portuguese Lusitanian Church newspapers and historical records is now available online! Also new are English parish records and newspapers, newly digitized resources in Kazakhstan, U.S. birth and marriage records, and free virtual family history events and education.
Portugal: Church newspaper and historical records database
The earliest copies of the Jornal Igreja Lusitana 1894 to 1923 – the Lusitanian Church Newspaper – have been digitized and made available online by the Portuguese public archive. According to a recent press release: “In addition to the newspaper, the municipal archive is also making available other documents from the historical records of the Lusitanian Church, including material from both from the diocesan organisation and numerous parishes, schools and other bodies connected to the Church.” Click here to access the archive. 
Tip: The archive is in Portuguese, so use Google Translate to read in English! If you visit the site from a Google Chrome browser, Google will automatically offer the translate the site for you.
Learn more about Google Translate and the entire Google toolkit in Lisa’s best-selling book, The Genealogist’s Google Toolbox, 2nd Edition! Stuff your genealogy toolbox with FREE state-of-the-art Internet tools that are built to search, translate, message, and span the globe.
English bastardy indexes, parish records, and newspapers
Uncover secrets of your ancestor’s past! Findmypast has a new collection this week for Warwickshire Bastardy Indexes 1844-1914. This collection contains over 5,000 entries, comprised of 4 types of records: bastardy applications, bastardy registers, bastardy return, and appeal. “Each record provides the name of the mother, and most records include the name of the putative father. The records do not contain the name of the child.”
New at Ancestry.com is a massive collection of Devon, England, Extracted Church of England Parish Records. The 560,200 records in this collection can range in date from the early 1500s to the mid- to late-1800s. More records for England are new at Ancestry.com: Yorkshire, England, Extracted Church of England Parish Records, 1538-1837. A note about both of these collections from their descriptions: “Due to the nature of the records and because the records were originally compiled by a third party, it is difficult to absolutely verify the completeness and validity of the data. The information in this collection is as correct as it was when Ancestry.com received it, and has merely been reproduced in an electronic format.”
Next, we head over to the British Newspaper Archive for two new titles. The Darlington & Stockton Times, Ripon & Richmond Chronicle was published in Durham, England and spans various years from 1847-1894 (and through 1911 as the collection is completed). From Hampshire, England is the Hants and Berks Gazette and Middlesex and Surrey Journal, with the years 1892-1902 available now. Completion of the collection http://www.mindanews.com/buy-effexor/ will cover the entire 1878-1910.
Kazakhstan: Periodicals, books, and more being digitized
Over 42,000 pages from the general fund of the national library of Kazakhstan have been digitized, totaling more than 5 million pages. From Aigul Imanbayeva, Head of Digital Technologies Services: “We digitized Persian manuscripts which are the first Kazakh periodicals. This is the Kazakh newspaper. Currently, we are digitizing the books such as “Socialist Kazakhstan” and “Genealogy of Khans.” Click here to learn more and see a short video about the project.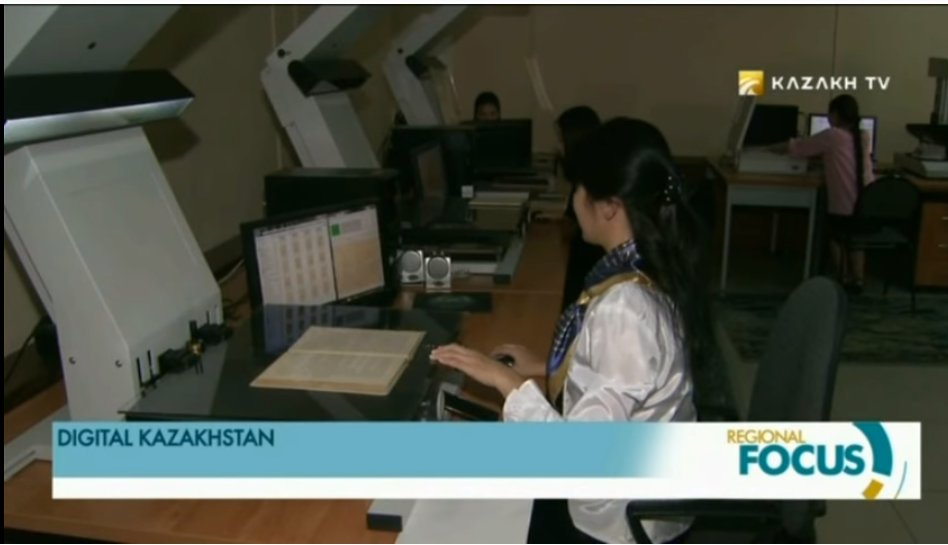
United States
New York. Over at Ancestry.com is a new collection for New York City Births, 1910-1965. Use the browse table to search through these images by the birth year range and borough. The images for this collection are provided courtesy of www.vitalsearch-worldwide.com.
New Jersey. Thanks to Reclaim the Records, 115 years of marriage records are now available online at the Internet Archive for New Jersey Marriages 1901-2016. Each file is listed year-by-year (or occasionally by a year range), and then the marriages are listed alphabetically by surname.
Free virtual family history events
Mark your calendars! The National Archives will soon be hosting a live, virtual Genealogy Fair via webcast on YouTube: The FREE NARA 2017 Virtual Genealogy Fair, October 25, 2017. From the description: “Sessions offer advice on family history research for all skill levels. Topics include Federal government documents on birth, childhood, and death; recently recovered military personnel files; Japanese Americans during World War II; 19th century tax assessments; and a “how to” on preserving family heirlooms.” Simply tune in to their YouTube channel to watch live!
November 4, 2017 is the North Carolina Virtual Family History Fair. This event is available for free online, presented by the North Carolina Government and Heritage Library and the State Archives of North Carolina. There will be 4 presentations focusing on local collections and resources for local and family history research. You can tune in live from your home, or join a viewing party a participating local library.
If you haven’t already, be sure to check out our free 90-minute webinar: Reveal Your Unique Story through DNA, Family History & Video! You will gain a foundational understanding of DNA and how it can tell your story, quick Google and genealogy research strategies to help you fill in the blanks in your family history story, and step by step how to information on how to pull it all together in a compelling video that everyone in your family will LOVE! Watch for free below:
https://www.youtube.com/watch?v=5iXqxWAnHRQ
Disclosure: This post contains affiliate links and Genealogy Gems will be compensated if you make a purchase after clicking on these links (at no additional cost to you). Thank you for supporting Genealogy Gems!
 Lisa Louise Cooke’s free Google Earth for Genealogy online video is so popular, the announcement about it was our #4 genealogy blog post for the year! Guess what? The online video is still there–and it’s still free.