These show notes feature everything we cover in this episode. Premium Members: download this exclusive ad-free show notes cheat sheet PDF. Not a member yet? Learn more and join the Genealogy Gems and Elevenses with Lisa family here.

Don’t let unexpected genealogical finds send you down a rabbit hole any longer. We’ll cover concrete strategies for staying focused on what matters most, while not losing track of opportunities that present themselves. You’ll also learn about free tech tools that you can put in place to give you peace of mind, take back those lost hours, and help you be more productive.
In order to improve in anything, you have to know your vulnerabilities. When it comes to falling down a genealogical rabbit hole I’ve identified 5 of the most common vulnerabilities:
We’re going to tackle 1, 2, and 3 above. With these in place I believe you’ll feel confident and take care of 4 & 5!
Before beginning your research, take a moment to write out your research question or statement. It will help guide you and keep you on task.
Think about what you want to specifically accomplish. State your goal in specific terms:
“Identify the village in Germany where Louise Nikolowski and her family were from so I can locate church records.”
(Per the Board of Certification of Genealogists)
Genealogy Standards #10:
“Questions underlying research plans concern aspects of identity, relationship, events, and situations. The questions are sufficiently broad to be answerable with evidence from relevant places and times. They are sufficiently focused to yield answers that may be tested and shown to meet or not meet the Genealogical Proof Standard.”
Genealogical-research questions:
Keep this research question in front of you by:
Break your primary research question down into smaller, individual research questions.
According to Elizabeth Shown Mills, after analyzing the existing data:
“we prepare a research plan that defines:
Example Question: Where is the birthplace of Gustav Sporowski (father of Alfreda) who resided in Gillespie, Illinois in 1910-1918?
Here are examples of questions to be answered that support the research question:
Question 1 – Did he apply for citizenship? If so, what is listed?
Question 2 – Find passenger list: what place of origin is listed?
Question 3 – What was listed for other passengers accompanying him? (If any)
Question 4 – Where are other Sporowskis from that are listed in passenger lists?
For each question above, make a list of the resources (records) you need to find to answer these questions, and where you plan to look for them. Track the outcome.
“we prepare a research plan that defines:
Don’t let unexpected genealogical finds send you down a rabbit hole any longer. In this episode I cover concrete strategies for staying focused on what matters most, while not losing track of opportunities that present themselves. You’ll also learn about free tech tools that you can put in place to give you peace of mind, take back those lost hours, and help you be more productive.
You can’t avoid danger (to your current research plan) if you don’t know what it looks like! My test will help you determine if what has caught your eye while researching online is a BSO.
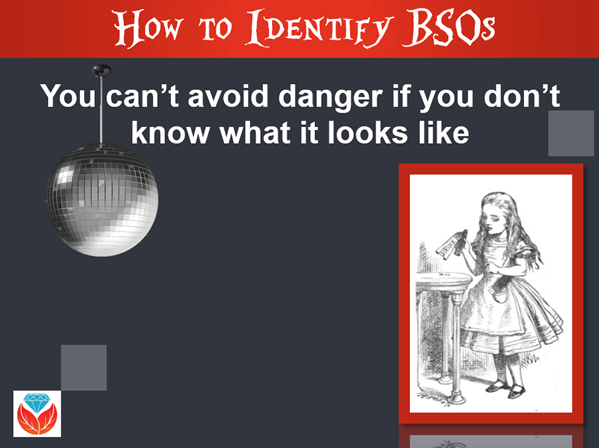
How Alice identifies a BSO
Once you’ve identified BSOs, it’s time to implement a process for dealing with them so you can stay focused on our research question, as well as return to the BSO to explore its potential.
Get yourself a free Cloud note-taking tool (Evernote, OneNote, Google Docs, etc.) and use it consistently. Use the website, software, and/or app to capture unexpected finds while researching.
I happen to use Evernote. If you’re new to Evernote, here’s a quick video that will help explain it to you.
Here’s an example of how I use Evernote to capture BSOs:
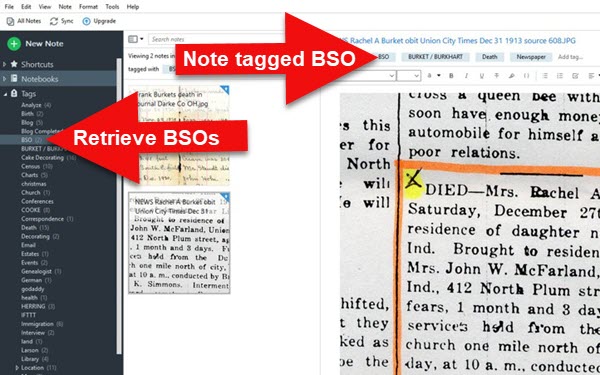
Notes tagged in Evernote
The benefit of using a Cloud-based note-taking tool is that your notes will be available to you on all your devices (depending on whether you have a free or subscription plan.) You can add additional information to your notes, and work with them anytime, anywhere.
You can also use Snagit to do your screen clipping and annotations. Automatically send the completed image to Evernote via the Share feature, or Copy and Paste it into a new note.
Learn more about this powerful screen clipping tool:
Elevenses with Lisa episode 61– How to use Snagit for genealogy
Elevenses with Lisa episode 67 – Advance clipping techniques with Snagit
Use coupon code: GENEALOGY15 to save 15% on Snagit. Thank you for using my link for purchasing your copy of Snagit. (We will be compensated at no additional cost to you, which makes the free Elevenses with Lisa show and notes possible.) Don’t worry if it initially shows as Euros in the cart. When you enter your address including country, it will convert the currency appropriately.
Save 15 % with my exclusive discount code.
2. Schedule BSO Time
One of the main reasons we get side-tracked by BSOs while working online is that we are afraid if we don’t look at it right now we’ll lost it or never go back to it. By scheduling time specifically for working on tagged BSOs, you will feel more confident about letting them go while you are working on a research plan.
I schedule my time in the free Google calendar. You can have several different calendars (i.e. categories of types of things you schedule.) Create a “BSO” calendar and color code it so it’s easy to spot. Schedule BSO time and follow up items as future events on your calendar. Set Notifications and Email Reminders for each item.
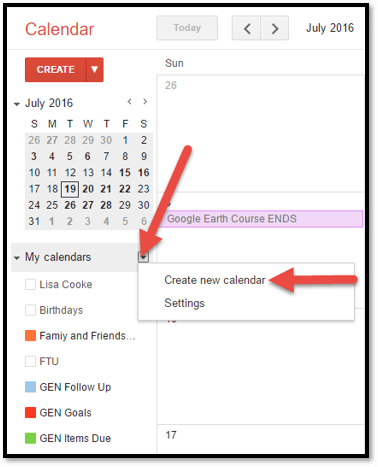
Create a “BSO” calendar
Scheduling BSO times means you can mentally let them go for now!
Show Notes PDF – click here to download the show notes PDF for this episode. (Premium Membership log in required.)
In this episode Lisa Louise Cooke will answer important questions such as:
This audio comes from my YouTube video series Elevenses with Lisa episode 40.
To Listen click the media player below (AUDIO ONLY):
Log into your Premium membership and then click here to download the handy PDF show notes that compliment this podcast episode.
Premium Members have exclusive access to:
Become a member here.
Don’t miss the Bonus audio for this episode. In the app, tap the gift box icon just under the media player. Get the app here.
The Genealogy Gems email newsletter is the best way to stay informed about what’s available with your Premium eLearning Membership. Sign up today here.
MyHeritage: Click here to start finding your family history at MyHeritage
Order a MyHeritage test or upload your raw data from another testing website here.
Download the episode mp3
Show Notes: The audio in this episode comes from Elevenses with Lisa Episode 40. Visit the show notes page here.
The places where your ancestors lived can tell you a lot about their lives. I’m going to show you a free and easy technique for plotting land in Google Earth.
episode 67
Would you like to be able to find your ancestor’s property on a map today? Keep reading and watch the video to learn how. We’re going to take U.S. government survey legal land descriptions found in sources such as Federal Land Patents and quickly and easily plot the boundaries in Google Earth Pro. I’ll also show you an easy way to do it for property in Canada too.

(PREMIUM MEMBERS: Get your ad-free PDF cheat sheet for this episode in the Resources section at the bottom of this page. Not a member yet? Click here to join the Genealogy Gems family and get all the benefits.)
In the video I show you how to plot the boundaries of a piece of land in Google Earth. We’re going to take U.S. government survey legal land descriptions found in sources such as Federal Land Patents and quickly and easily plot the boundaries in Google Earth Pro. I’ll also show you an easy way to do it for property in Canada too. These strategies come from my book The Genealogist’s Google Toolbox,
These days there are actually three versions of Google Earth:
All are free, but they are not the same. The app and web browser versions are sort of “Google Earth lite.” The software is what you want because it has all the bells and whistles that will allow you to do all the things I’m going to show you today.
Plotting legal land descriptions in Google Earth has its advantages. If you’re plotting the land of your ancestors, you’ll be able to see what the area looks like today and what the current street names are. In Google Earth you’ll also have access to additional tools that you can use in conjunction with the boundaries you’re going to create, such as historic maps, area photos, and a wide range of data sets that provide more information about the area.
The first thing to do is check to make sure you have the most current version of Google Earth on your computer. Again, we’re using the software so you need to do this on your desktop or laptop computer. You want to make sure you have Google Earth Pro – LINK – A tell tale sign that you don’t is if the Google Earth globe icon on your desktop is grey and not blue. Open it and in the menu go to Help > About Google Earth. Here it should say Google Earth Pro and you can see the version number.
Check the current version number here, and if you don’t already have the program, go ahead and download it.
Now that you have it on your computer, open it up and leave it running in the background. You’ll need a decent internet connection for it to run.
Next pull up the legal land description that you want to plot. Here’s one that I have for some property owned by George Burket. I found this at the Bureau of Land Management Government Land Office Records website. This free website is where you can search for land patent that your ancestors once held.
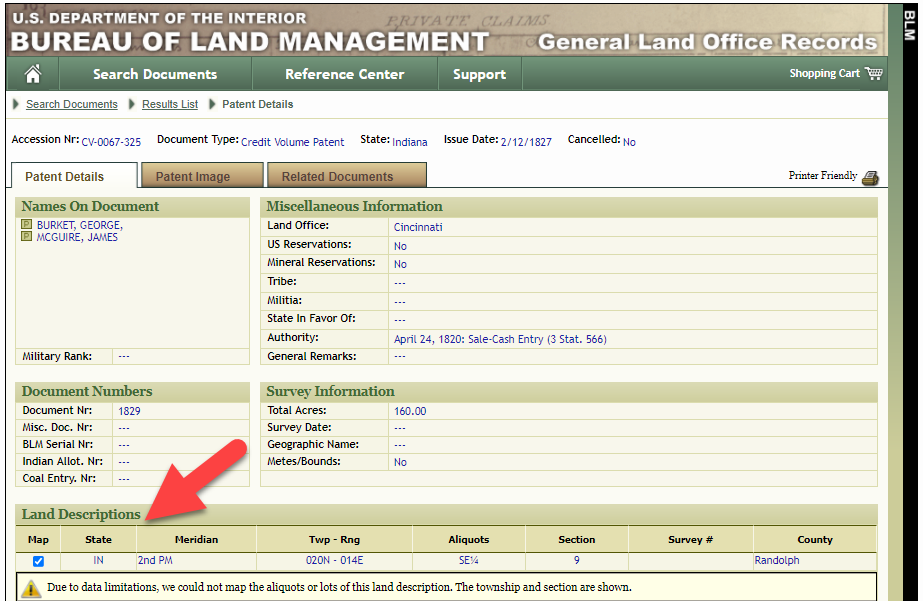
Legal land description at GLO
Even though the Bureau of Land Management places it on the map on their website, you can’t download this or add to it. The advantage of plotting this in Google Earth is that you will have access to much more geographic data, you can add many more details to the map, you can use it in conjunction with other related mapping work that you’re doing, and you can save and share it.
This description gives us the exact coordinates of the property. Jot down the land description or keep it open in your browser tab so you can refer to it.
In a new browser tab, we’re going to type in http://www.earthpoint.us. This will take us to the Earth Point website.
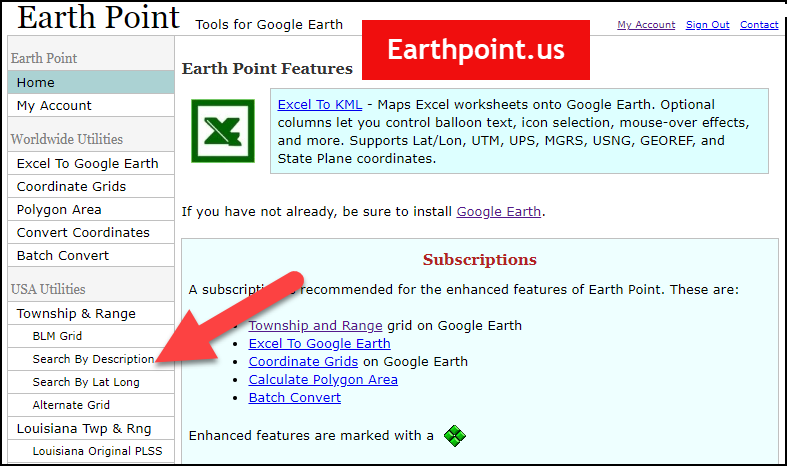
Search by legal land description at Earth Point
This website is free, although some of the features are available only with a paid subscription. Thankfully, the tool for plotting your ancestor’s land patent is free. Some of the free features do require that you sign up for a free account. The feature we are going to use currently does not.
On the Township and Range – Search by Description page you will see a field for each piece of information found in the land description. It’s important to enter this information in the order presented starting with the State. Select the state from the drop-down menu. Pause a moment to allow the fields to recalculate. This allows the appropriate data to be loaded into the next field based on your selection.
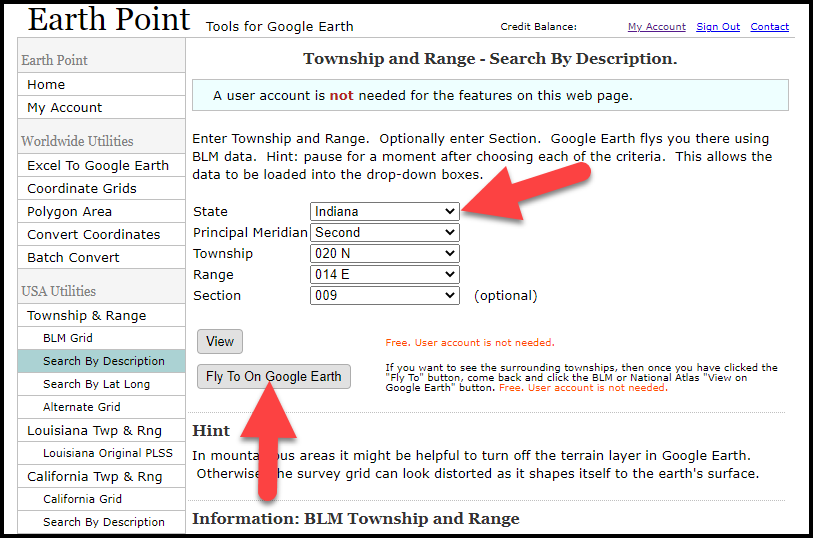
Entering data at Earth Point
After you have made each selection, click the Fly to on Google Earth button. This will generate a KML file which can be saved to your computer. KML stands for Keyhole Markup Language, which is the file type that Google Earth uses and understands. KMZ are zipped KML files which also are used by Google Earth.
Save the file to the desired location on your hard drive. Then click the file to open it. It will automatically open in Google Earth (which you already have open). The KML file is now located in your Temporary Places folder in the Places panel. The land is has now been automatically plotted on the map.
The orange outline is the township. In this example it is township T20N R14E. Click the orange ball in the center of the township for details. In the details you’ll find the total number of acres in the township, the latitude and longitude coordinates for the center of the township and corners.

Township in Google Earth
The pink / magenta outline is the Section where the property is. Click the pink center dot for the details:
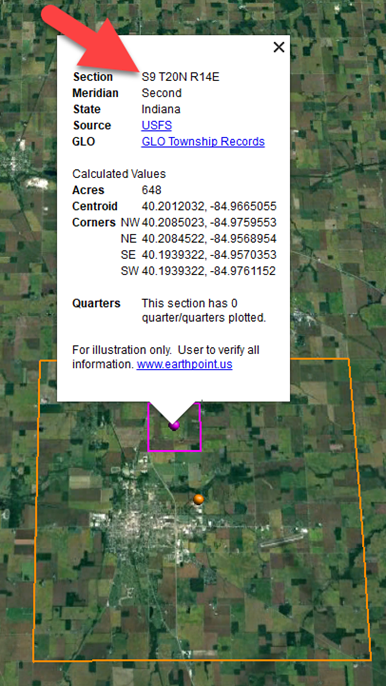
Land section in Google Earth
In this example Section 9 consists of 648 acres.
Notice that Earth Point was able to plot the land down to the Section level. However George Burket did not own the entire section. We must return to the land description for the Aliquots.
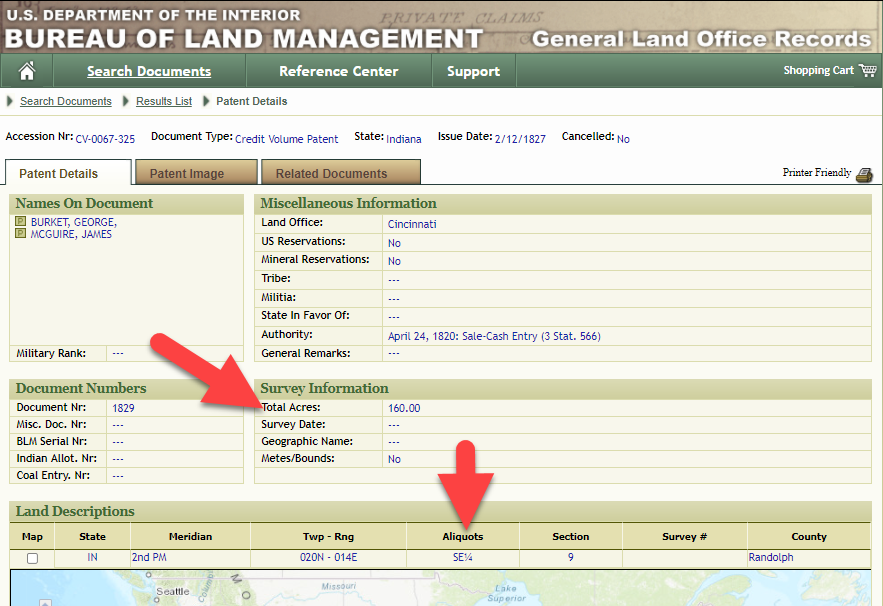
Aliquots in Legal Land Description
In this example, the land was the southeast quarter (SE1/4) of section 9. The land was a total of 160 acres.
We can use the Polygon tool in Google Earth to plot the 160 acres. In the toolbar, click the Polygon tool. This will open the New Polygon dialog box. Type a title, description and source citation.
As you hover your mouse over the map you will notice that the cursor is now a square shape. Click the screen on each of the four corners one at a time in order to set the four corners of the property – in this case the southeast quarter of the section. Once you have drawn the shape you can click on the handle on any corner to adjust precisely.
Click the Style / Color tab in the New Polygon dialog box to adjust the color and opacity of the acreage polygon. You can add color and thickness to the outline, and color and opacity to the fill of the shape. When you have it set the way you want it, click OK to close the New Polygon box. The Polygon is now set.
On the left side of the Google Earth screen you will see a series of panels: Search, Places and Layers. At the bottom of the Places panel is the Temporary folder. This is where the KML file was placed when it was opened. However, like its name implies, this is a temporary location. If you want to keep it, you’ll need to move it to a filed location within the Places panel. This will not change the position of the polygon on the map, only where it is filed and saved in the Places panel.
To file a polygon, click on the file in the Places panel, drag it to the desired location, and drop it. Next, go the main menu and click File > Save My Places. This will save your work so that when you close the program it will not be lost. Google Earth doesn’t auto-save.
The polygon plotting the acreage will be visible on the map when the box is checked in the Places panel. If you uncheck the box for the polygon it will still be there, but it will not be visible on the map. This allows you to create and save many items of interest without always having to have them displayed and cluttering up the map in Google Earth.
After your land polygon has been set, you may want to rename it. There are two ways to do this:
You can also restyle the polygon and edit the text. Start by going to the Places panel and click the arrow pointing at the Polygon’s globe icon. This will open it and show the nested content. Click to select the Polygon. Now you can right-click it (PC) and select Properties – OR – go to the menu under Edit > Properties. Either way it will reopen the Polygon dialog box so that you can make the desired changes. When you’re done, click the OK button to close the Polygon.
Snagit is the tool I used to capture the various views of the land I plotted in Google Earth. Learn more about Snag it by watching my videos and reading the show notes for episode 61 (for beginners) and episode 66 (advanced).
Although the Earth Point website doesn’t plot Canadian land, the Legal Land Description Converter website does. It can help you find land in Western Canada (British Columbia, Alberta, Saskatchewan & Manitoba) subdivided by the Dominion Land Survey (DLS) and the Alberta Township System (ATS).
These show notes feature everything we cover in this episode. Premium Members: download this exclusive ad-free show notes cheat sheet PDF. Not a member yet? Learn more and join the Genealogy Gems and Elevenses with Lisa family here.

Gwynn: I would like to know how to match plat with GPS coordinate/ current street address.
Answer: I cover how to overlay a plat map in Google Earth and discover the current street address in my book The Genealogist’s Google Toolbox.
Roger D: How exact do you need to be in picking points? Does Google snap to mid-points of lines?
Answer: Try to be as exact as you can, however as I showed in the video you can reposition them as needed. Google Earth doesn’t snap.
Lyn: Can I do this with English tithe maps?
Answer: There isn’t a website converter that I know of. However I do cover how to overlay digitized maps in Google Earth in my book The Genealogist’s Google Toolbox.
The manufacturer price is going up August 31, 2021. Now’s the perfect time to get your official Elevenses with Lisa mug.
You can also find them through the menu: Premium > Premium Videos > Elevenses with Lisa.
Even if you don’t use Snagit, or if you’re a newbie or still deciding whether you want to use it, this video will give you tangible examples of what it can do for you. If you are already using Snagit, this session will definitely take your skills to the next level.
Use coupon code GENE15 to get 15% off. Thank you for using my link for purchasing your copy of Snagit. (We will be compensated at no additional cost to you, which makes the free Elevenses with Lisa show and notes possible.) Don’t worry if it initially shows as Euros in the cart. When you enter your address including country, it will convert the currency appropriately.
In Elevenses with Lisa episode 66 Lisa Louise Cooke will discuss how to use Snagit:
You can also watch at the Genealogy Gems YouTube channel.
Elevenses with Lisa episode 61 was a tutorial for beginners on how to use Snagit, and specifically how I use it for genealogy. I think it really resonated with genealogists because accurately and completely capturing the family information that we’re finding is absolutely essential for good source documentation. It’s one of the most important things we do as genealogists.
So, this video is sort of a “Part 2” session where we dig into more ways to use this amazing screen capture tool and I answer some of your most pressing questions.
Even if you use a different snipping tool, I’m going to give you tangible examples of how you can clip more effectively.
I received the following email from Anne W.: “I very much enjoyed your recent Elevenses with Lisa episode on how to use Snagit. I love the screen clipper on my Mac but this does so much more. I used your link to purchase Snagit and I have found the tutorials very helpful as I figure out how to use it on my Mac with my files. The first thing I did was go back to several newspaper pages I clipped recently in chunks and used Snagit to capture the whole page. It worked like magic! I would love to see another episode about the features of Snagit. Thank you for your regular and premium podcasts. I listen to both regularly. I have learned so much that I can apply to my genealogy research.”
Oh I love hearing how you’re using what we talk about here at Genealogy Gems! And yes, Snagit is fantastic for clipping those squirrely newspaper pages, and so much more!
Let’s get started – I’m excited to show you 5 more problem-solving screen capture projects that you can do with Snagit, and then we’ll wrap up with answers to your Snagit questions.
Bill in San Antonio, TX wrote me last week and told me about a problem that he was having with his online family tree at Ancestry It turns out that some ancestors had duplicate profiles. He didn’t put them there. He asked Ancestry about it but was getting what he called “boiler plate” answers that didn’t solve the problem.
In situations where you’re trying to communicate a complicated problem to someone else, or you’re just trying to work through it yourself, it can really help to visualize the problem, and Snagit can help you do that very effectively.
Bill says: “I am seeing duplicate FACTS in profiles of siblings, parents, and children of a person and cannot figure out where they originate. I go to the profile which seems to be generating duplicate information, but it is not there.”
As I read through all the details that he wrote up about the problem, I found myself getting confused. I asked his for access to his family tree so I could take a look and he wrote back
Bill went on to say, “The duplications I see are all in my tree. I have reviewed each of them to be certain that the data is not coming from a profile, even though it appears in duplicated form elsewhere.
Here is a screenshot of one such issue, showing two siblings with repeated data. Note that in each case, the birth location is slightly different, as in “Texas” vs. “Concho County, Texas”.
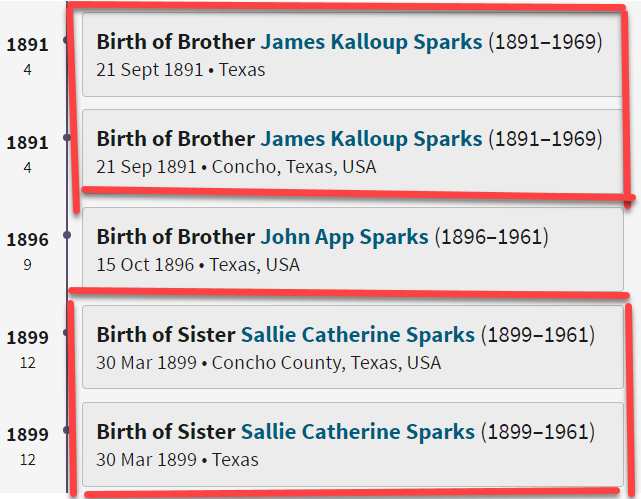
Ancestry Profile – problem of duplication
Bill had annotated his screen clipping to help me zero in on the problem. “(I used SnagIt for the screenshot — thanks for suggesting it!) I see this issue in other profiles, so your suggestions for solving it will be useful in other parts of the tree.”
Here are just three examples of ways you can highlight or call out an item in an image:
After you select and customization a style (such as a red outline shape) you will see that Snagit provides a “ghost” version of it in your list. It’s greyed out and ready to add. Simply click the plus sign to add the style to a theme. There are several themes available and you can create new themes.
I like to make it even faster to find the styles I use the most by adding them to my Favorites. It’s super easy to do. Just click the star on the style. You’ll find your Favorites in the star menu at the top of the screen.
As a side note, I do think this is a bug in Ancestry’s system. I recommended that he do the following to zero in on the problem:
Again, you can use Snagit to help work through things like this. Here’s how to see if you’re indeed looking at the same person: Right-click on each ancestor profile to open it in a new tab so you can compare and capture them. In this case it was Willie (the ancestor) and James and the duplicate of James. Each will have a URL address in your browser bar that will end in person/420009496764/facts. The number in red is the unique number for that person.
Had the tree number or person numbers been different, that would be the likely source of the problem. However, in Bill’s case, they are the same, so that’s more evidence that it’s a bug in Ancestry’s displaying of the information.
After screen capturing each profile they can be combined into one step-by-step document that can then be shared.
My guess is that at some point Bill viewed someone else’s tree or a hint that included this conflicting information, or he may have attached a record that had conflicting information, or rejected information from a record. In any case, some sort of action may have gotten “stuck” in the virtual stratosphere. The system has hung on to something it should not have. Bill says he’s finding more instances of this happening in the same tree, so it definitely needs to be addressed. It would be a shame to keep adding to the tree only to have that glitch continue to duplicate itself in other profiles.
I suggested looking through the records he has attached to James Kalloup Sparks to see if any of the attached records mention Concho, TX as his birthplace. I doubt there is one, but if there is, it is likely somehow linked to the problem.
It’s very odd that on Willie’s profile it shows James Kalloup Sparks’ birthplace as Concho in the duplication, but when you click that profile it doesn’t say Concho. It’s must surely be an Ancestry glitch.
If it were me, I would try downloading your tree and then creating a second tree by uploading it and seeing if the error still occurs. Here’s the Ancestry Help page.
Also, if by chance Bill was syncing his Ancestry online tree with genealogy software on his computer, there’s a possibility that could cause the problem.
Questions from Kelly: “Hi Lisa!, I would LOVE for you to create a very simple tutorial for adding in arrows and any text in “bubbles or boxes”. I have tried to do this and am missing something – I just LOVE Snagit but I am so technically challenged and would love to not become so annoyed when I am missing the simplest of steps.”
The most important thing to remember as you use annotations like text bubbles, shapes and text is you must select what you are working on. The font, color, sizing and other formatting features can be applied to every kind of annotation. You must select the item before applying the formatting.
If you’re ever confused about what “mode” you’re in, look at the top of the screen and note which tab is selected. In the example below, we are in “Shape” mode.
And if you try and try to make a change to an annotation and nothing seems to happen, you probably haven’t selected it. Click on the item to select it before attempting to make any changes.
If you want to move a item such as a shape or a selection of text, again you will need to click it to select it. You should see the “Move” selector handle that looks like this:
If you don’t or you’re having trouble, click “Move” in the toolbar at the top of the screen and then click on the item.
Most of the time if working with annotations or formatting them is presenting a challenge, it’s because the item hasn’t been properly selected before you begin.
Many of the most popular genealogy records websites offer a hinting feature that suggests records to you based on the information in your online family tree. Many of those “records” are quite unique. I recently came across a Photo Hint at Ancestry that was a screen capture of a story in a public Facebook group of the descendants of a particular couple. It was interesting information but I didn’t really want everything that was captured in the image. I used Snagit to capture and then edit the image the way I wanted it so I could then save it to my computer. This included erasing or removing unwanted areas. The following Snagit features can help you accomplish this easily:
Answers to your questions from episode 61 which was my beginning tutorial on Snagit. If you haven’t used it before stick with us in this video to see all the cool things it can do and then go back and watch that episode which is perfect for beginners.
Pat M.: Will OCR work for non-English newspapers?
Answer: Snagit doesn’t translate, but the OCR will Grab non-English text. Learn more here. You can then copy and paste it into Google Translate.
SHB: Don’t see Evernote on the list, how easy is it to save to EN?
Answer: If you have Evernote installed on your computer you should see it in the Share list. You can also download Evernote to add it as a Share destination. In fact, there are loads of programs you can download.
Cyndy B.: Are all these features in older versions?
Answer: No, like all software, each version introduces additional features.
SHB: Curious about printing… if you print a long article, will it print out readable?
Answer: Yes! You can set the resolution. And use Print Preview to make adjustments so it prints exactly the way you want it.
CA Sanders: if I bring a photo into Snagit and work with it will save IN Snagit, not in my original placement…so I would have to “save” or “move” to the folder it was in to begin with my changes.
Answer: After making your edits, use File > Save As to save it in the desired format to the desired location on your computer hard drive. You can also save it to replace the original if that’s your goal.
B Latham: How do we keep the SnagIt program up to date? It sounds as if other viewers here are saying they purchased the program a few years ago and may be outdated. Isn’t there a way to keep it up to date?
Answer: Yes, you can buy a maintenance plant that will include future updates at a reduced fee. Use our link and discount code, and the option will be available at checkout.
Barbara C.: For 2 different laptops, would we need to purchase Snagit twice?
Answer: TechSmith software is licensed per user, so how many computers can I install it on?
Each user may install and use one copy of the software product on up to two computers for their sole use, provided only one computer is in use at any given time. This includes home and work, or a laptop and desktop.
Here’s our link for purchasing your copy of Snagit (screen clipping tool) Thank you for using our link. Use coupon code: GENE15 (We will be compensated at no additional cost to you, which makes the free Elevenses with Lisa show and notes possible.)
These show notes feature everything we cover in this episode. Premium Members: download this exclusive ad-free show notes cheat sheet PDF. Not a member yet? Learn more and join the Genealogy Gems and Elevenses with Lisa family here.

The manufacturer price is going up August 31, 2021. Now’s the perfect time to get your official Elevenses with Lisa mug.
Click here to sign up now and you get your free bonus ebook.
Leave a Comment or Question Below
Family history can, and should be found around our own homes. Your house is a great place to look for clues as well as the ideal place to display what you’ve already found! In this free genealogy live webinar Lisa Louise Cooke will show you how.
In Elevenses with Lisa episode 65 Lisa Louise Cooke will:
Watch episode 65
Home is where the heart is and it’s certainly where the family history is. If you’ve found an interesting piece of family history around your home tell us about in the Comments section below so we can all get more ideas of what to look for.
Author Robbie Shell wrote an article for the Wall Street Journal called The Family Heirlooms That Our Children Don’t Want Lifelong possessions look very different when we start trying to pass them on.
She wrote about being retired and becoming a grandmother. “The new baby (my first grandchild) and new house ignited one of my long-awaited projects—excavating crawl spaces and basement corners on a hunt for possessions to pass on to the next two generations. It’s easy to predict how this played out. My son and his wife turned down many more items than they accepted. Much of what I had hoped to “upsize” to them stayed in my basement and attic. What wasn’t easy to predict, however, was how complicated this seemingly simple transaction could be. It involved multiple perspectives, across multiple generations. It showed how possessions, when held up to the light, often lose the very qualities that prompted us to set them aside. And, in my case, it offered a glimpse of a future that I’ve thought about—and looked forward to—for years.”
She proceeds to describe how she went through items in the house, offering them up to her son and daughter-in-law. She got replies like:
“They did give thumbs-up to desk lamps, guest sheets and towels, a few kitchen items and one folding chair, among other things—utilitarian items with no stories or expectations attached.”
It’s an interesting dilemma I hadn’t thought about when I was carefully collecting and saving things over the past few decades: that being attached to the story behind the item was key to valuing it. We’re attached. They aren’t.
Then of course if enough years and even generations go by, we develop an interest in family history and can’t believe our good fortune to unearth such a treasure.
“Then there was the collection of unrelated items I now saw in a different light—those whose stories matter only to me: the child’s battered wooden rocking chair from the porch of my grandparents’ summer house; a faded, inscribed photograph of my father as a young man standing next to his own father, whom I never met; and the small tarnished music box with a twirling ballerina on top that was a gift from my godfather when I was young enough to still dream about being a dancer.
These things will stay with me here in the home where I have lived for decades.
Unless…
One day a young girl visiting her grandparents comes upon the music box. She picks it up and turns the key that starts the music playing. “Grandma,” she says, “what’s this? Can I have it?” “It’s yours,” I say, my heart skipping a beat. “It always has been. You had only to ask.”
I’ve inherited a lot of sets of dishes, and I have three grown daughters, and so far there aren’t any takers. My friend Kim recently proposed the idea of taking a class to learn how to make mosaic stepping stones for the garden. I can’t think of a better way to downsize some of this china!
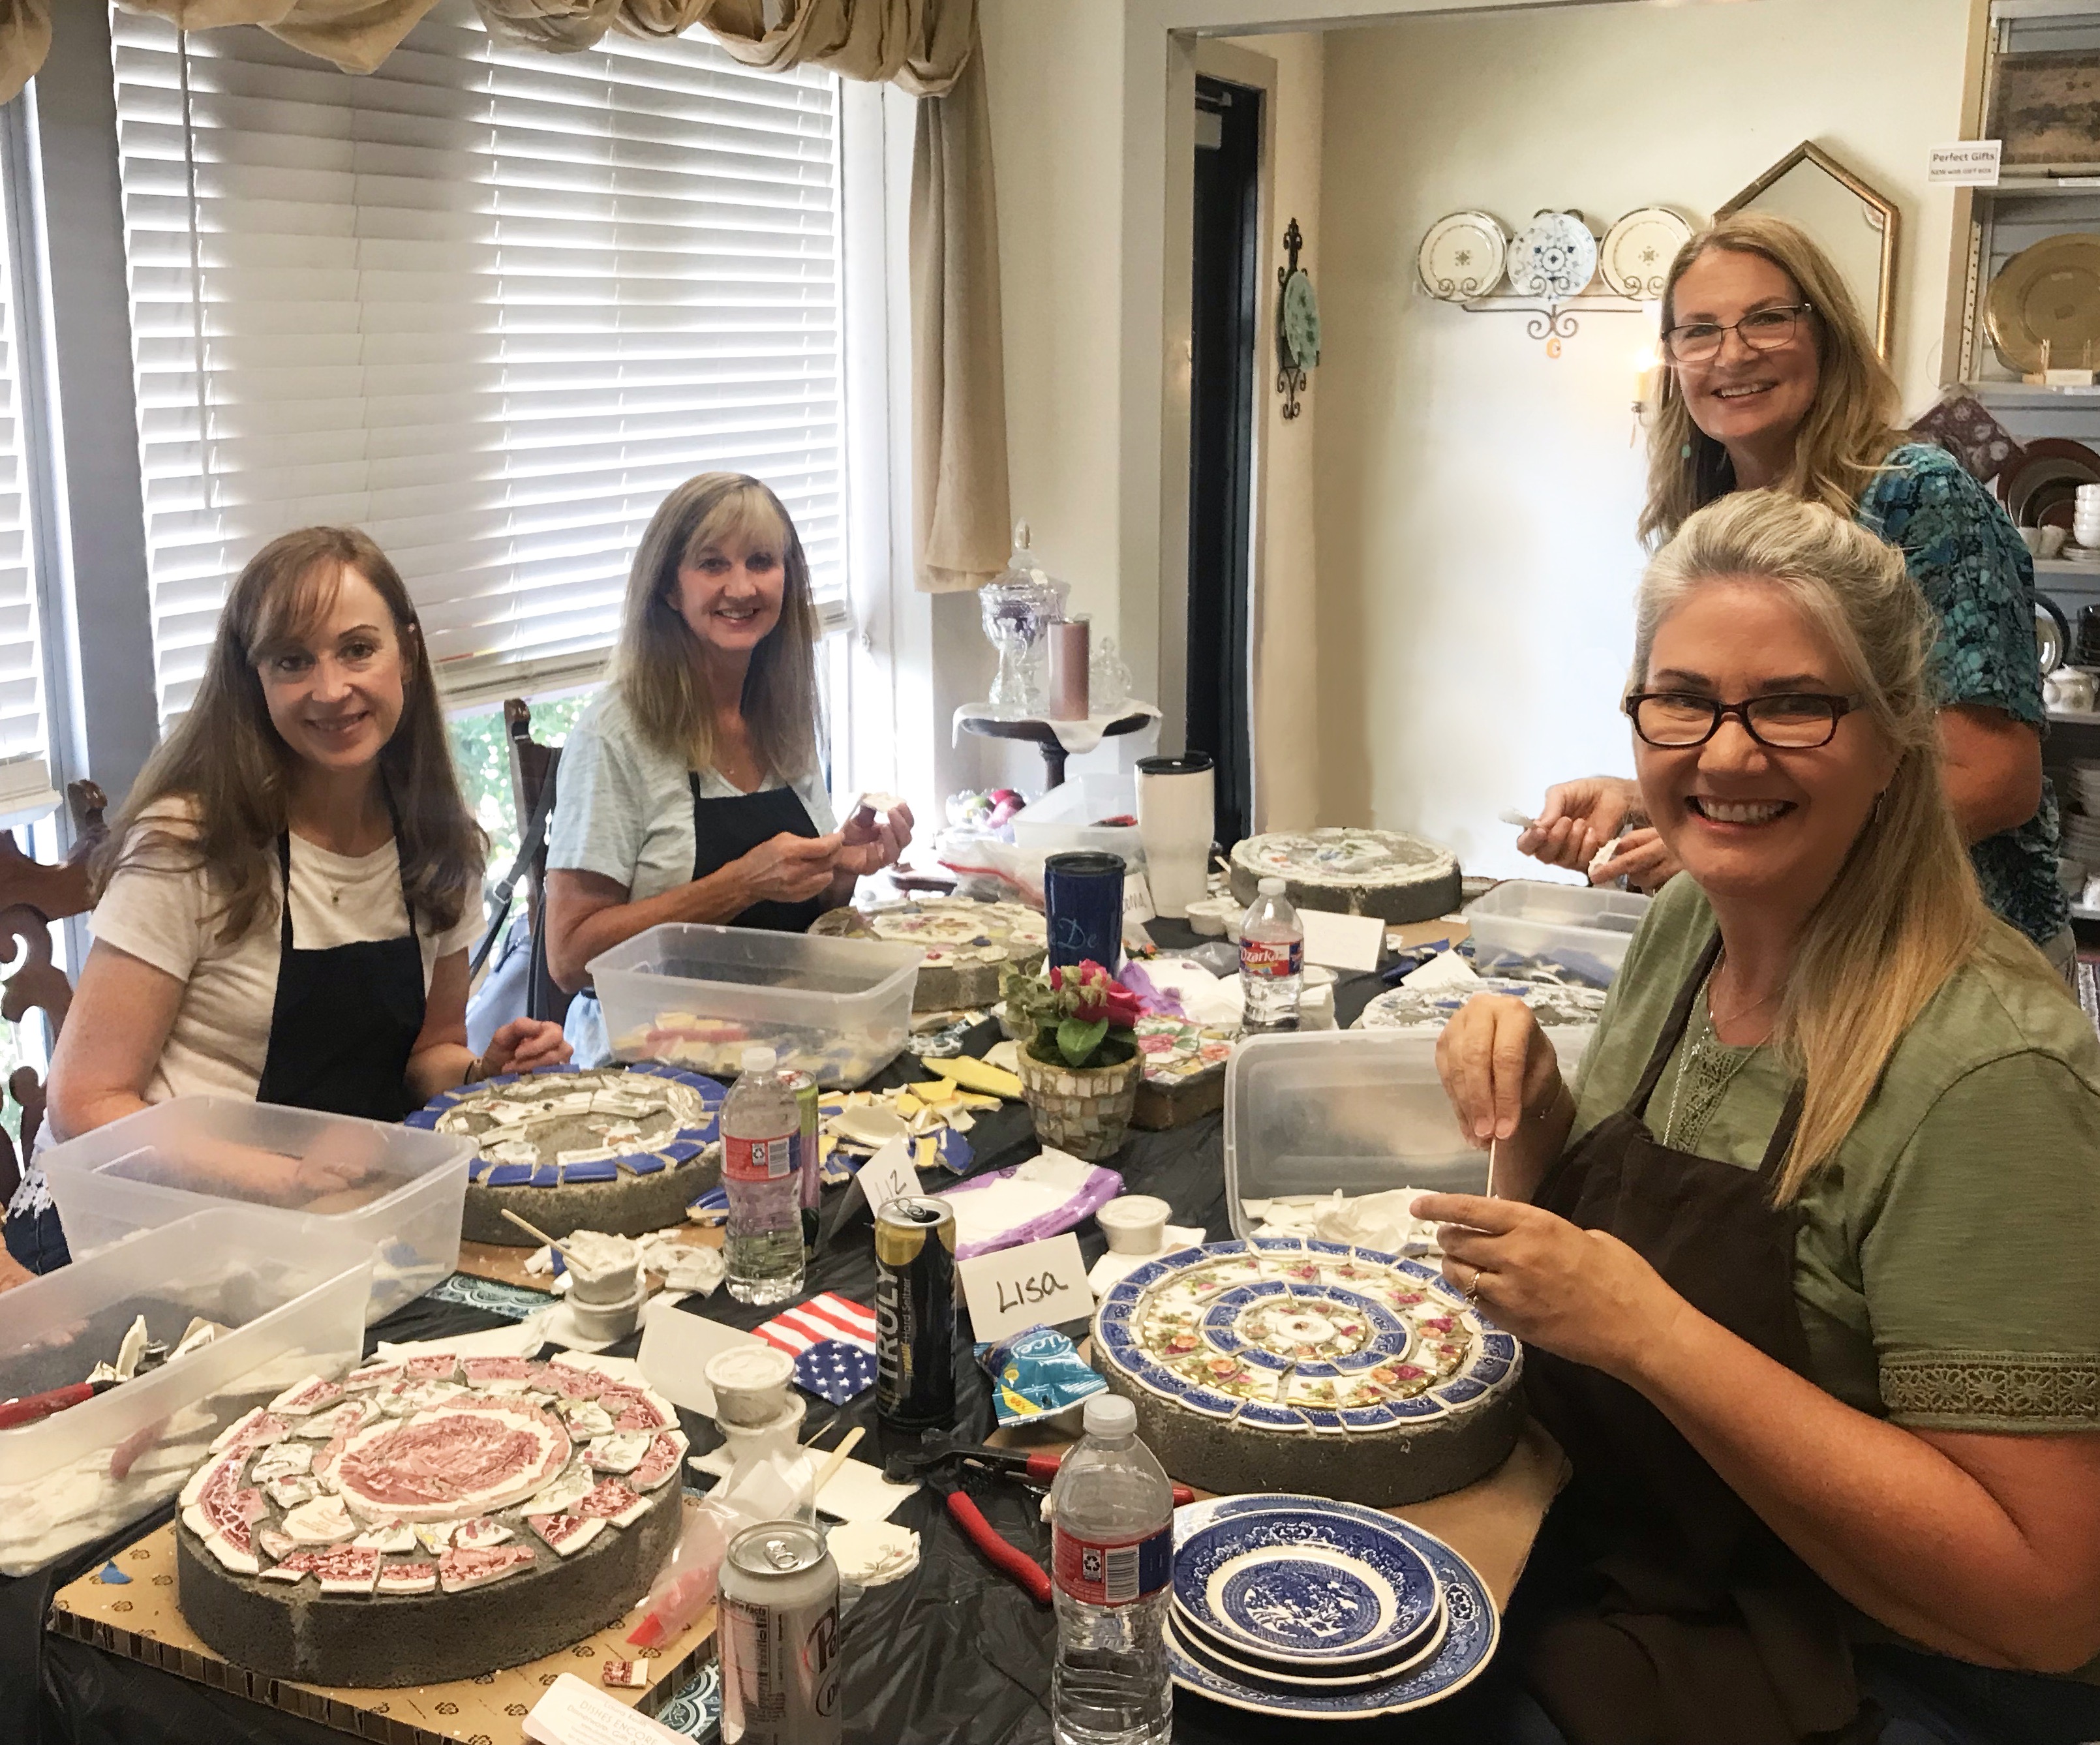
making mosaic tile stepping stones with my besties
So during last week’s live show (and you’ll find the link to the video replay here on YouTube in the video description below or go to genealogygems.com and click Elevenses in the menu to go to episode 64) I asked if any of you have family china:
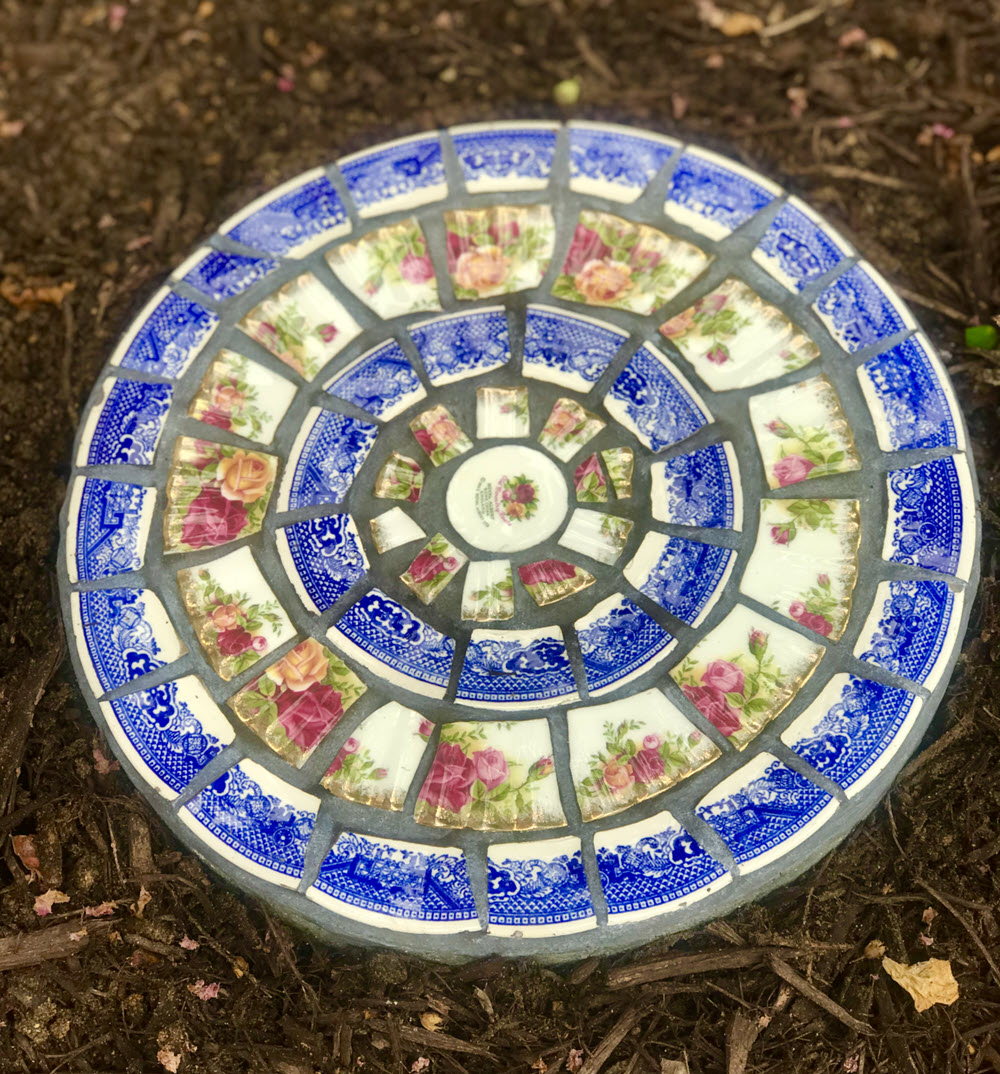
mosaic tile stepping stone
China Plate Mosaic Stepping Stone Supply List (the links below are affiliate links. We will be compensated if you make a purchase. Thank you for using them and supporting this free show):
China Plate Mosaic Stepping Stone Instructions:
Do you remember spending time in your grandmother’s kitchen? I sure do. My maternal Grandma would take us out to the fields to pick fruits and vegetables and she canned a lot of it to preserve it for winter, keeping it in an old wooden pie safe in her garage.
I inherited many of her trusty kitchen utensils. I’ve hung on to them for years in a cardboard box, dragging them with me as we moved around the country. I’ve always wanted to display them but shelf and counter space is always so limited and precious. I needed a way to get them up on the wall and I finally found it.
When I was out shopping at an antique store I came across an old wire basket. It caught my eye because it wasn’t round. It’s rectangular shape turns into a hand display shelf when it’s turned on it’s side. Being wire, it’s not only easy to hand (place the bottom of the basket against the way and secure over a few good nails or hooks), but it’s the perfect canvas for displaying your utensils. Items can be placed on the “shelf” portion, and wired onto it from all directions. The nearly invisible wire means all you see is the beautiful patina of these old kitchen work horses – flour sifters, peelers, mashers, blenders, funnels and more!
Let’s hear from you: In the comments section tell us what your favorite family kitchen utensil is and who it originally belong to.
Watch Elevenses with Lisa episode 27 on using Google Lens for genealogy.
Now we’re going to start off with a little family history mystery that Sharon emailed me about
She writes: “I’m a long time listener and I’m loving Elevenses with Lisa! After watching Beginning German Genealogy, I remembered that my friend, Tera Fey, had shared a unique music box with me, hoping I could identify the tune. Tera had been given the music box by her grandmother, Cora (Cornelia?) DeWein, who had been given the music box by her grandmother from Germany. Tera remembers that the top used to have a crest attached to it but doesn’t remember what it looked like. I was hoping you could share the tune with your many listeners and perhaps someone could “Name That Tune”. Many thanks for the work you do and that you share with us.”
How fun! OK we’ve had success playing Name that Tune before on my Genealogy Gems Podcast so you’ve come to the right place Sharon!
So, here’s my research plan on Tera’s music box. The first thing I did after receiving her email was to put it out on the Genealogy Gems Facebook page asking for help a few months ago.
While I waited for an answer I ran a Google search on the audio, and if you ever need to identify music you can do this too.
How to search for music using the Google search app:
In this case, we didn’t get a match.
Back on the Facebook post front, my daughter Lacey actually was the one who identified it as a Thorens Music Box, which are Swiss made. She said “Looks like 30-36 note? There would have been a card attached to the inside with the list of tunes. Looking at others for sale on eBay show similar boxes with their songs listed. Could listen to those songs to see if they match?” This is a good strategy.
A great place to listen to the songs available with a particular brand of music box is YouTube. I listened to several and although I didn’t hear a matching tune, there are many videos available naming the songs this box played, so it might be worth a more comprehensive search of Thorens Music Box.
Now it’s your turn. Let’s see if anyone out there knows the name of this song.
If you do, and you’re here watching live, post the title in the Live Chat. If you’re watching the video replay, go down to the Comments section and leave a comment. Let’s see if we can help Sharon and Tera out!
I bought this tablecloth about 5 years ago on ebay.com. It’s covered in embroidered handprints with names and birthdates. Since it’s the “Madden Family Branch” I would guess that those listed without last names are Maddens. Associated surnames are Egge and Arrants. Although a color key to the generations sewn into the corner of the tablecloth, there were other colors in the embroidery, so the “generation” distinctions aren’t hard and fast. I’ve also grouped families together where they appear to be a unit. If you think you know which family this is and have a contact for them today, email here.
1st Generation (pink)
Possible Family Unit:
2nd Generation (blue)
Possible Family Unit:
Possible Family Unit:
3rd Generation (red)
Possible Family Unit:
4th Generation (Yellow)
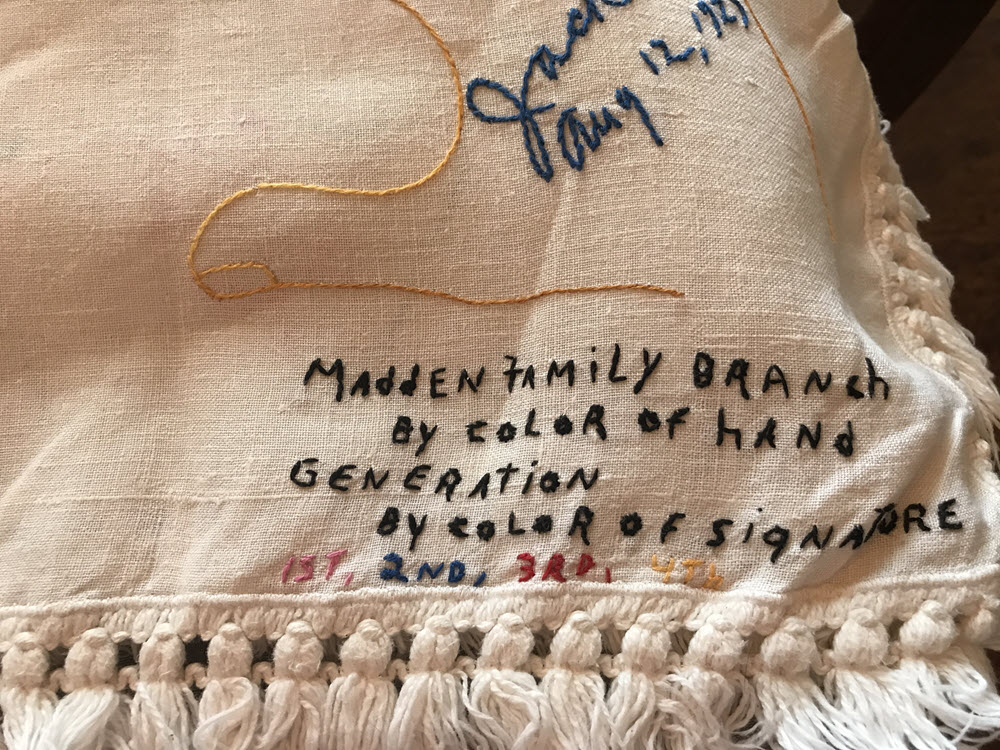
Can you help find the family?
Learn more about how to find family history on ebay. Listen to Genealogy Gems Premium Podcast Episode 16 – Tips for Finding Family History Related Items on eBay
These show notes feature everything we cover in this episode. Premium Members: download this exclusive ad-free show notes cheat sheet PDF. Not a member yet? Learn more and join the Genealogy Gems and Elevenses with Lisa family here.

The manufacturer price is going up August 31, 2021, so now’s the perfect time to get your official Elevenses with Lisa mug.
You can also find them through the menu: Premium > Premium Videos > Elevenses with Lisa.
Finding and Downloading Elevenses with Lisa Show Notes
Sign up here and get the free PDF bonus download.