Three ways to watch: 1. Video Player (Live) – Watch live at the appointed time in the video player above. 2. On YouTube (Live) – Click the Watch on YouTube button to watch live at the appointed time at the Genealogy Gems YouTube channel. Log into YouTube with your free Google account to participate in the live chat. 3. Video Player above (Replay) – Available immediately after the live premiere and chat.
Episode 71 Show Notes
Family History really comes alive when you can see actual faces and places, and that’s why the new photographic collection at Findmypast is so exciting. They’ve just added over 300,000 historical photographs chronicling more than a century of British life to their website. And these photos don’t just cover the UK – you can find images from other locations around the world as well.
Findmypast published these photos in partnership with Francis Frith, the UK’s leading publisher of local photographs since 1860, and they’re available to search online at Findmypast for the first time.
I’ve invited Alex Cox from Findmypast to join us today to tell us about the collection, the history, the scope and most importantly the best strategies for finding just the image you’re looking for.
About Francis Frith
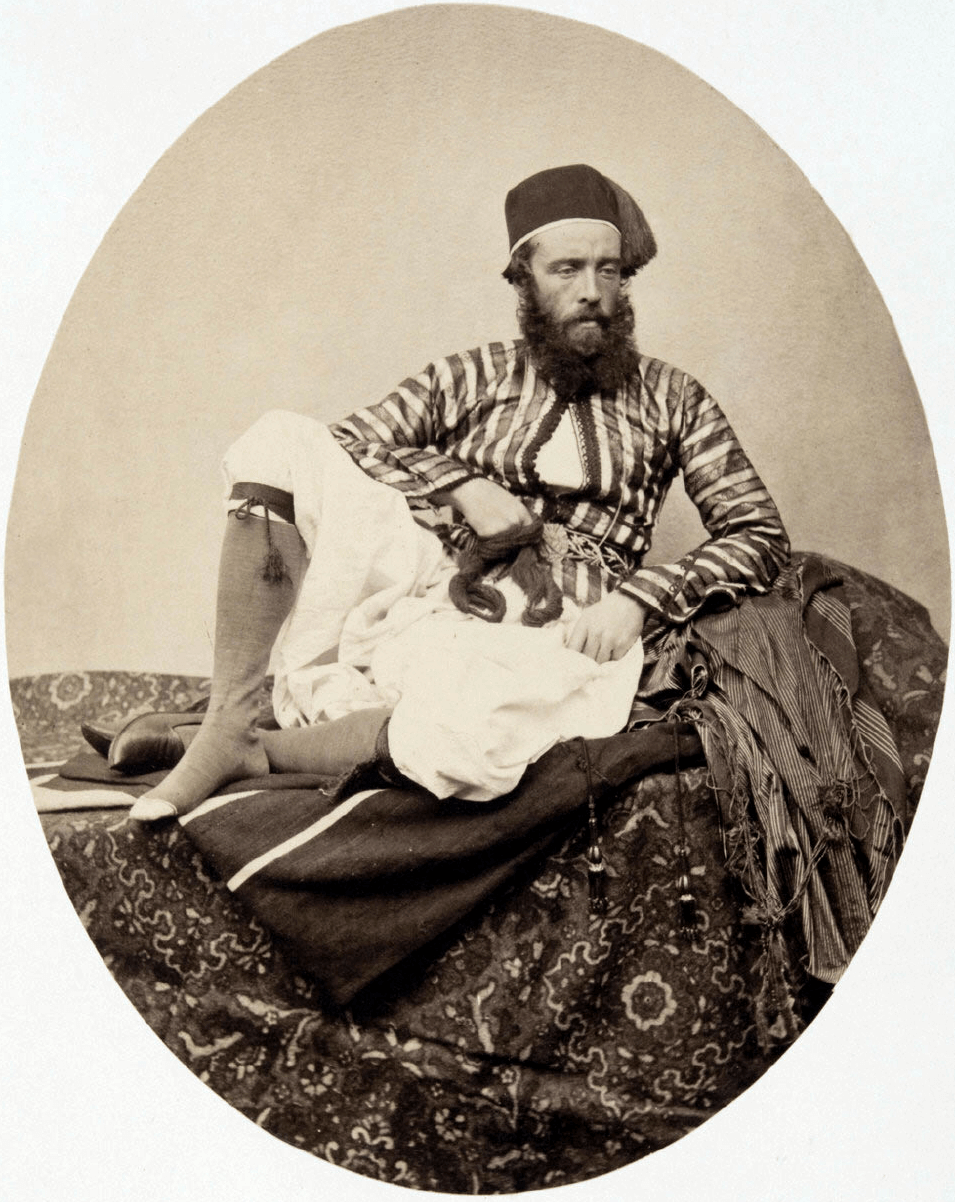
From the folks at Findmypast: “Born into a Quaker family in 1822 in Chesterfield, Derbyshire, Francis Frith was a complex and multi-talented man who had a formidable instinct for business. After becoming a founding member of the Liverpool Photographic Society in 1853 – only 14 years after the invention of photography – he founded his own photographic publishing company in 1860 with the aim of creating accurate and truthful depictions of as many cities, towns and villages as possible.
Francis Frith, 1854 (public domain)
Copies of Frith’s photographs proved immensely popular with the general public. Thanks to the rapid expansion of the Victorian railway system, Britons were now travelling in greater numbers than ever before, fueling a huge demand for photographic souvenirs.
To help meet this demand, Frith employed a team of company photographers who were trained to capture images of the highest quality according to his strict specifications.
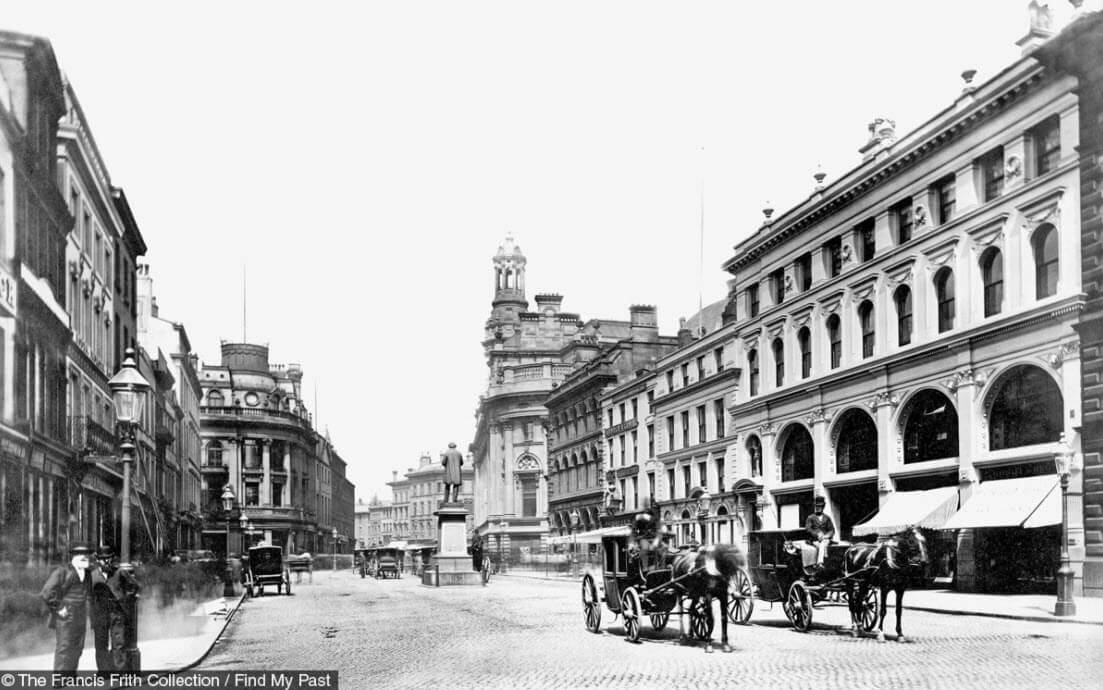
Manchester Saint Anns Square,1876
By the 1870s, the market for Frith & Co’s products was huge, especially after Bank Holidays and half-day Saturdays were made obligatory by Act of Parliament in 1871. By 1890 Frith had succeeded in creating the first and greatest specialist photographic publishing company in the world, with over 2,000 retail stockists.”
The Scope of The Francis Frith Collection
Quantity:
300,000 historical photographs
Coverage:
UK, Ireland and beyond
covering more than 9,000 cities, towns and villages across the UK and Ireland
wide variety of images captured overseas. Egypt, Canada, France, Germany Gibraltar, Hawaii, Holland, Italy, Switzerland, and the United States.
Timeframe:
1860 to 1970
Depictions:
scenes of daily life – people, places, occupations, things
Victorian, Edwardian and 20thcentury Britain.
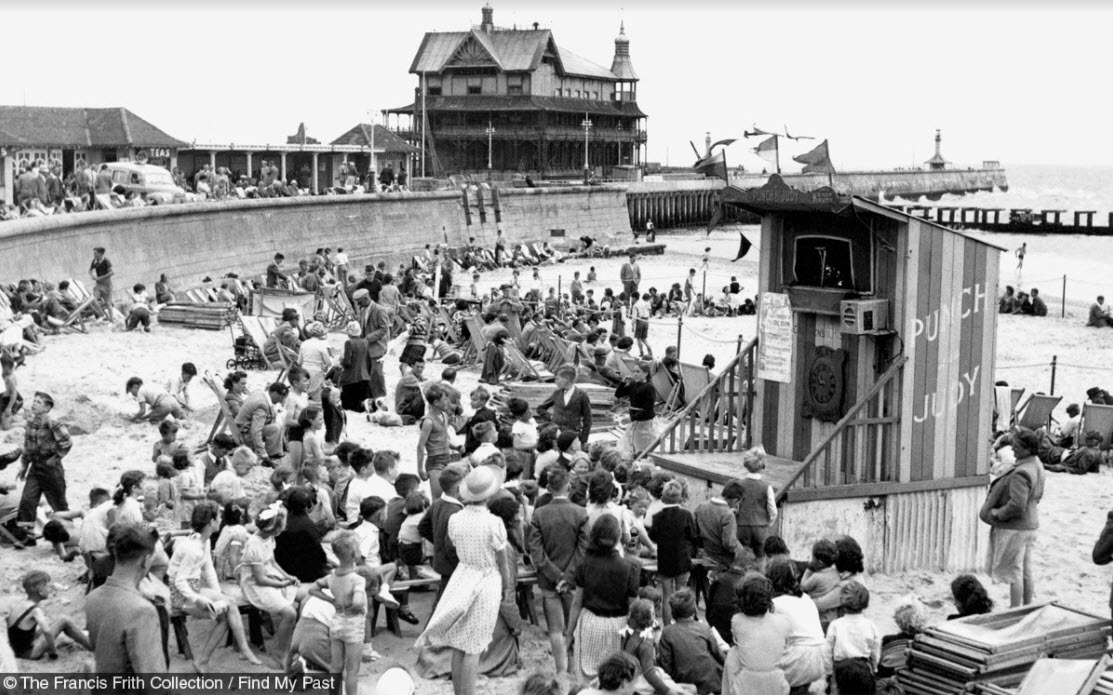
Lowestoft Punch and Judy Childrens Corner, 1952
Using the Photograph Transcriptions
Each photo comes with a transcription that is worth a look. You’ll find the transcription icon (it looks like a page) next to the image icon. The transcription provides information about the photo such as:
Year
Country and place
Latitude and longitude
Description
Link to the original photo on the source website (Francis Frith)
The Francis Frith photos are a great way to see how an area has changed over time. Copy latitude and longitude numbers found on the transcription page and then paste them into Google Earth to see the approximate location where the image was taken. Next, use Google Earth’s Street View to see the location up close today. You can save a high-resolution image of the location to your computer for comparison with the photo by clicking the SaveImage button in Google Earth’s toolbar at the top of the screen. I love using Snagit to clip and annotate the image more precisely. (Learn more about it by watching episode 61. There you’ll also find out link and current discount code for Snagit.)
Learn more about using Google Earth for genealogy by watching myfree class.
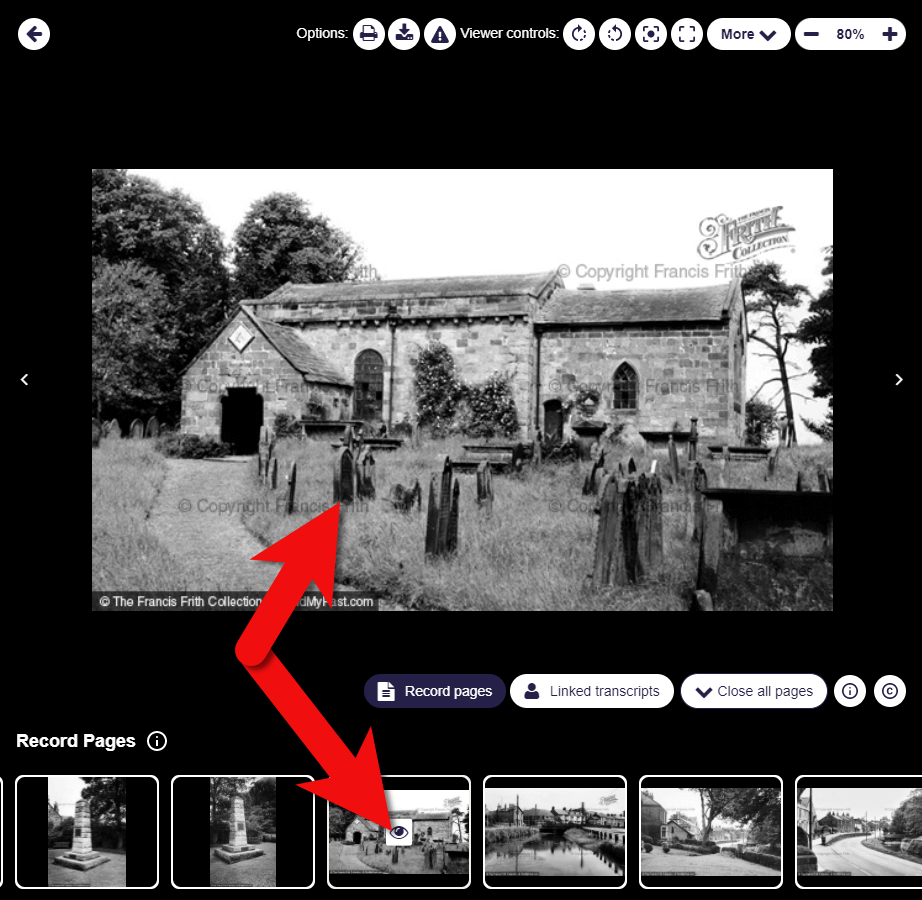
How to Browse the Photographs
Sometimes you just want to leisurely browse the photos for a given area. Here’s how to brows the Francis Frith Photo Collection at Findmypast:
Start by searching on the general location.
Click any image.
Thumbnail images will appear at the bottom, all from the same series of photos.
An “eye” icon will appear on the thumbnail of the image currently being viewed.
Click the images on either side to scroll through and browse the series.
How to browse the Francis Frith photo collection at Findmypast
Frith Photos Search Strategies
Lisa’s Tip: If your ancestors sailed from a British port, search the collection to see what it looked like at that time.
“Be clever with your keywords.” Alex Cox, Findmypast
Alex recommends that before you start to search, look up the locations of your ancestors on a map. Have a look at the area. Doing so may provide additional ideas for your searches.
In addition to searching for locations, use the keyword search field to search for words describing elements of your ancestors’ lives. Try words like:
Store
Shop
Business
Docks
Factories
Mills
People
Pedestrians
Horse
Use the distance slider to expand and narrow your search geographically. Keep in mind that 10 miles on either side of your ancestors’ town really isn’t that far. By expanding your search with the distance slider, you might be able to find helpful representative images, even if they don’t include your ancestors’ exact village or business.
Usage of the Frith Photographs
We’re all mindful about copyright, so Alex and Lisa discussed the rules around the usage of these images in our family history work. Alex says you are welcome to use the Francis Frith images (which include small watermarks and a copyright statement) in a variety of ways for your family history.
Here are just a few ideas on how to use the photos:
Add them to your family tree
If you find a location in another genealogical record, look up the location in the Frith Collection
Use them in your family history storytelling (videos, books, presentations, etc.)
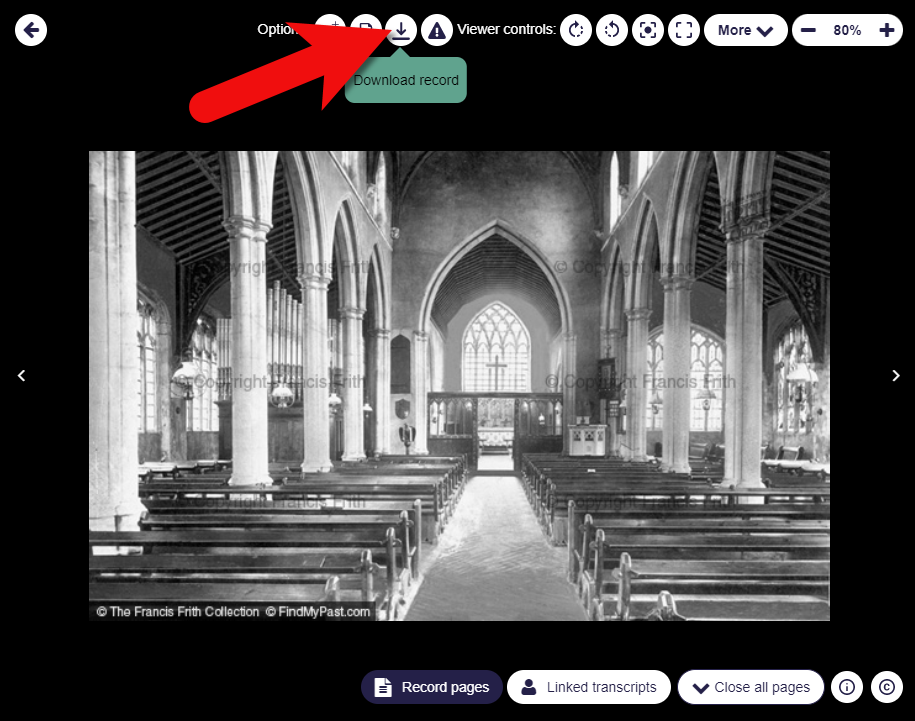
How to purchase a high-resolution watermark-free version
In each image transcript you’ll find a link to the original source image on the Francis Frith Collection website. Click it, and it will take you to the Frith website. There you can purchase a clean (without watermarks), high-quality version suitable for printing.
When you’re working on our genealogy, you’ve got data and records coming from all directions: websites, interviews, archives, downloadable documents, and more. Some of it you’re actively working on, some of it you need to save for later, and the rest has already been analyzed and is ready for archiving. This variety of data requires a variety of storage locations.
Watch episode 71
In this week’s special episode of Elevenses with Lisa (episode 71) I’m going to share with you my genealogy data workflow. We’ll talk about how it all fits together to ensure an uncluttered desk and the ability to instantly put my hands on what I need when I need it. If that sounds like something that you need help with, please join me this week.
Three ways to watch: 1. Video Player (Live) – Watch live at the appointed time in the video player above. 2. On YouTube (Live) – Click the Watch on YouTube button to watch live at the appointed time at the Genealogy Gems YouTube channel. Log into YouTube with your free Google account to participate in the live chat. 3. Video Player above (Replay) – Available immediately after the live premiere and chat.
Episode 71 Show Notes
Barbara left a comment saying she found our recent videos that we called How Alice the Genealogist Avoids the Rabbit Hole helpful (episode 68 and episode 69), but she did had a question about Evernote. She asks, “Once you have processed (the genealogy record) and extracted the information you need, do you remove them from Evernote and place them in your digital genealogy filing system? I get a bit confused in thinking about what the other purposes of Evernote might be. Wouldn’t I just save my documents, newspaper clippings, etc. to my digital files on the hard drive and also to my Google Drive folders? Is there any need to also have them in Evernote?”
This is a great question, and I think the best way to answer it is to talk about my entire genealogy workflow in which programs like Evernote play a part.
It really helps to have a consistent way to capture and find what you’re actively working on. My workflow works great for me, but its just one way. Follow along with me and see if this might be a flow that will work for you.
The Genealogy Data Flow
Let’s start off with an overview of my workflow. And there are really 5 major workstations, if you will, that your data flows through. Some of these we’ve discussed previously here and also in several Premium Member videos:
Active Genealogy Work
This is the stuff we are working on currently. I several different tools to capture and work on these items: Evernote, genealogy website subscriptions, “pending” folders on my computer, pending tabs in my 3 ring notebooks and physical pending box on my desk. We discussed this in Elevenses with Lisaepisode 7.
Conclusions added to Master Genealogy Database (Software on your computer)
Archival Digital Storage (your computer.) See episode 8 (Digital Archiving) You can certainly keep archival items in Evernote as well.
Archival Paper Storage (your binders.) See episode 6(Paper Archiving)
Cloud backup. I use Backblaze at https://www.backblaze.com/lisa (affiliate link – thank you for your support of our free content)
Incoming Genealogy Sources
Not everything I find while researching is ready to be archived the moment I find it. Some items are actively being found and worked with such as:
Items I’m exploring for the potential application to my current research project
Items pending analysis
Unproven items
Items playing a role in a bigger research question that I want all together for now.
Bright Shiny Objects (BSOs) – stuff I found along the way that doesn’t relate to my current research goals
Not everything is captured on my computer. Many items (photos, audio and video records, typed notes) are captured on my phone and my iPad. So, I need an easy way to funnel everything back to one active workspace. A cloud-based notetaking service allows me to do this because it’s available as software on my computer and an app on my mobile devices. All synchronize through my account on the cloud. I use Evernote (affiliate link – thank you for your support of our free content) so I’ll refer to that, but there are others out there like OneNote, and Google Keep. (Learn more about how to user Evernote in episode 70.)
Evernote allows me to:
Capture and hold items
search and retrieve more effectively than on my computer thanks to OCR (subscription)
work my genealogy research plan
easily collaborate with another researcher by sharing a single link
Store and share media such as audio and video recordings
OK, so does everything go straight into Evernote? The answer is no. So let’s take a look at what happens to a digital item when I get it. I’m going to call it data, but it could be a downloaded genealogy record, a web clipping from a website, a photo of a gravesite I took with my phone, or anything else that includes information I want to use.
Working Your Genealogy Research Plan
When we work our genealogy research plan, we will inevitably locate documents. Typically, these are digital, but sometimes we find a physical document and make a digital copy of it.
Before a digital item is deemed relevant and ready to archive, we have a lot of work to do. We need to evaluate and analyze the document to determine its value and its possible application to our family history. If deemed reliable and applicable, we then need to extract the data and enter it into our family tree software. We may also decide to add some or all of the information to other places such as our online tree if we have one.
Many times, all of this work can’t happen in one sitting. We may need to be able to review and work with the item several times before we’re finished with it. I call this “processing” the document.
Even after its processed, we may still need the item nearby for reference as we work our research plan in the hopes of reaching our goal. At this stage, I consider this item to be “Active.” The opposite of that would be items I consider to be “Archived.” An archived item has been fully utilized and is no longer playing an active role in my research plan. That’s not to say I may not need to reference it again in the future, which is why it must be archived where I can retrieve it. The point is that the item is not relevant to my current active research. For example, perhaps it pertains to my mother’s side of the family and right now I’m working on my father’s side of the family.
My active digital items are typically added to Evernote, which I consider to be my Active workspace. It is not my archival space. However, this is not to say that you can’t store everything in Evernote forever if that’s what you want to do. You certainly could. I’ve given this a lot of thought and there are a few reasons why I don’t store everything in Evernote.
The main reason I don’t store everything in Evernote is that I’m a firm believer in retaining control of my data. If we store everything on a website or in a cloud service (which Evernote is), they (or their hosting provider) could pull the plug tomorrow and it would all be gone. I certainly don’t think that would happen overnight, although there are real cases of that happening. But I don’t want to take the risk, and I don’t want to have to scramble in a panic to move a mountain of data because I’ve been given a 30 day notice that a service is ending or has been sold to another company. (And let’s not even think about the possibility that the email notification of that happening went to my Spam folder!)
In order to retain control of my family history data, my long-term data storage needs to be within my control: my computer, external hard drives (both backed up with Backblaze) and paper print outs. That being said, when it comes to my active research project, I’m willing to trade the risk for the speed and convenience of using an online tool or service such as Evernote. My active research is a small fraction of my total research, most of which has been archived on my computer.
So, when I first find an item, I have a decision to make: where am I going to put it? Will I save it to my computer or to Evernote? It depends on what it is.
Items I save to Evernote:
Items needing OCR to be most useful. Examples: Newspaper articles, web clippings
Items created with my phone or tablet. Examples: Photos of gravesites and documents, interview audio recordings, videos of research trips
Items needing analysis before confirmed as pertaining to my family. Examples: Record downloaded from a genealogy website. I want these in Evernote because everything is together in one place. Tags and the search feature allow me to instantly retrieve any combination of records I need at any given time for cross reference. And if I need to share any or all of the items with another researcher it’s easy to do with just one share link. A cloud notetaking service make working your research plan much easier. (Premium Members watch my video class Collaborative Genealogy with Evernote.
Example:Items pertains to my family but not part of my current research project.
Downloaded genealogy records I don’t have time to process right now.
All items are tagged with relevant information to make them quick and easy to find in addition to keyword searching.
Items I save to my computer hard drive:
Items to I want to keep that have been processed.
Digital scans of visual items. Examples: Family Photos, old postcards
Large files created on my computer (audio, video).
I have a solid system for organizing my folders and file on my computer so it’s quick and easy to find them. If you’re a Premium Member you can watch my step-by-step classes on how to set that up for yourself on my website GenealogyGems.com.
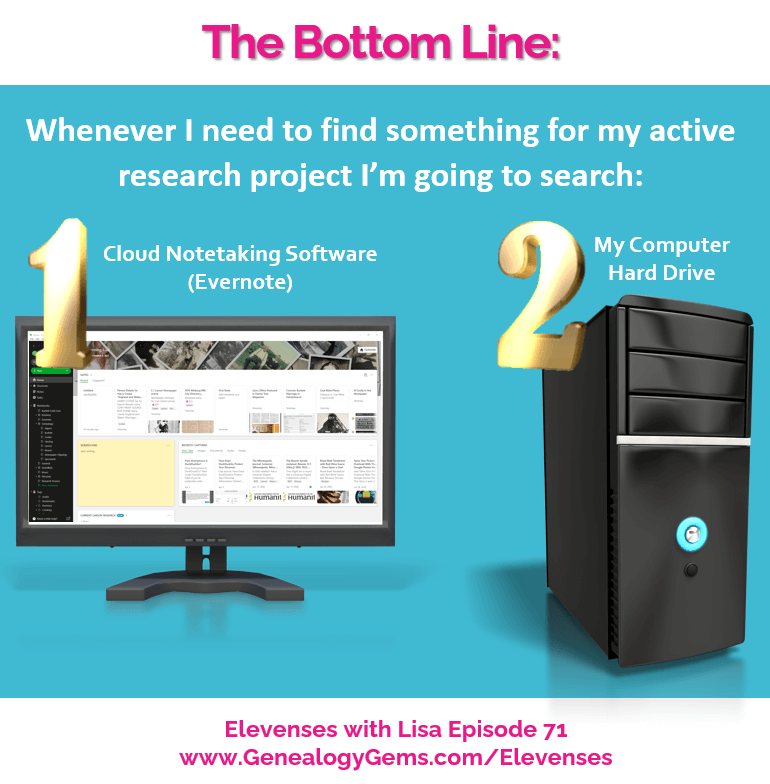
The bottom line is that whenever I need to find something for my active research project I’m going to search my notetaking service first, and then my computer hard drive.
Archiving Processed Items
Once I reach my research goal and I’m done actively using those sources, I’m ready to archive them. I could just leave everything in Evernote, but I want to make sure that all genealogical documents that I referenced as a source in my master database, are archived on my computer for long-term storage that I control, and that is being automatically backed up.
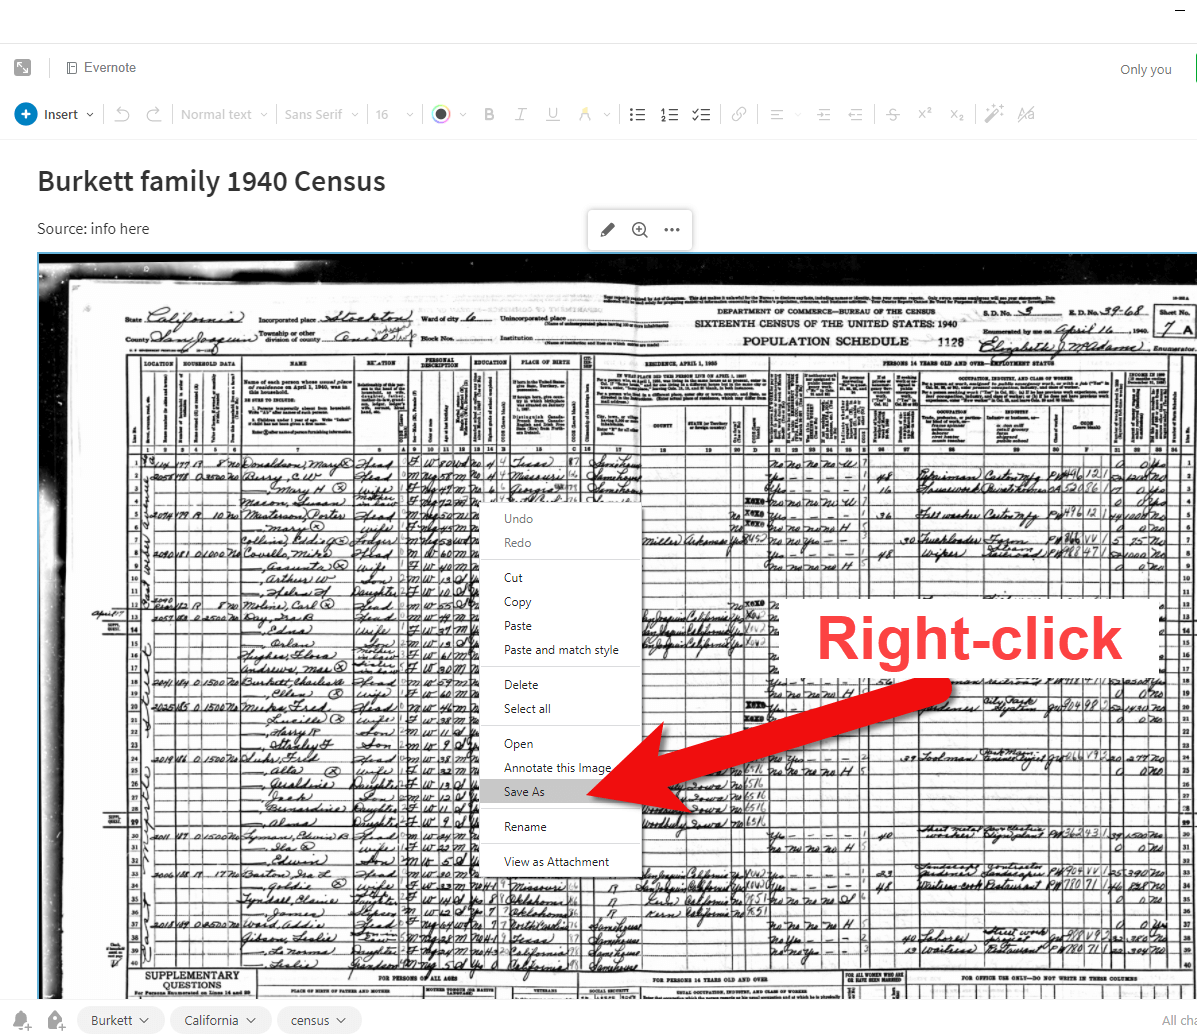
An important thing to understand about Evernote is that you can’t just download everything with one click in its original file format. However, you can save individual digitized items in your note, such as genealogical records, to your hard drive. Since there is no lifetime storage limit, I leave the note intact in Evernote, and I save the image to my computer hard drive. Save the image by right-clicking on it (in Windows, & I think it is Command click on a Mac) select Save As and save it to the appropriate archival folder. I do this at the end of the research project. Now you may feel like your “research project” never ends! But I’m referring to a genealogy research plan.
How to save a document image to your hard drive from Evernote.
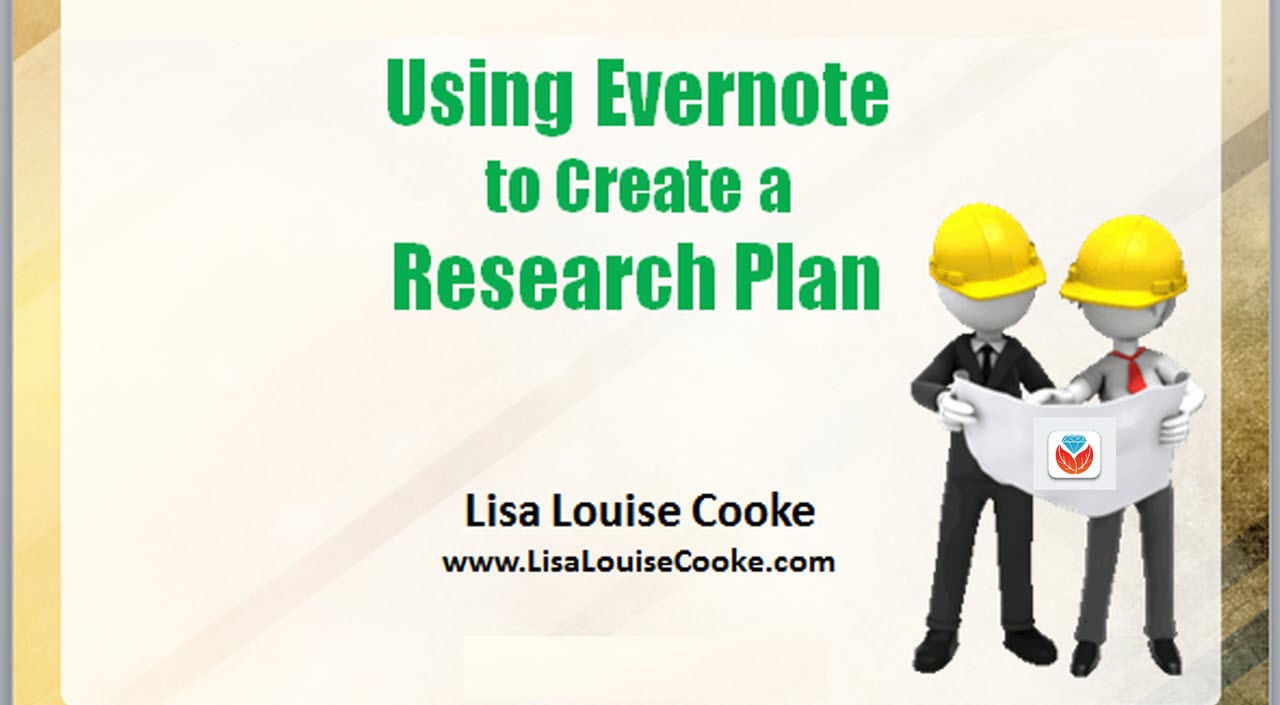
You can learn how to create one in Evernote by watching my Premium video class Using Evernote to Create a Research Plan. (Premium membership required.) Of course, after I’ve answered my research question I quickly develop the next one and build a plan around it. So, you’re right, it never actually ends – thank goodness!
How Do I Find It Later?
My software database is the brain of my genealogy operations. I may have family tree information on various genealogy websites, on my computer, in Evernote and maybe even on my own family history website. But my database is the final word on what I have found and believe to be accurate. As I draw conclusions and add data to my family tree in my database, I cite my source. Therefore, everything I need to know about my tree is in one location I control on my own computer. If someone asks me a question about someone in my family tree, I can quickly look up the information and also see where I got it (the source).
“Your genealogy database software is the brain of the organization.” Lisa Louise Cooke
When I want to refer back to one of those sources I would look in one of three places:
My computer archival digital files (especially if it’s not part of my active research plan). This is easy to do because I know my folder system well, and it guides me. I’ve never lost anything yet!
Evernote (particularly if the source is part of my current research plan.)
The surname binder (if my citation tells me or I suspect it would be an archived piece of paper.)
Because I stick to my system, I usually instinctively know where to look. And because of they way each is set up, I can find things FAST!
Final Thoughts
Of course there are always exceptions to any rule, and there may be an item or situation that doesn’t fall perfectly neatly into a category or activity. Use your own best judgement on how to handle those. OCR search capability and great systems for digital and paper items will make it possible to find what you need when you need it. And most importantly, you’ll retain control over your family history legacy.
Be sure to share your Evernote credentials in a secure place and share them with a trusted relative so that the account can be passed on in the future. Learn more about protecting your legacy by watching my video class Saving Your Research from Destruction. (Premium membership required.)
Author Nathan Dylan Goodwin (The Sterling Affair) joins Lisa Louise Cooke for a conversation about writing, DNA, Criminal Cold Cases, and his new book The Chester Creek Murders.
This audio comes from my YouTube video series Elevenses with Lisaepisode 47.
Listen to the Podcast Episode
To Listen click the media player below (AUDIO ONLY):
04:41 How Nathan Dylan Goodwin researches his books
11:07 Golden State Killer Case & what he learned from Barbara Venter
Don’t miss the Bonus audio for this episode. In the app, tap the gift box icon just under the media player. Get the app here.
Get the Free Genealogy Gems Newsletter
The Genealogy Gems email newsletter is the best way to stay informed about what’s available with your Premium eLearning Membership. Sign up today here.
Doing genealogy research generates a wide variety of research notes: typed and handwritten, audio, photos, video, and screenshots of information on websites. If you want one tool to pull together your current research projects, Evernote might just be the answer. In this video and article you’ll learn the role that Evernote can play, what it is and how to set it up, and your options for using for free or as a subscriber.
Evernote for Genealogy Video Tutorial
In this video and article Lisa Louise Cooke will discuss:
What Evernote is and the role Evernote can play in your genealogy research
Use it for free or upgrade to get all the bells and whistles like OCR and use on all your devices. (We will be compensated if you use our affiliate link. Thank you for supporting this free show.)
Show Notes
In my recent videos on how to avoid research rabbit holes that keep you from your genealogy goals, I mentioned that I use Evernote to capture BSOs or bright shiny objects that are interesting but not what I’m working on at the moment. So in this video I’m going to explain what Evernote is, and how to get started using it.
Evernote puts all your notes in one place and offers an incredibly fast and easy way to retrieve them.
Evernote is a:
website
software program for your computer (Win & Mac) that you download for free from their website
mobile app (iOS & Android): search for Evernote in your device’s app store
a web clipper for your computer’s web browser
Benefits
Genealogy can get a big messy. Information can be gathered from countless sources and in a variety of forms. You could funnel things through a cloud service like Dropbox. However, because Evernote is a note taking app, it offers unique and super helpful features:
Create all types of notes
From all of your devices. Thanks to Cloud synchronization you can take a note on any device and always have access to the most current version. (Free mobile app)
Web clipping – It allows you to clip items from the Internet (rather than saving entire bulky web pages),
OCR technology makes notes (such as newspaper articles) keyword searchable (subscription)
Data like URLs and the date you created the note is automatically included
No total storage limit, just monthly upload
You can use it for free, and upgrade for all the bells and whistles.
Install the software on your desktop computer (Windows & Mac)
Download the web clipper to your browser (app store or Google it)
Download the free Evernote app to your mobile devices from the iTunes App Store or Google Play
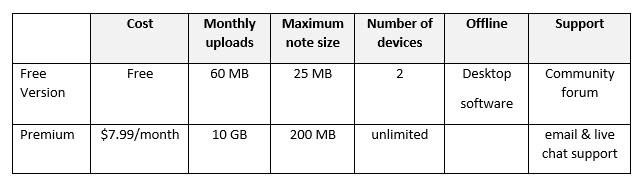
Features & Costs
(Subject to change. Visit evernote.com/compare-plans)
Evernote pricing plans comparison Sept. 2021 – See the website for the most current offer.
Software Home Layout
Evernote’s Home view gives you a summary of what you’ve got going on in Evernote. If Home is new to you and you don’t see it, simply head to the left Navigation menu and click Home.
Home gives you a place to sort of summarize what you’ve got going on in Evernote. It also allows you to add more personalization.
A fun way to personalize Evernote is by adding a background image. Click Customize in the upper right corner, and then click the Change Background button. Here you can add a preset image or add your own.
By default, Home comes with widgets such as:
Notes (highlighting your most recent notes, and Suggested notes based on your activity)
A Scratch Pad
Recently Captured items by type (web clips, images, documents, audio and emails)
While you’re in Customize mode, you’ll see additional available widgets like:
Calendar (allowing you to sync your Google calendar with Evernote)
Filtered Notes
Notebooks
Pinned Notes
An additional Scratch Pad
Shortcuts
Tags
Tasks
We’ll explore some of these further in a moment. But first, let’s create our first note!
All Notes View – SnippetView:
Left column = your files and organization
Center column = search for notes
Right column = the note you are currently working on
Change the layout by clicking the View Options icon (in SnippetView it appears at the top of the search column). This will give you a variety of layout options.
Change what appears or is hidden from view, and whether the view is dark or light by clicking View in the menu.
Notetaking 101
Create a note by clicking the New Note(+) button at the top of the screen.
Creating a new note is as simple as starting to type. Evernote saves your work instantly and without any extra effort on your part. Notes are saved in “the Cloud” on Evernote’s servers. This means all of your notes are automatically backed up. In addition, all of your notes will sync across all of your various computing devices. And Evernote facilitates sharing notes with others for research collaboration.
Click the Info icon at the top of the note to see the meta-data for that note. You can add and edit this information.
Types of Notes:
Typed
Sketched
Photos
Attachments
Video
Audio
Note Info has changed and can now be found by pressing Control + Shift + I on your keyboard, or clicking the More Actions (3 dots icon) in the upper right corner of the note and selecting Note Info.
Tagging is the Key to Organization
Add a tag based on important keywords associated with the note.
Examples of tags for genealogy:
Surnames (Cooke, Moore)
Record types (birth, census, land)
Locations (Indiana, Germany)
Time frames (1900-1909, 1910-1919)
Tasks (pending, add to database, follow up, etc.)
To tag a note, click Add Tag at the top of the note and select a tag from your list or add a new tag. Tags will appear in the left column. Click any tag in the left column to retrieve all notes with that tag.
Evernote Tasks
In June of 2021 Evernote added a Tasks feature. It operates just a little differently than how I’ve been using tasks. Evernote tasks are:
To Do Items
Note Specific (versus a tag which can retrieve all notes with that task)
Often Deadline Driven
Assignable to Others
Searchable
Where is the Trash?
You will find Evernote’s Trash bin at the bottom of the Navigation bar on the left.
Notebooks
Notebooks take organization a step further. I create notebooks sparingly. I use them to divide Evernote up into workspaces: Genealogy, Personal, Business, etc. I also use them for long-term and collaborative research projects that I may want to share with others. You can drag and drop notebooks on top of each other to create Stacks, although Evernote only allows one level of stacking.
How to create a new notebook:
In the menu select: File > New Notebook
Name the new notebook in the pop-up window
Select notebook type – usually you would set it up to synchronize, but you do have the option to have the notebook reside only on the computer it was created by selecting Local
The Cloud and Synchronization
Notes are saved on your computer and in the Cloud on Evernote’s servers. This means all of your notes are automatically backed up, and also accessible from your account on their website. Your notes will sync across all of your computing devices that have Evernote installed. There’s no need to manually sync with the new version. It happens automatically whenever you’re connected to the internet.
Web Clipping
As you visit webpages, you can clip just the portion of the page that you want to remember and keep rather than printing the page or bookmarking it. You can type the source citation directly into the note. Clippings appear as images in the note.
How to clip a screenshot using the computer software:
Right-click on the Evernote icon in your computer task bar.
Select Clip Screenshot.
Use the cross-hairs to draw a box around the desired content.
Release you mouse and you will see a quick flash on the screen indicating the content has been saved as a note in Evernote.
In Evernote click on the note to type additional information if desired.
How to download the free Evernote web clipper for your web browser:
Go to: evernote.com/webclipper
The download page will detect the browser that you are using and offer the correct web clipper. Click the download button.
The Evernote web clipper will install in your web browser (look in the upper right corner of your browser for the elephant icon.)
Sign into your Evernote account in the clipper.
Using the Browser Web Clipper:
When you visit a web page and find something that you want to clip, click the Evernote Web Clipper (elephant) icon in your web browser. The browser web clipper can save:
a full page (even the parts out of view)
an article
a simplified article (removing unwanted graphics and text not pertaining to the article)
a screenshot (where you precision clip with cross hairs)
a bookmark
As you clip you can select which notebook to file the note in and add any desired tags. It will also include the URL in the note header.
Search and Retrieval
Type a keyword into the search box and Evernote will locate and display notes that contain the keyword in the center column. This includes typed text from a website clipping or image, as in the example above. With a subscription, OCR technology makes it possible for you to search for words in Evernote to retrieve notes that include those words, both on the clipped image and in printed handwritten text.
This week we’re going to revisit two more early episodes of Elevenses with Lisa that will help you be more productive and organized no matter what device you using for your genealogy research. I’m bringing these episodes out from behind the Premium Membership paywall and making them available for free this week. These will be presented back-to-back as Live Video Premieres on my Genealogy Gems YouTube channel. Part 1 and part 2 of this short series can be found in episode 68. In part 1 we covered what makes us vulnerable to getting distracted, and how a research plan can help. In part 2 we talked about how to deal with BSOs (bright shiny objects!) In this episode 69 we will cover parts 3 (Mobile Organization) and 4 (Online Productivity Strategies).
How Alice the Genealogist Avoids the Rabbit Hole Continued…
Part 1 and part 2 of this short series can be found in episode 68. In part 1 we covered what makes us vulnerable to getting distracted, and how a research plan can help. In part 2 we talked about how to deal with BSOs (bright shiny objects!)
Part 3
In episode 68 we covered:
1. Use a Cloud-Notetaking Service
Get a free Cloud note-taking tool and use it consistently. (Examples include Evernote, OneNote, and Google Keep.)
Use the website, software, and/or app to capture unexpected finds while researching. Both Evernote and OneNote work on all platforms.
Your notes in your account will synchronize between your devices (depending on the program and plan you choose.) You can add to your notes or work with them anytime, anywhere.
2. Schedule BSO Time
I use Google Calendar to stay organized and schedule my BSO time. Create a BSO calendar, and then schedule BSO time on your calendar. These will help you remember to follow up. Knowing you have set aside time in the future to explore the BSO helps you mentally let them go and stay on track with your research plan.
In this episode:
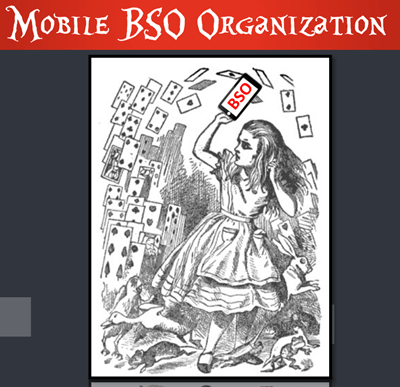
3. Mobile BSO Organization
Success comes from pairing your research plan and process with a great supportive research environment. We have a variety of “environments” we work within such as:
On paper at our desk
On our mobile devices
On our computer
Mobile Genealogy Organization
Let’s look at how we can set up a workflow for BSOs while mobile computing. My two favorite methods for capturing BSOs on a smartphone or tablet are 1) Cloud Notetaking, and 2) Home Screen “Bookmark Apps”.
Option 1: Cloud Notetaking
I’ll be using Evernote on an iPhone as an example. (You may see slight variations in the instructions depending on the service you use and your device.)
Evernote is a great choice if you want to easily sync and use your notes on all devices including your desktop computer and / or laptop computer.
Before you begin, you’ll need a free Evernote account at evernote.com. You’ll also need to download the free Evernote app from your device’s app store, and log into your account.
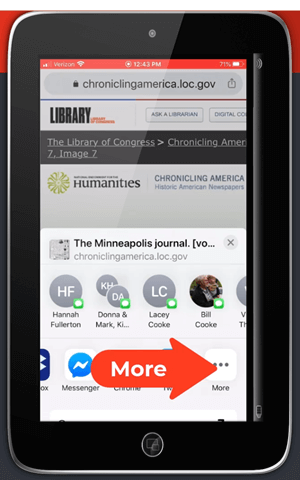
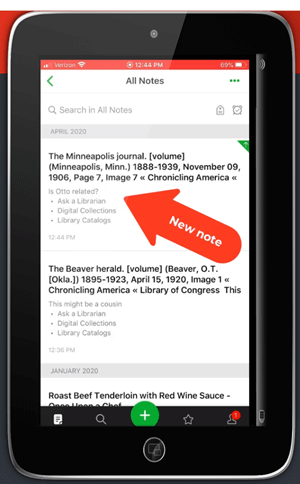
When you come across a BSO while researching online in a web browser (such as the Chrome or Safari app), here’s how to capture it:
Tap the Share icon on the web page.
Select Evernote from the menu. If you don’t see it tap More for the complete menu of available apps. If you still don’t see it, make sure you have downloaded the app.
Tap More to find the Evernote app
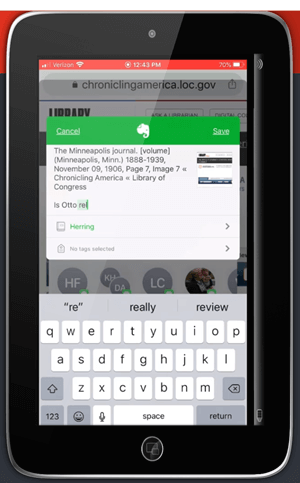
The app will open and should open a new note. Edit the note as desired.
Edit the BSO note
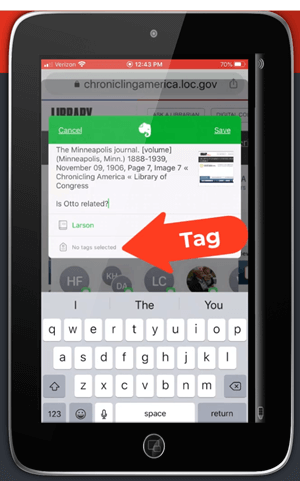
Tag the note with the “BSO” tag, as well as any other tags you find helpful.
Tag with the BSO tag
Tap Save.
The note is now saved to Evernote. If you are on WiFi, Evernote will synchronize so that the note will be available from any device signed into your Evernote account.
The BSO tagged note
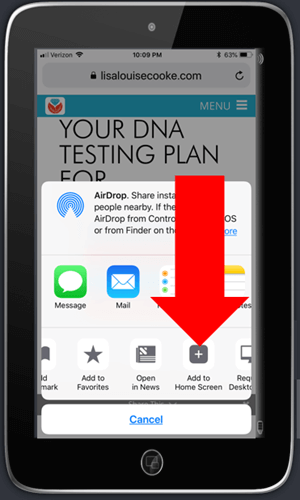
Option 2: Home Screen “Bookmark Apps”
Keep in mind that these aren’t the same as “Bookmarks” found in your web browser apps. I call them “Bookmark Apps” because they do save a particular web page, and they look just like apps. In the menu this feature is called “add to home screen.” (see image)
Bookmark Apps are best for when you plan to do your BSO follow up on the same mobile device.
How to capture a BSO as a Bookmark App:
In your browser app, when you come across a BSO web page, tap the share icon.
Tap Add to Home Screen.
Tap Add to Home Screen
Edit the title so it will be easy to remember why you wanted to follow up on it.
Tap Add (iOS – this may be different on Android, or different browsers)
The web page “bookmark app” is now on your home screen.
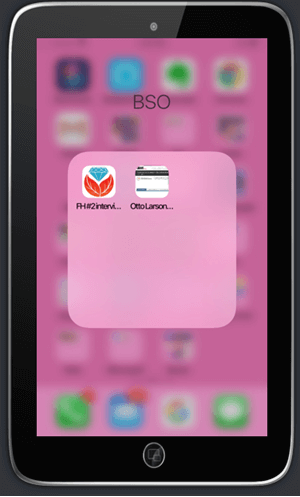
Once you have created at least two BSO bookmark apps, you can then create a folder.
How to create a folder:
Move the bookmark app by pressing and holding it until it shakes.
Keep your finger on it and drag it onto the other BSO bookmark. This will create a folder.
Name the folder “BSO”.
Press the home button to save.
Bookmark apps in the BSO folder
Now whenever you have some spare time you can tap the BSO folder and get back to one of those items that previously caught your eye.
How Alice the Genealogist Avoids Falling Down the Rabbit Hole Part 4
Creating a Supportive Computing Environment
The following tools are available for your computer desktop or laptop.
Restore Tabs
In addition to using Ctrl+Shift+T (Win) or Cmd+Shift+T (Mac) to restore a closed browser tab, you can also right-click on the new tab plus sign and select Reopen closed tab from the pop-up menu. You can do this multiple times and web pages will continue to open in the reverse-order that they were closed.
Turn Multiple Tabs into One and Save Memory with OneTab
Online genealogy research can leave you with a lot of open web browser tabs. While using multiple tabs allows you to jump back and forth between web pages and records, they can take up valuable computer memory.
You can dramatically reduce your memory usage with the OneTab extension available for both the Chrome and Firefox browsers. With one click, OneTab will combine your open tabs into a clickable list in one browser tab. You can even export the list for future reference.
Get OneTab in the Chrome Web Store here.
Get OneTab in the Firefox Web Store here.
Reduce Email Distractions
Gmail now has a Snooze feature which allows you to temporarily file an email until the date and time you select.
Snoozed emails will reappear in your Inbox at the scheduled time.
Retrieve snoozed emails at any time by clicking “Snoozed” in the menu on the left.
Get Back on Track with MyActivity
When you are signed into your Google account, MyActivity tracks the searches you conduct and the websites you visit. By visiting your MyActivity, you can search for and return to any previous activity. You can also turn it off. Go to MyActivity and click Activity Controls from the menu. Switch the slider to the off position. Visit MyActivity at https://myactivity.google.com/myactivity
Save Time by Previewing Your Google Search Results
Rather than clicking on each search result and loading the page (which also takes you away from the rest of your search results), use the Google Results Previewer web extension for Chrome. Once installed you can simply hover your mouse over a result link to reveal a preview of the page. Then you can decide whether to click through or preview additional results.
Click here to get the Google Results Previewer web extension for Chrome.