Blog


Genealogy Gems Podcast Episode 255 – National Archives Catalog
The U.S. National Archives Online Catalog for Genealogy
In this episode Lisa Louise Cooke will answer important questions such as:
- What kind of genealogy records can be found at the National Archives website?
- Which genealogy records are not available at the National Archives?
- How do I search for records at the National Archives online Catalog?
- How can I retrieve only digital items from the National Archives Catalog?
- How can I get better search results in the National Archives Online Catalog?
- How do I download files from the National Archives Website?
- What is the Record Group Explorer?
This audio comes from my YouTube video series Elevenses with Lisa episode 40.
Listen to the Podcast Episode
To Listen click the media player below (AUDIO ONLY):
Watch the Original Video:
Genealogy Gems Premium Members Exclusive Download:
Log into your Premium membership and then click here to download the handy PDF show notes that compliment this podcast episode.
Become a Genealogy Gems Premium Member
Premium Members have exclusive access to:
- Video classes and downloadable handouts
- The Genealogy Gems Premium Podcast
- Elevenses with Lisa downloadable ad-free show notes PDF cheat sheets
Become a member here.
Genealogy Gems Podcast App
Don’t miss the Bonus audio for this episode. In the app, tap the gift box icon just under the media player. Get the app here.
Get the Free Genealogy Gems Newsletter
The Genealogy Gems email newsletter is the best way to stay informed about what’s available with your Premium eLearning Membership. Sign up today here.
Our Sponsor:
MyHeritage: Click here to start finding your family history at MyHeritage
Order a MyHeritage test or upload your raw data from another testing website here.
Follow Lisa and Genealogy Gems on Social Media:
- Instagram.com/genealogygemspodcast
- Facebook.com/genealogygems
- Pinterest.com/lisalouisecooke
- YouTube.com/GenealogyGems
Podcast Resources
Download the episode mp3
Show Notes: The audio in this episode comes from Elevenses with Lisa Episode 40. Visit the show notes page here.

Plotting Land with Google Earth Pro
The places where your ancestors lived can tell you a lot about their lives. I’m going to show you a free and easy technique for plotting land in Google Earth.

episode 67
Would you like to be able to find your ancestor’s property on a map today? Keep reading and watch the video to learn how. We’re going to take U.S. government survey legal land descriptions found in sources such as Federal Land Patents and quickly and easily plot the boundaries in Google Earth Pro. I’ll also show you an easy way to do it for property in Canada too.
Episode 67 Show Notes

(PREMIUM MEMBERS: Get your ad-free PDF cheat sheet for this episode in the Resources section at the bottom of this page. Not a member yet? Click here to join the Genealogy Gems family and get all the benefits.)
In the video I show you how to plot the boundaries of a piece of land in Google Earth. We’re going to take U.S. government survey legal land descriptions found in sources such as Federal Land Patents and quickly and easily plot the boundaries in Google Earth Pro. I’ll also show you an easy way to do it for property in Canada too. These strategies come from my book The Genealogist’s Google Toolbox,
Download or Update the Free Google Earth Pro Software
These days there are actually three versions of Google Earth:
- Google Earth downloadable software
- Google Earth for Chrome Web browser
- Google Earth app
All are free, but they are not the same. The app and web browser versions are sort of “Google Earth lite.” The software is what you want because it has all the bells and whistles that will allow you to do all the things I’m going to show you today.
Plotting legal land descriptions in Google Earth has its advantages. If you’re plotting the land of your ancestors, you’ll be able to see what the area looks like today and what the current street names are. In Google Earth you’ll also have access to additional tools that you can use in conjunction with the boundaries you’re going to create, such as historic maps, area photos, and a wide range of data sets that provide more information about the area.
The first thing to do is check to make sure you have the most current version of Google Earth on your computer. Again, we’re using the software so you need to do this on your desktop or laptop computer. You want to make sure you have Google Earth Pro – LINK – A tell tale sign that you don’t is if the Google Earth globe icon on your desktop is grey and not blue. Open it and in the menu go to Help > About Google Earth. Here it should say Google Earth Pro and you can see the version number.
Check the current version number here, and if you don’t already have the program, go ahead and download it.
Now that you have it on your computer, open it up and leave it running in the background. You’ll need a decent internet connection for it to run.
Next pull up the legal land description that you want to plot. Here’s one that I have for some property owned by George Burket. I found this at the Bureau of Land Management Government Land Office Records website. This free website is where you can search for land patent that your ancestors once held.
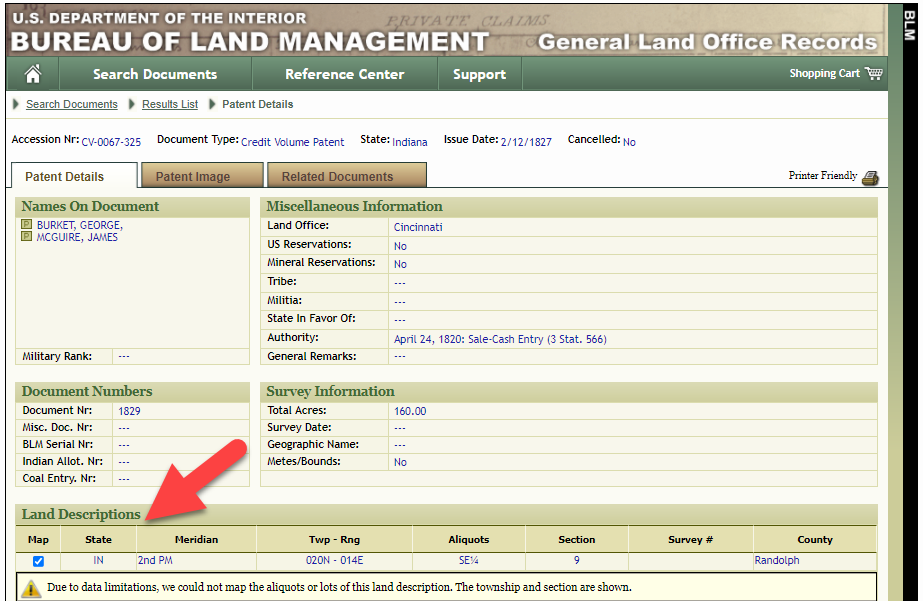
Legal land description at GLO
Even though the Bureau of Land Management places it on the map on their website, you can’t download this or add to it. The advantage of plotting this in Google Earth is that you will have access to much more geographic data, you can add many more details to the map, you can use it in conjunction with other related mapping work that you’re doing, and you can save and share it.
This description gives us the exact coordinates of the property. Jot down the land description or keep it open in your browser tab so you can refer to it.
In a new browser tab, we’re going to type in http://www.earthpoint.us. This will take us to the Earth Point website.
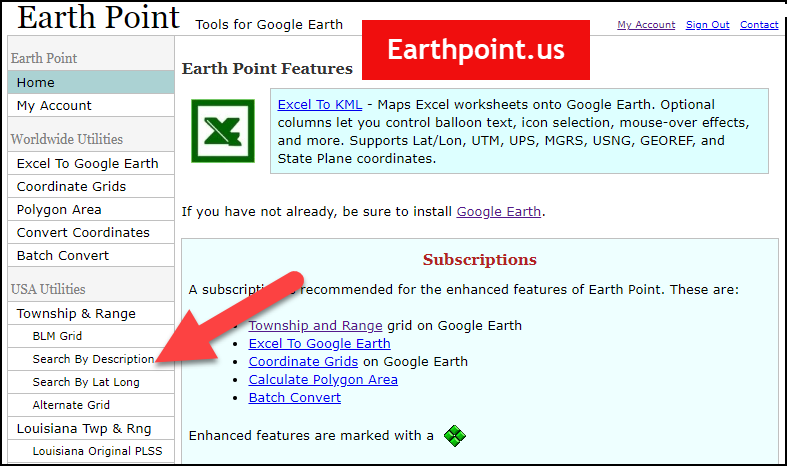
Search by legal land description at Earth Point
This website is free, although some of the features are available only with a paid subscription. Thankfully, the tool for plotting your ancestor’s land patent is free. Some of the free features do require that you sign up for a free account. The feature we are going to use currently does not.
On the Township and Range – Search by Description page you will see a field for each piece of information found in the land description. It’s important to enter this information in the order presented starting with the State. Select the state from the drop-down menu. Pause a moment to allow the fields to recalculate. This allows the appropriate data to be loaded into the next field based on your selection.
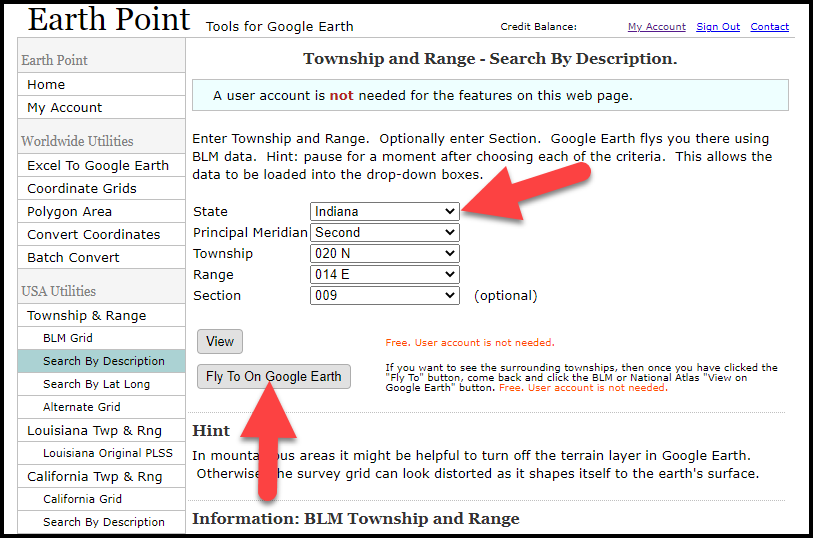
Entering data at Earth Point
After you have made each selection, click the Fly to on Google Earth button. This will generate a KML file which can be saved to your computer. KML stands for Keyhole Markup Language, which is the file type that Google Earth uses and understands. KMZ are zipped KML files which also are used by Google Earth.
Save the file to the desired location on your hard drive. Then click the file to open it. It will automatically open in Google Earth (which you already have open). The KML file is now located in your Temporary Places folder in the Places panel. The land is has now been automatically plotted on the map.
The orange outline is the township. In this example it is township T20N R14E. Click the orange ball in the center of the township for details. In the details you’ll find the total number of acres in the township, the latitude and longitude coordinates for the center of the township and corners.
Township in Google Earth
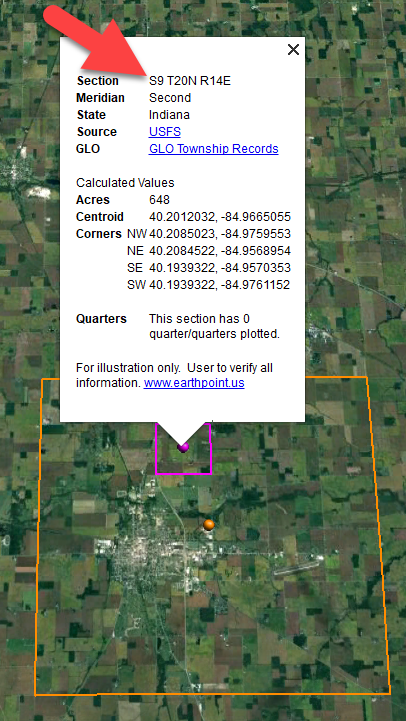
The pink / magenta outline is the Section where the property is. Click the pink center dot for the details:
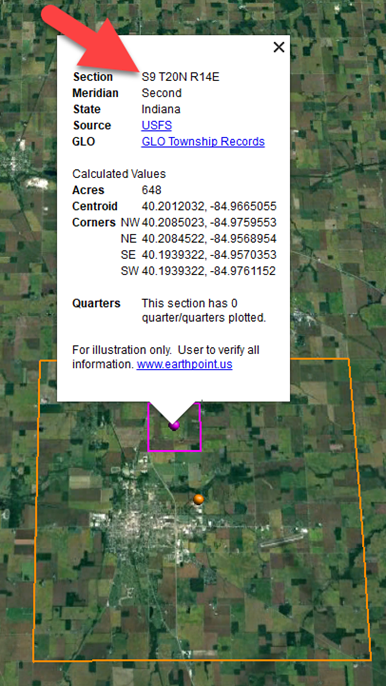
Land section in Google Earth
In this example Section 9 consists of 648 acres.
Notice that Earth Point was able to plot the land down to the Section level. However George Burket did not own the entire section. We must return to the land description for the Aliquots.
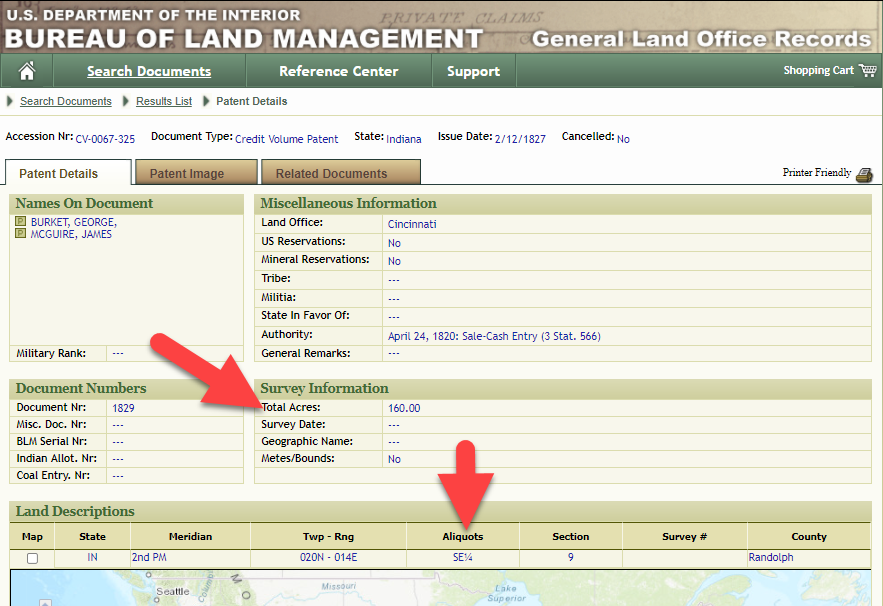
Aliquots in Legal Land Description
In this example, the land was the southeast quarter (SE1/4) of section 9. The land was a total of 160 acres.
We can use the Polygon tool in Google Earth to plot the 160 acres. In the toolbar, click the Polygon tool. This will open the New Polygon dialog box. Type a title, description and source citation.
As you hover your mouse over the map you will notice that the cursor is now a square shape. Click the screen on each of the four corners one at a time in order to set the four corners of the property – in this case the southeast quarter of the section. Once you have drawn the shape you can click on the handle on any corner to adjust precisely.
Click the Style / Color tab in the New Polygon dialog box to adjust the color and opacity of the acreage polygon. You can add color and thickness to the outline, and color and opacity to the fill of the shape. When you have it set the way you want it, click OK to close the New Polygon box. The Polygon is now set.
Moving Plotted Land in the Places Panel
On the left side of the Google Earth screen you will see a series of panels: Search, Places and Layers. At the bottom of the Places panel is the Temporary folder. This is where the KML file was placed when it was opened. However, like its name implies, this is a temporary location. If you want to keep it, you’ll need to move it to a filed location within the Places panel. This will not change the position of the polygon on the map, only where it is filed and saved in the Places panel.
To file a polygon, click on the file in the Places panel, drag it to the desired location, and drop it. Next, go the main menu and click File > Save My Places. This will save your work so that when you close the program it will not be lost. Google Earth doesn’t auto-save.
Turning Google Earth Polygons On and Off
The polygon plotting the acreage will be visible on the map when the box is checked in the Places panel. If you uncheck the box for the polygon it will still be there, but it will not be visible on the map. This allows you to create and save many items of interest without always having to have them displayed and cluttering up the map in Google Earth.
How to Edit a Polygon in Google Earth
After your land polygon has been set, you may want to rename it. There are two ways to do this:
- On a PC right-click on the polygon, either on the map or in the Places panel, and select Rename from the pop-up menu. Type the new name and then press Enter on your keyboard.
- Click to select the polygon in the Places panel (highlighting it in blue) and then go to the main menu to Edit > Rename. Type the new name and then press Enter on your keyboard.
You can also restyle the polygon and edit the text. Start by going to the Places panel and click the arrow pointing at the Polygon’s globe icon. This will open it and show the nested content. Click to select the Polygon. Now you can right-click it (PC) and select Properties – OR – go to the menu under Edit > Properties. Either way it will reopen the Polygon dialog box so that you can make the desired changes. When you’re done, click the OK button to close the Polygon.
Saving and Sharing Plotted Land
Snagit is the tool I used to capture the various views of the land I plotted in Google Earth. Learn more about Snag it by watching my videos and reading the show notes for episode 61 (for beginners) and episode 66 (advanced).
Plotting Canadian Land
Although the Earth Point website doesn’t plot Canadian land, the Legal Land Description Converter website does. It can help you find land in Western Canada (British Columbia, Alberta, Saskatchewan & Manitoba) subdivided by the Dominion Land Survey (DLS) and the Alberta Township System (ATS).
How to Plot Canadian Land
- Go to Legal Land Description Converter at https://www.legallandconverter.com.
- Enter the Section, Township, Range and Meridian information from the land description.
- Click the Calc button.
- Click the generated KML file and save it to your computer.
- Click the file to open it in Google Earth. It will open in the Temporary folder.
- It will fly you the location on the map and outline it for you.
- Rename the file if desired, and add source information.
- Add source citation.
- Drag and drop it to the desired location in your Places panel.
- Save your work: File > Save My Places.
Resources
These show notes feature everything we cover in this episode. Premium Members: download this exclusive ad-free show notes cheat sheet PDF. Not a member yet? Learn more and join the Genealogy Gems and Elevenses with Lisa family here.
Answers to Live Chat Questions
Gwynn: I would like to know how to match plat with GPS coordinate/ current street address.
Answer: I cover how to overlay a plat map in Google Earth and discover the current street address in my book The Genealogist’s Google Toolbox.
Roger D: How exact do you need to be in picking points? Does Google snap to mid-points of lines?
Answer: Try to be as exact as you can, however as I showed in the video you can reposition them as needed. Google Earth doesn’t snap.
Lyn: Can I do this with English tithe maps?
Answer: There isn’t a website converter that I know of. However I do cover how to overlay digitized maps in Google Earth in my book The Genealogist’s Google Toolbox.
Official Elevenses with Lisa Mug News
The manufacturer price is going up August 31, 2021. Now’s the perfect time to get your official Elevenses with Lisa mug.
Elevenses with Lisa Archive
You can also find them through the menu: Premium > Premium Videos > Elevenses with Lisa.
Free Newsletter and Bonus Ebook

Snagit Part 2 – Advanced Clipping Techniques
Even if you don’t use Snagit, or if you’re a newbie or still deciding whether you want to use it, this video will give you tangible examples of what it can do for you. If you are already using Snagit, this session will definitely take your skills to the next level.

Use Our Code & Link to Save 15%!
Use coupon code GENE15 to get 15% off. Thank you for using my link for purchasing your copy of Snagit. (We will be compensated at no additional cost to you, which makes the free Elevenses with Lisa show and notes possible.) Don’t worry if it initially shows as Euros in the cart. When you enter your address including country, it will convert the currency appropriately.
What You’ll Learn in this Episode
In Elevenses with Lisa episode 66 Lisa Louise Cooke will discuss how to use Snagit:
- for problem-solving, such as errors in your Ancestry family tree
- capturing unique records
- creating family history videos
- PLUS: answers to your Snagit questions
You can also watch at the Genealogy Gems YouTube channel.
Episode 66 Show Notes
Elevenses with Lisa episode 61 was a tutorial for beginners on how to use Snagit, and specifically how I use it for genealogy. I think it really resonated with genealogists because accurately and completely capturing the family information that we’re finding is absolutely essential for good source documentation. It’s one of the most important things we do as genealogists.
So, this video is sort of a “Part 2” session where we dig into more ways to use this amazing screen capture tool and I answer some of your most pressing questions.
Save 15% on Snagit with Code GENEALOGY15
Even if you use a different snipping tool, I’m going to give you tangible examples of how you can clip more effectively.
I received the following email from Anne W.: “I very much enjoyed your recent Elevenses with Lisa episode on how to use Snagit. I love the screen clipper on my Mac but this does so much more. I used your link to purchase Snagit and I have found the tutorials very helpful as I figure out how to use it on my Mac with my files. The first thing I did was go back to several newspaper pages I clipped recently in chunks and used Snagit to capture the whole page. It worked like magic! I would love to see another episode about the features of Snagit. Thank you for your regular and premium podcasts. I listen to both regularly. I have learned so much that I can apply to my genealogy research.”
Oh I love hearing how you’re using what we talk about here at Genealogy Gems! And yes, Snagit is fantastic for clipping those squirrely newspaper pages, and so much more!
Let’s get started – I’m excited to show you 5 more problem-solving screen capture projects that you can do with Snagit, and then we’ll wrap up with answers to your Snagit questions.
Using Snagit for Problem Solving
Bill in San Antonio, TX wrote me last week and told me about a problem that he was having with his online family tree at Ancestry It turns out that some ancestors had duplicate profiles. He didn’t put them there. He asked Ancestry about it but was getting what he called “boiler plate” answers that didn’t solve the problem.
In situations where you’re trying to communicate a complicated problem to someone else, or you’re just trying to work through it yourself, it can really help to visualize the problem, and Snagit can help you do that very effectively.
Bill says: “I am seeing duplicate FACTS in profiles of siblings, parents, and children of a person and cannot figure out where they originate. I go to the profile which seems to be generating duplicate information, but it is not there.”
As I read through all the details that he wrote up about the problem, I found myself getting confused. I asked his for access to his family tree so I could take a look and he wrote back
Bill went on to say, “The duplications I see are all in my tree. I have reviewed each of them to be certain that the data is not coming from a profile, even though it appears in duplicated form elsewhere.
Here is a screenshot of one such issue, showing two siblings with repeated data. Note that in each case, the birth location is slightly different, as in “Texas” vs. “Concho County, Texas”.
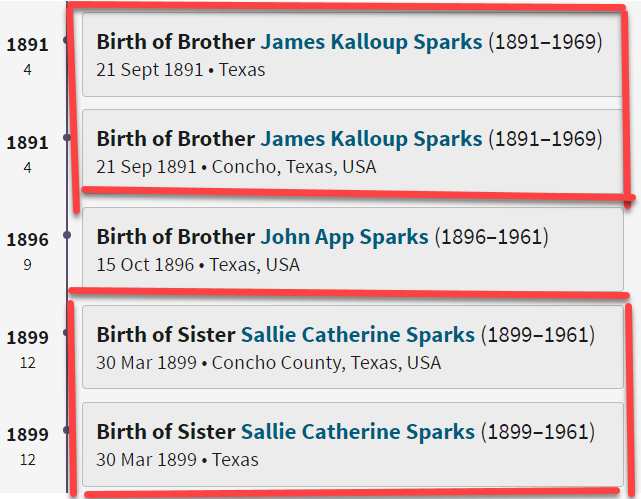
Ancestry Profile – problem of duplication
Bill had annotated his screen clipping to help me zero in on the problem. “(I used SnagIt for the screenshot — thanks for suggesting it!) I see this issue in other profiles, so your suggestions for solving it will be useful in other parts of the tree.”
Here are just three examples of ways you can highlight or call out an item in an image:
- Lines
- Highlighter
- Shape (set to transparent center, red outline)
Styles
After you select and customization a style (such as a red outline shape) you will see that Snagit provides a “ghost” version of it in your list. It’s greyed out and ready to add. Simply click the plus sign to add the style to a theme. There are several themes available and you can create new themes.
Favorites
I like to make it even faster to find the styles I use the most by adding them to my Favorites. It’s super easy to do. Just click the star on the style. You’ll find your Favorites in the star menu at the top of the screen.
As a side note, I do think this is a bug in Ancestry’s system. I recommended that he do the following to zero in on the problem:
- Search the tree – is the person duplicated in the pedigree view somewhere. Answer: No.
- Check the URLs – Are the tree and person numbers in the URLs the same for each “Fact”? Answer: Yes.
Again, you can use Snagit to help work through things like this. Here’s how to see if you’re indeed looking at the same person: Right-click on each ancestor profile to open it in a new tab so you can compare and capture them. In this case it was Willie (the ancestor) and James and the duplicate of James. Each will have a URL address in your browser bar that will end in person/420009496764/facts. The number in red is the unique number for that person.
Had the tree number or person numbers been different, that would be the likely source of the problem. However, in Bill’s case, they are the same, so that’s more evidence that it’s a bug in Ancestry’s displaying of the information.
After screen capturing each profile they can be combined into one step-by-step document that can then be shared.
How to Combine Captured Images with Snagit
- Click on the first image in the tray at the bottom of the page.
- Hold down your shift key and click the last image. (If you need to pick from the tray, hold down the Control key on your keyboard and click each desired image.)
- Right-click on the selected images and click Combine in Template – or – at the top of the screen click Create and select Image from Template – or – Press Control + Alt + Con your keyboard.
- Select the desired page layout. Custom Steps or Steps Portrait.
- Click the Next button.
- Give your document a title, captions, etc.
- Click the Combine button.
- Remove steps if desired, add annotations, etc. as desired.
- The combined image can then be saved to your computer and shared such as by email.
My guess is that at some point Bill viewed someone else’s tree or a hint that included this conflicting information, or he may have attached a record that had conflicting information, or rejected information from a record. In any case, some sort of action may have gotten “stuck” in the virtual stratosphere. The system has hung on to something it should not have. Bill says he’s finding more instances of this happening in the same tree, so it definitely needs to be addressed. It would be a shame to keep adding to the tree only to have that glitch continue to duplicate itself in other profiles.
I suggested looking through the records he has attached to James Kalloup Sparks to see if any of the attached records mention Concho, TX as his birthplace. I doubt there is one, but if there is, it is likely somehow linked to the problem.
It’s very odd that on Willie’s profile it shows James Kalloup Sparks’ birthplace as Concho in the duplication, but when you click that profile it doesn’t say Concho. It’s must surely be an Ancestry glitch.
If it were me, I would try downloading your tree and then creating a second tree by uploading it and seeing if the error still occurs. Here’s the Ancestry Help page.
Also, if by chance Bill was syncing his Ancestry online tree with genealogy software on his computer, there’s a possibility that could cause the problem.
Annotations
Questions from Kelly: “Hi Lisa!, I would LOVE for you to create a very simple tutorial for adding in arrows and any text in “bubbles or boxes”. I have tried to do this and am missing something – I just LOVE Snagit but I am so technically challenged and would love to not become so annoyed when I am missing the simplest of steps.”
The most important thing to remember as you use annotations like text bubbles, shapes and text is you must select what you are working on. The font, color, sizing and other formatting features can be applied to every kind of annotation. You must select the item before applying the formatting.
If you’re ever confused about what “mode” you’re in, look at the top of the screen and note which tab is selected. In the example below, we are in “Shape” mode.
And if you try and try to make a change to an annotation and nothing seems to happen, you probably haven’t selected it. Click on the item to select it before attempting to make any changes.
If you want to move a item such as a shape or a selection of text, again you will need to click it to select it. You should see the “Move” selector handle that looks like this:
If you don’t or you’re having trouble, click “Move” in the toolbar at the top of the screen and then click on the item.
Most of the time if working with annotations or formatting them is presenting a challenge, it’s because the item hasn’t been properly selected before you begin.
Using Snagit to Capture Unique Sources
Many of the most popular genealogy records websites offer a hinting feature that suggests records to you based on the information in your online family tree. Many of those “records” are quite unique. I recently came across a Photo Hint at Ancestry that was a screen capture of a story in a public Facebook group of the descendants of a particular couple. It was interesting information but I didn’t really want everything that was captured in the image. I used Snagit to capture and then edit the image the way I wanted it so I could then save it to my computer. This included erasing or removing unwanted areas. The following Snagit features can help you accomplish this easily:
- Select and delete
- Shapes recolored to match the background
- The Eraser tool under the More menu in the toolbar
Answers to Your Questions about Snagit
Answers to your questions from episode 61 which was my beginning tutorial on Snagit. If you haven’t used it before stick with us in this video to see all the cool things it can do and then go back and watch that episode which is perfect for beginners.
Pat M.: Will OCR work for non-English newspapers?
Answer: Snagit doesn’t translate, but the OCR will Grab non-English text. Learn more here. You can then copy and paste it into Google Translate.
SHB: Don’t see Evernote on the list, how easy is it to save to EN?
Answer: If you have Evernote installed on your computer you should see it in the Share list. You can also download Evernote to add it as a Share destination. In fact, there are loads of programs you can download.
Cyndy B.: Are all these features in older versions?
Answer: No, like all software, each version introduces additional features.
SHB: Curious about printing… if you print a long article, will it print out readable?
Answer: Yes! You can set the resolution. And use Print Preview to make adjustments so it prints exactly the way you want it.
CA Sanders: if I bring a photo into Snagit and work with it will save IN Snagit, not in my original placement…so I would have to “save” or “move” to the folder it was in to begin with my changes.
Answer: After making your edits, use File > Save As to save it in the desired format to the desired location on your computer hard drive. You can also save it to replace the original if that’s your goal.
B Latham: How do we keep the SnagIt program up to date? It sounds as if other viewers here are saying they purchased the program a few years ago and may be outdated. Isn’t there a way to keep it up to date?
Answer: Yes, you can buy a maintenance plant that will include future updates at a reduced fee. Use our link and discount code, and the option will be available at checkout.
Barbara C.: For 2 different laptops, would we need to purchase Snagit twice?
Answer: TechSmith software is licensed per user, so how many computers can I install it on?
Each user may install and use one copy of the software product on up to two computers for their sole use, provided only one computer is in use at any given time. This includes home and work, or a laptop and desktop.
Use Our Exclusive Code to Save 15%!
Here’s our link for purchasing your copy of Snagit (screen clipping tool) Thank you for using our link. Use coupon code: GENE15 (We will be compensated at no additional cost to you, which makes the free Elevenses with Lisa show and notes possible.)
Resources
These show notes feature everything we cover in this episode. Premium Members: download this exclusive ad-free show notes cheat sheet PDF. Not a member yet? Learn more and join the Genealogy Gems and Elevenses with Lisa family here.
Official Elevenses with Lisa Mug News
The manufacturer price is going up August 31, 2021. Now’s the perfect time to get your official Elevenses with Lisa mug.
Get my Free Newsletter Here
Click here to sign up now and you get your free bonus ebook.
Leave a Comment or Question Below