Blog


FamilySearch Search Strategy Essentials
Discover the essential search strategies that every genealogist should be using when searching for records at FamilySearch.org, the popular free genealogy website. In Elevenses with Lisa episode 64 Lisa Louise Cooke discusses:
- Wild cards you can use when searching FamilySearch
- Search strategies to help you get more results
- Advanced Search strategies
Episode 64 Show Notes
FamilySearch.org is a free genealogy records and family tree website. You will need to be logged into your free account in order to search for genealogy records.
In this video and show notes I will outline strategies for searching for people by name in genealogy records. You can then apply these techniques to your genealogy research plan. Knowing what you’re specifically looking for will give you a better chance at success.
Learn more about preparing for genealogy research success by watching and reading 10 Questions to Rate Your Readiness for Genealogy Research Success.

Elevenses with Lisa episode 64 – Share on Pinterest
Starting Your Search at FamilySearch
- In the menu go to Search > Records (then use the form).
- Start with a broad search.
- Search results ignore the order of first names but will preserve name order if there are two last names.
- Click the Exact Match box to start narrowing in on specific names and spellings.
- Even if you are confident that you know exact names and places try variations. For example, add or remove a name and turn on and turn off Exact Match.
Strategies for Searching Names FamilySearch:
- Add or remove middle names.
- Try searching for nicknames.
- Try spelling variations. Use the Alternate Name You can search up to four alternate names at a time. Try clicking the Exact Match box for each alternate name.
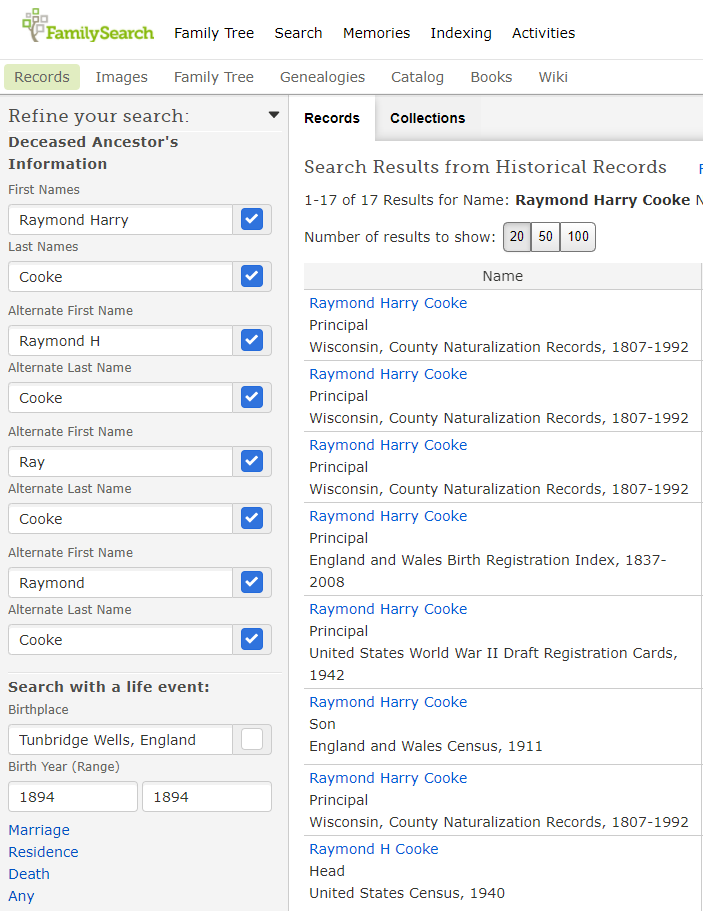
example of Alternate Name search at FamilySearch
- Try spelling the name as it would have been spelled in the old country. (Example: Sporan / Sporowski / Sporovsky / Sporowski)
- Use wildcards to help with search variations.
Asterisk (*) replaces zero or more characters.
Question mark (?) replaces a single character. - Use cluster research techniques by searching on relationships.
A few words about searching on relationships: Try searching only with your ancestor’s first name and a known relationship such as a spouse, parent or other relative. In addition to specific people, try searching for a surname associated with the family.
- Over time the spelling of a last name can change in a family. It’s important, even if you receive initial successful results, to try all variations, including language variations.
- In the case of women, records will be under the last name they were using at the time the record was created. Therefore, try searching for them using their maiden name and then their married name (or names if they were married multiple times.)
- Try leaving the last name field blank. This can be particularly effective when searching for female ancestors. This strategy works well in conjunction with entering additional information, such as the names of the spouse or parents.
- Try just surnames, unique first names, and Other Person
Pro Tip: Use Snagit to easily create a search log
Learn more about Snagit: How to Use Snagit for Genealogy (episode 61)
Save 15% on Snagit with our exclusive discount coupon code: GENEALOGY15
Have you been using Snagit? Leave a comment
Here’s an example of a search log I created using Snagit. You can add custom text, symbols, highlighting and much more to create exactly the log that works for you.
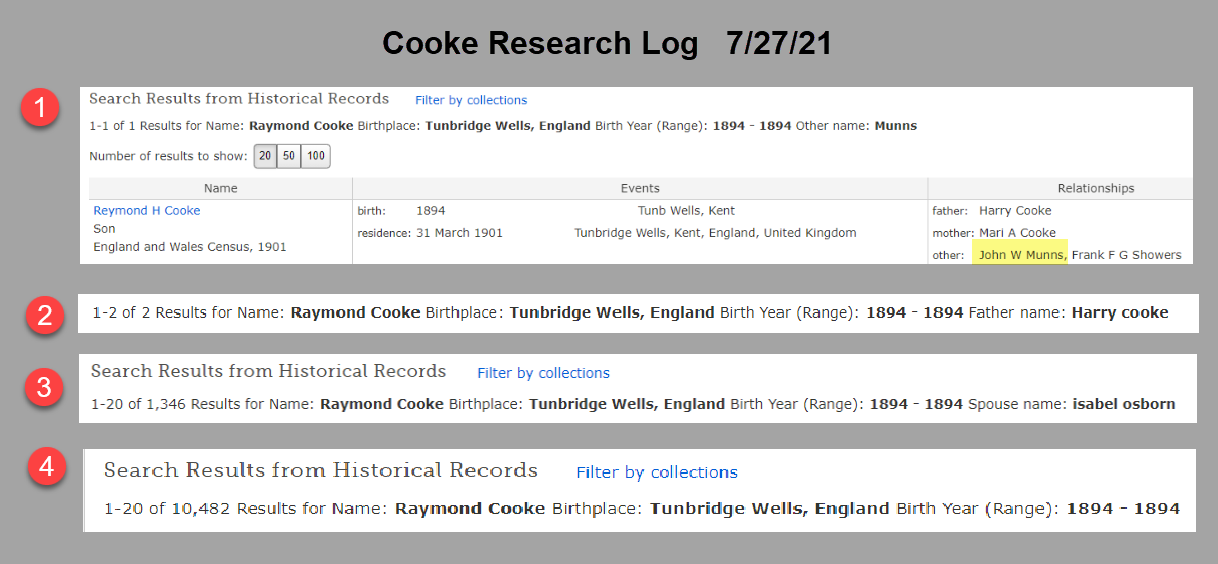
Search log created with Snagit
Here’s how to quickly capture and keep a research log of your FamilySearch searches:
- Run your search as usual.
- Use Snagit to clip the number of results and the terms searched at the top of the results page. (Set Snagit to “Region” to precisely clip that portion of the screen.)
- Continue searching and clipping. When done, go back to the Snagit Editor.
- Click Control (Win) or Command (Mac) and click to select each clipping you made in order. You can also select all of your clippings by clicking to select the first clipping and then hold down the shift key on your keyboard and click the last clipping.
- Right-click on the selected clipping to access the menu. Click Combine in Template.
- In the pop-up Combine in Template box, select a template. I like to use Custom Steps for a research log.
- Click the Next
- Give your combined image a Title. (You can edit this again later.)
- Select the font and canvas color as desired.
- The Number Images box will probably be selected. This will place a “step” number in front of each clipping showing the order in which you clipped. You can deselect this box if you don’t want to number your clippings.
- Click the Combine
- Edit the combined image as desired. You can click to select items to move and resize them. You may need to ensure you’re not in Text mode – click the Arrow at the top of the screen and then you’ll be able to click on items like the numbered steps and move them around. Grab the edges and drag them to crop if needed.
- Save your image: File > Save As.
Search Strategy: Events
Try searching on known life events such as:
- Birth
- Marriage
- Residence
- Death
- Any
Click the type of life event you want to include in your search. Enter the place and year range.
Life Events Search Tips:
- Try your search with different events.
- Try your search with no events.
- Use the Residence option to find records identifying where a person was living. Some records contain an address or last place of residence. Birthplaces, marriage places, and death places are not the same as residence places.
- Use the Any Event if you know a date and place for an event other than birth, marriage, death, or residence. For example, a search with an Any event can find dates of military enlistment or immigration.
Search Strategies: Places
- In the place field try searching at a more or less specific place level. If you searched for a town, try the county, state, district or country.
- Try using wildcards in place-names. (Enter * to replace zero or more characters. Enter ? to replace one character.)
Search Strategies: Years
- In the year fields try adding a year before and a year after.
- In the year fields, try searching with no years first, and then filter the results to narrow your search by year.
Advanced Search Strategies
- Include multiple events in your search when you are looking for a record that likely contains all the events.
- Death records – try searching with both birth and death events.
- Birth record, include only a birth event, since birth records usually do not contain death information.
- To search for a child’s birth records, enter the child’s name, then click Parents. Enter the parents’ names. If needed, try variations such as these:
- Both of the parents’ full names.
- The father’s full name only.
- The mother’s full married name only; then her full married name only.
- The father’s full name with the mother’s first name.
- The mother’s full maiden name with the father’s first name.
- To find all of the children in a family, leave the first and last name fields blank.
Then click Parents and conduct your search using only parents’ names. Try all the variations.
Searching for Marriage Records
To search for a marriage enter the name of one person in the first and last name fields. Click Spouses, and enter the name of the spouse. Try variations: the spouse’s first name and the wife’s maiden name. To limit your search results to marriage records only, click Type, and click the Marriage checkbox.
Search Best Practices
- Have a specific search goal.
- Start with a broad search. You do not have to enter information in all search fields. You often can get better results when you leave most blank, and then filter down.
- FamilySearch doesn’t support Boolean Operators like Google does.
- Expect records and indexes to contain errors, spelling variations, and estimations.
- Try your search several times with variations.
- Even if your ancestors had easy-to-spell names, expect spelling discrepancies. Anderson could be Andersen in some records. Try Anders?n in the Last Names search box.
- Always look at the image, if possible. It often has more information than the index alone.
Resources
These show notes feature everything we cover in this episode. Premium Members: download this exclusive ad-free show notes cheat sheet PDF. Not a member yet? Learn more and join the Genealogy Gems and Elevenses with Lisa family here.


MyHeritage 10 “Don’t Miss” Features You Need
I’m going to share with you my 10 “DON’T MISS!” features of MyHeritage. If you don’t currently use the site, this is your chance to see what it can do for you. If you do use it, let me introduce you to some of the GEMS you should be using. Scroll down to watch the video replay and get the show notes.
Watch Episode 63
Video & show notes below
Episode 63 Show Notes
10 Awesome MyHeritage Features You May be Missing:
1. Instant Discoveries™
Want to get started fast? After you add what you know about your family, you can start taking advantage of instant discoveries. You’ll find Instant Discoveries in the menu: Discoveries > Instant Discoveries.
There are three types of Discoveries:
- All Discoveries
- Person Discoveries
- Photo Discoveries
I particularly like Photo Discoveries:
- Finds photos of people in your tree
- Consolidates into packages of up to 10 photos from different family sites.
- Photos will originate only from family sites where the privacy setting for allowing photos to be copied from Smart Matches™ is enabled.
Click the View Discovery button for a batch of photo discoveries. Click “View original photo” to see a larger version and who else is tagged in it. By default, all photos in a Photo Discovery will be
copied to your tree when you add the discovery. Exclude specific photos by clicking the checkmark to deselect it. Click Add to add all selected photos to your tree.
To reject a Photo Discovery, click Reject this Discovery at the bottom of the list of photos.
Rejected discoveries will not be offered again. After applying a discovery, your tree will change,
and new discoveries will need to be recalculated (up to 24 hours.) Unlike SmartMatches, once a person or photo discovery is added, you can’t “undo”. You’ll need to remove them manually.
PremiumPlus and Complete subscribers have access to unlimited Discoveries.
2. Tree Consistency Checker
No tree is perfect! That’s why MyHeritage provides this handy tool that accelerates your ability to find and correct problems.
You’ll find the Tree Consistency Checker in the menu under My Family Tree > Consistency Checker.
MyHeritage’s Consistency Checker flags three types of issues:
- Errors: Obviously incorrect. (red triangle icon)
- Warnings: Possible but unlikely. (orange circle icon)
- Notices: Maybe OK but worth a look. (grey square icon)
To adjust what the tool searches for, click the gear icon to change the settings. The Consistency Checker searches for 37 types of issues. Make adjustments as desired.
As you review the found issues, you can:
- dismiss individual issues
- hide issues
- dismiss checking for this issue.
3. U.S. Yearbooks
After starting with what you know, the next logical and honestly one of the most fun record to go after is yearbooks! MyHeritage has over 250,000 yearbooks. To find the yearbook collection, go to the menu Research > Collection Catalog > U.S. Yearbooks Name Index, 1890-1979. To find even more school related records head the to grey column on the left side of the page and click School & Universities.
Description from MyHeritage: “This collection contains almost 290 million records…A student or faculty member often appears in a yearbook several times. Part of the work conducted to produce this collection merges all occurrences of the same name in a yearbook into one record with references to the pages where the person is mentioned. Records in this collection will list the person’s name, often their gender, school’s name and location, and likely residence based on the location of the school. Additional work was done to identify the grade of the students to be able to infer their age and an estimated year of birth for some of the records.
The same person will often occur in previous or subsequent editions of the same yearbook and these related yearbooks are presented at the bottom of the individual’s record – to assist the researcher in finding other books where their person of interest might be found.
This collection is a name index produced by MyHeritage from the U.S. Yearbooks, 1890-1979 collection and is based on the same set of yearbooks…In case you didn’t find what you were looking for, we encourage you to check out the U.S Yearbooks 1890-1979 collection to search the entire free-text index of this amazing collection.”
Yearbook Search Tips:
- Review the entire yearbook carefully for handwritten notes.
- Look for people in their social circle.
- Take a look at the Advertisers
- Keep in mind that yearbook content had to be submitted early, often by early spring. Events occurring after that may be missing.
- Copyright: “Most yearbooks are NOT covered by U.S. copyright laws. Yearbooks published before 1963 and without a copyright notice (©) are not covered by copyright restrictions.” (MyHeritage Knowledge Base)
5. U.S. City Directories
In the menu: Collection Catalog > U.S. City Directories
561,503,516 records in 25,468 directories
Description of the collection from MyHeritage: “City directories contain an alphabetical list of adult residents and heads of household, often with their spouse, with addresses and occupations and additional information. This collection is a huge genealogical compilation from 25,468 city directories published in 1860-1960 across the United States, created exclusively by MyHeritage using advanced machine learning technologies developed specifically for this purpose.”
“City directories, like census records, contain information that helps genealogists establish residences, occupations, and relationships between individuals. The added benefit of city directories is that they were published annually in many cities and towns throughout the United States.”
MyHeritage says that this collection will be updated soon to include pre-1860 directories as well as a large and unique set of directories published after 1960.
Snagit
In the video I showed you how I use Snagit to capture clippings. Learn more by watching episode 61. Get SnagIt here.

Watch this video to learn how I use SnagIt.
5. Family Statistics
There’s a ton of data in your family tree, and MyHeritage has the tech tools to help you see it in many forms. One of the coolest and most fun is Family Statistics. You’ll find it in the menu under Home > Family Statistics. Here you’ll find stats on:
- Gender
- Living or Deceased
- Marriage Status
- Common Last Names
- Common First Names – Male
- Common First Names – Female
- Places of Birth
- Places of Death
- Places of Residence
- Age Distribution
- Average Life Expectancy
- Oldest Living People
- Youngest People
- Lived the longest
- Lived the shortest
- Birth Months
- Zodiac Signs
- When Were People Born
6. MyHeritage PedigreeMap™
PedigreeMap™ is a free feature on MyHeritage. It allows you to visualize and navigate information found in the Place field of the ancestors in your family tree from a geographic perspective. You’ll find PedigreeMap in the menu under Family Tree > More > PedigreeMap.
Use MyHeritage’s PedigreeMap to help identify errors and migration patterns over time.
At the center of the PedigreeMap screen, you’ll see a map of the world with circles indicating the locations listed in your family tree.
- Gray circles = aggregations of locations in the same country or state
- Orange circles = specific locations
To the left of the map you’ll see your ancestral places in list form, sorted by the number of references in your tree and grouped by country or state. By default, PedigreeMap™ will display places associated with your extended family, with you as the central person. In the field where you as the central person are name, type in the name of any family member to change the view to focus on them. Then use the filtering options in the bar at the top of the map to change which groups of people in your tree are displayed (ancestors, descendants, etc.)Click the funnel icon for even more filtering controls.
PedigreeMap™ Top Tips:
- Click Heat Map in the bottom right corner. This displays concentration areas for your family. It is especially useful when combined with filtering by year and type.
- Click Not Found in the list on the left to quickly find family members who need Place information added.
- Look for grey exclamation marks which indicate that the place name needs more clarification.
- Because PedigreeMap™ is based on Google Maps, it can be best to use the current country so you can accurately locate it on the map. For example, you could list the country as “Poland (formerly East Prussia).”
7. MyHeritage Relationship Report
Have you ever found a person in your family tree and lost track of how you are related to them? MyHeritage’s Relationship Report makes it quick and easy to visualize your connection to any person in your tree. In fact, it will show you the relationship between any two people in your tree.
You’ll find the Relationship Report in the menu under Family Tree > More > Relationship Report. Simply enter the names of the two people and click the Display Relationship button. Change the detail drop down menu to show the amount of detail you want.
8. Confirm or reject a Theory of Family Relativity™
The Theory of Family Relativity ™ helps provide theories about how you and your DNA matches might be related by incorporating genealogical information from MyHeritage’s records and family trees. Of course, some theories might not be accurate.
Until recently, you didn’t have the option to confirm or reject theories. Now you can review theories, marking the ones you have already processed so the new ones are easier to notice.
Status Options: Pending, confirm, or reject.
Go to the DNA Matches page and use the filters to see only those DNA Matches that have a Theory of Family Relativity™.
Theories can be confirmed or rejected in two places:
- Review DNA Match page, which includes a summarized view of the theory.
2) Full theory view.
In the list of DNA Matches, once you’ve confirmed a theory, it will be displayed in the DNA Match card. Change your mind? Click View theory and then undo your confirmation or rejection, returning the theory to pending status.
Learn more about DNA at MyHeritage. Watch episode 42 on Genetic Groups at MyHeritage.
9. MyHeritage Photo Tools
Some of the most exciting advances coming from MyHeritage recently have been in the area of family photos. Currently they offer three outstanding tools:
- Photo Enhancement
- Photo Colorization
- Animation
You try them a few times for free. Complete plan subscribers get unlimited usage. You will find the photo enhancement tool in the menu under Family tree > Enhance Photos. It works much the same way as colorizing your photos.
Use the Comments section under the photo to share information and collaborate with others.
How to colorize a photo at MyHeritage: Under Family Tree in the menu select Colorize Photo. Click the Upload photo button and select a photo from your computer. You can drag and drop it onto the screen. In a few seconds your colorized photo is ready.
After colorizing your photo you can:
- Share the colorized photo to Facebook
- Share to Twitter
- Copy link to clipboard
- Download the photo
Go back to your photos and click the photo. You can compare the before and after. You can click to view the photo full size and use the zoom tool for an even closer look. Click the edit icon to edit the photo title, date, and place. Click Apply to save the changes. You can also make manual adjustments to the colorization.
Animate photos: You can upload a photo by going to the menu: Photos > Animate Photos. If you plan on enhancing or colorizing the photo do that first. Then from the photo page click the Animate button for that image. Currently you can animate one face at a time in a group photo. Closeup faces animate better than smaller faces in a bigger photo. Once the animation has processed you in the animation window, you can download the video or select different types of animations.
Photo Tools as Research Tools: Sometimes colorizing and enhancing your photos can help you spot more information in the photograph than was originally visible. You can colorize both photos and documents to improve clarity, readability, and visibility.
Learn more about photos at MyHeritage: Watch Lisa’s video Fabulous Photo Discoveries at MyHeritage
10. Commitment to Privacy
MyHeritage recently published the following announcement about their commitment to privacy:
“Earlier this year, prior to MyHeritage’s acquisition by leading private equity firm Francisco Partners, we issued a press release in which we promised to expand MyHeritage’s strong privacy framework for the benefit of our users.
The current updates to our Privacy Policy fulfill this promise. The highlight of the updates is the unequivocal commitment not to license or sell genetic data to any third party. This is highly unique among the larger genealogy and consumer DNA industry…”
Read the updated Privacy Policy
Resources
These show notes feature everything we cover in this episode. Premium Members: download this exclusive ad-free show notes cheat sheet PDF. Not a member yet? Learn more and join the Genealogy Gems and Elevenses with Lisa family here.
Click to learn more about Genealogy Gems Premium Membership.

Genealogy Gems Podcast Episode 254
How to Use Google Photos for Family History
Have you thought about using Google Photos but just weren’t sure how it worked or where to start? This episode will answer your questions and give you the confidence to use it effectively. In this audio introductory tour to Google Photos we will answer the questions:
- What is Google Photos? Is Google Photos private?
- What features do I get with Google Photos?
- How does Google Photos storage work? (Is Google Photos free?)
- How do I start using Google Photos?
- How do I upload my photos and videos?
- How to search and retrieve photos and videos in Google Photos How would Google Photos benefit genealogists, archivists and others?
This audio comes from my YouTube video series Elevenses with Lisa episode 23.
Listen to the Podcast Episode
To Listen click the media player below (AUDIO ONLY):
Watch the Original Video:
Genealogy Gems Premium Members Exclusive Download:
Log into your Premium membership and then click here to download the handy PDF show notes that compliment this podcast episode.
Become a Genealogy Gems Premium Member
Premium Members have exclusive access to:
- Video classes and downloadable handouts
- The Genealogy Gems Premium Podcast
- Elevenses with Lisa downloadable ad-free show notes PDF cheat sheets
Become a member here.
Genealogy Gems Podcast App
Don’t miss the Bonus audio for this episode. In the app, tap the gift box icon just under the media player. Get the app here.
Get the Free Genealogy Gems Newsletter
The Genealogy Gems email newsletter is the best way to stay informed about what’s available with your Premium eLearning Membership. Sign up today here.
Our Sponsor:
MyHeritage: Click here to start finding your family history at MyHeritage
MyHeritage is the place to make connections with relatives overseas, particularly with those who may still live in your ancestral homeland. Visit www.MyHeritage.com
Follow Lisa and Genealogy Gems on Social Media:
- Instagram.com/genealogygemspodcast
- Facebook.com/genealogygems
- Pinterest.com/lisalouisecooke
- YouTube.com/GenealogyGems
Podcast Resources
Download the episode mp3
Show Notes: The audio in this episode comes from Elevenses with Lisa Episode 23. Visit the show notes page here.