by Lisa Cooke | Apr 21, 2017 | 01 What's New, Recipes, Records & databases
Old cookbooks are among new recent online records collections. So are British newspapers, British Columbia estate files, New Zealand WWII appointments, UK Parliamentary returns, UK military indexes, US newspapers (Arkansas, Kansas, and New York) and church records for Sydney, Australia; Norfolk, England; and Stockholm, Sweden.
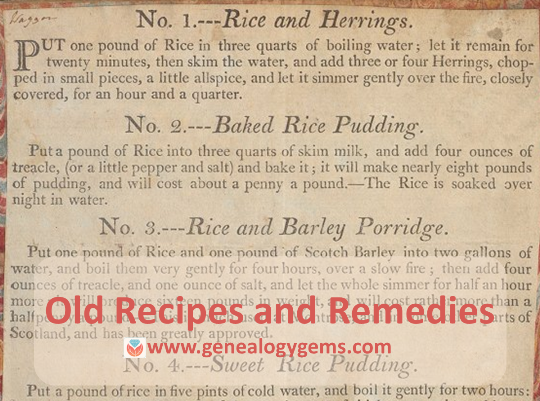
Featured New Records Online: Old Cookbooks and Home Remedies
 The US National Library of Medicine has “recently embarked on a project to digitize and make available” its collection of historical recipes and cookbooks, according to its blog. Old recipes (also called “receipts”) may give you a glimpse into what daily life was like for your ancestors. Among these are “recipes and advice for food preparation and preservation, animal husbandry, preparing useful household concoctions, and allopathic medicines and treatments for maintaining personal health.” Find these at the National Library of Medicine Digital Collections.
Love these? Click here to find more old recipes and classic cookbooks on the Genealogy Gems website.
Australia – New South Wales – Church records
Nearly 125 years of baptism, marriage, and burial registers for the city and parish of Saint Peter’s in the greater metropolitan area of Sydney, Australia (1839-1963) are now available on Ancestry.com. Baptismal registers may include the child’s name, birth and baptismal dates, parents’ names, abode and profession of parent(s) and officiant’s name. Marriage records may list for bride and groom the names, occupations, residences, ages and marital status, along with the date and place of the wedding, names of those giving consent (if required) and the officiant. Burial registers may mention the name of the deceased; death and burial dates; abode; age; “quality” or profession, and officiant.
Britain – Dougal’s Index Register
A Findmypast.com collection of Britain’s missing beneficiaries and unclaimed estates (1910) “contains over 500 records from Dougal’s Index Register to Next of Kin, Heirs at Law and Cases of Unclaimed Money Advertisements from 1910. The publication looks specifically at properties or estates registered in chancery court, which have gone unclaimed because a deceased person did not create a will or did not have any known descendants….The lists only provide an individual’s first and last name.”
Britain – Newspapers
Over 48,000 new articles and two brand new titles have been added to Findmypast’s collection of historic British newspapers. This month’s new titles are The Shipping & Mercantile Gazette and The Rutland Echo & Leicestershire Advertiser.
Canada – British Columbia
Findmypast.com subscribers may now browse among over 750,000 records of British Columbia Estate Files (1859-1949). According to the site, these “allow you to delve through probate estate files pertaining to the judicial districts of British Columbia; the County Court and the Supreme Court. Probate estate records are a valuable resource for family history research, providing vital details such as dates, names, and locations to help grow your family tree. Included in this collection is a probate index for the district of Vancouver, sorted alphabetically by last name.” Browsing tip: narrow results by year, document, court, and district.
Canada celebrated its 150th birthday in 2017! Click here to read tips for starting your Canadian research from Lisa Louise Cooke’s conversation with Library and Archives Canada staffer Claire Banton.
England – Norfolk parish records
Fifty-one volumes of Norfolk Archdeacon’s Transcripts (1600-1812) and 123 volumes of Bishop’s Transcripts (1687-1901) are now browseable at Findmypast.com. According to the site, the collections contain records of baptisms, marriages, and burials from across the county.
New Zealand – WWII
Fold3.com hosts a new collection of WWII Appointments, Promotions, Transfers and Resignations, extracted from the New Zealand Gazette. These give information such as name, rank, event date, and regiment for members of the New Zealand Expeditionary Forces (including army, air force, and navy).
Sweden – Stockholm
Nearly 175,000 indexed names and over 14,000 digital images were recently added to a free collection at FamilySearch.org: Sweden, Stockholm City Archives, Index to Church Records (1546-1927).
UK – Military
Ancestry.com has published a new collection of UK Military Indexes, 1920-1971. According to the site, “These lists comprise the names and service numbers of those who were discharged from the armed forces after 1920 and born before 1901. Details given for over 300,000 individuals found within this collection may include (where available): initial and surname, date of birth, their service, service number and Ministry of Defence reference number.”
UK – Parliamentary Returns
The UK Parliamentary Archive has “recently uploaded the Protestation Returns for Berkshire, Cornwall and Cumbria,” according to its blog. “The Protestation Returns are the closest thing we have to a census for England in 1641-1642. They originate in the scuffling between Parliament and Charles I just before Civil War engulfed the country. It was decided that all men over the age of 18 in England and Wales should swear an oath of allegiance to the Protestant religion, Parliament, and the King. Around one-third of the records for England survive.” A companion map allows users to search for these records by location.
US – Arkansas, Kansas, New York – Newspapers
Among new digitized newspaper collections at Newspapers.com are the following titles: The Frankfort Bee (Kansas, 1876-1898), The Southern Standard (Arkadelphia, Arkansas, 1878-1905), Arkansas Times and Advocate (Little Rock, 1837-1838), Cortland Register (Kansas, 1889-1924), The Frankfort Sentinel (Kansas, 1886-1892), The Marshall County Index (Frankfort, Kansas, 1905-1906), Epworth Advocate (Frankfort, Kansas, 1895-1896), Springville Journal (New York, 1867-1985) and The Ness County Pioneer (Sidney, Kansas, 1879-1880).

Are you listening to the free Genealogy Gems Podcast? This year Lisa Louise Cooke celebrates 10 years on the air. The show has more than 2.5 million downloads worldwide. Listen to hear for yourself her winning combination of technology tools, genealogy research strategies, inspiring stories–and tons of tips you can apply right away to your family history!

Disclosure: This article contains affiliate links and Genealogy Gems will be compensated if you make a purchase after clicking on these links (at no additional cost to you). Thank you for supporting Genealogy Gems!
by Lisa Cooke | Apr 1, 2016 | 01 What's New, Records & databases
Here’s our weekly roundup of new genealogy records online. This week: Australia, Belgium, Czech Republic, England, Germany, Japan, Mexico, Wales and U.S. passport  and homestead records.
AUSTRALIA – QUEENSLAND. Ancestry.com has added several indexes for Queensland, Australia: Prison and Reformatory Indexes (1824-1936), Property Indexes (1842-1895), Index to Aliens (1913) and Occupational Indexes (1857-1922). These indexes all come from the Queensland State Archives. You can search them for free at Ancestry.com or from the QSA website.
BELGIUM CIVIL REGISTRATIONS. FamilySearch has updated its civil registration collections for several parts of Belgium (dating back to the 1500s for some areas): Antwerp, Brabant, East Flanders, Hainaut, Liège and West Flanders. According to FamilySearch, these collections include “civil registration(s) of births, marriages and deaths from the Belgium National Archives. The collection also includes marriage proclamations, marriage supplements, and some original indexes.”
CZECH REPUBLIC SCHOOL REGISTERS. Over a million browsable digital images from the Opava State Regional Archive have been added to a free collection of Czech Republic School Registers (1799-1953) at FamilySearch.org. “School registers contain the full name for a child, birth date, place of birth, country, religion and father’s full name, and place of residence.”
ENGLAND AND WALES SCHOOL RECORDS. Findmypast.com has just added about 687,000 new school admission records for 41 counties in England and Wales (1870-1914). Original records may include names, residence, birth data, school name and location, parents’ names, admission information, father’s occupation, any exemption from religious instruction, previous school attendance, illnesses/absence and even exam results.
ENGLAND – CORNWALL. Several new collections on Cornwall are searchable at Ancestry.com: Congregational and Baptist Church Registers (1763-1923), Workhouse Admission and Discharge Records (1839-1872), Militia and Sea Fencibles Index (1780 – 1831), Bodmin Gaol Records (1821-1899), Penzance Dispensary Admissions (1828-1841), Truro Police Charge Books (1846-1896) and Inmates at St. Lawrence’s Asylum, Bodmin (1840-1900).
GERMANY VITAL RECORDS. Ancestry.com has recently added a new collection of death records for Mannheim. It has also updated collections of birth records for Hamburg; birth, marriage and death records for Regen County (dating to 1876) and birth, marriage and death records for Oldenberg.
JAPAN GENEALOGIES AND VILLAGE RECORDS. FamilySearch.org has added nearly a quarter million browsable images to its collection of Japanese village records (dating back to 709 AD) and nearly 60,000 browsable records to its collection of Japanese genealogies (dating to 850 AD).
MEXICO CIVIL REGISTRATIONS. Ancestry.com has updated its collections of indexed images to Chihuahua, Mexico birth, marriage and death records from civil registrations. The collections are in Spanish, so use Spanish names and locations.
U.S. HOMESTEAD RECORDS. Ancestry.com’s collection of U.S. Homestead Records (1861-1936) has recently been updated. According to the collection description, “Homestead files consist of unbound documents that include final certificates, applications with land descriptions, affidavits showing proof of citizenship, register and receiver receipts, notices and final proofs, and testimonies of witnesses. These documents are part of the Records of the Bureau of Land Management (formerly known as the General Land Office), Record Group (RG) 49. The collection currently includes records from Arizona, Indiana, Nebraska, Nevada, Ohio, and part of Iowa. Additional records will be added in future updates.”
U.S. PASSPORTS. Nearly 40,000 indexed names have been added to FamilySearch.org’s free collection of United States Passport Applications (1795-1925). These are a fantastic resource for finding immigrant ancestors and those who traveled a lot. Click here to learn more about U.S. passport records.

Thanks for sharing this post with others who have ancestors from these parts of the world. You’re a gem!
by Lisa Cooke | Sep 9, 2014 | 01 What's New, Ancestry, Beginner, Family History Podcast, Trees
Family History: Genealogy Made Easy Podcast
with Lisa Louise Cooke
Republished 2014

with Lisa Louise Cooke
https://lisalouisecooke.com/familyhistorypodcast/audio/fh44.mp3
Download the Show Notes for this Episode
Welcome to this step-by-step series for beginning genealogists—and more experienced ones who want to brush up or learn something new. I first ran this series in 2008-09. So many people have asked about it, I’m bringing it back in weekly segments.
Episode 44: Family Secrets in Genealogy Records
Today’s episode is unlike any other I’ve done on the podcast. Today we are going to tackle some difficult subject matter: family secrets in genealogy. You know, none of us have a perfect family tree. In fact, I would venture to guess that at some point each one of us who are delving into our family’s past will come across some sad and painful stories. An ancestor abandoned at an asylum, incarcerated for acts of violence, or perhaps who committed suicide.
For Crystal Bell, my guest on today’s show, that sad and painful story was very close to her branch of the tree. In fact, the troubles lay at her parents’ door, and she bore the brunt of the chaos that was created. And yet there is tremendous hope that comes from Crystal’s story. She is a wonderful example of the freedom that can come from facing your fears and breaking down the mystery of a troubled past. It’s what I call the redemptive gifts of family history.
Crystal also shares some of the research strategies that her co-workers at Ancestry.com gave her for taking the next steps in finding her mother, who passed away under an assumed name.
Thoughts from Crystal on responding to the family secrets in your own tree:
“Hatred and resentment only make you look older. They have a great toll on your health. As far as I’m concerned, I can’t hate my mother and father because I don’t know their circumstances were. I can only try to determine their ancestors. I want to know who were my ancestors. Where did they come from?
I feel badly when people…just don’t want to know. I don’t want to die with that sense of abandonment. I want to move on, I want to get past the grief. I want to know who my people were. I just, for the first time in my life, want to experience a feeling of joy and happiness that I feel like I deserve.”
Ancestry.com “Shaky Leaf” Hints Technology
Crystal made connections on her Ancestry.com family tree by reviewing the automated hints provided on the site, known popularly as “shaky leaves.” Learn more about using these in this video.
MyCanvas Update
The MyCanvas service mentioned by Crystal is no longer offered by Ancestry.com. But it is still around! Learn more in my blog post about it.
Here’s a final family history thought for today:
We are not just defined by one relative, or the product of a dysfunctional family or parental relationship. We come from all of our ancestors….
The ones who did amazing things,
The ones who did everyday things,
And the ones who did wrong.
You deserve to know them all, and as the saying goes, the truth will set you free.
by Lisa Cooke | Sep 4, 2013 | 01 What's New, Ancestry, Technology
Like anyone else who sells a popular product, Ancestry.com is always tweaking little things to improve the user’s experience. They’ve been working on some updates, some of which you may have noticed on the site over the summer and some of which are rolling out gradually over the next couple of weeks:
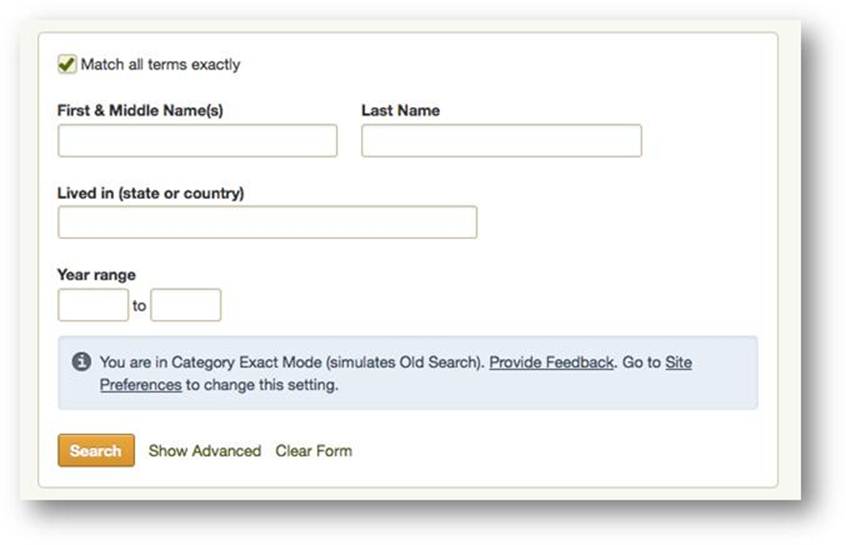
1. A simple search form with the check-box option to match all terms exactly.
2. Search results shown grouped by category. This is great–no more scrolling through lots of results when you’re looking for specific kinds of records. This sort feature also reminds us to check categories we may be overlooking, like city directories and local histories. These first two-features are opt-in: learn how to do it here and see what it looks like below:
 3. A summary box at the top of search results showing what you’ve already attached to your ancestor. The list is sorted alpha-numerically so you can see easily which records have been found and where there might be gaps (see what it looks like below). You can collapse this list if you want to give you more room to see the search results.
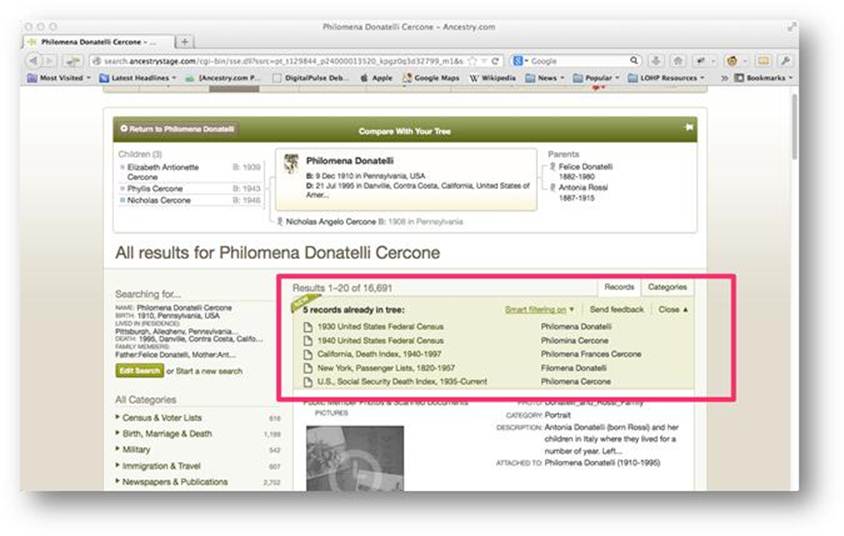
4. A filter that removes search results similar to types you already found for that ancestor. For example, if you already have a death record for someone, the filter will remove other death records. “Smart filtering” is an optional feature, so you can still choose to see the full list. Read more about it here and see it here:
 Ancestry says they will provide plenty of feedback opportunities for these new features. Don’t be shy: tell them what you like (and what you don’t) and why!