Doing genealogy research generates a wide variety of research notes: typed and handwritten, audio, photos, video, and screenshots of information on websites. If you want one tool to pull together your current research projects, Evernote might just be the answer. In this video and article you’ll learn the role that Evernote can play, what it is and how to set it up, and your options for using for free or as a subscriber.
Evernote for Genealogy Video Tutorial
In this video and article Lisa Louise Cooke will discuss:
What Evernote is and the role Evernote can play in your genealogy research
Use it for free or upgrade to get all the bells and whistles like OCR and use on all your devices. (We will be compensated if you use our affiliate link. Thank you for supporting this free show.)
Show Notes
In my recent videos on how to avoid research rabbit holes that keep you from your genealogy goals, I mentioned that I use Evernote to capture BSOs or bright shiny objects that are interesting but not what I’m working on at the moment. So in this video I’m going to explain what Evernote is, and how to get started using it.
Evernote puts all your notes in one place and offers an incredibly fast and easy way to retrieve them.
Evernote is a:
website
software program for your computer (Win & Mac) that you download for free from their website
mobile app (iOS & Android): search for Evernote in your device’s app store
a web clipper for your computer’s web browser
Benefits
Genealogy can get a big messy. Information can be gathered from countless sources and in a variety of forms. You could funnel things through a cloud service like Dropbox. However, because Evernote is a note taking app, it offers unique and super helpful features:
Create all types of notes
From all of your devices. Thanks to Cloud synchronization you can take a note on any device and always have access to the most current version. (Free mobile app)
Web clipping – It allows you to clip items from the Internet (rather than saving entire bulky web pages),
OCR technology makes notes (such as newspaper articles) keyword searchable (subscription)
Data like URLs and the date you created the note is automatically included
No total storage limit, just monthly upload
You can use it for free, and upgrade for all the bells and whistles.
Install the software on your desktop computer (Windows & Mac)
Download the web clipper to your browser (app store or Google it)
Download the free Evernote app to your mobile devices from the iTunes App Store or Google Play
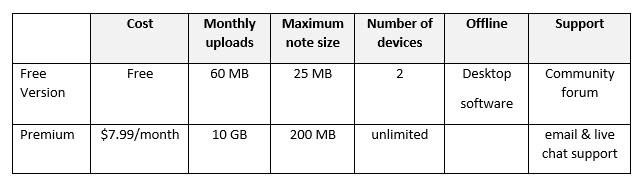
Features & Costs
(Subject to change. Visit evernote.com/compare-plans)
Evernote pricing plans comparison Sept. 2021 – See the website for the most current offer.
Software Home Layout
Evernote’s Home view gives you a summary of what you’ve got going on in Evernote. If Home is new to you and you don’t see it, simply head to the left Navigation menu and click Home.
Home gives you a place to sort of summarize what you’ve got going on in Evernote. It also allows you to add more personalization.
A fun way to personalize Evernote is by adding a background image. Click Customize in the upper right corner, and then click the Change Background button. Here you can add a preset image or add your own.
By default, Home comes with widgets such as:
Notes (highlighting your most recent notes, and Suggested notes based on your activity)
A Scratch Pad
Recently Captured items by type (web clips, images, documents, audio and emails)
While you’re in Customize mode, you’ll see additional available widgets like:
Calendar (allowing you to sync your Google calendar with Evernote)
Filtered Notes
Notebooks
Pinned Notes
An additional Scratch Pad
Shortcuts
Tags
Tasks
We’ll explore some of these further in a moment. But first, let’s create our first note!
All Notes View – SnippetView:
Left column = your files and organization
Center column = search for notes
Right column = the note you are currently working on
Change the layout by clicking the View Options icon (in SnippetView it appears at the top of the search column). This will give you a variety of layout options.
Change what appears or is hidden from view, and whether the view is dark or light by clicking View in the menu.
Notetaking 101
Create a note by clicking the New Note(+) button at the top of the screen.
Creating a new note is as simple as starting to type. Evernote saves your work instantly and without any extra effort on your part. Notes are saved in “the Cloud” on Evernote’s servers. This means all of your notes are automatically backed up. In addition, all of your notes will sync across all of your various computing devices. And Evernote facilitates sharing notes with others for research collaboration.
Click the Info icon at the top of the note to see the meta-data for that note. You can add and edit this information.
Types of Notes:
Typed
Sketched
Photos
Attachments
Video
Audio
Note Info has changed and can now be found by pressing Control + Shift + I on your keyboard, or clicking the More Actions (3 dots icon) in the upper right corner of the note and selecting Note Info.
Tagging is the Key to Organization
Add a tag based on important keywords associated with the note.
Examples of tags for genealogy:
Surnames (Cooke, Moore)
Record types (birth, census, land)
Locations (Indiana, Germany)
Time frames (1900-1909, 1910-1919)
Tasks (pending, add to database, follow up, etc.)
To tag a note, click Add Tag at the top of the note and select a tag from your list or add a new tag. Tags will appear in the left column. Click any tag in the left column to retrieve all notes with that tag.
Evernote Tasks
In June of 2021 Evernote added a Tasks feature. It operates just a little differently than how I’ve been using tasks. Evernote tasks are:
To Do Items
Note Specific (versus a tag which can retrieve all notes with that task)
Often Deadline Driven
Assignable to Others
Searchable
Where is the Trash?
You will find Evernote’s Trash bin at the bottom of the Navigation bar on the left.
Notebooks
Notebooks take organization a step further. I create notebooks sparingly. I use them to divide Evernote up into workspaces: Genealogy, Personal, Business, etc. I also use them for long-term and collaborative research projects that I may want to share with others. You can drag and drop notebooks on top of each other to create Stacks, although Evernote only allows one level of stacking.
How to create a new notebook:
In the menu select: File > New Notebook
Name the new notebook in the pop-up window
Select notebook type – usually you would set it up to synchronize, but you do have the option to have the notebook reside only on the computer it was created by selecting Local
The Cloud and Synchronization
Notes are saved on your computer and in the Cloud on Evernote’s servers. This means all of your notes are automatically backed up, and also accessible from your account on their website. Your notes will sync across all of your computing devices that have Evernote installed. There’s no need to manually sync with the new version. It happens automatically whenever you’re connected to the internet.
Web Clipping
As you visit webpages, you can clip just the portion of the page that you want to remember and keep rather than printing the page or bookmarking it. You can type the source citation directly into the note. Clippings appear as images in the note.
How to clip a screenshot using the computer software:
Right-click on the Evernote icon in your computer task bar.
Select Clip Screenshot.
Use the cross-hairs to draw a box around the desired content.
Release you mouse and you will see a quick flash on the screen indicating the content has been saved as a note in Evernote.
In Evernote click on the note to type additional information if desired.
How to download the free Evernote web clipper for your web browser:
Go to: evernote.com/webclipper
The download page will detect the browser that you are using and offer the correct web clipper. Click the download button.
The Evernote web clipper will install in your web browser (look in the upper right corner of your browser for the elephant icon.)
Sign into your Evernote account in the clipper.
Using the Browser Web Clipper:
When you visit a web page and find something that you want to clip, click the Evernote Web Clipper (elephant) icon in your web browser. The browser web clipper can save:
a full page (even the parts out of view)
an article
a simplified article (removing unwanted graphics and text not pertaining to the article)
a screenshot (where you precision clip with cross hairs)
a bookmark
As you clip you can select which notebook to file the note in and add any desired tags. It will also include the URL in the note header.
Search and Retrieval
Type a keyword into the search box and Evernote will locate and display notes that contain the keyword in the center column. This includes typed text from a website clipping or image, as in the example above. With a subscription, OCR technology makes it possible for you to search for words in Evernote to retrieve notes that include those words, both on the clipped image and in printed handwritten text.
Show Notes: The FamilySearch Wiki is like an encyclopedia of genealogy! It’s an invaluable free tool that every genealogist needs. However, many folks get frustrated when they try to search the Wiki. In this week’s video premiere I’m going to help you navigate with ease.
Video and Show Notes below
You’ll learn:
what the Wiki has to offer,
how to access the FamilySearch Wiki
how to navigate the FamilySearch Wiki effectively
and how to overcome the number #1 reason people get frustrated when searching the Wiki!
(00:42) There are two ways to access the FamilySearch Wiki. The first is to visit the website direction at https://www.familysearch.org/wiki. This will take you to the home page of the Wiki. Although you can sign into your free FamilySearch account on this page (in the upper right corner) it isn’t necessary in order to use it.
The second way to access the Wiki is to go to the FamilySearch website. You will need to log into your FamilySearch account or sign up for a free account if you don’t already have one. Once you’re signed in, then in the menu under Search click Research Wiki. This will take you to the same FamilySearch Wiki home page. However, you will see that you are signed in and able to use some of the additional features like participating in discussions, posting and creating watchlists.
On the FamilySearch website: Search > Research Wiki
Searching the Wiki by Location
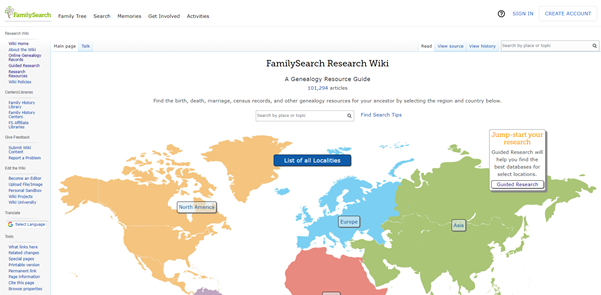
(01:21) On the home page, what you see a map of the world. This is a great way to search the Wiki because in genealogy, it’s really all about location. We need to know where geographically we want to search for ancestors, and from there we can narrow down the timeframe. Typically, you’ll have a sense of at least in which country you need to be researching. So, the map is typically the best way to start.
The FamilySearch Wiki Home Page
You’ll notice also on the home page, there is a search by place or topic search field. You could bypass using the map, and just start by typing in a place. If you do, you’ll notice that it starts to prompt you on the kinds of things that are commonly searched for. This could be kind of nice if you are really focused on a particular thing such as Italian census records. You can just start typing Italy and see if census is one of the prompts. If it is, simply click it and it will take you right there.
However, generally speaking, the map is the best way to search for records and information that is rooted in a location. Start by clicking the button for the continent, such as North America. Notice that if you go to click on the map itself, it isn’t an interactive map. You’ll need to actually click the button.
From there, select the county from the menu, such as United States, then drill down by state. This will take you to the Wiki entry for that state.
You’ll notice that the FamilySearch Wiki is a lot like Wikipedia. It’s like an encyclopedia of information. But the exciting part is that it’s genealogy specifically! This means you don’t usually have to worry about including the word genealogy in your searches.
Location-based FamilySearch Wiki Pages
Oftentimes, our research ends up taking us to a new location where the next set of great grandparents came from. If we’re not familiar with that location, let alone familiar with what’s available from a genealogical standpoint, that can pose a real challenge. You might be asking questions like when did they start recording birth records? Or did that state conduct a state census? Every state, every country, and every county has different types of records available.
Start your orientation over on the right-hand side of the wiki page. There you’ll typically find an overview box.
(04:15) This is a great place to quickly see what’s available here, and what you could dig into further. If you’re really new to research in this particular area, you might want to start with the guided research link. You may also see links to research strategies, and a record finder.
In the next section of the box you’ll find record types. This is going to be different depending on the area that you’re researching. For example, if they don’t happen to have any military records available you might not see that listed under record types. You should expect to see the most commonly used records included in the list. Click the link to the page for more information on that type of record. It will provide more details on record availability, and where you access the records.
Further down the box you’ll find links to background information on the area. It’s really easy to skim over this in excitement over records. But if you don’t want to get stuck at a brick wall, getting to know the place that you’re researching can make all the difference. Learning the background of an area can help you prepare the right questions to ask. It can help prevent you from looking for something that doesn’t exist or that wasn’t applicable to that area. You may find links to more reading, gazetteers and maps, migration patterns, periodicals, and the law. Understanding the law is going to help you understand why records were created, and who they affected. For example, if your ancestor was under 18 there might be certain records that don’t apply to them. Understanding the parameters of who was affected by the law will help guide you through the records themselves.
Next you’ll see cultural groups that you might expect to find in this area, and links to more specific information about researching them.
Under Resources you’ll find links to archives, libraries, societies, and the family history centers that are available in this particular area.
At the top of the main part of the page you’ll find the Getting Started section. Here you’ll find links to beginning step-by-step research strategies and some of the most popular records for that location such as vital records.
(08:35) You might be wondering who is putting this information together. Well, it starts with experts at the Family History Library in Salt Lake City. These are people who have worked the reference desks and found answers to thousands of patron questions.
Locating and Using the County Wiki Page
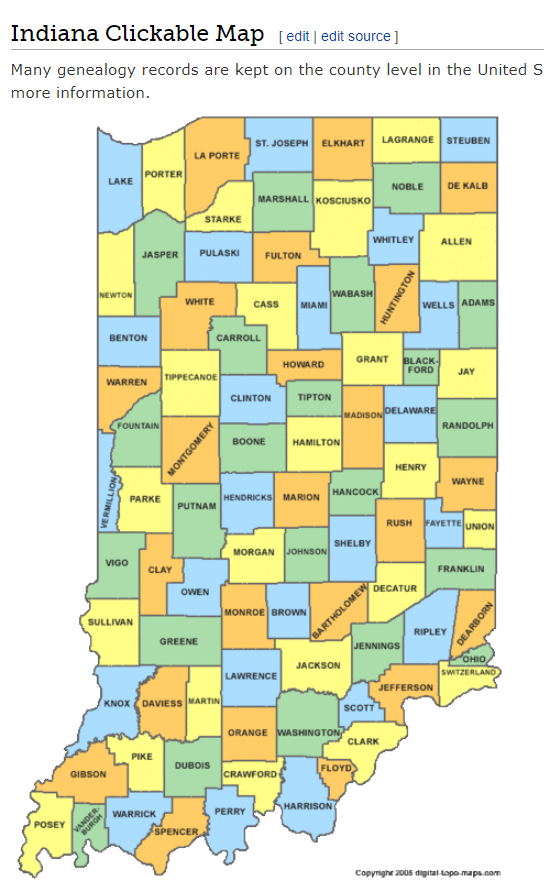
(09:22) Back on the state landing page scroll down further to the map of counties. Navigating by location is still important, even when we’ve narrowed it down to the state. Unlike the map on the homepage, you can hover your mouse over each county and click.
County map on the state wiki page
The county pages are where the real magic happens because many records such as birth, marriage, death, and court records are typically available at the county level. Here you’ll find out how to contact or visit the current county courthouse.
One of the most common questions new genealogists ask is “should I be looking at the county where the town is located today, or the county that it was when my ancestors lived there?” Counties certainly do change over time. The answer to the question is that we go to the county at the time that are ancestors lived in the area. In fact, the Wiki page provides the history, or genealogy, of the county. Look for Boundary Changes on the page.
Because these pages are often quite long and dense, use your computer’s Find on Page feature by pressing Control + F (PC) or Command + F (mac) on your keyboard. This gives you a nice little search box at the top of the page. Type in a keyword like Boundary and it will highlight all the locations on the page where the term appears. This is a great way to make quick use of the Wiki. This is also a good trick to use when you don’t see the record type or keyword that you’re looking for in the page’s table of contents. It may be called something else there, but if you search the page for your keyword, it should find it for you. An example of this is that you may not see Birth Records in the TOC because they list Vital Records. However, in the Vital Records section further down the page they definitely mention birth records.
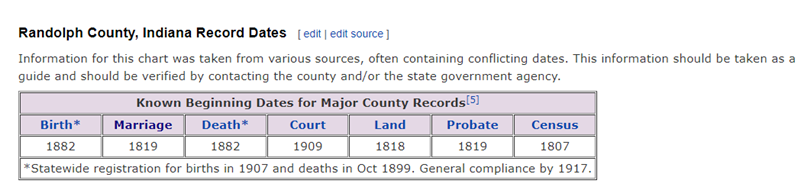
Finding the Dates that Records Began
(14:45) Here’s another reason the wiki is so helpful, and it makes things go so quickly. Remember, we talked about that location is key, but also timeframe. Well, if we are looking for genealogical records, we don’t want to look for a record in this county before they actually started creating those records. The wiki typically provides a nice little chart on each county page showing then some of the most important civil records such as birth, marriage and death were first created.
County record dates at FamilySearch Wiki
Often times civil records began much later than church records. Sometimes you will see an asterisk indicating when statewide registration for these civil records began and then another date indicating when general compliance was enforced. All of this is guiding us to success in finding genealogy records, and it’s saving the headache of investing time looking for records that did not yet exist.
(17:42) Further down the page you’ll find links to places. These may link to town pages on the Wiki, but more likely they will take you to Wikipedia where this information already exists. There will be a small icon indicating that the link will open in a new tab and take you to another website.
Next you’ll likely see a Timeline section which gives you a sense of when the first people settled in the county and who those people were. Again, it provides you more context to better understand the records.
In addition to all these individual records, many of them linked over toFamilySearch, Ancestry or MyHeritage, we see Research Facilities. Why is that so important? Because not all records are going to be online. When we’ve exhausted online records and resources we need to go offline, and there are lots of resources here on the wiki to work with: county archives, family history centers in the local area, libraries, museums, and genealogical societies. The wiki provides contact information and links to their website where you may be able to see a listing of what they have onsite so you can plan your visit.
Other website links may take you sites like USGenWebwhich is a fantastic free genealogy website. It’s organized by location much like the FamilySearch wiki website. Drill down to the state and then the county. You may also see links to the State Archive, or the state’s Memory project, and, of course, the FamilySearch catalog.
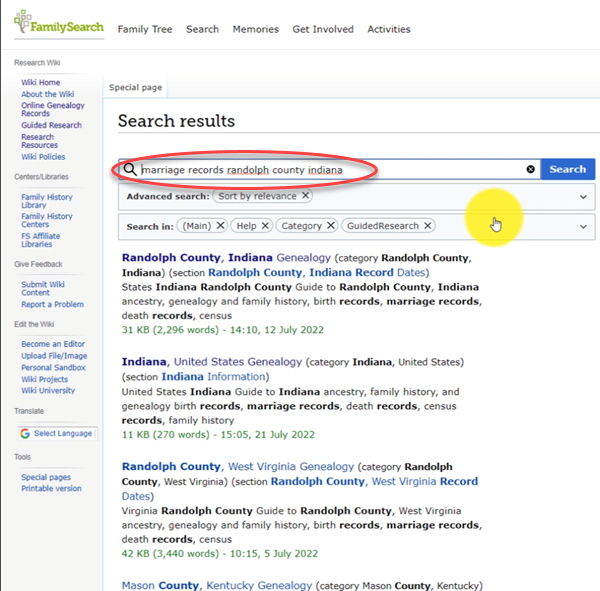
How to Overcome the #1 Search Problem
(22:01) The wiki really should be one of your first stops when you’re going to be starting research in a new area. Let’s wrap up with a quick conversation about the wiki’s search box. You could go ahead and put a topic in there. Many people will come in here and they’ll type in marriage records, Randolph, County, Indiana, and they will get a list of results. They don’t look as clear cut as Google results, and they may not all be on topic. This is where we can get lost. I think probably the number one reason why people give up on the wiki is they get these kinds of search results. They realize, wait a second, this isn’t even Indiana, it’s talking about Kentucky! Why am I getting all these? It can be frustrating.
The wrong way to search at the FamilySearch Wiki
This happens because we tried to do it ourselves, with our own keywords. Remember, like most search engines, they’ve indexed their content to make it searchable, so that means they’ve already decided how they want to talk about a particular topic. Rather than just addressing marriage record first, the wiki focuses on the location. Where is this marriage record? So, focus first on the place unless you are just looking for general information on a general genealogy topic such as genealogy software.
Pay attention to the pre-filled suggestions as you type because the wiki is going to suggest what it has in the format it has it. Again, you may want to first go to the country, state or county level page and then look for the record type.
What if you’re looking for marriage records but you don’t see them listed? Well, it might be that the word marriage isn’t the keyword the wiki uses. Or it might be that the type of record you’re looking for is a state or federal record. That’s another reason why the find on page feature (Ctrl + F) is so helpful. Don’t be discouraged if you don’t see what you want listed in the table of contents. It may just be a keyword issue. Let the work that they’ve already done in organizing their materials guide you. You’ll be more successful and also avoid frustration. The FamilySearch Wiki is just too good of a resource to miss.
Learn more about using Family Search at Genealogy Gems
VIDEO & SHOW NOTES: Learn how Archives.com can help you find your family history. We cover getting started, finding records, building your family tree and answer the question as to whether you should use it if you already use another genealogy website.
Why Use Archives.com?
If you’re new to genealogy, returning after taking a break, or just need a new place to search, Archives.com has a lot to offer. I’m going to show you how to get started with this affordable website packed with genealogical records.
The folks at Archives.com asked me to make a video sharing what I think about their website, so full disclosure, they are sponsoring this video. However, they have no clue what I’m going to say. For the past 17 years that I’ve been podcasting and just shy of that I’ve been publishing videos at the Genealogy Gems YouTube channel, I’ve always given you my honest opinion and shared my best strategies. So let’s get started and do that right now as I answer some of the most common questions about Archives.com.
What Makes Archives.com Unique?
Like many other genealogy websites, it has billions of genealogy records. However, the subscription is a fraction of the cost of other big name websites. That makes it ideal for beginners, or if you just need a new place to dig for records in addition to your other subscriptions. Start with a free 7-day trial to find out what Archives can do for your genealogy research.
What Does Archives.com Offer?
The main focus of the website is searching for genealogical records. And they have billions of the most popular.
Archive.com is owned by Ancestry, and according to the folks at Archives there is some overlap, just like there would be with other genealogy records sites. But Archives does include records you won’t find on Ancestry, and there are records on Ancestry that are not on Archives. Since Archives is much less expensive, it’s worth a look.
What Record Collections are Included?
The easiest way to find out if Archives.com has the record collections you want is to go to the Collections page at https://www.archives.com/collections or click Collections in the menu.
They currently have 650 record collections that include billions of individual records.
Use the filters on the Collections page to browse by Keywords, Record Type or Country. Click the down arrow on the Record Type filter to get a quick overview of the types of records the site focuses on.
In addition to some of the traditional types of records like birth, marriage, death, census and immigration, you’ll find some special collections such as Memory Pages, Surname Histories, and CityDirectories.
If you’re trying to find ancestors in the “old country”, check the Countries filter list before you start searching. No point in looking for records for a country that they don’t have.
How to Search for Records at Archives.com
In genealogy, we start with ourselves and work backwards. Your grandparents are a great place to start searching. When searching for records, I recommend that you start with a particular ancestor in mind and fill in as many details as you can about them before you move further back in your family tree.
There are three different ways to start searching:
Use the search fields at the top of the home page.
Click the Advanced Search link to go to a more robust search page.
Or click SEARCH in the menu which also takes you to the Advanced Search page.
I recommend going straight to the Advanced Search page. This way you can cut out the results that don’t match and zero in on the time frame and also the type of records you want to find.
In searching for genealogy records it’s important to balance searching narrowly enough to get to what you want while searching broadly enough not to miss something.
When searching for less common names, try just searching on the name without clicking the Exact match box. This will keep your results fairly broad and provide an opportunity to see how many and what kind of results you get. By not narrowing the scope of the search, you’re less likely to miss a record that has a slight name deviation.
Take a moment to quickly scroll down and see how many are close matches. Chances are it’s just a fraction of the total results. In my case, there were only about 9 close results out of over 40,000.
If the name you are searching is fairly common, then adding a location and life events with dates can help differentiate people and results.
A Beginner’s Basic Guide
Archives Record filters are in the general order that you need for genealogy:
Gather Death, Marriage and Birth records first.
Fill in with Census Records throughout your ancestors’ lifetime.
MilitaryService and Immigration Records are also really important milestones to find.
Fill in even more like City and Telephone Directories which were often published yearly.
Check out Family Trees that might include your ancestor, and Media records that can further fill in their story.
Can You Build a Family Tree?
Yes! Archives.com includes a family tree builder users can attach their records to and a discovery engine that helps users find new records about their ancestors. Start with your parents or grandparents.
You can search other people’s family trees from the Advanced Search page. You can also create your own tree. Archive’s provides a nice, simple user interface to build out a family tree online.
I just want to say that in my opinion, the very best place to build your family tree is in genealogy database software that you use on your own computer. That way you always have control of it no matter how long you have a subscription to any website. But if you’re just getting started, this is a great way to get your feet wet
If you’ve already created your tree on your own computer, then you can export it as a GEDCOM. That is the universal file type for genealogy family trees specifically. You can then upload that file to Archives.com and work with it from there.
My online family trees are not what I call my ‘master family tree’. That is on my computer. So why do I create an online tree? The reason is simple. It’s a great way to generate Discoveries and connections. I use it to generate clues and record hints.
Archives.com makes it easy to create a family tree. Start with yourself, add your parents, and what you know about your grandparents, and you are off to the races! Or, as I mentioned before, you can upload an existing GEDCOM file.
As soon as you set up your tree on Archives and start looking at records, you will start generating Discoveries automatically. It’s a way to speed up the research process and make genealogy easier than it’s ever been before.
Show Notes: Over the years I’ve talked a lot about how to use Evernote and Snagit. Both are amazing tools for research and make it easy to do web clipping. If you’ve been wondering what the difference is between these two powerful tools, or if you haven’t and you’re trying to figure out which one you should start using, you’re in the right place. Today we’re doing a head-to-head comparison of Evernote and Snagit (with a focus on web clipping) and figuring out which one is best for you and your genealogy research.
I got an email from one of our Premium Members named Nancy, and she says, “Can you help me understand why I would need Evernote and Snagit? I have both installed on my computer, but need to spend time becoming proficient in both. If they duplicate one another wouldn’t want to spend time learning both if Snagit is superior.”
This is a really smart question because like the old saying, time is money. And in the case of genealogy, time is ancestors! No one wants to stop and learn yet another tech tool if they don’t have to. So, let’s look at Evernote vs. Snagit, in a head-to-head comparison, and dig into their strengths and weaknesses. If you have both, this will also help you decide what to use in any given situation.
Evernote is a cloud-based notetaking tool that includes a web clipper.
Snagit is a screen capture / AKA web clipper tool.
So, first and foremost the thing they have in common is that they both can capture all or a portion of content that appears on your computer screen. You can clip exactly the part you want and save it as an image for future reference or use.
That’s a pretty simplified description – but essentially, web clipping is the common denominator. But from there, they diverge.
Evernote is primarily a note taking tool. It takes all kinds of notes (audio, photo, video, documents, web clipping, typed, handwritten.) All notes are added to it, and you work in it like a workstation where you can organize and quickly search and retrieve your notes. It can apply OCR to your screen captured notes, making them keyword searchable and editable. Evernote allows you to instantly access your notes from any device that you are signed into your account.
Snagit is primarily a screen capture tool. In fact, it’s screen capture on steroids compared to Evernote. It’s not a place to store notes, but it’s a fantastic way to web-clip or capture information, edit, annotate and manipulate it, save it, and use it in other programs (and we’ll talk more about that in a moment.) Snagit can capture both images and video of content on the web, and it can do other things like use OCR to convert the text that appears in the web content you’re clipping as an image and turn it into editable text. When you web clip with Snagit, you are creating an image. That image must be saved to a cloud service like Dropbox in order to be able to access the note from all your devices.
You can learn a lot more about what these two tools do in my other videos:
Another thing they have in common is that they are both software programs.
Evernote: In addition to being able to use it as a software program on your computer, you can also use Evernote on your mobile device by downloading the app from your app store. You can also use it on any computer by simply signing into your account at Evernote.com. That being said, the software is preferred over the website because it resides on your computer and is faster.
Cost: About $9/monthly or about $80 for the yearly subscription ($6.67 / MONTH).
There is a free version, but you can only use it on 2 devices, it doesn’t include OCR and there are very strict limits on storage, which we’ll address in just a moment. If you’re going to use Evernote for your research and other things, you’re going to need the yearly subscription.
Snagit: Snagit is software that you download to your computer (whether desktop or laptop.) You can buy it as a stand alone purchase, or you can also purchase an ongoing maintenance subscription which provides you with upgrades. There is not mobile app.
Cost: About $64 for one software license + 1 year maintenance (free upgrade). You don’t have to pay for ongoing maintenance.
Conclusion: Unless the free version of Evernote is adequate for your needs, Snagit it more economical. 10 months of Evernote on-going subscription would cover the cost of the one-time purchase of Snagit. However, if you need all the features of Evernote, then go for the yearly subscription to keep the cost down.
Storage and Retention
Because Evernote is a subscription, this brings up the question of whether you can use your notes after you stop subscribing. And storage limits are also a concern.
Snagit: No storage limits. All the content you capture is stored on your computer, not the cloud. It’s yours forever. There’s no limit to how much you can clip or create.
Evernote: Evernote does store your notes on your computer, but it also stores them in the Evernote cloud. While Evernote doesn’t have an overall storage limit, it does have limits on how much you can create each month. There is a free version that allows you to 60 MB of monthly uploads. This is talking about the size of your notes. If you add photographs to Evernote, you’re going to use that up very quickly. There’s also a 25 MB maximum note size limit. No note or clipping can be larger than 25MB. With the subscription you get 10 GB of monthly uploads (which would be pretty hard to max out) and the note size limit is 200 MB.
Conclusion: You’ll need the yearly subscription to really be able to use Evernote for genealogy. And while there are limits, you’re likely never to reach them. And you can use it offline because notes are on your computer.
Snagit has no limits and stores only on your computer unless you share your content to other sources. And that brings us to comparing how these tools allow you to export your content. In other words, can you get stuff out that you put into it?
Exporting Content
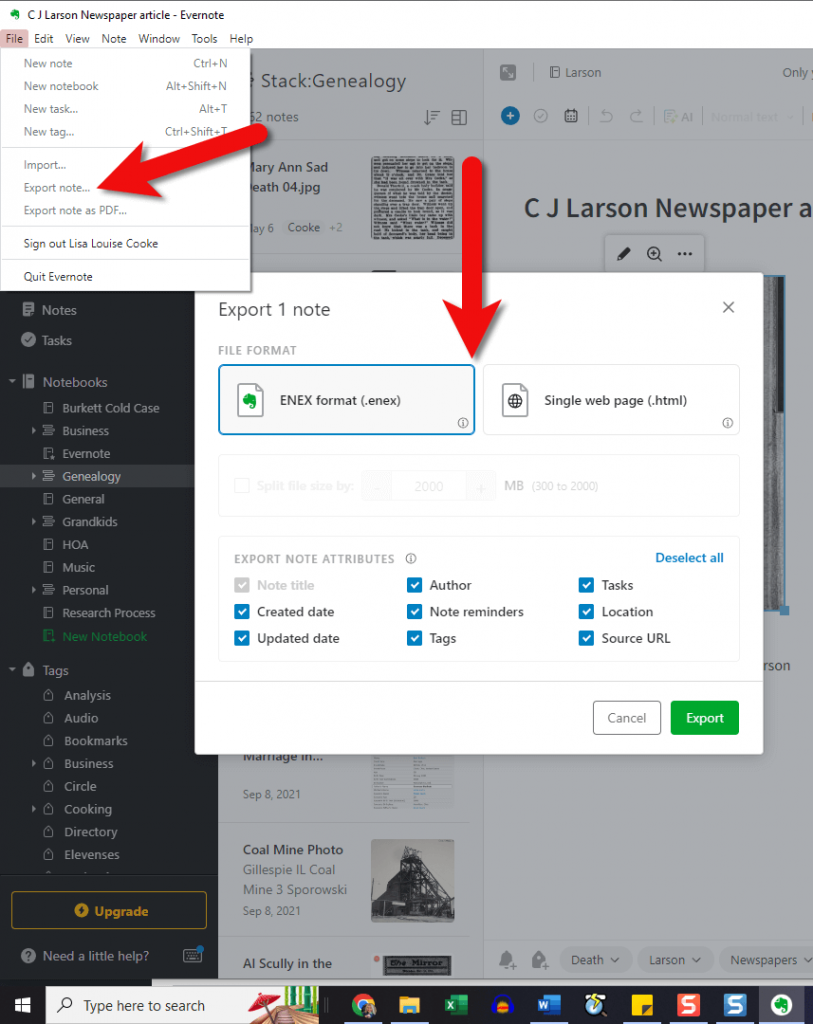
The necessity for an ongoing subscription to Evernote brings up to the next important comparison: how can you export and use your web-clippings and in the case of Evernote other types of notes?
Evernote: Not easy. You can export your notes as the Evernote file format called ENEX or as HTML, which is used in structuring web pages. Keep in mind that web clippings are image files, and we normally need image files in JPEG or PNG format to be able to use them in a variety of other programs.
In the menu click File > Export Note. Available file types are limited.
Snagit: Easy. You can export your clippings in countless ways. Pretty much all major file types are supported. You can easily add content directly to a large number of popular programs such as Word, PowerPoint and even Evernote! So, if you’re writing a family history story or book and you want to clip something on the web and include it, Snagit can send it right to your document with just a click.
Conclusion: If you need to be able to easily get web clippings and captured content out of the program and use it in other ways, use Snagit. If you want to keep your clippings and notes all in one place and be able to keep them organized and find them easily, use Evernote.
Sharing Content
When it comes to sharing content with other researchers or your family, both Evernote and Snagit do a great job in their own way.
Evernote: Each note has a convenient Share button that allows you to invite other people to view just that note. It also gives you a unique link to the note that can be shared. And you can email notes. You can also put a group of notes into a notebook and then share the entire notebook. You can control whether the person being shared with can just view the notes or if they can edit them. So, it does facilitate collaboration by allowing you both to edit the same note. That permission can also be turned off. That all being said, Evernote is really a tool for you, and it’s not focused on sharing as a priority, or on sharing in order to be able to publish the content in many other ways.
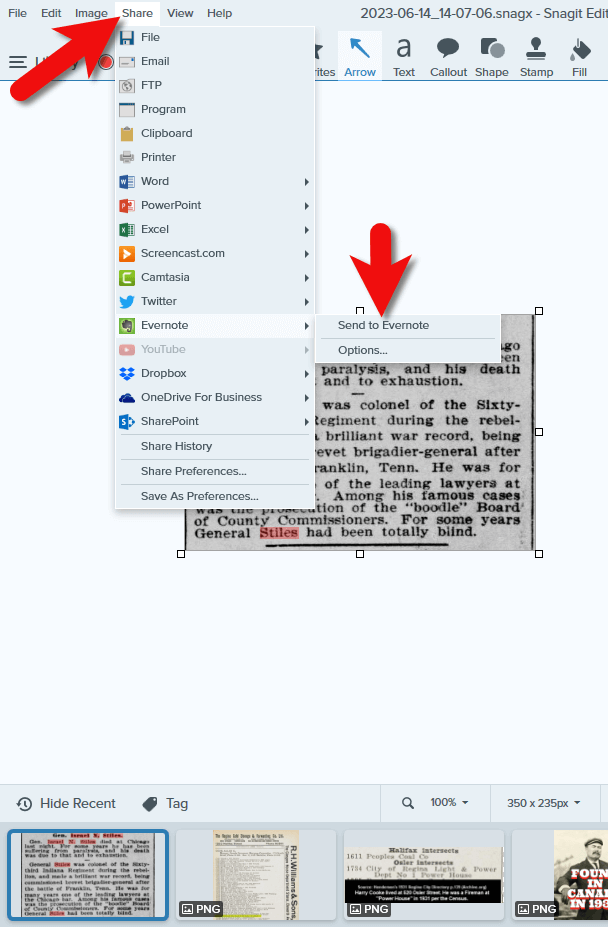
Snagit: With Snagit, if you want to share with someone else to collaborate, you’ll need to send it to them, either by email or shared cloud storage. They can then edit the item in their Snagit software and send it back. So, it doesn’t offer the ability to collaborate quite as easily as Evernote. However, Snagit’s sharing and publishing capability is one of its greatest strengths and priorities. Just click Share in the menu and you’ll have the ability to save the content as a file to your computer, email it to someone, upload it to your own website, your printer, a wide range of software programs and cloud storage services, and yes, even to Evernote!
Click Share in Snagit’s menu
Conclusion: If you want to share with other people, both tools can do the job, although Evernote inches ahead because it facilitates both people being able to edit the same note within Evernote. If you want to share your content for use in other programs and publish it in other ways, Snagit is the best choice.
Evernote vs. Snagit Conclusions
After a head-to-head comparison, we’ve discovered that your selection between these two tools depends on your task and your goals:
Use Evernote if you want to be able to:
keep all your work in one place organized and searchable
create a wide variety of notes such as audio, video, web clippings, PDFs, typed notes, etc.
have OCR automatically applied to web clippings and images
collaborate with other people on your notes
easily create notes on mobile
Use Snagit if you want to:
create high-quality web clippings and videos in universally usable file formats that are exportable
create web-clippings of hard to capture content like wide screen family trees, and information that appears further down a web page that you can’t see all on the screen at the same time
be able manipulate your content with annotations or drop it into project templates
easily export your captured content into a variety of other programs
not have to pay an ongoing subscription.
Another way of looking at it is that Evernote is more of a final destination for content you’re collecting, and Snagit is a content collector that makes it easy to use that content wherever you need it.
Conclusion
If you want to have one place to store and use a wide variety of notes including web clippings, Evernote is the best choice. If you want full flexibility in capturing and creating online content and using it in other programs and projects, Snagit is the best choice. I like to use them in combination. I keep my genealogy and other notes organized in Evernote, and then I use Snagit to capture web content exactly the way I want it and send it into Evernote as needed. And I use both programs for a whole lot more than just genealogy! I clip recipes, projects and ideas, and I use Snagit for all the images I create for Genealogy Gems.