The Best Way to Find Free Old Maps at DavidRumsey.com
Our ability to find our ancestors is rooted in two important pieces of information: the locations where they lived and the time frames in which they lived there. This means that old maps are essential to our genealogy research.
The good news is that there is an abundance of free digitized old maps available online. One of the best resources is the David Rumsey Map Collection website. There you will find over 100,000 free digitized historic maps. These maps span the globe and centuries. They are perfect for bringing geographic perspective to your family tree.

Elevenses with Lisa Show Notes
In this episode 36 of my free webinar video series Elevenses with Lisa I’ll show you how to navigate this ever-expanding free website. Watch the video and then follow along with the show notes in this article. Here you’ll find answers to questions such as:
- What’s the best way to find maps at David Rumsey’s map website?
- What is the difference between the search tools (Luna Viewer and MapRank Search)?
- What are the advanced search techniques for finding the old maps?
- How can I download maps at DavidRumsey.com?
- Is it OK to use the maps from DavidRumsey.com in my family history projects?
Rumsey Historical Maps in Google Earth
As we discussed in Ways to Use Google Earth for Genealogy (Elevenses with Lisa episode 12) there are approximately 120 Rumsey old maps available for free in Google Earth. You can find them in the Layers Panel under Gallery. Each map is already georeferenced as an overlay for you.

Click image to watch the video and read the article on ways to use Google Earth for genealogy
You can also create your own overlays in Google Earth using Rumsey Maps or digitized maps from other sources. I cover this step-by-step in chapter 16 of my book The Genealogist’s Google Toolbox.
Best Strategies for Finding Free Old Maps
Once you’ve exhausted the few hundred old maps in Google Earth, head to the David Rumsey Map Collection website. Rumsey’s collection includes over 150,000 map, over 100,000 of which have been digitized and are available for free on his website.
Copyright and Use Permission
You will probably be anxious to use these wonderful old maps in a variety of ways. The Rumsey website provides clear direction on copyright and use permission. Go to: DavidRumsey.com > Home Page > About > Copyright and Permissions.
The good news is that generally speaking, you are free to download and use the digitized maps for your own personal use.
The Best Way to View the Maps
There are several ways to view maps:
- The Luna Viewer: Browse and search 100,000+ maps
- The GeoReferencer: Help georeferenced maps, compare maps overlays
- MapRank Search: Browse & search 6000 maps by time & place
- Google Earth: 120 maps in the Layers panel, 140 can be added
- Google Maps: 120 maps included
- Second Life: View some in 3 dimensions and at a huge scale. Location: Rumsey Map Islands. Includes a welcome center with hundreds of maps, and a 600 meter tall map cylinder showing hundreds of maps.
- The Collections Ticker: Pop-out distraction!
- Insight Java Client: Downloadable workspace
Of this list, the best two tools to user are:
- The Luna Viewer: Browse and search 100,000+ maps
- MapRank Search: Browse & search 6000 maps by time & place
I will show you how to use each. Note that in these examples we will be using a computer to search the site rather than a mobile device or tablet.
The Luna Viewer: How to browse & search the maps
In the main menu under View Collection select the Luna Viewer. Under Luna Viewer click the Launch Luna Viewer button.
The Luna Viewer at David Rumsey Map Collection
Tips for keyword searching:
- In most cases it helps to start with a fairly broad search to see the full range of available maps
- Be cautious with abbreviations. “MN” does not return “Minn” or “Minnestota”.
- Advance search provides you with the use of full Boolean operators like “and,” “or,” “greater than,” “contains,” and others.
- After a search, to return to the full collection, click on “show all” under the search button.
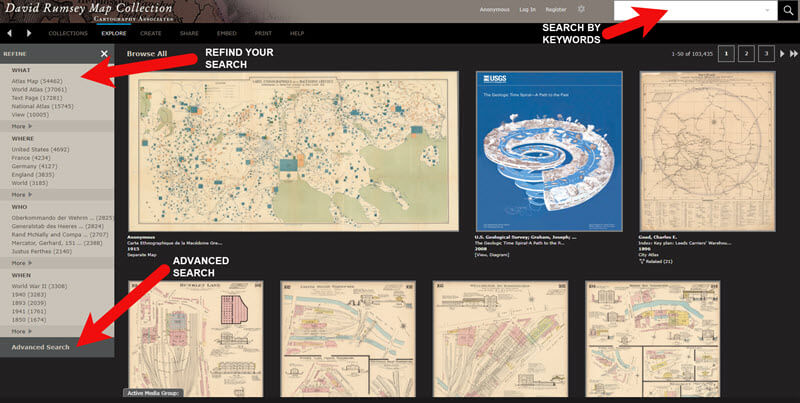
Let’s look at an example of using the keyword search in tandem with the Refine column. If you search for New York City, you will be searching all of the data associated with the maps. Since many maps may have been published in New York City, you will likely see many maps for other areas. You can improve this search by going to the Refine column and under Where clicking on New York City.
The Refine column will show you the first five options in each category (What, Where, Who, When). Click More to reveal all of the additional refining options in that category.
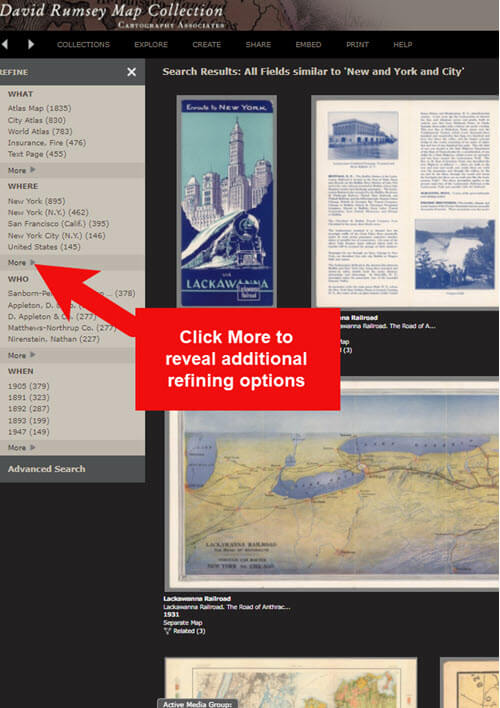
Click More to see all refining options in the Luna Viewer
From the returned results, click a map to view it.
You can select multiple items in the Refine column to filter more narrowly. Remove a filter by clicking it under Remove at the top of the Refine column.
Like genealogical records, old maps may include several pages. Look above the blue BUY PRINT button to see the number of Related maps. In my example of a map of the 1939 World’s Fair in New York City, there were two map pages available. Click Related to display all of the available pages.

Click the Related link to view all related map pages.
DavidRumsey.com Advanced Search
The Advanced Search feature can be found in two locations:
- Inside the search box – click your mouse in the box and select Advanced Search from the drop-down list
- At the bottom of the Refine column on the left side of the screen.
Advanced Search gives you more control over how you search. Let’s look at an example by searching for Sanborn fire insurance maps.
Searching for Sanborn Fire Insurance Maps
The David Rumsey Map Collection website includes many Sanborn Fire Insurance maps. These maps were created for insurance purposes and provide an incredible amount of detail about individual buildings and dwellings in a given neighborhood.
I recommend using the Advanced Search feature to search for these maps. This is because over the years the name of the company as publisher changed.
How to Find Sanborn Maps:
- Click on Advanced Search at the bottom of the Refine column
- In the “find all of these words” section, click Fields and select Publisher
- Type in Sanborn
- On the results page, go to the Refine column and Who click More
- There are at least six variations of the Sanborn publishing name.
Old Map books and atlases often include valuable historical text often called historical sketches. You can find these using the Advanced search. Search for the exact phrase Historical Sketch. Run this search and then in the Refine column under Where select an area of interest.
How to Download Maps from DavidRumsey.com
- Click the map from the results list
- On the map’s dedicated page click the EXPORT button at the top of the page.
- Select the appropriate size from the drop-down list. (Larger maps may take a few moments to download)
- Typically the maps will download to the Downloads folder on your computer
Tips for Selecting Download (Export) Map Size:
Save space on your computer and future headaches by selecting the correct size map for your use. If you plan on using the map to create an overlay or create a nice large print, select the largest size possible ( I recommend at least Extra Large for creating map overlays in the Google Earth.) This will ensure that the map doesn’t appear fuzzy when you Zoom in. High-resolution is also recommended when printing. For example, if you plan on including the map in a book about your family’s history (for personal use, not for resale) a high-resolution map will print crisp and clear. Maps for use on the web or something like a PowerPoint presentation would be fine at lower resolutions.
MapRank Search at DavidRumsey.com
The MapRank Search “app” at the David Rumsey Map Collection website allows you to browse & search 6000 maps by two important criteria: Time & Place.
There are two ways to find the MapRank Search:
- In the main menu under View Collection click MapRank Search. Scroll to the bottom of the page and click the Launch MapRank Search
- Scroll to the bottom of the home page until you see Featured App – MapRank Search, and click the Launch MapRank Search
How to Find Maps Using MapRank Search:
- Start with entering the location name in the search box (in the upper right corner) and click the Find a Place
- The location will appear on the modern-day map. The old maps that match the location will appear in the column on the right, prioritized starting with the map that most closely matches what you searched.
- Below the modern-day map, move the time slider levers to narrow in on the desired time frame.
- Note that the old maps in the results column will change based on the specified time frame.
- Broaden the location if desired by zooming out a bit on the modern-day map. Note that the results list will change as you zoom.
- Hover your mouse over a map in the results list and notice that a reddish-brown box will appear the selected map and will also appear on the modern-day map. This indicates the area of the map that the old map covers. This will aid you in selecting the map that will suit your needs.
- Click a map from the results list and it will open in a new browser tab, although some maps will appear as an overlay on the modern-day map. In that case, click the Luna Viewer button to go to the page where the map can be downloaded.
How to Compare Modern-day Maps with Old Maps
Whether you have found the map by searching with the Luna Viewer or the MapRank Search you will eventually find yourself on the page where the single map is displayed. On the left is the source information.
In the upper right corner of the screen click the View in GeoReferencer button. You will be taken to a page where you can view the old map overlayed on the modern-day map. In the upper right corner move the slider to make the old map transparent so that you can compare between the two maps.
Recap: Comparing the Two Best Search Tools at DavidRumsey.com
Luna Viewer:
– 100,000 maps
– Search, then refine
– Sometimes glitchy interface
MapRank Search:
– 6000+ maps
– More control with time slider & map
– Map results list ranked by closest coverage
Live Chat Q&A: Answers to Your Questions About David Rumsey Maps
One of the advantages of tuning into the live broadcast of each Elevenses with Lisa show is participating in the Live Chat and asking your questions.
From Megan: What is the difference between Google Earth and My Maps?
From Lisa: Google Earth is a free software download. This is where I create what I call family history tours. They are a collection of data points and media that come together as a research tool and storytelling tool. My Maps are created in Google Maps. I prefer creating in Google Earth because it offers more tools and options, and it’s where I keep all my mapping work.
From Gwynn: Heard in the past Java Client might have security holes has this been fixed?
From Lisa: Read more about the latest on Java Client at the website’s FAQ page.
From GeneBuds: Must set up account to use Luna Viewer?
From Lisa: No, you don’t have to have an account to use the Luna Viewer. “Registering for an account allows you to save your work and preferences, search external media, create Media Groups and Presentations, customize your settings, create annotations, and upload your own content.” As I mentioned in the video, I prefer to do all my work in Google Earth.
From Gwynn: Sanborn Fire Maps: Where do I find the Key to the symbols? Are they the same from year to year or do they change?
From Lisa: Here’s the main resource page for Sanborn maps at the Library of Congress. You will find specific information about interpreting the maps including Keys and Colors here.
From Karen: If you are specifically looking for plat maps for our US farmers would you put the word plat in the search field?
From Lisa: I would use the Advanced Search and enter the word plat in the “Find all these words” box. Click the plus sign to add an additional “Find all these words” field and type in the name of the location. If that doesn’t deliver the desired result, omit the location and just search on the word plant. Then, on the results page, go to the Refine column and under Where click More. Then you have a nice list to browse. You might spot a map that includes your location. TIP: When you find a result, be sure to check the Related number at the top of the page so that you didn’t miss any additional pages of the map.
From Mark: Lisa and Bill, is the intro music something that you all wrote?
From Lisa and Bill: No, it’s by a talented musician named Dan Lebowitz. Our goal this year was to learn to play it ourselves 🙂 We’re glad you love it as much as we do!
Resources
Get My Free Genealogy Gems Weekly Email Newsletter
The newsletter is your guide to upcoming shows, articles, videos, podcasts and new Premium content.
Bonus Download exclusively for Premium Members: Download the show notes handout.
Become a Genealogy Gems Premium Member today.
Please leave your comment or question below
Let us know if you found this video and article helpful. And if you have any questions, don’t hesitate to ask. We’re here to help!


 source material: Evernote.