Family History Episode 29 – Immigration and Naturalization Records for Family History, Part 1
Family History: Genealogy Made Easy Podcast
with Lisa Louise Cooke
Republished April 29, 2014

with Lisa Louise Cooke
https://lisalouisecooke.com/familyhistorypodcast/audio/fh29.mp3
Download the Show Notes for this Episode
Welcome to this step-by-step series for beginning genealogists—and more experienced ones who want to brush up or learn something new. I first ran this series in 2008-09. So many people have asked about it, I’m bringing it back in weekly segments.
Episode 29: Immigration and Naturalization Records for Family History, Part 1
In this podcast episode, one of my favorite experts talks about one of my favorite topics: immigration and naturalization records. Stephen Danko, PhD is a genealogy lecturer and a very popular blogger. In this episode he’s helping U.S. genealogists cross the pond through the use of immigration and naturalization records. He’ll talk to us about the challenges we’ll face in locating these records—and some documents you may not even know existed: certificates of arrival.
In the next episode, we’ll continue our conversation with a discussion of Departure Passenger Lists. Departure information from European ports is often available on microfilm at the Family History Library, on Ancestry.com or other websites. Some of the passenger steamship lines themselves kept departure lists, like the White Star Line or the Red Star Line, and these are on microfilm.
Here are my favorite tips from the episode:
Once you find an ancestral hometown, use Stephen Morse’s advanced search tools (see below) to look for others who arrived from the same place. This can help you identify other relatives, friends and others who part of a group or chain migration.
Usually we start with the most recent records and work backward. But when we look for immigration and naturalization records, look FIRST for immigration papers. THEN look for naturalization papers they may have filed later. You know they arrived—but not every immigrant naturalized, and their naturalization papers may have been filed in multiple places and may not be indexed.
Beginning in 1926, applicants for naturalization who arrived in 1906 or later had to be issued a certificate of arrival. These certificates were issued after their names were confirmed by the government on the original passenger lists. Between 1926 and 1943, information about certificates of arrival was noted on the original passenger lists.
The certificate of arrival information helps you in two ways:
- The date tells you about when they applied for naturalization
- The first part of the certificate number is the naturalization district (Northeast, Midwest, West coast, etc), to help you narrow down where to look.
Anything that helps you narrow down a search for naturalization records helps!
Updates and Links
About 70 million immigration and naturalization records have been indexed in recent years through an enormous community indexing project led by FamilySearch. Check out their site (below) to see what records are searchable now.
FamilySearch.org Immigration and Naturalization Online Resources
One-Step Webpages by Stephen P. Morse (Ellis Island Search Tool)
Family History Episode 30 – Immigration and Naturalization Records for Family History, Part 2
Family History: Genealogy Made Easy Podcast
with Lisa Louise Cooke
Republished May 6, 2014
Listen to the Family History: Genealogy Made Easy podcast by Lisa Louise Cooke. It’s a great series for learning the research ropes and well as refreshing your skills.
https://lisalouisecooke.com/familyhistorypodcast/audio/fh30.mp3
Download the Show Notes for this Episode
Welcome to this step-by-step series for beginning genealogists—and more experienced ones who want to brush up or learn something new. I first ran this series in 2008-09. So many people have asked about it, I’m bringing it back in weekly segments.
Episode 30: Immigration and Naturalization Records for Family History, Part 2
This episode continues last episode’s conversation about immigration and naturalization records. With me again is Stephen Danko, PhD, a genealogy lecturer and a very popular blogger. In today’s show Steve and I talk more about passenger lists, and some of the ramifications of an immigrant being detained or deported. We cover the multi-step naturalization process and you’ll hear about a fantastic find in naturalization papers–so fantastic that other researchers at the Family History Library in Salt Lake City wanted a copy!
Here are my favorite take-away points from this episode:
There were no requirements to keep passenger lists in the U.S. before 1820, or in Canada before 1867. (Many people originally arrived in one or the other of these countries, then migrated across the border, which was essentially unregulated before the 1890s.) There may have been records kept, but you’re not going to find them easily.
The passenger lists we’re most familiar with were filled out in the port of departure, then surrendered to U.S. government officials upon arrival. But other records were maintained at the port of departure. Departure information from European ports is often available on microfilm at the Family History Library, on Ancestry.com or other websites. Some of the passenger steamship lines themselves kept departure lists, like the White Star Line or the Red Star Line, and these are on microfilm. Here’s an excellent article on Passenger Departure Lists of German Emigrants, 1709-1914. Look for resources specific to other countries in genealogical guides under the headings “emigration” or “departure lists.”
Immigrants who were deported or even detained for further investigation, the steamship line had to pay the bill. If they were detained or they went back, the date and ship of deportation may be indicated on the passenger manifests.
Naturalization was a multistep process. The “first paper” is the declaration of intent. After a certain period of time, they applied for their petition for naturalization (“second papers”). Eventually they received their certificate of naturalization. After 1926, there may also be a certificate of arrival. (See Episode 29.)
Naturalization records may be at the county level or may be in federal court. Increasingly these are coming online. Meanwhile, some are easier to track down than others. Most Massachusetts naturalizations are available on microfilm and at the Massachusetts State Library. Some books
Many 20th-century naturalizations are packed with family information. Steve shared an example for one of his relatives. Her naturalization had her name, birthdate and birthplace, name of her husband and date of her marriage, her husband’s birthplace and date, the names of all her children, her date of arrival and the ship she came on! Some later naturalizations also have photographs. Microfilmed files may also have the certificate of arrival.
Updates and Links
About 70 million immigration and naturalization records have been indexed in recent years through an enormous community indexing project led by FamilySearch. Check out their site (below) to see what records are searchable now.
FamilySearch.org Immigration and Naturalization Online Resources
One-Step Webpages by Stephen P. Morse (Ellis Island Search Tool)
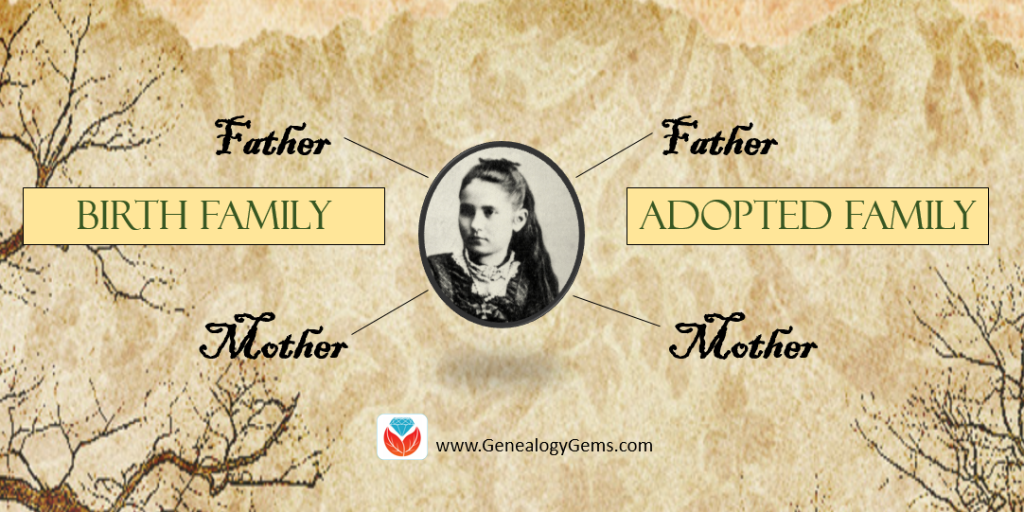
Adoption and Genealogy: How to Create and Navigate an Adopted Family Pedigree
Adoption and genealogy often cross paths. More and more genealogists are having to navigating between both birth family and an adopted family pedigrees. Our easy, step-by-step instructions will show you how to merge these two pedigree charts into one with FamilySearch Family Tree and Ancestry.com.
Creating a Birth and Adoption Line with FamilySearch Family Tree
Anyone can create a family tree at FamilySearch.org for free. You need to create your free account first. If you need more instruction on how to get started with a family tree on FamilySearch, click here.
For those of you who already have a FamilySearch family tree you work with, here is how to include both a birth line and adopted line.
In this example below, James Donald Woodard was raised by Robert Cole and Goldie Witt, but is the natural son of Elmer Woodard and Margaret Cole.
Step 1: From the pedigree view, click on the person you would like to have two pedigrees for. Then, choose “Person” to get to the individual’s person page.
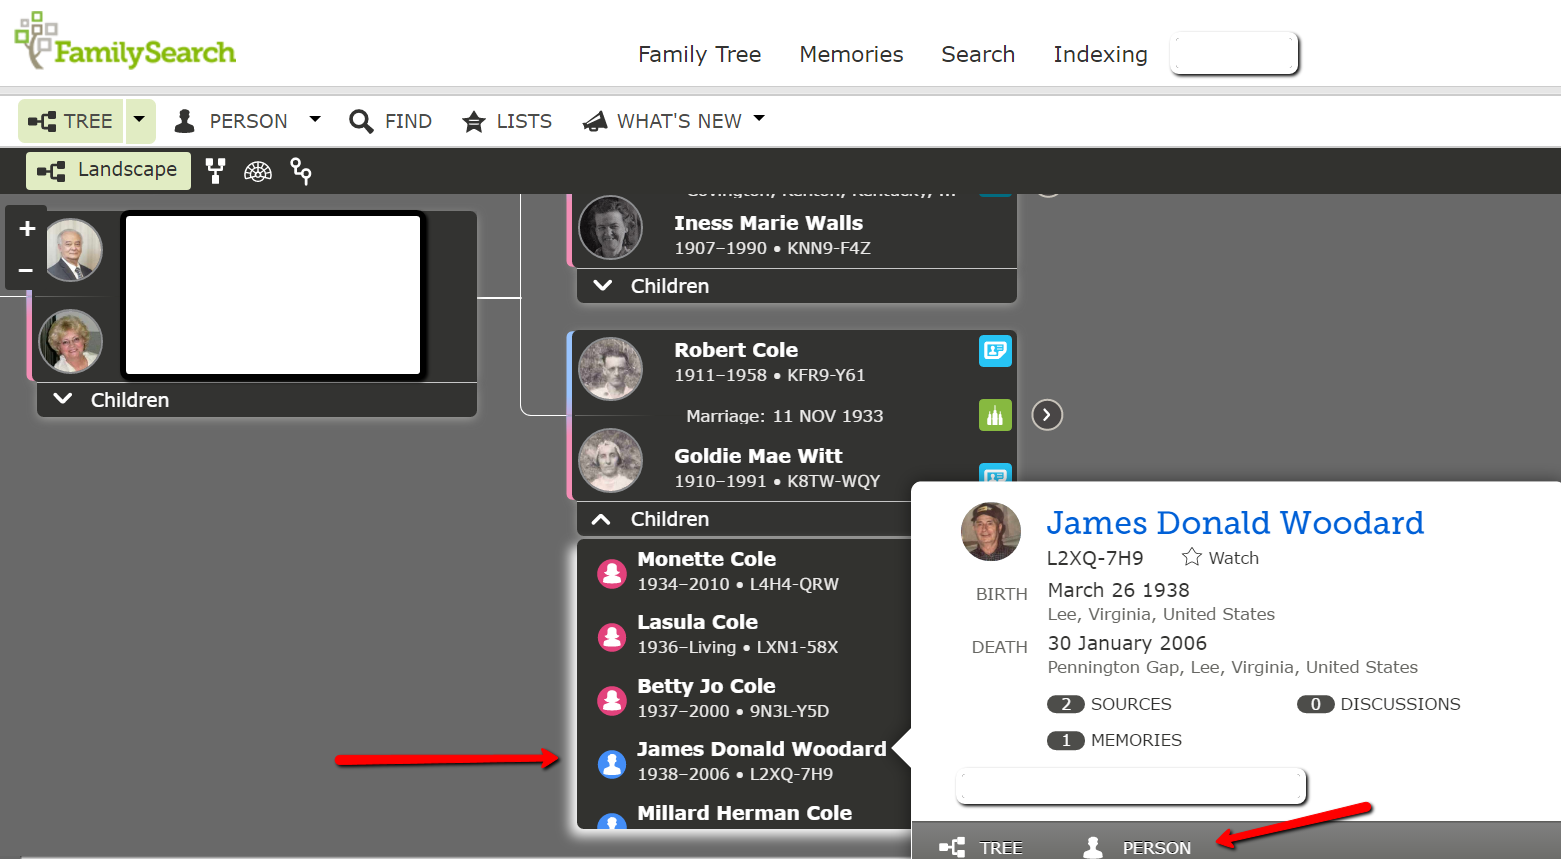
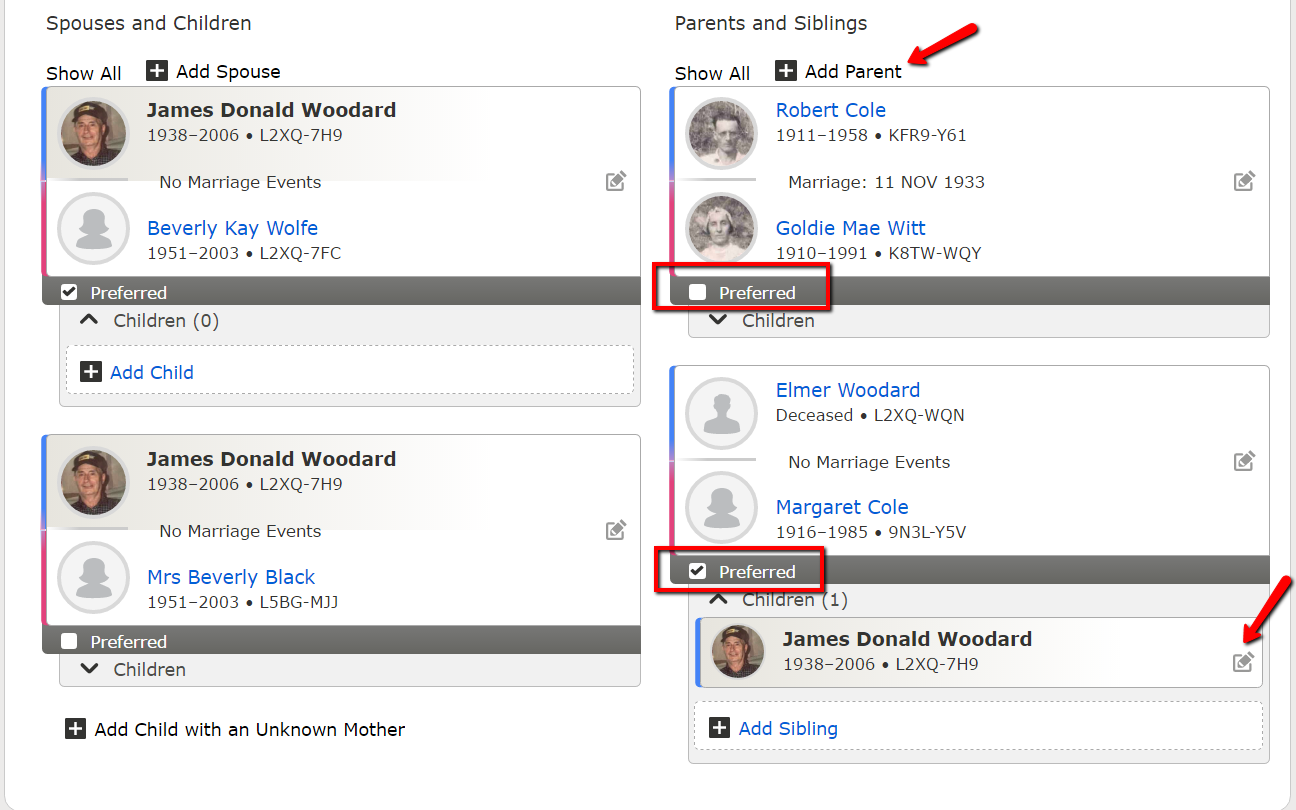
Step 2: At James’ person page, scroll down to the “parents and siblings” section. Here, multiple sets of parents can be added by clicking on “Add Parent.” We can also indicate what type of relationship the parent has to the child (choices include: biological, adopted, guardianship, foster, and step) by clicking the little pencil icon at the right of James’ name under the parent couple. Lastly, whichever couple is marked “preferred” will be the parents that will show up in your pedigree view.
Step 3: Add a second set of parents for James by clicking on the “Add Parent” icon and follow the prompts to add the new parents by name.
Step 4: You will have James appearing as a child under each couple. Now, indicate the type of relationship James has with each couple.
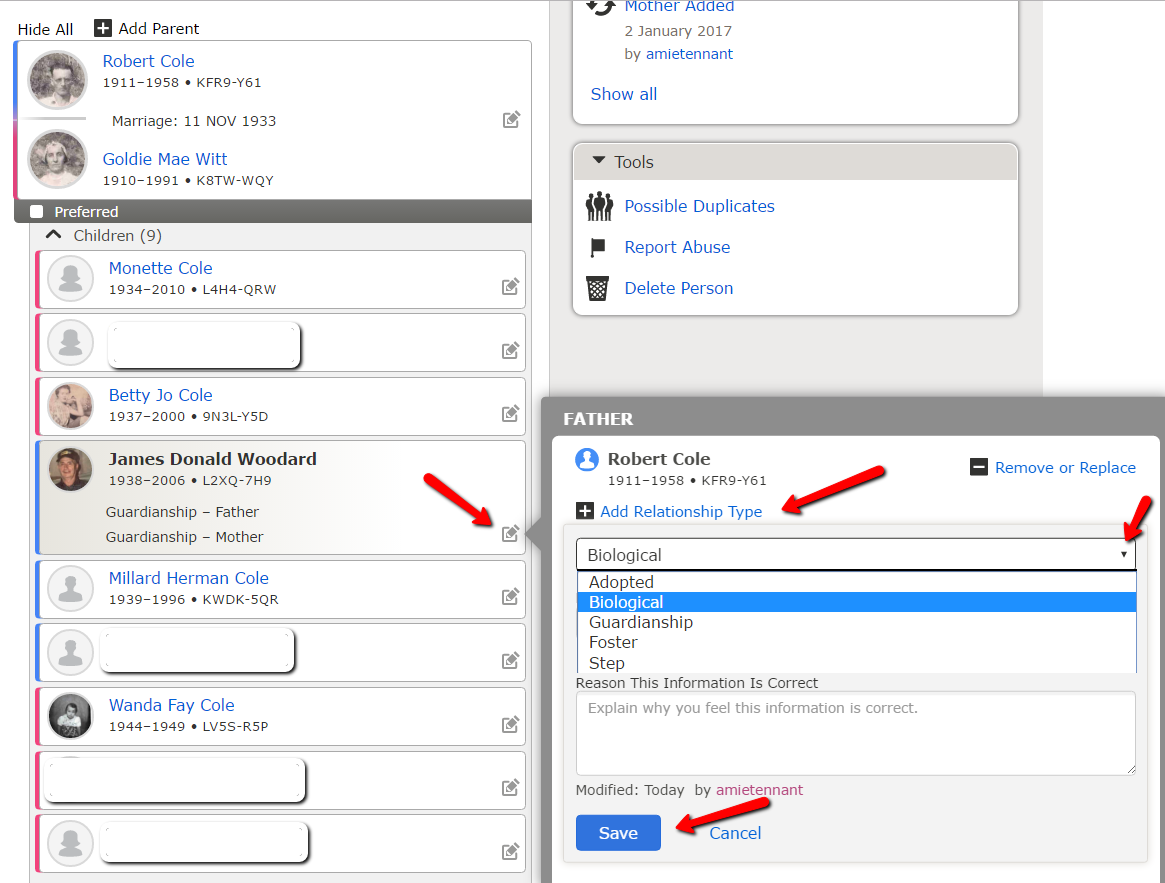
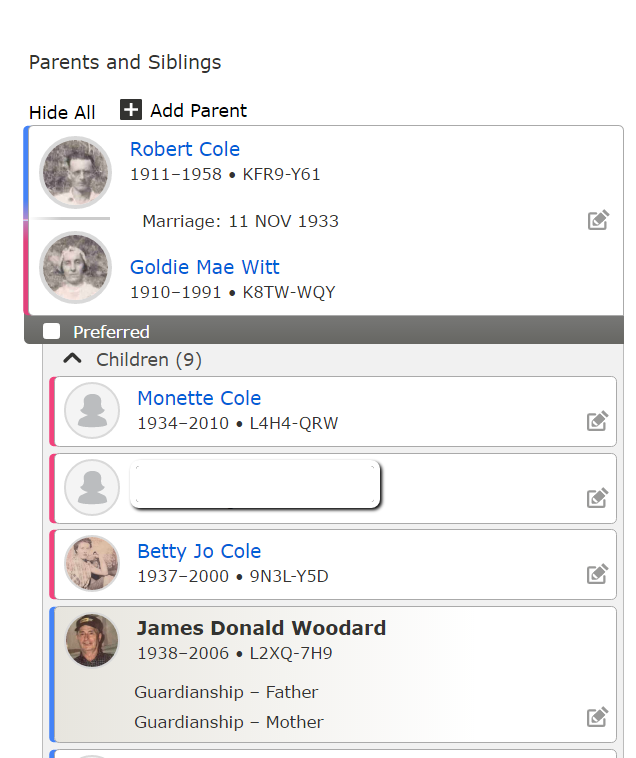
Find James in the list of children under Robert and Goldie.
Click on the little pencil icon in his box. A new window will pop-up. You will click on “Add Relationship Type” and then choose the appropriate relationship from the pull-down menu. When you are finished, click “Save.” You will need to do this for both the father and the mother.
You can see that James’ name appears under Robert and Goldie with the relationship noted. (When the relationship is biological, no notation appears.)
James now has two pedigree options. We can easily switch between the pedigrees for James by clicking the preferred button on whichever couple we would like to view. You can change the preferred couple whenever and how-many-ever times you want!
Creating A Birth and Adoption Line at Ancestry.com
Step 1: First, add one set of parents for the individual. You can do this in the pedigree view. Click on “Add Father” or “Add Mother” and fill in the fields for name, date of birth, etc.
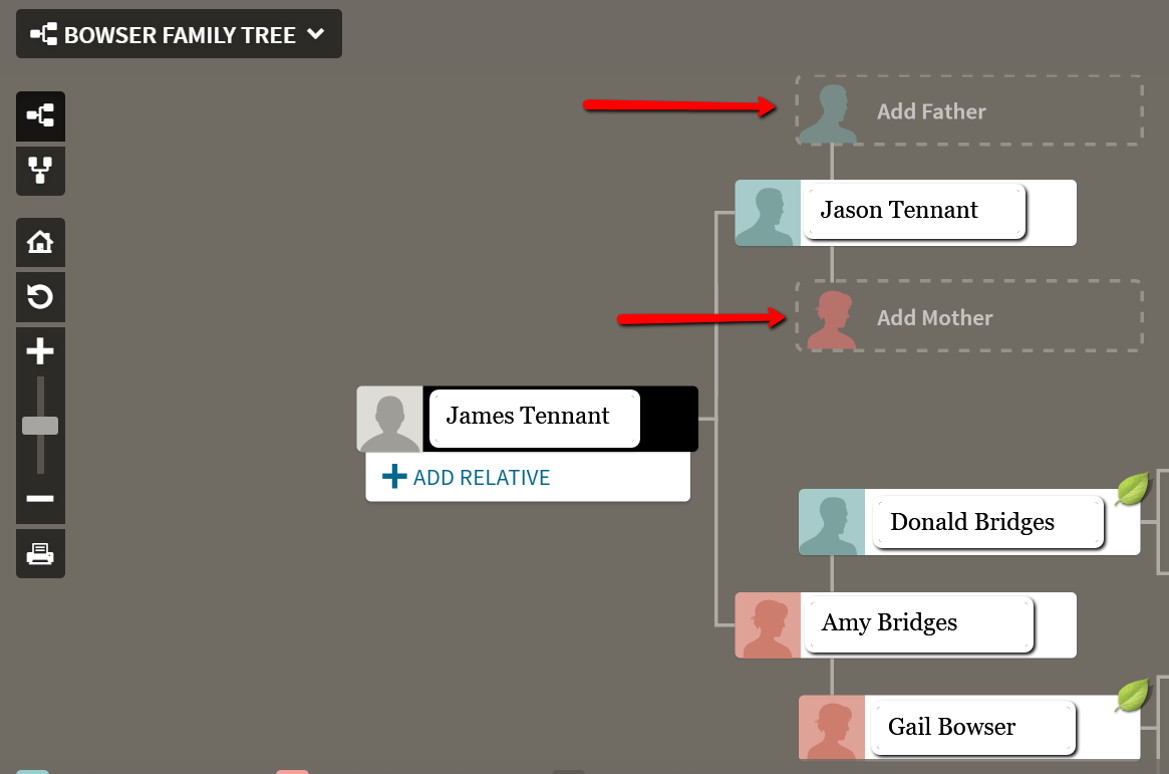
Step 2: Add a second set of parents for Jason by clicking on Jason’s name and choosing “Profile.” This takes you to a new screen that looks like this image below.
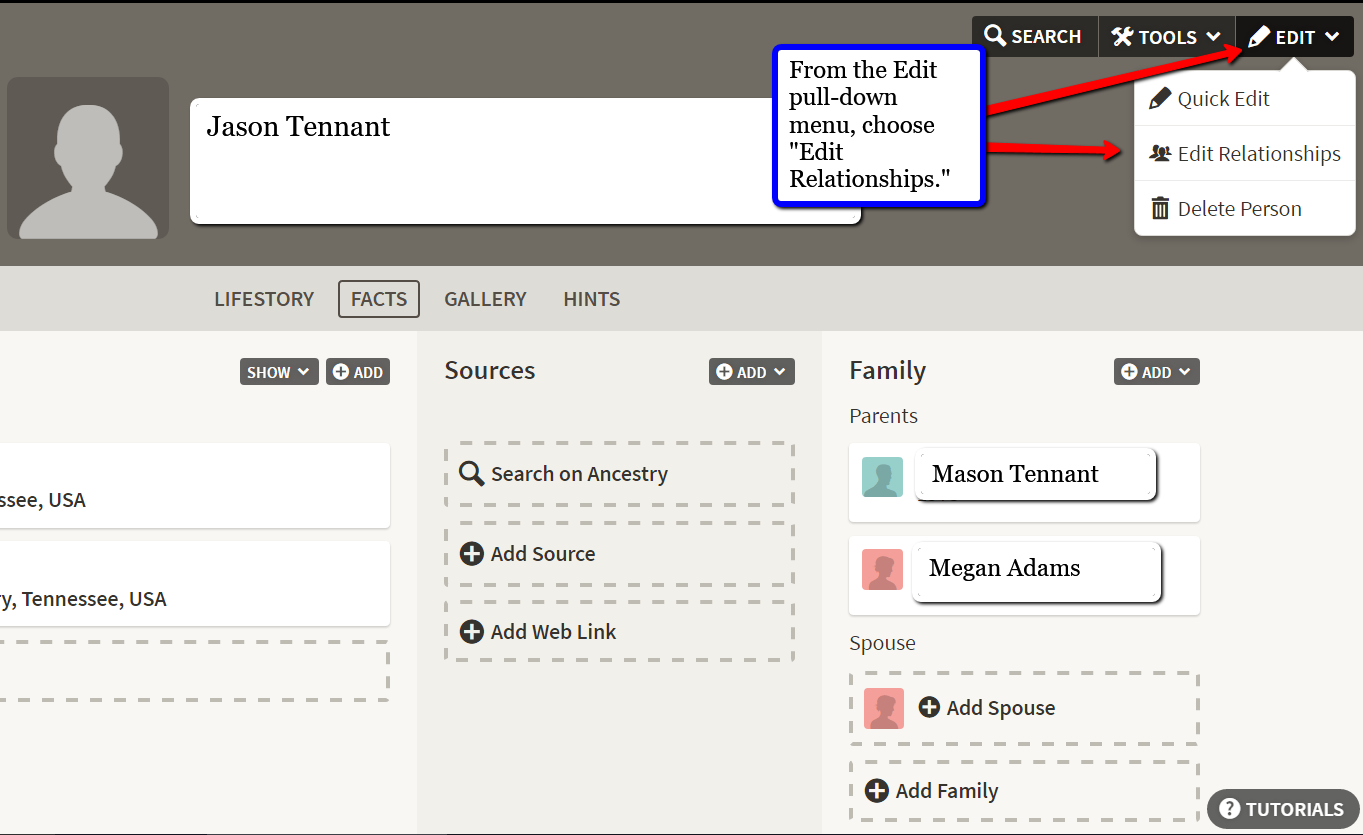
Step 3: This is Jason’s profile page. You can see his newly added parents, Mason Tennant and Megan Adams. Click the edit button at the top right of the screen and chose “Edit Relationships.”
Step 4: A pop-up window for relationships will appear. Here, you can mark the type of relationship between Jason and Mason. The choices are biological, adopted, step, related, guardian, private, and unknown. After you have chosen the appropriate relationship for the first father, click “Add Alternate Father.”

Step 5: Add the name of the second father and choose the appropriate relationship. You will then be able to choose which father you want to mark “preferred.” Do the same for the mothers.
If we want to see Jason’s birth or adopted family tree, we need only go to his profile page, click “Edit Relationships” at the top right, and mark one set of parents as “preferred.” Then, that couple will show up in the pedigree view.
Adoption genealogy certainly has it’s challenges, but creating a pedigree chart that includes both the birth and adoption lines, doesn’t have to be one of them! Let us know in the comments below how you have included both your birth and adoption lines into your family history. We love to hear from you.
More Adoption Gems
DNA for Adoption Research: Nice to Meet You!
Genealogy Gems Podcast episode 178: CeCe Moore Talks about Genealogy and Adoption (Listen for free)