Click the video player to watch episode 54 of Elevenses with Lisa about the 1890 census and substitute records. Below you’ll find the detailed show notes with all the website links I mention. Premium Members will find the downloadable ad-free PDF cheat sheet of these show notes at the bottom of this page in the Resources section, along with my BONUS 1890 Census Gap Worksheet.
What Happened to the 1890 Census
The census shows us our ancestors grouped in families, making it a valuable resource for genealogy. Soon the 1950 census will be available, but for now the most current census publicly available in 1940. In it we may find, depending on our age, ourselves, our parents, our grandparents, and our great parents. In many cases it’s quick and rewarding to make your way back in time to the 1890 census which was taken starting June 1, 1890. And that’s where the trail hits a bump. In January 1921 a large fire broke out in the Commerce Building in Washington DC where the 1890 census records were stored, and most were destroyed as a result. Only 6,160 individual names remain in the remnants. (Learn more about the destruction of the 1890 census at the National Archives.)
Prior to the 1890 U.S. Federal Census, the last census taken was in 1880. With about 99% of the 1890 being destroyed as the result of the fire, this leaves a 20 year gap in the census (1880 – 1900.)
Much can happen in a span of twenty years. For example, your ancestors could have been born and reached adulthood. Filling in their timeline for this period requires a bit more effort, but the results are worth it.
In this video and article we’ll cover:
How to find the remaining fragments of the 1890 population enumeration
What you can learn from the 1890 census records
Lesser known 1890 census schedules that can still be found.
The best 1890 substitute records and how to find them.
Surviving 1890 Federal Census Population Schedules
A very small portion of the 1890 census has survived, but it’s more than just the population schedule. Here are the six types of records still available.
List of the locations covered by the surviving 1890 federal census:
Alabama: Perryville Beat No.11 (Perry County) and Severe Beat No.8 (Perry County)
District of Columbia: Q Street, 13th St., 14th St., R Street, Q Street, Corcoran St., 15th St., S Street, R Street, and Riggs Street, Johnson Avenue, and S Street
Georgia: Columbus (Muscogee County)
Illinois: Mound Township (McDonough County)
Minnesota: Rockford (Wright County)
New Jersey: Jersey City (Hudson County)
New York: Brookhaven Township (Suffolk County) and Eastchester (Westchester County)
North Carolina: South Point and River Bend Townships (Gaston County), Township No. 2 (Cleveland County)
Ohio: Cincinnati (Hamilton County) and Wayne Township (Clinton County)
South Dakota: Jefferson Township (Union County)
Texas: J.P. No. 6, Mountain Peak, Ovilla Precinct (Ellis County), Precinct No. 5 (Hood County), No. 6 and J.P. No. 7 (Rusk County), Trinity Town and Precinct No. 2 (Trinity County), and Kaufman (Kaufman County)
Questions Asked in the 1890 U.S. Federal Census The following questions were asked by the census taker:
Name
Age
Sex
Address
Number of families in the house
Number of persons in the house
Number of persons in the family
Relationship to head of family
Race: white, black, mulatto, quadroon, octoroon, Chinese, Japanese, or Indian
Marital status
Whether married during the year
Total children born to mother
Number of children living
Birthplace
Birthplace of parents
If foreign born, how many years in the United States
Naturalized or in the process of naturalization
Profession, trade, or occupation
Months unemployed during census year
Able to read and write
Speak English; if not, language or dialect spoken
Suffering from acute or chronic disease (if so, name of disease and length of time afflicted)
Defective in mind, sight, hearing, or speech
Crippled, maimed, or deformed (with name of defect)
Prisoner, convict, homeless child, or pauper
Home is rented or owned by the head or a member of the family
(if so, whether mortgaged)
Head of family a farmer, if he or a family member rented or owned the farm
If mortgaged, the post office address of the owner
2. Schedules for Union Soldiers & Widows
According to the National Archives, “The U.S. Pension Office requested this special enumeration to help Union veterans locate comrades to testify in pension claims and to determine the number of survivors and widows for pension legislation. (Some congressmen also thought it scientifically useful to know the effect of various types of military service upon veterans’ longevity.) To assist in the enumeration, the Pension Office prepared a list of veterans’ names and addresses from their files and from available military records held by the U.S. War Department.
Index and images of schedules enumerating Union veterans and widows of veterans of the Civil War for the states of Kentucky through Wyoming. Except for some miscellaneous returns, data for the states of Alabama through Kansas do not exist. Some returns include U.S. Naval Vessels and Navy Yards. The schedules are from Record Group 15, Records of the Veterans Administration and is NARA publication M123.
Nearly all of the schedules for the states of Alabama through Kansas and approximately half of those for Kentucky appear to have been destroyed before transfer of the remaining schedules to the National Archives in 1943.”
The 1890 Oklahoma Territorial Census lists people who lived in the Oklahoma Territory. The seven counties making up the Oklahoma Territory at the time are listed below. Note the number as they were often listed only by these number on the census.
Logan County
Oklahoma County
Cleveland County
Canadian County
Kingfisher County
Payne County
Beaver County
How to find the records:
Oklahoma Historical Society – Search the 1890 Oklahoma Territorial Census for free. Order copies of print or digital records for a fee.
One of the primary uses of the census by the government is to compile statistical reports using the data gathered. Many of these can be found online at places like Google Books.
The Delaware African American Schedule came about because of one of these statistical reports. According to the National Archives, in 1901 the Chief Statistician for Agriculture wrote a report about agriculture in the state of Delaware. Just before it was to be published, some of the conclusions reached in the report were disputed. The controversy centered around what was then referred to as “Negro” farmers. The results was that additional research was conducted in an effort to find all “Negro” farmers in the 1890 and 1900 Delaware census records. The dust up over the statistical report was fortunate indeed because these records are now available.
The list is roughly in alphabetical order according to surname and contains the following information:
Name
Census Year
Enumeration District (ED) Number
ED Description (locality and county)
Occupation
5. Statistics of Lutheran Congregation & Statistical Information for the U.S.
These record collection offers limited usefulness because they don’t name people. However, if you have questions about Lutheran ancestors around 1890 or would like more contextual information about the time period, they might be worth a look.
Statistics of Lutheran Congregation reproduces a list of each Lutheran church or local organization compiled by the Census Office from information submitted by officials of the Lutheran officials.
How to find the records:
The National Archives – Contact the National Archives regarding National Archives Microfilm Publication M2073, Statistics of Congregations of Lutheran Synods, 1890 (1 roll). Records are arranged by synod, then state, then locality.
For each church or local organization, the following information is given in seven columns:
(1) town or city
(2) county
(3) name of organization
(4) number or type of church edifice
(5) seating capacity
(6) value of church property
(7) number of members.
6. Statistical information for the entire United States
Statistical reports were compiled and analyzed by the Census Office after the 1890 census was completed. These massive statistical reports are available in National Archives Microfilm Publication T825, Publications of the Bureau of the Census.
Now that we’ve scoured every inch of available records remaining from the 1890 U.S. Federal Census, it’s time to go on the hunt for substitute records. We’ll be focusing on the best available and easiest to find resources.
1885 & 1895 State Census Records:
The U.S. federal government was not alone in taking the census. Some states also took their own state census. These were usually conducted in the years between the federal censuses, most commonly on the “5” such as 1875, and 1885. You may find some as far back as 1825 and as recent as 1925, as in the case of the state of New York.
How to find the records:
Look for state census records at state archives, state historical societies, and state libraries. Many are also conveniently searchable online, most commonly at FamilySearch (free) and Ancestry (subscription.)
Lisa’s Pro Tip: Get a Bit More with Mortality Schedules
Do you happen to have someone in your family tree who was alive and well in the 1880 census but nowhere to be found in the 1900 census? Official death records may not have been available during this time frame where they lived, compounding the problem.
The U.S. Federal Censuses from 1850-1880 included a mortality schedule counting the people who had died in the previous year. Since the 1880 census began on June 1, “previous year” means the 12 months preceding June 1, or June 1 (of the previous year) to May 31 (of the census year).
Ancestry has a database of these schedules which fall just before the 20 year time frame we are trying to fill. However, this collection also happens to include Mortality Schedules from three State Censuses: Colorado, Florida and Nebraska. There were conducted in 1885. They weren’t mandatory so there are only a few, but if you happen to be researching in one of these states, you just might get lucky.
While you’re searching, be aware that not all of the information recorded on the census is included in the searchable index. This means that it is important to view the image and don’t just rely on the indexed information.
Ancestry 1890 Census Substitute Database
Ancestry has compiled a special searchable collection of records that can be used to fill in the gaps left behind by the loss of the 1890 census. It includes state census collections, city directories, voter registrations and more.
Find More 1890 Census Substitute Records at Ancestry
This substitute collection is a tremendous help, but don’t stop there. You can also manually hunt for substitute records to see if there might be something helpful that is overlooked in the 1890 census substitute search. This works particularly well if you have a specific research question in mind.
You might be wondering, why would I need to search manually? Many people rely on Ancestry hints to alert them to applicable records, and they figure the search engine will find the rest.
This is a mistake for two reasons.
only approximately 10% of Ancestry® Records Appear as hints.
There may be a record that meets your needs that was not captured in the 1890 Census Substitute Collection. Try going directly to the Card Catalog and filtering to USA and then by decade such as 1890s.
FamilySearch 1890 Census Substitutes
While FamilySearch doesn’t have one massive substitute database, you can find several focused 1890 census substitute collections available online, at Family History Centers around the country and world, and in book form at the Family History Library in Salt Lake City.
How to find the records: 1. Go to FamilySearch 2. Log into your free account
3. In the menu go to Search > Catalog 4. Click Titles 5. Search for 1890 census substitute 6. If desired, filter down to records available or at a Family History Center near you.
City Directories as an 1890 Census Substitute
Some of the best and most comprehensive substitute records are city directories. If published in your ancestor’s area when they lived there, they can offer a year-by-year record. And that can do wonders for filling in the gap between the 1880 and 1800 census.
How to find the records:
You can find city directories at the big genealogy websites like Ancestry, MyHeritage and FamilySearch, as well as state archives, historical societies and libraries. Google searches also come in very handy in unearthing lesser known websites and repositories. Two of my favorite places to look that are both free and online are Google Books and Internet Archive.
Google Books Search for the state and county. On the results page click the Tools The first option in the drop-down menu will be Any View. Change it to Full View. The third option is Any Time. Click the down arrow and select Custom Range and set it to 1880 through 1890.
Episode 30: Lisa’s 10 surprising things to find at Google Books
Like Google Books, the Internet Archive has a vast array of materials digitized and available for free. Watch Elevenses with Lisa episode 43for ideas and search strategies.
We’ve touched on some of the most popular and helpful records that can be used to fill in the gap left by the loss of the 1890 U.S. Federal Census. As you expand your search look for:
Premium Podcast Episodes As a Genealogy Gems Premium Member you have access to the entire back catalog of Premium Episodes! Of course, things do change over time, so occasionally you’ll hear about something that is no longer around (like the Premium Message...
Welcome to this step-by-step series for beginning genealogists—and more experienced ones who want to brush up or learn something new. I first ran this series in 2008-09. So many people have asked about it, I’m bringing it back in weekly segments.
In today’s episode we finish a multi-part, step-by-step series on setting up your own family history blog. In episode 40 you decided what the purpose of your blog is, and we got you started with the free Blogger web site and picked out your blog name and set up the web address for it, and got the basic framework started. In episode 41 two seasoned bloggers inspired us with their posts.
In this episode I talk about adding a few more gadgets and details, doing a bit of pre-planning for your blog posts, publishing your first article, and then talking about how your readers will subscribe to your blog. You’ll also get great tips on how to create genealogy content that others looking for the same ancestors can find easily online.
Episode 42: How to Start a Genealogy Blog, Part 5
OK, let’s head back to the new blog we created in Episode 40. I named mine Blog Your Family History.(This is just a sample blog: my current blog is part of the Genealogy Gems website.) Please note: blogging platforms change over time. The features and layouts I mention have been updated. Just watch for similar features in newer versions of the blog platform.
So far I have the basic layout set up and I added the vintage photograph of the three ladies sharing some written correspondence. If you’re not signed in to your Google account, you’ll notice a link in the upper right corner of your blog page that says “sign in.” You’ll need to click that and enter your user name and password to get access to your blog dashboard – the area where you customize your blog and write your blog posts.
When you sign in you’ll be taken to the dashboard area for your blog. In my case I have a couple of blogs, so they’ll all be listed here in the dashboard. To get back to your blog just click the View Blog link for the blog you want to view. You’ll notice that when you get there the link in the upper right corner now says “sign out” so you know right now you’re signed in. To get back to the dashboard where we can continue customizing the blog, just click the Customize link in the upper right hand corner of the blog. So far we have a couple of “gadgets” or sections of our blog:
the title area at the top;
the blog posts box. In the case of the blog I’m creating here the gadgets run along the right hand side of the blog page.
About Me
the gadget with the photo I added
A followers gadget showing other blogger readers
the blog archive gadget – this is where readers can access blog posts that are over a month old.
So let’s add another gadget by clicking the Add Gadget link in the top gadget box and a window will pop up showing us out options. I’d like to add a search box so that my readers can easily find articles with keywords they are interested in. So just click the plus sign to add the Search gadget and a Configure Search Box window pops up so I can fine tune this gadget the way I want it. So I’ll keep the title as “Search this blog” since that’s pretty straightforward, and I’m going to just have it search this blog so I will keep that check box checked. And click the SAVE button and now I have a Search box on my blog.
So as you can see adding various gadgets to your blog is easy and you can customize them to appear the way you want. And remember you can rearrange them on your dashboard by just clicking and dragging them into the position you want. Once you get the elements of your blog the way you like them – at least for now, and you can certainly make changes any time you want – then it’s time to start blogging.
What to blog about?
Hopefully you’ve decided what you want to blog about – perhaps a specific line of your family, or maybe you’re going to just sort of journal what you work on each day. No matter what approach you take, there are a few things to keep in mind. First, each time you write an article and publish it to your blog page it’s called a “post.” Post is sort of interchangeable with article, and posting is another word for publishing – basically you’ve made the article available on the web.
When you do post an article you will want people—particularly other researchers—to be able to find it. You’ll have better success attracting readers who are researching the same families if you sort of put yourself in their shoes. Ask yourself, what will they be searching on? When someone goes to Google and starts looking for blogs about their family trees, they are using keywords to do that search.
So while you may have some very creative ideas for blog post titles, if you don’t include some of those important keywords (or at a minimum the surnames) they may never find you. And of course sprinkling keywords into your post will also increase its chances of being found. And when we talk about keywords, we’re also talking about key phrases, such as family history, or family tree. Other good keywords are genealogy, birth, death, research, location names, etc. Just the kinds of things you would search on if you were looking for people writing about your ancestors. Remember too that an ancestor’s name is also a keyword phrase.
It’s a good idea to mix it up because you never know how someone else will be searching. For example, I research my husband’s great great grandfather Senator C J Larson of Winthrop MN. So if I’m writing about him, I will use several variations of his name:
C J Larson
Carl Johan Larson
Charles Larson
Charles J Larson
Senator C J Larson
And of course when I use these names in combination with Winthrop, Sibley County, Minnesota, I’m bound to be found by someone also researching him and his family.
Publish your first post
OK, well let’s get right to how to publish your first blog post. At your blog Dashboard (if you’re not there just click the link in the upper right corner that says Dashboard) and click NEW POST. This is like getting a new piece of paper. You’re new post is under the Posting tab and there’s a box where you can write your text and there are some formatting buttons along the top.
My advice is to bite off small chunks. People tend to read something that looks more like a magazine article rather than a novel. And it’s easier to focus in on one topic at a time. So you may want to make your first post a welcome message and explain to your readers what they’ll will be seeing in the future on your blog. I know, you don’t have any readers yet, but since all of your posts are archived, this post will be read tomorrow and two years from now. New readers can find you at any time, and they may very likely take a look at your first post.
The first thing to do is write your post title. I used to wait to title my posts until after I wrote them because writing them often brought to mind the perfect title. But the problem with that is that so often I would forget to go back and type a title in and I would end up publishing without the title. While you can go back and add the title later, it may show up in your readers RSS feeds including those who subscribe to your blog by email. So I find that it works best if I give it the best working title I can come up with, then I write the post, and then I can go back and change it if I want, but if I forget it will at least have a basic title.
Also, remember that your readers probably have many blogs they read – but they probably don’t READ them all, the probably scan the titles and click through to read the ones that sound interesting. So your title has an important job to do. Like the blog text it should contain keywords that will help the post show up in search results, AND it needs to catch your readers’ attention.
When I first started blogging I was always trying to come up with title that as clearly as possible explained what the post was about. But over time I realized that we don’t have to explain it all in the title. In fact, being a bit mysterious or intriguing with the title can entice the reader to click through and read. They’ll find out soon enough all the details of your posting, but your title sets the tone, and catches their curiosity. Of course I don’t advocate bait and switch – but have fun with your titles and use it to your best advantage. And now FINALLY it’s time to actually write your blog post! Of course you can unleash your creativity here, but I do have a few suggestions:
Keep your paragraphs shorter rather than longer – it just makes them easier and quicker to read
Incorporate those keywords and phrases
A picture says a thousand words – add images whenever possible and I’ll show you how in just a moment
Write in your natural voice. Typically blogs aren’t formal, and you will have an easier time writing if you write more like you speak. And that will come across as more genuine to your readers.
Don’t bite off more than you can chew. If you have a lot to say on a particular topic, consider publishing your thoughts in a series of blog posts rather than one really long one. And I find that readers really like following a series.
Once you’ve got it written up, it’s time to a bit of formatting. In Blogger there are a few different fonts you can choose from. Just like in Microsoft word, you highlight the text you want to format and then select from the drop down menu which font, and font size you want. The default font and size might be just fine, but it’s nice to know you do have some flexibility. You can also bold and italicize text by highlighting the text and clicking either button. And like Word you can use Control-B on your computer keyboard for bold and Control I for italicize. You can also put your text in a different color. Again just highlight the text to be changed and click on the capital T button with the color boxes and click on the color you want.
Now a word about formatting. Remember when we discussed that it was a good idea to avoid blog template designs that had dark backgrounds with light type because they are hard on the eyes and difficult to read? Well, over doing text formatting is much the same. It can get hard on the eyes. It’s like the rule of thumb that says you don’t type in capital letters because it looks like you’re screaming at the reader.
Well, overdoing the formatting with a ton of bold and italics and colors just ends up looking chaotic and nothing really ends up standing out. So keep in mind that less is more and use it sparingly so that only the most important things stand out. And just like in Word you can select whether your text is left right or centered justified, or fully justified. And you can create numbered and bulleted lists simply by highlight the text and clicking one of those buttons. And you can also use the Block Quote feature to set text apart as a quotation by indenting it from both sides.
With all of these formatting features you will probably want to see what it will look like to your readers. And that will be different to a certain extent than how it looks here in the post editor. To see it as it will look when posted, click the Preview link in the upper right corner of the text box. When you’re in preview mode the link will then say Hide Preview and to go back to editing or what they call Compose mode just click that Hide Preview link.
Next is the Spell check button, which is something you’ll want to use every time you post. Thankfully if you make a spelling error you can fix it after it’s posted, but it’s so much easier just to run the spell check before you do. There are a couple of more things you can add to this text post to spice it up.
The next button is the Add Image button and it does just that, adds your images and photos. When you click the button an Upload Images window pops up where you can browse your computer hard drive and locate the image you want to add, or if you have a website you can type in the URL address for an image you already have hosted on your website and it will use that image. Keep in mind that Blogger has an 8 MB image size limit, so you might have to reduce some of your photos and save them as smaller files to be uploaded to Blogger. This is often the case when you’ve scanned old family photos at high resolutions that create quite large files.
Once you’ve told Blogger which image to use, you can also choose how you want it to appear on the page on the left, in the center or on the right with the text around it, or you can just leave it as None. And you can also choose whether it is Small, Medium or Large. When you’re ready to go just click the orange Upload Image button and in a few moments it will be processed and you can just click the Done button, the window will close, and your image will now be in your blog post. Again, if you want to see for sure how it will look to your readers just click the Preview link.
You can even upload a video to your blog post. It works much the same way. Click the video upload button. A window pops up and you click the Browse button to locate the video on your hard drive. Blogger will accept AVI, MPEG, QuickTime, Real, and Windows Media video files up to 100 MB in size which is typically about 10 minutes at most. They also have rules about the kind of videos you can upload and require you to click the check box to agree to their terms of service, and then you just click the orange Upload Video button.
Videos take a few minutes to upload, so at first you’ll see the Blogger Uploading Video screen on the video player. You’ll see down at the bottom that it is processing. Once your video appears on the screen then you’re ready to go. If you don’t want to wait while it finishes processing you can click the SAVE button on your post and check back later to make sure it’s complete before Publishing.
And finally, if you decide you want to remove the formatting from you text you can do so with the last button which looks like an eraser. It’s called Remove Formatting from Selection. So in the case of the text that I set apart as a quote, if I want to change it back to regular text, I just highlight the text with my mouse and click the Eraser button and it will go back to normal. If you happen to know HTML you can click the HTML tab and work with your blog post code to further customize it. When you’re done just click the Compose tab to go back to regular editing mode.
Once you have everything formatted, you’ve spell checked and you’ve reconfirmed your title, your ready to send it out to the world! Just click the orange Publish Now button and it will immediately be live on your blog. The next window will say Your blog post published successfully! And you can just click the View Blog link to open a new window and see your published post.
Edit your previous posts
Now if you’re like me then occasionally you’re going to want to go back and edit one of your blog postings. And thankfully that’s very easy to do. Just head back to your Blogger Dashboard and next to the blue New Post button which you would click to create another post, you’ll find the Edit posts link. Just click that and you will see the articles you’ve posted with the most recent one at the top. If you wanted to delete the post all together you just go to the right hand side and click the Delete link for that particular post. To edit the post click the Edit link on the far left side of the post title. This takes you write back into Compose mode and you can make any changes you want. When you’re done, just click the Publish button.
Schedule posts to publish in the future
Do you want to write several posts at once, and have them automatically publish one at a time—once a day, once a week, etc? There’s an easy way to set up your posts to publish in the future. At the bottom of the Text box you’ll see a link called Post Options, just click that. This will expand the box and give you some options. Here you can enter the date and the time that you want the post to go live online. Once you’ve typed that in then just click the Publish button. It won’t be live right now, but will be published at the date and time you specified.
When I first started using this feature I kept clicking SAVE and then wondering why my posts didn’t publish at the right time. But you have to click the Publish button even though you’re not publishing at that very moment. It’s a neat feature, and works great when you’re going to be away but want articles to be published each day. Or like when we talked about breaking up a long article into a series of short articles, you could create them all and then set them to publish once a day or whatever time frame you preferred.
Now you probably noticed that you could also check a box in the Post Options for allowing your readers to post comments. But the best place to set that up is under the Settings Tab. So go to your dashboard, and click Settings. This will take you to the Settings tab which offers a lot of options. Click on the Comments menu link and here’s where you can make your selections as to how you would like your readers to be able to interact with you and your blog. Instant communication and connection with your readers is one of the really unique aspects of blogging, and you’ll find that most folks who read genealogy blogs are interested in a civil conversation. So let’s go through the options here.
Show: I usually have this set to show comments. But you can hide them if you want.
Under Who Can Comment? I would recommend that you allow anyone to comment. After all, you don’t want to prevent that long lost cousin who finds your family history blog in a search to not be able to contact you.
For Comment Form Placement that’s just a personal preference, but I find the pop up window is easy for readers to use.
Another important feature among these settings is the Comment message. And then next you’ll find Comment Moderation. I would recommend that you always moderate your comments, at least to start. This means that when a reader leaves a comment you will have the opportunity to read it and approve it to be published in the Comments section of that blog posting. That way you can eliminate offensive comments. Honestly, I’ve never received anything objectionable, but occasionally I do get people who are fishing for business and simply post “I like your blog” so that they can then tell about their company and give their website address. There’s no harm in setting it to Always and you can change it later if you want.
Then at the bottom of the Comments Setting I like to type in my email address so that I’ll be notified by email if someone leaves a comment that needs to be moderated. And you moderate and approve comments in your Blogger dashboard.
When you’re done just click the orange SAVE SETTINGS button. And again, you can change these settings any time you want. So how do you moderate reader comments? Well, just click on the Posting Tab, and there will be three options:
New post
Edit Posts
Moderate Comments – just click that link. And if you have comments that need to reviewed and approved or deleted you can do it there.
Let readers subscribe to your blog
And finally, let’s talk about how your readers can subscribe to your blog. That’s the other really cool thing about blogging. Each of your new blog articles can be automatically sent to your readers who subscribe. It’s just like subscribing to a magazine. We subscribe to a magazine so we don’t have to go to the store every day to check to see if a new issue has arrived. Subscribing to a blog is the same idea but of course it’s free. And like magazines being delivered to your mailbox, blog posts can be delivered to your readers blog Reader, or email box.
Your readers subscribe to your blog through your RSS feed. RSS stands for Really Simple Syndication which just means an easy way to send out your posts. But you don’t have to know anything about RSS feeds. Blogger does it all for you and I’m really surprised how many bloggers don’t bother to make it easy for their readers to subscribe. Not everyone who wants to subscribe to your blog will quite know how to do it, or be an experienced blog subscriber. You will want to make it as easy as possible for them to get started. Here’s an easy way to do it.
Go to http://www.google.com/webmasters/add.html. Here you can add an “Add to Google” button to your blog. That way your readers can easily add your blog to their iGoogle homepage or to Google Reader, a tool they can use to receive and read blogs.
For Choose your content type select RSS.
Under Promoting select one blog.
Select the style of button you want to put on your blog
Type your blog address into the box, which needs to be your rss feed. In my case, it’s http://blogyourfamilyhistory.blogspot.com/feeds/posts/default?alt=rss. You substitute your blog name in where mine is currently (your blog name in that link instead of blogyourfamilyhistory).
Click the Generate HTML button. The html code you need to add your button will automatically appear in the box, and it’s already highlighted for you so all you need to do is Control C on your keyboard to copy the code to your computer’s clipboard, and then head back to your Blog dashboard.
Click Layout.
Click Add a Gadget.
Click the HTML / Java Gadget. A window will pop up where you can type in a title such as “Subscribe to this blog.”
In the big box press Control V to paste the HTML code that you copied into the box.
Click the SAVE button.
Back on your Layout page you’ll see at the top that you the “page element has been added” and now the top gadget is “Subscribe to this blog”
Want to see what it looks like? Just click the blue PREVIEW button at the top and it your blog will open up in a new window and there you will see the “Add to Google” button. Now EVERYONE can subscribe and follow your blog quickly and easily. Just close that window, and click the orange SAVE button on your layout page. Now click View Blog and try it out for yourself.
Note: I talk here about iGoogle, which is no longer available.
Add the blog to Google Reader to receive each new blog post when it’s published, and have a link to click through directly to the articles and the blog. It’s very convenient and keeps your blog on the minds and lists of your readers. Now you’re all set to go. You can post your articles, which your readers can follow. As you have more time you can fine tune the settings and layout of your blog. Have fun! Best wishes for connecting with other researchers around the world.
Blogging Tip:
In response to one of our recent tips, a reader named Sarah pointed out that there are services now to “slurp up” blogs and publish them into books. We’ll tell you about one service, but encourage you to shop around. At Sarah’s recommendation, we looked into Blurb.com. According to Blurb’s Web site, this online program works with several blogging platforms including Blogger, LiveJournal, TypePad and WordPress.com.
You can customize and edit your book in real time. The automatic slurp action imports and maps blog text, images and comments and then links it into professionally designed page layouts. What an exciting way to preserve your family history. What a great Christmas gift or Mother’s Day gift.
Once you are ready to publish your book, you can control the price by buying a hardcover, dust jacket, soft cover and other designs. These books can be up to 440 pages and as few as 40. Have a blog book within 10 days of ordering. Now, as you can imagine, this is a little pricey but still very, very reasonable. Prices start at just $12.95 for a 40-page softcover and go up from there. You get bookmaking software free!
Original air date: 10/1/20 Join me for Elevenses with Lisa, the online video series where we take a break, visit and learn about genealogy and family history.
Google Lens with Lisa Louise Cooke
What is Google Lens?
Google Lens is a free technology that Google says helps you ”search what you see.” It uses the latest in Optical Character Recognition (OCR) and artificial intelligence to accomplish tasks.
In this video and article we’ll discuss where you can get Google Lens and how to use it for a wide variety of tasks.
Hang on tight to your phone and let’s jump in!
Google Lens is in Google Photos
Google Lens is doing much of the work in Google Photos. It can detect the faces in your photos, and allow you to search by face. It can also detect objects and text, making it a super fast way to search the photos and images you store in Google Photos.
If you’re not interested in storing all of your photos on Google Photos, that’s OK. As a genealogist, you could still use it for more strategic purposes. You could use it just for family history photos and related genealogical images like documents and photos of tombstones. All of the content you add can then be quickly and easily searched for and found. It can even help you identify a known ancestor in other photos where you may not have recognized it was the same person.
We will talk about specific ways to use Google Lens in Google Photos. But first, let’s talk about all of the ways you can get your hands on Google Lens.
Where can I find Google Lens on my phone or tablet?
Google Lens is available on most mobile devices but not all. Some Samsung devices don’t currently support it. Here’s where you can find Google Lens.
Google Lens is built into Google Photos – Download the Google Photos app to your phone. Pull up one of your photos and look for the Lens icon at the bottom of the screen. If it is there, your phone supports Google Lens.
Google Lens in the Google Search app – You will see the Lens icon in the search bar if your phone supports Google Lens.
The Google Lens app – On Android devices look for the Google Lens app in the Google Play app store.
Where can I find Google Lens on my computer?
Google Lens is primarily a mobile tool although Google Lens is built into the functionality of Google Photos. (It works behind the scenes – you won’t find a Google Lens icon.)
However, you can use your phone to user Google Lens to capture text and then send it to the Chrome browser on your desktop computer.
Using Lens in the Google Photos App
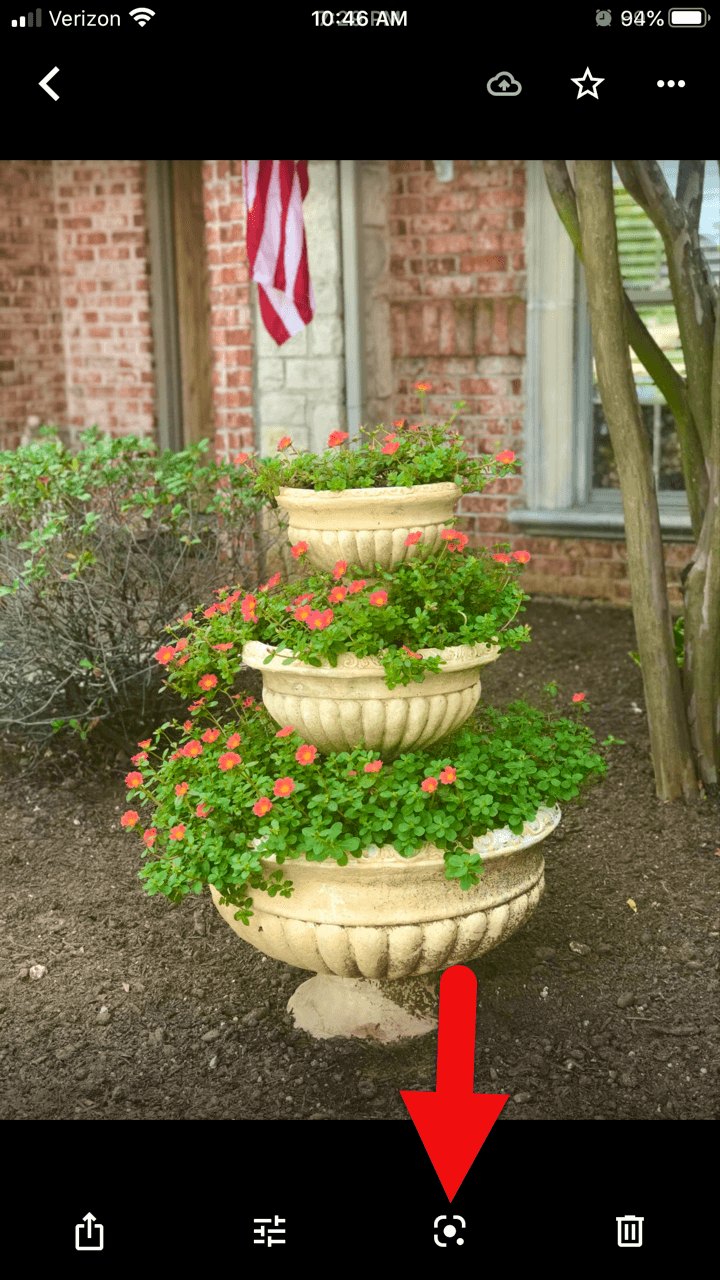
To use Google Lens on your photos in the Google Photos app, you’ll first need to give the app permission to receive the photos you take with your phone. You can then open the Google Photos app and select a photo. In this episode I used the example of a potted plant (Image A below).
(Image A) Google Lens in the Google Photos app
Tap the Google Lens icon at the bottom of the screen and you will receive search results that include the name of the plant, photo examples of the same plant, possible shopping options, and web pages providing more information about that plant.
Here’s another way you can use the Google Lens feature in the Google Photos app:
Take a photo of a business card. (I used Google’s PhotoScan app to do this. The app does a great job of removing glare and other distortions that can occur when you photograph something with your phone. You can download the free Google PhotoScan app from your device’s app store.)
Access the photo in the Google Photos app.
Tap the Google Lens icon.
Lens turns the information on the card into actionable buttons:
Add to contacts
Call now
search on the web
go to the website
Google Lens is in the Google Search app
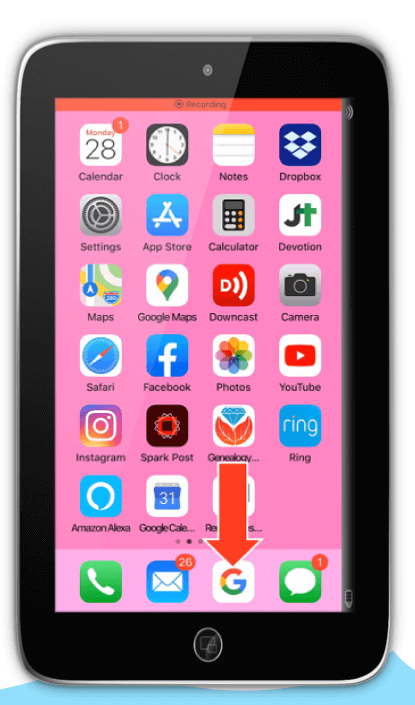
On many mobile devices such as the iPhone (but not all devices) the Google Lens icon will appear in the search bar. If you’re not sure if you already have the Google Search app on your phone, go to the app store app on your phone and search for “Google Search.” You will see the app listed with a button that either says “Open” (because it is already on your phone) or “Install” (because it is not yet on your phone.)
You can also check to see if they app is on your phone by searching for “Google Search” in the search bar of your phone.
Here’s what the Google Search app looks like on a phone (Image B below):
(Image B) Look for the Google Search app on your phone.
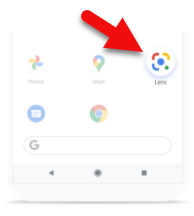
The Google Lens App
If you have an Android phone, search the Google Play store for the Google Lens app. Here’s what the app looks like (Image C below):
(Image C) Android users with phone’s supporting Google Lens will find the app in the Google Play app store.
What Google Lens Can Do
Once you start using Google Lens the possibilities for its use can seem endless. Here’s a list of the kinds of things Google Lens can do:
Shopping
Identify Objects
Copy Text from printed materials or objects
Search for Text on printed material or objects
Solve math problems
Read text to you
Translate text
How to Use Google Lens to Read a Book
Before you buy that next history book or go through the trouble of requesting it through inter-library loan, why not let Google Lens determine if it is already available for free online? This next tip works really well for old books that are likely to be in the public domain or printed before 1924.
Open the book to the title page
Open the Google Search app on your phone
Tap the Google Lens icon
Hold your phone over the title page
Tap the search button
If the book is available on Google Books, the title will appear along with a blue “Read” button
Tap the “Read” button to access, read and search the book on Google Books for free!
(Image D) Point your phone’s camera or Google Lens at the QR code
Open the camera on your phone and point it at the QR code above (Image D) to be taken to the book in the Genealogy Gems store. Use coupon code LENS to get 20% off!
One of the advantages of tuning into the live broadcast of each Elevenses with Lisa show is participating in the Live Chat and asking your questions.
From Rosalyn: Lisa are the old photos hanging on your wall the originals or copies? They are very nice. Lisa’s Answer: I always put copies in frames when I hang them on the wall because light can fade originals. They are all my family.
From Jn Rollins: Does it do the same identification for birds? Lisa’s Answer: I haven’t snapped a photo of a bird, but I’m sure it could. I used it on a photo of a bird, and it identified it perfectly.
From Susan: I have to download an app to get the lens icon? Lisa’s Answer: If you have an Android phone, you may be able to download the free Google Lens app from your app store. Otherwise, you will find the icon in the Google Search app or the Google Photos app on supported devices.
From Patriva: Is Google Go the same as Google Search? Lisa’s Answer: Google Go is a “lighter faster” search app. I think it may be geared more toward Samsung devices. I have a Samsung Tab and it doesn’t support Google Lens.
From Carrie: Does this work with the Google Chrome app? Lisa’s Answer: The Chrome app doesn’t have the Google Lens icon.
From Jn Rollins: I installed Lens a while ago on my Android phone, but when I open Google search the lens icon doesn’t appear next to the microphone icon. How can I change that? Lisa’s Answer: Some Android devices (like Samsung phones) don’t support Google Lens so you won’t see the icon. Check the app store to see if they offer the Google Lens app for your phone. However, I’m guessing it probably won’t be offered since it sounds like your phone doesn’t support Google Lens.
From Christine: I love this technology for speeding up research! But I have some reservations—what privacy are we giving away? How will Google use our search history? Lisa’s Answer: I would not use Google Lens for anything I consider “sensitive.” Go to the privacy settings in your Google MyActivity to learn more.
From Lynnette: Can you put the text into Evernote easily? Lisa’s Answer: Absolutely! Tap to copy the detected text, open an Evernote note, press your finger in the note and tap Paste to paste the text.
From Colleen: I see you are google searching. Does doing this with photos allow others to access my google photos when searching for an item? For example, the example you used with the purse? Lisa’s Answer: To the best of my knowledge your photos are not searchable by others online. However, it is possible that Google uses the image internally to “train” the machine learning. Go to the privacy settings in your Google MyActivity to learn more.
From Christine: Lisa, can this be used to compare photos to determine if they are the same person? Thanks for sharing all your wisdom! Lisa’s Answer: Yes! Watch my Premium membership video called Solving Unidentified Photo Album Cases.
From Caryl: Don’t know what a symbol is on a headstone? Now this would be oh so helpful!! Lisa’s Answer: Yes, indeed!
From Susan: I quickly took a photo of the book cover, so now I can get your book! Is it better to buy directly from you or go to Amazon? Lisa’s Answer: The book is available exclusively at my website: https://www.shopgenealogygems.com
From Debbie: Will FamilySearch’s app be independent, or will it work / integrate with Google? Lisa’s Answer: FamilySearch would not be integrated. However, as handwriting technology is developed I’m sure you’ll find it in use in both places.
Please Leave a Comment or Question
I really want to hear from you. Did you enjoy this episode? Do you have a question? Please leave a comment on the video page at YouTube or call and leave a voice mail at (925) 272-4021 and I just may answer it on the show!
If you enjoyed this show and learned something new, will you please share it with your friends? Thank you for your support!
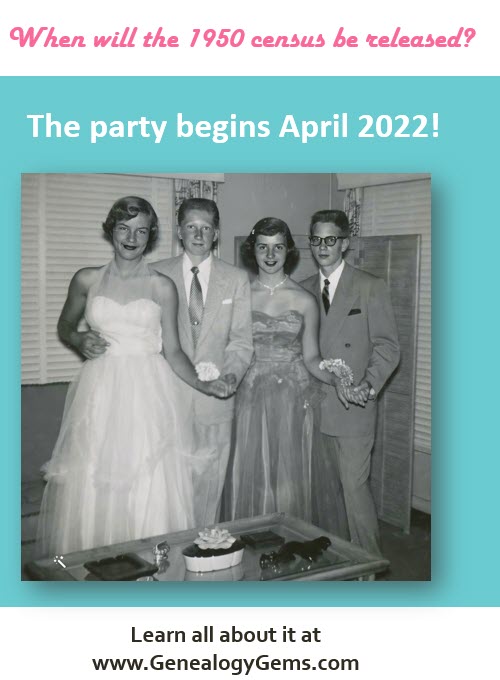
The census is the backbone of genealogical research. Here in the United States it gives us a cohesive look at our ancestors every 10 years between 1790 and 1940. And now there is a new census on the horizon!
The 1950 census is an exciting one because it may include your great grandparents, grandparents, parents and perhaps even you! It will provide opportunities to confirm some of what we already know and clues for new research.
This week brings us to the one year mark before the release of the 1950 census in April 2022. Now is the perfect time to familiarize ourselves with it and start preparing. In this free webinar on the Genealogy Gems YouTube channel we’re going to do just that! In Elevenses with Lisa episode 51 you will learn:
the interesting and little known stories behind the 1950 census,
what it can reveal about your family, (and who you will NOT find!)
the important documents associated with it that you can access right now!
Get the HD version by clicking the gear icon in the video player.
1950 Census Show Notes Cheat Sheet
Premium Members have access to the ad-free downloadable show notes cheat sheet in the Resources section at the bottom of the page. Click here to become a Premium Member.
What You Can Learn About Your Family from the 1950 Census
The 1950 Census may be able to answer all kinds of questions for you such as:
Where was your family living in 1950?
Did you have American relatives living abroad?
What did your relatives do for a living?
What was their household income in 1949?
The 1950 census also stands out because it ushered in some new features and data collection improvements with the goal of providing more complete and accurate information than ever before.
This census can help you confirm information you already have about your family while also providing new facts and clues for further genealogical research.
So, let’s dig into the 1950 US census. Oh wait…we better hold our horses! The 1950 census isn’t available yet!
When will the 1950 census be released?
The official census day in 1950 was April 1. So as of April 2021 we are one year away from the release of the 1950 Census. However, it’s never too soon to get acquainted with this important genealogical record. There’s a lot we can do to get ready to research when it’s released by the National Archives in April 2022. That will be 72 years after the official 1950 census day.
So why don’t we get to see the 1950 census until 72 years have passed?
The “72-Year Rule” became law in 1978 (92 Stat. 915; Public Law 95-416; October 5, 1978). It restricts access to decennial census records to only the person named on the record or their legal heir.
Why is there a “72-Year Rule” for the Census?
It’s long been believed that the rule was based on the average life-expectancy at the time. However, that may not be the case at all. Letters at the National Archives dating back to 1952 from the census bureau director and the archivist of the U.S. support the rule, but don’t say what it’s based on. Joel Weintraub’s essay Why the 72 Year Rule for U.S. Census Privacy? proposes that the rule evolved for a variety of reasons when the National Archives was first created.
The bottom line: For now, we have to wait until 2022 for the 1950 U.S. Federal Census.
Who was counted during the 1950 census?
In addition to Americans living here in the States, for the first time Americans abroad were enumerated in 1950. This included:
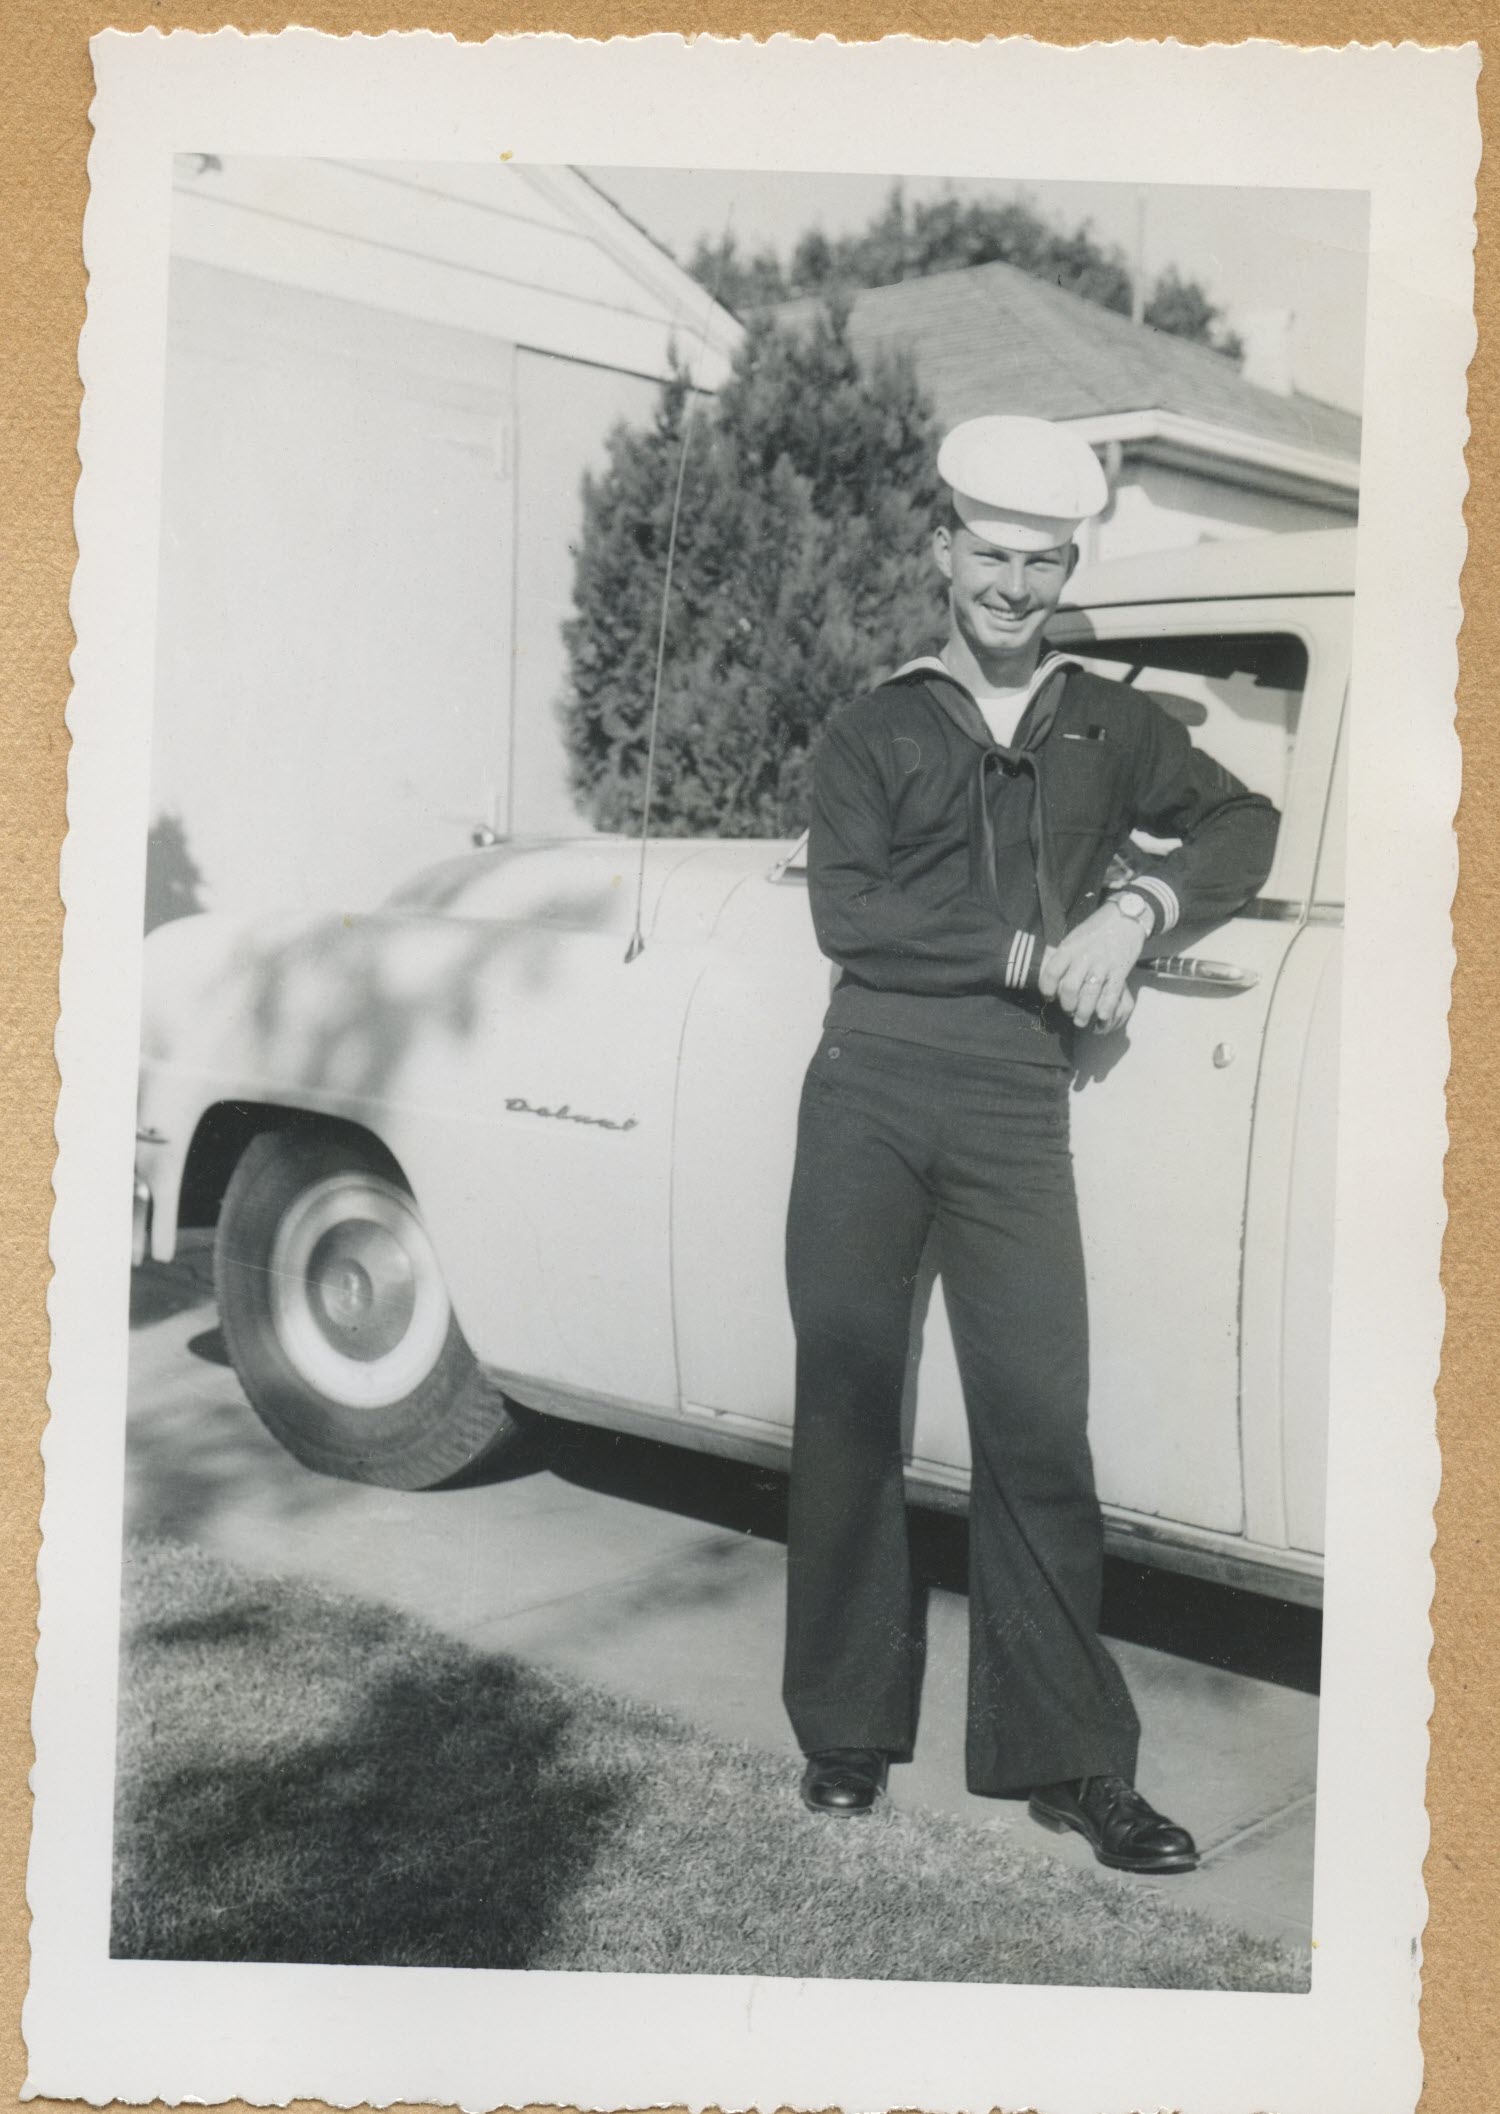
members of the armed forces,
crews on vessels at sea,
and employees of the United States government and their families living in foreign countries.
Sailors and soldiers serving overseas were counted in the 1950 census.
Be aware that there were other people living abroad at that time who didn’t fall within these official categories. In those cases, they were to be reported by their families or even neighbors who lived in the U.S. This was clearly second-hand information which means that the information wasn’t as reliable. In fact, so much so that these individuals weren’t included in the published statistics. Keep this possibility in mind if you have trouble locating a relative when the census comes out.
What Questions Were Asked in the 1950 Census?
The 1950 population census questionnaire asked for information such as:
Address;
whether their house was on a farm;
name;
relationship to the head of the household;
race;
sex;
age;
marital status;
birthplace if they were foreign born,
whether or not they were naturalized;
their employment status;
how many hours they worked in a week;
occupation,
industry,
and class of worker.
The information provided by your ancestors has the potential to lead you to more genealogical records.
Geographic Areas Covered in the 1950 Census
So where were all these people living? The 1950 census covered:
the continental United States,
the territories of Alaska and Hawaii,
American Samoa,
the Canal Zone,
Guam,
Puerto Rico,
the Virgin Islands of the United States,
and some of the smaller island territories.
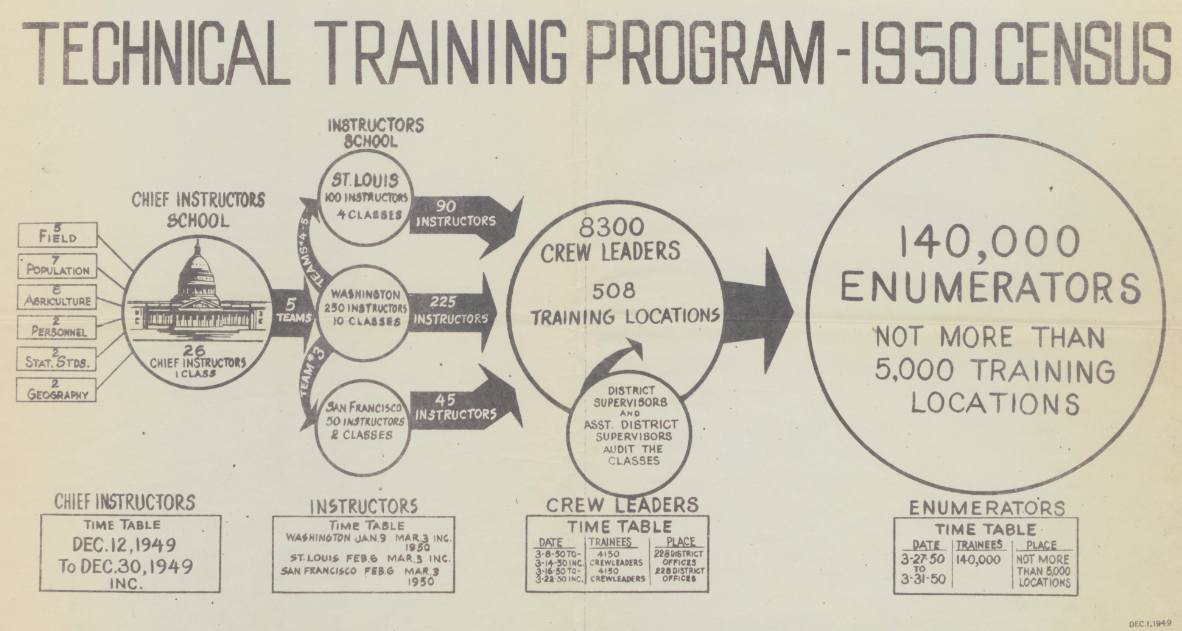
1950 Census Enumerators
In 1950 the population of the United States was about ½ of the population today. But it still took a lot of people and organization to count 150 million people. The people doing the counting are called enumerators. These enumerators came from all walks of life and had to be trained so that everyone got counted with the fewest mistakes possible. A technical training program was developed to accomplish this goal. 26 chief instructors would teach a few hundred instructors to train 8300 crew leaders who would ultimately train over 140,000 census enumerators.
The 1950 census enumerator training program. (Source: census.gov)
1950 Census Enumeration District Maps
You may be wondering ‘how did the enumerators know where to go to count people?’ The answer is Enumeration Districts or EDs. The geographic area to be covered by the enumerator was divided up into Enumeration Districts. These ensured that enumerators were not crossing paths and duplicating efforts. EDs were just the right size so that the census taker could cover the area in one census period, which was about 2-4 weeks.
Enumeration District maps were drawn for the 1950 census. These are important for your genealogy research because they:
describe your ancestors’ neighborhood in 1950
are essential for figuring out where to find your ancestor in the census.
don’t fall under the 72-year rule, which means that they are available now.
It takes time for the entire census to be indexed. If you want to start using it as soon as it’s released, you will need ED maps. You’ll need to know where your relatives lived so that you can find the address on the ED map. The map will provide you with the associated ED number. This number is needed to search the unindexed census.
There are 8000 ED maps for the 1950 census that have been digitized. You can find them at the National Archives website in Record Group 29: in the series called Enumeration District and Related Maps 1880-1990.
An alternative place to find 1950 Enumeration District maps is the One-Step Webpages by Stephen P. Morse website. It’s not only an easier way to find the correct map, but it includes maps not found on the National Archives website. It’s also worth reading the essay on the website called Problems Using 1950 Enumeration District Maps. It will help you better understand how to use the maps.
Up until 1870 the job of census taker fell to the U.S. Marshals. The U.S. Marshalls received very little in the way of instructions or training. It wasn’t until 1830 that they even got printed schedules to record the information given by each household! That all changed with an act of congress passed in 1879 that shifted the job to people specifically hired to be enumerators. This was just in time for the 1880 census.
By 1950, 140,000 census enumerators hit the field armed with their Enumeration District map showing them where to canvas, and a lengthy set of instructions that they received during their training. In fact, 1950 was the last time that the census was taken exclusively in person because in 1960 the Census Bureau started mailing out questionnaires.
The 1950 census enumerator instructions are available for free as a downloadable and searchable PDF file. It’s 24 pages of specific instructions designed to help enumerators record the information they gathered.
The enumerator instructions are important for you as a researcher because they explain what you’re seeing on the census page. If we see a mark or a notation, or a field left blank, the instructions will explain why the census did it that way. If we understand the why behind the information we find we will be much more likely to interpret it correctly.
An example of this can be found in the 1940 census. You’ve probably noticed X’s in circles scattered about the pages. On a map that could be misinterpreted as there’s buried treasure in that house! But alas, it doesn’t. Only the census enumerator instructions can help us really understand their true and important meaning. The 1940 census enumerator instructions state “Enter (X in a circle) after name of person furnishing information.” This helps us better determine the validity of the information provided for each individual in the household.
Who Was Not Counted in the 1950 Census?
The instructions for the 1950 census also includes a list of those people who were not to be enumerated, such as:
People temporarily visiting the household
Foreign citizens visiting embassies and similar facilities. Do enumerate foreigners who are studying or working here temporarily.
Students below college level who are boarding to attend school locally.
College students visiting but who live elsewhere to attend school.
People who eat with the family but don’t sleep there.
Domestic workers who don’t sleep in the household.
Household members who are currently an inmate in prison or other institution.
Ship crew members or people who live in lighthouses
Absent Soldiers and sailors
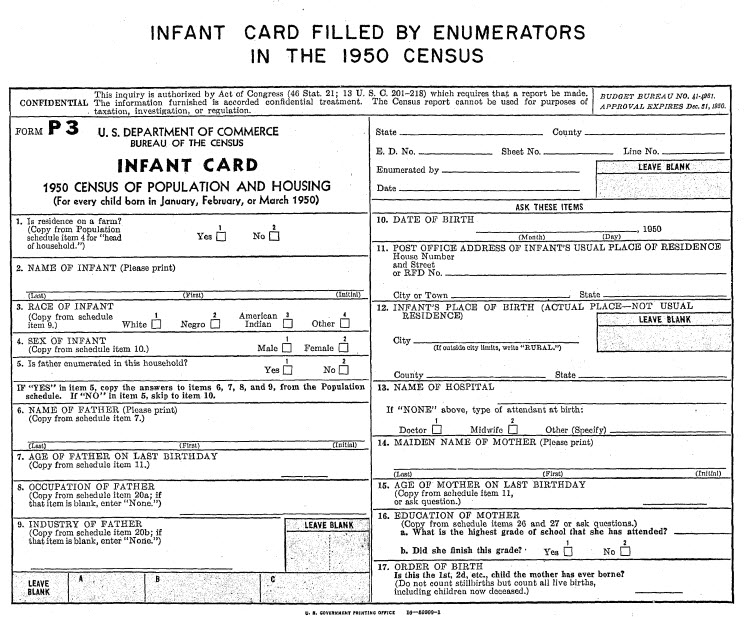
What are 1950 Census Infant Cards?
There’s also an entire page in the instructions devoted to explaining what Infant Cards were and the information they were to contain. If you have relatives who were born in January, February or March of 1950, they would have had a special Infant Card completed just for them. Learn more: Download the infant card PDF
1950 census infant card.
How Accurate is the 1950 US Census?
Several procedures were put in place in an effort to dramatically improve the accuracy and completeness of the 1950 census. These included:
improved enumerator training,
providing enumerators with detailed street maps of their assigned areas,
publishing “Missed Person” forms in local newspapers,
and setting aside specific days to conduct a special enumeration of people staying in hotels, motor courts, and other places frequented by transient people.
Also, in an effort to ensure greater accuracy and completeness, a post-enumeration survey was instituted for the first time. The Census Bureau recanvassed a sample of approximately 3,500 small areas and compared these to the original census listings. The goal was to identify households that might have been omitted in the original enumeration. They also took a sample of about 22,000 households and reinterviewed them to determine the number of people who might have been missed in the first count.
How Were Transient People Counted in the 1950 Census?
The challenge of counting people is that people can move around. This means they could be counted twice, or the genealogist’s nightmare: not counted at all!
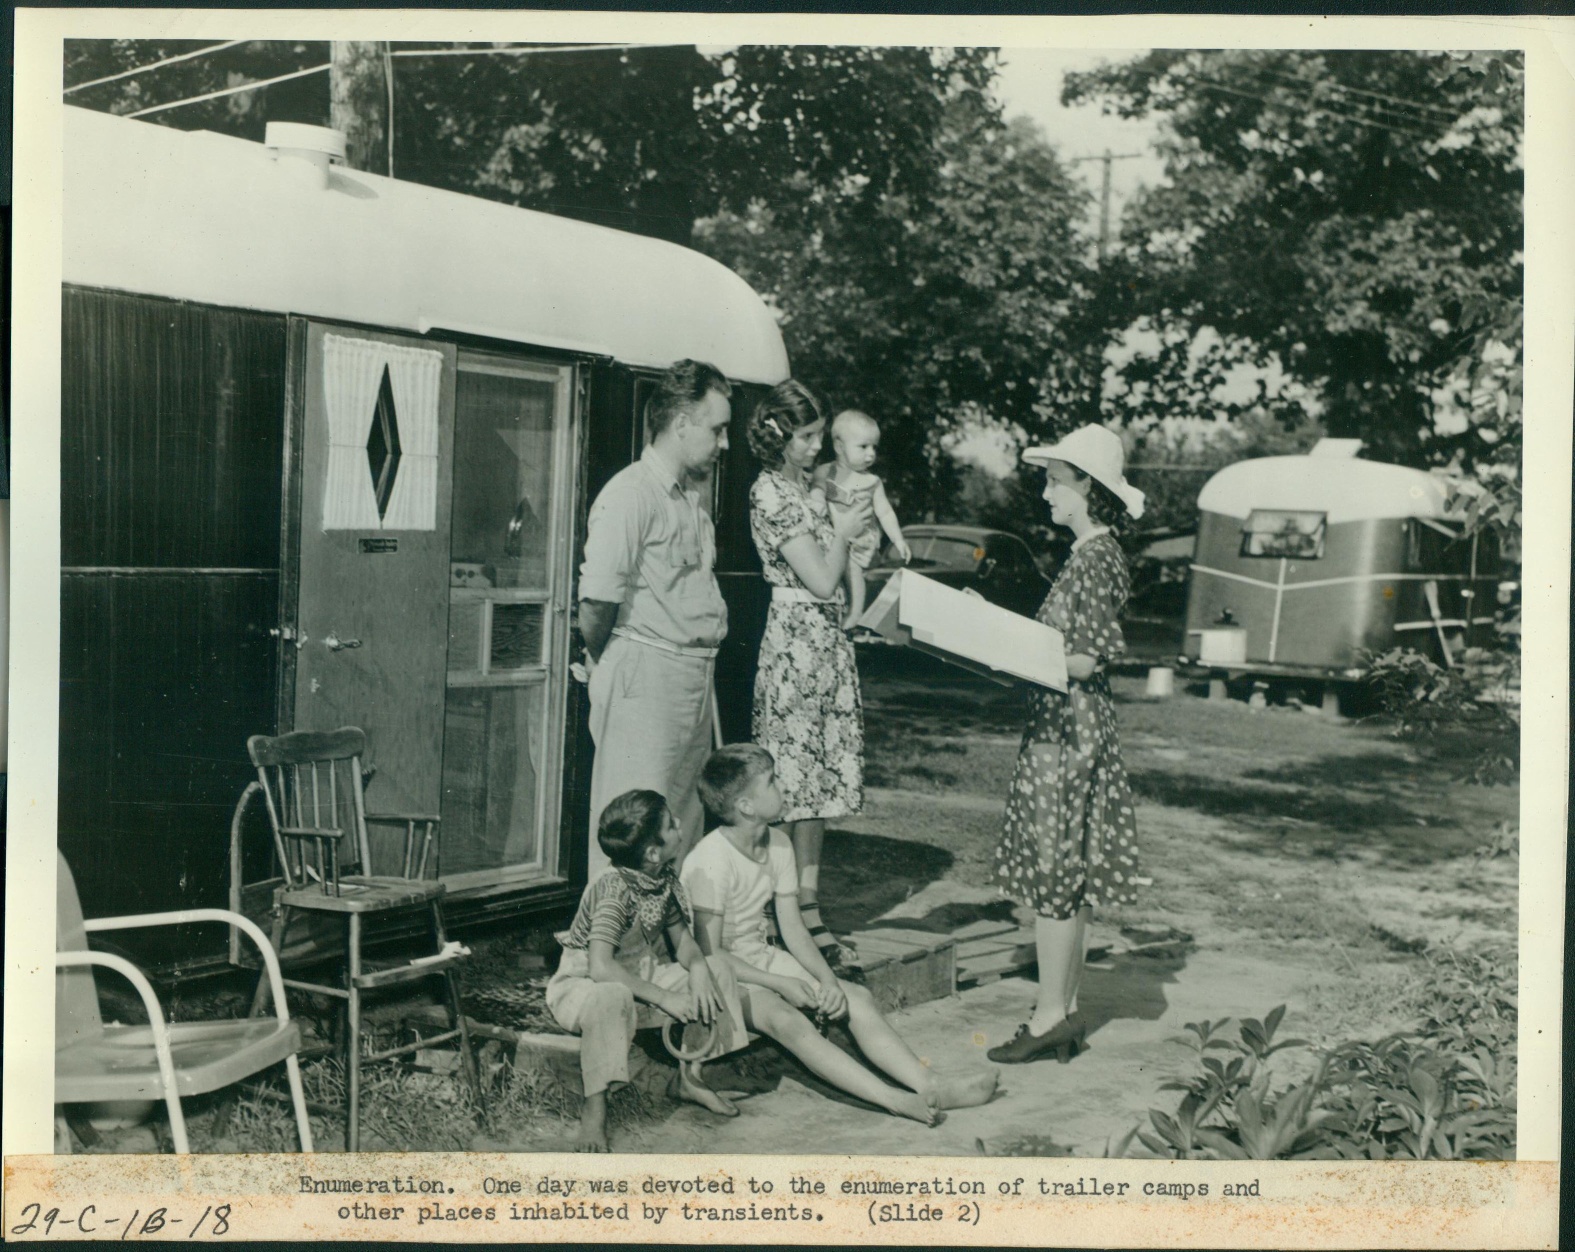
The solution to counting transient people in the 1950 census was T-Night canvasses. The “T” stood for “transient” and they were held on Tuesday April 11 & Thursday April 13, 1950. They were designed to provide a more accurate count of people who did not have a fixed address or were temporarily away from home.
“Transient” enumerations were conducted on specially designated days in 1950. (source: census.gov)
Tuesday, April 11, 1950 was the date for “an intensive drive to cover in a single night the occupants of certain places usually devoted to transients” such as hotels, YMCAs, and tourist courts or camps (campgrounds). Young men were moving to the city from rural areas, and the YMCA (Young Men’s Christian Association) was a popular, safe and affordable place to stay. By 1940 YMCA room across the country totaled more than 100,000.
According to the instructions, enumerators were to visit these facilities from 5 p.m. to 11 p.m. on Tuesday evening and again from 7 a.m. to 12 noon the next day. On Thursday, April 13, 1950 enumerators turned their attention to missions and flophouses. T-Night enumerators assigned to these facilities were to “station themselves at the main entrance or the lobby of the place” and instructed to interview guests, resident staff and employees personally.
Another unique feature of T-Nights was that enumerators used the Individual Census Report Form (ICR). In an unusual move, it was completed by the person being counted instead of by the census taker. This ensured privacy for the informant since census interviews often had to be conducted in hallways or a room with other roomers. Thanks to the 1950 census enumerators working the hotel lobby, asking guests passing through if they had already completed an ICR, calling up guests on the house phone and working with staff on identifying those checking in, there’s an even better chance that we will find our family members in the 1950 census.
What Does “REG” mean on the 1950 Census?
Even after all of this extra effort, some people never completed the ICR form. In those cases, the enumerator would fill out the ICR on information taken from the hotel register. The entry on the census would be marked “REG” indicating that the information came from the hotel register.
The 1950 Census Residential Survey
A new feature of the 1950 census was the Residential Survey. In a separate surveying effort, information was collected on a sample basis from owners of owner-occupied and rental properties and mortgage lenders.
1950 Census Technology Trivia
According to the National Archives, “The Census Bureau began use of the first non-military computer shortly after completing the 1950 enumeration. UNIVAC I (for Universal Automatic Computer), the first of a series, was delivered in 1951, and helped tabulate some of the statistics for the 1954 economic censuses. It weighed 16,000 pounds and used 5,000 vacuum tubes.”
5 Things to Do While Waiting for the 1950 US Federal Census
Looking for something to do now while you wait for the 1950 census? Here are just a few things you can do while you wait:
1. Review your family tree. Make a list of those families you want to look up. And look for gaps and questions that might be able to be answered using the 1950 census.
2. Look for 1950 family addresses.
Old letters
Diaries
Scrapbooks
Ask Relatives
City directories
Vital Records
Occupational records
Newspapers
Social Security Records
1940 census addresses
3. Use the One-Step website to find Enumeration District Numbers
Enter the state and town to retrieve the map
Find your ancestor’s address on the map
Make note of the ED number written on the map for that address
Note: The One-Step website includes some maps not found at the National Archives!
4. Download the Enumeration District Map for your Ancestor’s Home Again, you can access the maps through the One-Step website or the National Archives website. These are excellent research resources to have on hand. They can be used to create map overlays in the Google Earth Pro software. Step-by-step instructions for doing so can be found in my book The Genealogist’s Google Toolbox and my downloadable video tutorial series Google Earth for Genealogy.
5. Check out the 1790 through 1940 census records online at the National Archives. Census records can be found at many popular genealogy websites. The National Archives has a great resource page listing each decennial census and the associated online resources including where census images are hosted and searchable for free or on subscription websites. It also includes additional resources and background on each census taken.