In Elevenses with Lisa episode 79 Lisa Louise Cooke explains:
How to find 1950 US Census Enumeration District (ED) Maps
The purpose behind them and how to interpret the maps
Ways to use the maps for your genealogy
This is a follow up to episode 51 on The 1950 Census for Genealogy. In that episode I discussed the importance of finding your ancestors’ enumeration district numbers in order to be able to find them when the digitized images are released (before the index is available.) In this episode I will walk you through how to locate the enumeration district (ED) number and then find the actual 1950 US Census ED map. We’ll wrap things up with a quick update on the release of the 1950 US Federal Census.
Episode 79 Show Notes
(Get your ad-free Show Notes Cheat Sheet at the bottom of this page in the Resources section.)
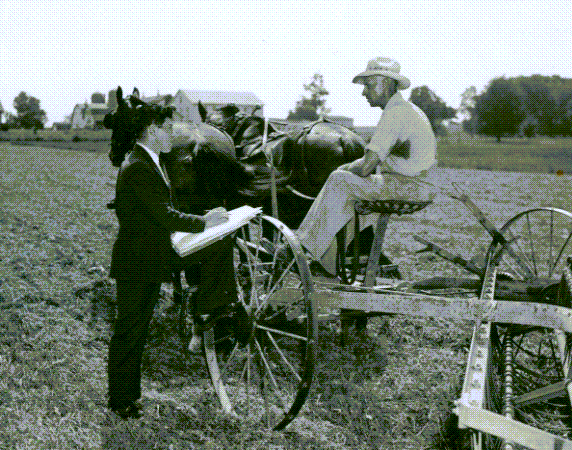
As I mentioned in Elevenses with Lisa episode 51 The 1950 Census for Genealogy, prior to 1880, U.S. Marshalls were the enumerators for the federal decennial census. Starting with the 1880 census enumerators were hired and they were each assigned an enumeration district, also known as an ED. These districts had to be mapped out so that the enumerators knew the area they were responsible for counting. Therefore, maps are drawn in anticipation of each census being taken, including the 1950 census.
Learn more by watching episode 51 on the 1950 census.
About the 1950 US Census Maps
It’s always important to understand the purpose of a record or source, and the 1950 Enumeration District maps (ED maps) are no exception. Unlike most maps where it’s all about accurately drawing up the current roads and geographical features, census ED maps are drawn up for the purpose of defining boundaries for the purpose of counting people. This means as we look at ED maps we need to keep a few things in mind.
The first thing to understand is that the 1950 ED maps were not necessarily up-to-date with the lay of the land in 1950. Not all streets, parks and features will be included. The reason for this is that the maps themselves were not created for this purpose. Existing maps were used and then enumeration district boundaries were drawn on them.
Maps came from a variety of sources including but not limited to county and City Planning Commissions, 1940 census bureau tract maps, and city engineers. In fact, from a mapping perspective the variety of maps in the collection are fascinating.
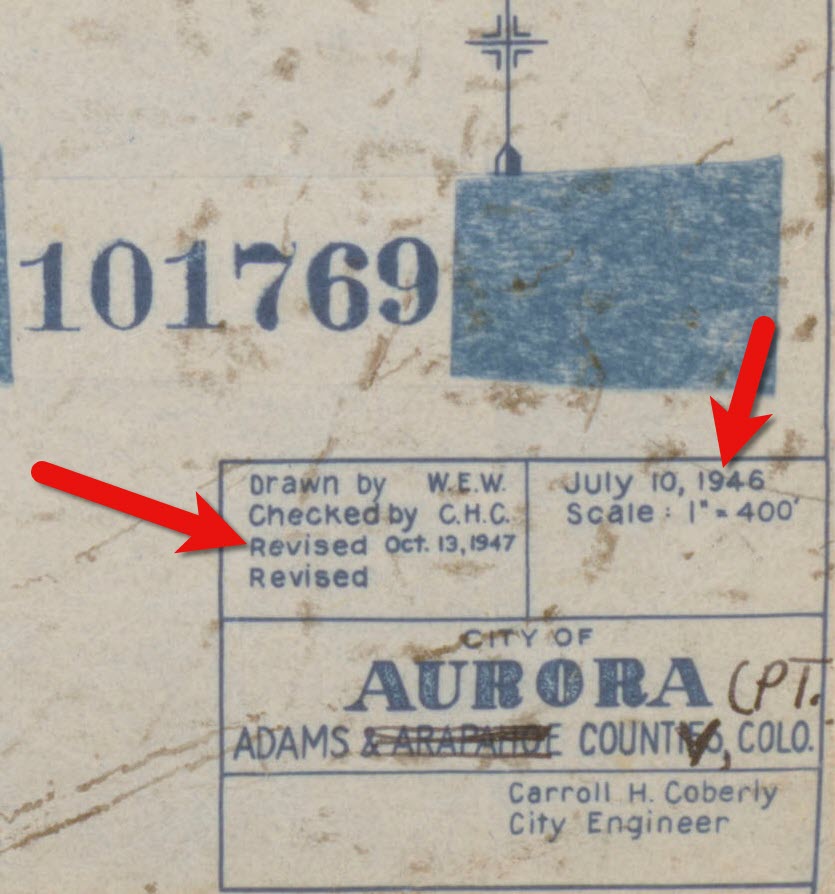
Look for the map title, description, legend and census stamps typically found in one of the corners. In this example (see image) from Aurora, Colorado the map used was originally created by the city engineer in 1946 and was revised in 1947.
1950 census map of Aurora, Colorado (Source: National Archives)
Following the end of World War II, the United States was growing at a quick pace in 1950. This is particularly true of the newly emerging suburbs. Therefore, if your ancestors built a new home in a new development in 1949, don’t be surprised if you don’t see the street on the 1950 census ED map. However, rest assured that the maps still hold value for your family history as they provide many interesting and unique details about the area surrounding your ancestors’ homes.
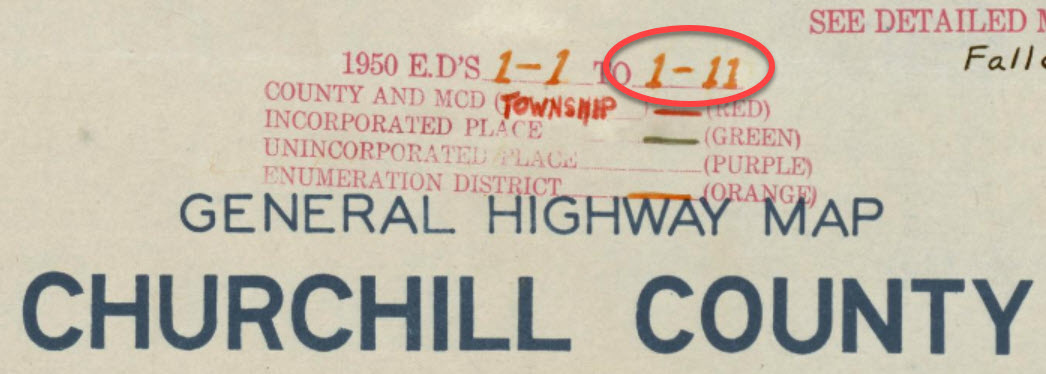
Each map was stamped with a small legend where the meaning for each of the colored lines drawn could be indicated. From my random sampling of 1950 census maps across the United States it appears that the coloring coding was consistent as follows:
Red = Township
Green = Corporate Limits/Ward
Orange = Enumeration District
Expect to see errors, inconsistencies and omissions in the maps. The more rural the area the more likely the map was compiled from several sources by the Census Bureau cartographers. This compilation created more opportunity for errors, and often used older maps.
Source: National Archives
The Meaning of Census Enumeration District Numbers
A census enumeration district number is made up of two numbers separated by a dash. The first number (in this example: 1) represents the county/region. The second number represents the area within the county that could be covered by an individual census enumerator within the amount of time provided for taking the census, about 2-4 weeks. The official start of the 1950 US Federal Census was April 1, 1950.
Census enumeration district (ED) numbers on a 1950 census map.
How to Find 1950 Census Maps
Some 8,000 census maps have been digitized and are available at the National Archives. However, the National Archives website can be challenging to navigate. I recommend using the Unified 1880-1950 Census ED Finder Tool at Steve Morse’s website.
1. Go to https:/stevemorse.org
2. In the menu in the upper left corner hover over US Census and in the secondary menu click Unified 1880-1950 Census ED Finder
3. Select the state from the first drop-down menu.
4. Next select the county.
5. Then select the city.
6. You will then see many enumeration district links listed. In order to find the right one for your ancestor’s home, enter the house number and select the street from the next drop-down menu. Don’t worry about directional parts of the address like west or east unless they are offered in the list of street names.
7. As soon as select the street name, the list of ED numbers should be reduced. In this example we are down to three.
8. To further reduce the possible ED numbers, we can select Cross or back street on same city block. If you’re not sure what the neighboring streets are, click the see Google Map This will plot the address you entered into Google Maps where you can then find the closest cross street, and the next streets over. If the address is not precisely marked on the map, check the address that appears in the Google Maps search box.
In my case, the One-Step tool didn’t allow me to specific W. Arcade, so Google Maps just gave me the general area, and not the address. By adding the W. to the address and pressing enter on my keyboard Google Maps was able to precisely plot the location. Now we can make note of the closest cross street (ex. N. Center), the street north of the address (E. Monterey Ave.) and the street south of the address (W. Noble St.)
9. Head back to the Unified 1880-1950 Census ED Finder page and enter each nearby street (you can enter multiple.) This should reduce the ED numbers one. This is the ED that includes your ancestor’s address.
How to Find 1950 Census Maps
1. Make note of the ED number, and then go back and click the button that says See ED Maps for ____________ County. You could have clicked this button without going through the process of locating the ED number, but the ED number makes it much easier to find your ancestor’s home street on the map. This number will also assist you in being able to find your ancestors in the 1950 census before it is indexed.
2. You will now be on the Viewing 1950 Enumeration District Maps in One Step Re-enter the city from the drop-down menu.
3. Click the Get ED Map Images You will receive two links. The first link is Links to NARA viewer will take you to the page on the National Archives website which includes all of the information about the map and the record hierarchy. Source citation information can be gathered from this page.
5. Click the second link called Direct links to jpegs on NARA server. This will take you to the image by itself as hosted on the National Archives website. I find this the easiest way to save the full resolution image to my computer hard drive. On my PC I right-click on the map and select Save Image As.
This page is also important if you want to use this image in another program such as Google Earth. The URL for this page is the direct URL to the image. Notice that it ends in .jpg. This means that it is the image alone, and this link can be used to create a custom map overlay in Google Earth. You can see an example of a custom map overlay in my video Create a Family History Tour with Google Earth Pro at the 06:13 mark.
These days we are all collecting more ebooks than ever before. We also have more devices than we’ve ever had before. Here’s a solution that gives you access to your ebooks from one convenient location no matter which device you are using.
The Advantage of eBooks
While you may love the feel of the pages of a book rifling through your fingers, there is a distinct advantage to collecting many of your genealogical reference materials and books ebooks. They don’t take up precious shelf space in your house!
However, I don’t live in a digital fantasy-land. I’m keenly aware that there are some challenges you may want to avoid:
purchasing an ebook and downloading it to one device, and then trying to figure out how to access it on your other devices
corralling your ebooks from different sources all together
having to pay for an app or web service to manage them
Don’t Reinvent the Wheel
If you’ve ever attended one of my genealogy classes, or watched one of my videos, at some point you’ve probably heard me say that I use Google Books on a daily basis for genealogy. I don’t say that just because the service provides access to over 25 million books, many of them fully digitized and searchable, and downloadable. It also provides you with your own personal library. Let’s take a look at how Google Books and Google Play Books work together to make that possible:
Google Books is a free and powerful service that also allows you to have your own library within it called My Library. As you search for and find ebooks to aid you in your genealogical research, you can save them to your library.
Google Play Books, is sort of the other side of Google Books. It is a vast ebook store that includes a feature called My Books. When you purchase an ebook, it is saved to your My Books. However, it also includes all ebooks that you have saved to your Google Books My Library. Even better, it allows you to upload your own ebooks! This makes it a central clearinghouse for all of your ebooks.
Here’s the bottom line. Think of My Books and My Library as the same thing in two different places: a personal library for your free, purchased and uploaded ebooks. The only reason they have different names is because Google Books has evolved over time into a book store as well. Don’t worry about that. Just know that whether you are searching through Google Books, or shopping in the Play book store, your library is right there with you, no matter what device you are using.
How to Start Using your Google Play Books Library
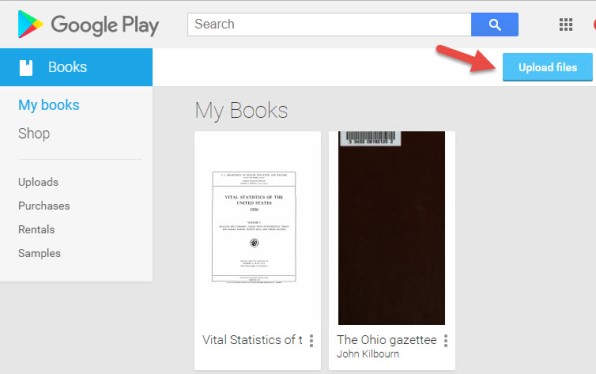
To get started, all you need is a free Google account, which you very likely already have. Go to https://play.google.com/books and sign in. In the menu on the left, click My Books. If you have ever saved a free ebook to your My Library in Google Books you should now see it on your screen.
This library is a place where you can save, upload, and access your digital books from any mobile device. This means everything is conveniently in one place, and accessible from all of your computing devices, both Apple and Android. You’ll have the freedom to read your favorite books on the go, and to access your digital genealogy research library at the drop of a hat.
Yes, there are some other services out there that could also do the job. But if you’re like me and don’t want to invest the time to learn and pay for yet another tech tool, Google Play Books is a great solution, because we are already using Google Books for our genealogy research.
How to Upload Your Own eBooks to Your Google Play Books Library
Let me walk you through the simple steps to putting this free tool to work for you:
1. First, open your web browser and log in to your Google account.
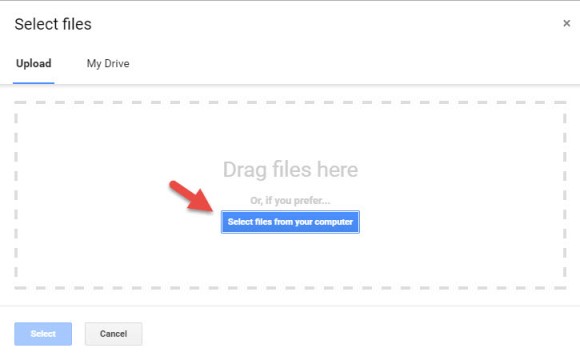
4. Select your ebook files from your computer folders, or drag them into the box shown. You can also click on My Drive to select files from Google Drive. You can choose epub documents or PDFs.
Now, let me stop right here for a second and distinguish between doing this on a computer, and doing it on a tablet or smartphone. What I’m illustrating here is on a computer. I always recommend when you purchase ebooks to download them first to your computer, regardless of whether you plan on uploading them to Google Play Books. However, if you do want to do this on a tablet, for example, there are currently two options from which to pull your ebooks:
“My Drive” which is Google Drive, or
click “Select files from your computer” then tap “More” and select Dropbox.
Trust me, things will work more smoothly if you use your main computer as your hub for downloading, and then upload directly to your Google Books library.
Other things that are good to know:
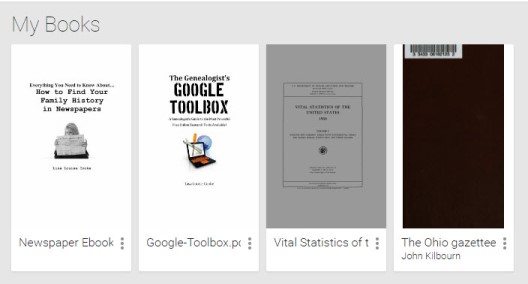
It may take a minute or two to upload an entire book.
The cover will be the title page, not the actual dust-jacket cover you might be used to.
Currently, you can only search within books you obtain from Google (both free and paid), not the ones you upload.
You can upload 1,000 books into your Google Play Books library.
It’s private. Your books are only visible to you when you login to your Google account; you’re not sharing them with the world.
Your Google Books Library on Your Mobile Device
So now you have found free historical ebooks on Google Books (if you haven’t, take a moment and click here to read my article about using Google Books) and saved them to your Google Books My Library. Then, you uploaded your own ebooks and PDFs to Google Play Books. The final step is to jump on all of your smartphones and tablets and head to the app store. Search for Google Play Books and download the free Google Play Books app to each device. Sign in to the app with your same free Google account, and you’ll have access to all of your ebooks. Your library can now travel with you in your purse or tucked into your pocket.
In the app, tap the three horizontal lines icon in the upper left corner, and then tap My Library. You’ll find your ebooks sorted under the following tabs:
All Books
Purchases
Uploads
Samples
By tapping the three uneven horizontal lines icon in the upper right corner, in each category you can sort your books by:
Recent
Title
Author
Those Pesky Variable Formats
eBooks come in several different formats. While I’m not covering in this article how to convert file types or deal with DRM protected books, there are resources available to help you do so.
The answer? Just Google It!
And if you need help figuring out how to effectively Google search, I have a book for that!The Genealogist’s Google Toolbox–the ultimate guide to using all of Google, including a full chapter on Google Books.
PDF – I Love You!
Many white-papers, scholarly works, and quick reference guides come in PDF format, and they upload like a breeze.
PDFs are so versatile, and they play ever-so-nicely with Google Play Books. It’s just another reason to love your Google Books library.
Stock Your Google Books Library
Are you feeling like your Google Books Library has room to fill? All of our quick reference guides are easy-to-upload PDFs, and all of the following genealogy resources are available as digital downloads in the Genealogy Gems store:
For a hand-picked list of novels and other great leisure reading for genealogy lovers, visit the Genealogy Gems Book Club page. I know you’re going to love our suggested best-sellers and best-kept-secrets about family, the search for identity, and fascinating stories in history.
Elevenses with Lisa is our little slice of heaven where friends get together for tea and talk about the thing that never fails to put a smile on our face: Genealogy!
The National Archives is a wonderful resource of unique genealogical records. Though the archives are closed, the website is open, and it’s a great place to search for records and prepare for future genealogy research trips.
The National Archives website and online catalog can be a bit mystifying. If you’ve ever tried to search it and wound up frustrated, you’re not alone. This is often the case because the nature of the archives and the search function of the online Catalog are not genealogically focused. Armed with an understanding of how and why it is set up the way it is, and the know-how to search, refine, and download documents, you’ll be ready to add it to your genealogy toolkit.
In this video episode and article, we’ll be answering important questions such as:
What kind of genealogy records can be found at the National Archives website?
Which genealogy records are not available at the National Archives?
How do I search for records at the National Archives online Catalog?
How can I retrieve only digital items from the National Archives Catalog?
How can I get better search results in the National Archives Online Catalog?
How do I download files from the National Archives Website?
What Kind of Records Can be Found at the National Archives Website?
To understand the types of records we can expect to find we must first understand the role and mission of the National Archives. Their role is preserving and making available only the permanent Federal Government records. Some have genealogical value.
These records are arranged as the agencies created them, so there is no master subject or name index.
While they have 110 million + digitized pages in the Catalog, this represents just a small fraction of the holdings.
The Catalog contains descriptions for their nationwide holdings in the Washington, DC area, regional facilities, and Presidential Libraries.
The Catalog currently contains descriptions for 95% of the records, described at the “series” level.
You can find basic information about the records, including size and location, from the catalog description.
The National Archives is regularly adding more file unit and item descriptions, many of which include digital files.
Some traditional genealogy records can be found at the National Archives such as:
Census Records
Passenger Arrival Records (Immigration)
Land Records
Military Personnel Records
Court records
Fugitive slave cases
Naturalization records
Federal employees
Applications for enrollment in Native American tribes
Most if these records are available in person. However, all National Archives locations have been closed since March 13, 2020 and remain so as of this writing.
Genealogy Records You Will Not Find at the National Archives
Because the following genealogy records are not created at the federal level, they would not be cataloged or found at the National Archives:
Birth
Marriage
Divorce
Death records
Deeds and wills.
To obtain these records, check with the appropriate state or county.
What to do before you search the National Archives Catalog online
Before you begin your online search:
Write down your research question.
Decide what topic you want to browse.
Think of possible ways your ancestor interacted with the Federal Government.
On the National Archives website they provide a great example of a research question that a genealogist might have and how it can lead to records.
QUESTION: Why did my ancestor have a significant decrease in net worth between the 1860 Census and 1870 Census?|
ASK YOURSELF: How might your ancestor have interacted with the federal government that could help explain this discrepancy?
RECORDS TO SEARCH FOR: The Bankruptcy Act of 1867 allowed many people to file for voluntary bankruptcy. The genealogists could search in the National Archives Catalog for bankruptcy AND [state where you ancestor lived during that timeframe] to see if bankruptcy records are available that could help answer the question.
How to Search the National Archives Catalog Online
There are three key types of searches you can conduct in the catalog:
Keyword searches
Filtered searches
Advanced search
Let’s start with a keyword search:
Go to https://catalog.archives.gov
Enter keywords in the search box in the center of the page.
(If you are looking for an exact phrase using two or more words, put them in quotation marks example: “bounty land”)
Press the magnifying glass button to run your search.
The results will be returned starting with best results at the top.
To view a description, click on the blue title.
You can use the filters on the left side of the results page to narrow down your results.
Refine your search results by type if you know the type of material you want. Example of material type include photos, maps, or textual records.
It’s important to remember that just because the item appears in the result does not mean that it is available online. Many of the descriptions don’t include digital images of the records.
How can I retrieve only digital items from the National Archives Catalog?
You can dramatically narrow down your search results to include only digital items that you can review from home. To do this, on the search results page, click on the filter Archival Descriptions with Digital Objects. This will revise your results list so that you will only see descriptions of items with images attached.
How can I get better search results in the National Archives Online Catalog?
It never hurts to try searching by name, although many record descriptions will not name the people who are named in the records. You can improve these searches by using quotes around the entire name, or just the surname. This will restrict results to only items that exactly matches what appears in the quotes.
You’ll notice that there isn’t a specific search field for names in the National Archives Catalog. Here are several additional search strategies you can use when searching for the names of people:
Search on the person’s full name in first name-last name order.
Search for last name – first name within quotes
Search on the surname only. Again you can use quotes.
Search on spelling variations using the search operator OR. This works well when searching name variations such as: Burkett OR Burkette.
Search on variant spellings of the first name, including “Americanized” versions.
Example: Joseph Maggio OR Guiseppe Maggio.
Again, keep in mind that most descriptions in the National Archives Catalog do not include the names of people mentioned in the record. If you know an individual participated in event, search for related keywords and look within the records. You will need to read them to see if your ancestor is mentioned.
Another way to improve your search results is to shift your focus from people to topics. This is strongly recommended by the National Archives. You are much more likely to get a greater number of results because people aren’t usually named in descriptions. Be sure to read the description carefully to see if the item will be helpful and worth requesting.
When searching topics, think about and make a list of relevant phrases and keywords. For example, when searching for Land Records, try searching for phrases such as:
How to Download Files from the National Archives Website
After clicking the description on the search results page you will be on the record page. If there is a digital image, it can be downloaded. Look below to see if there are additional pages. You can click to select the desired page and then click the download icon just below the image.
If you would like to download all of the images, look below the list of images to see if a compiled PDF is available. This will allow you to download and save all of the images in one convenient file.
The Record Group Explorer at the National Archives Website
The Record Group Explorer offers a unique way of visualizing and finding records at the National Archives website:
Allows you to browse NARA’s holdings by Record Group
Use it to get a sense of the scale and organization of records
Explore what is available online via the Catalog
Provides an overview of the digital scans available online within a Record Group: textual records, photographs, maps and charts, electronic records, and more.
Records are grouped by specific government agencies. Each group is represented visually in a section. The section is light blue, signifying the total volume of textual records. If a dark blue bar appears in the section, it is an indicator that some of the records are digitized. The percentage or number (depending on the view you select in the grey Record Group Explorer Tools bar across the top) of digital images will be shown.
If the section is green, that indicates that there are records online but they are not textual records. They may be items like photographs or films.
If the section is grey, there are no records available online at all.
Click a section to learn more about that Record Group and explore the records.
Record Group Highlight: Motion Pictures
The National Archives holds a surprising number of motion pictures. As you browse or search, focusing on topic will likely be more helpful than searching by name. Consider looking for your ancestors’ homes, businesses, military service, events and associated locations.
“A series of films: 306-LSS, a group of more than 400 black and white reels of stock footage that ended up in the hands of the United States Information Agency (USIA).”
Answers to Live Chat Questions
One of the advantages of tuning into the live broadcast of each Elevenses with Lisa show is participating in the Live Chat and asking your questions.
From Sue M.: Do they hold WPA and CCC records? From Lisa: Yes to both!
From Steve S.: Can you use the * and ? as search operators in the NARA catalog? Also thanks for de-mystifying this site! you have made it much more understandable. From Lisa: After the show Steve did some searching and found this handy page providing additional search tips and operators supported by the website. Thanks Steve!
From Michael R.: Are the Naturalization records in the National Archives different from those in local courthouses? From Lisa: I haven’t looked lately, but about 15 years ago I filed a Freedom of Information Act (FOIA) request and received my great grandfather’s federal naturalization paperwork. It included a photograph that was not included at the county court level.
From Lynnette B.: I had my parent’s old home movies put on DVD’s several years ago. What is the next step in making them more available? Adobe spark video? YouTube? I want to identify each person on them? From Lisa: An easy way to get started is by making Adobe Spark Videos (see episode 16) which is free and easy. Use the Titles feature to add text explaining who is who. Uploading them to your free YouTube account channel is a super easy way to share them.
Resources
Get My Free Genealogy Gems Newsletter – click here.
The 1950 census must be indexed so that we can search for relatives by name, location and much, much more. You can help with this exciting project, and no special skills or background are required. Jim Ericson of FamilySearch 1950 Census Community Project explains what’s happening and how you can get involved.
Lisa: The 1950 US federal census was released by the National Archives just a short time ago on April 1 2022. But it was just a release of the digitized images of the census pages. The indexing of those records happens afterwards. It’s really the indexing that makes it possible for all of us to be able to search the records and find our families. Here to tell us about that really important indexing project. To get all this done is Jim Ericson from FamilySearch. They are heading up this project. Welcome, Jim.
Jim: Thank you, Lisa. It’s wonderful to be here with you today.
Lisa: I know you guys are so busy. You’re right on the heels of Rootstech which just wrapped up. And now we’re here with the release of the US Federal Census for 1950! Do you have somebody you’re looking forward to seeing in that census record?
Jim: Yeah, both of my parents will be there. My dad will be 20 years old. He turned 21 that year after the census. And my mom is 15, she will just have had her 15th birthday.
I know where my mom was. She was in Salt Lake City. But I have no idea where my dad was in 1950 as a 20 year old. He’d left college and I know that he had enlisted in the in the army. But I don’t know. He also worked in San Francisco for a couple of years. I don’t know if he’ll be in San Francisco, or where exactly where he would have been in 1950 when the census was taken so there’s a little mystery right there.
Lisa: Absolutely, and that’s a perfect example of why the indexing is so important, because you’ll be able to name search for him when this is done.
The History of FamilySearch
(2:07)
Before we jump into that indexing project, for those who maybe aren’t familiar or haven’t used FamilySearch, tell us what familysearch.org does and what it offers the genealogist.
Jim: FamilySearch is a nonprofit organization. We were founded in 1894 as the Genealogical Society of Utah.
FamilySearch is more of a recent incarnation of the organization that kind of reflects when we went online, and when we started publishing CD ROMs in the 1990s.
We’ve been microfilming and digitizing records since 1938. We started a worldwide project to go and collect records from around the world. Microfilm was really the innovation that allowed us to store all those records in a library. Getting a whole bunch of books or physical records in one location was difficult.
Since then, all of our record operations are now digital. All of our records are captured digitally now. We have worldwide operations in hundreds of countries. We publish over about a billion records a year.
As a nonprofit, we partner with commercial entities who have an interest in profit, because we know that they know how to innovate. And that also helps our resources go further through partnerships with these commercial entities. The 1950 census is actually an example of that sort of a partnership. We’re working on this with Ancestry and using the resources that they have.
FamilySearch has a collaborative family tree where you can see what others know about your family. We have, like I mentioned, 10 billion records that are online. We have free resources to learn how to do family history. And we really try to just bring people wherever they are, to the experiences that can help them learn about their family.
(04:32) Lisa: It’s amazing how much it’s grown! I remember the days of the CD ROMs with the record sets that we used to order. And now so much is available for free from home. Users just need to sign up for a free account to use the website and take advantage of the records. And I love the Wiki. It’s such a wonderful treasure trove of knowledge when it comes to genealogy research
Let’s talk about the most exciting and the newest record collection, which is the 1950 census. When it was released by the National Archives did you get all the images? Does that mean instantaneous publication on familysearch.org? How did that work initially?
Jim: Well, 10 years ago, in 2012, when they released the 1940 census, we were actually waiting at the National Archives with a van and hard drives. We had to transfer all the data onto hard drives and take them to our data facility in Virginia.
This time, everything was available online. Everything was downloaded and uploaded to our servers immediately. There was high demand. So that was one of the challenges that we faced was making sure that we’re going to be able to download those images, over 6 million images is a lot of images to be able to download. And those images include records for 151 million people. So that’s a lot of information at high quality, resolution. So that was actually the first hurdle.
And since we are doing this project with Ancestry, we also have to wait for Ancestry to do the same thing and download the images, to be able to process them to create their computerized index with their own handwriting recognition technology that then comes to us. It makes it so much easier to review an index as opposed to starting with transcription from scratch. So, there are so many innovations that have taken place. But from the National Archives, the online delivery of images was one of those innovations.
Lisa: How fantastic to be able to do that online. I can imagine that speeding it up. And then you’ve got artificial intelligence, which is already impacting how we use genealogy websites, how we access digitized books, and here you are using it to help index the records.
(7:28)
I’d love to know kind of a comparison between the speed at which you indexed the 1940 census which I thought was pretty darn quick to how that looks for 1950.
Jim: There is a great question, and we’re still learning how this is going to play out with the 1950 census.
The history of census indexing by FamilySearch
(7:54)
One of the first projects that we did as FamilySearch when we were publishing, CD ROMs was the 1880 census. The 1880 census took us more than a decade to press on to CD ROM. It was a huge project! It was crowd sourced, but before the advent of the internet. It was sending packets and physical papers around and then gathering them and then creating a CD ROM.
We went from a project like that, to doing the 1940 census just over a decade later in a matter of about six months. So already the technology was just astounding because of what you’re able to do because of the internet. Now you have the artificial intelligence, the handwriting, character recognition, and then you have innovations that we’re doing with the crowdsourcing. And all of a sudden, you’re able to take those tasks that we’re all human, I guess bounded by human capabilities, and you’re now allowing the computer to do what the computer can do.
With the 1950 census, we are actually indexing or reviewing this automated index for every single field that was captured in the 1950 census. It’s way more data than we were dealing with for the 1940 census. Because of the cost and the time, we just wanted to make sure that we just had the most logically relevant fields captured, so occupation, and some of those fields were seen as extra fields. But for 1950, we recognize that we can do a lot more in terms of the experiences that we can provide and that these other entities can provide if we have a full index, so that’s one of the big innovations. It’s going really well.
When will the 1950 census index be complete?
(10:08)
We have a goal to get it all done by Flag Day, so that’s June 14. That will be about two months from when we really got the project going and up to speed. That just depends on how many people come and participate.
There’s more than one way to participate. We feel like we have a lot of options, and it’s more accessible than it’s ever been because of how recent (the 1950 census) is. Recognizing handwriting from 1950s is not that different from recognizing handwriting from a week ago. Things haven’t changed that dramatically. And so, it’s a really accessible experience. And these are people that everybody knows. It’s kind of fun to come in and see what you can find in those areas where your family is from.
Innovations in the 1950 Census Index
(11:07) Lisa: Exactly. You said something which I hope everybody really appreciates, which is that you indexing every field. I mean, you must have gotten excited when you heard that was really going to be possible. It’s a game changer because now you can slice and dice data in so many ways. You can look up everybody who worked on the railroad or whatever the fields are that were filled out. What do you think the impact will be of that? Will that change anything about genealogy research?
Jim: Yes, it will. And not just genealogical research but also understanding the makeup of our country in 1950. And really understanding the history of our nation because that is part of your family history is enabled by capturing those additional fields. Being able to see differences in income, differences in occupation from region to region, being able to easily see, neighborhoods.
The address for the 1950 census is similar to the 1940 census in that it’s a vertical capture down the side of the forms. So that is something that just allows people to see what’s there today, if their house is still there. These are experiences that that we’ve dreamed of but without the index it is impossible to provide that sort of an experience. And so now with the commercial entities and what we’re trying to do, you’re going to have a lot of different experiences now that are unlocked and available because of these innovations. And especially with Ancestry’s (technology) it has enabled us to do this.
Is the 1950 census available for free?
(13:06) Lisa: Since you’re partnering together, is it available at Ancestry for free as well as for FamilySearch?
Jim: Ancestry will make their own businesses decisions. But yes, initially, it’ll be available for free. They’ve opened up the 1940 census recently, and that’s been available for free. I don’t know what all their future plans are. It allows them a lot of flexibility on how to do that. Of course, we make everything we can available for free at FamilySearch.
Again, there’s going to be a lot of different experiences that are available around this record set. So, it’s exciting going all the way back to how the National Archives made it available. It’s really democratizing the records. I think their goal is to just make it accessible to as many people as possible. And then it’s these other organizations that have a vision for what they can do with those records.
Lisa: Yes, and you guys certainly had the vision around the indexing project. That’s something that is such a skill that you’ve all developed and really fine-tuned. You’ve been able to crowdsource so much of what then becomes available to everybody.
Tell folks how they can get involved in it. And I’m really interested in some of the changes. I was very excited to hear that people will be able to have, in a way a more personal indexing experience. Tell folks about that.
Jim: Something that everybody wants to do when they come in and volunteer and get involved in a project is to find their own family. That will be expedited. When the index is published and available, after it’s been reviewed, everybody’s going to have that wonderful experience. But even on the review side, we’ve made it so people can search for a specific location down to the county level, or, in some cases down to the city level. Then you can actually search for a surname, or last name within that location. Now, if your family hasn’t already been reviewed, you’ll be able to review it if it hasn’t been reviewed. That just means that it’s going to be published sooner, because progress has already been made. And then you can come back and review it.
How to make corrections to the 1950 census index
(15:42) If for some reason, the person who reviewed it did it wrong, you can still make corrections. We do corrections on FamilySearch. Ancestry does corrections on Ancestry. And we are sharing whatever corrections are made on FamilySearch with Ancestry so they can get the benefit of any corrections that are made on our website as well. So that’s terrific.
For the 1940 census we had 163,000 people come and help and get involved. And with how easy it is for 1950, we think that we’ll have well over 200,000 people who will come and want to review these names.
How to volunteer to index the 1950 census
(16:30) If you want to get involved, there are a couple different places you can go. But the easiest place to remember is familysearch.org/1950census. And on that page, there’s a lot of information. Near the top of the page there’s a big link to join the project and to come over and participate.
The project is ongoing. All the states are there, some have already been published. Come and get involved and see what you can do. It’s going very quickly, and people are really enjoying it. We’re glad that it’s along as quickly as it is.
Lisa: Volunteers can do this from home from their computer. Is there a certain minimum commitment that they have to make or a certain minimum amount of technological ability?
Jim: No. This is again one of the things that’s kind of fun. I mentioned that briefly before there’s actually more than one experience or a way to participate.
Household Review
(17:42) The standard way that most people who’ve done it before want to participate is what we call the Household Review. With the household review we try to identify from the head of the house, all the members of the household or the family to the next head of the house. That can sometimes cross pages on the census forms. That is an every field review. You can review as many of those fields as you want. And then the next person can come and pick up where you left off. So that’s really fun. It does require you to be on a computer.
Name Review
(18:27) There are two other types of tasks. One doesn’t require you to be on a computer. You can be on your handheld device, your smartphone. It is what we call Name Review. So, instead of reviewing all of the fields, you can download our app called Get involved. FamilySearch Get Involved is available on the iTunes Store or the Apple Store, as well as from Google, the Android store. You can download the app and you can just start looking at the images where we have the names of the people in the census. Then you can compare that with what the computer thinks it is. You can either say yes, that’s right or no, and you can actually enhance or fix what the name is. You can do hundreds of these in an hour. I’ve done it, and it’s a fun activity. It’s really engaging if you like seeing that you’re making a difference in terms of volume. It’s a really fun way to participate.
Again, the computer doesn’t always get it right. So, you have to be really careful in the review process. But it’s super easy to just look at the image and look at the index value for the name and just make sure it’s right. You don’t have to have the app though.
Header Review
(20:00) So, there’s the Household Review or the Name Review. And then the other task is the Header Review.
every census image, every census ledger, has a header that includes all of the location information and the information about the enumeration itself. And reviewing that is a separate task. We broke that one out because again, the data is formatted differently. If you want to go in and help us, those have to be done as well to be able to publish the dataset. We invite you to come in and see what states still have the header review available, and you can help us finish out that as well. It’s not as exciting because it doesn’t include the names of the people. But it still has to be done to be able to publish the reviewed index.
Lisa: I hadn’t thought about the header, but that’s pretty important. If that’s not right, then we get way off track pretty quickly. It includes our enumeration district number, the county, etc. That makes a lot of sense.
Well, Jim, it sounds like you guys have really been innovating over at FamilySearch. We’re grateful. We’re grateful that you’re giving everybody watching an opportunity to also give back a little bit and we can all pull together and get this done by Flag Day.