The UK ‘genealogy giant’ Findmypast has made exciting new updates to their records this week! They’ve announced over 100 million new European records are now available online, and this week highlights their extensive collection for Norway. Also new this week are genealogy records for Staffordshire, England; Queensland, Australia; and Ontario, Canada.
New European Records Online: Norway Featured
Findmypast recently announced their addition of over 100 million new European records now online. “Over 114 million new European births, baptisms, marriages, banns, deaths and burials are now available to search and explore on Findmypast. The new additions consist of transcripts sourced from the International Genealogical Index, a database compiled from a variety of sources from around the world.
Featured from this huge addition are three new indexes containing over 9.1 million Norwegian baptisms, marriages and burials are now available to search as part of our new collection of European records. These new collections span nearly 300 years of Norwegian history (1634 to 1927) and will generate new hints against your Findmypast family tree.
Anyone with ancestors from Norway has probably tapped into the National Archives of Norway’s Digital Archive. It’s one of the shining stars on the Internet that offer rays of research hope for those with Norwegian heritage. That’s why I was thrilled to be able to interview Yngve Nedreb, the Chief archivist at Riksarkivet (National Archives of Norway) for the Family Tree Magazine Podcast. In fact, I published an extended version of that interview in episode #161 of The Genealogy Gems Podcast. This is a “must hear” for those with Norwegian heritage! Click below to listen right now:
Lisa’s special guest: Yngve Nedrebø, Chief Archivist at Riksarkivet. http://www.arkivverket.no/eng/Digitalarkivet
Staffordshire, England Vital Records
Another brand new genealogy records collection online is over at Ancestry.com. The Staffordshire, England, Birth, Marriage and Death Indexes, 1837-2017 collection comprises indexes of civil registrations from Staffordshire, excluding the City of Stoke-on-Trent, reported quarterly to the General Register Office (GRO) in London.
The indexes for the three events are divided into volumes by year and names are listed alphabetically. Once an entry in one of the indexes is found, you are then able to use that information to order of copy of a death, marriage, or birth certificate from the GRO. Information that can be obtained from the birth marriage and death index includes, where available:
Name
Maiden name of mother
Date of event
Death Age
Place of Marriage
Gender
Registration district (each county in England and Wales was divided up into registration districts; jurisdictions are organized and appear as they existed at the time the record was created)
Reference
Queensland, Australia
Also new at Ancestry is the Queensland, Australia, Licensed Victuallers Index, 1900-1903. The names of holders of victuallers’ licenses (publicans) were printed in the Queensland Government Gazette from 1900 to 1914 on an annual basis. This index covers the period from 1900 to 1903 and includes names, districts, and hotel names.
More about licensed victuallers from Wikipedia: “In the United Kingdom the owner and/or manager of a pub (public house) is usually called the “landlord/landlady”, and often, strictly incorrectly, “publican”, the latter properly the appellation of a Roman public contractor or tax farmer. In more formal situations, the term used is licensed victualler or simply “licensee”.[9] A female landlord can be called either a landlady or simply landlord.”
Ontario, Canada Insurance Policy Applications
Findmypast has another new collection now available online. “Did your Canadian ancestor apply for life insurance with The Independent Order of Oddfellows (IOOF) between 1875 and 1929? The IOOF is one of the world’s oldest fraternal orders. These insurance records are a unique source for tracing your family history. You will find images of the original applications which include your ancestor’s medical history, family’s medical history, and a physical description. The applications are two pages long. Be sure to use the next arrow to move to the next image.
Here at Genealogy Gems, we’ve adopted the name ‘Genealogy Giants’ to refer to the 4 major genealogy records websites: Ancestry.com, Findmypast.com, MyHeritage.com, and FamilySearch.org. Each website has its own unique and distinct offerings, but there can also be a lot of overlap. So with hefty subscription price tags, the question we’re often asked is, “Which website subscription do I need?” To tackle this, Sunny Morton’s RootsTech class uncovers the secrets on how to compare these 4 giants so that you spend your time and money wisely. Watch the entire presentation for free below, and then grab a copy of the companion quick reference guide Genealogy Giants: Comparing the 4 Major websites.
About the Author: Lisa Louise Cooke is the producer and host of the Genealogy Gems Podcast, an online genealogy audio show and app. She is the author of the books The Genealogist’s Google Toolbox, Mobile Genealogy, How to Find Your Family History in Newspapers, and the Google Earth for Genealogy video series. She is an international keynote speaker and the Vice President of the Genealogical Speakers Guild.
Disclosure: This article contains affiliate links and Genealogy Gems will be compensated if you make a purchase after clicking on these links (at no additional cost to you). Thank you for supporting Genealogy Gems!
A GEDCOM file is a universal type of file that genealogists use to move data from one genealogy software program to another. Using these helpful tips below, you can open genealogy files your family members send to you, or share your data with others.
When and Why You Would Need to Open a GEDCOM File
A Genealogy Gems reader recently wrote:
I recently signed up for [the Genealogy Gems] newsletter. I received a CD from a relative with family history information that was set up through Family Tree Maker. I am currently not subscribed to any of the genealogy sites. My question is, how can I retrieve this information [from the CD.] Can you help?
The answer to the question is: Use another program to open the GEDCOM file from the CD. Let me show you how easy it is to open and create GEDCOM files.
GEDCOM Basics
GEDCOM is an acronym standing for Genealogical Data Communication. It is a universal genealogy file that allows you to exchange genealogical data between different genealogy software programs.
Because it is “universal” in nature, a GEDCOM file can be read by many different types of genealogy software. That means, if you are using RootsMagic, you can still share all the data you have collected with your cousin who uses Family Tree Maker, and she will not have to type in all the names, dates, and places manually.
Occasionally, not all the information included in a GEDCOM file will transfer perfectly. There are differences in how that information is interpreted and some things, like notes and sources, may be affected. However, for the most part, much of it will transfer correctly.
How to Open a GEDCOM File
Our reader needs to open a GEDCOM file contained on the CD he was sent. To do this, he must have a program on his computer that will read a GEDCOM file. There is an option I would like to share with you.
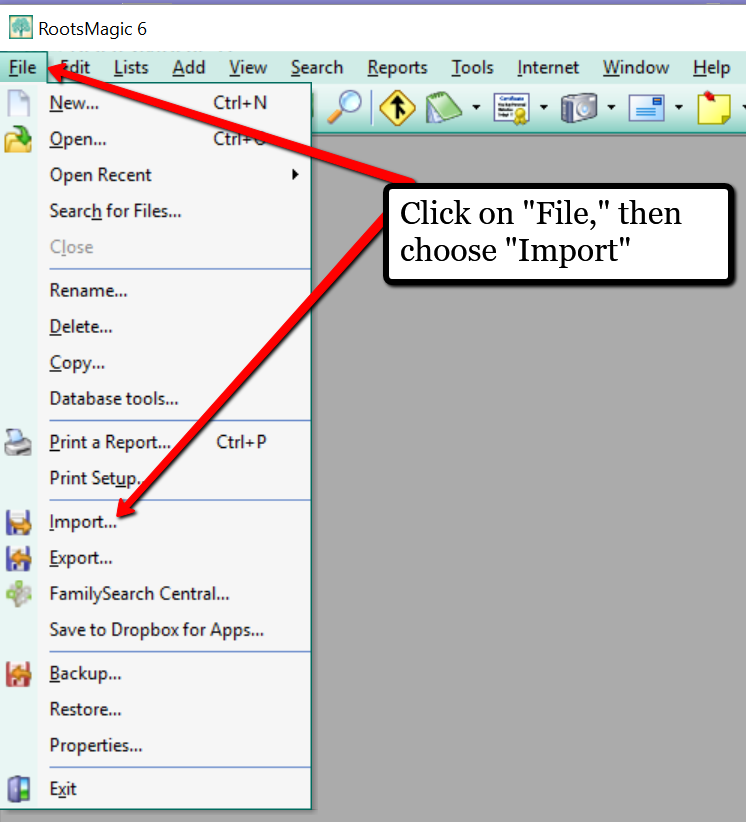
RootsMagic is a downloadable software for both Mac and PC users. (And, it is the one we here at The Genealogy Gems Podcast use! That’s why we accepted them as a sponsor of the podcast.)
Once you have downloaded RootsMagic to your computer, open it. At the top left corner, click on File and from the pull-down menu, choose Import.
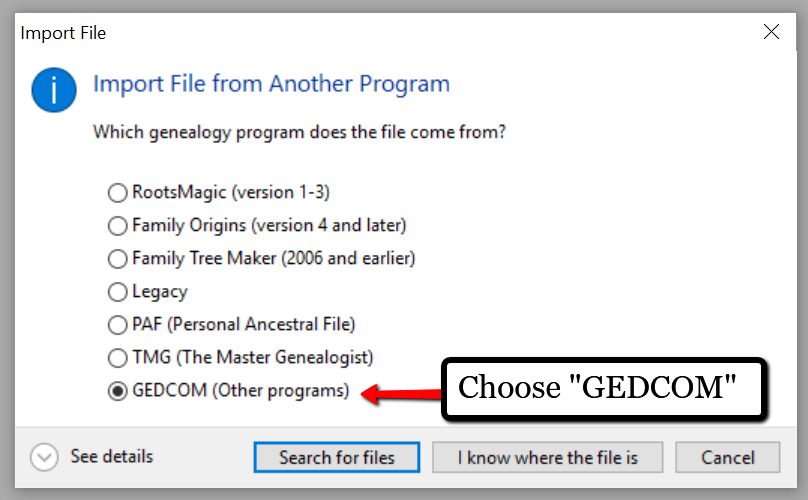
Now, a new pop-up window will open and ask from what source you would like to import from. You will notice several options, but for our reader’s question, he will choose the GEDCOM option.
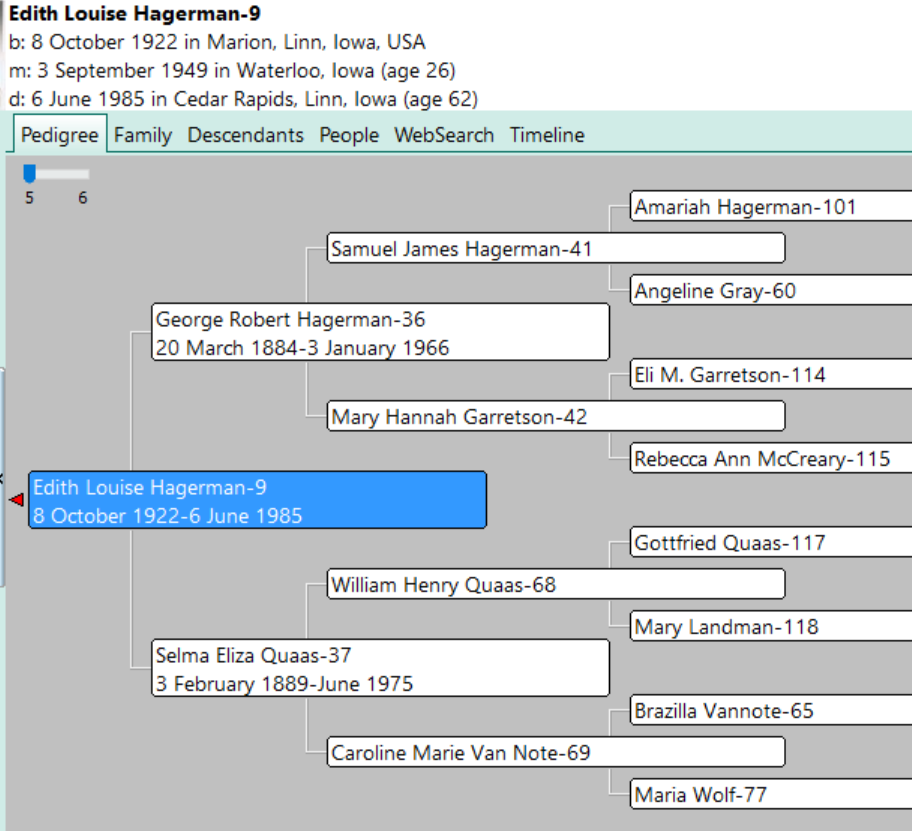
Then, choose I know where the file is, and the file explorer window will appear. In this case, our reader would click on the CD that he has loaded into his computer’s disk drive, and follow the prompts to open the GEDCOM file. All that information his relative sent him will be slurped into RootsMagic and he can easily look through the pedigree of his family.
Creating a GEDCOM to Share with Others
RootsMagic also allows you to create a GEDCOM file. This is what you would send to your relatives when they would like to have a copy of the family tree.
To do this, open RootsMagic. Click on File, as we did before, and this time choose Export from the pull-down options.
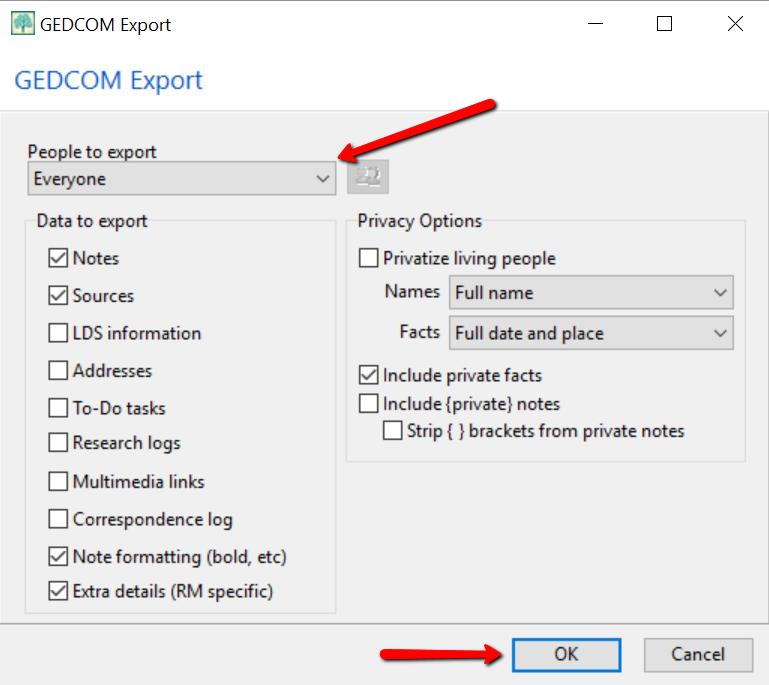
The export box will pop-up. You can choose what you wish to have included in this export. I typically choose Everyone, but you can do yours by family names by clicking on the down arrow next to Everyone and choosing Select from list.
Once you have clicked OK, the GEDCOM file is ready to be saved to your computer. Save the file on your desktop or somewhere you will be able to locate it again. Remember to name the file and pay attention to where you are saving it!
Creating a GEDCOM from Ancestry.com
If you have stored your genealogy data at Ancestry.com, you may be interested to know that you can create a GEDCOM file for your family tree there as well. It’s just a matter of signing into your Ancestry account, locating the Tree Settings, and then clicking Export. I found a nice article outlining the steps on how to do that here.
Protecting Your GEDCOM Files
Creating a GEDCOM is also a great way to save or backup your hours and hours of family history research. One of the saddest tales of genealogists everywhere is losing their computer or printed family files with all that work!
GEDCOM files can be saved to a hard drive, saved to an external unit, emailed, put on a thumb drive, or uploaded to the Cloud. You can also invest in a company like Backblaze, the official backup of The Genealogy Gems Podcast, that will automatically backup all your files. (Read more about Backblaze, here.) All of these methods protect you and your genealogy.
More on Protecting Your Genealogical Data
Learn more about Backblaze, The Genealogy Gems Podcast’s first choice when it comes to backing up precious genealogy research and personal files. Read the article’s below and determine if Backblaze is the answer you’ve been looking for.
Welcome to this step-by-step series for beginning genealogists—and more experienced ones who want to brush up or learn something new. I first ran this series in 2008. So many people have asked about it, I’m bringing it back in weekly segments.
Episode 7: Best Subscription Websites for Genealogy Research, Part 1
In our first segment, my guest is Lisa Alzo, popular genealogy lecturer and writer (now the author of nine books and online genealogy instructor at Family Tree University and the National Institute for Genealogical Studies). We talk about her reasons for researching her family history and what she’s learned in her genealogical journeys (which include international travel in Eastern Europe).
In the second half of the show, we tackle an essential topic: the best subscription sites for family history records. This is a two-part topic: in this episode I talk about the best genealogy websites that require payment to access their core content. In Episode 8, we’ll talk about the fantastic free websites that are out there.
Keep in mind that this episode was recorded a few years ago. As I mention in the show, the online records landscape is constantly changing. Here are a few updates:
The biggest powerhouse paid subscription website is still Ancestry: it’s just bigger and better than what I originally described. As of fall 2013, they host 11 billion historical records. Member-contributed items include over 50 million family trees and 160 million uploads of photographs, stories and scanned documents. They still have a free 14-day trial membership and multiple subscription options: check out current ones here.
WorldVitalRecords is still a great website, though it’s grown more slowly. At our republishing date, it boasts over 158 million digitized images, (including US and UK censuses); 300 million names from vital records; 75 million names from military records, over 100 million pages of newspapers dating from 1739; 1.5 million historical maps; 8000 yearbooks and over 30 million tombstone photos. WorldVitalRecords is now part of the MyHeritage.com family of websites. Click here for a free 3-day trial membership.
Findmypast now has two web storefronts: findmypast.com (recommended for folks in the U.S.) and FindMyPast.co.uk (which specializes in British and Irish roots and records). At last glance in fall 2013, findmypast hosts over 1.5 million family history records. It offers great search options and a budget-friendly pay-per-view model or a more traditional subscription.
RootsIreland is now home now to over 20 million Irish records.
Genline.com for Swedish research is still online, though it’s part of Ancestry.com now. It’s home to over 20 million church record images and more.
Scotland’s People is still your official home for online Scottish records, including an enormous collection of parish records with births and baptisms, banns and marriages and deaths and burials.
Many other sites support specific topics in genealogy research. An example on my side of the pond is Fold3 (formerly Footnote) for American military records. This site is home to over 400 million total records from the Revolutionary War era forward. Check with others who research families from the same location or ethnic background as your family to see what sites would be perfect for you.
My website mentioned in the podcast, GenealogyGems.tv, is now better known as www.genealogygems.com. The Genealogy Gems newsletter mentioned in the episode is now my blog, which you can find on my website.
Sometimes it’s best to hire a translator for genealogy documents–even if you’re a committed DIY-family historian. Here are some fantastic tips from a pro on when and how to hire a translator rather than do it yourself (or ask Google Translate). When should...
Millions of British Isles descendants—whether still living in England, Scotland, Ireland and Wales or dispersed to the United States, Canada, Australia or New Zealand, may find their ancestors in these new online records that include medieval maps, BMD and immigration...