These show notes feature everything we cover in this episode. Premium Members: download this exclusive ad-free show notes cheat sheet PDF. Not a member yet? Learn more and join the Genealogy Gems and Elevenses with Lisa family here.

Show Notes: Professional Genealogist J Mark Lowe joins Lisa Louise Cooke on the show to share a marriage research case study that highlights the importance of understanding Gretna Greens. Then Professional Genealogist and blogger Robyn Smith shares her 3 step process for researching witnesses found on records from her new Family Tree Magazine article Witness Testimony.
To Listen click the media player below (AUDIO ONLY):
Watch Lisa Louise Cooke’s video interview with J Mark Lowe on the Marriage Research Show Notes page.
Watch Lisa Louise Cooke’s video interview with Robyn Smith on the Researching Witnesses Show Notes page.
Log into your Premium membership and then download the handy show notes PDFs that complement the topics covered in this podcast episode:
Premium Members have exclusive access to:
Become a member here. Learn more about Genealogy Gems Premium Membership.

Fort Wayne, Indiana is the home of the second-largest free genealogy library in the country. Make your plans to visit one of my favorite genealogy libraries today!
Learn more at https://www.visitfortwayne.com

Don’t miss the Bonus audio for this episode. In the app, tap the gift box icon just under the media player. Get the app here.

Download our Genealogy Gems app from your app store.
The Genealogy Gems email newsletter is the best way to stay informed about what’s available with your Premium eLearning Membership. Sign up today here.
Show Notes: When it comes to choosing an online family tree, there are lots of different options. It can be a challenging decision as to where to put yours. In this video and show notes article we’re going to take a look at WikiTree.com. You’ll learn what it is, how you to use it effectively, and how you can use it in conjunction with your own private family tree on your own computer. My guest is Chris Witten, the President and Founder of WikiTree.
Download the Show Notes Cheat Sheet (Premium Membership required)
Lisa: We are always interested in those websites that are going to help us build out our family tree, and learn more about our family history. WikiTree has been doing that for several years now. Please tell people about what you do at WikiTree.
Chris: WikiTree is completely free. It’s open to everybody. It’s a genealogy community. So, it’s all for collaboration. We’re growing a single-family tree.
We like to say it’s not your tree or my tree, it’s our tree that we all share. A lot of people are familiar with the FamilySearch tree, and it’s somewhat like that. There’s also Genie and a few others around the world that are doing the single family tree idea where everybody collaborates in one environment.
What sets WikiTree apart, I think, is really that we are a community. It’s very much a supportive group. We place a big emphasis on sourcing. So, we’re the most accurate, single-family tree available. And we have a lot of fun.
Lisa: I know that for many people it makes them happy when they hear that there is an emphasis on sourcing. Of course, if we get connected with a tree that isn’t correct, then we have more problems than we started with. Tell us a little bit more about that. What are the some of the mechanisms on your website that help and facilitate the sourcing of the information that is going into the trees?
Chris: Well, first and foremost, we ask that every piece of information that somebody puts on WikiTree has a source. So even if you’re saying this is from my Aunt Sally, or this is the family tree that was handed down to me, you have to at least say where it came from. And then that gives people a starting point for the collaboration. If somebody else then comes along and says, “Well, you know what, I have different information. What’s your source?” You can then compare and come to a conclusion.
Lisa: That does sound a bit like the FamilySearch tree in terms of it being one tree. Does that create any other challenges? What do people disagree about when it comes to the information that they’re putting on the website?
Chris: Oh, yeah, people disagree all the time. I mean, that’s what happens when human beings get together and try to work together. They will argue and have problems.
Probably one of the most really special things about WikiTree is this culture that we’ve developed over the years, because we’ve been around 14 years. It’s very much community based, like I don’t know, if I mentioned, it’s totally free, free for everybody. And we don’t have any full time employees. This isn’t run by this big team of people. It’s almost entirely volunteer based. The team we have is just part time and they are there to support the community. So there is a whole set of policies and procedures that’s developed over the years from the ground up to work out problems like this.
Lisa: How did you decide from the beginning that free was going to be the price? And how do you keep the lights on when you do it for free? What’s the model there?
Chris: It has been challenging at times. For the first seven years I did this, and it was a struggle. We quite honestly lost money. But we figured out and had to reach a point where we’re getting enough visitors that we can pay for ourselves with advertising. We now get about a million and a half visitors a month. So, we do have the big advertisers. Like if you come on WikiTree, you’ll see MyHeritage and Ancestry ads, and ads for DNA tests. But if you sign our honor code, and you register as a member, the ads essentially disappear. Members don’t even see ads. And for non-members, the ads they see are not as offensive as what you see in a lot of places out there on the internet. So really, it’s just a balance that we had to reach. And we reached it years ago. So now it’s quite comfortable where the community doesn’t even have to see the ads. It’s all free for everybody.
Lisa: What do you recommend is the best way to get engaged with the website?
Chris: Yeah, that’s a good question. The biggest complaint about WikiTree is that it can be overwhelming, because it’s a very large community. And it’s evolved over a long time. It’s very elaborate, like, there are just thousands of little corners of WikiTree where you have people collaborating on their Mayflower ancestors over here, and working on translating obscure Latin documents over there. There are also a lot of independent developers who have created tools that work with WikiTree. And so some of those can be a little bit complicated and intimidating. We try to keep it all simple, but we do realize that it can be a bit much for the new user. So, the first thing you do is you just register, just log in, and you get that free Guest account.
If you want to put something on your profile, you upgrade that to what we call a family member account. A lot of us have family member accounts for our family members. So, the third step is to sign that honor code that I mentioned before, and that’s just these 10 basic principles. Things like saying, we cite sources, that’s number one. We collaborate, we work together, we give credit, when credit is due, we respect copyrights, we respect privacy. So, it’s this very simple 10 point Honor Code. Read it in two minutes. And as long as you agree with that, you say yes, and then you move forward to the next step.
If you want help, it’s there. There’s this really vibrant community in the discussion forum. There’s live online chat or video chats you can do. There are one on one personal mentors you can get. There are training programs in various projects. So you can be as involved as you want to be in whatever areas you want to be involved in. I just recommend taking it one step at a time and trying not to get overwhelmed.
Lisa: Right. I know many people will have software that they use on their computer that they use to build their family tree. What’s the balance between using your own personally controlled software to build your family and using the collaborative online WikiTree? It sounds like you can benefit from the collective knowledge. Is there a way to export portions of the tree that you want to have in your own database? How do they interact with each other?
Chris: Well, we do have a GEDCOM, and import / export capability. I’m sure a lot of your listeners know what GEDCOM is. It’s a terrific, standardized format developed many years ago by Family Search. So that that standard is almost universal.
Watch and read: All About GEDCOM (interview with Gordon Clarke, FamilySearch’s GEDCOM Developer Relations Manager)
Whatever program you’re using, or website you’re using, will almost certainly allow you to import and export trees in this format. Because it’s a completely collaborative environment where we’re all working together, you can’t simply keep your tree in sync with WikiTree, because that would involve overriding what other people have done really. Like if you could just click a button and import your whole tree that would end up creating these records that would overwrite the collaborative work.
The export is just like it works anywhere else. If you want to download a tree, you can. If you want to upload, you just have to do it one profile at a time. What we do is, you would upload your GEDCOM and it would say, “this it looks like of the thousand people in your tree, 100 seem to already exist on WikiTree.” So take a look at these potential matches.
And by the way, that’s a great way to do a quick search if you want to see if your ancestors are already on WikiTree. So, you get this GED Compare process we call it, and you can look one at a time, left and right side. You know, here’s what’s on WikiTree, here’s what’s in your system. Do you want to move this? Do you want to move that? And then you would cite your sources at the bottom.
Lisa: You mentioned search. When we go to the homepage, we see that we can search. There’s a first name, last name, there’s letters for the last name, we can do surname searches, etc. Does WikiTree support any other kind of searching or search operators? Is there a Search Help page to help us make sure that we’re finding what we want to find?
Chris: Sure. If you go ahead and just try a search on WikiTree.com, you’ll see it right there. If you don’t enter anything, if you just click the search button, you would be taken to the search page that has more advanced options on it and has all kinds of help links. And if you’re looking for somebody, and you can’t find them, or you’re unclear on how to use the search engine, click over to the forum and just ask.
Lisa: I also noticed that on the homepage, it said something about DNA connections, and people are definitely interested in DNA, and it’s the way it intersects with genealogy. How does that work on WikiTree? What should we be looking for in terms of our DNA tree test connections?
Chris: DNA for us is a way to verify the tree that we’re growing, The basic work always has to be done in the traditional way, right? Like, genealogy has grown in the way we’ve always done it through records. That’s the only way you’re going to get names. But that traditional genealogy research can then be verified, or disproven with DNA. So, that’s what a lot of members do on WikiTree.
We do use DNA, and we facilitate this in some interesting ways that are done nowhere else. For example, on every single profile, every person profile, every ancestor, every cousin, were a DNA test, or more than one DNA test has been taken, which could help verify connections to that ancestor, it’ll show that. It’ll say, Lisa Louise Cooke has taken an Ancestry.com test. And it’s on GedMatch. And Chris witness taken a DNA test that I got from MyHeritage, and it’s also on GedMatch, click here. And you can compare those two. And that’ll take you right to GedMatch, where you can look to see if we match the way that we should. And on that profile on like, let’s say we’re first cousins, and so we share grandparent. It’ll say then that we would expect to share 12% of our DNA. So, if we then go to GedMatch and we don’t share 12% that’s a red flag. Or if we do, that’s a big step to confirmation.
Lisa: Finally, I want to ask you about privacy because it mentions privacy on your site as well. I know that’s on the forefront of people’s minds. What kind of privacy controls can people expect a WikiTree?
Chris: We take privacy really seriously. To me, and especially to the non-genealogist family members, if you can’t connect living people to the tree, it loses a lot of its family history and a lot of its interest. So, we need to be able to connect living people. And we want to include family photos. Photos of living people. But if you’re doing that, you need privacy controls.
Profiles have seven different levels. And you have some options for customizing. If you have somebody who is not a WikiTree member, but they’re living, they have to be unlisted. We have this privacy level called unlisted. That essentially means that their information cannot be found on WikiTree, except by you and your family members that you specifically put on what we call the trusted list. And then we have four different levels of private, but with a public biography. Private but with a public tree. And so, these are all levels that you can choose.
If you’re a member, there’s privacy around your own profile. And then for every non-living person, the recently deceased can be private but once somebody was born 100 years ago or died 100 years ago born 150 years ago, they have to be fully open. They have to be fully collaborative. So, every profile has those seven privacy levels. You have a fair amount of control on your modern family history about what’s private and what isn’t. But then for the sake of collaboration, the deeper ancestry is meant to be broad collaboration, because that’s really what WikiTree is all about.
Lisa: I can’t let you go without asking you, what is your best advice for us as we make the most out of using the website?
Chris: Just come try it. It’s free. You have nothing to lose. And there’s a community of people to support you.
Lisa: Sounds like folks are going to find other friendly genealogists who have the same interest in family history as we do. That’s a nice place to be. Chris Witten, thank you so much for joining us here today. I appreciate it.
Chris: Thanks, Lisa.
I’d love to hear from you. Have you used WikiTree? Do you have a success story? Do you have a problem story? We’d love to learn from each other. So head down to the comments below and leave us a comment and let us know what your experience with WikiTree.com is.
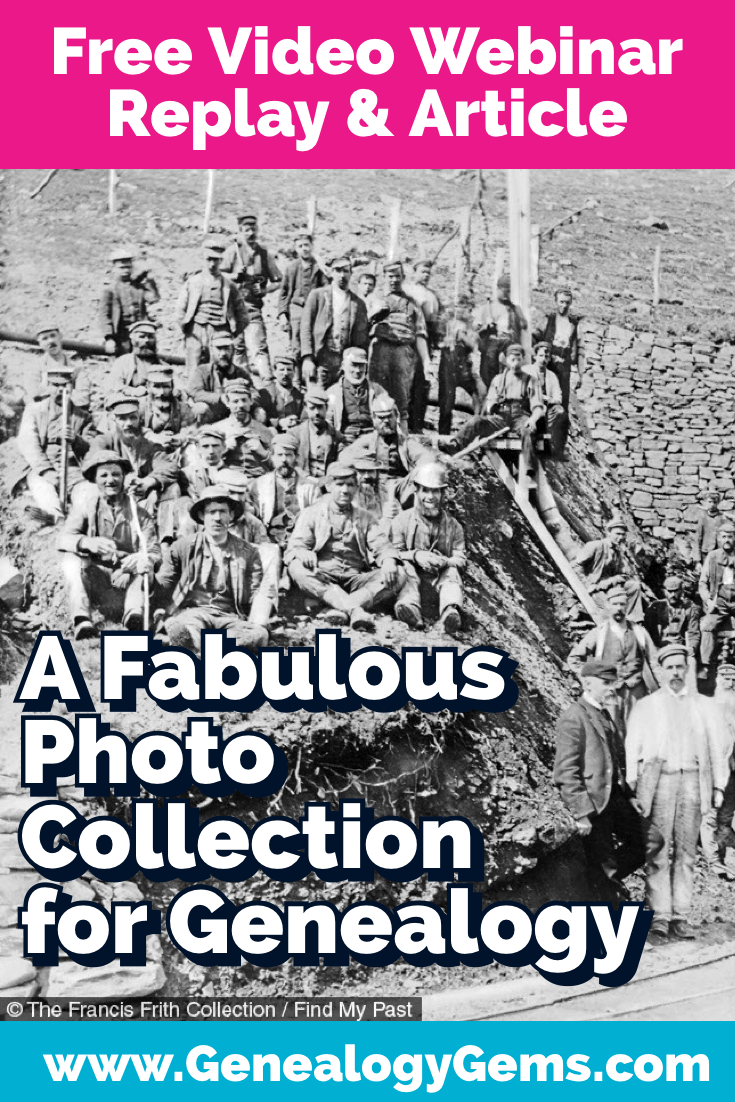
In Elevenses with Lisa episode 72 Alex Cox of Findmypast joins Lisa Louise Cooke to discuss the exciting new Francis Firth Photographic Collection.
Watch episode 72
Discover the scope of the collection and the best strategies for finding photos that will enrich your family history.
Watch Live: Thursday, September 23, 2021 at 11:00 am CT
(calculate your time zone)
Three ways to watch:
1. Video Player (Live) – Watch live at the appointed time in the video player above.
2. On YouTube (Live) – Click the Watch on YouTube button to watch live at the appointed time at the Genealogy Gems YouTube channel. Log into YouTube with your free Google account to participate in the live chat.
3. Video Player above (Replay) – Available immediately after the live premiere and chat.
Family History really comes alive when you can see actual faces and places, and that’s why the new photographic collection at Findmypast is so exciting. They’ve just added over 300,000 historical photographs chronicling more than a century of British life to their website. And these photos don’t just cover the UK – you can find images from other locations around the world as well.
Findmypast published these photos in partnership with Francis Frith, the UK’s leading publisher of local photographs since 1860, and they’re available to search online at Findmypast for the first time.
I’ve invited Alex Cox from Findmypast to join us today to tell us about the collection, the history, the scope and most importantly the best strategies for finding just the image you’re looking for.
From the folks at Findmypast: “Born into a Quaker family in 1822 in Chesterfield, Derbyshire, Francis Frith was a complex and multi-talented man who had a formidable instinct for business. After becoming a founding member of the Liverpool Photographic Society in 1853 – only 14 years after the invention of photography – he founded his own photographic publishing company in 1860 with the aim of creating accurate and truthful depictions of as many cities, towns and villages as possible.
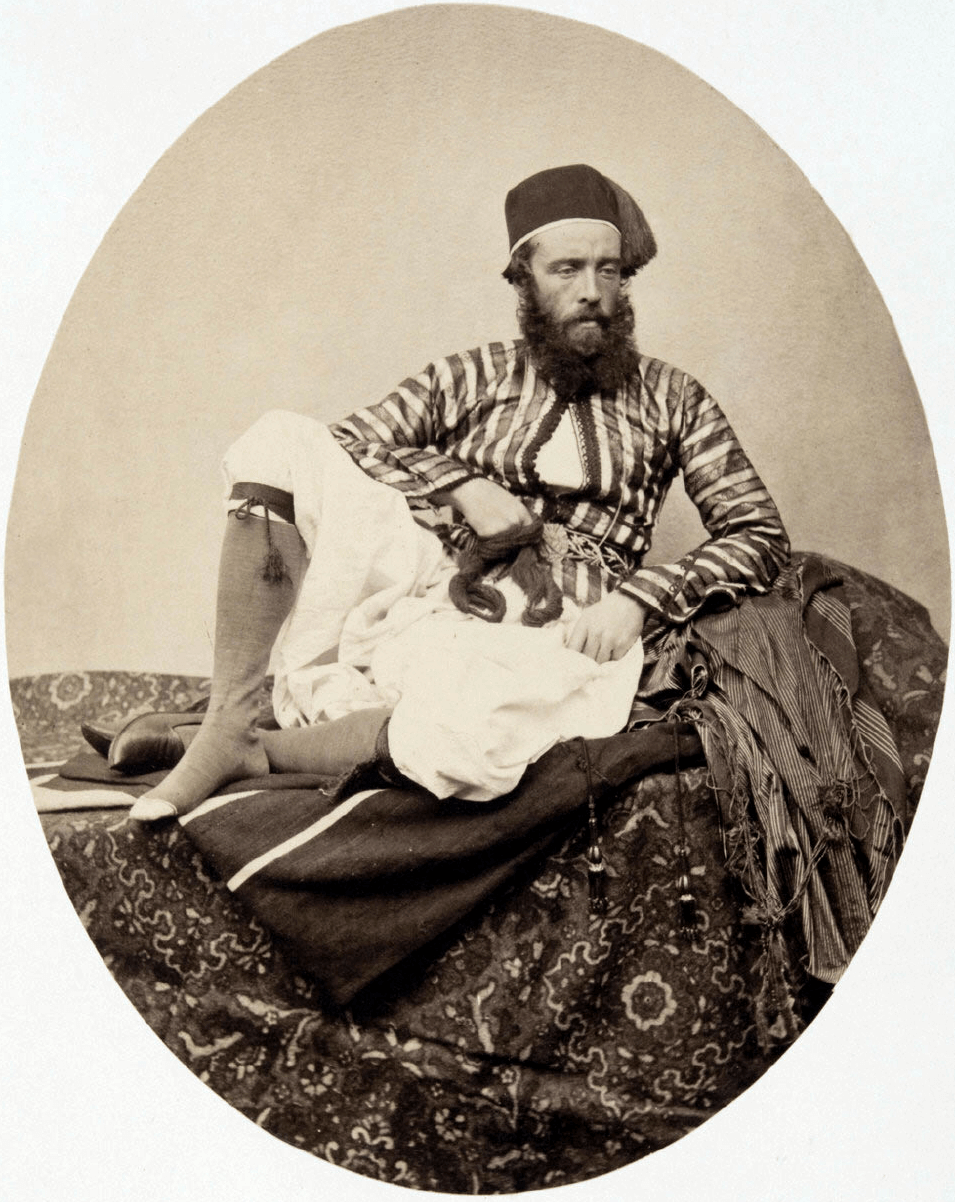
Francis Frith, 1854 (public domain)
Copies of Frith’s photographs proved immensely popular with the general public. Thanks to the rapid expansion of the Victorian railway system, Britons were now travelling in greater numbers than ever before, fueling a huge demand for photographic souvenirs.
To help meet this demand, Frith employed a team of company photographers who were trained to capture images of the highest quality according to his strict specifications.
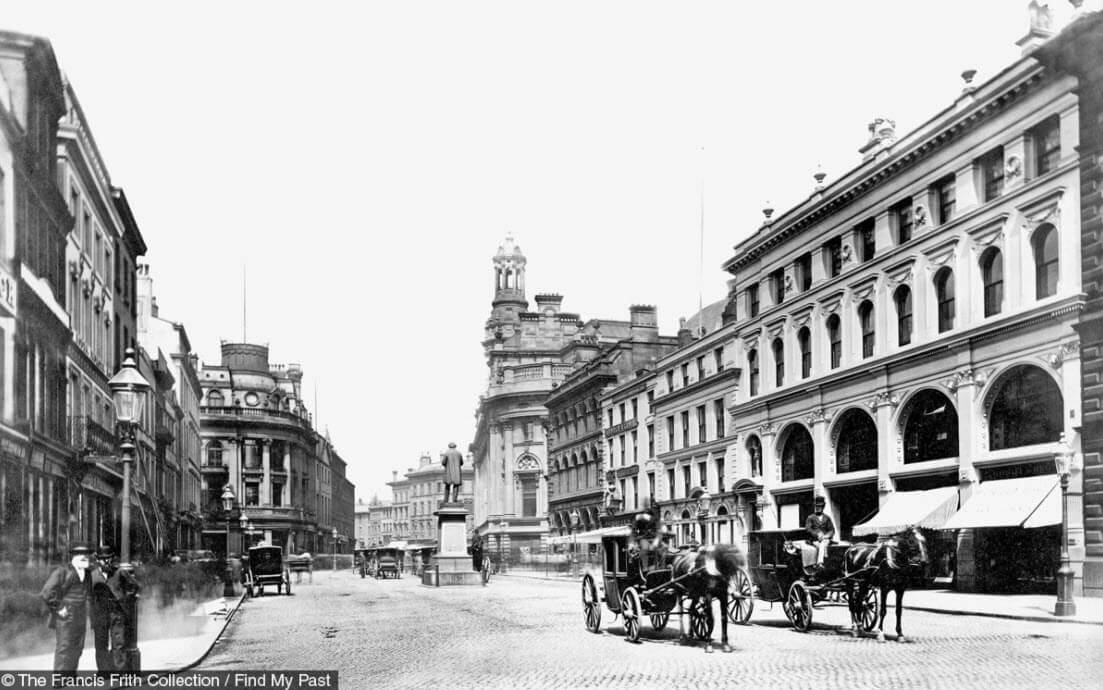
Manchester Saint Anns Square,1876
By the 1870s, the market for Frith & Co’s products was huge, especially after Bank Holidays and half-day Saturdays were made obligatory by Act of Parliament in 1871. By 1890 Frith had succeeded in creating the first and greatest specialist photographic publishing company in the world, with over 2,000 retail stockists.”
Quantity:
Coverage:
Timeframe:
Depictions:
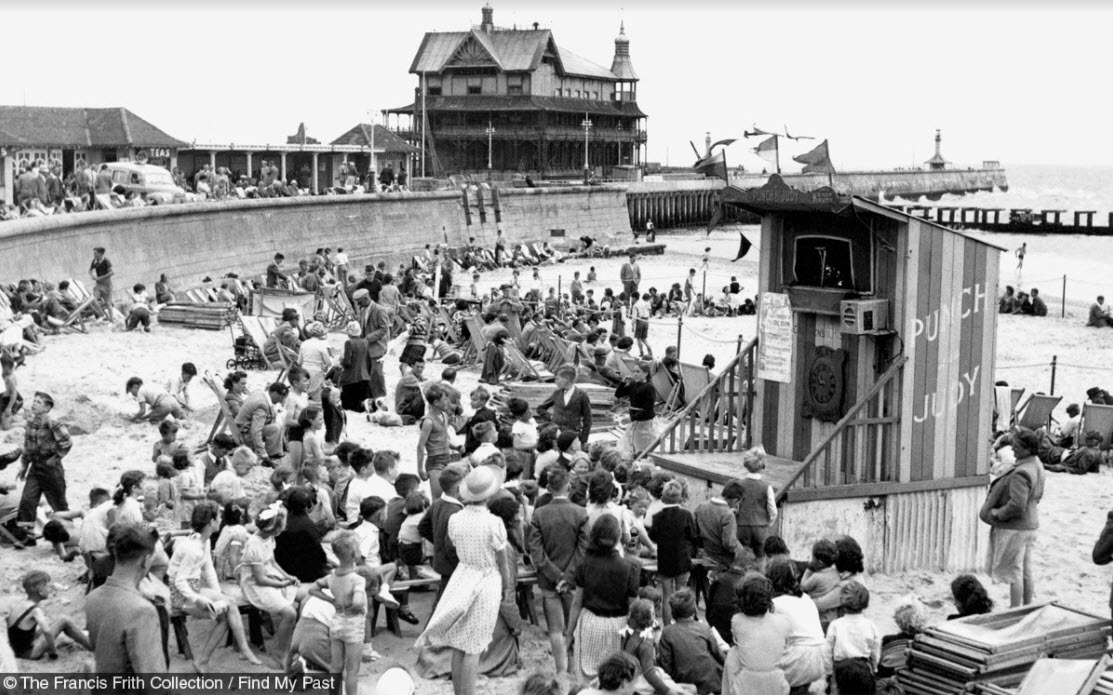
Lowestoft Punch and Judy Childrens Corner, 1952
Each photo comes with a transcription that is worth a look. You’ll find the transcription icon (it looks like a page) next to the image icon. The transcription provides information about the photo such as:
The Francis Frith photos are a great way to see how an area has changed over time. Copy latitude and longitude numbers found on the transcription page and then paste them into Google Earth to see the approximate location where the image was taken. Next, use Google Earth’s Street View to see the location up close today. You can save a high-resolution image of the location to your computer for comparison with the photo by clicking the Save Image button in Google Earth’s toolbar at the top of the screen. I love using Snagit to clip and annotate the image more precisely. (Learn more about it by watching episode 61. There you’ll also find out link and current discount code for Snagit.)
Learn more about using Google Earth for genealogy by watching my free class.
Sometimes you just want to leisurely browse the photos for a given area. Here’s how to brows the Francis Frith Photo Collection at Findmypast:
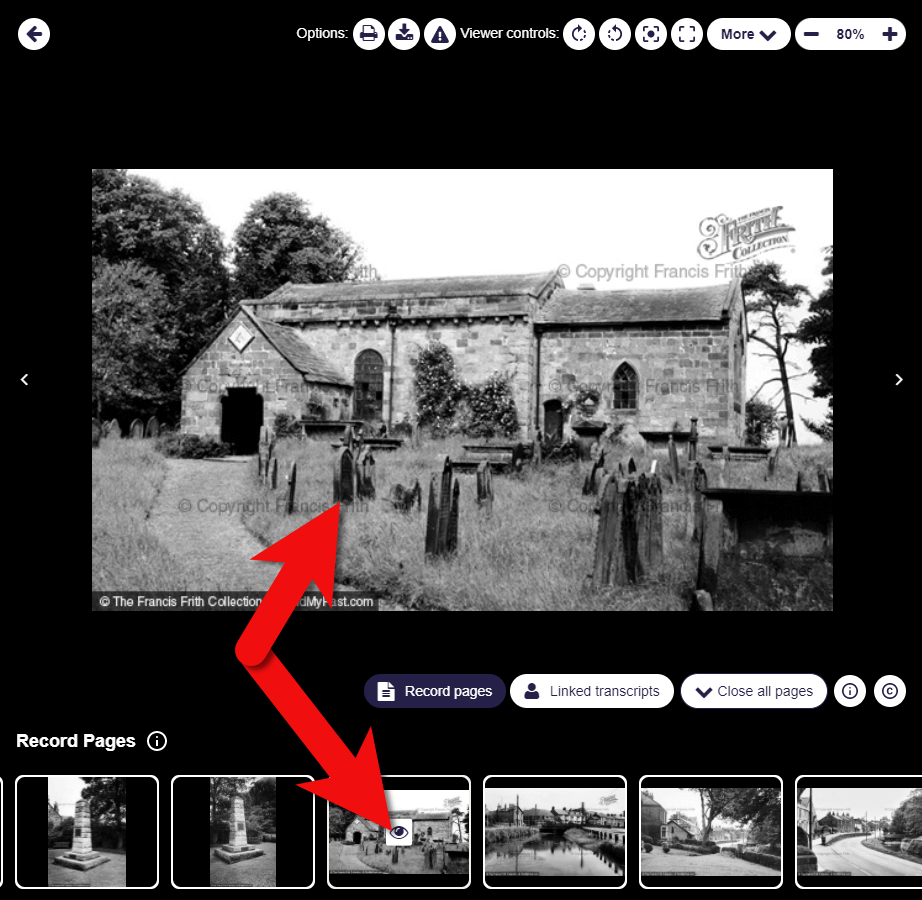
How to browse the Francis Frith photo collection at Findmypast
Lisa’s Tip: If your ancestors sailed from a British port, search the collection to see what it looked like at that time.
“Be clever with your keywords.” Alex Cox, Findmypast
Alex recommends that before you start to search, look up the locations of your ancestors on a map. Have a look at the area. Doing so may provide additional ideas for your searches.
In addition to searching for locations, use the keyword search field to search for words describing elements of your ancestors’ lives. Try words like:
Use the distance slider to expand and narrow your search geographically. Keep in mind that 10 miles on either side of your ancestors’ town really isn’t that far. By expanding your search with the distance slider, you might be able to find helpful representative images, even if they don’t include your ancestors’ exact village or business.
We’re all mindful about copyright, so Alex and Lisa discussed the rules around the usage of these images in our family history work. Alex says you are welcome to use the Francis Frith images (which include small watermarks and a copyright statement) in a variety of ways for your family history.
Here are just a few ideas on how to use the photos:
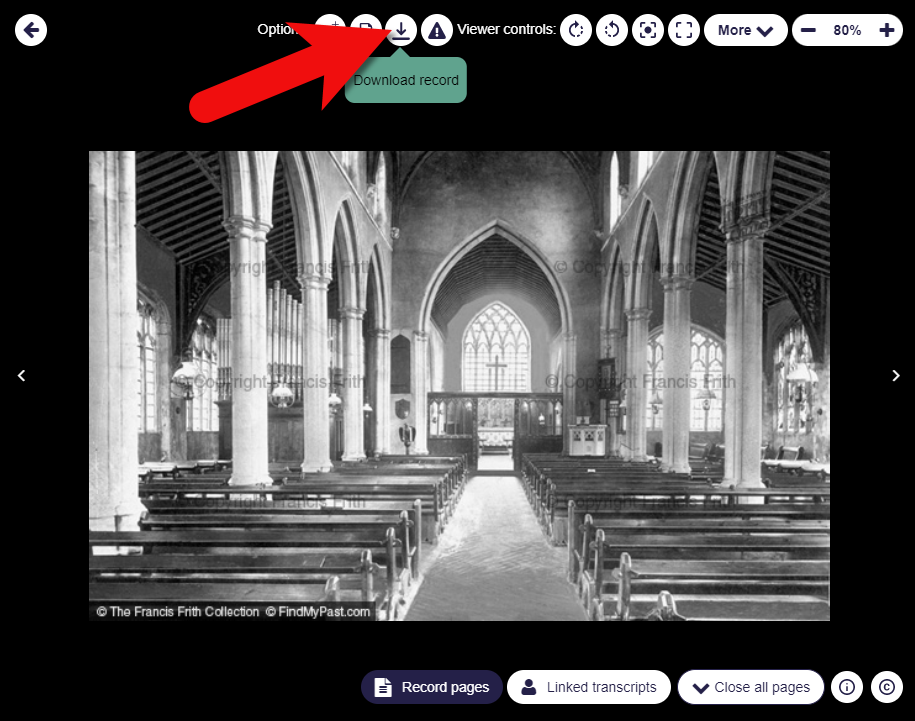
How to download a Frith photo at Findmypast
In each image transcript you’ll find a link to the original source image on the Francis Frith Collection website. Click it, and it will take you to the Frith website. There you can purchase a clean (without watermarks), high-quality version suitable for printing.
Premium Members: download this exclusive ad-free show notes cheat sheet PDF.
Not a member yet? Learn more and join the Genealogy Gems and Elevenses with Lisa family here.
You can find the Elevenses with Lisa Video Archive here or through the menu: Premium > Premium Videos > Elevenses with Lisa.
Please click here to sign up now if you haven’t already. You’ll receive a BONUS free eBook with your first email.
The places where your ancestors lived can tell you a lot about their lives. I’m going to show you a free and easy technique for plotting land in Google Earth.
episode 67
Would you like to be able to find your ancestor’s property on a map today? Keep reading and watch the video to learn how. We’re going to take U.S. government survey legal land descriptions found in sources such as Federal Land Patents and quickly and easily plot the boundaries in Google Earth Pro. I’ll also show you an easy way to do it for property in Canada too.
(PREMIUM MEMBERS: Get your ad-free PDF cheat sheet for this episode in the Resources section at the bottom of this page. Not a member yet? Click here to join the Genealogy Gems family and get all the benefits.)
In the video I show you how to plot the boundaries of a piece of land in Google Earth. We’re going to take U.S. government survey legal land descriptions found in sources such as Federal Land Patents and quickly and easily plot the boundaries in Google Earth Pro. I’ll also show you an easy way to do it for property in Canada too. These strategies come from my book The Genealogist’s Google Toolbox,
These days there are actually three versions of Google Earth:
All are free, but they are not the same. The app and web browser versions are sort of “Google Earth lite.” The software is what you want because it has all the bells and whistles that will allow you to do all the things I’m going to show you today.
Plotting legal land descriptions in Google Earth has its advantages. If you’re plotting the land of your ancestors, you’ll be able to see what the area looks like today and what the current street names are. In Google Earth you’ll also have access to additional tools that you can use in conjunction with the boundaries you’re going to create, such as historic maps, area photos, and a wide range of data sets that provide more information about the area.
The first thing to do is check to make sure you have the most current version of Google Earth on your computer. Again, we’re using the software so you need to do this on your desktop or laptop computer. You want to make sure you have Google Earth Pro – LINK – A tell tale sign that you don’t is if the Google Earth globe icon on your desktop is grey and not blue. Open it and in the menu go to Help > About Google Earth. Here it should say Google Earth Pro and you can see the version number.
Check the current version number here, and if you don’t already have the program, go ahead and download it.
Now that you have it on your computer, open it up and leave it running in the background. You’ll need a decent internet connection for it to run.
Next pull up the legal land description that you want to plot. Here’s one that I have for some property owned by George Burket. I found this at the Bureau of Land Management Government Land Office Records website. This free website is where you can search for land patent that your ancestors once held.
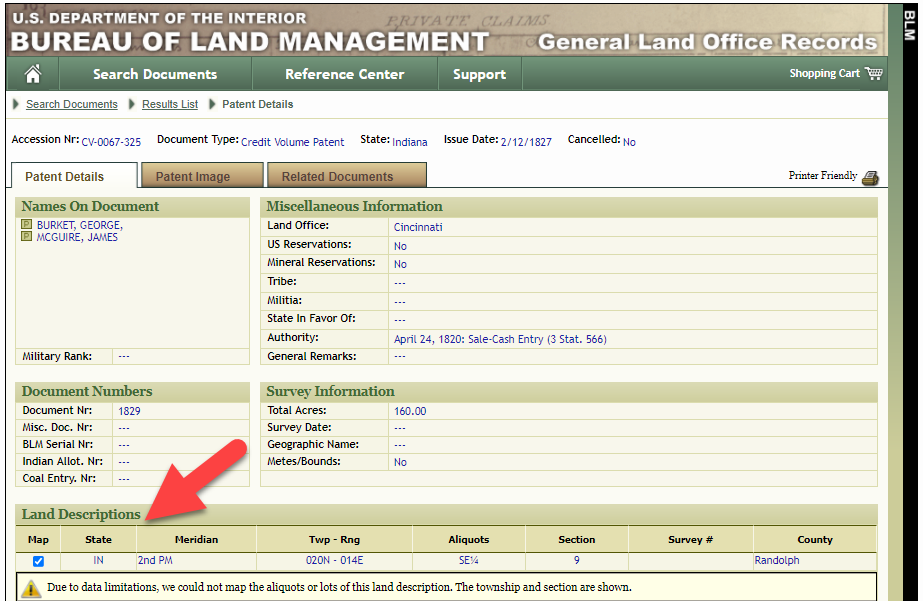
Legal land description at GLO
Even though the Bureau of Land Management places it on the map on their website, you can’t download this or add to it. The advantage of plotting this in Google Earth is that you will have access to much more geographic data, you can add many more details to the map, you can use it in conjunction with other related mapping work that you’re doing, and you can save and share it.
This description gives us the exact coordinates of the property. Jot down the land description or keep it open in your browser tab so you can refer to it.
In a new browser tab, we’re going to type in http://www.earthpoint.us. This will take us to the Earth Point website.
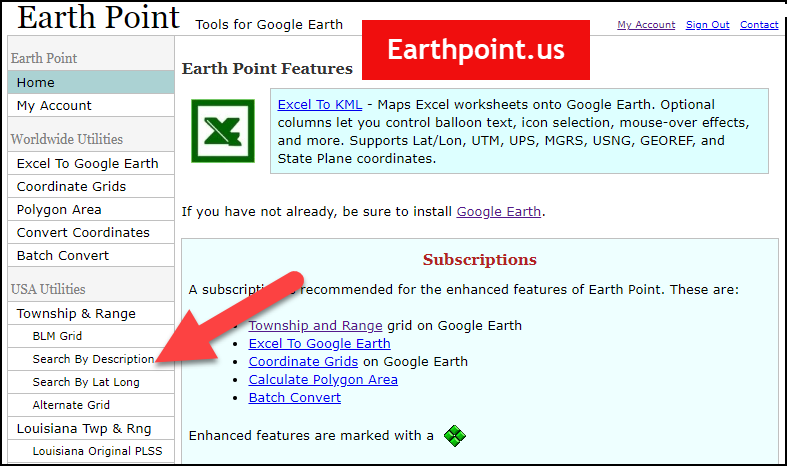
Search by legal land description at Earth Point
This website is free, although some of the features are available only with a paid subscription. Thankfully, the tool for plotting your ancestor’s land patent is free. Some of the free features do require that you sign up for a free account. The feature we are going to use currently does not.
On the Township and Range – Search by Description page you will see a field for each piece of information found in the land description. It’s important to enter this information in the order presented starting with the State. Select the state from the drop-down menu. Pause a moment to allow the fields to recalculate. This allows the appropriate data to be loaded into the next field based on your selection.
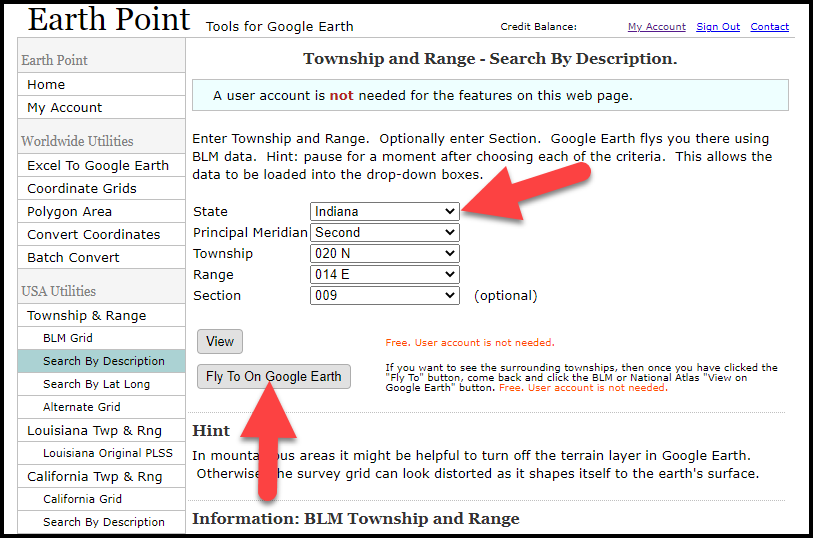
Entering data at Earth Point
After you have made each selection, click the Fly to on Google Earth button. This will generate a KML file which can be saved to your computer. KML stands for Keyhole Markup Language, which is the file type that Google Earth uses and understands. KMZ are zipped KML files which also are used by Google Earth.
Save the file to the desired location on your hard drive. Then click the file to open it. It will automatically open in Google Earth (which you already have open). The KML file is now located in your Temporary Places folder in the Places panel. The land is has now been automatically plotted on the map.
The orange outline is the township. In this example it is township T20N R14E. Click the orange ball in the center of the township for details. In the details you’ll find the total number of acres in the township, the latitude and longitude coordinates for the center of the township and corners.
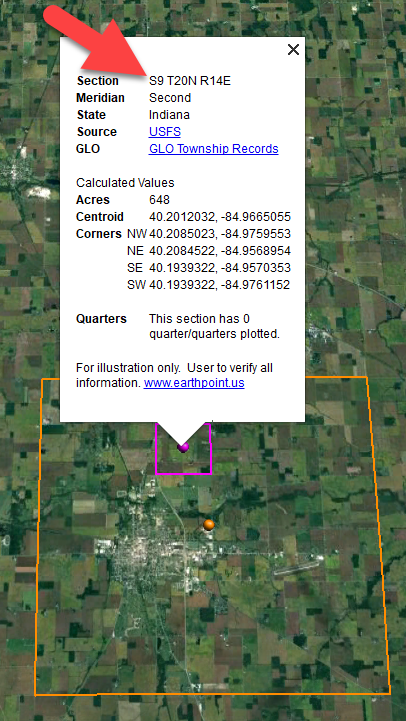
Township in Google Earth
The pink / magenta outline is the Section where the property is. Click the pink center dot for the details:
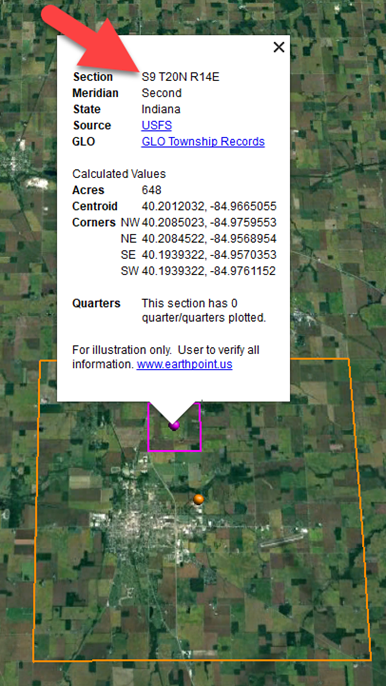
Land section in Google Earth
In this example Section 9 consists of 648 acres.
Notice that Earth Point was able to plot the land down to the Section level. However George Burket did not own the entire section. We must return to the land description for the Aliquots.
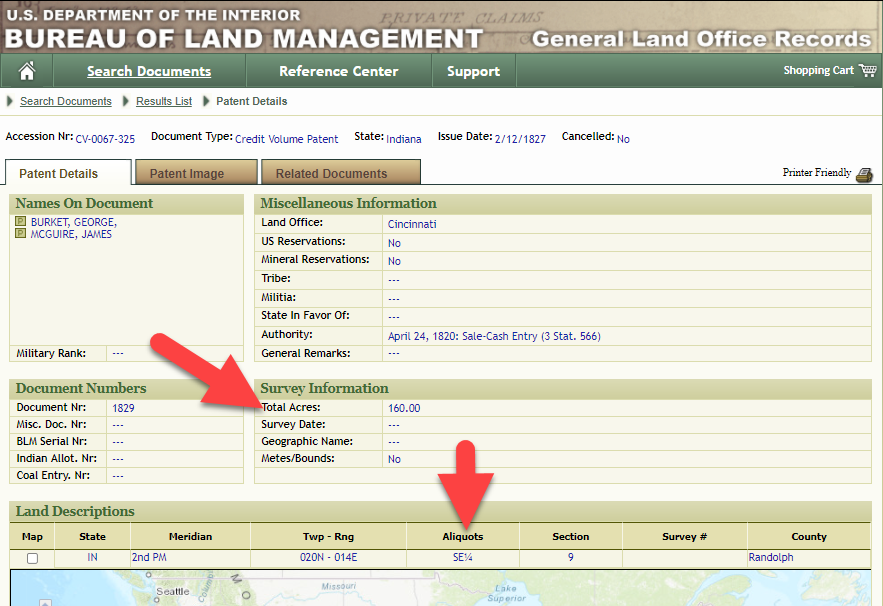
Aliquots in Legal Land Description
In this example, the land was the southeast quarter (SE1/4) of section 9. The land was a total of 160 acres.
We can use the Polygon tool in Google Earth to plot the 160 acres. In the toolbar, click the Polygon tool. This will open the New Polygon dialog box. Type a title, description and source citation.
As you hover your mouse over the map you will notice that the cursor is now a square shape. Click the screen on each of the four corners one at a time in order to set the four corners of the property – in this case the southeast quarter of the section. Once you have drawn the shape you can click on the handle on any corner to adjust precisely.
Click the Style / Color tab in the New Polygon dialog box to adjust the color and opacity of the acreage polygon. You can add color and thickness to the outline, and color and opacity to the fill of the shape. When you have it set the way you want it, click OK to close the New Polygon box. The Polygon is now set.
On the left side of the Google Earth screen you will see a series of panels: Search, Places and Layers. At the bottom of the Places panel is the Temporary folder. This is where the KML file was placed when it was opened. However, like its name implies, this is a temporary location. If you want to keep it, you’ll need to move it to a filed location within the Places panel. This will not change the position of the polygon on the map, only where it is filed and saved in the Places panel.
To file a polygon, click on the file in the Places panel, drag it to the desired location, and drop it. Next, go the main menu and click File > Save My Places. This will save your work so that when you close the program it will not be lost. Google Earth doesn’t auto-save.
The polygon plotting the acreage will be visible on the map when the box is checked in the Places panel. If you uncheck the box for the polygon it will still be there, but it will not be visible on the map. This allows you to create and save many items of interest without always having to have them displayed and cluttering up the map in Google Earth.
After your land polygon has been set, you may want to rename it. There are two ways to do this:
You can also restyle the polygon and edit the text. Start by going to the Places panel and click the arrow pointing at the Polygon’s globe icon. This will open it and show the nested content. Click to select the Polygon. Now you can right-click it (PC) and select Properties – OR – go to the menu under Edit > Properties. Either way it will reopen the Polygon dialog box so that you can make the desired changes. When you’re done, click the OK button to close the Polygon.
Snagit is the tool I used to capture the various views of the land I plotted in Google Earth. Learn more about Snag it by watching my videos and reading the show notes for episode 61 (for beginners) and episode 66 (advanced).
Although the Earth Point website doesn’t plot Canadian land, the Legal Land Description Converter website does. It can help you find land in Western Canada (British Columbia, Alberta, Saskatchewan & Manitoba) subdivided by the Dominion Land Survey (DLS) and the Alberta Township System (ATS).
These show notes feature everything we cover in this episode. Premium Members: download this exclusive ad-free show notes cheat sheet PDF. Not a member yet? Learn more and join the Genealogy Gems and Elevenses with Lisa family here.
Gwynn: I would like to know how to match plat with GPS coordinate/ current street address.
Answer: I cover how to overlay a plat map in Google Earth and discover the current street address in my book The Genealogist’s Google Toolbox.
Roger D: How exact do you need to be in picking points? Does Google snap to mid-points of lines?
Answer: Try to be as exact as you can, however as I showed in the video you can reposition them as needed. Google Earth doesn’t snap.
Lyn: Can I do this with English tithe maps?
Answer: There isn’t a website converter that I know of. However I do cover how to overlay digitized maps in Google Earth in my book The Genealogist’s Google Toolbox.
The manufacturer price is going up August 31, 2021. Now’s the perfect time to get your official Elevenses with Lisa mug.
You can also find them through the menu: Premium > Premium Videos > Elevenses with Lisa.