Using the US Public Records Index for Genealogy
The US Public Records Index can be useful for genealogy–if you understand what it is and how to use it properly. Here’s an example and some tips.
Not long Russ sent in this tip recommending the US Public Records Index for genealogy:
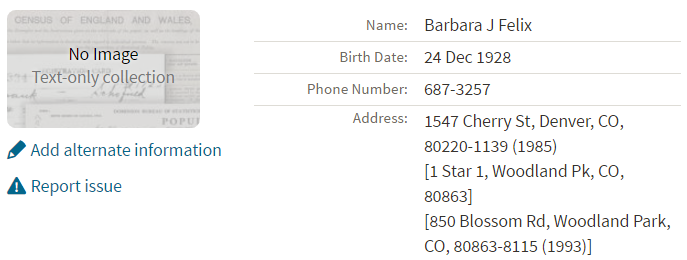
“I was listening to Genealogy Gems Podcast 181 [in which] you were talking about where do we search while we are waiting for the 1950 Census….I recently discovered a wonderful resource, on Ancestry.com, that I have used along with city directories. The name of the record group doesn’t sound interesting but it can be a Gem for you: the US Public Record Index, 1950-1993, Volume 1 and 2. Volume 1 is far more interesting with more data. A search will return a name AND birth date, along with more than one address, zip code and sometimes phone numbers.”
Here’s a sample search result:
Russ kindly sent me Ancestry’s description of its online database for Volume 1, which says that original data comes from public records spanning all 50 states, such as voter registration lists, public record filings, historical residential records and other household database listings.
Collection Profile
What: U.S. Public Records Index
Where: Ancestry, FamilySearch, MyHeritage
Years Spanned: 1950-2009
Source Type: Lacking original source citations. “Hints to go on and follow up with further research into verifiable sources.”
Then he shared the following example of using the US Public Records Index to find recent relatives that he can’t look up yet in the 1950 census:
“I had a hint for a cousin in a yearbook. I know that she recently lived in Philadelphia, Pennsylvania. I didn’t know where she went to college and I know her birthday. The name is not unique, not also not common. At the same time, I had the hint for the Public Record Index. You know those things we can’t use in a proof argument, but there [she] was in Philadelphia. The yearbook had her picture and only her name, not spelled the way I know it, but the Public Record Index puts her in Philadelphia at the right time and place.
I have seen 2 or 3 addresses for folks in the 1980s and 1990s in these indexes. Not all addresses have dates, but some do. I have one cousin with 5 addresses since 1983 and he won’t be in a census until the 1960 Census Records are released.”
Russ blogs about his family history at worthy2be.wordpress.com/. Thanks for the tip!
The U.S. Public Records Index pops up in my search results sometimes, too. Both volume 1 and volume 2 are searchable on Ancestry.com, as Russ says, in separate databases. Each has over 400,000 records in it. There’s also a free partial version of this database for 1970-2009 at FamilySearch.org and yet a third version at MyHeritage, with 816 million records, with nearly the same time frame. The FamilySearch database says its data comes from “telephone directories, property tax assessments, credit applications, and other records available to the public.”
More on the US Public Records Index
Here are a few tips worth mentioning about the US Public Records Index. Some of these points come from the FamilySearch wiki:
- Not everyone who lived in the U.S. appears in the index, and you’re more likely to find birth information for those born between 1900 and 1990. What you’ll find is primarily where someone lived, and often when they lived there.
- It’s rarely possible to positively identify a relative in this index since there’s limited information and it spans the entire country for up to a half-century, and you can’t follow up on the record it comes from because the index doesn’t say where individual records come from. So as Russ says, this is a great resource to use in combination with other records. It’s a similar concept to the way you might consult family trees that lack sources: hints to go on and follow up with further research into verifiable sources.
- When you find more recent listings, you can sometimes find telephone numbers for living distant relatives. If the thought of cold-calling distant relatives seems a little intimidating, listen to my Family History: Genealogy Made Easy podcast, episodes 14-15, for tips–and to get your courage up!
 More Gems on Researching Recent Relatives
- The 1950 Census Substitute: What to Use Until Its Release Date
- Google Earth for Genealogy: Map Your Own Childhood Homes
- World War II Military Yearbooks
Family History Episode 4 – Genealogy Conferences, the SS-5, Delayed Birth Records and Death Records
![]() Published October 29, 2013
Published October 29, 2013
Download the Show Notes for this Episode
by Lisa Louise Cooke
Welcome to this step-by-step series for beginning genealogists—and more experienced ones who want to brush up or learn something new. I first ran this series in 2008. So many people have asked about it, I’m bringing it back in weekly segments.
Episode 4: Attending Genealogy Conferences and Vital Records Requests
In our first segment, our guest is the longtime online news anchorman of genealogy, Dick Eastman, the author of Eastman’s Online Genealogy Newsletter. He talks about the changing industry and the benefits of attending genealogy conferences.
Next, you’ll learn the ins and outs of using some “vital” sources for U.S. birth and death information: delayed birth records, Social Security applications (SS-5s) and death certificates.
Genealogy Conferences Conversation: A Few Updates
- Dick and I talk about Footnote.com as a relatively small site. Has that ever changed! Footnote.com is now Fold3.com and it’s a go-to site for millions of online American military records.
- Family History Expos still offers an exciting conference, especially for first-timers. But there are others as well: In the United States, there’s RootsTech, the National Genealogical Society and many state and regional conferences (like one near my home, the Southern California Genealogical Society’s annual Jamboree). Find a nice directory at Cyndi’s List. Many conferences are starting to offer live streaming sessions for people who can’t attend: check websites for details. In addition, Family Tree University offers regular virtual conferences—where sessions and chat are all online! If you live outside the U.S., look for conferences through your own national or regional genealogical societies. If you can get to London, don’t miss Who Do You Think You Are Live.
- Dick now writes all of his Plus content himself. If you haven’t already checked out Eastman’s Online Genealogy Newsletter, you should! Both his free and Plus newsletters are great insider sources on what’s new and great (or not-so-great) in the family history world.
The SS-5
You can order a copy of the application that your ancestor filled out when they applied for a Social Security Number: the SS-5. I have done this, and they really are neat, but they aren’t cheap. So let’s talk about the facts you’re going to find on them so you can determine if it is worth the expense.
The SS-5 has changed slightly over time, but may include the applicant’s name, full address, birth date and place and BOTH parents’ names (the mother’s maiden name is requested). If your ancestor applied prior to 1947 then you will also very likely find the name and address of the company they worked for listed, and possibly even their position title.
Here’s an example of a Social Security application form:

In the 1970s, the Social Security Administration microfilmed all SS-5 application forms, created a computer database of selected information from the forms, and destroyed the originals. So it’s important to order a copy of the microfilmed original, rather than a printout or abstract from the Administration’s database. And luckily now you can request a Social Security Application SS5 Form online under the Freedom of Information Act.
It will help to have your relative’s Social Security Number (SSN) when you apply for a copy of their SS-5. First, it gives you greater confidence that their SS-5 exists. Second, it’s cheaper to order the SS-5 when you have their SSN. Third, the Social Security Death Index, in which you’ll find their SSN, usually has death data that makes your application for their SS-5 stronger. Privacy concerns have caused some genealogy websites to pull the SSDI, but you can still search it (in many instances for free) at the links provided in Episode 3.
Finally, here’s a little background on the Social Security Number itself. The nine-digit SSN is made up of three parts:
The first set of three digits is called the Area Number. This number was assigned geographically. Generally, numbers were assigned beginning in the Northeast and moving westward. So people whose cards were issued in the East Coast states have the lowest numbers and those on the West Coast have the highest numbers.
Prior to 1972, cards were issued in local Social Security offices around the country and the Area Number represented the state in which the card was issued. This wasn’t necessarily the state where the applicant lived, since you could apply for a card at any Social Security office.
Since 1972, when the SSA began assigning social security numbers and issuing cards centrally from Baltimore, Maryland, the area number assigned has been based on the ZIP code of the mailing address provided on the application for the card. And of course, the applicant’s mailing address doesn’t have to be the same as their place of residence. But in general the area number does give you a good lead as where to look for an ancestor.
The next two digits in the number are called the Group Number, and were used to track fraudulent numbers.
The last set of four digits is the Serial Number, and these were randomly assigned.
UPDATE: The website for ordering Social Security applications (SS-5s) has changed since the podcast first aired. For current ordering instructions, including online ordering, click here. The cost is still $27 to order a deceased relative’s SS-5 if you know the Social Security number and $29 if you don’t know it.
Delayed Birth Certificates
After 1937 folks who qualified to apply for social security had to have proof of their age. If they were born prior to official birth certificates being kept in their state, they applied for a delayed birth certificate.
Anytime someone needs a birth certificate for any reason, they have to contact the state—and often the county—in which the birth occurred. If a birth certificate exists, they can simply purchase a certified copy. But if there were no birth certificates issued at the time of the person’s birth, they could have a “delayed birth certificate” issued by that state or county.
In order to obtain a delayed certificate, they had to provide several pieces of evidence of their age. If these are considered satisfactory, the government would issue the certificate and it would be accepted as legal proof of birth by all U.S. government agencies.
Originally people turned to the census for proof of age. But eventually the Social Security Administration began to ask for birth certificates. For folks like my great grandmother who was born at a time and place where birth certificates were not issued, that meant they had to locate documents that could prove their age and allow them to obtain a delayed birth certificate. Delayed just meaning it was issued after the time of the birth.
Delayed birth certificates are not primary sources. (Remember we talked about Primary Sources in Episode 2. Since the delayed certificate was based on other documents, and not issued at the time of the event by an authority, such as the attending physician, then it is not a primary source. This means that while it’s great background information, it is more prone to error. In order to do the most accurate genealogical research you would want to try to find a primary source if possible. Chances are your ancestor used another primary source, such as an entry in the family bible, to obtain the delayed birth certificate.
The process for ordering a delayed birth certificate is likely going to be the same as ordering a regular birth certificate. You would start with the checking with the county courthouse, and then the Department of health for the state you’re looking in. Let them know that the birth record is a delayed birth certificate. Also the Family History Library card catalogue would be a place to look as many were microfilmed. Go to www.familysearch.org and search for delayed birth records by clicking on Search from the home page. Then click Catalog and do the keyword search just as the episode instructs, using “delayed birth” as your keyword. (Within that search, you can also add parameters for the place name.)
So the lesson here is that even though your ancestor may have been born at a time or in a location where births were not officially recorded by the state, they may very well have a delayed birth certificate on file.
Ordering Death Certificates
The Social Security Death Index is just one resource for getting death information. But in the end you’re going to want the primary source for your ancestor’s death, and that’s the death certificate. While many of your ancestor’s born in the 1800s may not have a birth certificate, there is a much better chance that they have a death certificate since they may have died in the 20th century. Each state in the U.S. began mandating death certificates at a different time, so you have to find out the laws in the state, and probably the county, since death certificates were filed at the county level.
As I said before, the death certificate is going to be able to provide you with a wealth of information. Of course you’ll find the name, date of death and place of death, and possibly their age at death and the cause and exact time of death, place of burial, funeral home, name of physician or medical examiner and any witnesses who were present. The certificate is a primary source for this information.
You may also find information such as their date and place of birth, current residence, occupation, parent’s names and birthplaces, spouse’s name, and marriage status. But because this information is provided by someone other than the ancestor themselves it is really hearsay, and the certificate is considered a secondary source for that information.
And lastly you may find a name in the box that says Informant. This is the person who reported the death to officials. Informants are often spouses, children, and sometimes, depending on the person’s circumstances, just a friend or neighbor. But the informant is almost always someone that you want to investigate further because they obviously were close to your ancestor.
Once you think you know the location where your ancestor died, and the approximate if not exact death date, you’re ready to order a certificate. If the person died in the last 50 years you’ll probably have really good luck at the county courthouse Department of Vital Records. The older the record, the more likely it may have been shipped off by the county records department to the state Department of Health. Look for helpful links to death records at Cyndi’s List Death Records.
Here are some tips that will ensure that you don’t get bogged down in bureaucratic red tape:
- Get the appropriate request form – this is usually available online.
- Print neatly and clearly – if they can’t read it, they will send it back to be redone.
- Provide as much information as you have.
- Provide a self addressed stamped envelope.
- Make one request per envelope.
- Include a photocopy of your driver’s license to prove your identity.
- Be sure to include your check for the exact amount required.
- Make a copy of the request form for your records and follow up.
- Lastly, keep in mind that county offices have limited personnel and are often swamped with paper work. So my best advice is that the more courteous and thorough you are the more success you’ll have.
Online Death Indexes
In the case of very old death certificates, as well as birth certificates, some state agencies have opted to hand them over to state Archives and Historical Societies, or at least make them available for digitizing.
And there you have it, lots of different avenues for tracking down your ancestor’s death records providing you with key information for climbing your family tree.
Family History Episode 40: How to Start a Genealogy Blog, Part III: Step by Step
Family History: Genealogy Made Easy Podcast
with Lisa Louise Cooke
Republished July 15, 2014

Listen to the free in podcast in your favorite podcast app.
https://lisalouisecooke.com/familyhistorypodcast/audio/fh40.mp3
Download the Show Notes for this Episode
Welcome to this step-by-step series for beginning genealogists—and more experienced ones who want to brush up or learn something new. I first ran this series in 2008-09. So many people have asked about it, I’m bringing it back in weekly segments.
Episode 40: How to Start a Genealogy Blog, Part III: Step by Step
In the last two episodes you’ve been hearing from experienced genealogy bloggers about family history blogging. I hope it piqued your interest and got you thinking about the possibility of doing it yourself. As we’ve discussed, it’s a great way to share your experiences with other researchers and potentially connect with long lost relatives.
Well in today’s episode I’m going to walk you through setting up your own family history blog step-by-step. By the end of this episode you could have your own family history blog up and running and sharing your enthusiasm about genealogy with the world. How does that sound? Are you willing to give it a try? And even if you’re not looking to start blogging today, listen in and plant the seeds for the future.
From the Mailbox:
A long-time listener wrote in this last week about the recent blogging episodes:
“The Transcript software mentioned by Denise Levenick looks great – I downloaded and installed it this morning. I am giving a brief software demonstration at the Greater Portland Chapter of the Maine Genealogical Society’s 30th Anniversary Celebration tomorrow and I am going to let people know about this product.
Episode 38 and Episode 39 have really got me thinking about starting my own blog. It won’t be easy with my 50 hours plus a week civil engineering job, but your podcasts have motivated me. Thank you!” -Will Haskell, Listener to All Your Podcasts
Transcript software is really cool: download the most recent version for free here. And that’s just one example of the kind of great tech tips that Denise Levenick blogs about at The Family Curator Blog!
Follow-up: when republishing this episode, we were curious about whether Will ever started a blog. He did! It’s very cool! Find Will’s Genealogy Blog at http://wchgenealogyblog.blogspot.com/.
Also, listener Anne-Marie had some questions about how to make progress with her Maw-gee research, specifically how to track down their immigration records. She wrote in again to say that she’s going to follow up on our suggestions and let us know what she finds. But she also had some comments about my interview with genealogy blogger the Footnote Maven (Episode 38):
“I have begun listening to Family History and Genealogy Gem podcasts from the beginning again. When I listened the first time I was so novice that I did not always understand what I was hearing. It’s great to have this audio reference guide.”
How to Start a Genealogy Blog: Step by Step
Now before we get started on created your blog let me just say that there are probably countless websites for setting up blogs and certainly countless ways to go about it. My goal in the approach that I’m going to take is to get you up and running in a short period of time for free. This is a great way to get your feet wet, see if it’s for you, and if you decide to get more elaborate with it later you can always do that.
1. Decide what the purpose of your blog is.
When it comes to a genealogy themed blog there are still lots of options – so here are some ideas:
- A Research Log
- A Surname Focus
- Family Traditions, Family Recipes, Photos
- Genealogy News
- Focus on a certain record type
- Provide beginner education
- Interviews with relatives
- History of an ancestor’s home or community
- Have a general all purpose blog
- Follow a pattern for each day
And remember the Footnote Maven’s good advice – You can’t be an expert in everything, so don’t even try. To me a good way to stay out of that trap is to stay narrowly focused. If you find yourself having to be an expert in everything you’re blog theme is probably too broad. And of course, be yourself. Do what you do best!
2. Use Blogger (http://www.blogger.com) to create your blog. It’s free, and easy to use.
Blogger is owned by Google so if you already have a Google account than you’re one step ahead of the game. If not that’s the first thing you’ll need to do. Then click “Create Your Blog Now.”
Note: As on any website, the organization and features of Blogger change over time. The following description was current at the time of publication. Use this following descriptions and concepts to guide you through the current version of Blogger.
Name your blog. Of course, the name should reflect what your blog is about, but it’s also good to think of one that is catchy, and one that you can get the URL address for. The URL name you pick has to be something that isn’t already being used, so it might take a few tries.
How to Name Your Blog:
- Type in the Title Field
- Type the URL you want in the “Blog Address URL” field
- click the Check Availability link to see if it is available
- Type in the word verification code
- Click the CONTINUE button.
3. Select a Design Template:
- Scroll through the design templates and pick one you like
- Click the select button
- Click the CONTINUE button
- You’ll get a page that says Your Blog has been created!
- Click the orange arrow that says START BLOGGING.
There are a couple of more things we’ll want to do with our blog before we get to the business of actually posting blog articles. First let’s just get familiar with the blog dashboard. This is sort of the “behind the scenes,” an area your readers will never see, but where you will actually do your blogging.
There are 4 tabs along the top: Posting, Settings, Layout and Monetize.
Blog Tune Up: From the Posting Tab….Click the SETTINGS tab. Type up a short description of the blog.
Vocab Word: KEYWORDS
Keywords label your blog so that when readers go searching for a blog to read they will find it. So some good keywords for this new blog that I’m creating would be
- Genealogy
- Family history
- Family tree
- Blog
- How to
Keywords can be single words or a short keyword phrase such as “family history” which readers will very likely be searching for. Blogger allows you 500 characters.
The rest of your options on this Basic Settings page are mostly about how your content will be labeled and found on the internet. You can take a look through the options but in most cases you will want to leave them on their default settings. When you’re done just click the SAVE SETTINGS button at the bottom of the page. And for right now you can leave all of the other types of settings as is as well. There are about 9 different categories within the Settings Tab that you can tweak, but the default settings on these are just fine for now.
4. Add at least one gadget. Click the LAYOUT tab. I love working with this area because this is where you get to customize the layout and the types of gizmos and gadgets that are on your blog. We don’t want to overdo it but there are some really good ones you’re not going to want to miss.
Blogger will automatically add a couple of gadgets to the sidebar of your blog. They are:
- Followers – people who use blogger who subscribe to your blog’s RSS feed.
- Blog Archive – This gadget automatically archives your older blog posts.
- About Me – This is just a place where you can tell your readers a little more about yourself and include your email address if you wish.
To see what other types of gadgets you can add just click the Add A Gadget link in top side box. That will bring up a window with lots of choices for you:
- Search Box
- Text
- Photos
- Slide show
- Video Bar
- Polls
- Lists
- RSS feed
- Subscription Links
- HTML / Javascript
Each one of these is very easy to use and pretty self-explanatory. But I recommend not overloading your blog. Only include, at least to start, the items you really think your readers would get some value from. Otherwise it can just be annoying distraction that gives readers a reason to leave your blog.
How to Add a Picture Gadget to Your Blog:
- Cick the plus sign on the right hand side of the page for the PICTURE gadget.
- This will bring up a page call CONFIGURE IMAGE.
- Give the image a title
- Type a Caption
- Link to an image on the web OR upload from your computer hard drive.
- (To upload from your computer make sure the “From your computer” button is selected and then just click the BROWSE button. Navigate your way to the location of the photo on your computer’s hard drive and select it.) Once the image appears that means it has been successfully uploaded to Blogger.
- (If you want to link this image to another website, then you will want to type in the address in the LINK field.)
- Click the orange SAVE button and we’re done.
- Now you will be back at your dashboard in the Layout mode. You will see that the top box on the side is now labeled as the title you gave your image.
- Click the blue PREVIEW button at the top and a preview window will open showing how your blog currently looks and it will include the image you just uploaded.
5. Rearrange Your Gadgets on Your Blog. Hover your mouse over the gadget and your cursor will turn into a cross with arrows. Click and grab the gadget and drag it where you want it and drop it in place. Click the PREVIEW button to see how that looks.
Genealogy Blogging Summary
We’ve made a lot of progress on our blog in a very short amount of time. Take some time this week to take the steps we took in this episode:
- Decide on the theme or focus on of your blog
- Get a Google Account and create your Blogger blog account with your chosen name and secure the URL address to go with it.
- Pick your design template
- Add at least one gadget from the choices provided
- And move the gadgets you have so far around until they are in the order you want.
Next week we will finish up this family history blogging lesson with adding a few more gadgets and details, doing a bit of pre-planning for our blog posts, publishing your first article, and then talking about how your readers will subscribe to your blog.
Finally, here’s a link to genealogy expert (and blogging guru) Amy Coffin’s blog post, “Another Jones Surprise or Why Genealogists Should Blog.” Next week’s episode will include handouts on Amy’s great ideas for up to a year’s worth of genealogy blog posts by societies or individuals—you won’t want to miss that!