From Diahan Southard, Your DNA Guide here at Genealogy Gems: DNA testing is one of the most personal ways to get involved in your family history. You have DNA from your parents, who have DNA from their parents, and so it goes, back into your greats and great-greats. The technology of genetic genealogy is all about tapping into that DNA record and pulling out information that might be useful in your family history. DNA can do this for you in two ways:
First, it connects you to places. These are places where your ancestors came from a hundred, a thousand, or tens of thousands of years ago.
Second, it connects you to people. These people are your genetic cousins, other living people who have taken the same DNA test that you took. The similarities in your DNA tell you that you share a common ancestor. You can then examine the pedigree of your match and work with them to help verify your family history, or give you new ideas about who your ancestors might be.
Types of DNA Tests for Family History
You have three choices of DNA tests, each with its own unique purpose.
Autosomal DNA – For any ancestor, male or female, who is fewer than 5 generations from you, you can take the autosomal DNA test at either Family Tree DNA, AncestryDNA, 23andMe, or MyHeritage to find out more about that individual. Remember with the autosomal DNA that you always want to test the oldest generation first. So anyone who does not have both of their parents living should take the autosomal DNA test.
mtDNA – If I want to know about a female ancestor, let’s say Mary West, I need to find Mary’s daughter’s daughter’s daughter’s, etc. child (male or female) to take the mitochondrial DNA (mtDNA) from Family Tree DNA.
YDNA – Essentially, if you want to know about a male ancestor, you need to find a direct male descendant to be tested. So if I want to know about my 3X great grandfather Morris Mitchell, I need to find Morris’s son’s son’s son, etc. until I find a living male with the Mitchell surname who can be tested on the Y chromosome DNA (mtDNA) test at Family Tree DNA.
DNA Testing Companies
There are several companies that test DNA for family history including:
Each of these companies offers a very similar autosomal DNA test, but each has its own unique tools and databases. Decide which company you want to test with by evaluating things like:
their website accessibility
their company goals
and especially the size of their database
You can see a table comparing these companies here.
Great (DNA) Expectations
The best thing you can do when setting out on your genetic genealogy journey is set good expectations. You can expect that the test will document the personal genetics of the person who takes it. By so doing, you are creating another genealogy record that will last for generations. This test will link you to your ancestors via your cousins. That means that you may take the test looking for ancestors, but what you get are cousins. It will take traditional genealogy work to turn those cousin connections into ancestral connections. Above all, expect that this is a growing industry, and what we know today is different than what we will know tomorrow, so enjoy the journey!
Genetic Genealogy for the Layman
There are several comprehensive books on Genetic Genealogy out there. However, for the layman who just wants to understand their DNA test results and get some additional value from them, an entire book full of scientific explanations can be overwhelming and daunting. The following email is one we receive regularly:
“Could you direct me to an understandable publication which explains dna results in layman’ terms ? Thank you” – Anne B.
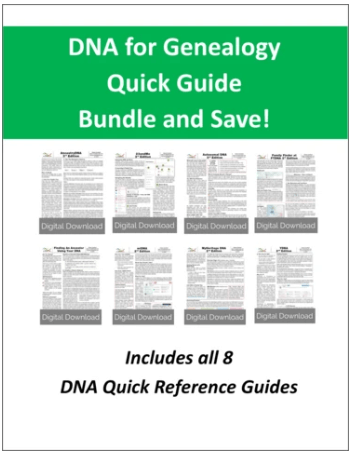
Genealogy Gems Publications is proud to publish Diahan Southard’s wonderful series of DNA quick reference guides for understanding your DNA results in plain language, and helping you get the most out of the investment you made in testing.
8 Guides to Help You Understand and Use Your DNA Results
The complete collection of DNA quick reference guides cover:
The testing companies: AncestryDNA, 23andme, Family Tree DNA, MyHeritage
The tests: Autosomal, YDNA, Mitochondrial
How to find your ancestors using your DNA.
All guides are available in convenient digital download format.
Click here to shop now: Save on the set of 8 DNA quick reference guides at the Genealogy Gems store.
Free Podcast: Diahan has a regular segment on the free Genealogy Gems Podcast where she answers your questions and provides invaluable insights into the latest in genetic genealogy.
Free Articles: You can browse the complete archive of DNA articles at Genealogy Gems. The most recent will appear first and then scroll down to read through the past articles.
DNA in the News
As of March 28, 2017, AncestryDNA customers can see if their ancestors belonged to about 300 different Genetic Communities, small migratory groups that can be identified by DNA. In the next free Genealogy Gems podcast episode #202, you will learn more about it straight from Ancestry’s Chief Scientific Officer, Catherine Ball. For more information on Genetic Communities, watch the video below:
In this blog and video series I’m showing you how you can create captivating videos about your family history quickly and easily with Animoto.
In the First Episode
In episode 1 we laid a foundation for the family history video that you are going to create. Doing this will save you time and ensure a cohesive, well-told story. We also:
defined your audience
identified and outlined the story that you want to tell
collected the content that you will include in your video
If you missed episode 1, you can watch it below:
Get a Free Animoto.com Account
The first thing to do is to go to Animoto here and sign up for a free trial account, which gives you the full power of Animoto Pro. No credit card is required. This trial period is the perfect opportunity to test drive Animoto and see just how easy it is to use. As I’ve said before, if you can click, drag, and drop, you can make videos with Animoto.
The videos you create during the trial will be watermarked, but still downloadable and shareable. If you decide to use Animoto beyond the trial period, there are several pricing plan options. You can purchase as little as one month for around $16 (check their site for current pricing). If you’ve done your prep work like we did in episode 1, you can create several videos in that time period.
OK, I know you’re anxious to get going, so let’s create a video!
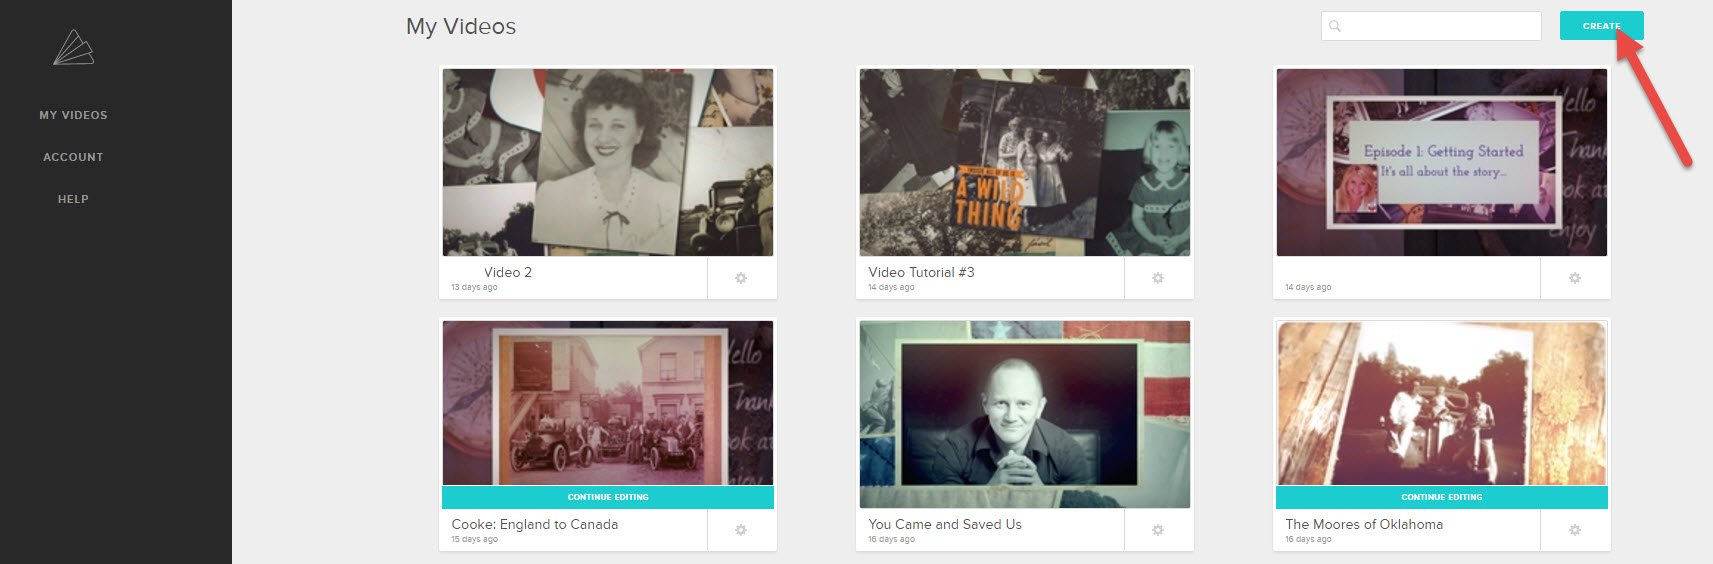
Create!
It’s super easy. Once you’re signed into your account, click the Create button.
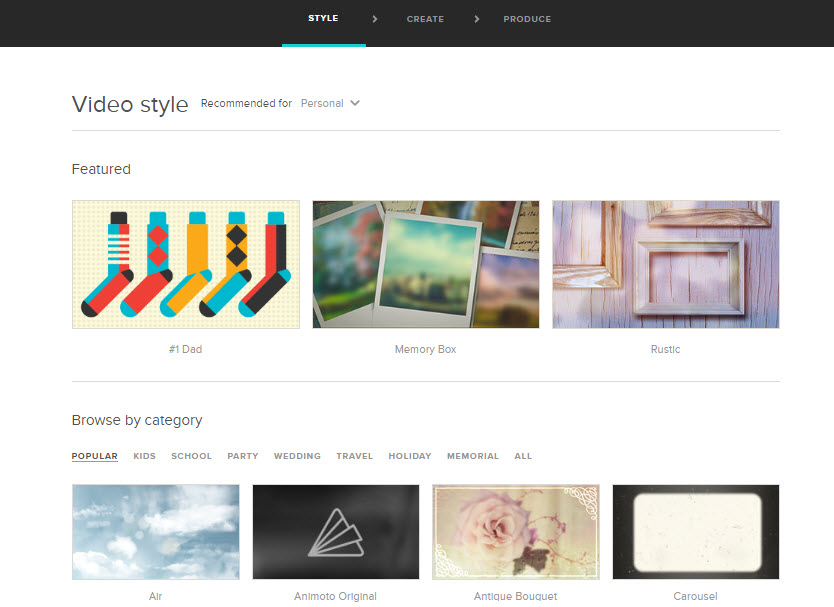
Style
First up, select a style that fits your story. Here are some of my favorites for family history:
Memory Box
Antique Bouquet
Remembrance
Vintage Voyage
Rustic
You’ll notice that some styles have a Premium banner. Those require a Premium subscription. However, if you’ve opted for a Personal level subscription you still have lots of wonderful styles to choose from.
Click on a style that catches your fancy and watch a preview of what it will look like. When you find the one you want, click the Create Video button on that style page. This will load the Video Creator.
Music
The style you chose will include a song, but you can change that if you want to. To select a new song, click Change Song, and you can pick a song from the Animoto library.
You can also upload your own music mp3 file from your computer. (Remember to keep copyright in mind, and make sure you have the rights to use the song.)
But wait, you can add more than music! You can also upload an audio file, such as a family history interview, or even an mp3 file that you created that includes both music and words.
Adding Pictures & Video
Now it’s time to add your photos, images, and video clips. Of course that’s easy because in episode 1 of this series you created an outline for your story, and you copied the files you wanted to use to illustrate that story into a folder on your computer. So you’re all set to go!
There are two ways to add files. From the menu, click AddPics & Vids, or on the timeline click the plus sign in the empty box. In the pop up window you’ll find lots of options for imagery, including stock photos from Animoto. But for now, let’s add the images you put in the folder on your drive (see episode 1).
Under Your Computer click Upload Pictures and Video. Navigate your way to your content folder on your computer’s hard drive. Click to select the first image, and then you can select them all by holding down the shift key on your keyboard, and clicking the last image in the folder. Press Enter on your keyboard to add them to your project.
You can rearrange the order of your images and videos by dragging and dropping them with your mouse. If you decide to eliminate an image, simply click to select it and from the menu click Delete.
Text
Next, we’re going to add text to your videos, creating title cards. Again you can do this from the menu, or just click the plus sign in the empty box on the timeline, and then click Add Text.
In the pop up box you’ll type a title (or the main text) and then you have the option to add a subtitle. This is where the outline we created in Video 1 comes in so handy! When you’re done, click Save. And don’t worry because you can always go back and change any text at any time.
Title cards are great for the beginning and ending of your video and also for transitioning to different parts of the story.
Simply click and drag the cards into the order that you want them.
You can also add text captions to each of your images. Hover your mouse over the image and click Caption under the image. In the pop up window containing your image, click to place your cursor in the text area, type in the desired text, and then click Save.
Spotlighting an Item
You may have a few images or title cards that you want the “camera” to spend a little more time on, thereby spotlighting it. To create that effect, just click to the select the image or title card, and then click Spotlight in the menu. I particularly like to Spotlight title cards so that the viewer has plenty of time to read them.
Previewing
So let’s see how this looks so far, and to do that we’re going to click PreviewVideo. You can preview your video at any time during the production process.
A low resolution version of your family history video will be created in about 15 seconds. Then you can watch and see what little tweaks and changes you want to make. Click Continue Editing to head back to the timeline and keep working.
Next Steps
I hope you’re getting excited about your video projects. Next time we get together, we’re going to bring our projects down the homestretch and produce them into glorious shareable videos.
Beware: Personal Opinions are coming your way in this article!
In my book The Genealogist’s Google Toolbox I emphasize how to use Google to determine what is already available and free online before investing your limited time and money in offline family history searching. Smart genealogists allocate their resources wisely, getting the most bang for their buck. And collaboration between individual genealogists allows us to accomplish even more.
It looks like the U.S. Federal Government could learn a thing or two from savvy genealogists. The Washington Times is reporting that Congress’s auditor has discovered that our tax payer money given to the federal government isn’t being spent very wisely. (Imagine that!) Agencies fail to collaborate and share information, creating redundancy and overspending.
One example from the article: the Commerce Department “has been charging other government agencies millions of dollars for reports that the other agencies could just as easily have gotten online, for free – often with a Google search.”
This news makes it even harder to swallow the news that the National Archives and Records Administration (NARA) is suffering reduced hours of service due to budgetary issues.
The Bottom Line: Google Twice, Pay Once (and only if you have to!)
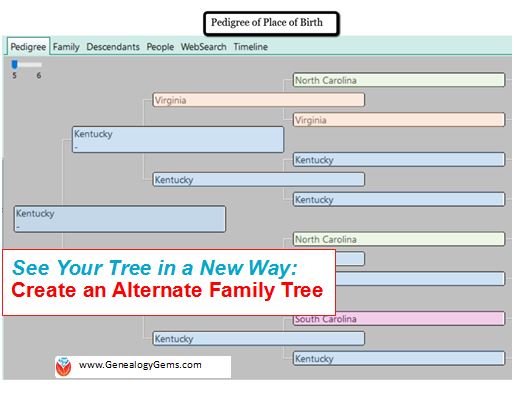
Use an “alternate family tree” to emphasize unique or interesting patterns in your family history, such as eye or hair color, birthplace, age at death, or adoption. Here’s how to do it–and WHY.
Alternate family trees are popping up all over social media and genealogy blogs. Have you seen them? Some trees emphasize the age at death, cause of death, or birthplace for each individual.
There can be tremendous value to creating trees like these. Recognizing patterns can help tear down brick walls. Imagine a pedigree chart with birth places instead of names. It’s a new way to see migration patterns. I also love the a-ha moments I have! For example, the time I realized my hair and eye coloring likely came from my maternal great-grandmother who I have a special connection with.
I can share these quick “did you know” revelations with my relatives on social media (totally shareable images!) or at family reunions. Images are often more powerful than words because they are easy to glance over. Your family won’t be able to resist taking a look, and most importantly, sharing your tree images with other family members. Shared images can generate new information when shared with the right relative. Hey, here’s an idea: you could even blow up your alternate family tree to poster size for the next family reunion!
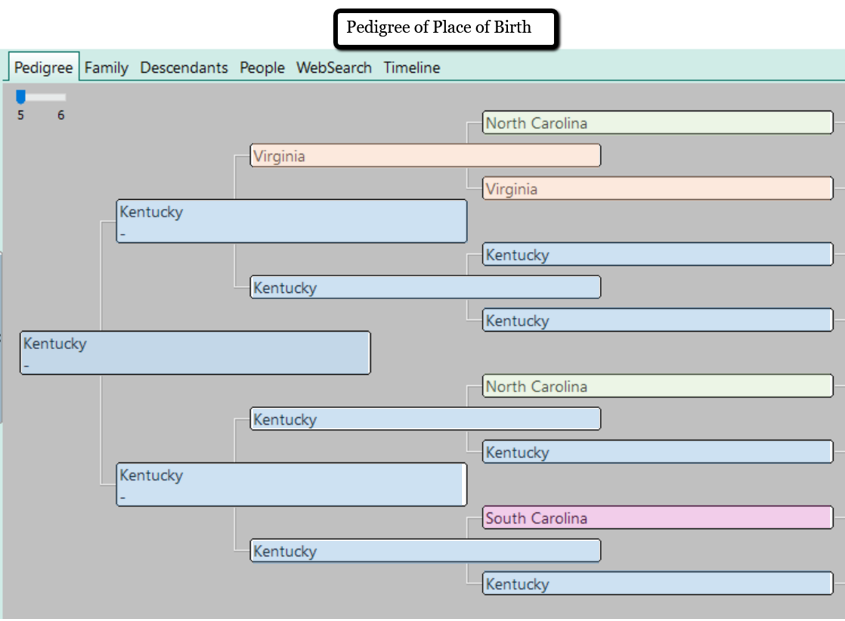
Take a look at these examples of my own alternate family trees for age at death (left) and birthplace (right).
Other alternate family trees may focus on occupations, schooling, or color of eyes or hair.
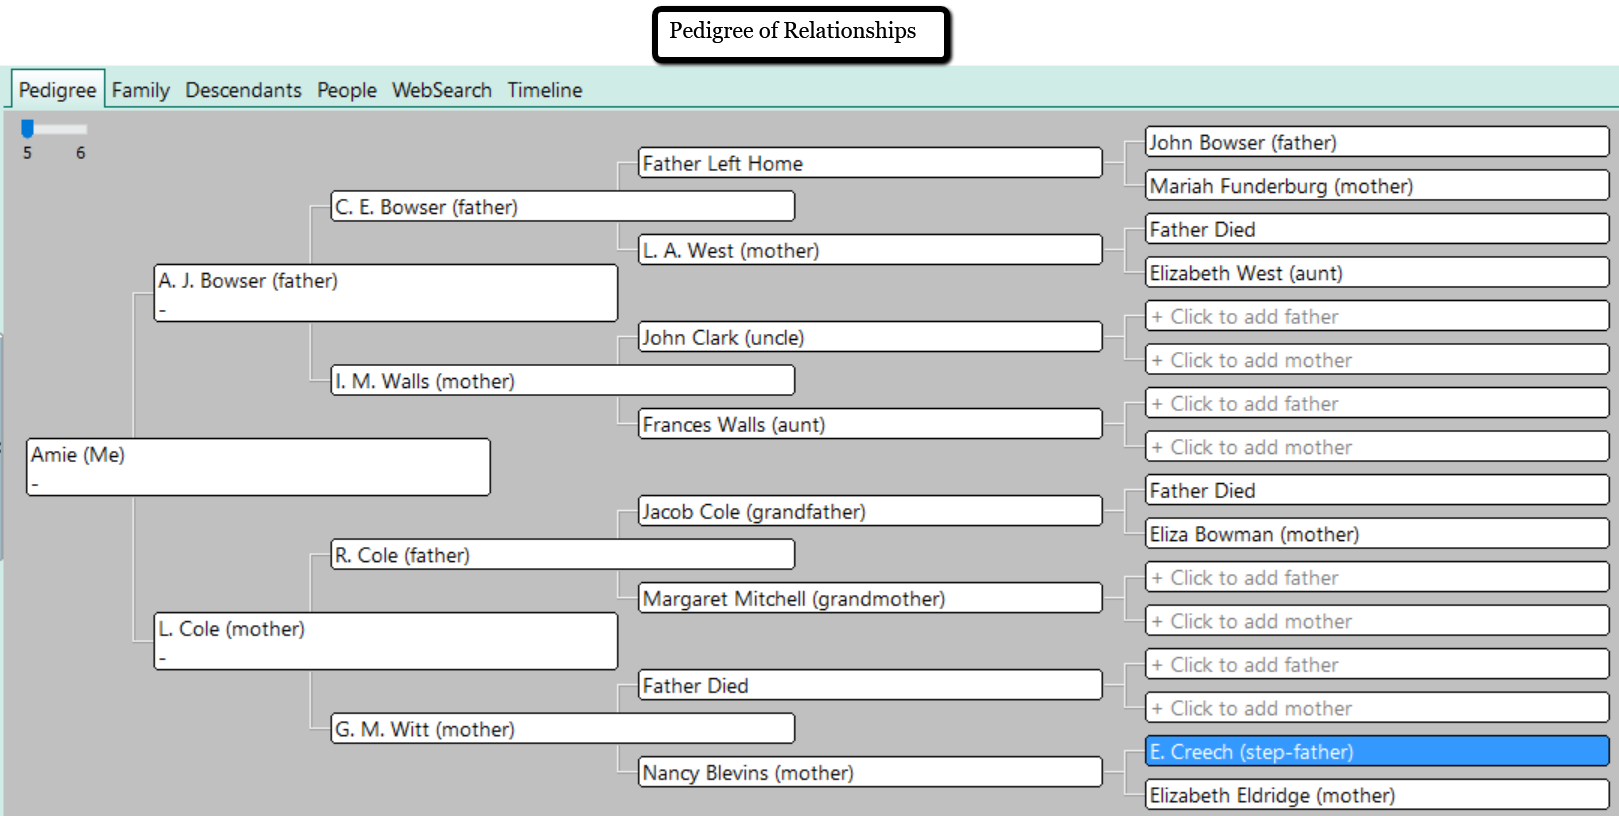
I was inspired to create an alternate family tree that had significance to my own immediate family. We have a lot of adoption in our family tree. My three children are adopted, my husband is adopted, and several of my great-grandparents were raised by other family members. This is a unique perspective. Blood lines are important, but even more important are those people who influenced my family the most as caregivers.
I created a pedigree that indicates who, if anyone, the father and mother figures were. Take a look:
Did you notice that every set of my great-grandparents had one or more parent die or abandon them? I was shocked to see this significant ancestral dynamic. I had never considered the likely effect of such a family tree. It was fascinating!
How to Create an Alternate Family Tree
The easiest way to create an alternate family tree is to use a genealogy software program. I use RootsMagic. RootsMagic is a genealogy software program for PC and Mac computers. (Note: To use RootsMagic on your Mac computer, you will need to use the MacBridge add-on.) You can purchase the full version of RootsMagic for $29.95 or you can use the RootsMagic Essentials for free!
There are two ways to make an alternate family tree using RootsMagic. You can start from scratch or use the wall chart report.
Starting from Scratch
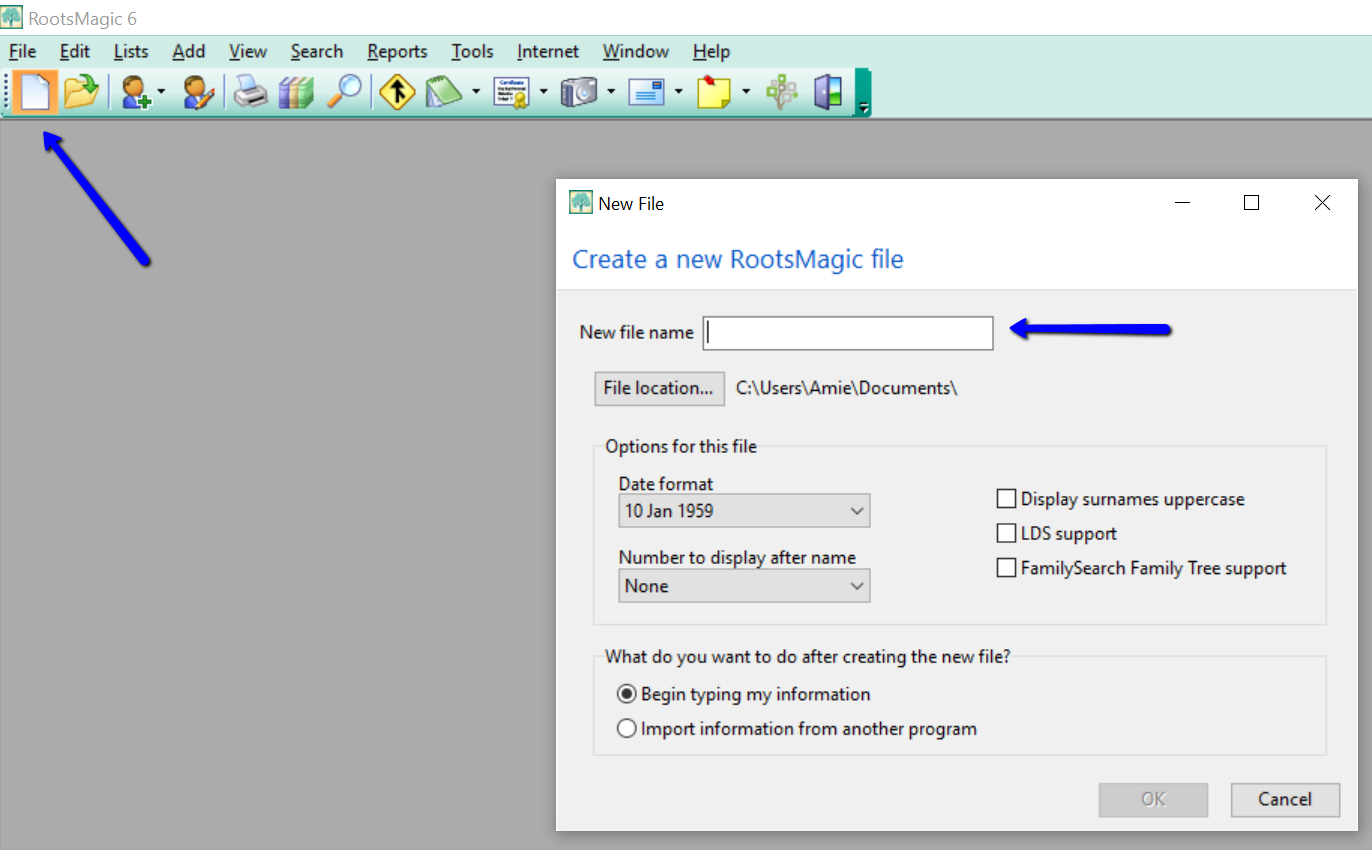
To start a new pedigree:
click the “blank sheet of paper” icon at the top left. Name your tree with a title that will indicate its purpose. (Example: Age-at-Death Tree)
Instead of using the names of your ancestors, use whatever alternate pieces of information you wish in the name fields.
Now, you simply click “Reports” across the top and choose “Pedigree.” You can generate the report and print out your new alternate tree.
Using an Existing Tree
If you already have your tree on RootsMagic, you can use the Wall Chart feature to create trees with unique data.
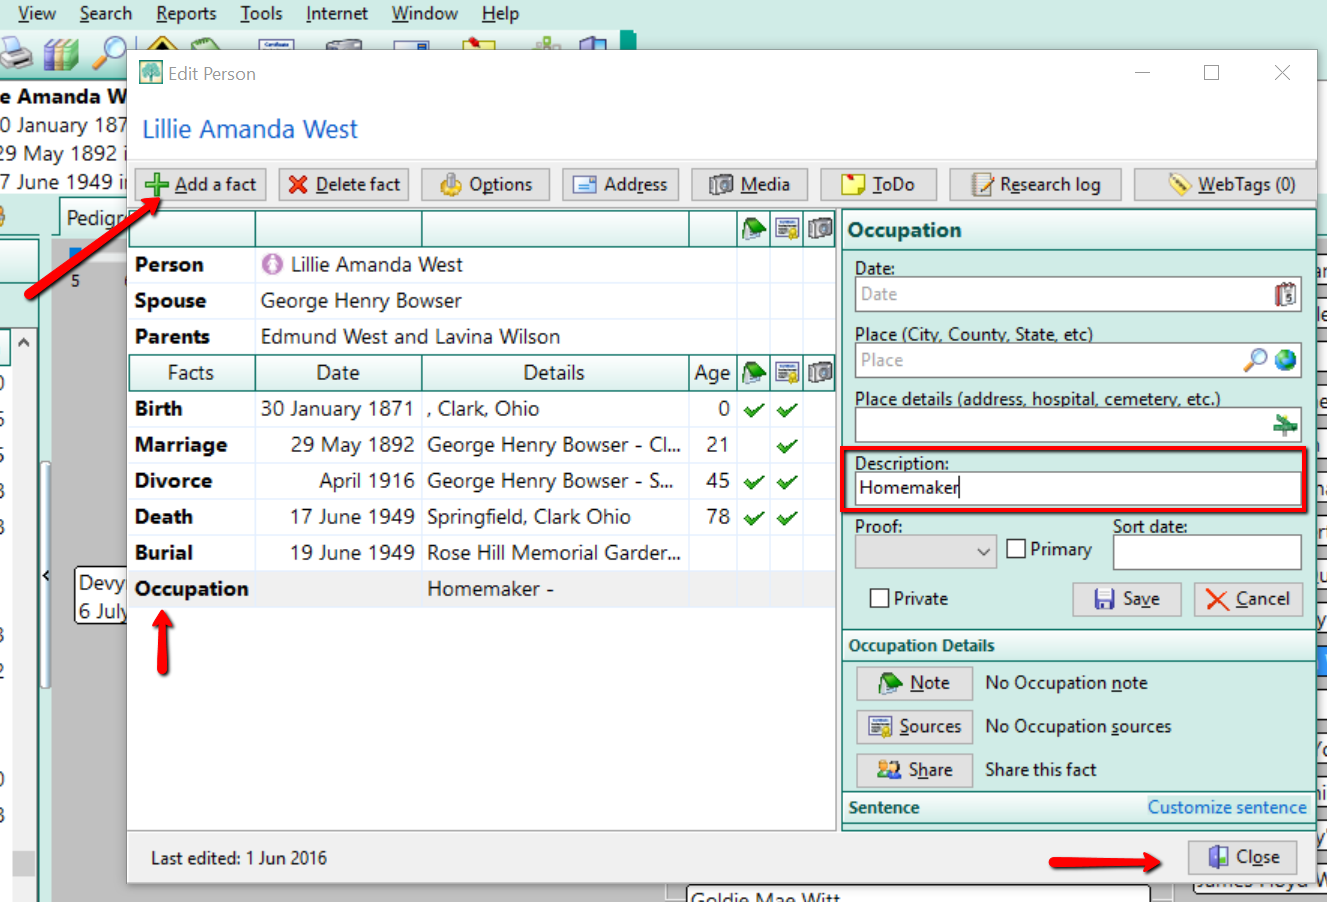
As an example, if I wanted to create an occupation family tree, I would first need to enter that data for each person by clicking on the individual and then “Add a Fact.” From the drop-down list, choose “occupation.” Type in the occupation in the description field at the right and click “Save.”
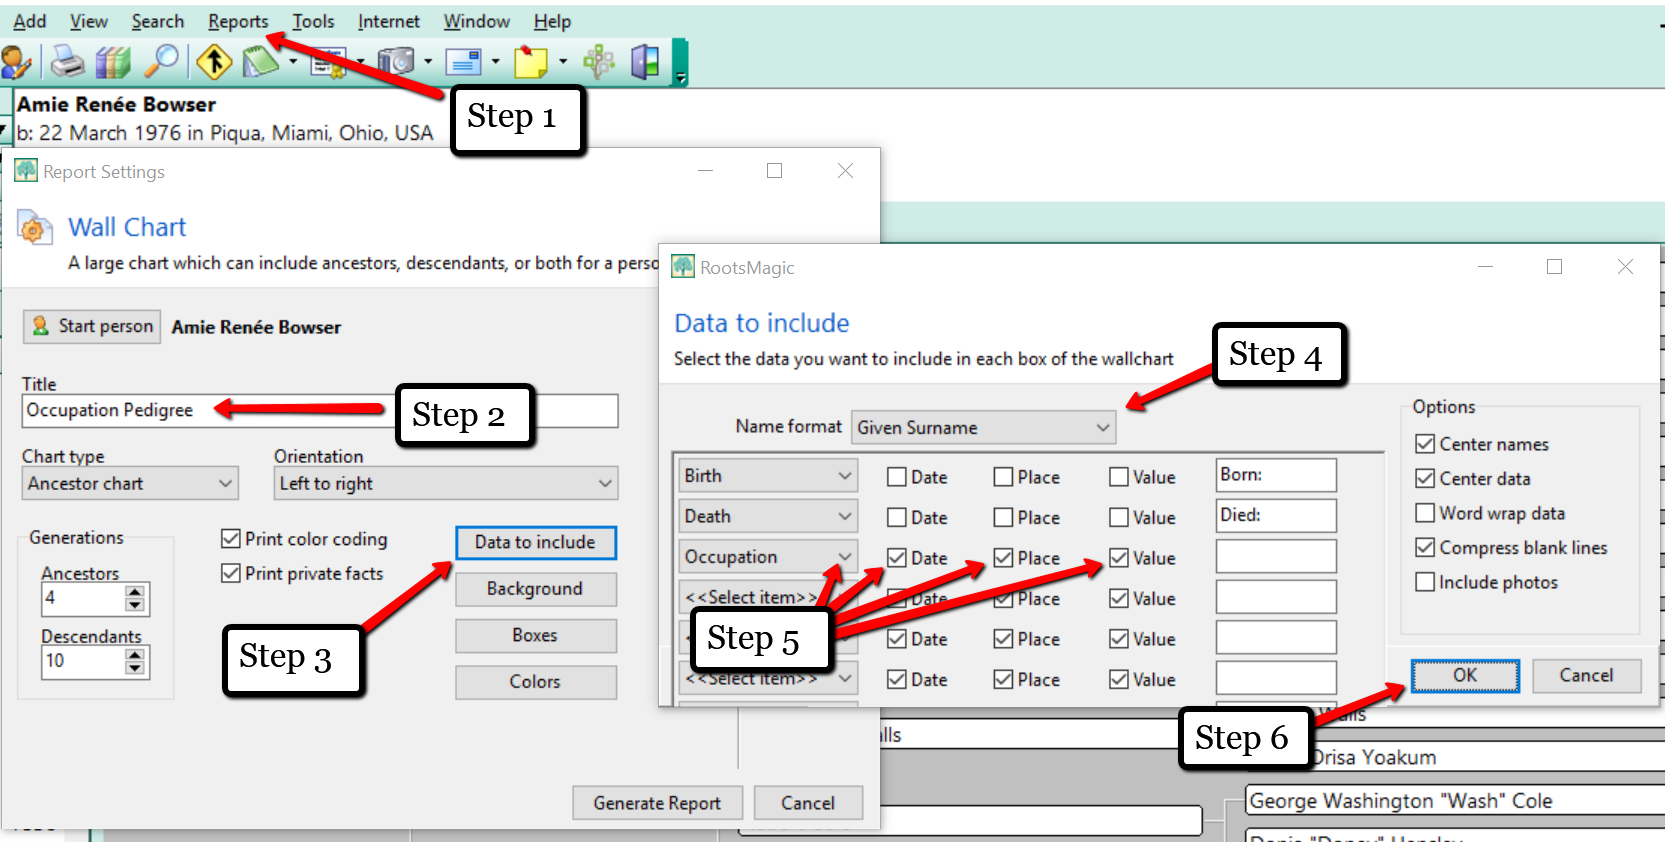
Add the occupation to each individual and when you are ready to print your alternate family tree, simply take the following steps in the image below.
After taking these six steps, it is time to “Generate Report.” You will be taken to a new screen where you will see your creation.
Once you have completed your alternate tree, it’s a great idea to print it and lay it out in front of you. You might ask yourself, “What does this information tell me?” The interpretation of the data will be unique for everyone. Maybe your “Cause of Death Tree” will make you think, “Oh no! I should really be watching my heart health!”
I hope that you will take the opportunity to create an alternate family tree or two today. Genealogy Gems Premium website members who like this idea will also want to listen to Genealogy Gems Podcast #136, due out later this month. In that episode, Your DNA Guide Diahan Southard goes in depth on the value of gathering family health history.
How does this view of your family tree make you feel?
We love to hear from you so leave your feelings or comments below,
and please feel free to share your alternate family tree on our Facebook page!
Have you ever brought back a favorite family tradition from your childhood? I did that with a favorite Memorial Day tradition–revived with a little help from YouTube.
Deep in the hollows of Virginia lived ‘Big Grandma’ with her nine children. She was a mountain woman, schooled only in the herbs she could sell for money. Celebrations were few, but Decoration Day was special. She would gather her children together to make crepe paper flowers and then hike up the mountain to lay them on the graves of loved ones.
This year, I revived this tradition by teaching her great-grandchildren the art of making crepe paper flowers for Decoration Day (now known as Memorial Day.) It wasn’t easy. My mother hadn’t made crepe paper flowers with us since I was 10 years old!
First, we had to find the crepe paper. I tried using crepe paper streamers, but the paper was too delicate and not stretchy enough. Crepe paper is unique. It is strong and very stretchy which lends to the realistic shape of petals and leaves. With a little help from Google, I found PaperMart, an online store that sells rolls of colorful crepe paper for $1.93 a roll. Each roll is 8 feet long and 19 inches wide. A roll this big will create bouquets of lovely flowers!
I ordered a variety of colors for petals, some green for the leaves, and yellow for the middles. Floral stem wire, floral stem tape, paddle wire in 24 gauge, and tacky glue are other must-haves.
Without Grandma around, it was left to me and Mom to remember how to make each type of petal. YouTube to the rescue! With videos like the one below, we were able to re-teach ourselves the techniques for creating beautiful roses, peonies, morning glory, and mums. (Click here to read more ideas on using YouTube for family history research.)
After family dinner, we gathered together as mothers, sisters, and cousins to laugh and giggle as we tried to create each piece. I was able to share with the next generation the story of Decoration Day in the “holler.” Many of the young ones asked, “Why can’t we just buy the flowers?” I am sure it would have been easier and quite a bit quicker to buy flowers, but I wouldn’t trade the opportunity to share this tradition with them for the world.
This week, we gathered as an extended family to place our crepe paper flowers on the graves of our ancestors. You know what? When we came to Big Grandma’s grave, all the children wanted their flowers to be placed there. They remembered! My heart was full and I could imagine Grandma looking down at all these little children as they were following in her footsteps.
A Memorial Day tradition like this is a wonderful way to teach family history to our children. Other ideas include learning a hobby that our ancestor enjoyed. Several years back, I decided I wanted to learn to play the guitar like my uncles did. It was their favorite past time to get out the guitars for an old-fashioned singin’ after Thanksgiving or Christmas dinner. The family would gather in the living room to sing favorites like “Amazing Grace,” “When the Roll is Called up Yonder,” and “Jesus is Coming Soon.” A new guitar and YouTube practice tutorials and I was strumming along with them at the family reunion.
With today’s easy access to online tutorials and videos, you can learn and share your ancestors’ lives in this unique and personal way. Pick something today and share your favorite family traditions and past times with your loved ones.

 Use an “alternate family tree” to emphasize unique or interesting patterns in your family history, such as eye or hair color, birthplace, age at death, or adoption. Here’s how to do it–and WHY.
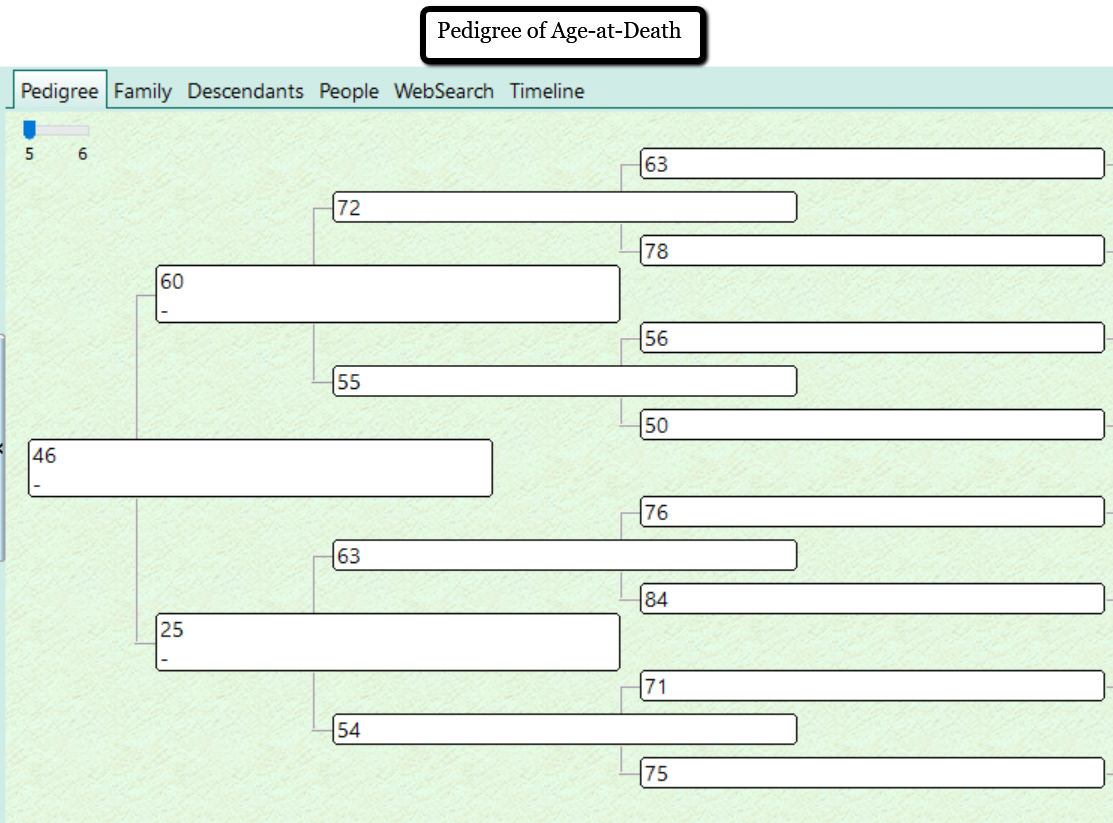

 This week, we gathered as an extended family to place our crepe paper flowers on the graves of our ancestors. You know what? When we came to Big Grandma’s grave, all the children wanted their flowers to be placed there. They remembered! My heart was full and I could imagine Grandma looking down at all these little children as they were following in her footsteps.