Check out these 3 free online tools that help with how to pronounce names.
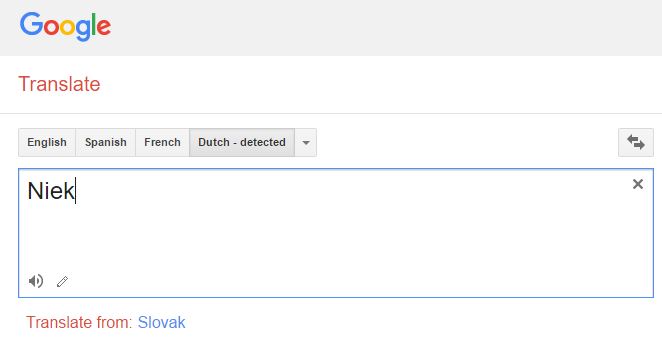
Recently, I heard from a Genealogy Gems listener in The Netherlands, who shared research tips for those starting to trace Dutch ancestors. I wanted to mention his email on my free Genealogy Gems podcast, but I didn’t know how to pronounce his name, Niek.
There have been other times I wished I knew how to pronounce names of ancestors or distant cousins, or other foreign words.
I received more than one email regarding the way I mispronounced Regina, Saskatchewan on my Genealogy Gems podcast. I pronounced it with a long “e” sound (like Rageena) when in reality it is pronounced with a long “i” sound (as in Reg-eye-na). I appreciated the correction. But wouldn’t it be nice if you could check how to say something before you say it?
Here are 3 free online tools that can help. They’re each a little different. I’m giving you all three so you can run the name through more than one site to be even more confident you’re getting the right pronunciation.
Google Translate is a powerful, free tool I use for quick translation look-ups. Google Translate now has an audio tool for some languages that will pronounce the words you enter. Look for the speaker icon in the bottom left corner of the translate box and click it:
Google Translate is an awesome free tool for other reasons, too.
As we research our family history it often leads us to records and reference books in foreign languages. The Google Translate app on your phone comes in very handy in such times.
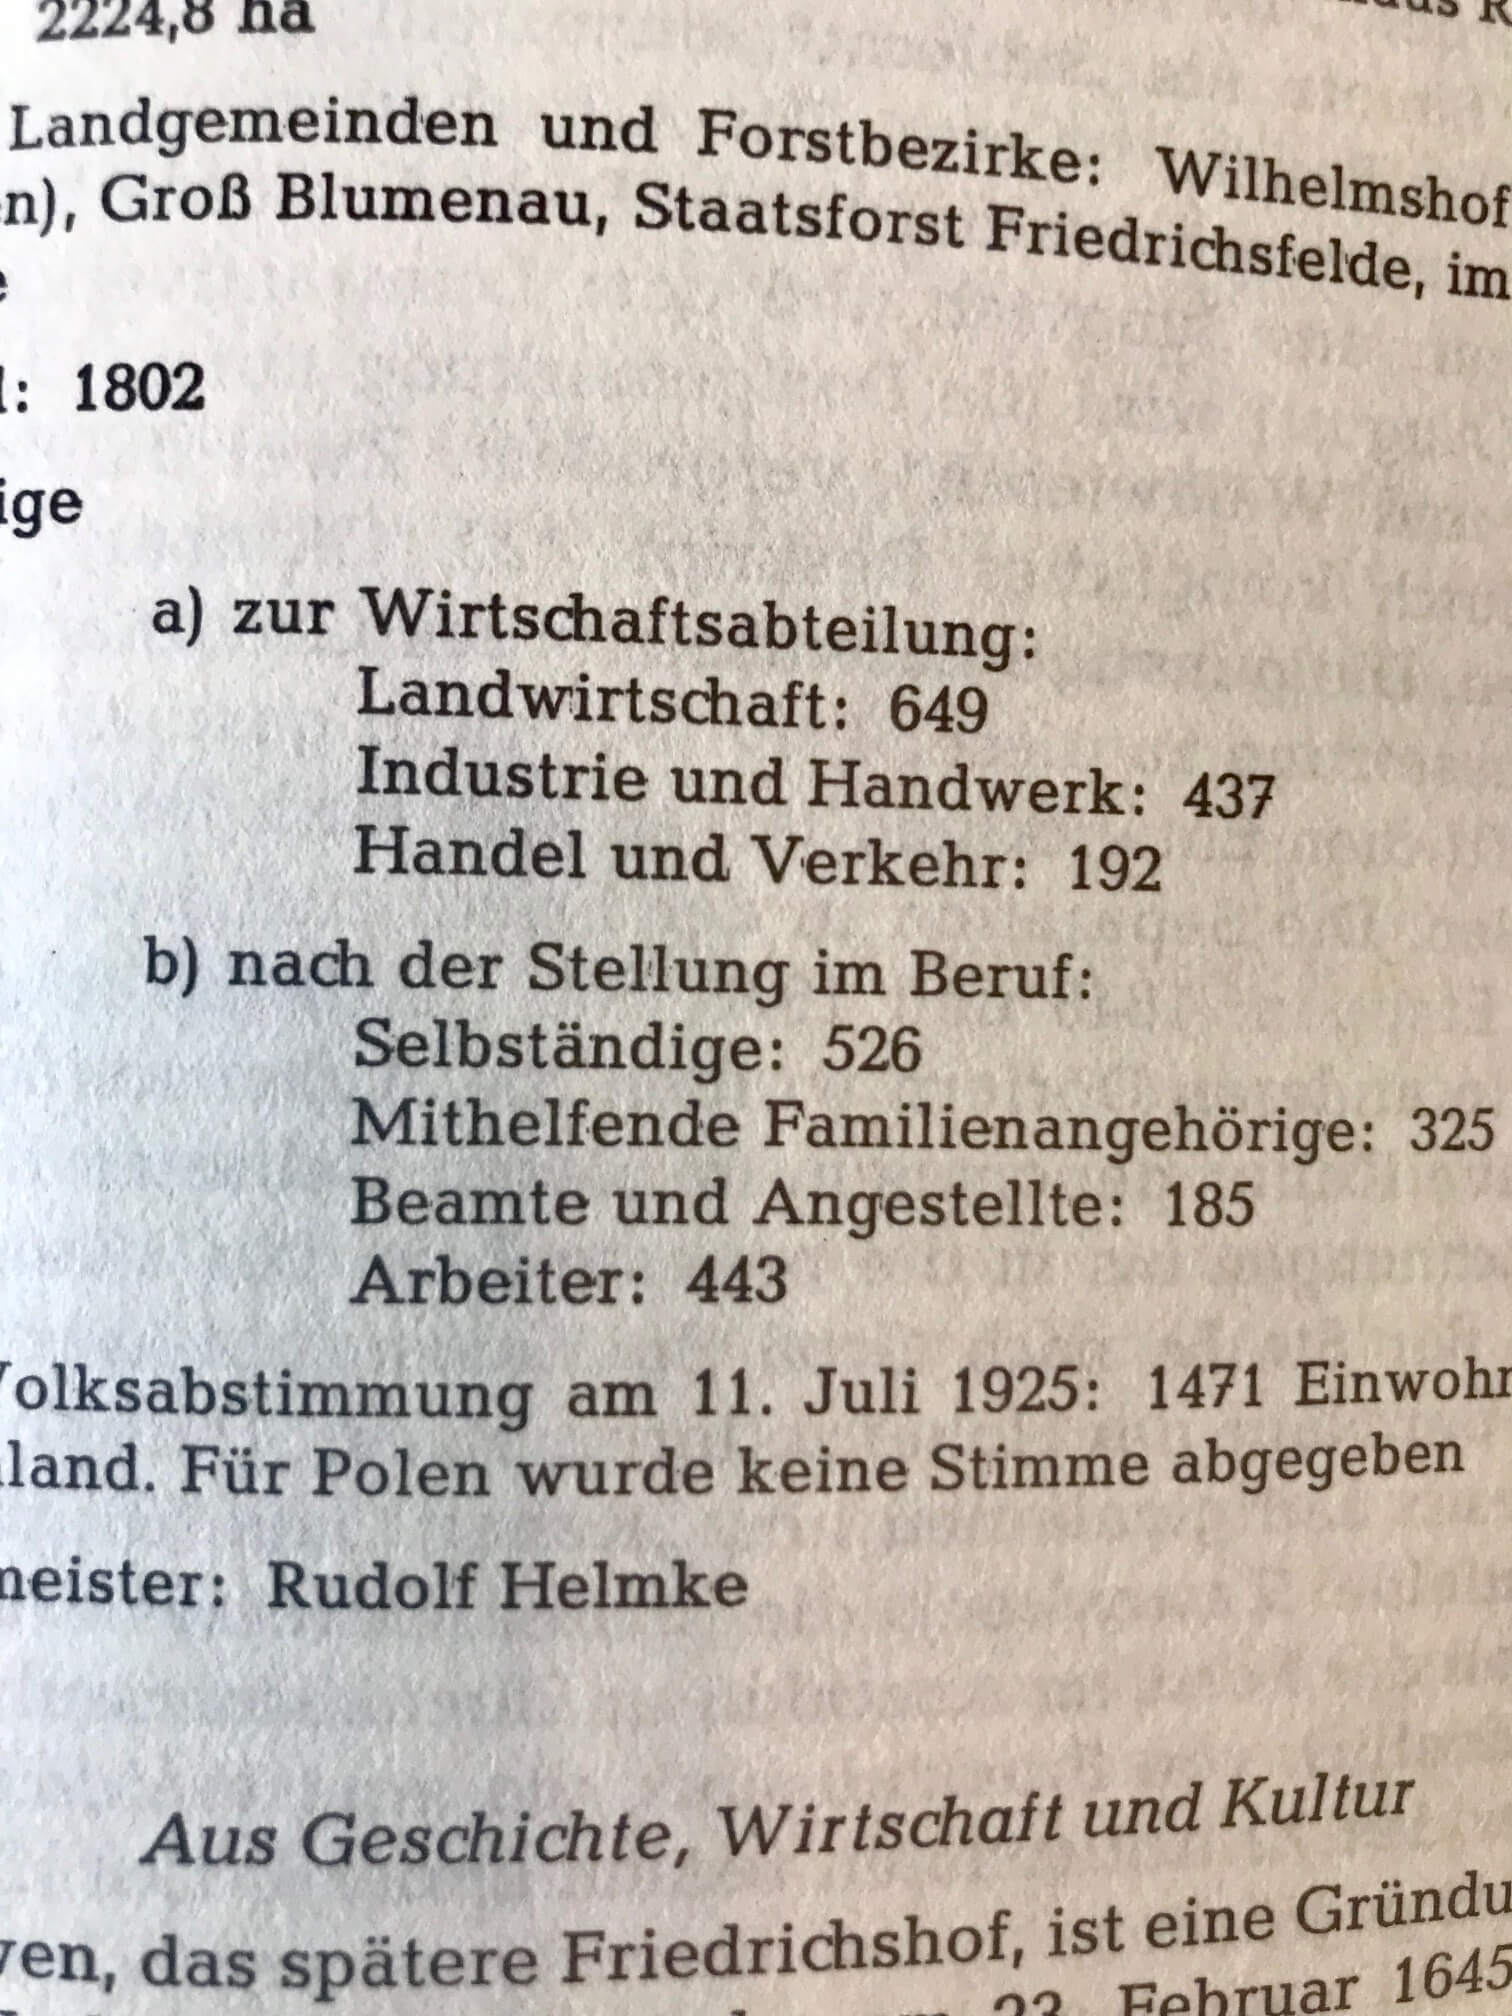
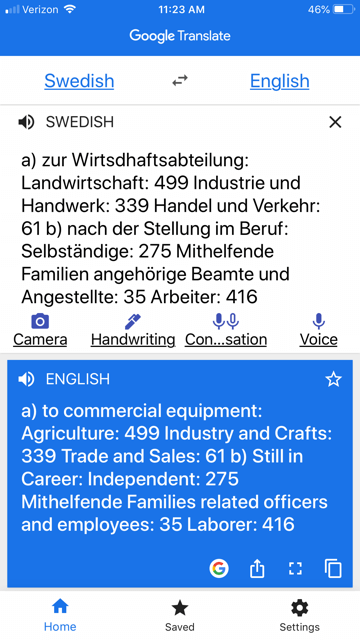
You can translate short bit of text in real time. Here’s an example of a page from a German reference book:
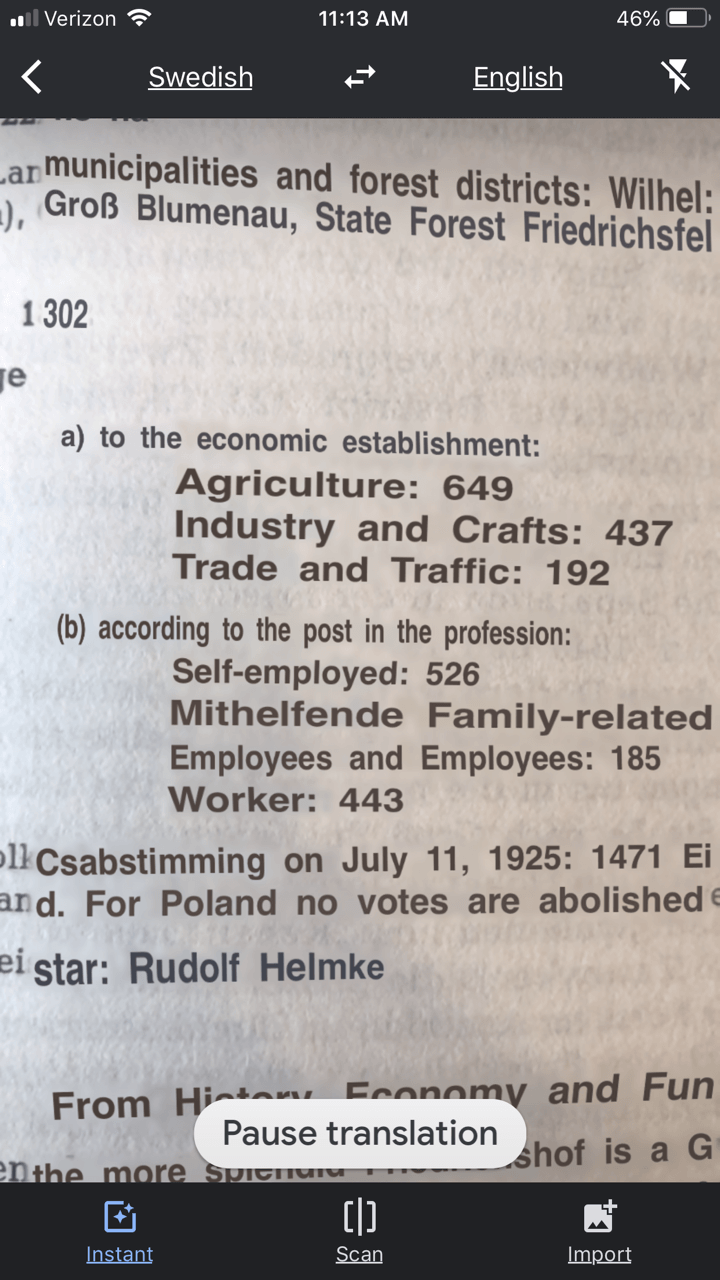
In order to translate this page, I tapped the Camera icon in the app and then held my camera over the page. The image is sent via an internet connection to Google. Text recognition occurs and the text is translated. Here’s what the real-time translation looks like in the Google Translate app:
The translation may not be perfect, but it is much better than not being able to read the page at all.
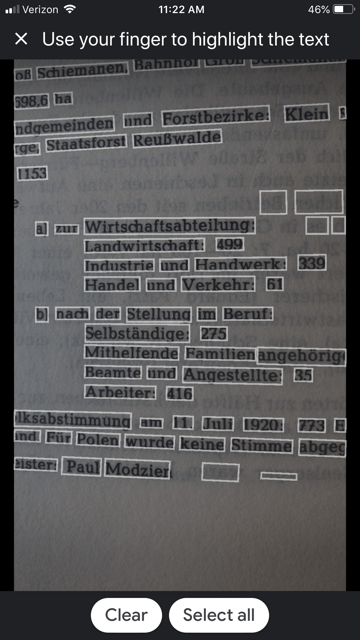
You can also use the Scan feature to take a photograph of a page or document. This can often give you a better translation because the image is more stable. To do this, tap Scan in the bottom menu. Hold your phone over the page, and then tap the circle button. This is what the initial scan looks like:
Tap the Select All button if you want all the text to be translated. The other option is that you can swipe your finger over just the words that you want translated. As you can see in the image, each word has been individually found by Google providing you with precise selection control You can also tap the Clear button if you want to start over and take the image again. In the image below I have selected a portion of the text on the screen:
The translation is almost instantaneous, and it appears in the blue line at the top. Tap the right arrow on the blue line to see the full translation:
The Google Translate app is continually being improved, and is worth a try if you haven’t used it recently. The most recent updates included better translation quality and support for more languages.
If you would like to learn more about how to use Google Translate, check out chapter 13 in my book The Genealogist’s Google Toolbox.
Click here to read about one of its qualities that actually got a gasp out of the audience when I mentioned it in a lecture.
2. Forvo
Forvo describes itself as “the largest pronunciation guide in the world, the place where you´ll find millions of words pronounced in their original languages.” It’s like a pronunciation wiki.
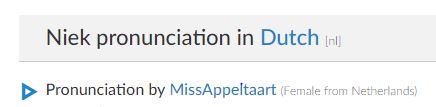
A quick search for “Niek” gave me the result shown here. I clicked on “Pronunciation by MissAppeltaart” to hear how that contributor (who is from The Netherlands) said that name.
By the way, you can contribute your own pronunciations by clicking on “Pronounce” to see a list of words that are waiting to be recorded.
3. Pronounce Names
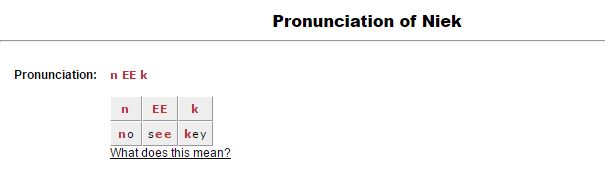
Pronounce Names is a website that gives you visual cues for pronouncing a name. This can be helpful for those who aren’t sure they heard an audio pronunciation correctly. This is what it looks like when you ask for a name pronunciation for Niek:
Being a visual learner myself, I particularly appreciate this site! I think I would have remembered the correct pronunciation of Regina had I seen it in a format like this.
Now if I could just get the telephone solicitors to use the tools. Maybe then they will stop calling and asking “is Mrs. Cookie there?”
More Free Online Tools–These are Gems!
I’m always on the look up for free online tools that solve problems. Whether you are trying to find genealogy records, solve geographical questions, or you want to identify a face in a photographs, there are tools out there that just may do the trick. Here are three more articles that provides answers to challenges like these.
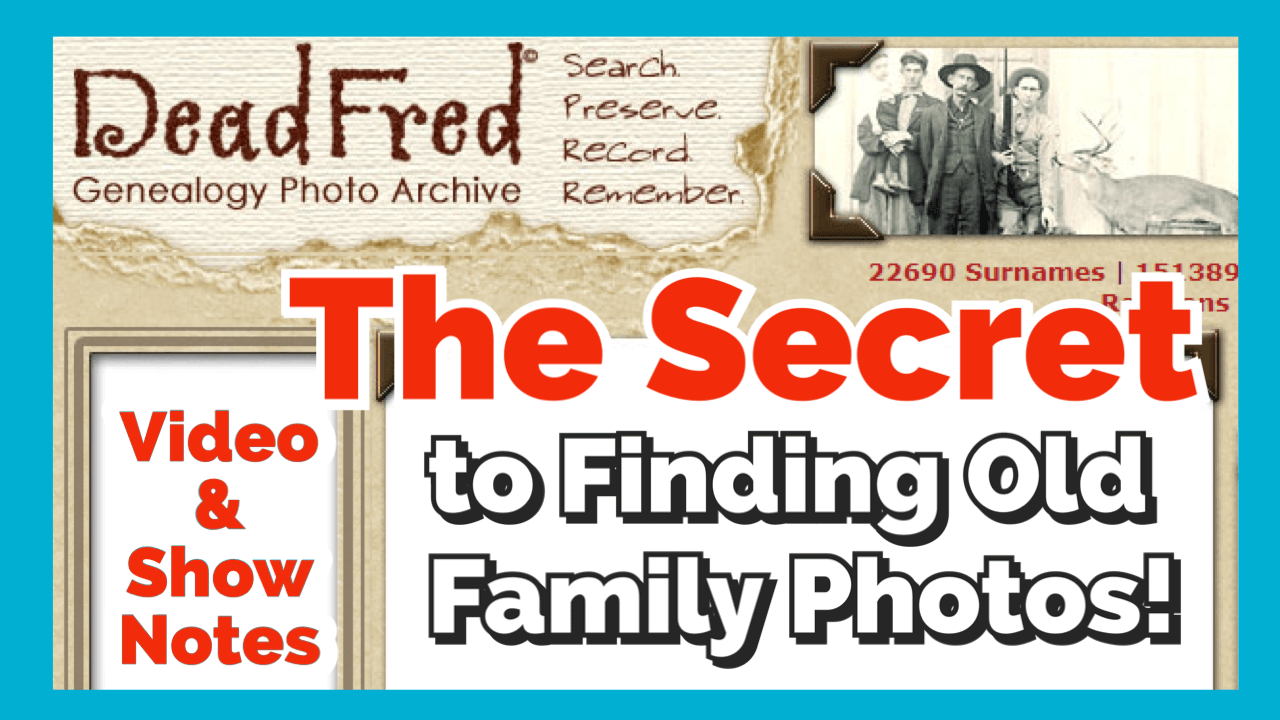
Show Notes: Discover more than 100,000 old family photos on Dead Fred. Founder Joe Bott explains how to find photos of your relatives on this free website.
Video Premiere and live chat
Watch the Video
Show Notes
Would you like to find more old family photos? One of the secrets is to search places where other distant relatives (and even people not related to you) are uploading old photos – hundreds of thousands of photos!
In this video, Dead Fred founder Joe Bott explains how to find photos of your relatives on his free website. Joe will also provide some of the back story on how he ended up devoting his life to helping families find their photos, and how in the world he decided on this most unusual name for his website!
From Joe: “I’m sitting down here in my little niche, scanning photos and putting them on my website so people can find them. That’s what I do for retirement now. I post photos, put them on the internet and wait for somebody to come knock on my door and say, “Hey, I know who that is! That’s my great, great whatever!” It’s happened already about 3000 times since I’ve started. Actually 3,157 times, just to be specific.”
What Does the DeadFred Website do?
“You take your photographs taken before 1965, and the people in the photographs have passed on. You can put them on there. It’s free to use. There are instructions on how to post your photos. Where it says Post Your Photos, click on that and just go ahead and do it.
When you post your first photo, you’ll receive a password in your email. You use that to manage your postings.
You can post as many photos as you’d like. Now, I might take a day or two to get it up on the website because I check every photo that comes in to make sure there’s nothing untoward. Because they do pop up every once in a while.”
After you post the photo, other DeadFred users will search the website, and that’s how old family photos can get reunited with descendants.
It’s also useful if you want to learn more about a photo. When you post your photo, include additional comments and questions. When you’re logged in you can post a sticky note.
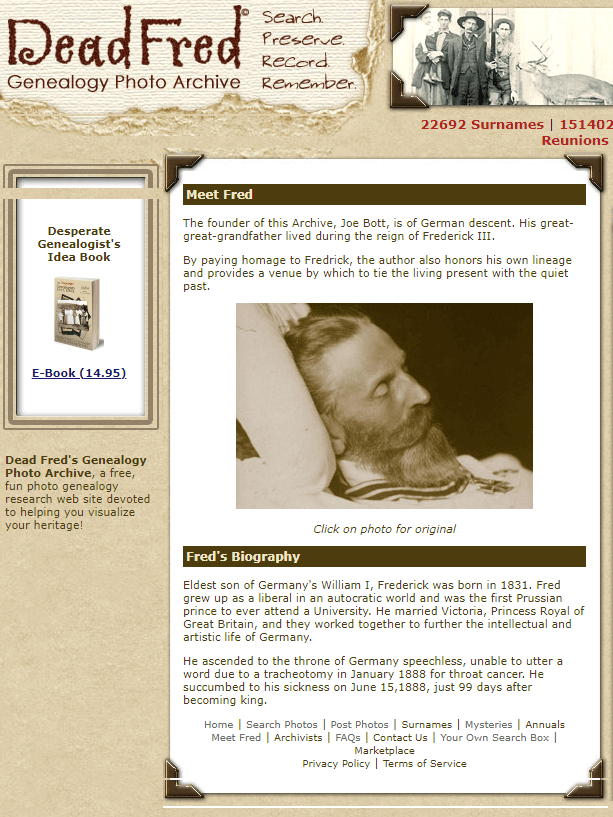
Why was the website named DeadFred?
“People often ask me why it is called DeadFred, and that gives me the opportunity to tell them that Dead Fred is a photo.”
The photo Joe is referring to is of Frederick the Great, who died in Germany. “The young man had cancer of the throat and died. My great great grandfather was living during that time in Germany, so that’s sort of the genealogy connection to it.”
The reason behind the name DeadFred
Joe and his family were sitting around a table trying to figure out what to call the website. He had purchased the photo of Frederick the Great on ebay and it came in the mail. “We opened it up and one of my sons, I have four boys, one of them said, ‘Well, we’ll just call it that, Fred.’ Everybody seems to like it. That’s the story.
“That photo of Fred is on my website…Just scroll down on the right-hand side and you’ll see him.”
Has Joe always been fascinated with old photos?
“Not always. In fact, I didn’t know I was fascinated with photographs until 1965 while I was in the Navy. I was in Newport Rhode Island, and I was walking down the street and it started to pour, I mean really pour, and I didn’t want to get my suit wet, my sailor outfit. So, I ran into this antique store. I hadn’t looked like I was going to buy something, but I found something. I found this photo album, and it just totally amazed me. And it most likely said, “buy me!” and I had to. I didn’t have a lot of money back then. I don’t have a lot of money now, but I didn’t have a lot of money back then either. And I bought it for $18. Now $18 in ’65 was a lot of money, especially for a sailor that has just joined the Navy. So, I bought it. And that was my first album. I have it sitting up here on my cabinet. But that’s how it started. I just said, wow, look at this. I couldn’t get my eyes off it!”
Reuniting Photos with Families: A Success Story from Joe
“When I was working. I was driving up to Iowa. And I stopped in store at the antique store. I found some photos in a box – a whole family – and I bought it. I worked out a deal. I learned how to do that over the years. I got a good deal on it. I went home and I scanned the photos. They were from Saskatchewan, Canada.
I got a phone call, or I actually got an email. I eventually got a phone call from a woman from South Saskatchewan who says “that’s my whole family. My grandparents, their aunts and uncles, the cousins, the whole shebang!” And apparently, now this is in the 1980s, late ‘80s, early ‘90s, and those pictures were taken 100 years before. The family left Saskatchewan and they moved to Iowa and farmed there until they all died out. There wasn’t anybody to take the photographs. So, there were the boxes, so I bought them, and I put them up on the website. Somebody from Saskatchewan said they knew who they were. And they sure did. Then I sent them home. That was an exciting moment for me right there.
Now there’s a lot of stories like that. There are stories where people cry when they find their photographs. There are cases when somebody is dying, and there’s a picture of a wife or a mother and their family wants to show them a picture before they die. So, there’s a lot of stories to be told. I could write a book about people that have found photographs. I sent out a couple every week now. Matter of fact, I just sent one of a baby, which was great. The baby has died now, got old and died at the age of 88, and I sent it out to his grandson. Yeah. My mind’s getting older, so I can’t remember as much as I would like to as far as names and places. But these kinds of things, they stick in your head.”
How to Post Photos on DeadFred
The first step in submitting a photo to DeadFred is to make sure it meets the guidelines. Currently, they accept photos that are earlier than 1965 and that, for privacy reasons, the people in the photo are deceased. Make sure to identify the photo in some way. This could mean including a country, date, state, etc.
Scan your photo in JPG format. Per the website, for best results, scan at 150 dpi resolution or higher and save at 72 dpi.
On the home page, under the Tools column on the right-side, click Post Photos in the menu. Under Step One, read the directions, check the box for the Terms of Service, and click the Choose File button to locate the photo file on your computer. Then click on the “Upload Image” button.
Your photo will receive a unique record number. Follow the prompts on the page, type in the identification information in the proper fields, and then submit.
You can expect your photos to appear on the DeadFred website typically within 3-5 days of being uploaded.
4 Ways to Search for Photos at Dead Fred
Every photograph on DeadFred website is unique, as is the information associated with the photo. That’s why there are 5 ways to search for them. Here’s how:
1 Surname Search
There are two options for searching Dead Fred for photos by surname. Option 1: Quick Search Field and Option 2: Linked first letter of the surname.
2 Detailed Search
On the home page, click the link for the Detailed Search. This will take you to a form that you can complete. The more information you can enter into the Detailed Search form, the better your chances of finding a match.
3 Search by Photographers
Of important note on the Detailed Search form is the Photographer field. Many old photos, particularly cabinet cards from the late 19th and early 20th centuries include the stamp of the photographer. Sometimes you’ll find a tremendous amount of detail about the photographer on the backside too. Use this information to conduct a photographer search.
Searching by a photographer is a great way to find other photos potentially related to your family’s history. Take a look at the photos you already have for the family you want to search for and make note of the photographers. Then, conduct a search by entering the surname of the photographer in the Photographer field. This will retrieve all photos listing that photographer’s name.
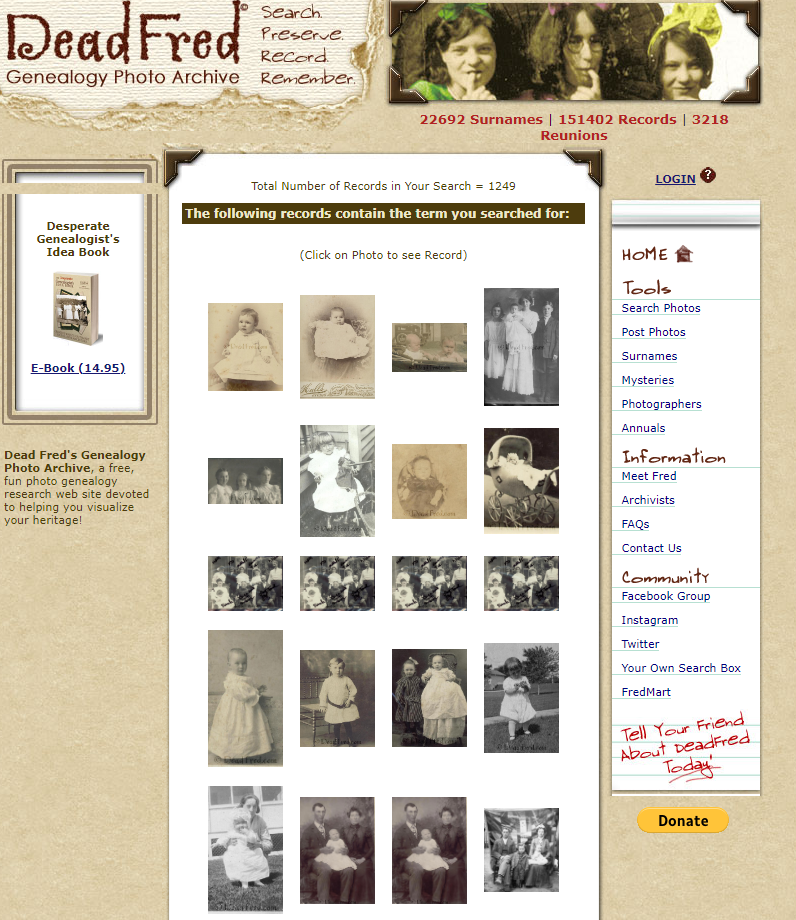
4 Keyword Search
Many DeadFred users include surnames that are related or associated with the photograph in the Comments field if they are not certain of the subject’s identity. You can take advantage of this in your search by using the Keyword search field on the home page of the website. For example, search on the word baby and you’ll get all the photos where that word is mentioned in the Comments.
Keyword Search results for baby
Accessing DeadFred Photos
When you click a photo on the search results page, it will take you to that photo hosted on the Dead Fred website. Notice that the page URL ends in .jpg indicating this is the image file itself. You can right-click on the image for usage options.
In Elevenses with Lisa episode 79 Lisa Louise Cooke explains:
How to find 1950 US Census Enumeration District (ED) Maps
The purpose behind them and how to interpret the maps
Ways to use the maps for your genealogy
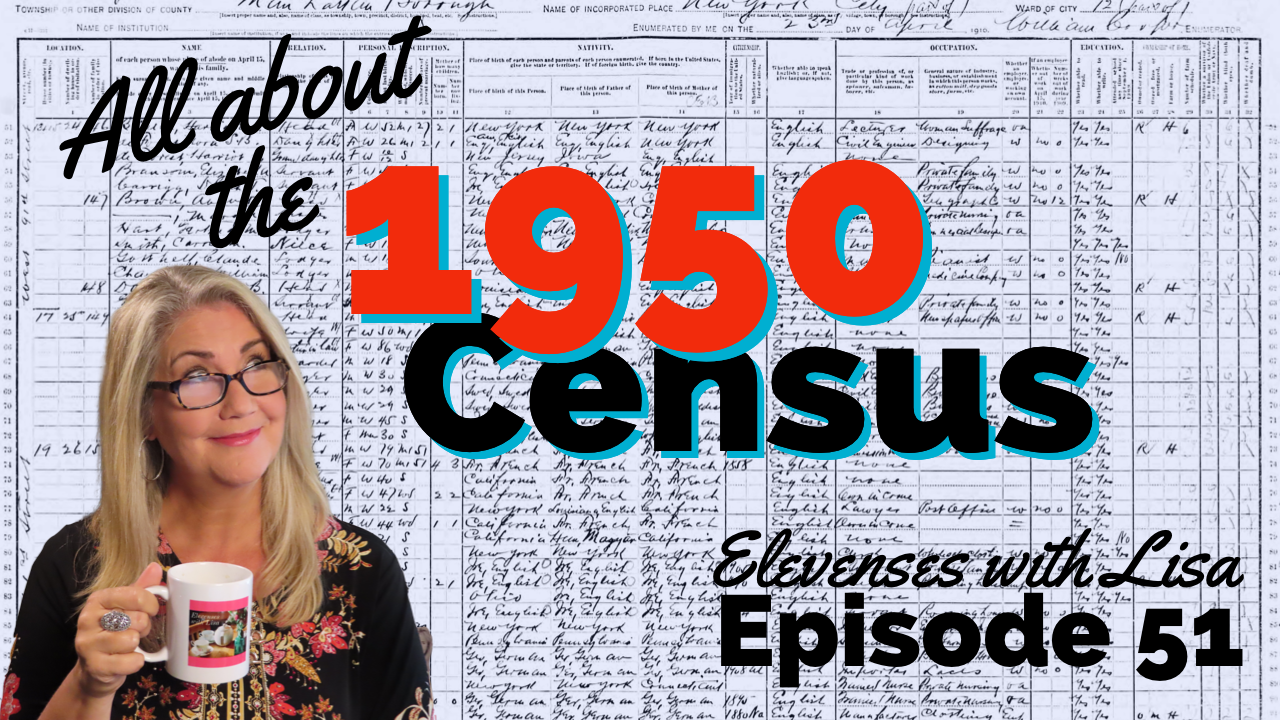
This is a follow up to episode 51 on The 1950 Census for Genealogy. In that episode I discussed the importance of finding your ancestors’ enumeration district numbers in order to be able to find them when the digitized images are released (before the index is available.) In this episode I will walk you through how to locate the enumeration district (ED) number and then find the actual 1950 US Census ED map. We’ll wrap things up with a quick update on the release of the 1950 US Federal Census.
Episode 79 Show Notes
(Get your ad-free Show Notes Cheat Sheet at the bottom of this page in the Resources section.)
As I mentioned in Elevenses with Lisa episode 51 The 1950 Census for Genealogy, prior to 1880, U.S. Marshalls were the enumerators for the federal decennial census. Starting with the 1880 census enumerators were hired and they were each assigned an enumeration district, also known as an ED. These districts had to be mapped out so that the enumerators knew the area they were responsible for counting. Therefore, maps are drawn in anticipation of each census being taken, including the 1950 census.
Learn more by watching episode 51 on the 1950 census.
About the 1950 US Census Maps
It’s always important to understand the purpose of a record or source, and the 1950 Enumeration District maps (ED maps) are no exception. Unlike most maps where it’s all about accurately drawing up the current roads and geographical features, census ED maps are drawn up for the purpose of defining boundaries for the purpose of counting people. This means as we look at ED maps we need to keep a few things in mind.
The first thing to understand is that the 1950 ED maps were not necessarily up-to-date with the lay of the land in 1950. Not all streets, parks and features will be included. The reason for this is that the maps themselves were not created for this purpose. Existing maps were used and then enumeration district boundaries were drawn on them.
Maps came from a variety of sources including but not limited to county and City Planning Commissions, 1940 census bureau tract maps, and city engineers. In fact, from a mapping perspective the variety of maps in the collection are fascinating.
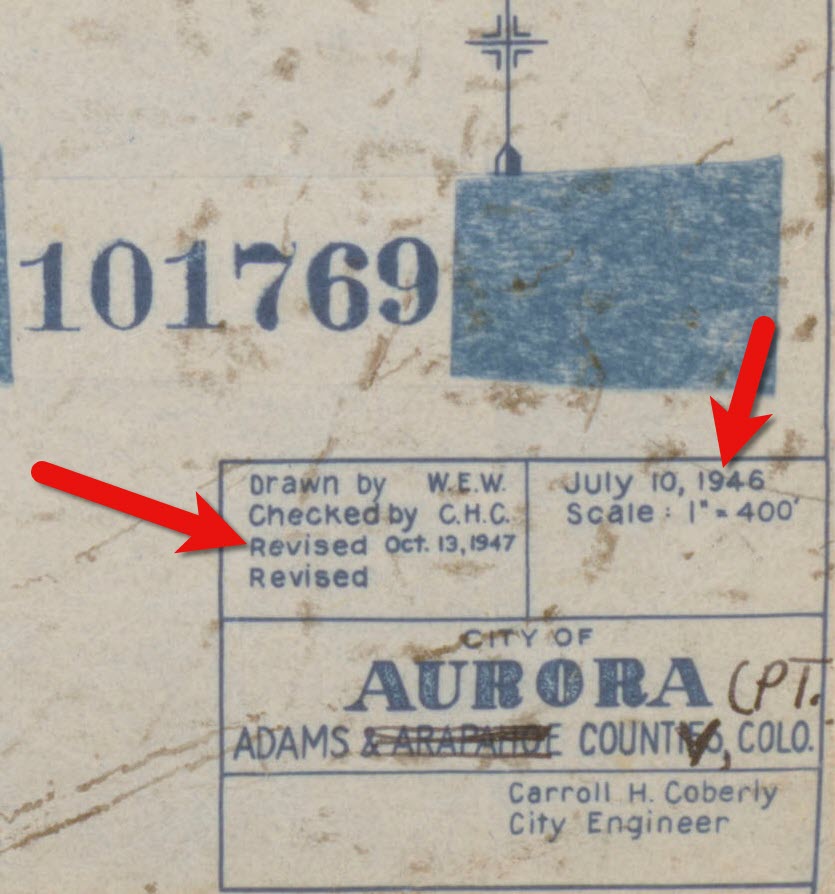
Look for the map title, description, legend and census stamps typically found in one of the corners. In this example (see image) from Aurora, Colorado the map used was originally created by the city engineer in 1946 and was revised in 1947.
1950 census map of Aurora, Colorado (Source: National Archives)
Following the end of World War II, the United States was growing at a quick pace in 1950. This is particularly true of the newly emerging suburbs. Therefore, if your ancestors built a new home in a new development in 1949, don’t be surprised if you don’t see the street on the 1950 census ED map. However, rest assured that the maps still hold value for your family history as they provide many interesting and unique details about the area surrounding your ancestors’ homes.
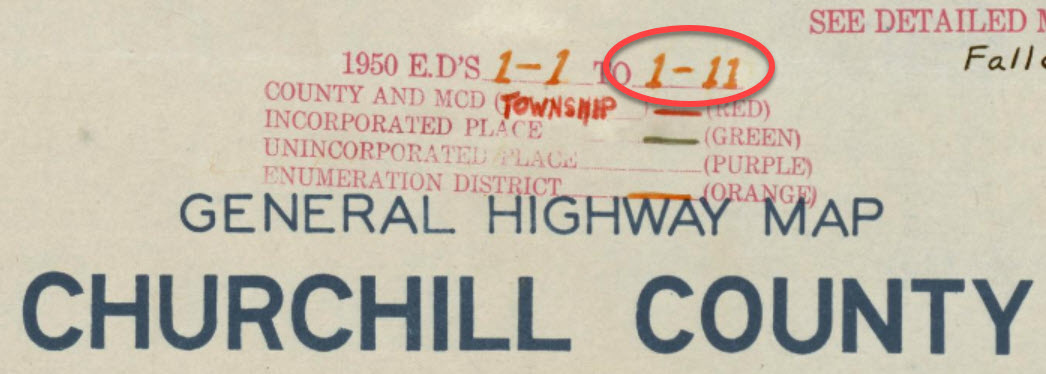
Each map was stamped with a small legend where the meaning for each of the colored lines drawn could be indicated. From my random sampling of 1950 census maps across the United States it appears that the coloring coding was consistent as follows:
Red = Township
Green = Corporate Limits/Ward
Orange = Enumeration District
Expect to see errors, inconsistencies and omissions in the maps. The more rural the area the more likely the map was compiled from several sources by the Census Bureau cartographers. This compilation created more opportunity for errors, and often used older maps.
Source: National Archives
The Meaning of Census Enumeration District Numbers
A census enumeration district number is made up of two numbers separated by a dash. The first number (in this example: 1) represents the county/region. The second number represents the area within the county that could be covered by an individual census enumerator within the amount of time provided for taking the census, about 2-4 weeks. The official start of the 1950 US Federal Census was April 1, 1950.
Census enumeration district (ED) numbers on a 1950 census map.
How to Find 1950 Census Maps
Some 8,000 census maps have been digitized and are available at the National Archives. However, the National Archives website can be challenging to navigate. I recommend using the Unified 1880-1950 Census ED Finder Tool at Steve Morse’s website.
1. Go to https:/stevemorse.org
2. In the menu in the upper left corner hover over US Census and in the secondary menu click Unified 1880-1950 Census ED Finder
3. Select the state from the first drop-down menu.
4. Next select the county.
5. Then select the city.
6. You will then see many enumeration district links listed. In order to find the right one for your ancestor’s home, enter the house number and select the street from the next drop-down menu. Don’t worry about directional parts of the address like west or east unless they are offered in the list of street names.
7. As soon as select the street name, the list of ED numbers should be reduced. In this example we are down to three.
8. To further reduce the possible ED numbers, we can select Cross or back street on same city block. If you’re not sure what the neighboring streets are, click the see Google Map This will plot the address you entered into Google Maps where you can then find the closest cross street, and the next streets over. If the address is not precisely marked on the map, check the address that appears in the Google Maps search box.
In my case, the One-Step tool didn’t allow me to specific W. Arcade, so Google Maps just gave me the general area, and not the address. By adding the W. to the address and pressing enter on my keyboard Google Maps was able to precisely plot the location. Now we can make note of the closest cross street (ex. N. Center), the street north of the address (E. Monterey Ave.) and the street south of the address (W. Noble St.)
9. Head back to the Unified 1880-1950 Census ED Finder page and enter each nearby street (you can enter multiple.) This should reduce the ED numbers one. This is the ED that includes your ancestor’s address.
How to Find 1950 Census Maps
1. Make note of the ED number, and then go back and click the button that says See ED Maps for ____________ County. You could have clicked this button without going through the process of locating the ED number, but the ED number makes it much easier to find your ancestor’s home street on the map. This number will also assist you in being able to find your ancestors in the 1950 census before it is indexed.
2. You will now be on the Viewing 1950 Enumeration District Maps in One Step Re-enter the city from the drop-down menu.
3. Click the Get ED Map Images You will receive two links. The first link is Links to NARA viewer will take you to the page on the National Archives website which includes all of the information about the map and the record hierarchy. Source citation information can be gathered from this page.
5. Click the second link called Direct links to jpegs on NARA server. This will take you to the image by itself as hosted on the National Archives website. I find this the easiest way to save the full resolution image to my computer hard drive. On my PC I right-click on the map and select Save Image As.
This page is also important if you want to use this image in another program such as Google Earth. The URL for this page is the direct URL to the image. Notice that it ends in .jpg. This means that it is the image alone, and this link can be used to create a custom map overlay in Google Earth. You can see an example of a custom map overlay in my video Create a Family History Tour with Google Earth Pro at the 06:13 mark.
This week we’re going to revisit two more early episodes of Elevenses with Lisa that will help you be more productive and organized no matter what device you using for your genealogy research. I’m bringing these episodes out from behind the Premium Membership paywall and making them available for free this week. These will be presented back-to-back as Live Video Premieres on my Genealogy Gems YouTube channel. Part 1 and part 2 of this short series can be found in episode 68. In part 1 we covered what makes us vulnerable to getting distracted, and how a research plan can help. In part 2 we talked about how to deal with BSOs (bright shiny objects!) In this episode 69 we will cover parts 3 (Mobile Organization) and 4 (Online Productivity Strategies).
How Alice the Genealogist Avoids the Rabbit Hole Continued…
Part 1 and part 2 of this short series can be found in episode 68. In part 1 we covered what makes us vulnerable to getting distracted, and how a research plan can help. In part 2 we talked about how to deal with BSOs (bright shiny objects!)
Part 3
In episode 68 we covered:
1. Use a Cloud-Notetaking Service
Get a free Cloud note-taking tool and use it consistently. (Examples include Evernote, OneNote, and Google Keep.)
Use the website, software, and/or app to capture unexpected finds while researching. Both Evernote and OneNote work on all platforms.
Your notes in your account will synchronize between your devices (depending on the program and plan you choose.) You can add to your notes or work with them anytime, anywhere.
2. Schedule BSO Time
I use Google Calendar to stay organized and schedule my BSO time. Create a BSO calendar, and then schedule BSO time on your calendar. These will help you remember to follow up. Knowing you have set aside time in the future to explore the BSO helps you mentally let them go and stay on track with your research plan.
In this episode:
3. Mobile BSO Organization
Success comes from pairing your research plan and process with a great supportive research environment. We have a variety of “environments” we work within such as:
On paper at our desk
On our mobile devices
On our computer
Mobile Genealogy Organization
Let’s look at how we can set up a workflow for BSOs while mobile computing. My two favorite methods for capturing BSOs on a smartphone or tablet are 1) Cloud Notetaking, and 2) Home Screen “Bookmark Apps”.
Option 1: Cloud Notetaking
I’ll be using Evernote on an iPhone as an example. (You may see slight variations in the instructions depending on the service you use and your device.)
Evernote is a great choice if you want to easily sync and use your notes on all devices including your desktop computer and / or laptop computer.
Before you begin, you’ll need a free Evernote account at evernote.com. You’ll also need to download the free Evernote app from your device’s app store, and log into your account.
When you come across a BSO while researching online in a web browser (such as the Chrome or Safari app), here’s how to capture it:
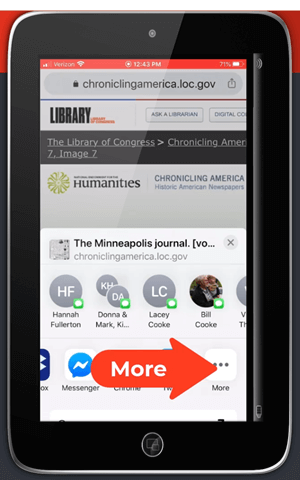
Tap the Share icon on the web page.
Select Evernote from the menu. If you don’t see it tap More for the complete menu of available apps. If you still don’t see it, make sure you have downloaded the app.
Tap More to find the Evernote app
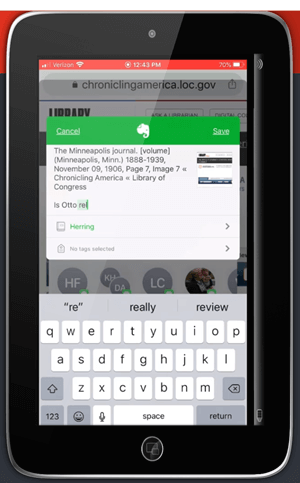
The app will open and should open a new note. Edit the note as desired.
Edit the BSO note
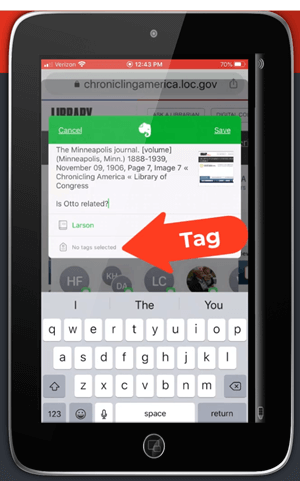
Tag the note with the “BSO” tag, as well as any other tags you find helpful.
Tag with the BSO tag
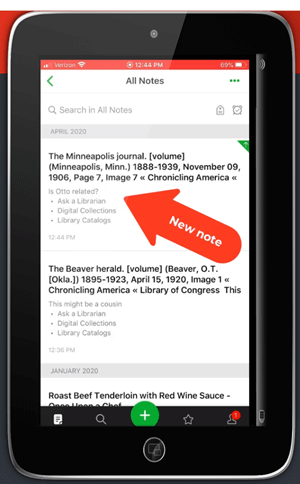
Tap Save.
The note is now saved to Evernote. If you are on WiFi, Evernote will synchronize so that the note will be available from any device signed into your Evernote account.
The BSO tagged note
Option 2: Home Screen “Bookmark Apps”
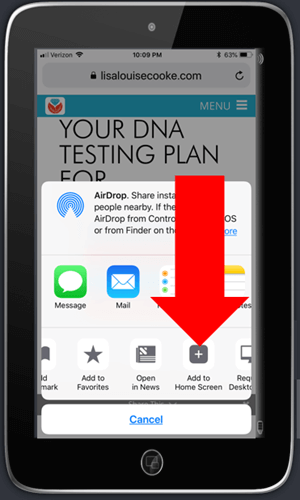
Keep in mind that these aren’t the same as “Bookmarks” found in your web browser apps. I call them “Bookmark Apps” because they do save a particular web page, and they look just like apps. In the menu this feature is called “add to home screen.” (see image)
Bookmark Apps are best for when you plan to do your BSO follow up on the same mobile device.
How to capture a BSO as a Bookmark App:
In your browser app, when you come across a BSO web page, tap the share icon.
Tap Add to Home Screen.
Tap Add to Home Screen
Edit the title so it will be easy to remember why you wanted to follow up on it.
Tap Add (iOS – this may be different on Android, or different browsers)
The web page “bookmark app” is now on your home screen.
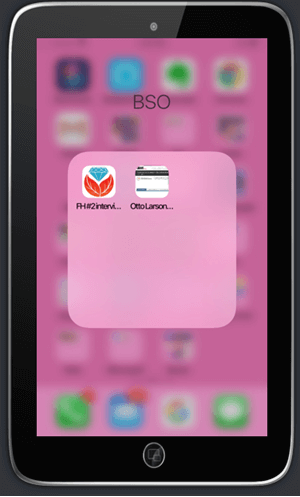
Once you have created at least two BSO bookmark apps, you can then create a folder.
How to create a folder:
Move the bookmark app by pressing and holding it until it shakes.
Keep your finger on it and drag it onto the other BSO bookmark. This will create a folder.
Name the folder “BSO”.
Press the home button to save.
Bookmark apps in the BSO folder
Now whenever you have some spare time you can tap the BSO folder and get back to one of those items that previously caught your eye.
How Alice the Genealogist Avoids Falling Down the Rabbit Hole Part 4
Creating a Supportive Computing Environment
The following tools are available for your computer desktop or laptop.
Restore Tabs
In addition to using Ctrl+Shift+T (Win) or Cmd+Shift+T (Mac) to restore a closed browser tab, you can also right-click on the new tab plus sign and select Reopen closed tab from the pop-up menu. You can do this multiple times and web pages will continue to open in the reverse-order that they were closed.
Turn Multiple Tabs into One and Save Memory with OneTab
Online genealogy research can leave you with a lot of open web browser tabs. While using multiple tabs allows you to jump back and forth between web pages and records, they can take up valuable computer memory.
You can dramatically reduce your memory usage with the OneTab extension available for both the Chrome and Firefox browsers. With one click, OneTab will combine your open tabs into a clickable list in one browser tab. You can even export the list for future reference.
Get OneTab in the Chrome Web Store here.
Get OneTab in the Firefox Web Store here.
Reduce Email Distractions
Gmail now has a Snooze feature which allows you to temporarily file an email until the date and time you select.
Snoozed emails will reappear in your Inbox at the scheduled time.
Retrieve snoozed emails at any time by clicking “Snoozed” in the menu on the left.
Get Back on Track with MyActivity
When you are signed into your Google account, MyActivity tracks the searches you conduct and the websites you visit. By visiting your MyActivity, you can search for and return to any previous activity. You can also turn it off. Go to MyActivity and click Activity Controls from the menu. Switch the slider to the off position. Visit MyActivity at https://myactivity.google.com/myactivity
Save Time by Previewing Your Google Search Results
Rather than clicking on each search result and loading the page (which also takes you away from the rest of your search results), use the Google Results Previewer web extension for Chrome. Once installed you can simply hover your mouse over a result link to reveal a preview of the page. Then you can decide whether to click through or preview additional results.
Click here to get the Google Results Previewer web extension for Chrome.