In this episode, Irish expert Donna Moughty joins host and producer Lisa Louise Cooke to talk about Irish genealogy to help you get a jump on yours before everyone starts talking about their Irish roots on St. Patrick’s Day next month! Also in this episode:
Your DNA Guide Diahan Southard has DNA news
Other listeners write in with inspiring successes
Michael Strauss musters in with tips on finding your ancestors in the five branches of the U.S. military.
Muffy in Seattle sent this link to her family history video. Great job!
Melissa asked about finding copyright-free music to add to family history videos. Lisa’s tips:
Unfortunately, free royalty-free music sites are few and far between.
You’re smart to be cautious because if you were to put your video on YouTube they have the technology to identify any song that is used that is a violation of copyright.
YouTube does make free music available:
Sign into YouTube with your Google account
Click on your picture in the upper right corner and go to your Creator Studio.
Upload your video (you can keep it private if you wish) and then on the video page click “Audio” (above the video title).
Choose among the many music tracks there.
Once you’ve added a track and saved it, you should be able to download the video with the music included.
The other source of music I use is music that comes with the programs I use (Animotoand Camtasia).
Lisa Louise Cooke uses and recommends RootsMagic family history software. From within RootsMagic, you can search historical records on FamilySearch.org, Findmypast.com and MyHeritage.com.
Keep your family history research, photos, tree software files, videos and all other computer files safely backed up with Backblaze, the official cloud-based computer backup system for Lisa Louise Cooke’s Genealogy Gems. Learn more at https://www.backblaze.com/Lisa.
INTERVIEW: DONNA MOUGHTY ON IRISH RESEARCH
The following review appeared in the January 2018 newsletter of the Midwest Genealogy Center, Mid-Continent Public Library:
“If you want a quick guide on how to get started on Irish research, this short, four-page guide is an excellent resource. This guide will help you start your research in the United States, so you can figure out where in Ireland your ancestor came from. It is organized into 12 steps with helpful websites added. This guide is the first in the Irish Research Series by Donna M Moughty.”
Donna Moughty, shown left with Lisa Louise Cooke, is a professional genealogist and former Regional Manager for Apple Computers. She has been conducting family research for over 20 years. She teaches classes for beginners and lectures on a variety of subjects including Internet, Irish research, and computer topics. In addition, she provides consultations, research assistance, and training. She is a member of Association of Professional Genealogists and the Genealogical Speakers Guild.
Preparing for Success in Irish Records Research – Guide #1 (reviewed above): Without the right preparation, researching in Ireland can be frustrating! Before you jump the pond, start your research at home to determine a place in Ireland, as well as details to help differentiate your person from someone of the same name. This research guide will walk you through the process of identifying records in the US to set you up for success in your Irish research.
Irish Civil Registration and Church Records – Guide #2. Civil Registration for all of Ireland began in 1864, with Protestant marriages dating back to 1845. Even if your ancestors left before that date, they likely had relatives that remained in Ireland. Prior to Civil Registration, the only records of births (baptisms), marriages or deaths (burials) are in church records. This Reference Guide will explain how to use the new online Civil Registration records as well as how to identify the surviving church records for your ancestors in Ireland.
Land, Tax, and Estate Records – Guide #3 (NEW!). Had the Irish census records for the 19th century survived, Griffith’s Valuation, a tax list, would not be one of the most important resources for Irish researchers. Without any context, however, it can just seem like a list that includes lots of people of the same name. This Guide explains how and why Griffith’s Valuation was done, and how to use it to glean the most information about your family. Once you know your ancestor’s locality in Ireland, Griffith’s Valuation can place them on a specific piece of land between 1846 and 1864. After Griffith’s Valuation, the Revision Books allow you to follow the land and in some cases, to the 1970s, possibly identifying cousins still living on the land.
Start creating fabulous, irresistible videos about your family history with Animoto.com. You don’t need special video-editing skills: just drag and drop your photos and videos, pick a layout and music, add a little text and voila! You’ve got an awesome video! Try this out for yourself at Animoto.com.
MyHeritage.com is the place to make connections with relatives overseas, particularly with those who may still live in your ancestral homeland. Visit www.MyHeritage.com
Each of the military branches is listed below, detailing information about when each was organized and resources available to genealogists on your ancestors who served in any of these branches.
United States Army. The largest of the five military branches dates back to June 14, 1775, during the early days of the Revolutionary War. Prior to the formation of the Army, each colony had companies and battalions of Associators and local militia. With the war, the need for a professional standing army to fight the British saw the formation of the Continental Army.
With the end of the Revolutionary War, the Army disbanded in 1783 after the signing of the Treaty of Paris. Later in 1796, two legions formed under the command of General Anthony Wayne would later become the nucleus of the United States Army. The Encyclopedia Britannica published this nice article on the history of the Army from its inception to the present.
A number of excellent genealogical resources are available to search for ancestors who served in the United States Army since the beginning. These databases are found on Ancestry, Fold3, and Family Search. One of the largest collections of records covers the United States Regular Army enlistments from 1798 to 1914 (available by subscription at Ancestry.com). Searching the card catalogs of Ancestry.com, Fold3and FamilySearch will yield many databases that contain information about soldiers who served, and sacrificed their lives with the Army over the last two centuries.
United States Navy. The United States Navy dates from October 13, 1775 when it was officially established by an Act passed by the Continental Congress. At the end of the Revolutionary War it was disbanded, and again reestablished under the Naval Act of 1794 which created the Navy as a permanent branch of the military.
The history of the Navy and technology can be divided into two major eras. The earlier period, called the “Old Navy,” was the age of wooden sailing ships, and still later came the birth of the ironclads during the Civil War. The later period called the “New Navy” occurred with further innovations in late nineteenth century as the United States transformed into a global power recognized the throughout the world.
The United States Navy website has a nice background history of the service. Numerous databases and searches for records of the Navy covering multiple war period detailing pensions, continental sailors, muster rolls, ships logs, and cruise books are located on Ancestry.com, Fold3and FamilySearch. Consult each database individually for records of interest.
Another organization related to the Navy is the United States Merchant Marines. Although not officially a branch of the military, the Merchant Marines sacrificed and lost lives since the days of the Revolutionary War, carrying out their missions of supply and logistics during times of war. Here’s an excellent website on the history of the Merchant Marines.
United States Air Force. The modern day Air Force dates from September 18, 1947, when it was formed as part of the Security Act of 1947. The Air Force and aviation history began under the authority of the United States Army, starting on August 1, 1907 when it was organized under the name of the Aeronautical Division of the Signal Corps. Over the next 30 years the service changed names several times:
Aviation Section of the Signal Corps (1914-1918);
Division of Military Aeronautics (1918);
Air Service of the United States Army (1918-1926);
United States Army Air Corps (1926-1941);
United States Army Air Forces (1941-1947).
In that final year, it was separated as its own organization as it is known today. Click herefor a complete history of the Air Force from 1907 to the present.
Two excellent online sources covering the early history of the Air Force from World War I and World War II are located on Fold3:
United States Marines. This elite branch of the military began with the organization of the Continental Marines on November 19, 1775. The mission of the Marines initially comprised ship-to-ship fighting, security onboard naval vessels, and assistance in landing force operations. This mission would continue to evolve over the years. At the end of the Revolutionary War, the Marines were disbanded on October 4, 1783.
Along with the Navy, under the Naval Act of 1794, the United States Marines were again re-established and would serve faithfully in every major war period and in peacetime between conflicts. The Marines will forever remain true to their motto of “Semper Fidelis” or Always Faithful as they continue to live up to their long-running tradition of honor and service. Click here to watch an interesting and accurate history of the Marine Corps is viewable online on You Tube.
Coast Guard. The history of this seagoing service dates back to August 4, 1790. Established as the Revenue Cutter Marines under the direction of Alexander Hamilton, the name was changed in 1894 to the Revenue Cutter Service until 1915. That year, an Act of Congress was passed and signed into law by President Woodrow Wilson called the “Act to Create Coast Guard.” The United States Live Saving Service and Revenue Cutter Service came together. Later, in 1939, the United States Light House Service was added to form the modern day United States Coast Guard.
The complete history of the United States Coast Guard from 1790 is on the Historians Office. It includes information about each of the separate organizations that came together to form the Coast Guard at. Ancestry.com has a collection of casualties of the Navy, Marines, and Coast Guard. Very few additional online sources are available online for this branch of the service. Researchers must access these documents and records onsite at the National Archives in Washington, DC.
Military Minutes Case Study
By Michael Strauss
Subject: Russell Strauss
Died: December 27, 1981-Jonestown, PA
Son of Harry B. Strauss & Agnes S. (Gerhart) Strauss
Over the last 30 plus years doing genealogy research, I’ve discovered that nearly all of my family members who served in the military were in the United States Army. But I have been occasionally surprised to find relatives who served in other branches of the military.
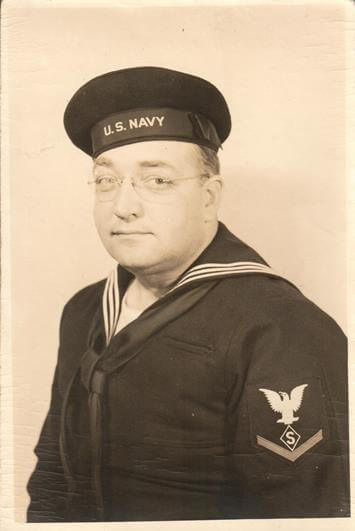
On the paternal family several years ago one of my cousins gave me a box of photographs. One of the images was marked Russell G. Strauss. He wore the uniform of the United States Navy during World War II. I recognized his name and knew that he was my grandfather’s first cousin. I was 16 years old when he died and didn’t know him very well.
His uniform indicated that he was a third class petty officer in the Navy during the war. I looked further at his uniform and noticed a diamond shaped “S” as part of the insignia. This military occupation indicated that he was a specialist that would require further research. I spoke with a couple of my older family members who knew Russell. All of my family interviewed said that he in the military police (M.P.) during the war. With additional research, I discovered that his insignia was that of the Shore Patrol. When I compared what my family said to me and his uniform told me the information matched very closely.
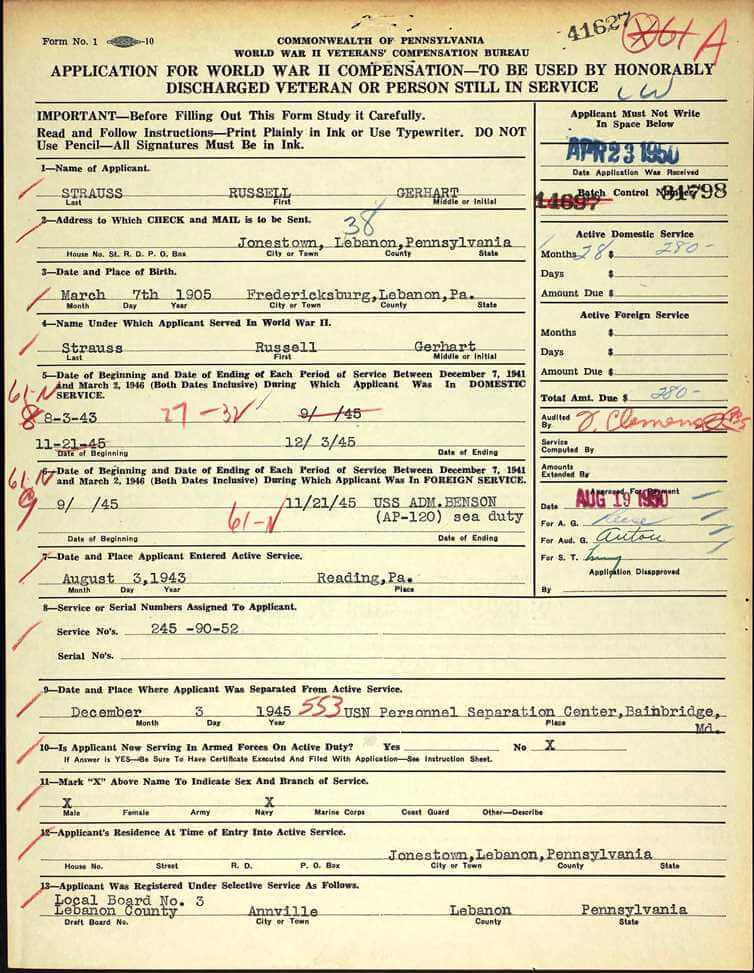
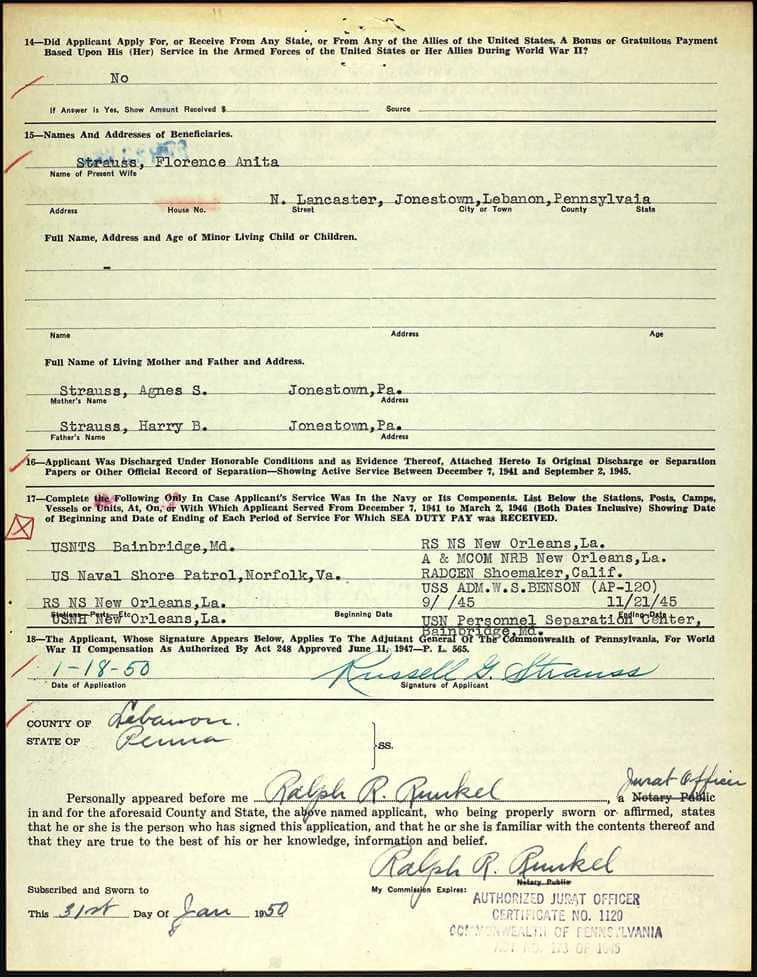
I found on Ancestry his application for compensation from the Commonwealth of Pennsylvania in 1950 when he served in the Shore Patrol in Norfolk, Virginia as part of his military duty (inserted below). Putting information from his photograph together with what my family members shared with me helped answer questions I had regarding of my relatives.
PRODUCTION CREDITS
Lisa Louise Cooke, Host and Producer
Sunny Morton, Editor
Vienna Thomas, Associate Producer
Hannah Fullerton, Production Assistant
Lacey Cooke, Service Manager
Disclosure: This page contains affiliate links and Genealogy Gems will be compensated if you make a purchase after clicking on these links (at no additional cost to you). Thank you for supporting this free podcast and blog!
We already trust Backblaze as the official cloud-based computer backup service for Genealogy Gems. Now they’ve added another optional layer of security: even better!
Recently Backblaze, our computer backup service and a sponsor of the Genealogy Gems podcast, let us know that we can now activate an extra layer of security to better protect the data we have stored with them.
The feature is called two-factor verification. It requires that we present both our account credentials and a verification code from a second device to gain access to our Backblaze account. That means someone who was trying to steal our data would have to have both our account information and access to the phone that’s tied to the account. Pretty unlikely!
“This feature is available immediately to all Backblaze users and does not require an update to be used,” they told us. It’s also not automatic–you can activate it if you choose.”
We’ve heard from so many Gems listeners and readers who have purchased Backblaze that we wanted to share with you how to enable this optional feature.
How to Activate Backblaze Computer Backup Service’s Two-factor Verification Security
1. Log in to your existing Backblaze account.
2. Open the “My Settings” page as shown here.
Step 4
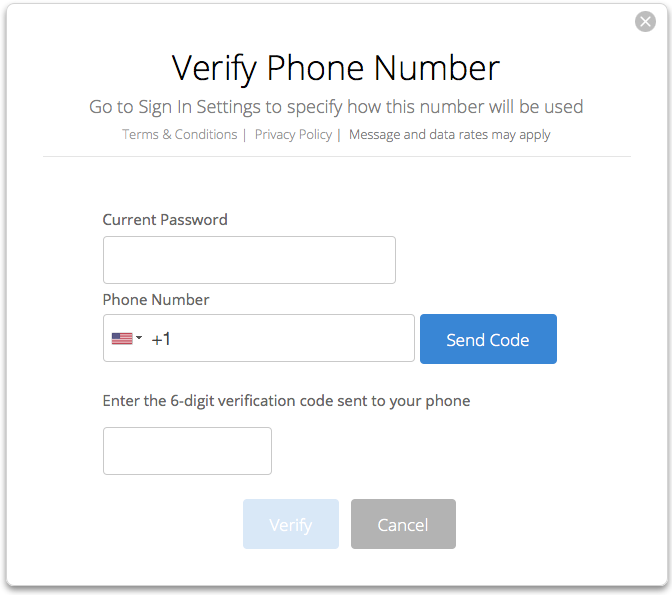
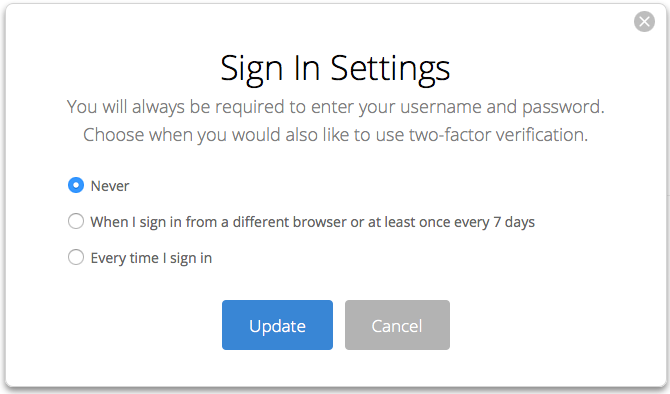
3. Click on the “Sign in Settings” link on the right hand side. If you already have a phone number set up for your account, go to Step 4. If you do not have a phone number set up for your account you will see this screen:
In the “Verify Phone Number” window, you’ll enter your phone number and then verify it is correct by having Backblaze send a verification code to the phone. That verification code is entered in this window. You can not turn on two-factor verification without successfully completing this step.
4. Once you have a phone number set up for your account, you’ll see a screen like this when you click on the “Sign in Settings” link.
Step 5
5. Choose the two-factor verification setting you desire and select “Update” to change the setting.
6. The set-up/change of your two-factor verification setting is now complete.
What it will be like to use Backblaze two-factor vertification
Let’s say you have selected the “Every time I sign in” option for your two-factor verification setting. Here’s what happens when you sign in to Backblaze:
1. Click the sign-in button and enter your Backblaze account credentials.
2. A unique text message is sent to the phone number on your account, as shown here:
3. At the same time, a “Two-Factor Verification” screen is presented.
4. Enter the code from the text message you received into the “Two-Factor Verification” screen, then press “Enter Code.” You have 10 minutes to enter the code. If you do this correctly you will be logged in to your Backblaze account.
Why not use it?
This is an optional feature on Backblaze. Why would you choose not to activate it?
“It is important to weigh the added security of two-factor verification against the possibility that you will not have the second device with you when you require access to your Backblaze account,” says an email from the company. Some users may not consider what they’ve got stored with Backblaze to be the kind of data that needs extra layers of protection. Others may not want the hassle of an additional layer of security.
But think carefully–Backblaze backs up ALL the files you tell it to. You may have personal and financial data in at least some documents: bank account or credit card numbers, digitized birth certificates or Social Security cards.
Consider what works best for you! Our best recommendation is to HAVE a computer back-up service in place. We chose Backblaze because of its reputation, the quality and security of its service and its very reasonable price. Click here to learn more about Backblaze and why we selected them as a sponsor of our free Genealogy Gems Podcast.
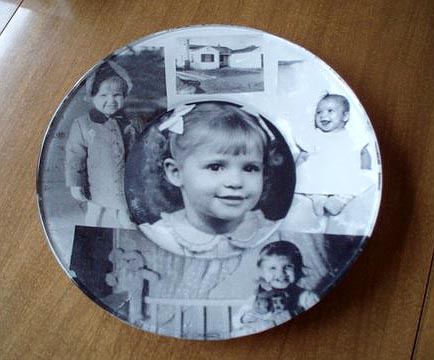
This blast from the past episode comes from the digitally remastered Genealogy Gems Podcast episodes 11 and 12 (originally recorded in 2007). They are now interwoven with fresh narration and updated show notes. Topics include: Google Images; Top 10 Tips for finding Graduation Gems in your family history; Display your family history with an easy to create Decoupage plate.
Did you know you can use Google to help identify images, to find more images like them online, and even to track down images that have been moved to a different place online? Find these great Google tech tips in this episode, along with 10 tech-savvy tricks for finding an ancestor’s school records. You will also hear how to create a family history photo decoupage plate: a perfect craft to give as a gift or create with children.
This “blast from the past” episode comes from the digitally remastered Genealogy Gems Podcast episodes 11 and 12 (originally recorded in 2007). They are now interwoven with fresh narration; below you’ll find all-new show notes.
Google Image searches: Updated tips
Click here to watch a short new tutorial video on using Google Images to find images for your genealogy research.
Conduct an initial search using the search terms you want. The Image category (along with other categories) will appear on the screen along with your search results. For images of people: enter name as search term in quotes: “Mark Twain.” If you have an unusual name or if you have extra time to scroll through results, enter the name without quotation marks. Other search terms to try: ancestral place names, tombstone, name of a building (school, church, etc.), the make and model of Grandpa’s car, etc.
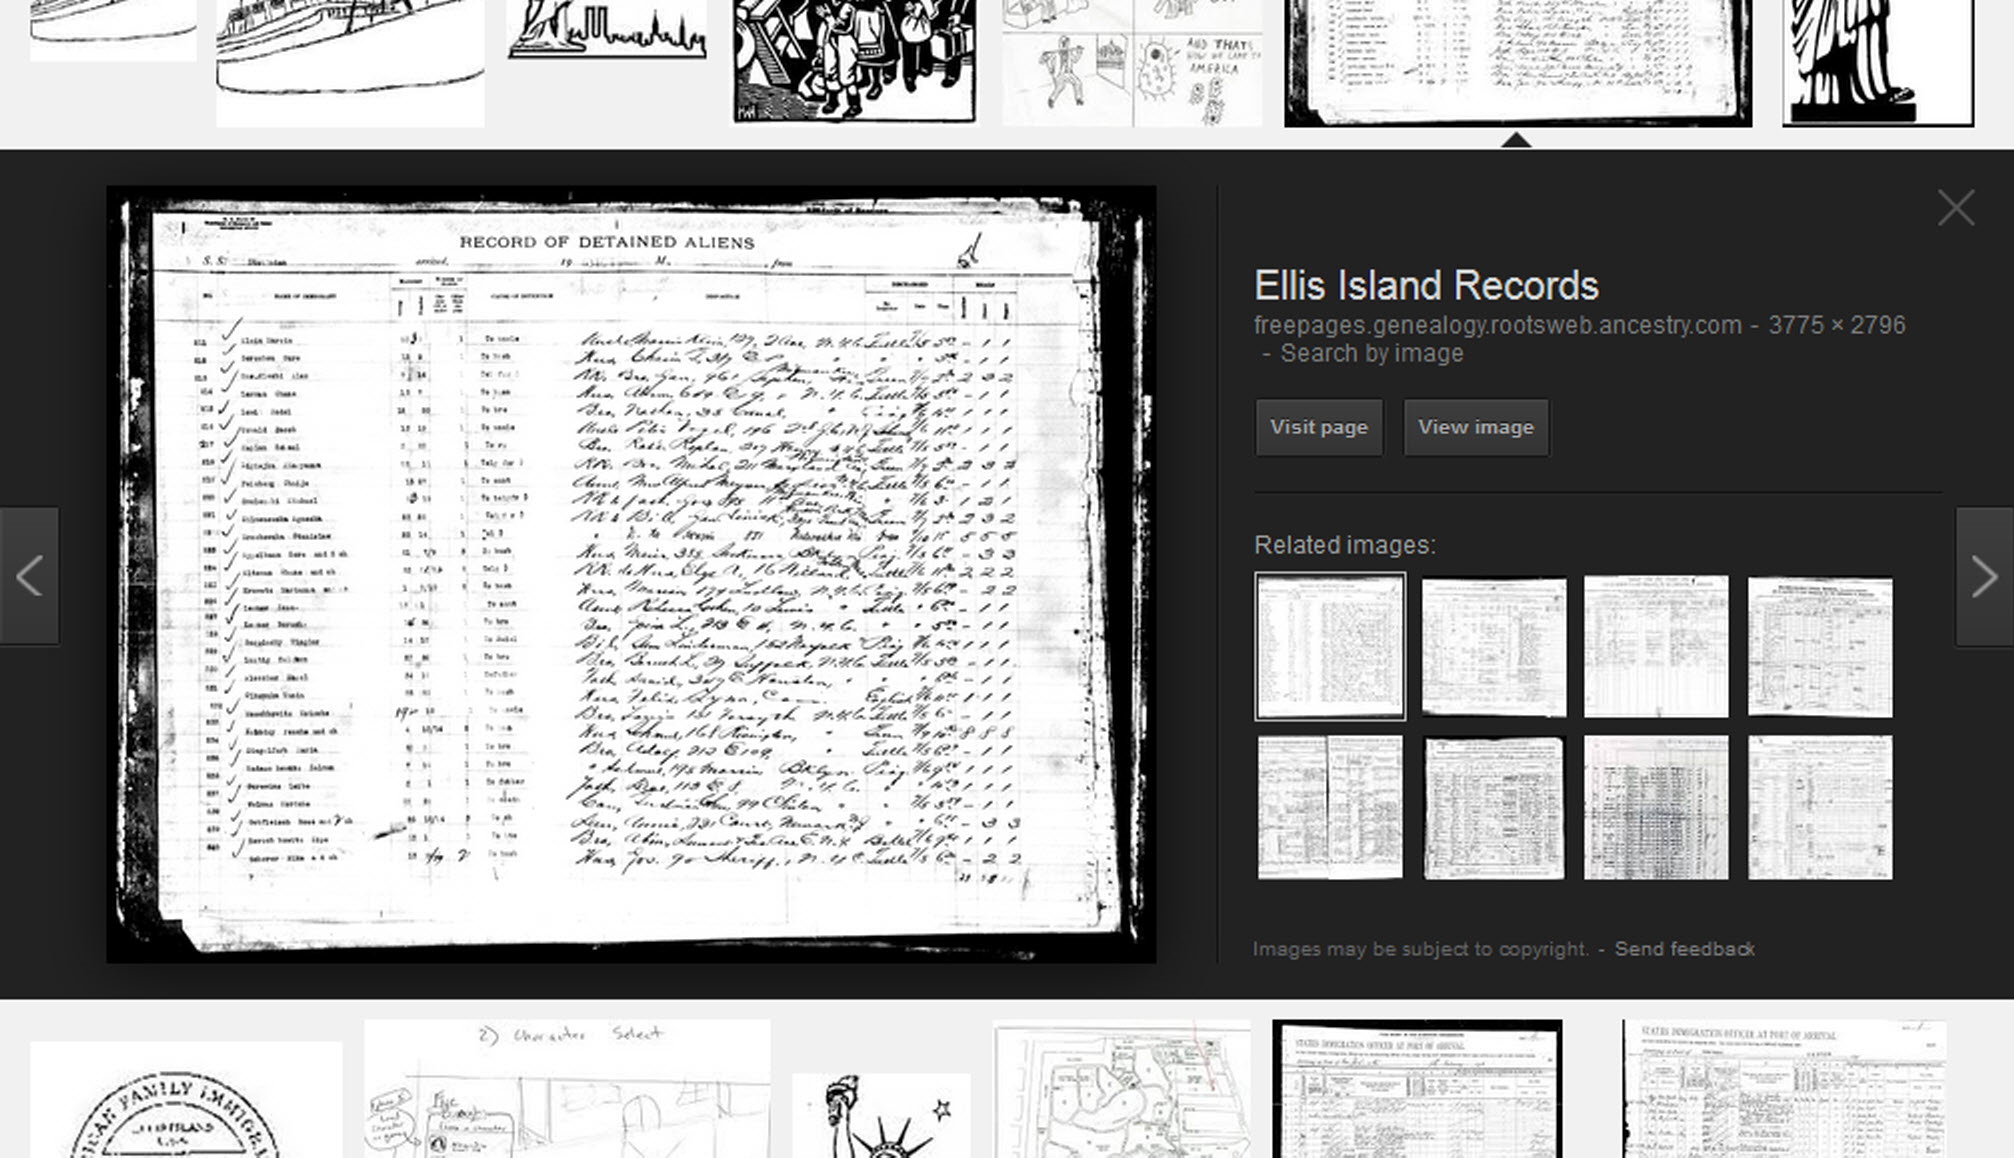
Click on one of the image thumbnails to get to a highlight page (shown here) where you can visit the full webpage or view the image. If you click View images, you’ll get the web address.
To retrieve images that no longer appear at the expected URL: Click on View image to get the image URL. Copy the image’s URL (Ctrl+C in Windows) and paste it (Ctrl+V) into your web browser to go to that image’s page. When you click through, you’re back in Web view. The first few search results should be from the website with the image you want. Click on a link that says “cache.” A cached version is an older version of the website (hopefully a version dated before the image was moved or removed). Browse that version of the site to find the image.
NEW Tip: Use Google Chrome to identify an image and find additional images showing the same subject, such as a place, person or subject.
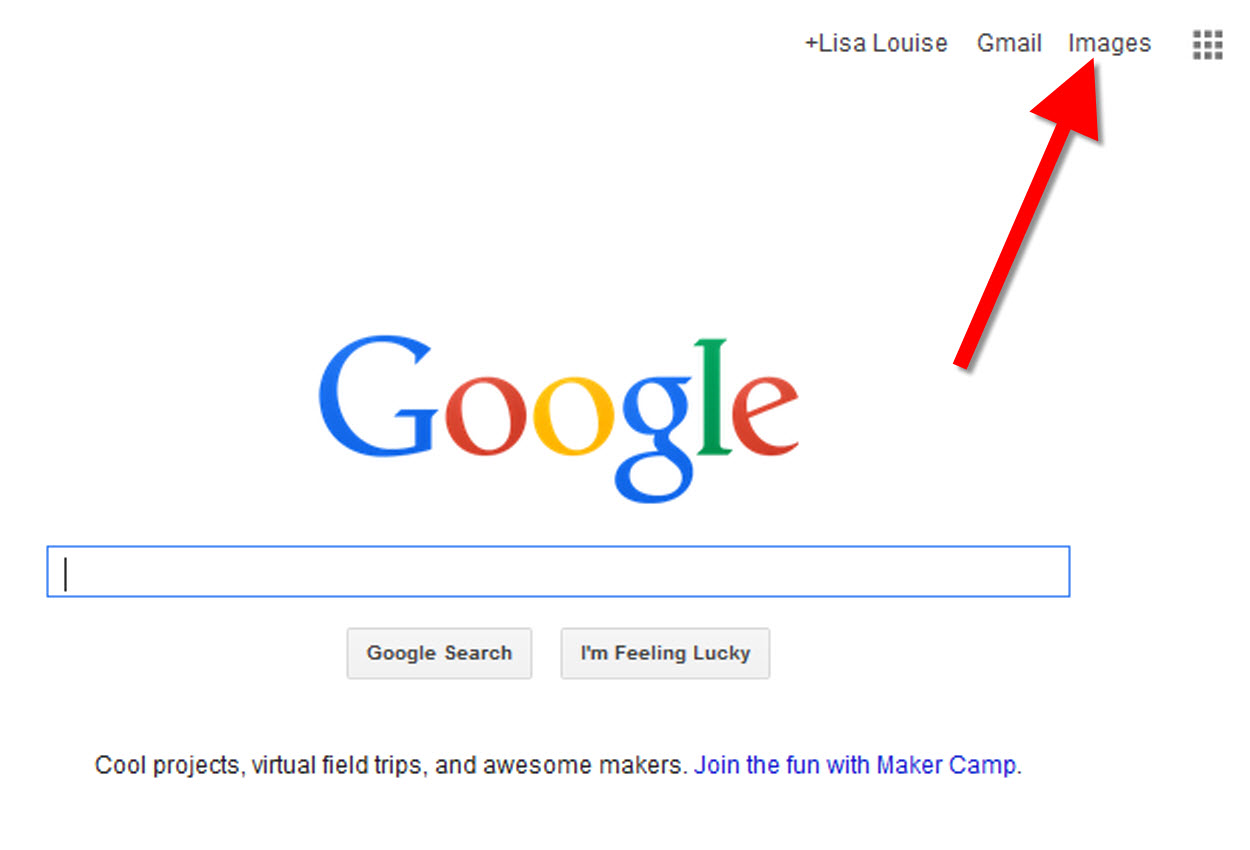
From the Google home page, click Images.
In the Google search box, you’ll see a little camera icon. Click on it.
If you have an image from a website, insert the URL for that image. If you have an image on your computer, click Upload an image. Choose the file you want.
Google will identify the image as best it can, whether a location, person, or object, and it will show you image search results that seem comparable.
Click hereto watch a free video tutorial on this topic.
GEM: Decoupage a Family Photo Plate
Supply List:
Clear glass plate with a smooth finish (available at
kitchen outlet and craft stores)
Sponge craft brush
Decoupage glue
Fine paper-cutting scissors (Cuticle scissors work well)
Small bottle of acrylic craft paint in a color you would like for the back
A flat paintbrush
Painter’s tape
Brush-on clear acrylic varnish for a glossy finish on the back of the plate
A selection of photos (including other images that complement the photos)
Assembling your plate:
Lay out your design to fit the plate
Add words if desired. You can draw directly on the copy or print it out and cut it to fit.
Put an even coat of glue on the front of each photo. Don’t worry about brush strokes, but be careful not to go over it too many times which could cause the ink to run.
Apply the photos to the back of the plate, working in reverse order (the first images placed on the plate will be in the foreground of the design). Glue the edges firmly. Turn the plate over to check the placement of images. Smooth using craft brush.
Brush glue over the back of each photo.
Turn the plate around so you can see the image from the front and work out the air bubbles.
Continue to place the images until the entire plate is covered. Let it dry 24 hours.
Use painters’ tape to tape off the edges before you apply the acrylic paint to the back of the plate. Paint the back and let dry. Apply a second coat. Let dry.
Apply an acrylic varnish for a glossy finish on the back. Let dry.
Lisa Louise Cooke uses and recommends RootsMagic family history software. From within RootsMagic, you can search historical records on FamilySearch.org, Findmypast.com and MyHeritage.com. And it is in the works for RootsMagic to be fully integrated with Ancestry.com, too: you’ll be able to sync your RootsMagic trees with your Ancestry.com trees and search records on the site.
Keep your family history research, photos, tree software files, videos and all other computer files safely backed up with Backblaze.com/Lisa, the official cloud-based computer backup system for Lisa Louise Cooke’s Genealogy Gems.
GENEALOGY GEMS BOOK CLUB
Our current book is Everyone Brave is Forgiven by Chris Cleave. Follow the story of Mary North, a wealthy young Londoner who signs up for the war effort when the Great War reaches England. Originally assigned as a schoolteacher, she turns to other tasks after her students evacuate to the countryside, but not before beginning a relationship that leads to a love triangle and long-distance war-time romance. As her love interest dodges air raids on Malta, she dodges danger in London driving ambulances during air raids in the Blitz.
This story is intense, eye-opening and full of insights into the human experience of living and loving in a war zone and afterward. Everyone Brave is Forgiven is inspired by love letters exchanged between the author’s grandparents during World War II.
Click here for more Genealogy Gems Book Club titles
GEM: Top 10 Tips for finding Graduation Gems in your family history
Establish a timeline. Check your genealogy database to figure out when your ancestor would have attended high school or college.
Consult family papers and books. Go through old family papers & books looking for senior calling cards, high school autograph books, journals and diaries, senior portraits, fraternity or sorority memorabilia and yearbooks.
Search newspapers. Look for school announcements, honor rolls, sports coverage, end-of-year activities and related articles. Updated tips and online resources:
Ancestry.com has moved the bulk of its historical newspaper collection to its sister subscription website, Newpapers.com.
Search your browser for the public library website in the town where your ancestor attended school. Check the online card catalogue, look for a local history or genealogy webpage, or contact them to see what newspapers they have, and whether any can be loaned (on microfilm) through interlibrary loan.
Search the Library of Congress’ newspaper website, Chronicling America, for digitized newspaper content relating your ancestor’s school years. Also, search its U.S. Newspaper Directory since 1690 for the names and library holdings of local newspapers.
Contact local historical and genealogical societies for newspaper holdings.
Consult the websites of U.S. state archives and libraries: click here to find a directory of state libraries
State historical and genealogical societies. In addition to newspapers, state historical and genealogical societies might have old yearbooks or school photograph collections. For example, the Ohio Genealogical Society library has a large (and growing) collection of Ohio school yearbooks. Local historical and genealogical societies may also have school memorabilia collections.
RootsWeb, now at http://www.rootsweb.ancestry.com. Check the message board for the county and state you’re looking for. Post a message asking if anyone has access to yearbooks or other school info.
TIP: Use Google site search operator to find mentions of yearbooks on the county page you’re looking at. Add site: to the front of the Rootsweb page for the locale, then the word yearbook after it. For example:
Yearbookgenealogy.com and the National Yearbook Project, mentioned in the show, no longer exist as such
US GenWeb at www.usgenweb.org. Search on the county website where the school was located. Is there anyone willing to do a lookup? Is there a place to post which yearbooks you’re looking for?
Call the school, if it’s still open. If they don’t have old yearbooks, they may be able to put you in touch with a local librarian or historian who does.
TIP: Go to www.whowhere.com and type the school name in “Business Name.” Call around 4:00 pm local time, when the kids are gone but the school office is still open.
ebay: Do a search on the school or town you’re looking for to see if anyone out there is selling a yearbook that you need. Also search for old photographs or postcards of the school. Here’s my extra trick: From the results page, check the box to include completed listings and email potential sellers to inquire about the books you are looking for.
TIP: Don’t be afraid to ask ? ebay sellers want to sell! And if all else fails, set up an ebay Favorite Search to keep a look out for you. Go to and check out Episode #3 for instructions on how to do this.
MyHeritage.com is the place to make connections with relatives overseas, particularly with those who may still live in your ancestral homeland. Click here to see what MyHeritage can do for you: it’s free to get started.
FREE NEWSLETTER:
Subscribe to the Genealogy Gems newsletter to receive a free weekly e-mail newsletter, with tips, inspiration and money-saving deals.
Disclosure: This article contains affiliate links and Genealogy Gems will be compensated if you make a purchase after clicking on these links (at no additional cost to you). Thank you for supporting Genealogy Gems!
Here’s our link for purchasing your copy of Snagit (screen clipping tool) Thank you for using our link. Use coupon code GENE15 to get 15% off.(We will be compensated at no additional cost to you, which makes the free Elevenses with Lisa show and notes possible.)
You’re going to learn:
What Snagit does and the problems it can solve for you as a genealogist!
How to screen capture using Snagit
Amazing advanced new features you didn’t know Snagit had and how to use them.
How to do scrolling and panoramic screen clipping (perfect for family trees, historic maps, long web pages and so much more.)
How I specifically use it for my genealogy research.
Add my YouTube channel to your “Favorites” list on YouTube:
Click here to add my channel to your YouTube favorites. Clicking the red “Subscribe” button at the Genealogy Gems YouTube channel will add my channel to your YouTube library which makes it super easy to return to my channel and Elevenses with Lisa any time you’re on YouTube.
How to Use Snagit
One of the things that we all work really hard to do is solve family history mysteries. And as we do that, we are finding all kinds of goodies. But the trick is that we have to capture them. Right? If we don’t, then we may end up losing the trail.
Last week, we talked about citing the sources that we find. This week, we’re going to be capturing our findings in a very visual way, and actually incorporating those source citations. And we’re going to be doing it with the tool that I really absolutely use every single day. And that’s Snagit.
The Image-Capturing Challenges that Genealogists Face
To understand the value of a tool we need to make identify the problems we face and see how it solves them. Here are some of the challenges genealogists face when it comes to capturing images:
We don’t need or want to save the whole page. (Why waste all that ink printing it or storage space saving it?) We may not want to download or copy an image from an unknown website. (No one wants to accidentally put a virus on their computer!)
The page in its entirety is blurred when printed. (This often happens with newspaper pages.)
We need to capture a very long or wide page that can’t be displayed in its entirety on the screen.
We want to annotate or add a citation to the source image.
It takes extra time to save to items to your computer and then add them to other documents in other programs.
Do you identify with some of these challenges? I sure do.
Let’s say that you find an article, a document, or something else, and you want to add an annotation. Maybe you want to add the source citation, a watermark, or just notes to yourself directly onto the image.
It would be time-consuming to clip the image with perhaps the free snipping tool that comes on your computer and save it to your hard drive, and then pull it into another program to annotate it. I don’t know about you, but there’s never enough time for family history so anything that we can do to save time, means we’re going to be able to spend more time with ancestors.
The solution is using Snagit.
Snagit Functionality
Here are just some of the things that Snagit can do:
“Capture” items that appear on your screen
Create videos with audio (Create > Video from Images)
Edit images (You can edit clipped and imported images and photos. You can also send screen shots automatically when using your computer’s snipping tool.)
Convert text on an image to typed text (Grab Text)
Create documents using templates (Create > Image from Template)
“Share” items to other programs with one click.
I have found that snag is so robust, and it has so many different options, I still can’t exhaust all the things that it offers me. But it’s also simple. It’s simple in the way that you use it. It certainly solves simple, everyday problems. And most importantly, it is a program that I can use not just for genealogy, but also for my business and personal use. I like to have tech tools that serve me across the board, if possible, because it takes time to get up to speed on any program. If you’re just getting programs that are only for genealogy, then you end up needing a second program to be able to do similar things in other parts of your life. Why not find tech tools that can serve you across the board. That’s what certainly Snagit does. So, while I’m focusing on showing you genealogical applications for using Snagit, just know that if you’re new to family history, or you stumbled across us this article, and you don’t do genealogy, you’re going to be able to use Snagit for just about everything.
How to Get Started with Snagit
Purchase the software
Download and install
Open it and let it run in the background so you have easy access from your task bar
Yes, there may be a snipping tool built into your computer, and you can use Print Screen. Snagit can blow them away.
How to Capture a Screen Image with Snagit
Display the desired page on your screen
Click the orange Snagit icon in your task bar (Snagit should be running in the background on your computer.) This is the Capture If you don’t see it, click the blue Snagit icon to open the editor and then click the red circle Capture button at the top of the program. After your first capture, the orange Capture icon will then be open and available in your task bar.
Select the Image tab
Set the Selection to Region
Click the large red Capture button
Use your mouse to draw a box around the desired area. You may see flashing arrows. If you click one you will be ablet to scroll that direction to capture more of the page.
When you release your mouse the image will appear in the Snagit editor.
Sometimes we find an item that is larger than is visible on the screen. The page may scroll side to side or up and down. Use Scrolling capture to capture everything in one piece.
How to Scrolling Capture with Snagit
Display the desired page on your screen
Click the orange Snagit icon in your task bar
Select the Image tab
Set Selection to Scrolling Window
Click the large red Capture button
You will see flashing arrows. Click the arrow pointing in the direction that you want to scroll in Snagit will automatically scroll down and capture. Click Stop at any time if you don’t want to capture the entire page.
When you release your mouse the image will appear in the Snagit editor. You can then trim all sides by simply grabbing the handles and dragging.
In some situations you will need more flexibility in your scrolling. Panoramic capture allows you to select the region and then scroll manually, capturing exactly what you want to capture. Think of it as image capture and scrolling capture merged together. Panoramic capture allows you move both up and down and side to side.
How to Panoramic Capture with Snagit
Display the desired page on your screen
Click the orange Snagit icon in your task bar
Select the Image tab
Set Selection to Panoramic
Use your mouse to draw a box around the desired area
When you release your mouse a panoramic capture bar will appear. Click the Start button to being your panoramic capture.
Click in the captured image area and drag the image as needed. The more precise you are in your movement the better the final image will be. You can move in any direction.
When you release your mouse the image will appear in the Snagit editor. You can then trim all sides by simply grabbing the handles and dragging.
Panoramic captures work great for large items like maps, online family trees and newspaper articles just to name a few things. If you zoom out in order to capture these types of items in their entirety you will end up with a blurry item when you zoom in for a closer look. Panoramic solves this problem.
Let’s discuss a few more options for capturing hard to clip items like newspapers. Sometimes, the article you need is continued on a different page or column. With Snagit you can capture the individual pieces and then combine them.
How to Combine Captured Images with Snagit
Capture each section of the article individual using Image Capture (Region)
In the Snagit editor press Control / Command on your keyboard and click each item you want to be included in the combined image.
Press Control + Alt + C on your keyboard or at the top of the screen click Create > Image from Template.
Select the desired page layout. Custom Steps or Steps Portrait works well for articles.
Click on any items (such as numbered steps) and press delete on your keyboard to remove them.
The combined image can then be saved to your computer or shared to another program.
Editing and Highlighting Images
There are many ways to annotate and edit images (both captured and imported) in Snagit including adding:
arrows
text (perfect for adding source citations directly onto the image
call outs
shapes
stamps (Images on images)
lines
squiggles and drawing
step by step numbering
You can also modify images by cutting out portions, blurring and erasing areas, and even magnifying an area on the image!
Snagit Advanced Features and Strategies
Once you’ve mastered the basics there are many more ways to use this tool to power-up your genealogy research. Here are a few more ideas we covered in the video.
How to Grab Text from an Image with Snagit
Option 1 – Grab text from existing image:
Select the image in the editor so that it is displayed in the editing area
In the menu Edit > Grab Text. This will grab all of the text that appears in the image. If you only want a portion of it, click the Selection tool at the top of the screen and draw a box around the area you want to grab the text from.
The converted text will appear in a pop-up window
Copy the text to your computer’s clipboard by clicking Copy All.
Paste wherever you want the text to appear (another document, etc.)
Option 2 – Grab Text While Clipping:
Display the desired page / item on your screen
Click the orange Snagit icon in your task bar
Select the Image tab
Set the Selection to Grab Text
Click the large red Capture button
Use your mouse to draw a box around the desired area. You may see flashing arrows. If you click one you will be ablet to scroll that direction to capture more of the page.
When you release your mouse the image will appear in the Snagit editor. The converted text will appear in a pop-up window
Copy the text to your computer’s clipboard by clicking Copy All.
Paste wherever you want the text to appear (another document, etc.)
Grab Text from Windows Not Easily Copied
We’ll use the example of copying the titles of computer folders into an Excel spreadsheet. Open your file explorer and navigate to the desired folders. Since a mouse can’t be used to copy all the names in one swoop, we will use Option 2 – Grab Text While Clipping instructions above.
Create Videos with Snagit
You can compile separate images into a video and add voice narration.
In the editor select Create > Video from Images
Click to select the first image in the tray
Click the microphone button in the video recording bar if you want to record narration.
Click the Webcam button if you want to appear on screen
Click the red Record button to begin recording.
Click each image in the order desired for the amount of time you want it to appear on the screen.
Press the Stop button when done.
How to Create a Timeline with Snagit Templates
In the editor add images either by importing (File > Import) or capturing
Select the images to be include by holding down the Control / Command key and clicking on them
Create > Image from Template
Select the timeline template
Add a title and captions as desired
Click the Combine button
Productivity with Snagit
One of my favorite features of Snagit is how easy it is to share items to other programs directly instead of having to save them first to my computer. It’s easy to do. Simply select and display the image to be shared and in the menu go to Share > and select the program.