These show notes feature everything we cover in this episode. Premium Members: download this exclusive ad-free show notes cheat sheet PDF. Not a member yet? Learn more and join the Genealogy Gems and Elevenses with Lisa family here.

The places where your ancestors lived can tell you a lot about their lives. I’m going to show you a free and easy technique for plotting land in Google Earth.
episode 67
Would you like to be able to find your ancestor’s property on a map today? Keep reading and watch the video to learn how. We’re going to take U.S. government survey legal land descriptions found in sources such as Federal Land Patents and quickly and easily plot the boundaries in Google Earth Pro. I’ll also show you an easy way to do it for property in Canada too.
(PREMIUM MEMBERS: Get your ad-free PDF cheat sheet for this episode in the Resources section at the bottom of this page. Not a member yet? Click here to join the Genealogy Gems family and get all the benefits.)
In the video I show you how to plot the boundaries of a piece of land in Google Earth. We’re going to take U.S. government survey legal land descriptions found in sources such as Federal Land Patents and quickly and easily plot the boundaries in Google Earth Pro. I’ll also show you an easy way to do it for property in Canada too. These strategies come from my book The Genealogist’s Google Toolbox,
These days there are actually three versions of Google Earth:
All are free, but they are not the same. The app and web browser versions are sort of “Google Earth lite.” The software is what you want because it has all the bells and whistles that will allow you to do all the things I’m going to show you today.
Plotting legal land descriptions in Google Earth has its advantages. If you’re plotting the land of your ancestors, you’ll be able to see what the area looks like today and what the current street names are. In Google Earth you’ll also have access to additional tools that you can use in conjunction with the boundaries you’re going to create, such as historic maps, area photos, and a wide range of data sets that provide more information about the area.
The first thing to do is check to make sure you have the most current version of Google Earth on your computer. Again, we’re using the software so you need to do this on your desktop or laptop computer. You want to make sure you have Google Earth Pro – LINK – A tell tale sign that you don’t is if the Google Earth globe icon on your desktop is grey and not blue. Open it and in the menu go to Help > About Google Earth. Here it should say Google Earth Pro and you can see the version number.
Check the current version number here, and if you don’t already have the program, go ahead and download it.
Now that you have it on your computer, open it up and leave it running in the background. You’ll need a decent internet connection for it to run.
Next pull up the legal land description that you want to plot. Here’s one that I have for some property owned by George Burket. I found this at the Bureau of Land Management Government Land Office Records website. This free website is where you can search for land patent that your ancestors once held.
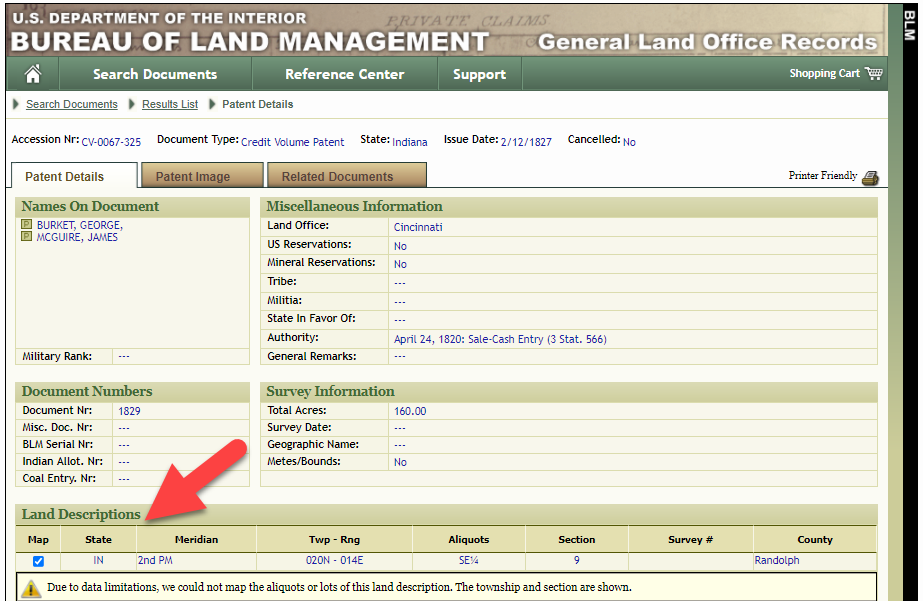
Legal land description at GLO
Even though the Bureau of Land Management places it on the map on their website, you can’t download this or add to it. The advantage of plotting this in Google Earth is that you will have access to much more geographic data, you can add many more details to the map, you can use it in conjunction with other related mapping work that you’re doing, and you can save and share it.
This description gives us the exact coordinates of the property. Jot down the land description or keep it open in your browser tab so you can refer to it.
In a new browser tab, we’re going to type in http://www.earthpoint.us. This will take us to the Earth Point website.
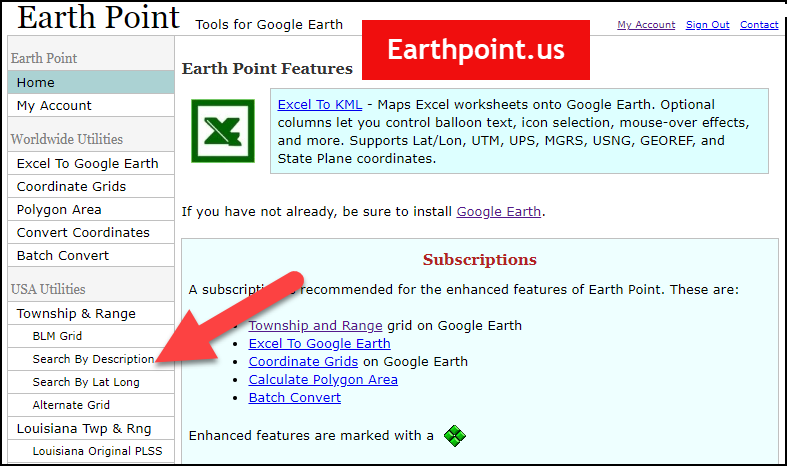
Search by legal land description at Earth Point
This website is free, although some of the features are available only with a paid subscription. Thankfully, the tool for plotting your ancestor’s land patent is free. Some of the free features do require that you sign up for a free account. The feature we are going to use currently does not.
On the Township and Range – Search by Description page you will see a field for each piece of information found in the land description. It’s important to enter this information in the order presented starting with the State. Select the state from the drop-down menu. Pause a moment to allow the fields to recalculate. This allows the appropriate data to be loaded into the next field based on your selection.
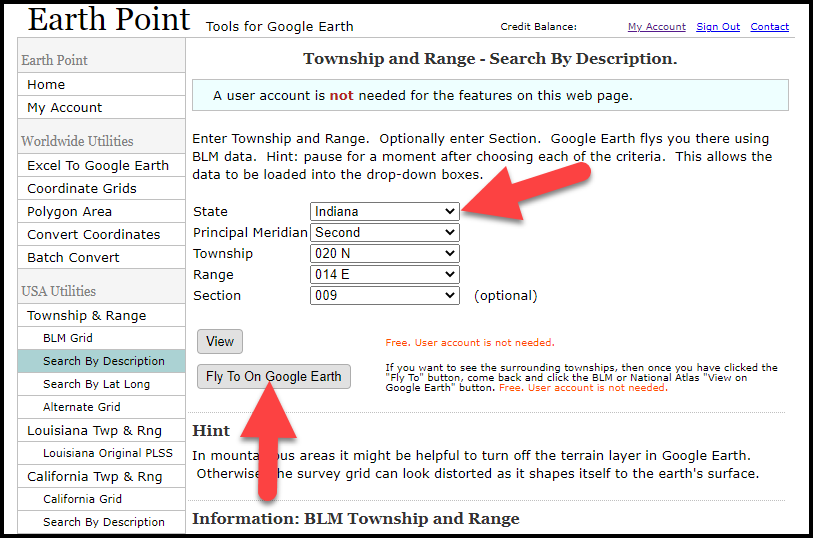
Entering data at Earth Point
After you have made each selection, click the Fly to on Google Earth button. This will generate a KML file which can be saved to your computer. KML stands for Keyhole Markup Language, which is the file type that Google Earth uses and understands. KMZ are zipped KML files which also are used by Google Earth.
Save the file to the desired location on your hard drive. Then click the file to open it. It will automatically open in Google Earth (which you already have open). The KML file is now located in your Temporary Places folder in the Places panel. The land is has now been automatically plotted on the map.
The orange outline is the township. In this example it is township T20N R14E. Click the orange ball in the center of the township for details. In the details you’ll find the total number of acres in the township, the latitude and longitude coordinates for the center of the township and corners.
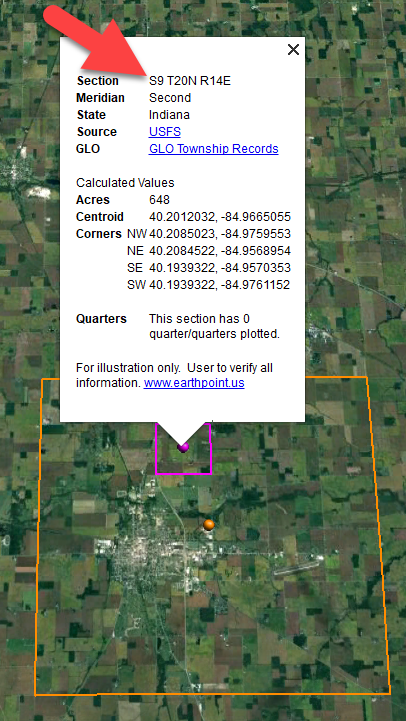
Township in Google Earth
The pink / magenta outline is the Section where the property is. Click the pink center dot for the details:
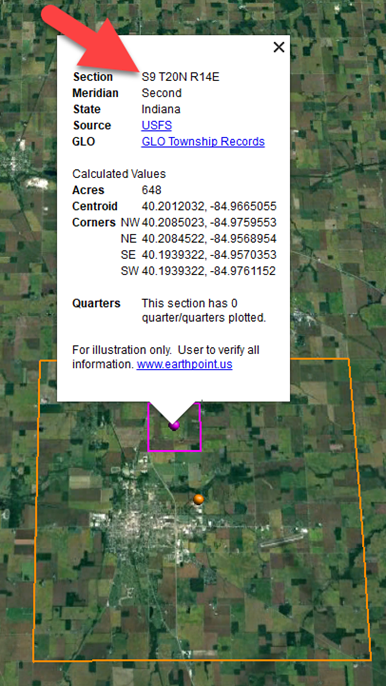
Land section in Google Earth
In this example Section 9 consists of 648 acres.
Notice that Earth Point was able to plot the land down to the Section level. However George Burket did not own the entire section. We must return to the land description for the Aliquots.
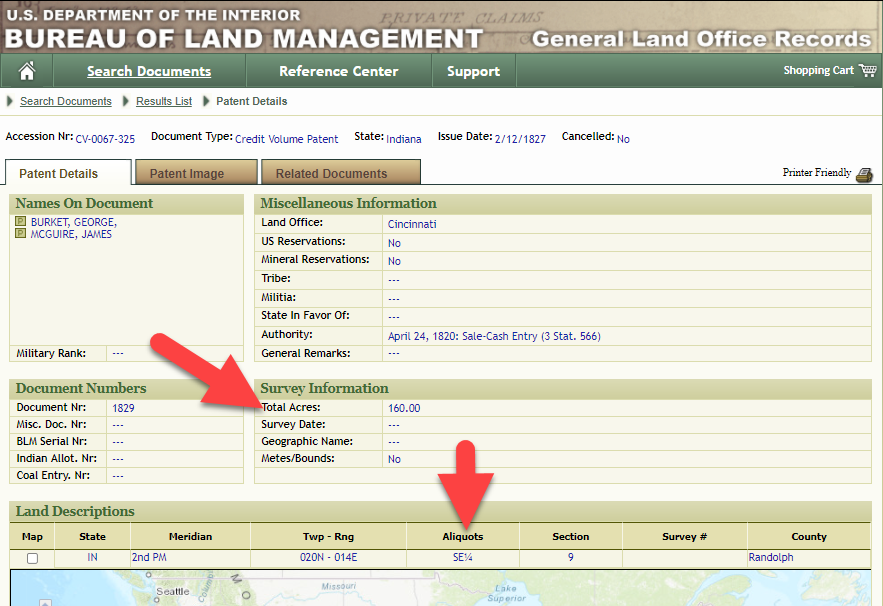
Aliquots in Legal Land Description
In this example, the land was the southeast quarter (SE1/4) of section 9. The land was a total of 160 acres.
We can use the Polygon tool in Google Earth to plot the 160 acres. In the toolbar, click the Polygon tool. This will open the New Polygon dialog box. Type a title, description and source citation.
As you hover your mouse over the map you will notice that the cursor is now a square shape. Click the screen on each of the four corners one at a time in order to set the four corners of the property – in this case the southeast quarter of the section. Once you have drawn the shape you can click on the handle on any corner to adjust precisely.
Click the Style / Color tab in the New Polygon dialog box to adjust the color and opacity of the acreage polygon. You can add color and thickness to the outline, and color and opacity to the fill of the shape. When you have it set the way you want it, click OK to close the New Polygon box. The Polygon is now set.
On the left side of the Google Earth screen you will see a series of panels: Search, Places and Layers. At the bottom of the Places panel is the Temporary folder. This is where the KML file was placed when it was opened. However, like its name implies, this is a temporary location. If you want to keep it, you’ll need to move it to a filed location within the Places panel. This will not change the position of the polygon on the map, only where it is filed and saved in the Places panel.
To file a polygon, click on the file in the Places panel, drag it to the desired location, and drop it. Next, go the main menu and click File > Save My Places. This will save your work so that when you close the program it will not be lost. Google Earth doesn’t auto-save.
The polygon plotting the acreage will be visible on the map when the box is checked in the Places panel. If you uncheck the box for the polygon it will still be there, but it will not be visible on the map. This allows you to create and save many items of interest without always having to have them displayed and cluttering up the map in Google Earth.
After your land polygon has been set, you may want to rename it. There are two ways to do this:
You can also restyle the polygon and edit the text. Start by going to the Places panel and click the arrow pointing at the Polygon’s globe icon. This will open it and show the nested content. Click to select the Polygon. Now you can right-click it (PC) and select Properties – OR – go to the menu under Edit > Properties. Either way it will reopen the Polygon dialog box so that you can make the desired changes. When you’re done, click the OK button to close the Polygon.
Snagit is the tool I used to capture the various views of the land I plotted in Google Earth. Learn more about Snag it by watching my videos and reading the show notes for episode 61 (for beginners) and episode 66 (advanced).
Although the Earth Point website doesn’t plot Canadian land, the Legal Land Description Converter website does. It can help you find land in Western Canada (British Columbia, Alberta, Saskatchewan & Manitoba) subdivided by the Dominion Land Survey (DLS) and the Alberta Township System (ATS).
These show notes feature everything we cover in this episode. Premium Members: download this exclusive ad-free show notes cheat sheet PDF. Not a member yet? Learn more and join the Genealogy Gems and Elevenses with Lisa family here.
Gwynn: I would like to know how to match plat with GPS coordinate/ current street address.
Answer: I cover how to overlay a plat map in Google Earth and discover the current street address in my book The Genealogist’s Google Toolbox.
Roger D: How exact do you need to be in picking points? Does Google snap to mid-points of lines?
Answer: Try to be as exact as you can, however as I showed in the video you can reposition them as needed. Google Earth doesn’t snap.
Lyn: Can I do this with English tithe maps?
Answer: There isn’t a website converter that I know of. However I do cover how to overlay digitized maps in Google Earth in my book The Genealogist’s Google Toolbox.
The manufacturer price is going up August 31, 2021. Now’s the perfect time to get your official Elevenses with Lisa mug.
You can also find them through the menu: Premium > Premium Videos > Elevenses with Lisa.
Get the Genealogy Gems deal with ExpressVPN here.
VPN stands for Virtual Private Network. It’s a top tech trend right now, although their origins can be traced back to the 1990s.
According to the top tech blogs VPNs usage in the U.S. jumped by 41% between March 13 and March 23, 2021 and is expected to continue to surge. Today I’m going to explain what that is, and the top reasons why I use a VPN and why you might want to start using one too.
Sending data over an unencrypted internet connection is like mailing a postcard. Your message is wide open for the mailman and any other nosy people to see.
Whenever you’re connected to an unencrypted internet network on your phone, computer, tablet, TV, etc., you’re sending countless pieces of information out into the digital world that can be seen and intercepted by many different parties before they get to their intended destinations.
While not every message and piece of data I send out over the internet is sensitive (such as banking information) I like knowing that my activity is private. It’s a lot like why we always protect the identity of living people in our family tree. It’s always best to err on the side of privacy and security when working online.
A VPN creates a secure encrypted tunnel between your device and the internet. In other words, it puts an envelope around your postcard so that no one can sneak a peek at your private correspondence. That way none of your data going in and out of your devices can be seen – not the government, hackers, your internet service provider, or even by the VPN.
The best VPNS also don’t create or keep activity logs or connection logs. This means if they are asked by government or law enforcement to hand them over, there’s nothing to hand over.
Since every device has a unique IP address, your device can be traced back to you. However, when you use a VPN, your connection gets routed through one of thousands of servers, hiding your real IP address and replacing it with one of their own. This allows you to browse the web anonymously.
There’s no one way to make everything you do completely private. But a VPN does add a nice layer plus some great added benefits. I’ve been thinking about doing something more for a long time, and then my brother-in-law who worked for years for one of the largest tech companies in the world told me he set up a VPN and that I should too. I did my own homework, and here are the top reasons why I use a VPN:
Libraries, archives, traveling to speaking engagements, visiting ancestral locations, vacation. Public Wi-Fi is often provided and it’s really convenient, plus I don’t have to use my phone as a hot spot which uses up cellular data not to mention battery. Your favorite coffee shop could be a favorite spot for hackers who steal personal information. And you can even get hacked on your own home Wi-Fi. With only basic computer knowledge, the hacker could gain access to your passwords, financial details, or even your emails!
Any time you’re on public Wi-Fi a VPN hides your IP address encrypts your internet connection using encryption.
Your internet service provider (known as an ISP) can see everything you do.
In the US, ISPs can legally sell your data to ad companies.
In the UK and Australian ISPs are required to keep logs of the websites you visit, the apps you use for around a year.
Governments, large corporations, and websites potentially surveil your activity regularly to harvest your data for their own agendas.
A VPN makes your online activity private and secure with tunneling and encryption. Your messages go through a tunnel of sorts so others, including your ISP, can’t see where you’re located, or that the data is from you. It also applied encryption (AEs-256 is what you’re looking for in encryption) so that your message is essentially locked by you and the service delivering the data for you doesn’t have the key. Only the recipient does (such as the website you’re trying to communicate with.)
But you may be wondering, isn’t your activity safe because you only visit secure “HTTPS” websites?
In an interview with TechRadar.com Dan Pomerantz, Co-Founder of ExpressVPN explains it this way: “Many of those companies know your identity, and they might store and resell those data about you without your knowledge or approval. Why is that the case even when you use https? Because technologies called DNS and SNI transmit those data in plain text, and because the pipe operators can still see the destination of your traffic.”
Many websites offer deals based on your location. Countless times I’ve been shopping for airlines tickets and watched the price go up each time I checked the price. It’s an effort to get me to buy before the price goes up more. The website can do this because it knows who I am and my location.
Have you noticed more and more websites asking you to allow them to know your location? You can click “Don’t allow” but if you’re not using a VPN you can’t be sure they don’t know who and where you are. Using a VPN means you’re accessing their website through that tunnel which hides your location, opening up opportunities for deals you might not have gotten otherwise.
A VPN allows you to select from servers in different location to be your “location”. So, I may live in Texas but my internet traffic might be by way of London. And by going through the “tunnel” the website doesn’t know it’s me. This gives me more flexibility to shop for the best deals.
I was a little worried about a VPN slowing down my connection speed. But I’ve not found that at all, and in fact if your ISP is throttling your speed, which many do, it can actually speed up your connection because again your ISP can’t tell where you’re located. Connecting to a server closer to your location increases the speed, and switching servers is super easy in the app. Smart location will automatically pick the best server to you too.
There are tons of VPNs out there but it’s important to know they don’t all offer the same features, especially the free ones. (My theory is that nothings ever really free particularly when it comes to security.) After doing my homework I decided to use ExpressVPN. It’s top-rated and has all the features I was looking for. I’ve been using it for a while now and I’m really happy with it. It’s super easy to use. So I reached out to ExpressVPN and they’ve agreed to extend a special offer to us. This is an affiliate link so I’ll receive compensation when you use my link. That helps make this free show possible, so thank you! Plus you’re going to save money.
Special Deal for Genealogy Gems Viewers:
Get 3 extra free months with the discounted 12-month plan.
Comes out to just over $8.00 a month (+ 3 months free) Gosh, I feel like I would have spent more than that just to gain access to the additional shows it gives me access to with ExpressVPN. Keep reading below to learn more about that. ExpressVPN offers a 30-day money back guarantee so there’s no risk to try it.
Get the Genealogy Gems deal with ExpressVPN here.
Rated #1 by CNET, The Verge, Wired, TechRadar, & many more! Learn more about their approach to security at the ExpressVPN Trust Center. (Includes Network Lock which protects you if there’s an interruption in your internet connection.)
And speaking of being able to access the internet through any global server, this allows you to access regionally specific content. Did you know that many websites or apps are blocked or restricted depending on where you are located?
I discovered this while on the road for some genealogy speaking engagements. I was keynoting in London several years ago, and at the end of the day in my hotel room I sat down to watch my favorite show on Netflix. But when I logged in it said that I was not allowed to watch the show in England. My iPad was telling the internet provider that I was in London, and the ISP told Netflix. Had I had a VPN at that time, I could have rerouted my server connection through England and binged watched as many episodes as I pleased.
So is this helpful even if you aren’t traveling right now? You bet it is!
Remember when the UK version of Who Do You Think You Are? came out. We were going crazy over here in the U.S. because we would go to the website to watch it only to get an access denied message. It said you had to be in the UK to use the BBC iPlayer. A VPN allows you to switch locations and enjoy the show.
This is true of subscriptions like Disney+, Hulu, HBO Max, ITV, Sky Go, and more.
You’ll also find that various subscription services offer different content based on your ISP location. By switching locations you can get access to shows not available in your home country with the same subscription.
My experience specifically with Amazon:
Start on your computer by getting your subscription.
Spoof Your Location
When you visit a website and it wants to know your location, it asks because it’s not getting that information based on your IP address. It’s based on nearby Wi-Fi networks, your systems location settings, or your device’s GPS. This means in that situation your location can still be potentially revealed via your web browser. If you decline the request for your location, you might find that some websites or content will be blocked for you. The Spoof Your Location feature helps solve the problem. When you’re connected and it’s turned on, the extension hides your location by automatically sharing the ExpressVPN server location instead.
Block WebRTC
WebRTC is an HTML5 specification designed to enable voices and video communication to work inside web pages without needing to install any special plugins in your web browser. (Examples include Google Meet, Facebook Messenger and GotoMeeting.) In some situations, Web RTC could potentially leak your IP address even while connected to a VPN. Block WebRTC allows you to block it entirely.
HTTPS Everywhere
Automatically makes websites switch from HTTP to a secure encrypted HTTPS connection where available.
One of advantages of watching the show live is the chance to ask you questions. I answered many at the end of the show, but here are the remainder with my answers.
flounder1st: Does VPN only work for Wi-Fi data or Cellular Date also?
Lisa: Yes.
Mary S: I may get a new computer soon, should I wait and install it on the new one?
Lisa: You don’t have to. When you get the new one simply uninstall the VPN from the old computer and install and sign in on the new one.
Linda G: So I can use a VPN but my husband can continue doing his own thing through his regular ISP?
Lisa: Yes.
Please share your questions and comments below.
Show Notes: The FamilySearch Wiki is like a free encyclopedia of genealogy! In this FamilySearch Wiki tutorial, discover the wealth of information the Wiki has to offer, and learn the secrets to navigating it with ease. We’ll also cover the number #1 reason people get frustrated when searching the Wiki and how to overcome it.
RootsTech has set the class video to “private”. You can watch it on their website by going to the video page in their on-demand library. You may need to sign in to your free FamilySearch account in order to watch it.
Enjoy this special free tutorial video which was originally presented at the RootsTech conference. Download the ad-free Show Notes cheat sheet for this video class. (Premium Membership required.)
A wiki is a website that
The FamilySearch Wiki is focused on providing information for genealogy research such as:
You’re going to see many things about wiki creation and management. Not everything is relevant to you when just wanting to find information. In fact, the majority of the Help section is geared to people creating, editing and maintaining pages. Don’t worry about being a contributor. Enjoy being a user.
Keep in mind that the purpose of the Wiki is to explain where genealogical materials are located and how to get access to them. The Wiki does not have individual ancestor information. If you want to find records, start by deciding specifically what kind of records you want. Identify when and where the ancestor lived at the time the record was created. Then head to the Wiki to figure out what records are available and where they can be found.
The Wiki links to:
Topic Search: When searching for information on a specific topic such as probate records, type the topic into the Search box. As you type, a list of pages with the topic word or words in the title appears below the Search box. If one of the listed pages is the desired topic, highlight and press enter. If you don’t pick from the drop-down list you will get a results list of every page that includes the topic.
Vital records Search: FamilySearch recommends using the Guided Search for info on vital records.
Location Search in the search box: When only the name of any country, state in the U.S., province in Canada, or county in England is typed in the Search box you will be taken directly to that Wiki page. For example: If Texas is searched the result is the Texas, United States Genealogy page.
Page Title: If you happen to know the exact title of the Wiki article you want, type it in the Search Box.
Many people will search for something like marriage records, Randolph, County, Indiana, and they will get a list of results. The results don’t look as clear-cut as Google results, and they may not all be on topic. This is where we can get lost. I think probably the number one reason why people give up on the wiki is they get these kinds of search results. They realize, wait a second, this isn’t even Indiana, it’s talking about Kentucky! Why am I getting all these? It can be frustrating.
This happens because we tried to do it ourselves, with our own keywords. Remember, like most search engines, they’ve indexed their content to make it searchable, so that means they’ve already decided how they want to talk about a particular topic. Rather than just addressing marriage record first, the wiki focuses on the location. Where is this marriage record? So, focus first on the place unless you are just looking for general information on a general genealogy topic such as genealogy software.
Pre-filled suggestions will appear as you type because the wiki is going to suggest what it has in the format it has it. Again, you may want to first go to the country, state or county-level page and then look for the record type.
If you’re looking for marriage records but you don’t see them listed it might be that the word marriage isn’t the keyword the wiki uses. Or it might be that the type of record you’re looking for is a state or federal record.
Don’t be discouraged if you don’t see what you want listed in the table of contents. It may just be a keyword issue. Let the work that they’ve already done in organizing their materials guide you. You’ll be more successful and also avoid frustration. The FamilySearch Wiki is just too good of a resource to miss.
You can run three main types of searches:
Resource: Wiki Search Help Page
Generally speaking, the map is the best way to search for records and information that is rooted in a location. Start by clicking the button for the continent, such as North America. From there, select the county from the menu, such as United States, then drill down by state. This will take you to the Wiki entry for that state.
If you’re really new to research in a particular location, start with the guided research link on the location’s wiki page. You may also see links to research strategies, record finder, and record types.
Getting Started section – links to step-by-step research strategies and the most popular records.
The county pages are where the real magic happens because many records such as birth, marriage, death, and court records are typically available at the county level. There you’ll find out how to contact or visit the current county courthouse. Look for Boundary Changes on the page. Use your computer’s Find on Page feature by pressing Control + F (PC) or Command + F (mac) on your keyboard to more quickly find words like Boundary on the page.
Many record collections have their own page on the Wiki. As you type, these pages will populate in the drop-down list. Example: German Census Records. Take a moment to read through the page and you’ll discover some important information that will save you time and headaches, such as:
There are a couple of actions we may want to take before going on to search for records. Here are a few:
Click on the Category to see what else is attached to this category – in this case we see some example images that are helpful in interpreting German census forms.
Click the Cite this page link in the left column if we plan to reference the page elsewhere.
Click Printable Version in the left column if we want a printable or PDF version of the page.
Explore related pages by clicking the What links here link in the column on the left. Notice it also shows if there are any other users watching the page.
Videos at Lisa Louise Cooke’s Genealogy Gems YouTube channel: