It’s time for the third part of our disaster planning process in honor of National Preparedness Month in the United States. Two weeks ago, I talked about assessing your home archive and research files and prioritizing the items you want to protect. Last week, we talked about making copies of important originals and other valuable items. This week:
PROTECT PRECIOUS ORIGINALS. After you’ve duplicated your originals, take steps to preserve them. How exactly you do this depends on what you’re protecting; how much time and money you’re willing to spend; and how you plan to store or display them. The core strategy is to store them in appropriate archival materials away from direct light and extremes in temperature and humidity. No damp basements or hot attics! But what materials constitute safe storage are different for paper items, different types of photos or cloth, and electronic items, so you need to do a little research. (Hey, we genealogists are good at that!)
Several resources can help you learn more about giving your family artifacts the protection they need, including:
Guide to Collections Care, a free e-booklet with top-notch archiving advice from Gaylord, an archival supply company.
Disclosure: This article contains affiliate links and Genealogy Gems will be compensated if you make a purchase after clicking on these links (at no additional cost to you). Thank you for supporting Genealogy Gems!
In celebration of National Preparedness Month in the United States, I’m running a four-part post on securing your family history archive and research against disasters. Last week I talked about assessing and prioritizing your original family artifacts, photographs and documents. This week’s tip:
DUPLICATE THE PAST. There’s no true substitute for an original family Bible, but if it’s lost, you at least want to have a copy. Scan your original photos, documents, and other flat artifacts—including the important pages of that Bible. While you could carefully use a flatbed scanner, consider a portable scanner or a mobile scanning app like Genius Scan or Scanner Pro.
Next, photograph dimensional family artifacts like artwork, handicrafts, clothing, military and school memorabilia, etc. Use a regular digital camera or the camera on your phone or tablet/iPad. Make sure you label the photos by using the metadata fields in digital files or by printing them out and captioning them in an album. Consider using the Heirloom Inventory Kit developed by the folks at Family Tree Magazine to create an archival record of your artifacts with images, stories and more.
Next week, we’ll tackle a third topic: preserving original documents, photos and heirlooms.
We genealogists often accumulate a lot of family “stuff:” original documents, old photographs and heirlooms. Though it’s wonderful to own them, it can be a serious challenge to keep them organized and documented.
Sunny’s 6 Tips for Organizing Your Genealogical Items
1. Take stock of what you’ve got. Gather together all the original documents or photos, or take pictures of all your heirlooms, then review the entire collection at the same time.
2. Get rid of duplicates and stuff that doesn’t matter so much. You probably don’t really need all 10 of grandma’s quilts or those hundreds of scenic photographs from old family vacations. Rethink the 12-piece setting of china you’ll never use and grandpa’s tidy but prolific collection of nuts and bolts.
3. Carefully document and organize originals. Each kit includes supplies and instructions to help you safely identify each item. This is probably the most important step. We love our pictures, old letters and heirlooms because of the family connection. If that connection is lost, so is the value of the object.
4. Scan flat items and take digital pictures of dimensional ones. Keep these as “backups” in case the original is ever harmed. (The document and photo kits even come with Archival Gold CDs, which aren’t easy for genealogists to come by but perfect for long-term digital storage.) Use copies for reference and display, so you don’t expose your originals to everyday wear.
5. Store originals safely. The Heirloom Inventory kit includes suggestions for storing and displaying original objects. The document and photo kits include top-quality archival supplies and step-by-step illustrated instructions on how to store your stuff in them.
6. Share what you’ve got. Frame copies of your old photos and put them on the wall or a shelf. Keep copies of old documents handy to show relatives. Display your heirlooms. Use them all as conversation pieces whenever you get a chance. Tell stories about the people. Share memories that help other relatives understand why these items matter to you. That will help ensure that these items will live on in the family lore.
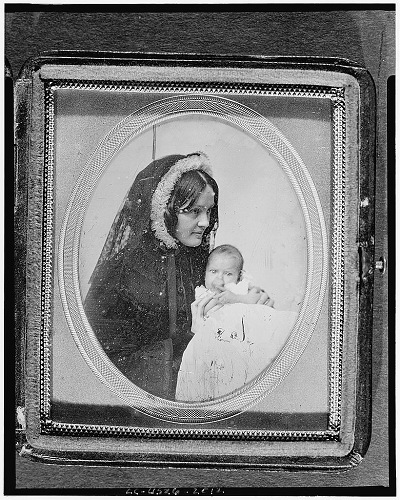
We live in the era of digital photography–far from the time of the daguerreotype. But that didn’t stop Seattle-based photographer Dan Carrillo from falling in love with daguerreotypes and bringing this art form back to life.
“There’s something about a daguerreotype that is unlike any other type of photograph, in my opinion the most beautiful form of photography ever invented,” Dan says in a fantastic, four-minute documentary video you can watch below. He learned the craft of daguerreotyping at an Eastman House workshop, then spent a year gathering and building his own equipment. Today he creates photographs he calls “shiny little jewels” using the same laborious process and dangerous chemicals as early photographers.
He likes the idea that the images he creates will outlive him. “It’s so easy to take a picture and forget about it,” he says. “I’m trying to make something that will be a cherished object from generation to generation.” Family historians certainly can appreciate that line of thinking!
The process of creating a daguerreotype was so laborious that those who used it were constantly tweaking it. According to one site that explains the process in more detail, inventors were able to eventually drop the exposure time from a daunting 15 minutes to less than one minute (who can sit totally still for 15 minutes?). I think it’s interesting that there are more than 480 daguerreotype-related patents at Google Patents. This makes me think differently about those “shiny little jewels” we may come across in our own family photo collections. Daguerreotypes of our ancestors are themselves painstakingly-crafted “genealogy gems!”
 It’s time for the third part of our disaster planning process in honor of National Preparedness Month in the United States. Two weeks ago, I talked about assessing your home archive and research files and prioritizing the items you want to protect. Last week, we talked about making copies of important originals and other valuable items. This week: