by Diahan Southard | May 15, 2016 | 01 What's New, Evernote, Organization

Use these step-by-step instructions to organize notes in Evernote notebooks.
Recently Donna watched one of my Evernote for genealogy webinars. She wrote in afterward to give the webinar a thumbs-up and ask this question about how to organize notes in Evernote notebooks:
“I…have been happily using Evernote for a while now so I already have lots of notes, notebooks and stacks. Got web clipper, made my Genealogy and Personal notebooks, added tags you suggested, and discovered Evernote Clearly is no longer available. But you’re right, I’ve lost some of the notes in the myriad. What is the best way to begin putting notes into the new Genealogy & Personal notebooks? Is there another video on that? Thanks for being there for us, Lisa, All our stuff can become overwhelming if it can’t be organized.”

Genealogy Gems
I’m so glad that Donna found the video helpful!
The thing about getting organized is that sometimes it can gobble up all your research time. So one approach I often recommend is just to move Evernote notes as you use them. That way you can keep researching, while getting more organized each day. As you create new notes you’ll be putting them directly where they belong, and as you use existing notes, you can tidy them up as you go.
If you feel more comfortable getting everything moved in one fell swoop, that’s good too. One way to save time is with a simple trick: decide what you have more of (Genealogy or Personal) and then move ALL your notes into that notebook. So if you have more Genealogy notes, all your notes will be in that notebook. Now you only have less than 1/2 of your notes that need to be moved to Personal.
You can move the rest to the other notebook by selecting multiple notes at once. Here’s a step-by-step breakdown:
1. Click the Genealogy notebook in the left column.
2. In the center column are all of your notes. Click the first note in your list to be moved.
3. Hold down the Control key on your keyboard.
4. Now click to select each additional note you want to move to the Personal notebook. (Use the wheel on your mouse to scroll down as you need to.) Your notes will be collecting in the right-hand window pane, and a dialog box will appear.
5. In that dialog box, click the Move to Notebook button and click to select the desired notebook from your list (ex. Personal).
6. For good measure, click the Sync button to manually synchronize all of your notes.
I heard back from Donna with this comment:
“Thank you Lisa! Within a matter of minutes I was able to move my notes and notebooks into the two stacks. Now that Personal and Genealogy are separated, I’ll follow your suggestion to tidy up the notes as I go and add all my tags (which I hadn’t realized the importance of before the video). Ahhhh! It feels so good to have it clearly organized! You rock, Lisa!”
 This website is packed with resources for using Evernote for genealogy! Click here to find free tips and videos to get started. To REALLY make Evernote work for your family history, become a Genealogy Gems Premium website member. Members have a full year’s access to my Ultimate Evernote Education for Genealogists instructional video series with their membership.
by | Dec 14, 2015 | 01 What's New, Evernote
 Need a better understanding of how to print merged Images in Evernote? Here’s a Q&A from a reader.
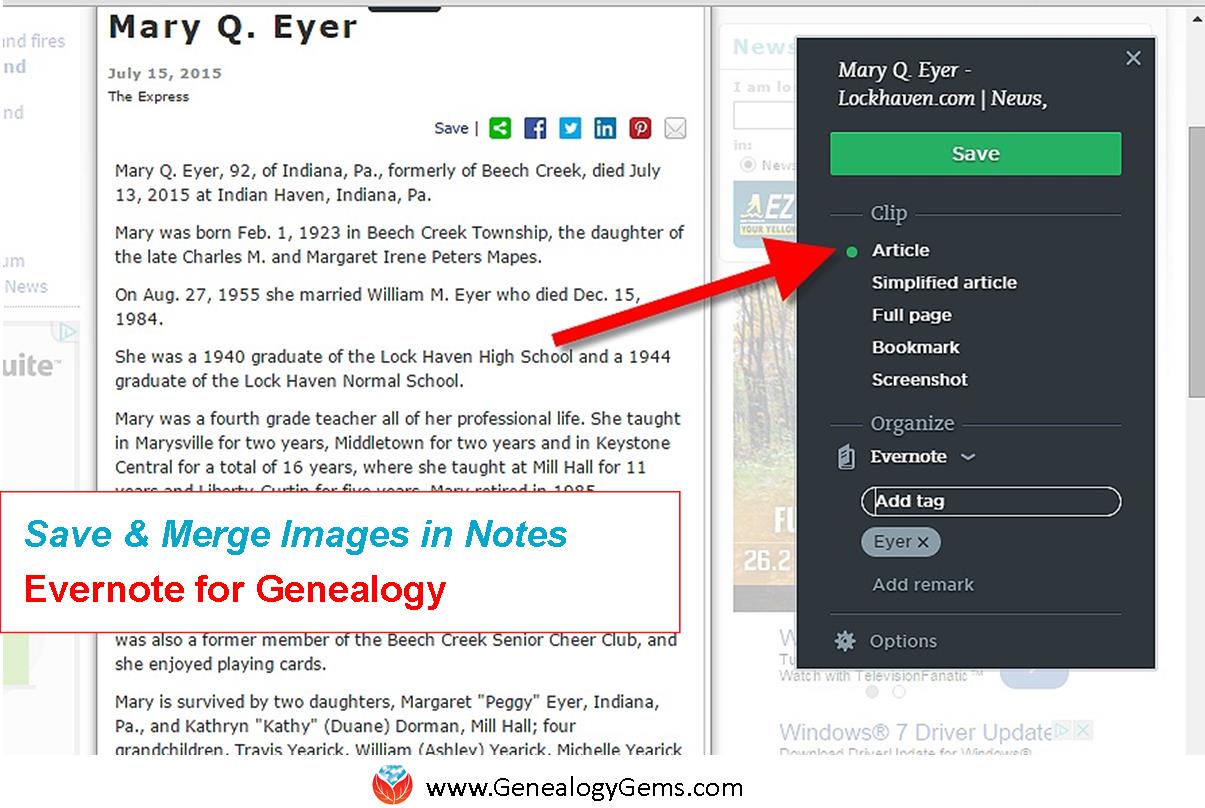
Recently I heard from Joe, who was trying to merge screen clips into a single image and note. He found that after he merged the screen clips, “the merged clips appear as one note on the screen. However, when I try to print or save the merged note, only the portion under the cursor is printed or saved. For example, after I right clicked on this obit to ‘Save as,’ only the top or bottom part was saved to another directory on my PC.
How can I make the vertical bar on the right encompass ALL of the merged clips, rather than just one of them, depending on where the cursor is located? Here is an example of my problem. When I print the obit, a small, top portion prints on page 1, then the large, bottom portion prints on page 2. Thanks in advance for your help!”
Here’s how merged images work in Evernote:
Joe clipped the item in pieces. Each piece is an image, and each piece saved as a separate note. Then he merged them all together. “Merge” means they were all put in one note, but it doesn’t mean the separate images were actually stitched together to make one single image.

The end result is multiple images in one note. That’s why when Joe goes to print, Evernote prints each image on one page. Of course, he can always preview how the printing will come out.

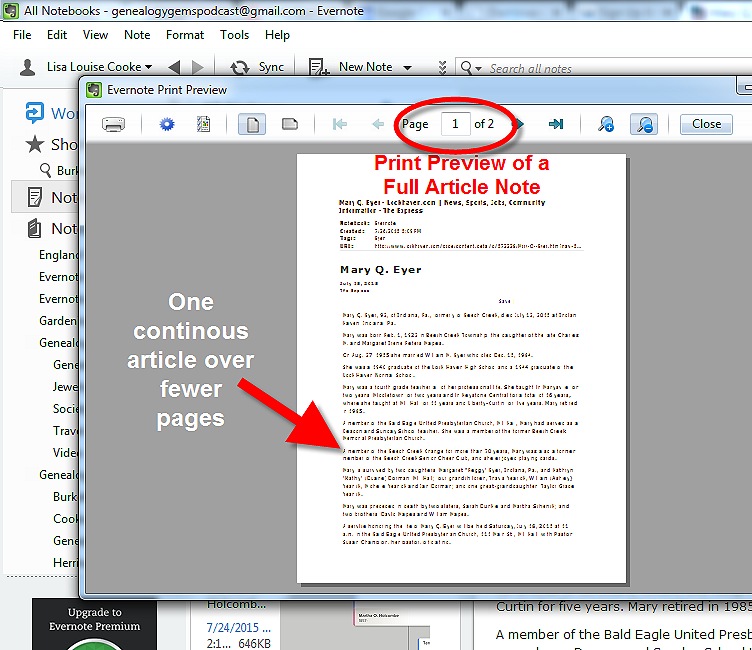
How to Print Merged Images in Evernote in a continuous format:
1. After merging the notes into one, click the Share button at the top of the note, and click “Share Note.” This will copy the URL for that note to your computer’s clipboard.
2. Go to you web browser and Paste the URL into the address field
3. With the entire note on your screen, use the Evernote Web Browser clipper to “Clip > Full Page.” This will create a new note with the entire obit in one image.
You can see the difference when you go to File > Print Preview in Evernote for the merged note and then the full page note. The merged note is broken up and the full page note is more continuous like the original obit, and likely over fewer pages. It’s an extra step, but should do the job if you really need the item to be reinstated as one image.

Whenever possible clip items from the web using the web browser clipper’s Full Page, or Article feature. It can capture what’s on the page even further down where you can’t see. (The exception would be items that appear in special “viewers” which is how sites like Ancestry display their images. In that case you need to use the Screenshot feature and clip what you can see on the screen, and then move down and clip the next portion separately.)
Thanks to Joe for his question!
 Thousands of genealogists use Evernote to keep track of their family history. Because everyone learns differently, I’ve created a variety of helpful resources in video, audio, print and online formats. The Evernote app and software are free to use–and so are many of my tutorials. Click here to learn (for free) how to get started in Evernote and how to access the ultimate Evernote education for genealogists!
by Lisa Cooke | Aug 27, 2015 | 01 What's New, Digital Archives, Evernote, images, Mobile, Organization, Photographs, Technology
Snagit and Skitch can help you highlight screenshots and other digital images you capture for genealogy. Here’s how!

 Recently Diane from Alberta, CA sent in this question:
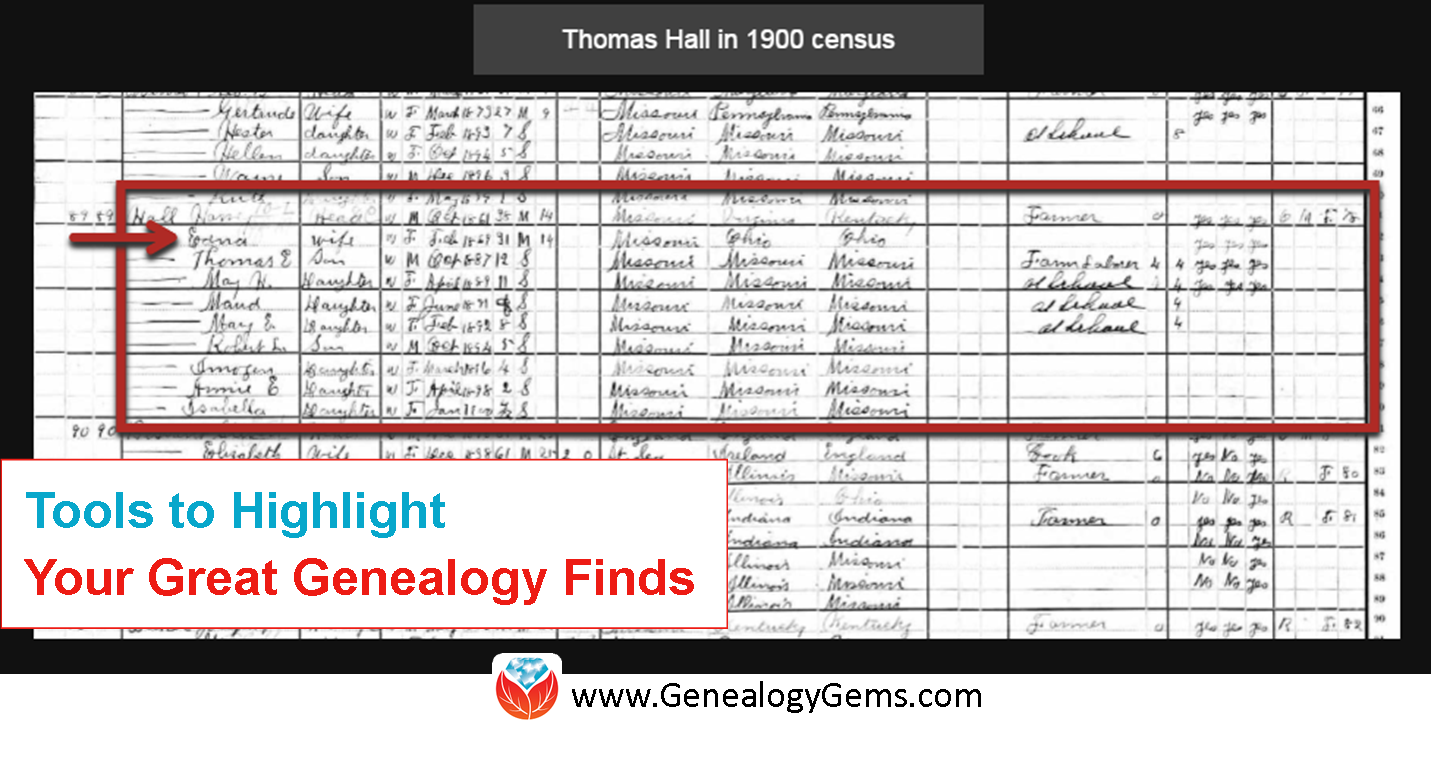
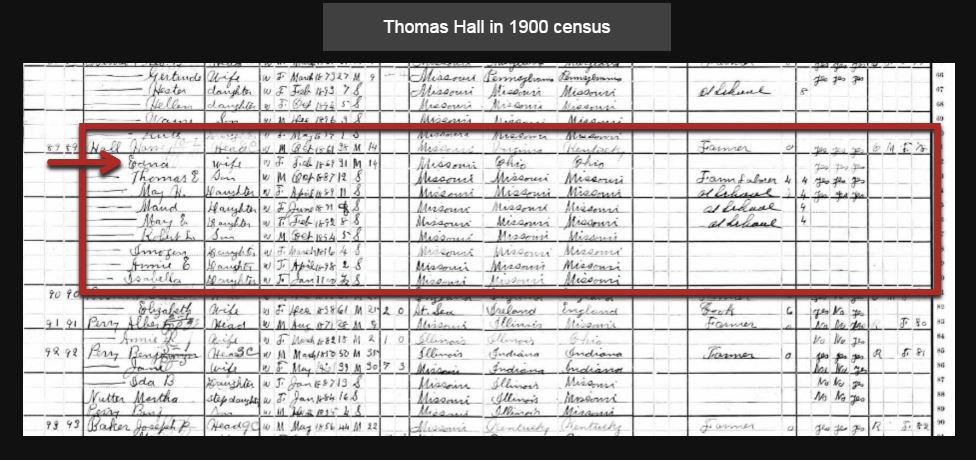
“I am trying to find how to highlight a portion of a document such as a birth certificate. The document has three people listed for the county and prior to adding it to my tree on Ancestry, I would like to highlight my ancestor so he will stand out. Can you offer any suggestions. I tried Evernote without success, also my family tree program. What am I missing?”
I suggested Diane use Snagit 2019, compatible with Windows and Mac software to highlight her documents. In fact, I use it constantly for a variety of genealogical projects. The full-blown software has loads of cool features!
You can also download the free Snagit Chrome extension here. After you install Snagit, you’ll see it show up on your browser page. Here’s what it looks like on Google Chrome (the blue “s” button):
 When you see something on your screen you want to capture, just click on the blue “S” icon. You’ll be asked at the outset to give Snagit access to various cloud storage options so it can store the image for you. Once you allow it access, then you’ll be able to name your file and add your own shapes, arrows and text. Use these to call attention to part of a record; annotate what you learned from it or even mark your ancestor’s face in a group photo.
As far as doing something similar in Evernote: Evernote only allows you to highlight typed text, not portions of an image. However, you can download Skitch and drag and drop the document from Evernote into Skitch. Then you can highlight an image to your hearts content. When you’re done you can Save to Evernote in the menu (SKITCH > SAVE TO EVERNOTE).
 Thanks to Diane for a great question! I hope you’ll all share this post: Snagit is free and makes it so easy to take notes on your digital images, for your own use or to share with others!
Resources
How to Add Text to a Web Clipping in Evernote
Should Evernote Be My Digital Archive?
Annotating and Transcribing Documents in Evernote (What Evernote Can and Can’t Do for Family History)
by Lisa Cooke | Aug 10, 2015 | 01 What's New, Evernote, images, Source Citation
Here’s a simple solution for making additions to an existing web clipping in Evernote.
![By CBS Television (eBay item photo front press release) [Public domain], via Wikimedia Commons](https://lisalouisecooke.com/wp-content/uploads/2015/08/evernote-source-citation.jpg)
Photo: [Public domain], via Wikimedia Commons
Carolyn wrote me recently when she ran into this problem of how to add text to a web clipping in Evernote: “I clipped a wedding document from FamilySearch to Evernote Notebook [and] added URL to dropdown menu. But where can I add the citation that is given on FS document page?
I tried copy/paste but…back at Evernote, nowhere to paste citation. I like to document everything I use in my family records, so this is important to me…I enjoy using Evernote and following your tutorials that came with my (Genealogy Gems Premium website) membership. I have been using Evernote for just two weeks.”
Carolyn, I’m thrilled to hear that source citation is important to you, because it is the backbone of solid genealogical research! Here’s a simple solution.
How to Add Text to a Web Clipping in Evernote:
1. In Evernote, click once on the web clipping in the existing note
2. Press the right arrow key on your keyboard (you will see that now there is a big flashing cursor to the right of the clipped image)
3. Press the Enter key on your keyboard (just like a Return on a typewriter, your cursor has now moved one line below your clipping.)
4. Type or paste copied source citation as desired.
5. Use the formatting options at the top of the note to change the font size, type, and color, etc.
6. Click the INFO icon to see and add more data as desired (such as the original URL of the webpage where you clipped the item.)


Click here to learn more about using Evernote for genealogy.
Did you find How to Add Text to a Web Clipping in Evernote helpful? It’s easy to share it by clicking any of the social media icons at on this post. And we feel all happy inside here at Genealogy Gems when you do – thanks for being a Gem!
by Lisa Cooke | Jul 21, 2015 | 01 What's New, Digital Archives, Evernote, images, Organization
 “If I put a PDF copy of a newspaper article or a jpeg photo into Evernote, can I get a copy back? I am putting them there for safe keeping and an easy way to archive them but I want to be able to use them in other places in the future.”
Recently Pam sent me the excellent question above. She’s been using Evernote for a couple of years, she says, “but not very well.” I’ve heard that before! I like how she’s now thinking carefully about not just organizing her genealogy research materials (which is important!) but also digitally archiving them effectively.
As I told Pam, folks have tried to accomplish this in a variety of ways. Here’s my two-cent’s worth on how I look at it.
First, I don’t save newspaper articles to PDF because you have to have a Premium Evernote in order to annotate PDFs and have OCR applied to them. (At least the last time I looked last week.) Personally, I prefer web clipping the article as a note and saving it directly to Evernote.
I haven’t found a simple free way to export a PDF that has been saved to Evernote back out as a PDF. This is a weakness of Evernote. (Click here for a blog post about this.)
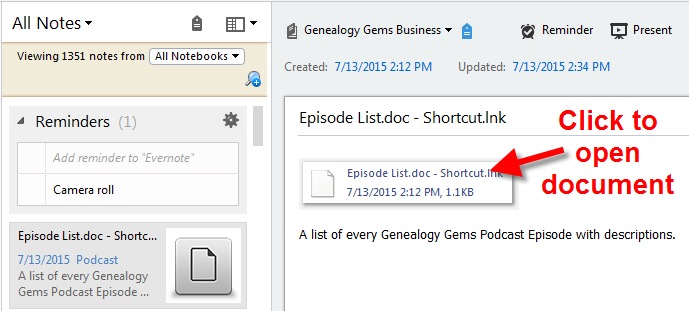
 If you are keen on saving items to PDFs, I would suggest not bothering to store them in Evernote. If you really want a “note” of the item in Evernote, you could use this technique: First, save the PDF to your hard drive (using my Hard Drive Organization Premium Videos).
 Then right-click the PDF and “Create a Shortcut.” Drag and drop the short cut into a note. Now with one click of the shortcut in the Evernote note, you can instantly open the document on your hard drive and make any additional notations in the note about the item.
If you would rather save the PDF to a cloud service such as Dropbox rather than your hard drive, you can right click the PDF in Dropbox and select “Share Dropbox Link” and then paste that into a note. This, again, gives you one-click access to the item.
I don’t worry about making Evernote the holding tank for absolutely everything. Sometimes other technologies and services are better suited for the task at hand. But it’s pretty easy to create connections so that Evernote is still your central service. There is another alternative called CloudHQ, which can help you export items, but it is a paid service, and I don’t think the value is there for the price when you can use the method I’ve already described.
To get more answers to questions like these about using Evernote for genealogy I invite you to follow this blog.
Resources:
 Evernote for Genealogy Quick Guides for Windows and Mac will help you begin using Evernote immediately and effectively.
- Become a Genealogy Gems Premium member to access the Ultimate Evernote Education: a series of videos that take you from beginner to advanced user.
- Click here to find even more resources for using Evernote for genealogy!
Page 2 of 6«12345...»Last »