Resources
These show notes feature everything we cover in this episode. Premium Members: download this exclusive ad-free show notes cheat sheet PDF. Not a member yet? Learn more and join the Genealogy Gems and Elevenses with Lisa family here.

Show Notes: I’m excited to share with you my favorite new tool at Google Books. This is a game changer for utilizing the information you find on the digitized pages. Plus I’ll show you other new features recently added to Google Books.
Why use Google Books for genealogy? Well, Google Books features over 10 million free digitized books, most of which were published prior to 1927. That makes Google Books a gold mine for genealogy research. And when you visit Google Books, think “published on paper” NOT just books! In addition to books, the collection includes newspapers, magazines, journals, almanacs, city directories, catalogs, court papers and so much more!
Google Books features over 10 million free digitized books, most of which were published prior to 1927. That makes Google Books a gold mine for genealogy research. And when you visit Google Books, think “published on paper” NOT just books! In addition to books, the collection includes newspapers, magazines, journals, almanacs, city directories, catalogs, court papers and so much more!
Access Google Books at https://books.google.com
Downloadable ad-free Show Notes handout for Premium Members.
If you haven’t been over to Google books for a while, this is going to look a little bit different. A while back they launched a new user interface. They’ve now made some improvements. The main difference is we’re going to see this menu along the bottom of the screen.
Before we even look at the new menu, I promised you my favorite item that they have added to Google Books.
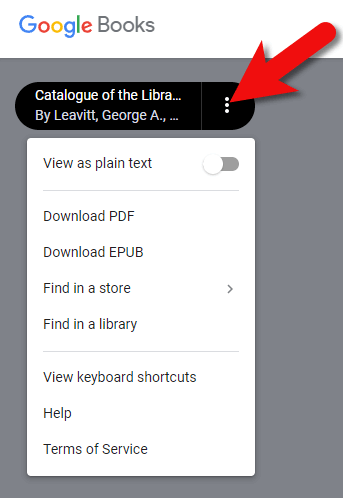
In the upper left corner, click the three vertical dots icon. This reveals a menu that gives you access to a lot of items that typically are kind of ‘behind’ the book. If you were to close this book, you would see the catalog entry for it.
New menu at Google Books
My favorite new feature here is View as Plain Text. Click the toggle button to convert the entire book to plain text. This makes the digitized images of the pages usable in many other projects and programs. Google applied optical character recognition to the books to be able to read the words on the images to make the books keyword searchable. In the past, we had to use the clipper tool to capture a bit of the image and convert it to text. The box was really small and inconvenient. This new feature provides the ability to instantly use as much of the text as you want.
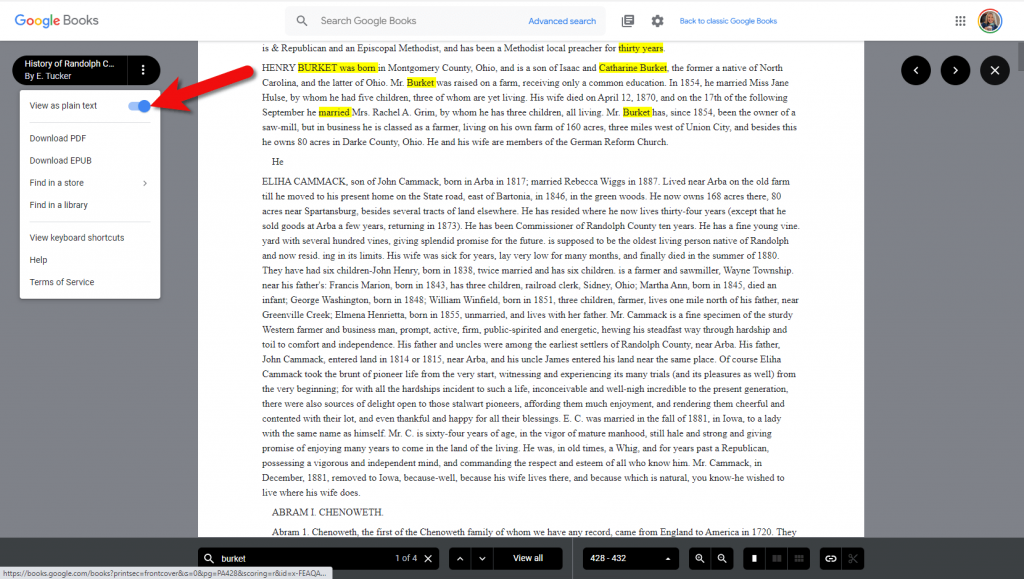
Convert digitized books to text in Google Books
Because this book is fully digitized, it’s already been cleared for copyright. These books are in the public domain. They are available to use for free, copyright free. You are free to copy the text and include it in your projects, in your genealogy database, in a family history book, and so on.
Back over at the three-dot menu in Google Books, you can also:
Another new feature is keyboard shortcuts.
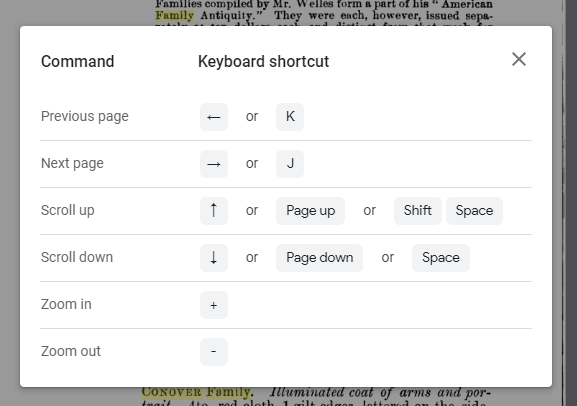
Google Books shortcuts / hot keys
I mentioned that the catalog entry for this book is sort of ‘behind’ the book. To access that, click the X in the upper right corner of the screen. This removes the view of the book. We haven’t lost access to the book. You can still access it by clicking the blue Read free of charge button.
The nice thing about the book catalog entry page is that it contains all the details about the book such as where you can purchase it, finding copies at the library, and additional editions.
Also on the catalog entry page is the Source Citation tool. Click create citation to reveal the options. Click the desired style, and then copy the citation and paste it in your family tree database, or other places where you are referencing this book. So, there’s no reason not to cite your source for any book found at Google Books. Source citation is very important, because down the road you might discover something more about your family and realize that you need to access that book again. Without the source citation you may not remember where you got the original information. The source citation is your breadcrumb trail back to the previous research that you’ve done. Also, if anybody ever has a question about what you have put in your family tree, you can point them to the sources that you used.
The final new feature at Google Books that I wanted to draw your attention to is the main menu for this item. It used to be at the top of the screen, but now you’ll find it at the bottom. At the top of the screen, we now have a search box that allows you to search the entire Google Books collection. But oftentimes, when you’re looking at a book, you’re going to want to be able to search for particular names, places, dates, events, topics. You will find the search field for that in the new menu at the bottom of the screen. Type in names or other words and press enter. You’ll be given all of the pages in the book that mention those words. Also, in this menu are:
Also in the new menu is the clipper tool. The materials in Google Books contain maps, drawings, photos and many other types of imagery that you may want a copy of. Or perhaps you just want an image of a section of text. The clipper tool allows you to capture it and save it to your computer as an image file.
There you have it, some of the exciting new features over at Google Books. There’s never been a better time to search for information about your family history in Google Books.
Show Notes: Marriage records are essential to building your family tree. Here are the 5 steps you need to in order to find an ancestor’s marriage record.
Downloadable ad-free Show Notes Marriage Records Worksheet for Premium Members.
A really good Spring cleaning task is to look through your family tree, starting with yourself and working backwards, and just checking to see if you have all the vital records for everyone. Vital records include birth, marriage and death records. Civil marriage records are typically some of the oldest vital records, and offer valuable information.
Time and place are critical to marriage record searches. Records like census records can help you get within 10 years of a marriage, and can also help you narrow in on the location of the wedding. Thankfully, all U.S. Federal Census records are free and online at FamilySearch.
Marriage records are typically filed at the county level. However, they can sometimes be found at the town level, particularly in New England.
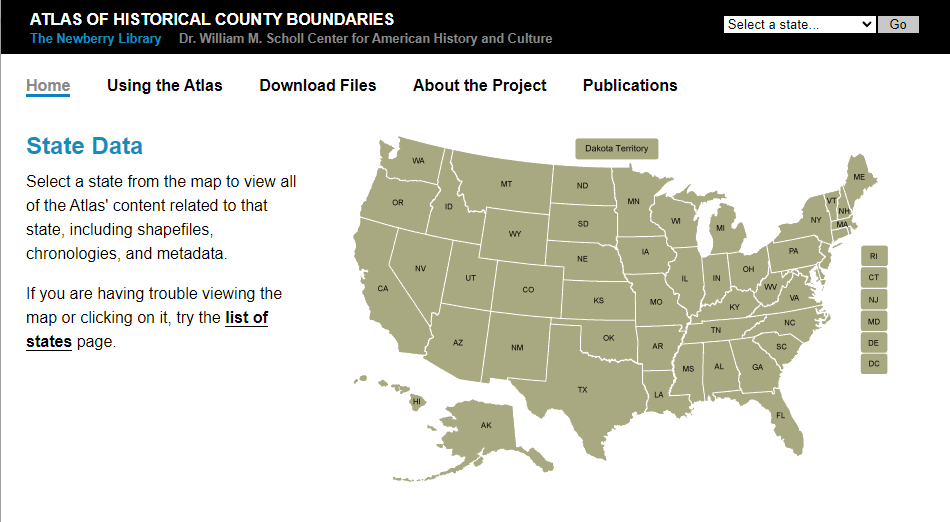
It’s very important to identify the correct county at the time of the estimated marriage. You can do that using the Newberry Library’s Atlas of Historical County Boundaries. Click on the state and then select the time frame.
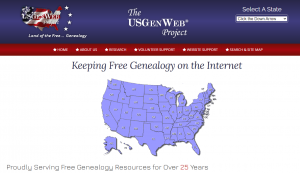
Genealogy “guidance” websites pull together information from a variety of sources to aid you in your research in a particular area. Here are two of my favorites:
Click on North America > United States > State. Scroll down the state page and click on the county. Use Alt + F to quickly search for the word marriage.
The wiki will likely also provide you with links and clues as to where to find the records. Remember, it’s not always a comprehensive list, but it’s a great place to start.
Learn more about the Wiki with these videos:
If civil marriage records had not yet started when your ancestors married, look for church marriage records. Learn more with my video: How to Use Church Records for Genealogy (Premium)
If those leads don’t pan out, next turn to major genealogy websites. Start with the free FamilySearch, then if you have subscriptions to sites like Ancestry or MyHeritage, use those. (Note: These are affiliate links and we are compensated if you make a purhcase.) Only a fraction of these website’s record collections are included in their hints and suggestions. This means that the card catalog is essential if you want to scour all the records.
Learn more about searching Ancestry’s card catalog: Ancestry Top Tips and Hot Keys (Premium)

Video & Show Notes (Premium)
If you don’t get the record that way, you’ll need to do it the old-fashioned way: contact the county or town clerk.
Early vital records are often moved to the state level. That contact information can likely be found on the FamilySearch Wiki page you found, or you can Google:
County name, state “marriage records”
Check the following repositories:
If all else fails, turn to Google to see if there are any other repositories or online resources outside of the largest genealogy websites and archives. Use search operators to focus your search.
Example: Randolph County Indiana “marriage records” 1880..1900
The quotation marks ensure that the exact phrase (Marriage records) is included on each web page result you get.
Two numbers separated by two periods is called a Numrange search. This instructs Google to also ensure that each web page result includes a number (in our case, a year) that falls within that range. It’s a great way to target marriage records from a particular time frame.
Learn more about marriage record research with these two instructional videos:
Downloadable ad-free Show Notes Marriage Records Worksheet for Premium Members.
Even if you don’t use Snagit, or if you’re a newbie or still deciding whether you want to use it, this video will give you tangible examples of what it can do for you. If you are already using Snagit, this session will definitely take your skills to the next level.
Use coupon code GENE15 to get 15% off. Thank you for using my link for purchasing your copy of Snagit. (We will be compensated at no additional cost to you, which makes the free Elevenses with Lisa show and notes possible.) Don’t worry if it initially shows as Euros in the cart. When you enter your address including country, it will convert the currency appropriately.
In Elevenses with Lisa episode 66 Lisa Louise Cooke will discuss how to use Snagit:
You can also watch at the Genealogy Gems YouTube channel.
Elevenses with Lisa episode 61 was a tutorial for beginners on how to use Snagit, and specifically how I use it for genealogy. I think it really resonated with genealogists because accurately and completely capturing the family information that we’re finding is absolutely essential for good source documentation. It’s one of the most important things we do as genealogists.
So, this video is sort of a “Part 2” session where we dig into more ways to use this amazing screen capture tool and I answer some of your most pressing questions.
Even if you use a different snipping tool, I’m going to give you tangible examples of how you can clip more effectively.
I received the following email from Anne W.: “I very much enjoyed your recent Elevenses with Lisa episode on how to use Snagit. I love the screen clipper on my Mac but this does so much more. I used your link to purchase Snagit and I have found the tutorials very helpful as I figure out how to use it on my Mac with my files. The first thing I did was go back to several newspaper pages I clipped recently in chunks and used Snagit to capture the whole page. It worked like magic! I would love to see another episode about the features of Snagit. Thank you for your regular and premium podcasts. I listen to both regularly. I have learned so much that I can apply to my genealogy research.”
Oh I love hearing how you’re using what we talk about here at Genealogy Gems! And yes, Snagit is fantastic for clipping those squirrely newspaper pages, and so much more!
Let’s get started – I’m excited to show you 5 more problem-solving screen capture projects that you can do with Snagit, and then we’ll wrap up with answers to your Snagit questions.
Bill in San Antonio, TX wrote me last week and told me about a problem that he was having with his online family tree at Ancestry It turns out that some ancestors had duplicate profiles. He didn’t put them there. He asked Ancestry about it but was getting what he called “boiler plate” answers that didn’t solve the problem.
In situations where you’re trying to communicate a complicated problem to someone else, or you’re just trying to work through it yourself, it can really help to visualize the problem, and Snagit can help you do that very effectively.
Bill says: “I am seeing duplicate FACTS in profiles of siblings, parents, and children of a person and cannot figure out where they originate. I go to the profile which seems to be generating duplicate information, but it is not there.”
As I read through all the details that he wrote up about the problem, I found myself getting confused. I asked his for access to his family tree so I could take a look and he wrote back
Bill went on to say, “The duplications I see are all in my tree. I have reviewed each of them to be certain that the data is not coming from a profile, even though it appears in duplicated form elsewhere.
Here is a screenshot of one such issue, showing two siblings with repeated data. Note that in each case, the birth location is slightly different, as in “Texas” vs. “Concho County, Texas”.
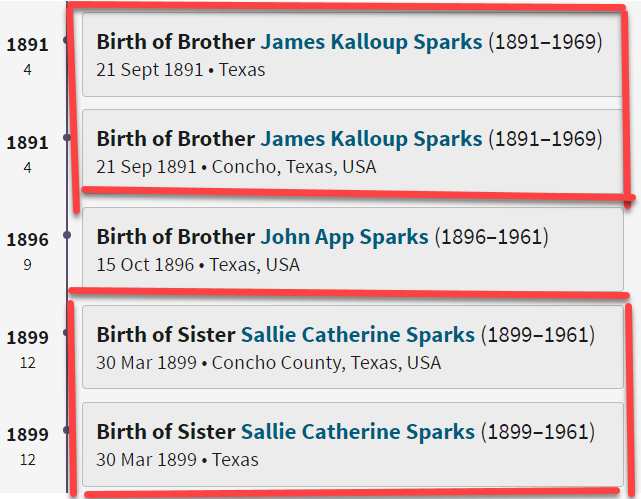
Ancestry Profile – problem of duplication
Bill had annotated his screen clipping to help me zero in on the problem. “(I used SnagIt for the screenshot — thanks for suggesting it!) I see this issue in other profiles, so your suggestions for solving it will be useful in other parts of the tree.”
Here are just three examples of ways you can highlight or call out an item in an image:
After you select and customization a style (such as a red outline shape) you will see that Snagit provides a “ghost” version of it in your list. It’s greyed out and ready to add. Simply click the plus sign to add the style to a theme. There are several themes available and you can create new themes.
I like to make it even faster to find the styles I use the most by adding them to my Favorites. It’s super easy to do. Just click the star on the style. You’ll find your Favorites in the star menu at the top of the screen.
As a side note, I do think this is a bug in Ancestry’s system. I recommended that he do the following to zero in on the problem:
Again, you can use Snagit to help work through things like this. Here’s how to see if you’re indeed looking at the same person: Right-click on each ancestor profile to open it in a new tab so you can compare and capture them. In this case it was Willie (the ancestor) and James and the duplicate of James. Each will have a URL address in your browser bar that will end in person/420009496764/facts. The number in red is the unique number for that person.
Had the tree number or person numbers been different, that would be the likely source of the problem. However, in Bill’s case, they are the same, so that’s more evidence that it’s a bug in Ancestry’s displaying of the information.
After screen capturing each profile they can be combined into one step-by-step document that can then be shared.
My guess is that at some point Bill viewed someone else’s tree or a hint that included this conflicting information, or he may have attached a record that had conflicting information, or rejected information from a record. In any case, some sort of action may have gotten “stuck” in the virtual stratosphere. The system has hung on to something it should not have. Bill says he’s finding more instances of this happening in the same tree, so it definitely needs to be addressed. It would be a shame to keep adding to the tree only to have that glitch continue to duplicate itself in other profiles.
I suggested looking through the records he has attached to James Kalloup Sparks to see if any of the attached records mention Concho, TX as his birthplace. I doubt there is one, but if there is, it is likely somehow linked to the problem.
It’s very odd that on Willie’s profile it shows James Kalloup Sparks’ birthplace as Concho in the duplication, but when you click that profile it doesn’t say Concho. It’s must surely be an Ancestry glitch.
If it were me, I would try downloading your tree and then creating a second tree by uploading it and seeing if the error still occurs. Here’s the Ancestry Help page.
Also, if by chance Bill was syncing his Ancestry online tree with genealogy software on his computer, there’s a possibility that could cause the problem.
Questions from Kelly: “Hi Lisa!, I would LOVE for you to create a very simple tutorial for adding in arrows and any text in “bubbles or boxes”. I have tried to do this and am missing something – I just LOVE Snagit but I am so technically challenged and would love to not become so annoyed when I am missing the simplest of steps.”
The most important thing to remember as you use annotations like text bubbles, shapes and text is you must select what you are working on. The font, color, sizing and other formatting features can be applied to every kind of annotation. You must select the item before applying the formatting.
If you’re ever confused about what “mode” you’re in, look at the top of the screen and note which tab is selected. In the example below, we are in “Shape” mode.
And if you try and try to make a change to an annotation and nothing seems to happen, you probably haven’t selected it. Click on the item to select it before attempting to make any changes.
If you want to move a item such as a shape or a selection of text, again you will need to click it to select it. You should see the “Move” selector handle that looks like this:
If you don’t or you’re having trouble, click “Move” in the toolbar at the top of the screen and then click on the item.
Most of the time if working with annotations or formatting them is presenting a challenge, it’s because the item hasn’t been properly selected before you begin.
Many of the most popular genealogy records websites offer a hinting feature that suggests records to you based on the information in your online family tree. Many of those “records” are quite unique. I recently came across a Photo Hint at Ancestry that was a screen capture of a story in a public Facebook group of the descendants of a particular couple. It was interesting information but I didn’t really want everything that was captured in the image. I used Snagit to capture and then edit the image the way I wanted it so I could then save it to my computer. This included erasing or removing unwanted areas. The following Snagit features can help you accomplish this easily:
Answers to your questions from episode 61 which was my beginning tutorial on Snagit. If you haven’t used it before stick with us in this video to see all the cool things it can do and then go back and watch that episode which is perfect for beginners.
Pat M.: Will OCR work for non-English newspapers?
Answer: Snagit doesn’t translate, but the OCR will Grab non-English text. Learn more here. You can then copy and paste it into Google Translate.
SHB: Don’t see Evernote on the list, how easy is it to save to EN?
Answer: If you have Evernote installed on your computer you should see it in the Share list. You can also download Evernote to add it as a Share destination. In fact, there are loads of programs you can download.
Cyndy B.: Are all these features in older versions?
Answer: No, like all software, each version introduces additional features.
SHB: Curious about printing… if you print a long article, will it print out readable?
Answer: Yes! You can set the resolution. And use Print Preview to make adjustments so it prints exactly the way you want it.
CA Sanders: if I bring a photo into Snagit and work with it will save IN Snagit, not in my original placement…so I would have to “save” or “move” to the folder it was in to begin with my changes.
Answer: After making your edits, use File > Save As to save it in the desired format to the desired location on your computer hard drive. You can also save it to replace the original if that’s your goal.
B Latham: How do we keep the SnagIt program up to date? It sounds as if other viewers here are saying they purchased the program a few years ago and may be outdated. Isn’t there a way to keep it up to date?
Answer: Yes, you can buy a maintenance plant that will include future updates at a reduced fee. Use our link and discount code, and the option will be available at checkout.
Barbara C.: For 2 different laptops, would we need to purchase Snagit twice?
Answer: TechSmith software is licensed per user, so how many computers can I install it on?
Each user may install and use one copy of the software product on up to two computers for their sole use, provided only one computer is in use at any given time. This includes home and work, or a laptop and desktop.
Here’s our link for purchasing your copy of Snagit (screen clipping tool) Thank you for using our link. Use coupon code: GENE15 (We will be compensated at no additional cost to you, which makes the free Elevenses with Lisa show and notes possible.)
These show notes feature everything we cover in this episode. Premium Members: download this exclusive ad-free show notes cheat sheet PDF. Not a member yet? Learn more and join the Genealogy Gems and Elevenses with Lisa family here.
The manufacturer price is going up August 31, 2021. Now’s the perfect time to get your official Elevenses with Lisa mug.
Click here to sign up now and you get your free bonus ebook.
Leave a Comment or Question Below
In Elevenses with Lisa episode 79 Lisa Louise Cooke explains:
This is a follow up to episode 51 on The 1950 Census for Genealogy. In that episode I discussed the importance of finding your ancestors’ enumeration district numbers in order to be able to find them when the digitized images are released (before the index is available.) In this episode I will walk you through how to locate the enumeration district (ED) number and then find the actual 1950 US Census ED map. We’ll wrap things up with a quick update on the release of the 1950 US Federal Census.
(Get your ad-free Show Notes Cheat Sheet at the bottom of this page in the Resources section.)
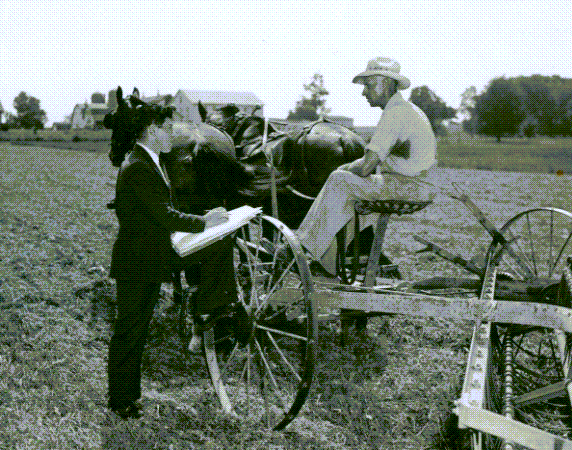
As I mentioned in Elevenses with Lisa episode 51 The 1950 Census for Genealogy, prior to 1880, U.S. Marshalls were the enumerators for the federal decennial census. Starting with the 1880 census enumerators were hired and they were each assigned an enumeration district, also known as an ED. These districts had to be mapped out so that the enumerators knew the area they were responsible for counting. Therefore, maps are drawn in anticipation of each census being taken, including the 1950 census.
Learn more by watching episode 51 on the 1950 census.
It’s always important to understand the purpose of a record or source, and the 1950 Enumeration District maps (ED maps) are no exception. Unlike most maps where it’s all about accurately drawing up the current roads and geographical features, census ED maps are drawn up for the purpose of defining boundaries for the purpose of counting people. This means as we look at ED maps we need to keep a few things in mind.
The first thing to understand is that the 1950 ED maps were not necessarily up-to-date with the lay of the land in 1950. Not all streets, parks and features will be included. The reason for this is that the maps themselves were not created for this purpose. Existing maps were used and then enumeration district boundaries were drawn on them.
Maps came from a variety of sources including but not limited to county and City Planning Commissions, 1940 census bureau tract maps, and city engineers. In fact, from a mapping perspective the variety of maps in the collection are fascinating.
Look for the map title, description, legend and census stamps typically found in one of the corners. In this example (see image) from Aurora, Colorado the map used was originally created by the city engineer in 1946 and was revised in 1947.
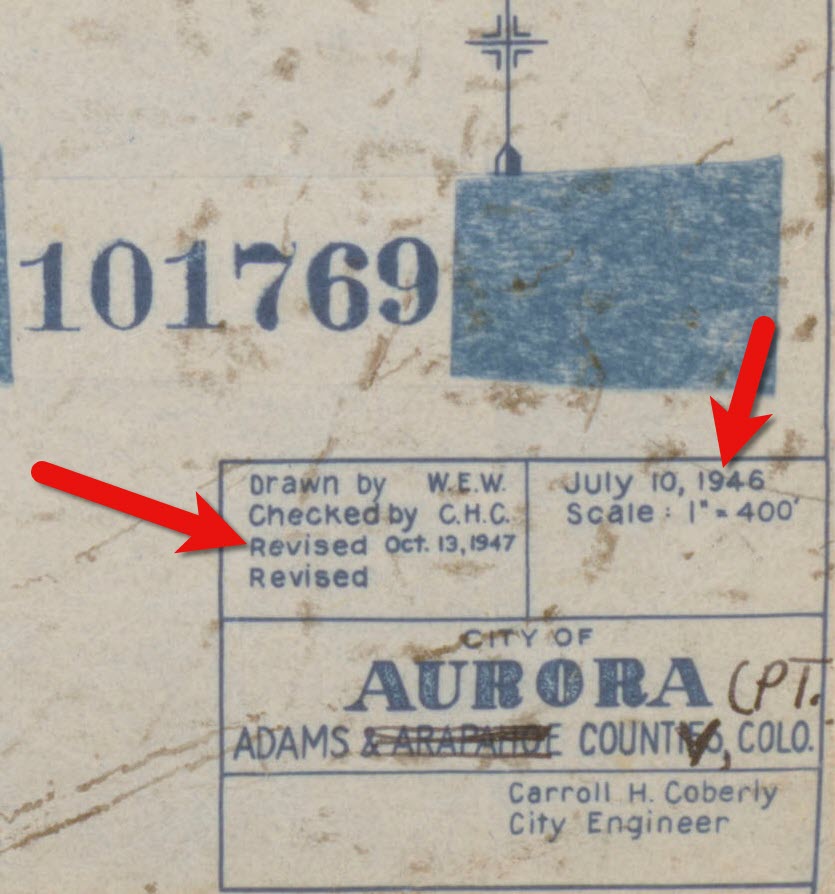
1950 census map of Aurora, Colorado (Source: National Archives)
Following the end of World War II, the United States was growing at a quick pace in 1950. This is particularly true of the newly emerging suburbs. Therefore, if your ancestors built a new home in a new development in 1949, don’t be surprised if you don’t see the street on the 1950 census ED map. However, rest assured that the maps still hold value for your family history as they provide many interesting and unique details about the area surrounding your ancestors’ homes.
Each map was stamped with a small legend where the meaning for each of the colored lines drawn could be indicated. From my random sampling of 1950 census maps across the United States it appears that the coloring coding was consistent as follows:
Expect to see errors, inconsistencies and omissions in the maps. The more rural the area the more likely the map was compiled from several sources by the Census Bureau cartographers. This compilation created more opportunity for errors, and often used older maps.
Source: National Archives
A census enumeration district number is made up of two numbers separated by a dash. The first number (in this example: 1) represents the county/region. The second number represents the area within the county that could be covered by an individual census enumerator within the amount of time provided for taking the census, about 2-4 weeks. The official start of the 1950 US Federal Census was April 1, 1950.
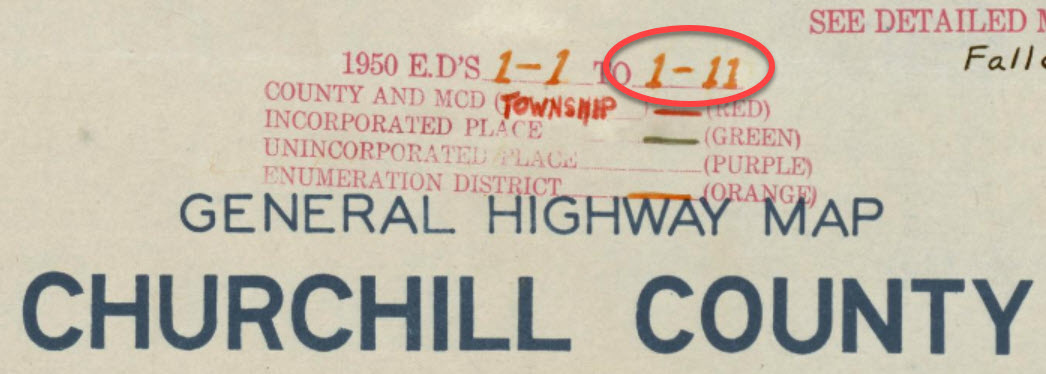
Census enumeration district (ED) numbers on a 1950 census map.
Some 8,000 census maps have been digitized and are available at the National Archives. However, the National Archives website can be challenging to navigate. I recommend using the Unified 1880-1950 Census ED Finder Tool at Steve Morse’s website.
1. Go to https:/stevemorse.org
2. In the menu in the upper left corner hover over US Census and in the secondary menu click Unified 1880-1950 Census ED Finder
3. Select the state from the first drop-down menu.
4. Next select the county.
5. Then select the city.
6. You will then see many enumeration district links listed. In order to find the right one for your ancestor’s home, enter the house number and select the street from the next drop-down menu. Don’t worry about directional parts of the address like west or east unless they are offered in the list of street names.
7. As soon as select the street name, the list of ED numbers should be reduced. In this example we are down to three.
8. To further reduce the possible ED numbers, we can select Cross or back street on same city block. If you’re not sure what the neighboring streets are, click the see Google Map This will plot the address you entered into Google Maps where you can then find the closest cross street, and the next streets over. If the address is not precisely marked on the map, check the address that appears in the Google Maps search box.
In my case, the One-Step tool didn’t allow me to specific W. Arcade, so Google Maps just gave me the general area, and not the address. By adding the W. to the address and pressing enter on my keyboard Google Maps was able to precisely plot the location. Now we can make note of the closest cross street (ex. N. Center), the street north of the address (E. Monterey Ave.) and the street south of the address (W. Noble St.)
9. Head back to the Unified 1880-1950 Census ED Finder page and enter each nearby street (you can enter multiple.) This should reduce the ED numbers one. This is the ED that includes your ancestor’s address.
1. Make note of the ED number, and then go back and click the button that says See ED Maps for ____________ County. You could have clicked this button without going through the process of locating the ED number, but the ED number makes it much easier to find your ancestor’s home street on the map. This number will also assist you in being able to find your ancestors in the 1950 census before it is indexed.
2. You will now be on the Viewing 1950 Enumeration District Maps in One Step Re-enter the city from the drop-down menu.
3. Click the Get ED Map Images You will receive two links. The first link is Links to NARA viewer will take you to the page on the National Archives website which includes all of the information about the map and the record hierarchy. Source citation information can be gathered from this page.
5. Click the second link called Direct links to jpegs on NARA server. This will take you to the image by itself as hosted on the National Archives website. I find this the easiest way to save the full resolution image to my computer hard drive. On my PC I right-click on the map and select Save Image As.
This page is also important if you want to use this image in another program such as Google Earth. The URL for this page is the direct URL to the image. Notice that it ends in .jpg. This means that it is the image alone, and this link can be used to create a custom map overlay in Google Earth. You can see an example of a custom map overlay in my video Create a Family History Tour with Google Earth Pro at the 06:13 mark.