by Lisa Cooke | Aug 8, 2020 | 01 What's New, Elevenses with Lisa, Premium Video, Research Skills |
Episode 19 Video and Show Notes
Join me for Elevenses with Lisa, the online video series where we take a break, visit and learn about genealogy and family history. (scroll down to watch the video)
Genealogy Consultation Provides a Strong Hypothesis
My 45-minute consultation with a genealogy expert Kate Eakman at Legacy Tree Genealogists broke things wide open on my Irish family lines and gave me the information and resources I needed to make all of the progress I shared in this episode. It’s the best investment I’ve made in my genealogy in a long time. They have experts in all areas. Learn more about how easy it is to book a consultation here.
After my consultation I needed to update my research plan and get to work collecting more genealogical evidence.
Let’s quickly recap what happened when I started working on my brick wall last week in episode 18:
- Margaret Lynch’s death certificate said her parents were James Scully and Bridget Madigan.
- Her obituary said she was born in Limerick Ireland.
- There was one couple by those names in Limerick, having children and the right time. There is a gap in the records where Margaret should be.
- Her husband Michael Lynch dies in Stillwater MN. St. Michael’s Catholic church. Found their marriage record in Stillwater. It was a large booming town, and a good place to focus. The Lynch family had a farm across the river in Farmington, Wisconsin.
My research question: Was this couple we found, James Scully and Bridget Madigan, who married in Kilcolman, Limerick, Ireland in 1830, the parents of Margaret Scully?
What Kate Eakman of Legacy Tree Genealogists helped me do in my 45-minute consultation:
- Become acquainted with a variety of excellent Irish research websites
- Located the indexed marriage record for James and Bridget
- Located the original marriage record for James and Bridget
- Located the indexed baptismal records for all of the children who had James and Bridget listed as their parents.
A Genealogy Research Plan for Collecting Evidence
After the consultation I developed a new research question: Are the children that we found records for in Ireland the siblings of my Margaret Lynch?
My research plan included:
- Verify if there were any other couples by the names James Scully and Bridget Madigan married in Ireland, particularly in the time from of circa 1830. (Location of source: RootsIreland.ie)
- Search in the U.S., starting in the area where Margaret lived, for each child. I’m looking for records that name these same parents, and show the child at an age that correlates with the baptismal date.
I identified several sources I believed would help me accomplish my goals.
Marriage Records – I conducted a search for James in Bridget in all counties in Ireland. I discovered that the couple Kate found during my consultation is the only couple in the RootsIreland database with those names married in Ireland. This gives me more confidence that I have the correct couple.
U.S. Records – Armed with the names and ages of the children of James and Bridget, it was time to return to America. I needed to search U.S. records to see if any of the children came to America (perhaps living near Margaret) and if these parents were named.
Records to look for:
- U.S. Federal Census (Ancestry, FamilySearch), and State Census (Minnesota Historical Society, Ancestry, FamilySearch)
- Death records (Minnesota Historical Society, FamilySearch.)
- Newspapers, particularly obituaries possibly naming parents or Limerick. (Minnesota Historical Society, Newspapers.com)
Before I began my search I created an excel spreadsheet to capture the information. I included columns for what their ages should be in each census.

Using a spreadsheet to track my findings.
Now I was ready to start the genealogical hunt!
U.S. Census
Search each sibling one at a time in the census.
- Focus on Washington Co., Minnesota (marriage and death location for Margaret & Michael Lynch)
- Move on to Polk County Wisconsin, and greater Wisconsin.
- Search both U.S. Federal Census & State Census
- Top locations identified for this search: Ancestry.com, Familysearch.org, Minnesota Historical Society
Results:
- Found individuals matching the sons in Stillwater and Baytown (Washington County)
- Found Bridget Scully (Mother) living with various sons in various census records.
- Immigration years listed for some of Margaret’s siblings.
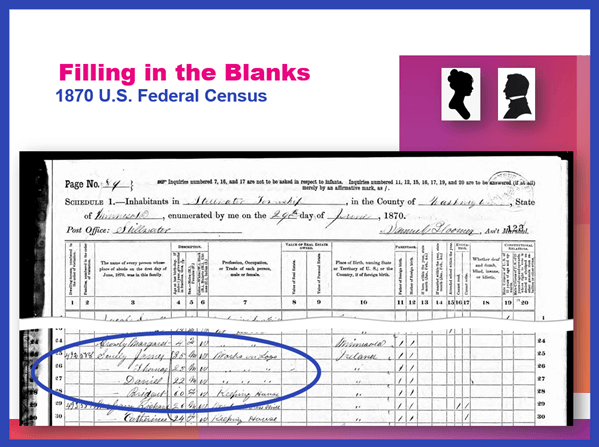
Found in the 1870 U.S. Federal Census: James, Thomas, Daniel and Bridget.
I created folders for each sibling marked MAYBE and collected the records on my hard drive.
Learn more about hard drive organization in Elevenses with Lisa episode 8.
Searched FamilySearch and the Minnesota Historical Society for a death record for each son.
- Found Thomas and James.
- James Scully and Bridget Madigan listed as parents
- Ages matched
- Next step: order the death certificates
Newspapers
Next I searched the Minnesota Historical Society website for newspapers.
Results:
- 170+ articles
- Two obituaries for Bridget Scully! (8 children, immigration year, husband died in Ireland implied)
- Found James Scully working with his brother and his obituary
Research Tip: Look at a map and identify nearby towns and larger cities. Expand your search to these areas.
I found a James Scully in the 1860 census with Bridget and his brothers, and working with Thomas in many newspaper articles.
Bridget’s obituary said she came to America with 8 children. 7 had baptismal records in Ireland. James and Margaret were not found in the baptismal records but were confirmed in U.S. records to have the same parents. That would be a total of 9 children. It’s possible one of the daughters that have not yet been found in U.S. records may have died in Ireland prior to their leaving for America.
I then combed back through my Lynch binder – I might spot something that I marked as unsure, or that might jump out at me now that didn’t 20 years ago.
- Found History of the St. Croix Valley I had photocopied a section. Names Daniel Scully (who I have since found in the census, newspapers and death records) and says his parents are James Scully and Bridget Madigan!
- Looked the book up in Google Books. It’s fully digitized. Now I can extensively read and search it.
Tech Tip: Clip and combine newspaper clippings with SnagIt software
Clipping and saving newspapers poses a unique challenge for genealogists:
- Clipping a small portion of a very large digital newspaper page can result in a low resolution file.
- If you clip an article you don’t always capture which newspaper and issue it came from
- Articles often continue in different locations on the page or pages, making it impossible to capture the entire article in one image.
I use SnagIt software to clip my newspaper finds. I can then save them to Evernote or archive them on my hard drive. SnagIt can save your clippings in wide range of file types and can even clip video. You can get your copy of SnagIt here. It’s a one time fee and download – no subscription! (Thank you for using my link – it financially supports this free without any added expense to you.)
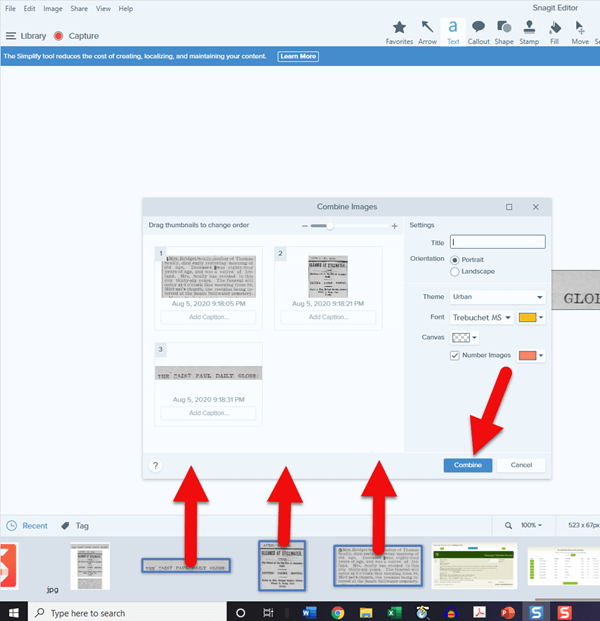
How to combine multiple clippings with Snagit:
- Clip the paper title and date
- Clip the article
- Clip any additional applicable sections of the article
- In the SnagIt menu under Image click Combine Images
- Drag and drop the clippings into the desired order
- Click the Combine button
- Save the combined image: In the menu File > Save As (you can select from a wide variety of file types)
Research Tip: Using Street Addresses in Google Earth
When you find a street address, whether in a newspaper, city directory, census or other genealogical record, use it to find the location in the free Google Earth software program. You can then save an HD quality image of the location.
How to find a location in Google Earth (on a computer):
- Type the address into the search field in the upper left corner
- Click the Search button
- The map will automatically “fly to” the location and a pin will mark the general spot.
- Hover your mouse pointer in the upper right corner of the to reveal the navigation tools. Click the plus sign to zoom in closer.
How to view the location with Street View:
- Zoom in relatively close so that the street and buildings are distinctly visible.
- Just above the zoom tool you will find the Street View icon (the yellow “peg man”). Click on the icon and drag it over the street in front of the building / location. Don’t release your mouse. It may take a second or two for the blue line to appear indicating that Street View is available in that location. If no blue line appears street view is not available.
- When the blue line is visible, drop the Street View icon directly onto the blue line in front of the location you want to view. by releasing your mouse. If you miss the line and the picture looks distorted, click the Exit button in the upper right corner and try again.
- Once on Street View, you can use your keyboard arrow keys to navigate. You can also click on further down the street to move forward that direction.
How to save an image of a street view location:
- Position yourself in the best view of the desired location using your mouse and keyboard arrow keys as described above.
- In the toolbar at the top of the screen, click the Image icon (it looks like a portrait-oriented page, near the printer icon)
- A Title and Description box will appear at the top of the screen beneath the toolbar. Click it and type in a title and description for your image if desired.
- You can adjust the size (resolution) of the image you will be saving by clicking the Resolution button above the title box.
- When you’re ready to save the image to your hard drive, click the Save Image
Learn more about using Google Earth for genealogy in Elevenses with Lisa episode 12.
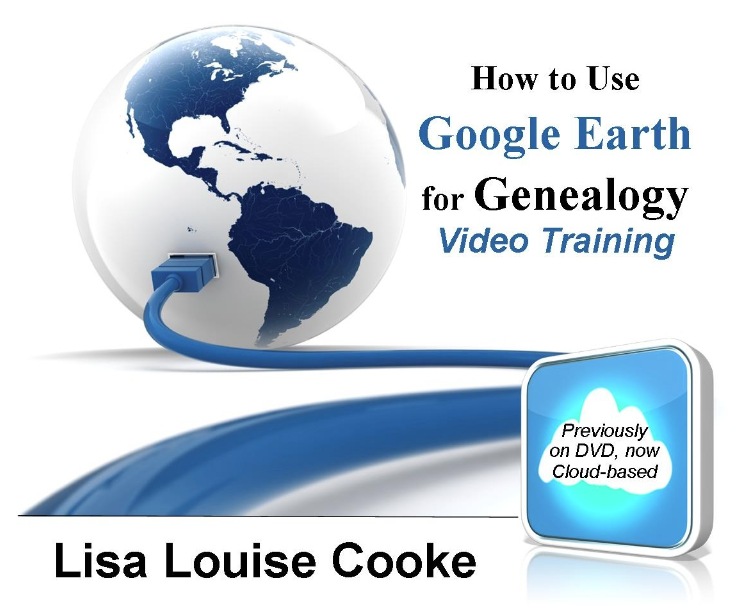
Order the video training series at the Genealogy Gems Store featuring 14 exclusive step-by-step video tutorials. The perfect companion to the book The Genealogists’s Google Toolbox by Lisa Louise Cooke.
After a week of post-consultation research:
Question: Who were the parents of Margaret Scully born in Limerick Ireland on approximately July 9, 1840?
Answer: James Scully and Bridget Madigan, married in Limerick, Ireland June 13, 1830. (Though I feel confident about this, I still have additional records I want to find in order to further solidify this conclusion.)
Question: In what Parish was Margaret Lynch born?
Answer: Most likely Kilcolman based on the baptismal locations of her siblings.
My Next Research Steps:
- Browse search through the baptismal parish records at NLI 1839-1842 for Margaret, and 1834-1836 for James Scully.
- Look for marriages of Margaret’s female siblings, and family burials.
(Contact St. Michael’s church, Stillwater, MN.)
- Go through newspapers.com – there are several Minneapolis and St. Paul papers running articles from Stillwater.
- Resume my search of passenger list records with the newly revised date of c. 1851.
- Search for the death record of Bridget’s husband James at RootsIreland and NLI.
How to Book a Genealogy Consultation
My 45-minute consultation with a genealogy expert Kate Eakman at Legacy Tree Genealogists broke things wide open on my Irish family lines and gave me the information and resources I needed to make all of the progress I shared in this episode. It’s the best investment I’ve made in my genealogy in a long time. They have experts in all areas. Learn more about how easy it is to book a consultation here.
Learn More:
For more step-by-step instructions for using Google Earth read my book The Genealogist’s Google Toolbox available at the Genealogy Gems Store.
Recommended Genealogy Gems Premium Member Videos with downloadable handouts:
Learn more about Genealogy Gems Premium membership here.
Genealogy News: Free Webinar
Watch the free video recording of my session on the MyHeritage Collection Catalog here.
Resources:
Live Chat PDF– Click here to download the live Chat from episode 19 which includes my answers to your questions.
Genealogy Gems Premium Members:
Become a Premium Member here.
by Lisa Cooke | Aug 18, 2015
GENEALOGY GEMS found at https://www.lisalouisecooke.com/ (“Website”) is governed by the following privacy policy (“Privacy Policy”).
We respect your privacy and are committed to protecting it. The purpose of this Privacy Policy is to inform you what personally identifiable information we may collect and how it may be used. This statement only applies to this Website.
WHAT INFORMATION DO WE COLLECT AND HOW IS IT USED?
Information You Voluntarily Submit to the Website: We may collect personal information from you such as your name or email address. For example, you may voluntarily submit information to the Website by leaving a comment, subscribing to a newsletter, or submitting a contact form. In addition, you are able to create a user profile, which allows you to create a username and password. We will store the username, but your password will not be visible in our records.
Automatically-Collected Information: We automatically collect certain information about you and the device with which you access the Website. For example, when you use the Website, we will log your IP address, operating system type, browser type, referring website, pages you viewed, and the dates/times when you accessed the Website. We may also collect information about actions you take when using the Website, such as links clicked.
Cookies: We may log information using cookies, which are small data files stored on your browser by the Website. We may use both session cookies, which expire when you close your browser, and persistent cookies, which stay on your browser until deleted, to provide you with a more personalized experience on the Website.
HOW YOUR INFORMATION MAY BE USED
We may use the information collected in the following ways:
- To operate and maintain the Website;
- To create your account, identify you as a user of the Website, and customize the Website for your account;
- To send you promotional information, such as newsletters. Each email promotion will provide information on how to opt-out of future mailings;
- To send you administrative communications, such as administrative emails, confirmation emails, technical notices, updates on policies, or security alerts;
- To respond to your comments or inquiries;
- To provide you with user support;
- To track and measure advertising on the Website;
- To protect, investigate, and deter against unauthorized or illegal activity.
THIRD-PARTY USE OF PERSONAL INFORMATION
We may share your information with third parties when you explicitly authorize us to share your information.
Additionally, the Website may use third-party service providers to service various aspects of the Website. Each third-party service provider’s use of your personal information is dictated by their respective privacy policies.
The Website currently uses the following third-party service providers:
Google Analytics – this service tracks Website usage and provides information such as referring websites and user actions on the Website. Google Analytics may capture your IP address, but no other personal information is captured by Google Analytics.
Constant Contact – this service is used for delivery of email updates and newsletters. We store your name and email address for purposes of delivering such communications. Please refer to Constant Contact’s privacy policy for further information.
At this time, your personal information is not shared with any other third-party applications. This list may be amended from time to time in the Website’s sole discretion.
Except when required by law, we will not sell, distribute, or reveal your email addresses or other personal information without your consent; however, we may disclose or transfer personal information collected through the Website to third parties who acquire all or a portion of our business, which may be the result of a merger, consolidation, or purchase of all or a portion of our assets, or in connection with any bankruptcy or reorganization proceeding brought by or against us.
ANONYMOUS DATA
From time to time, we may use anonymous data, which does not identify you alone, or when combined with data from other parties. This type of anonymous data may be provided to other parties for marketing, advertising, or other uses. Examples of this anonymous data may include analytics or information collected from cookies.
PUBLICLY VISIBLE INFORMATION
If you create a user profile on the Website or leave a comment, certain information may be publicly visible. To create a user profile, you must choose a username and password and input your email address for profile confirmation. Your email address will never be available publicly. At your option, you may also add an avatar, a profile description, and a link to your website.
Users may see your username, avatar, profile description and website information.
COOKIES
The Website uses cookies to store visitors’ preferences, record user-specific information on what pages users access or visit, ensure that visitors are not repeatedly sent the same banner ads, customize Website content based on visitors’ browser type or other information that the visitor sends. Cookies may also be used by third-party services, such as Google Analytics, as described herein.
Users may, at any time, prevent the setting of cookies, by the Website, by using a corresponding setting of your internet browser and may thus permanently deny the setting of cookies. Furthermore, already set cookies may be deleted at any time via an Internet browser or other software programs. This is possible in all popular Internet browsers. However, if users deactivate the setting of cookies in your Internet browser, not all functions of our Website may be entirely usable.
ADVERTISING
Affiliate Program Participation
The Website may engage in affiliate marketing, which is done by embedding tracking links into the Website. If you click on a link for an affiliate partnership, a cookie will be placed on your browser to track any sales for purposes of commissions.
Genealogy Gems is a participant in the Amazon Services LLC Associates Program, an affiliate advertising program designed to provide a means for sites to earn advertising fees by advertising and links to Amazon.com. As part of this Amazon Associates program, the Website will post customized links, provided by Amazon, to track the referrals to their website. This program utilizes cookies to track visits for the purposes of assigning commission on these sales.
Newsletters
On the Website, you may subscribe to our newsletter, which may be used for advertising purposes. All newsletters sent may contain tracking pixels. The pixel is embedded in emails and allows an analysis of the success of online marketing campaigns. Because of these tracking pixels, we may see if and when you open an email and which links within the email you click. Also, this allows the Website to adapt the content of future newsletters to the interests of the user. This behavior will not be passed on to third parties.
RIGHTS RELATED TO YOUR PERSONAL INFORMATION
Opt-out – You may opt-out of future email communications by following the unsubscribe links in our emails. You may also notify us at service@genealogygems.com to be removed from our mailing list.
Access – You may access the personal information we have about you by submitting a request to service@genealogygems.com.
Amend – You may contact us at service@genealogygems.com to amend or update your personal information.
Forget – In certain situations, you may request that we erase or forget your personal data. To do so, please submit a request to service@genealogygems.com.
Please note that we may need to retain certain information for recordkeeping purposes or to complete transactions, or when required by law.
SENSITIVE PERSONAL INFORMATION
At no time should you submit sensitive personal information to the Website. This includes your social security number, information regarding race or ethnic origin, political opinions, religious beliefs, health information, criminal background, or trade union memberships. If you elect to submit such information to us, it will be subject to this Privacy Policy.
CHILDREN’S INFORMATION
The Website does not knowingly collect any personally identifiable information from children under the age of 16. If a parent or guardian believes that the Website has personally identifiable information of a child under the age of 16 in its database, please contact us immediately at service@genealogygems.com and we will use our best efforts to promptly remove such information from our records.
Mediavine Programmatic Advertising (Ver 1.1)
The Website works with Mediavine to manage third-party interest-based advertising appearing on the Website. Mediavine serves content and advertisements when you visit the Website, which may use first and third-party cookies. A cookie is a small text file which is sent to your computer or mobile device (referred to in this policy as a “device”) by the web server so that a website can remember some information about your browsing activity on the Website.
First party cookies are created by the website that you are visiting. A third-party cookie is frequently used in behavioral advertising and analytics and is created by a domain other than the website you are visiting. Third-party cookies, tags, pixels, beacons and other similar technologies (collectively, “Tags”) may be placed on the Website to monitor interaction with advertising content and to target and optimize advertising. Each internet browser has functionality so that you can block both first and third-party cookies and clear your browser’s cache. The “help” feature of the menu bar on most browsers will tell you how to stop accepting new cookies, how to receive notification of new cookies, how to disable existing cookies and how to clear your browser’s cache. For more information about cookies and how to disable them, you can consult the information at All About Cookies.
Without cookies you may not be able to take full advantage of the Website content and features. Please note that rejecting cookies does not mean that you will no longer see ads when you visit our Site. In the event you opt-out, you will still see non-personalized advertisements on the Website.
The Website collects the following data using a cookie when serving personalized ads:
- IP Address
- Operating System type
- Operating System version
- Device Type
- Language of the website
- Web browser type
- Email (in hashed form)
Mediavine Partners (companies listed below with whom Mediavine shares data) may also use this data to link to other end user information the partner has independently collected to deliver targeted advertisements. Mediavine Partners may also separately collect data about end users from other sources, such as advertising IDs or pixels, and link that data to data collected from Mediavine publishers in order to provide interest-based advertising across your online experience, including devices, browsers and apps. This data includes usage data, cookie information, device information, information about interactions between users and advertisements and websites, geolocation data, traffic data, and information about a visitor’s referral source to a particular website. Mediavine Partners may also create unique IDs to create audience segments, which are used to provide targeted advertising.
If you would like more information about this practice and to know your choices to opt-in or opt-out of this data collection, please visit National Advertising Initiative opt out page. You may also visit Digital Advertising Alliance website and Network Advertising Initiative website to learn more information about interest-based advertising. You may download the AppChoices app at Digital Advertising Alliance’s AppChoices app to opt out in connection with mobile apps, or use the platform controls on your mobile device to opt out.
For specific information about Mediavine Partners, the data each collects and their data collection and privacy policies, please visit Mediavine Partners.
CONTACT INFORMATION
At any time, please contact us at service@genealogygems.com for questions related to this Privacy Policy.
Last updated: 2022
by Lisa Cooke | Jul 22, 2017 | 01 What's New, Legacy Tree Genealogists, Swedish |
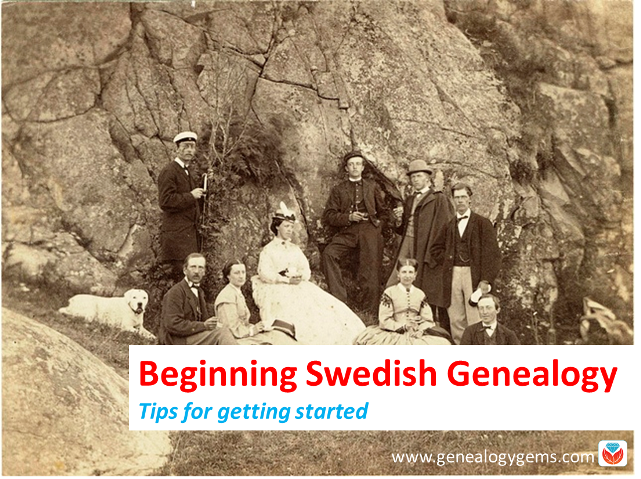
Beginning Swedish genealogy can be daunting. But don’t let language barriers or unfamiliar naming traditions deter you! Check out these getting-started tips from an expert at Legacy Tree Genealogists.
 This guest post comes from Paul Woodbury, a Senior Genealogist with Legacy Tree Genealogists. He’s an internationally recognized genetic genealogy expert and his varied geographical interests include Scandinavia. Thanks, Paul!
Many people avoid Swedish research because they don’t speak the language and because the names change every generation–like from Ole Olsson to Ole Nilsson to Nils Pehrrson. Despite these barriers, Swedish research can be relatively simple, fun, and successful for several reasons.
1. You can “read” many records without reading Swedish.
Particularly in late 18th and 19th century records, you don’t need in-depth Swedish language skills to make exciting discoveries. Swedish church records of the time were kept in tables and were largely composed of names, dates, and residences. Records include those of:
- Birth and christening (födelse och döpte)
- Marriage and engagement (lysning och vigsel)
- Death and burial (död och begravning)
- Moving-in lists (inflyttade) and moving-out lists (utflyttade)
- Clerical examination (“husförhörslängd”)–more on these below.
Dates were frequently recorded in number formats according to the European system (dd-mm-yyyy). As a result, researchers can learn a great deal from Swedish documents with little knowledge of the Swedish language. For the few additional words you may need to learn, consider reviewing this list of words commonly found in Swedish documents available through FamilySearch.org.
2. Family events are summarized in Swedish clerical examinations.
The clerical examination or “husförhörslängd” can act as an index to important family events. Beginning in 1686, each parish was required to keep a household examination for each household. Many early records don’t survive, but copies of these records exist for many parishes in Sweden after about 1780. As part of the household examination, parish priests of the Swedish Lutheran church were required to visit with the members of their parish at least once yearly and test them on their knowledge of the catechism.
Typically, these registers document a family over the course of 5-10 years. They not only include information about the family’s religious duties, but additional information regarding migration, family structure, residence and important family events. If a child was born, he or she was added to the clerical examination, and the birth date and christening date were noted. If an individual or a family moved within the parish, a note was made in the clerical examination with a reference to the page number of the family’s new residence. If they moved out of the parish, the date they left was often recorded along with the number of their entry in the moving-out books. The dates of deaths, confirmations, marriages, vaccinations and communions were also recorded. If you are lucky, additional notes might comment on crimes, physical characteristics, occupations, punishments, social standing, economic status, or other life events with references to pertinent records.

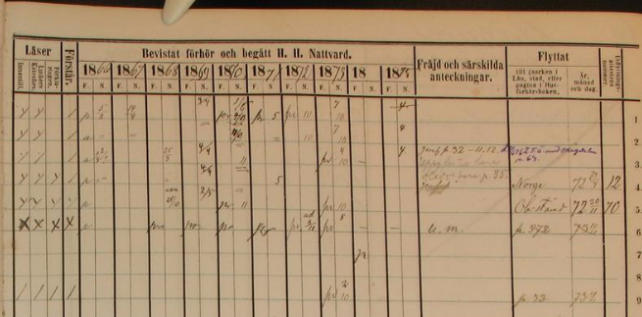
ArkivDigital, Dals-Ed (P) AI:15 (1866-1875), clerical examination, household of Per Johansson, Image 74 / page 64, https://app.arkivdigital.se, subscription database, accessed July 2017.
The above Household Clerical Examination in Dals-Ed Parish in Älvsborg covers 1866-1875 and shows the household of Per Johansson on the farm of Lilla Wahlberg in Bälnäs. The document provides birth dates and places for each household member. It shows that Per’s son, Andreas, moved to Norway in 1872. Another son, Emanuel, moved within the parish but returned after just a month. Among other notes on the document, we learn that Emanuel only had one eye and that he was a dwarf.
3. Many Swedish records cross-reference each other.
Clerical examinations reference other church records, such as those of a child’s birth or a couple’s marriage. But the reverse is also true: birth, marriage, death and migration records frequently reference household examinations. Birth records might list the page number of the child’s family in the household examination. Marriage records indicate the corresponding pages of the residences of the bride and the groom. Death records identify the residence of the deceased. Moving-in and moving-out records frequently report the corresponding page numbers of the farm where a migrant eventually settled or the parish from whence he came.
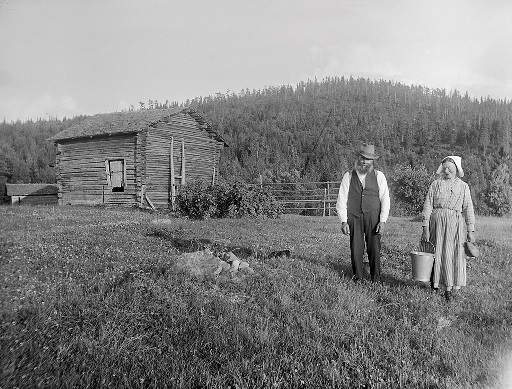
The yeoman farmer Ollas Per Persson and his wife Greta at a hut in Dalecarlia. Photograph by: Einar Erici, c1930. Wikimedia Commons image, Permission granted Swedish National Heritage Board @ Flickr Commons.
Most clerical examination buy medication for anxiety volumes include an index of farms and residences within the parish. In the case of some larger parishes and cities, local genealogical societies have sometimes indexed all individuals in the volume by name. When researching in multiple volumes, note the farm or residence of your ancestor in the previous record and then search the index of residences near the front or end of the next clerical examination volume. Usually, this will narrow your search to just a few pages out of the book rather than the entire volume.
4. You can trouble-shoot record gaps.
Even when an ancestor’s record trail turns cold, recent publications and indexes created by active Swedish genealogical societies make it possible to pick up the trails of elusive ancestors in earlier and later records. Even if these records do not list the specific pages of interest, they may still provide the reported residences, which can then be located in the clerical examination records.
Occasionally, an ancestor might have moved in a year for which migration records are not currently available, or they might have moved to a larger city with many parishes. Other times, their migration may not have been noted, or jurisdiction lines may have been redrawn resulting in the formation of a new farm and residence. In these cases it may be difficult to continue tracing an ancestor’s record trail. One strategy to overcome these situations is to search the clerical examinations by reported birth date. The birth dates or ages of Swedish ancestors are recorded in many of their records. If you are browsing through large collections, consider searching by birth date rather than by name. Since birth dates were often recorded in their own unique column and are more immediately recognizable than names, this may expedite your search. Even if these strategies still yield no results, searches in indexes may help to uncover an elusive ancestor’s record trail.
5. There are some excellent Swedish indexes and databases online.
In recent years, online indexes and databases have made Swedish genealogical research simpler than ever:
- FamilySearch.org, MyHeritage.com and Ancestry.com all have large collections of indexed birth, marriage and death records from Sweden.
- Sveriges Släktforskarföbund has compiled an index of Swedish death records from 1900 to 2013. It includes the birth dates, birth places, names, maiden names, death dates, residences at time of death, age at time of death, and if the individual was married or widowed, the index will also include the date of marriage or the date of death of their spouse. If they were not married, it will indicate their civil status. Click here to purchase the database (the price is in Swedish krona; do a Google search such as currency converter sek to usd to see the price in your country’s currency). (A related Ancestry.com database is entitled “Births from the Swedish Death Index” and only includes names, maiden name, birth dates and birth places of the individuals in the index.)
- MyHeritage has partnered with ArkivDigital to provide an index to Swedish clerical examinations between 1880 and 1920. (Indexing is underway for household examinations from 1850 to 1880.)
- Other indexed collections at ArkivDigital include the 1950 and 1960 Swedish censuses.
- Ancestry.com has indexes of Gotenburg passenger lists, which can help identify relatives who migrated from Sweden to others parts of the world.
As you can see, Swedish genealogical records from the late 1700s and 1800s can be fairly easy to read, detailed and full of cross-references. It’s often possible to trace a Swedish ancestor in every year of their life from birth to death! So don’t let language or patronymics (naming traditions) frighten you away from exploring your Swedish family tree.
Help is available when you need it
Have you hit a brick wall that could use professional help? Or maybe you simply don’t have the time for research right now? Our friends at Legacy Tree Genealogists provide full-service professional research customized to your family history, and deliver comprehensive results that will preserve your family’s legacy.
Disclosure: This article contains affiliate links and Genealogy Gems will be compensated if you make a purchase after clicking on these links (at no additional cost to you). Thank you for supporting Genealogy Gems!