The Beaver Map, 1715. By Special Collections Toronto Public Library. Flickr, via Wikimedia Commons.
Recently I’ve seen two calls for volunteers to help “georeference” old maps. Basically, you’re tagging the maps in a way similar to tagging photos of people on social media sites. This makes finding old maps online easier and more accurate. It also allows sites to overlay the old and new maps. “Some places have changed significantly or disappeared completely, creating a puzzle that reveals an exciting contrast,” explains the British Library.
These two sites are asking for volunteers:
The British Library Online Gallery.The British Library is asking for volunteers to help georeference 50,000 maps it’s put online. Go right to the site and you’ll see the invitation to help on the home page. You’ll also see that you can click on a tab to search maps that are already georeferenced! The British Library tells its volunteers: “Your name will be credited, and your efforts will significantly improve public access to these collections. Contributors can see the results of their work, as well as the progress of the pilot and other participants, and the top contributor will be publicly announced.”
David Rumsey Historical Maps. This mega-maps site is also looking for volunteers to help add locations to its online map collections. On the home page, click on the left where it says Georeferencer: Help Add Location to Maps.
We blog about maps a lot here at Genealogy Gems. To learn more about using old maps online and for genealogy, go to our home page and search on the Maps category on the lower left side of the page. Additionally, Genealogy Gems Premium members have access to full-length video classes like these:
Welcome to this step-by-step series for beginning genealogists—and more experienced ones who want to brush up or learn something new. I first ran this series in 2008. So many people have asked about it, I’m bringing it back in weekly segments.
In this episode, I chatted with Margery Bell, Assistant Director of the Oakland, California Family History Center. Her own family history journey started in her 20s with a visit to a relative’s house. She didn’t even know what to talk about! But it was a start. Years later, she visited the Northern Ireland home of her great-grandmother, and felt like she’d come home. Learn her tips for getting started and two inspiring stories of “genealogy serendipity.”
In the second half of the show, you’ll learn why choosing a database for your family tree is your first essential step. Hear about some of my favorite databases—both free resources and products you can pay for. Don’t spend too much time fussing about software: I’ll tell you why you should just pick something and go with it.
Choosing a Genealogy Database
Whether you want to build an elaborate family tree, or just want to know who your direct ancestors were and some of the stories about them, the place to start is to get yourself a family history database. You don’t have to be highly computer savvy to use one. They are VERY intuitive and user friendly. Basic data entry skills is all you need.
Now I know you’re anxious to get started finding out about the folks who came before you and contributed to putting you on this planet. But this step is key to long term success and enjoyment. I know too many people who have gotten all excited and jumped in, getting all kinds of information about their family, but without a database they very quickly end up with huge stacks of paper and stickie notes. With all this chaos they often end up duplicating efforts they forgot they already did which is a waste of precious time. And worst of all, when someone shows an interest in what they are doing, it’s impossible to coherently pull out the information from the jumbled stacks in order to share it.
Having a family history database will keep all of your findings organized, with proper background information on where you found the data, as well provide a place to pull together photographs, documents and everything else you discover along the way. It’s like painting a piece of furniture. A little prep work goes along way to a really nice finish.
Now there are lots of family history software programs out there, but you only need ONE, and all of them will serve your basic needs. So I’m going to give you my top choices. It’s you’re decision how much you want to spend and how sophisticated you want your database to be.
If FREE is your price range, and you’re looking for a place to stay organized with streamlined screens to work in without a lot of startup time, then Family Tree Legends Online is perfect for you. (Family Tree Legends Online is now Family Tree Builder by MyHeritage.
Don’t let FREE fool you into thinking it won’t do the job. Legends offers lots of family history charts; custom reports; helps you share your data and pictures on a CD or DVD; allows you to back up your files to CD or DVD; and includes genealogy programs for Palm handheld devices and the Pocket PC. I’ve used it and it’s great. You can download the software FREE at the above link.
If you’re a PC user and are willing to spend $30-40 dollars, there are several really good and easy to use options available. You can order the product or purchase a digital download which will save you some money. And frankly, I really don’t think you need to the physical boxed product. All the help you need is online. And all of these products offer a free demo that you can download to try it out before you buy.
The top seller is Family Tree Maker which is from the folks at Ancestry.com which is the largest online records website which we’ll be talking a lot more about in future episodes. Click on its name to learn more about Family Tree Maker. This is probably the most commonly used database out there.
If you’re looking for great printed reports that you can share then RootsMagic is a great choice. It’s available as a digital download from their website at RootsMagic.
Some of the differences you’ll find between these products is the types of reports and charts they produce. So if that’s important to you, you can try the demos and see which you like. But again, I really don’t think you can go wrong with any of these products. They are all well established and fully supported.
And I want to stress, it’s just important that you take the steps and get started. Don’t get bogged down in analyzing software forever. If you really want to change to a different program down the road you can always do that. But the important thing here is that you have a place to put the information that you find and be able to retrieve that information so you can share it with others.
Now if you’re a Mac user I have two solid programs you could use. Again, both of these programs offer free demos if you want to test drive them:
Reunion 9 is fairly pricey at $99.95. If you’re interested in Reunion 9, I highly recommend that you listen to Episode 51of my more advanced Family History show called The Genealogy Gems Podcast. In that episode you can listen to a review of Reunion 9 by my contributing partner Ben Sayer, the MacGenealogist, who’s an expert on everything Mac for family historians. And if you want to compare iFamily against Reunion to see what you’re getting for your money, you can also listen to Ben’s review of iFamily in Genealogy Gems Episode 53.
Now when you fire up your new software database it’s going to ask you to fill in information about yourself, then your parents and so on. In family history we always start with ourselves, and then work our way backward. So enter everything you know. By just enter data on you and your parents, you’ll very quickly get a feel for how the program works. And once you get everything in there that you know, go ahead and try and print out a pedigree chart.
And there’s our first family history term: “pedigree chart.” You’ve probably heard the term used for pure bred dogs, but pedigree just means lineage or ancestral line. It shows your parents, grandparents, great grandparents, etc. No aunts, uncles or siblings. Just the folks you directly descend from.
Another type of chart your database can print is a descendant chart, which shows all the people who descend from one person. So if you had two kids, your descendant chart would show you at the top, and two children directly under you. This comes in real handy when you want to have a reunion of all the descendants of let’s say your great grandpa Marvin. You would go to Marvin’s card in the database, and then print the descendant chart from there. It would then include Marvin, all his kids, his grandkids, his great grandkids and so on. But it wouldn’t show the kids spouses, or Marvin’s parents. It’s just going to tell you who was born directly as a result of Marvin.
So enter what you know, and once you’ve got all that in there, play around with your new database by printing out a pedigree chart and a descendant chart. And next week we’ll start uncovering more clues to your family history.
Here’s a final thought for today: A famous idea taken from one of Shakespeare’s plays is that what is Past is Prologue. It seems to me that a key to moving forward in your life is to look back and see what’s come before. How things were done. What worked, and what didn’t. It can inspire you to continue family traditions or give you the motivation to create something new for the next generation.
Discover the essential search strategies that every genealogist should be using when searching for records at FamilySearch.org, the popular free genealogy website. In Elevenses with Lisa episode 64 Lisa Louise Cooke discusses:
Wild cards you can use when searching FamilySearch
Search strategies to help you get more results
Advanced Search strategies
Episode 64 Show Notes
FamilySearch.org is a free genealogy records and family tree website. You will need to be logged into your free account in order to search for genealogy records.
In this video and show notes I will outline strategies for searching for people by name in genealogy records. You can then apply these techniques to your genealogy research plan. Knowing what you’re specifically looking for will give you a better chance at success.
Elevenses with Lisa episode 64 – Share on Pinterest
Starting Your Search at FamilySearch
In the menu go to Search > Records (then use the form).
Start with a broad search.
Search results ignore the order of first names but will preserve name order if there are two last names.
Click the Exact Match box to start narrowing in on specific names and spellings.
Even if you are confident that you know exact names and places try variations. For example, add or remove a name and turn on and turn off Exact Match.
Strategies for Searching Names FamilySearch:
Add or remove middle names.
Try searching for nicknames.
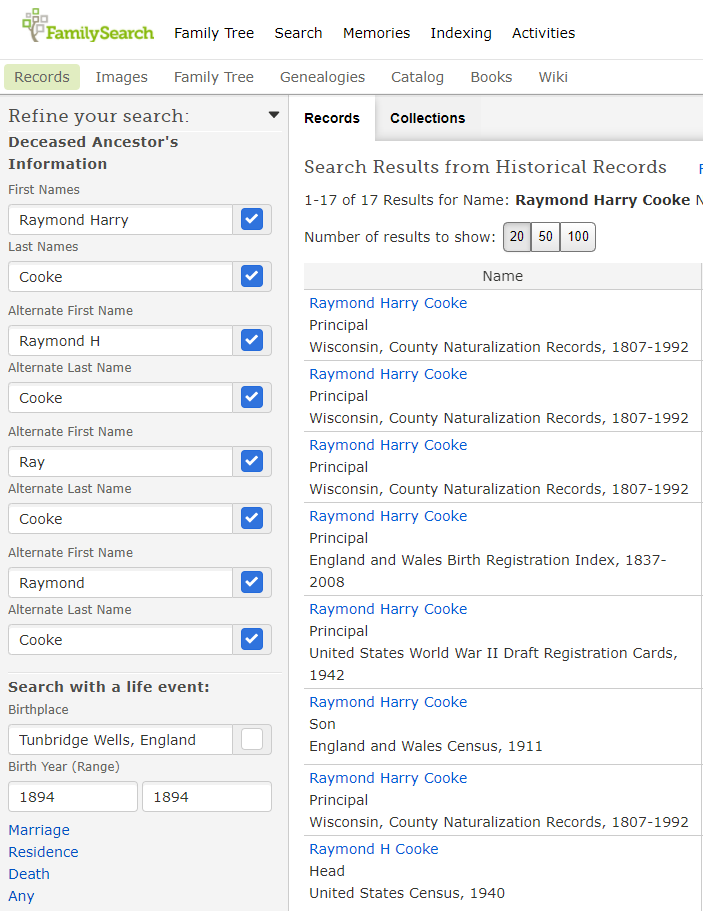
Try spelling variations. Use the AlternateName You can search up to four alternate names at a time. Try clicking the Exact Match box for each alternate name.
example of Alternate Name search at FamilySearch
Try spelling the name as it would have been spelled in the old country. (Example: Sporan / Sporowski / Sporovsky / Sporowski)
Use wildcards to help with search variations.
Asterisk (*) replaces zero or more characters.
Question mark (?) replaces a single character.
Use cluster research techniques by searching on relationships.
A few words about searching on relationships: Try searching only with your ancestor’s first name and a known relationship such as a spouse, parent or other relative. In addition to specific people, try searching for a surname associated with the family.
Over time the spelling of a last name can change in a family. It’s important, even if you receive initial successful results, to try all variations, including language variations.
In the case of women, records will be under the last name they were using at the time the record was created. Therefore, try searching for them using their maiden name and then their married name (or names if they were married multiple times.)
Try leaving the last name field blank. This can be particularly effective when searching for female ancestors. This strategy works well in conjunction with entering additional information, such as the names of the spouse or parents.
Try just surnames, unique first names, and Other Person
Pro Tip: Use Snagit to easily create a search log
Learn more about Snagit: How to Use Snagit for Genealogy (episode 61) Save 15% on Snagit with our exclusive discount coupon code: GENEALOGY15
Have you been using Snagit? Leave a comment
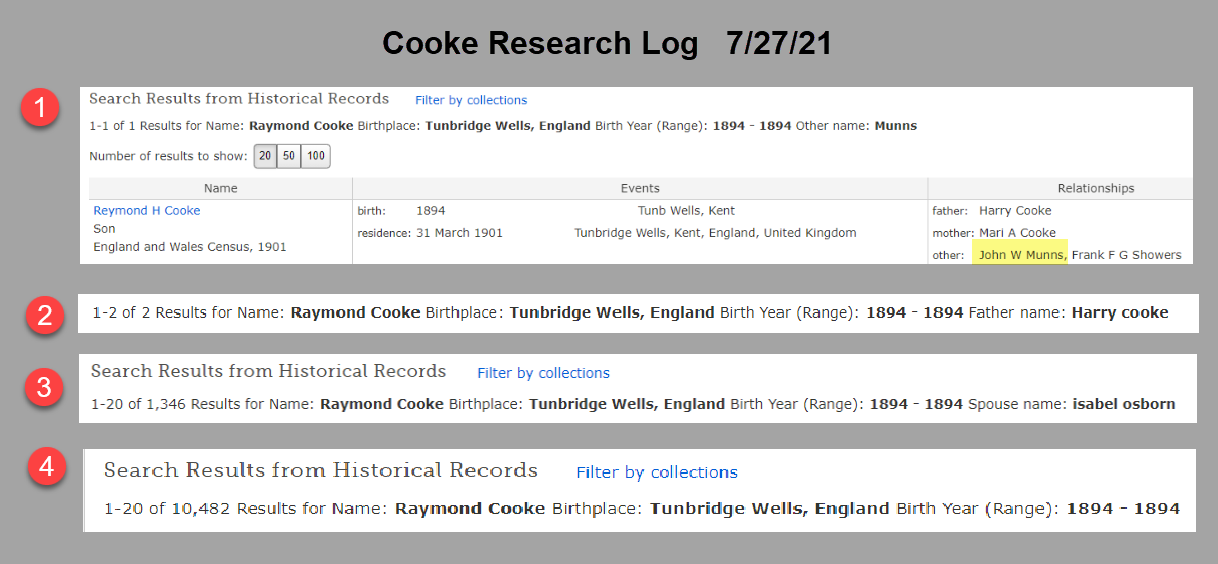
Here’s an example of a search log I created using Snagit. You can add custom text, symbols, highlighting and much more to create exactly the log that works for you.
Search log created with Snagit
Here’s how to quickly capture and keep a research log of your FamilySearch searches:
Run your search as usual.
Use Snagit to clip the number of results and the terms searched at the top of the results page. (Set Snagit to “Region” to precisely clip that portion of the screen.)
Continue searching and clipping. When done, go back to the Snagit Editor.
Click Control (Win) or Command (Mac) and click to select each clipping you made in order. You can also select all of your clippings by clicking to select the first clipping and then hold down the shift key on your keyboard and click the last clipping.
Right-click on the selected clipping to access the menu. Click Combine in Template.
In the pop-up Combinein Template box, select a template. I like to use Custom Steps for a research log.
Click the Next
Give your combined image a Title. (You can edit this again later.)
Select the font and canvas color as desired.
The NumberImages box will probably be selected. This will place a “step” number in front of each clipping showing the order in which you clipped. You can deselect this box if you don’t want to number your clippings.
Click the Combine
Edit the combined image as desired. You can click to select items to move and resize them. You may need to ensure you’re not in Text mode – click the Arrow at the top of the screen and then you’ll be able to click on items like the numbered steps and move them around. Grab the edges and drag them to crop if needed.
Save your image: File > Save As.
Search Strategy: Events
Try searching on known life events such as:
Birth
Marriage
Residence
Death
Any
Click the type of life event you want to include in your search. Enter the place and year range.
Life Events Search Tips:
Try your search with different events.
Try your search with no events.
Use the Residence option to find records identifying where a person was living. Some records contain an address or last place of residence. Birthplaces, marriage places, and death places are not the same as residence places.
Use the Any Event if you know a date and place for an event other than birth, marriage, death, or residence. For example, a search with an Any event can find dates of military enlistment or immigration.
Search Strategies: Places
In the place field try searching at a more or less specific place level. If you searched for a town, try the county, state, district or country.
Try using wildcards in place-names. (Enter * to replace zero or more characters. Enter ? to replace one character.)
Search Strategies: Years
In the year fields try adding a year before and a year after.
In the year fields, try searching with no years first, and then filter the results to narrow your search by year.
Advanced Search Strategies
Include multiple events in your search when you are looking for a record that likely contains all the events.
Death records – try searching with both birth and death events.
Birth record, include only a birth event, since birth records usually do not contain death information.
To search for a child’s birth records, enter the child’s name, then click Parents. Enter the parents’ names. If needed, try variations such as these:
Both of the parents’ full names.
The father’s full name only.
The mother’s full married name only; then her full married name only.
The father’s full name with the mother’s first name.
The mother’s full maiden name with the father’s first name.
To find all of the children in a family, leave the first and last name fields blank.
Then click Parents and conduct your search using only parents’ names. Try all the variations.
Searching for Marriage Records
To search for a marriage enter the name of one person in the first and last name fields. Click Spouses, and enter the name of the spouse. Try variations: the spouse’s first name and the wife’s maiden name. To limit your search results to marriage records only, click Type, and click the Marriage checkbox.
Search Best Practices
Have a specific search goal.
Start with a broad search. You do not have to enter information in all search fields. You often can get better results when you leave most blank, and then filter down.
FamilySearch doesn’t support Boolean Operators like Google does.
Expect records and indexes to contain errors, spelling variations, and estimations.
Try your search several times with variations.
Even if your ancestors had easy-to-spell names, expect spelling discrepancies. Anderson could be Andersen in some records. Try Anders?n in the Last Names search box.
Always look at the image, if possible. It often has more information than the index alone.
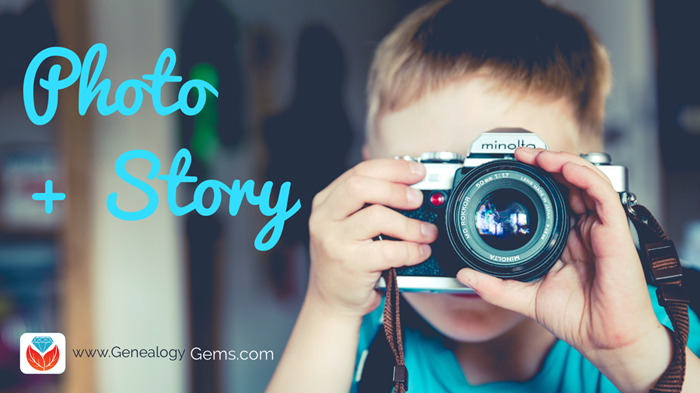
A new Photo + Story competition will be part of RootsTech 2018! If you can take a story-filled picture and caption it meaningfully, you should enter. Check out these tips for creating winning family history photo and story combinations. Winners will receive prizes from Canon and Dell–so start putting together your best photos and stories.
RootsTech 2018 Photo + Story Competition
“A good photo tells a good story. And behind every good photo and story is a photographer who recognized the moment the two had come together and snapped the shutter.” So says the press release announcing RootsTech 2018‘s Photo + Story Competition. Here’s how to enter:
“Participate by finding or capturing a photo and story, past or present, of you or a family member. Unlike standalone photo or story competitions, we want you to use the power of both photo and story to share, persuade, inform, inspire, connect, and belong.” In fact, some of those verbs are the four categories in the competition:
Connect
Belong
Family
Heritage
Winners will awarded prizes from Canon and Dell, which will certainly help your future family history storytelling! Selected entries will appear in an exhibit at RootsTech 2018.
This contest complements the appearance of RootsTech 2018 keynote speaker Humans of New York photographer Brandon Stanton. His personal glimpses into the lives of ordinary people in New York has set a standard for quality photo stories.
Details You’ll Want to Know
Here are several must-know details if you’d like to enter the contest–or encourage someone you know to enter:
Entrants can submit one photo and story in each of the categories.
Entrants must be at least 18 to apply.
No professional qualification, licenses, certificates, or certification is required.
If you didn’t take the picture, you must have permission or rights to use the photo (if it was taken after 1923). Agreeing to compete places full liability on the participant.
Selected entries will be notified by January 15, 2018, with more information on their intent to exhibit.
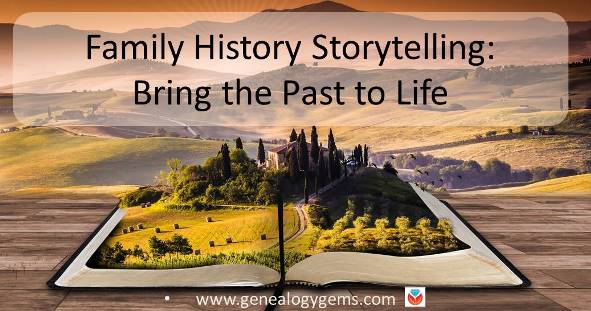
Family History Storytelling Tips for You
At Genealogy Gems, we’re all about helping you to discover, preserve and share your family history. If you’re thinking of entering this contest, consider how the following tips, adapted from a Genealogy Gems article on family history storytelling, can help your Photo + Story competition entry:
Create vivid “characters.” Photos can capturing someone’s expressions, body language, mood, unique clothing or a moment of intense personal drama. They can also create compelling portraits of the heirlooms or objects that store family memories. Your stories can do the same. Choose unique, meaningful details–both in words and pictures.
Paint the backdrop. What’s going on in the background of your picture? The “setting” and any background action should help tell the story, not distract from it. In your story, add essential details that the image can’t communicate. Is the exact date or place important? What else?
Tell why this story matters. Call it what you will: a meaning, a moral, a message–the best stories and photos say something about life. Something more than skin deep. Think about why the picture and story matter to you. Share it clearly, concisely, with humor or feeling or whatever tone best works for you and the message.
Genealogy Gems will be at RootsTech 2018 to help you discover and share your family stories!Click here to learn more.