Barry Landau Sentenced to 7 Years for Thefts From National Archives, Other Institutions
Washington, DC . . . U.S. District Judge Catherine C. Blake yesterday sentenced Barry H. Landau to seven years in prison, and three years of supervised release, for conspiracy and theft of historical documents from cultural institutions in four states, including the Franklin D. Roosevelt Presidential Library in Hyde Park, New York.
The items stolen from the Roosevelt Library, which is part of the National Archives and Records Administration, were seven “reading copies” of speeches that Roosevelt delivered. They contained his edits and handwritten additions, along with his signature. They have all been recovered.
Landau’s co-conspirator, Jason Savedoff, will be sentenced at a later date.
Archivist of the United States David S. Ferriero said he was pleased that Judge Blake “recognized the seriousness of this crime and meted out an appropriate punishment that will serve as a warning to others who may contemplate stealing our nation’s history.”
“There is a very special bond that forms between researchers and research institutions. It’s kind of like an insider’s club. We speak the same language, share the same interests, explore the same minute details of historical knowledge that will eventually fill in the fabric of our shared history as a nation,” the Archivist added.
“When a researcher turns out to be a thief and steals the documents that are the very underpinnings of our democracy, our trust and respect for the community is shaken. Barry Landau is just that thief. Dressed in the guise of a scholar, he ingratiated himself with our staff and stole priceless documents from the Franklin Roosevelt Library. In essence he robbed from all of us—our collective history. And he did far worse damage to numerous other research institutions around the country.”
The Archivist said that because of incidents such as those involving Landau, the National Archives and other research institutions around the world have become more vigilant over the last few decades. They have instituted a number of measures aimed at preventing theft, such as closed-circuit cameras, clean research room rules, exit searches, and increased staff surveillance.
“When a theft does occur, we rely on the Office of the Inspector General and the Justice Department to build a case and bring the perpetrator to justice,” he added. “I want to thank them for their hard work.”
Lynn Bassanese, Acting Director of the Roosevelt Library, recalled that when Roosevelt dedicated his library on June 30, 1941, he declared it an “act of faith” in the American people.
“Barry Landau and Jason Savedoff violated that faith by taking advantage of the trust and confidence that the Roosevelt Library’s staff has for its researchers,” she said.”With the successful return of the stolen documents, the Roosevelt Library renews its commitment to protect and preserve the records of the Roosevelt Presidency and to make them accessible to the American people for generations to come.”
According to Landau’s plea agreement, the “reading copies” of Roosevelt’s speeches were stolen when he and Savedoff visited the Roosevelt Library on December 2, 2010.
“Reading copies” are the actual copies of the speeches from which the President read. They contain edits and handwritten additions made by him and bear his signature.
Four of these “reading copies” of speeches were sold by Landau on December 20, 2010, to a collector for $35,000. Three other “reading copies” of inaugural addresses delivered by Roosevelt, valued at more than $100,000 each, were recovered from Landau’s apartment in New York City during court-authorized searches, including the water-stained reading copy of the inaugural address Roosevelt delivered in a steady rain in 1937.
Judge Blake also ordered Landau to pay restitution totaling $46,525 to three dealers who purchased the stolen documents from Landau, not knowing they were stolen. She also ordered Landau to forfeit all the documents recovered during searches of his New York apartment.
The National Archives and Records Administration is an independent Federal agency that preserves and shares with the public records that trace the story of our nation, government, and the American people.
Google offers a variety of ways to help you find and search for images. In fact, there are so many different ways it can get a little confusing. In this video and article I’m going to show you how to find images and photographs that apply to your family history. Who knows, we may even find an ancestor’s photo. I’m also going to show you how you can use Google Images to even help identify some of the images and photos you have in your family scrapbooks. These are my best image search strategies and they come my book The Genealogist’s Google Toolbox.
Follow along in the show notes below. The step-by-step instructions are available in an ad-free show notes cheat sheet which is downloadable in the Resources section at the end of these show notes. (Premium Membership required.)
How to Find Photos and Images with Google Images
When it comes to searching for images, part of the confusion comes from the fact that the search experience on desktop and mobile are a bit different. So, let’s start with running a basic image search on computer desktop. There are actually two ways to do that.
#1 Google search for images at Google.com on desktop:
Go to Google.com
Run a search
Click Image results
#2 Search for images at Google Images on desktop:
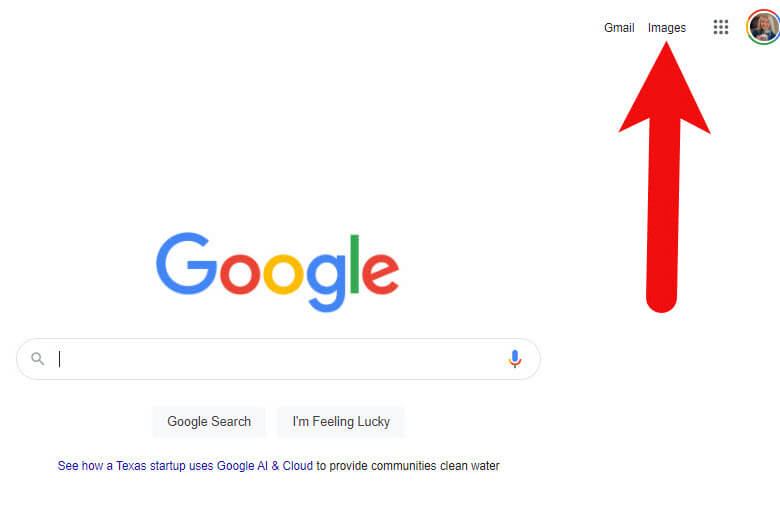
Go to https://images.google.com or go to Google.com and click Images in the top right corner (Image 1)
Image 1: How to get to Google Images from Google.com
Run a text search: Example: John Herring
Images results will be presented
If I’m in a hurry, I’ll usually just search from Google.com because I’m probably over there anyway. But if I really want to find the best image, or I expect to do some digging, I go directly to Google Images.
How to Get the Best Google Images Results
Searching for a name is fine, but chances are there are and have been many people with that name. You’ll need to narrow things down and provide Google with more specific information about what you want.
There are a several excellent ways to refine and dramatically improve your results. The best place to start is by using a few powerful search operators.
The first search operator is quotation marks. By putting quotation marks around a word or a phrase you are telling Google that it must:
Be included in each search result,
Be spelled the way you spelled it,
And in the case of a phrase, the words must appear in the order you typed them.
You can also use an asterisk to hold the spot for a middle initial or middle name. This is important because without it, Google may pass over these since the name was presented in quotation marks which means its to be searched exactly as typed.
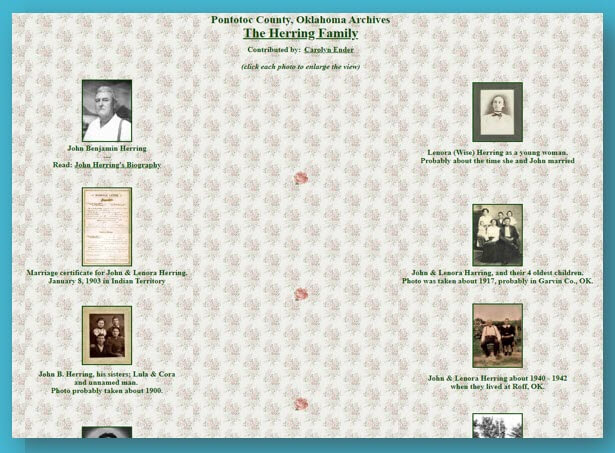
Notice in the following screen shot how this refined search appears. The search operators have made quite an improvement in the image results. I’ve located four photos of my great grandfather! (Image 2)
(Image 2) Google Images found photos of my great grandfather
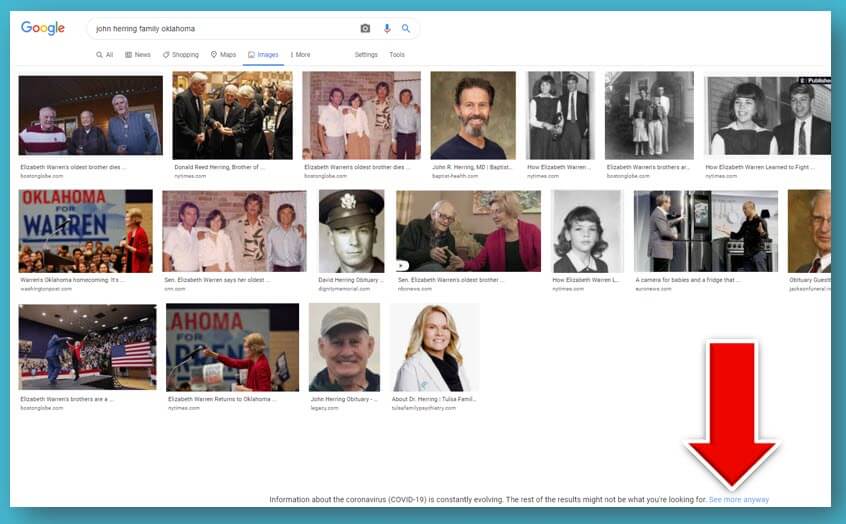
Google might restrict how many images it shows you. Click See more anyway at the bottom of the screen to reveal all the results. (Image 3)
(Image 3) Click to see more image results
You may need to scroll down to see even more results. Click an image to preview it. (Image 4)
(Image 4) Click to preview Google Image results
Click the enlarged preview image again to visit the website where it is hosted. I’ve got my fingers crossed that since this website is hosting a photograph of my ancestors, it just might have more. And indeed, it does – genealogy happy dance! (Image 5)
(Image 5) Old family photos found on this web page
How to Narrow Down an Image Search to Old Photos
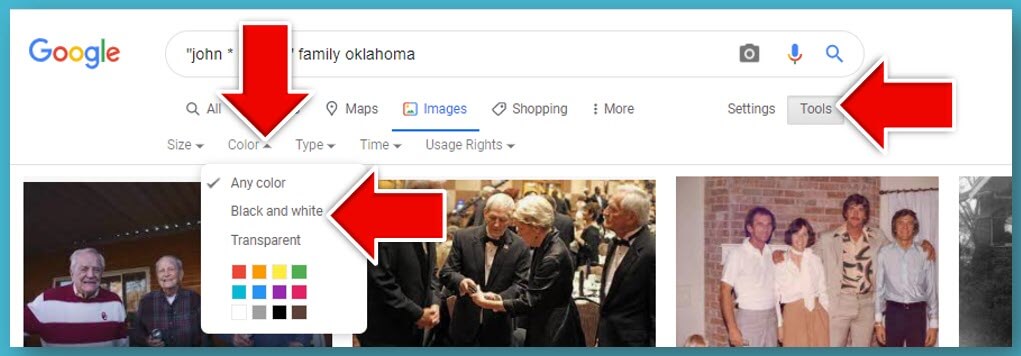
One of the ways you can zero in on old photos is by filtering down to only Black and White images. This makes sense because most of our older family photos are black and white.
On the Google Images search results page click the Tools button. This will cause a secondary menu to drop down. Click the Any Color menu and select Black and White. (Image 6)
(Image 6) How to filter Google Image results
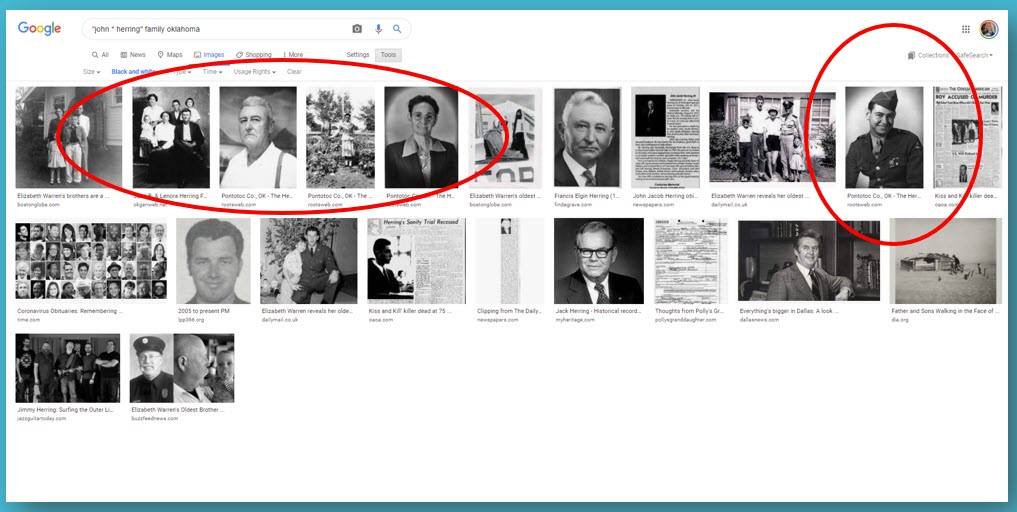
Now all of your image results will be black and white. It’s easy to tell that most of these are older photos. (Image 7)
(Image 7) Filtered image results
Permission to Use Images Found with Google Images
If you want to use any of the photos you find, you’ll need to ensure that you have permission to do so. Start with the FAQ at Google Search Help. This page will help guide you through issues like Fair Use and how usage rights work. In the end, the best thing to do when in doubt is to contact the person who posted the photo and explore any requirements they may have regarding use of the image.
How to Use Google Images to Identify Images and Photos
Do you have unidentified photographs, old postcards or other images in your family scrapbooks or photo albums? Google Images just might be able to help!
Start by first digitizing the image (I use a flatbed scanner) and saving it to your computer hard drive. Then head to Google Images on your computer and click the camera icon in the search field. This will give you two options:
Paste URL (we’ll get to that in just a bit)
Upload an image (this is the one you want – click it)
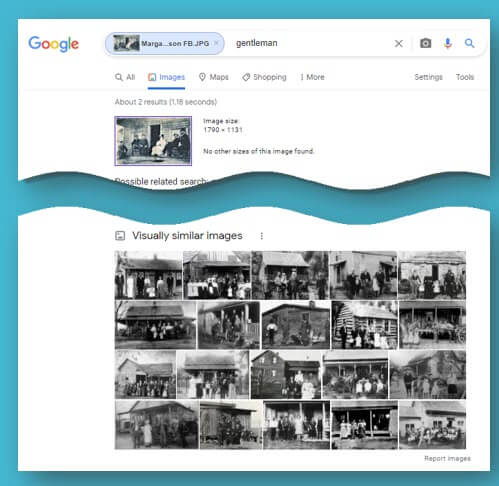
Click Choose File and grab the photo you saved to your computer. Google Images will search the Web for that image. It may find an exact copy, or it may deliver visually similar images.
Notice on the Google Images search results page that Google has added keywords to the search field at the top of the page. You’ll also see a tiny version of the image you searched. The keywords may be rather generic such as gentleman, family, etc. Try replacing these words with more specific words about the photos and what you are looking for. For example, you could replace the word gentleman with your ancestor’s name in quotation marks, or replace the word family with the family surname and the town where they lived. Experiment and try different variations to see what provides the best results.
How to Upload an Image to Google Image Search (Reverse Search):
Navigate to and select the digitized photo you saved to your computer.
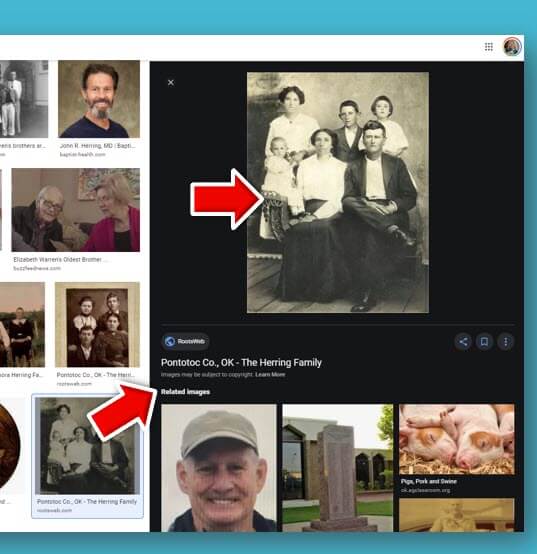
Google will attempt to find that exact image. If not the closest visually. You will see words in the search field along with your photo. These words describe what Google AI noted about the photo. For example, when I upload a photo of Margaret Scully sitting in her rocking chair, Google note “sitting” and delivered old photo of people sitting. When I upload a photo of the John Herring family Google notes “family” and provides old photos of family groups. Neither Margaret nor the Herrings are well-known, so this isn’t a surprise. If I upload a postcard from an ancestor’s scrapbook of a well-known or famous location, Google will likely find additional copies on the web and provide background information on the location and a website address for it if there is one.
You can revise this search by replacing the words that Google noted (i.e. family) with the person’s name of the surname. In the case of the John Herring group photo, I replaced family with Herring and then John Herring.
Remember the option to Paste URL? Use this when you find a photo on a website, (or if you have posted a photo on your own website or blog) and you want to find more like it. Right-click (PC – or Control Click on a Mac) on the image and Copy Image Address. Next, head back to Google Images, click the camera icon and paste the URL. Google will use that image to run your image search.
How to Search an Online Photo with Google Images (Reverse Search):
Right-click on a PC (Control Click on a Mac) on the image on the web page.
In the pop-up menu select Copy Image Address.
Go to Google Images.
Click the camera icon in the search field.
Paste the image URL that you copied to your computer clipboard (on a PC use Control V on your keyboard.)
Click the Search by Image button to run your search.
Searching with your own image or an image you find online can help you discover many more website that have the visual content you need. In this episode I searched using an Elevenses with Lisa viewer’s old photo and revised the search with the name of the town. This resulted in a wonderful assortment of websites to look at that also hosted photos from the same town and timeframe.
The initial Google Image results added the keyword gentleman to the search field. But you can see by the visually similar images it found that it was able to target photos that included more similarities than just gentleman. These photos also matched in other important ways (Image 8):
House
Porch
Multiple People
White dress
Old photo
(Image 8)
Who might have photos online of your family? Here’s just a short list of possibilities:
Archives
Libraries
Historical Societies
Newspapers
Genealogy Websites
Cousins
Social Media
How to Use Google Image Search on Mobile
The Google Images camera icon allows you to conduct reverse image searches. However, whether you use a browser app like Safari or Chrome to go to Google Images or you use the Google search app, you won’t find the Google Images camera icon in the search field. Google Images is different on mobile than it is on computer desktop. The main difference is that there is no camera icon for uploading images to search. However, there’s a little secret for getting around that problem.
On an iPhone / iPad you can switch your settings for the Safari app so that it behaves more like a desktop computer. And for our purposes, that means getting the camera icon in Google Images.
How to Search Your Own Image Using Google Images on an iPhone or iPad
Open the Settings app
Scroll down and tap the Safari app
Scroll down and tap Request Desktop Website
Tap the slide to activate All Websites
Close the Settings app
Open Safari
Go to Google.com – if you’re signed into your account you can tap the apps icon (9 dots) and open Images or just google Google Images
Now you have the camera icon in your search bar ready to reverse search images!
How to Reverse Search a Web Image on an iPhone or iPad (Reverse Search Images)
When you find a photograph on a website in Safari, press and hold the image
Tap Copy
Go to Google Images (after changing your settings to Desktop Website)
Tap the camera icon
In the Paste URL field press and hold and tap Paste
The web image URL will appear in the search field.
Tap the Search by Image button to run your search.
Not sure how to use microfilm or microfiche readers? Watch these quick video tutorials before your next trip to the library!
Recently I heard from a Genealogy Gems Premium member who is digging in deep to her family history. But she confessed that she left the Oklahoma Historical Center in Oklahoma City “in tears because I really didn’t know what I was doing” with the microfiche machine and with microfilms.
I totally understand. Microfilm and fiche readers are not my favorite part of genealogy research, either. But despite the wealth of digitized records that continue to appear online, microfilm is going to be around for a while! FamilySearch and other publishers of microfilmed data (like state archives) do not have copyright permissions to digitize all their microfilmed materials. Even if they can get it, it’s going to take a long time to make that happen.
Meanwhile, we will continue to need microfilm and microfiche readers!
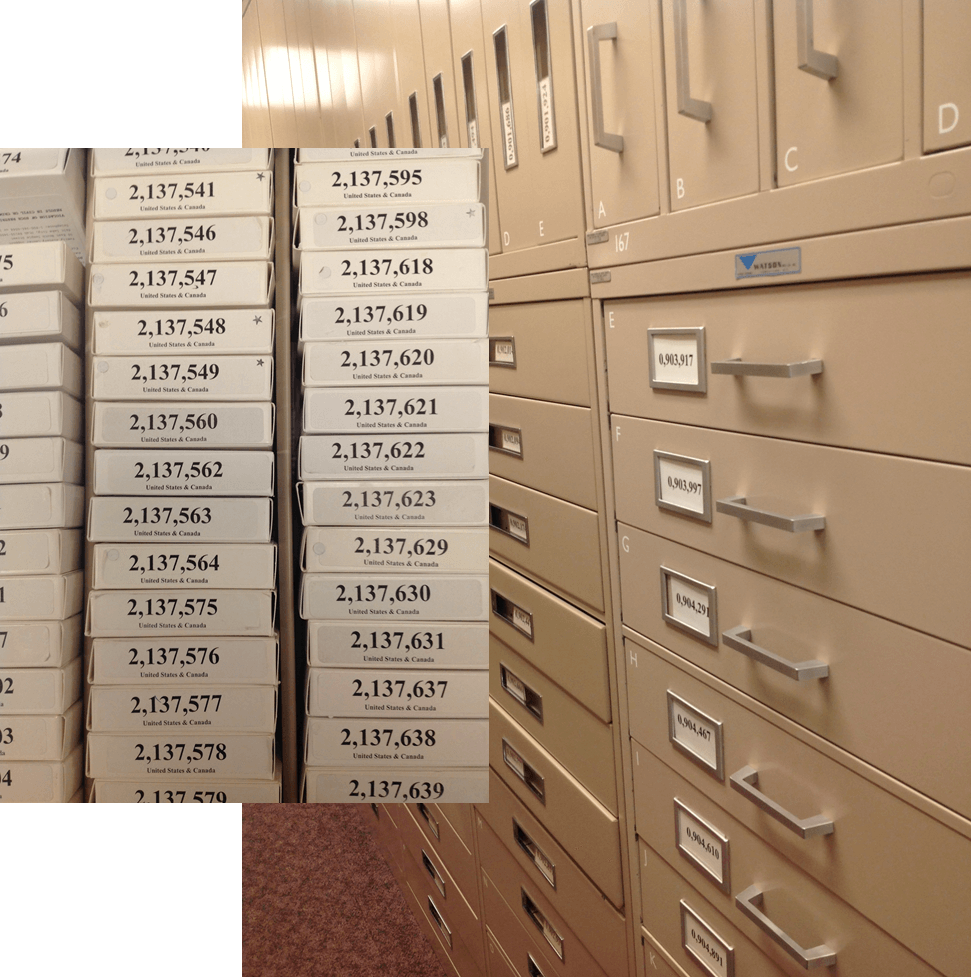
Microfilm is a long reel of film (up to 125 feet, I’ve heard) that are essentially page-by-page photos of a document collection, book, newspaper, etc.
Microfiche is a single sheet of film (about 4″ x 6″) that contains the same, only shrunk down so small you need a magnified reader to make sense of it.
These were standard technologies for duplicating records in the pre-digital era. The Family History Library in Salt Lake City alone has over 2.4 million rolls of microfilm. Yes, that’s million! (And yes, they will lend them out to a Family History Center or FamilySearch Library near you.)
To access these fantastic films and fiches, you will need to use microfilm readers and microfiche readers. It’s easy to walk into the library and think everyone knows how to use them but you. But that’s not true. In fact, every single genealogist has had to face their first encounter with a reader. Don’t be shy about asking politely for a tutorial (and help when you do it wrong and something gets stuck). And don’t be shy about watching these tutorials on YouTube before you go to the library again:


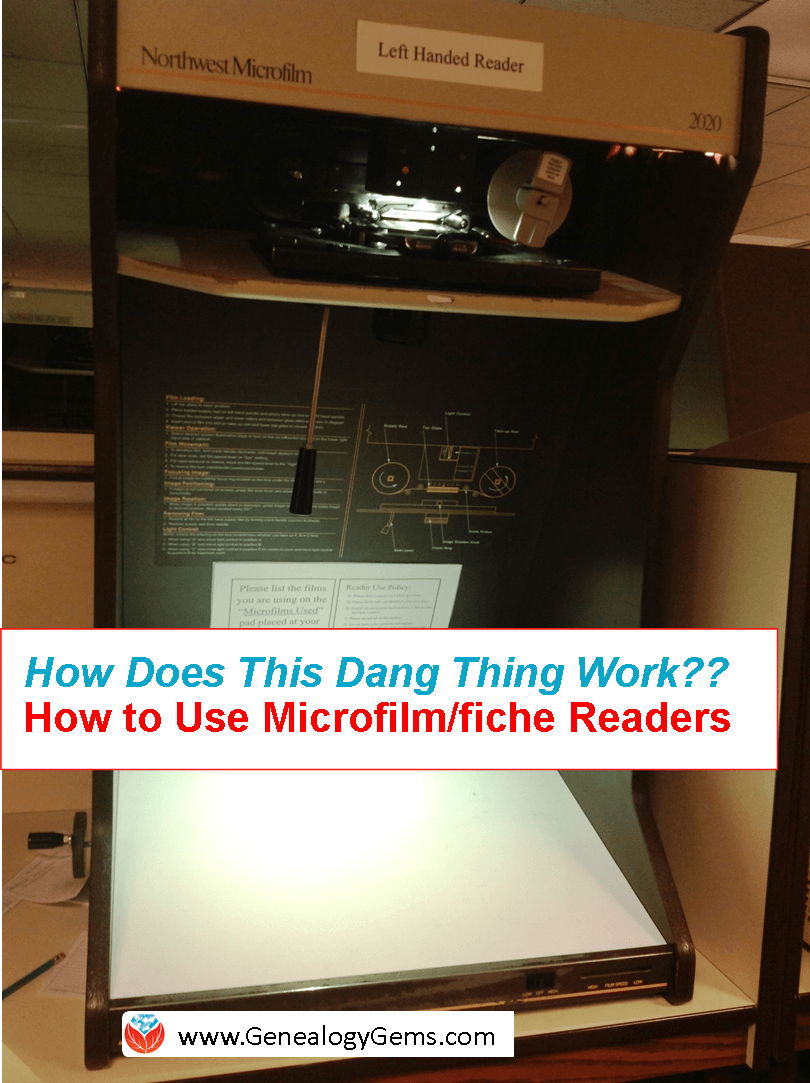 Not sure how to use microfilm or microfiche readers? Watch these quick video tutorials before your next trip to the library!