by Lisa Cooke | Jun 5, 2015 | 01 What's New, Records & databases
Every Friday, we blog about new genealogy records online. Do the collections below include your ancestor? Don’t forget: tomorrow is Lisa Louise Cooke’s FREE live streaming class on using Google Tools to Solve Family Mysteries–use them to find more records like these! (Details below.)
This week: Irish newspapers, London electoral registers, Ohio naturalizations and Virginia vital records (through 2014!).
IRISH NEWSPAPERS. Subscribers at FindMyPast can now access over a million new Irish newspaper articles. These eight papers have updates: Cork Examiner, 1841-1896, Derry Journal, 1825-1950; Freeman’s Journal, 1820-1900; Roscommon Journal and Western Impartial Reporter, 1828-1864; Saunder’s News-Letter, 1773-1864; Ulster Gazette, 1844-1871; Waterford Chronicle, 1827-1870 and Waterford Mail, 1824-1870.
LONDON ELECTORAL RECORDS. Nearly 3 million indexed records have been added to the free England, London Electoral Registers, 1847–1913 database at FamilySearch.org. The overall collection contains more than 660,000 digital images of electoral registers filmed at the London Metropolitan Archives.
OHIO NATURALIZATIONS. Over 80,000 indexed names have been added to the US, Ohio, Southern District Naturalization Index, 1852–1991. This database covers a prime migration route: north of the Ohio River (records include courts at Cincinnati, Dayton, Columbus and Steubenville). The index points toward records that can traditionally be tough to find because people could naturalize at any court.
VIRGINIA VITAL RECORDS. Ancestry subscribers can now access these new databases: Virginia, Divorce Records, 1918-2014, Virginia, Death Records, 1912-2014, Virginia, Marriage Records, 1936-2014 and Virginia, Birth Records, 1864-2014. These records–available through 2014–come from the Virginia Department of Health.
 Here’s a tip: Harness Google’s power to search for specific record sets in which your family may appear. Watch Lisa’s free live streaming class TOMORROW, June 6, “Google Tools and Procedures for Solving Family History Mysteries.” Click here for details. Can’t watch tomorrow? You can still register to watch the class in the SCGJ archive through July 5.
by Lisa Cooke | Apr 29, 2015 | 01 What's New, images, Listeners & Readers, Newspaper, Records & databases, Technology, United States, Volunteer
 Recently we received this inspiring story from Brian Zalewski, a longtime Genealogy Gems podcast listener. He found a valuable genealogy resource and made it easier for others to access. Thank you, Brian!
“Over the years I’ve spent a lot of time looking for death listings in the archive of The Milwaukee Journal on Google News. These entries are usually so small (or too bad of quality) that they don’t get picked up by the character-recognition software….This means you can’t search for [ancestors’ names in them via OCR]. Also, depending on the date of the paper, the death may be recorded in a normal obituary, a full article (like my great-great grandfather, fortunately), a tiny single-line burial permit, or a small death notice.
“I decided to start recording all of the deaths I can find. I try to note the date, individual’s name, paper, type of record, age, and address. So far, I’ve recorded over 1000 entries (some duplicates due to similar entries on multiple days), mainly from the years of 1884, 1885 and 1910.
“The benefit of doing this is two-fold. This data will be recorded and searchable for everyone, and I will probably find information on my family somewhere. Also, who knows how long Google will keep the archives online. These papers are available elsewhere on microfilm, etc, but I’ll do what I can when I can.
“I have also spent some time adding a few helpful features. Within the details of a death entry, you can automatically search for the individual in a few burial index sites. Currently, this includes the Archdiocese of Milwaukee Catholic Cemeteries burial index, Find-A-Grave, and BillionGraves. The search, while helpful, is not perfect. I can only search using the information included in the entry. Sometimes this does not work if the name is spelled differently in both places, though you can always tweak the search variables once you’re at the indexing site. If I happened to find a matching entry from one of those sites, that URL is now linked directly from the entry. The entry will also be flagged with the little headstone icon.
“Currently, it’s not a massive database, but it’s constantly growing. Hopefully it will be helpful to somebody with research in the Milwaukee, Wisconsin area.” Click here to search his database of Milwaukee Journal obituaries.
Want to learn more about searching for obituaries in newspapers? Click to read the blog posts below:
by Lisa Cooke | Apr 3, 2015 | 01 What's New, African-American, Ancestry, Australian, British, Canadian, Cemeteries, FamilySearch, Findmypast, Military, Records & databases, United States
Each Friday we share a list of selected new genealogy records online. Watch for records in which your ancestors might appear–and get inspired by the  kinds of records that may be out there waiting for you to discover. This week: Australian cemetery records, British military officer deaths, various U.S. passenger lists and North Carolina marriage records.
AUSTRALIAN CEMETERY RECORDS. Two million indexed records have been added to the free Australia, Queensland Cemetery Records, 1802–1990 dataset at FamilySearch.org. According to the site, “The records include an index which combines several other indexes, cemetery transcriptions, burial and other records from cemeteries in Queensland….Cemetery records are especially helpful for identifying ancestors who were not recorded in other records, such as children who died young or women. They may also give clues to finding more information. In Australia, the first cemetery is reported to have been in Sydney in 1788.”
BRITISH MILITARY OFFICER DEATHS. FindMyPast’s new dataset, Royal Artillery Officer Deaths 1850-2011, lists the details of over 17,000 commissioned officers who were killed or died during the campaigns in Kosovo, Bosnia, Borneo and Iraq as well as the First and Second World Wars. It is estimated that since the regiment’s formation in May 1716, over 2.5 million men and women have served with the regiment. Each record includes a transcript of details found in the original records.
US PASSENGER LISTS. Browsable images were added to several existing US immigration records. Click here (and then scroll down) to view a table that has links directly to these datasets:
- For San Diego, CA:Airplane Passenger and Crew Lists, 1929–1954 and an apparently segregated Chinese Passenger and Crew Lists, 1905–1923;
- San Francisco, CA Passenger Lists, 1893–1953;
- Key West, FL Passenger Lists, 1898-1945;
- Minnesota Passenger Lists, 1910-1923;
- New York City, NY Passenger and Crew Lists Soundex (meaning an index based on how a name sounds), 1887-1921; (this is actually a new image collection)
- North Dakota Manifests of Immigrant Arrivals, 1910-1952 (this is also new).
NORTH CAROLINA (US) COUNTY MARRIAGES, 1741-2011. This new dataset on Ancestry “includes images of marriage bonds, licenses, certificates, and registers from 87 different counties.” According to an Ancestry blog post, some marriages have multiple records in this collection, like a bond and an indexed marriage record. This record set may be particularly useful for those tracing African-American marriages, as they “reference the joining of couples living as man and wife dating back to 1820, and possibly earlier…. Sometimes they also include the names of their former owners.” There’s a free, similar-looking dataset at FamilySearch, but the dates aren’t as extensive (it covers 1762-1979).
 Tip: When searching within record sets like these, read the record collection description! Sometimes you are just seeing a partial collection that is being updated on an ongoing basis. Some years or locales may be missing from an otherwise complete record set.
When you have questions that aren’t answered in the record collection description online, Google them! Use keywords like the type of record (“marriage records”) and the missing locale (“Burdett County”) to see whether other sites can lead you to these records or confirm that they don’t exist. Learn more about advanced Google searching for genealogy in the fully-updated 2nd edition of The Genealogist’s Google Toolbox by Lisa Louise Cooke.
by Lisa Cooke | Jan 27, 2015 | 01 What's New, History, Kids, School Records
In years past, a five-hour graduation exam was required for eighth graders (around 13 years old) in many U.S. states. It made me wonder: are questions they asked still relevant today? How well would we score? Are we smarter than an 8th grader from 120 years ago?
A copy of an 1895 graduation exam from Kansas has become famous since being circulated online. We tracked down the original exam at the Smoky Valley Genealogical Society in Salina, Kansas.
Here’s the Geography part of the exam, which took an hour (taken from a transcription at the above website):
1. What is climate? Upon what does climate depend?
2. How do you account for the extremes of climate in Kansas?
3. Of what use are rivers? Of what use is the ocean?
4. Describe the mountains of N.A. [presumably North America]
5. Name and describe the following: Monrovia, Odessa, Denver, Manitoba, Hecla, Yukon, St. Helena, Juan Fernandez, Aspinwall, and Orinoco.
6. Name and locate the principal trade centers of the U.S.
7. Name all the republics of Europe and give capital of each.
8. Why is the Atlantic Coast colder than the Pacific in the same latitude?
9. Describe the process by which the water of the ocean returns to the sources of rivers.
10. Describe the movements of the earth. Give inclination of the earth.
The Smoky Valley Genealogical Society has posted a copy of the original exam, along with links to the answers, at the above link. Their site also comments, “Many people forget that Kansas is an agricultural state. 8th grade was as far as many children went in school at that time. It was unusual for children to attend either a high school or a normal school because they were needed on the family farms.”
Wonder how each of our forebears would do on it? Consider following up on an ancestor’s level of education (like from a census entry) by finding a copy of a textbook, exam or another document showing the kinds of things they would have learned? The free Google Books is a great place to start! I devote an entire chapter to Google Books in the brand new Second Edition of my book The Genealogist’s Google Toolbox.
Learn more about researching your ancestor’s education here at Genealogy Gems:
Genealogy Gems Premium Podcast Episode 98 answers a listener’s question about finding Yearbooks. Sign in to your membership to listen, or become a member today.
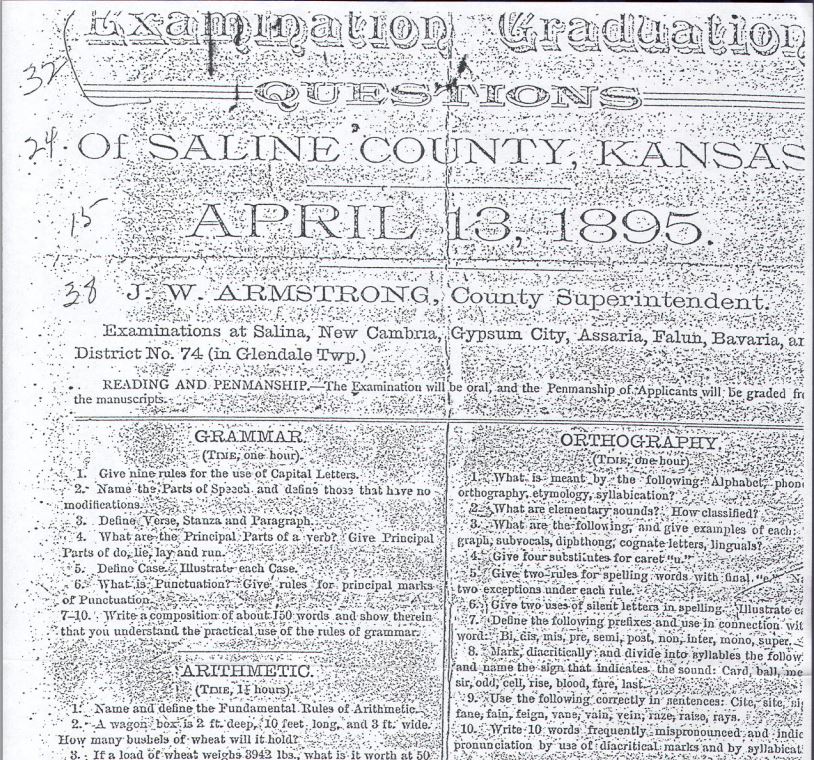
Image taken from exam posted by the Smoky Valley Genealogical Society, Salina, KS, http://www.rootsweb.ancestry.com/~kssvgs/school/exam1895/8th_exam_orig.pdf.
You’ll never look at “8th Grade Education” in a genealogical document the same way again!
by Lisa Cooke | Apr 25, 2019 | 01 What's New, Findmypast, Trees
Findmypast, the leader in British online genealogy, is catching up in the area of family trees. Findmypast has 18 million registered users across its family of brands, which include: Findmypast Genes Reunited The British Newspaper Archive Twile These users have...