Genealogy Gems Podcast Episode 251
Free Online Records at the Allen County Public Library Genealogy Center
If you’re looking for a wide array of free online genealogical records for your family history, look no further than then Allen County Public Library’s Genealogy Center in Fort Wayne, Indiana. It’s the second largest genealogy library in the country. In addition to the in-house collection, the Genealogy Center offers a vast amount of free digitized resources through their website and partnerships with other websites.
I invited Allison Singleton, Senior Librarian at the Allen County Public Library Genealogy Center in Fort Wayne, Indiana to the show. She is taking us on a tour of the website and sharing her tips and strategies for finding genealogy gems.
To Listen click the media player below (AUDIO ONLY):
Genealogy Gems Premium Members Exclusive Download:
This audio from this episode comes from Elevenses with Lisa episode 31. Log into your membership and then click here to download the handy PDF show notes that compliment this podcast episode.
Become a Genealogy Gems Premium Member
Premium Members have exclusive access to:
- Video classes and downloadable handouts
- The Genealogy Gems Premium Podcast
- Elevenses with Lisa downloadable show notes PDF
Become a member here.

Genealogy Gems Podcast App
Don’t miss the Bonus audio for this episode. In the app, tap the gift box icon just under the media player. Get the app here.
Get the Free Genealogy Gems Newsletter
The Genealogy Gems email newsletter is the best way to stay informed about what’s available with your Premium eLearning Membership. Sign up today here.
Get Unlimited Photo Enhancement and Colorization at MyHeritage
Get genealogy records and unlimited Enhanced and Colorized photos as a MyHeritage PremiumPlus or Complete Plan Subscriber. Click here to start a free trial.
MyHeritage.com is the place to make connections with relatives overseas, particularly with those who may still live in your ancestral homeland.
Follow Lisa and Genealogy Gems on Social Media:
- Instagram.com/genealogygemspodcast
- Facebook.com/genealogygems
- Pinterest.com/lisalouisecooke
- YouTube.com/GenealogyGems
Podcast Resources
Download the episode mp3
Show Notes: The audio in this episode comes from Elevenses with Lisa Episode 31. Visit the show notes page here.
Episode 71 – Genealogy Organization and Work Flow that WORKS!
When you’re working on our genealogy, you’ve got data and records coming from all directions: websites, interviews, archives, downloadable documents, and more. Some of it you’re actively working on, some of it you need to save for later, and the rest has already been analyzed and is ready for archiving. This variety of data requires a variety of storage locations.
Watch episode 71
In this week’s special episode of Elevenses with Lisa (episode 71) I’m going to share with you my genealogy data workflow. We’ll talk about how it all fits together to ensure an uncluttered desk and the ability to instantly put my hands on what I need when I need it. If that sounds like something that you need help with, please join me this week.
Watch Live: Thursday, September 16, 2021 at 11:00 am CT
(calculate your time zone)
Three ways to watch:
1. Video Player (Live) – Watch live at the appointed time in the video player above.
2. On YouTube (Live) – Click the Watch on YouTube button to watch live at the appointed time at the Genealogy Gems YouTube channel. Log into YouTube with your free Google account to participate in the live chat.
3. Video Player above (Replay) – Available immediately after the live premiere and chat.
Episode 71 Show Notes
Barbara left a comment saying she found our recent videos that we called How Alice the Genealogist Avoids the Rabbit Hole helpful (episode 68 and episode 69), but she did had a question about Evernote. She asks, “Once you have processed (the genealogy record) and extracted the information you need, do you remove them from Evernote and place them in your digital genealogy filing system? I get a bit confused in thinking about what the other purposes of Evernote might be. Wouldn’t I just save my documents, newspaper clippings, etc. to my digital files on the hard drive and also to my Google Drive folders? Is there any need to also have them in Evernote?”
This is a great question, and I think the best way to answer it is to talk about my entire genealogy workflow in which programs like Evernote play a part.
It really helps to have a consistent way to capture and find what you’re actively working on. My workflow works great for me, but its just one way. Follow along with me and see if this might be a flow that will work for you.
The Genealogy Data Flow
Let’s start off with an overview of my workflow. And there are really 5 major workstations, if you will, that your data flows through. Some of these we’ve discussed previously here and also in several Premium Member videos:
- Active Genealogy Work
This is the stuff we are working on currently. I several different tools to capture and work on these items: Evernote, genealogy website subscriptions, “pending” folders on my computer, pending tabs in my 3 ring notebooks and physical pending box on my desk. We discussed this in Elevenses with Lisa episode 7. - Conclusions added to Master Genealogy Database (Software on your computer)
- Archival Digital Storage (your computer.) See episode 8 (Digital Archiving) You can certainly keep archival items in Evernote as well.
- Archival Paper Storage (your binders.) See episode 6 (Paper Archiving)
- Cloud backup. I use Backblaze at https://www.backblaze.com/lisa (affiliate link – thank you for your support of our free content)
Incoming Genealogy Sources
Not everything I find while researching is ready to be archived the moment I find it. Some items are actively being found and worked with such as:
- Items I’m exploring for the potential application to my current research project
- Items pending analysis
- Unproven items
- Items playing a role in a bigger research question that I want all together for now.
- Bright Shiny Objects (BSOs) – stuff I found along the way that doesn’t relate to my current research goals
Not everything is captured on my computer. Many items (photos, audio and video records, typed notes) are captured on my phone and my iPad. So, I need an easy way to funnel everything back to one active workspace. A cloud-based notetaking service allows me to do this because it’s available as software on my computer and an app on my mobile devices. All synchronize through my account on the cloud. I use Evernote (affiliate link – thank you for your support of our free content) so I’ll refer to that, but there are others out there like OneNote, and Google Keep. (Learn more about how to user Evernote in episode 70.)
Evernote allows me to:
- Capture and hold items
- search and retrieve more effectively than on my computer thanks to OCR (subscription)
- work my genealogy research plan
- easily collaborate with another researcher by sharing a single link
- Store and share media such as audio and video recordings
OK, so does everything go straight into Evernote? The answer is no. So let’s take a look at what happens to a digital item when I get it. I’m going to call it data, but it could be a downloaded genealogy record, a web clipping from a website, a photo of a gravesite I took with my phone, or anything else that includes information I want to use.
Working Your Genealogy Research Plan
When we work our genealogy research plan, we will inevitably locate documents. Typically, these are digital, but sometimes we find a physical document and make a digital copy of it.
Before a digital item is deemed relevant and ready to archive, we have a lot of work to do. We need to evaluate and analyze the document to determine its value and its possible application to our family history. If deemed reliable and applicable, we then need to extract the data and enter it into our family tree software. We may also decide to add some or all of the information to other places such as our online tree if we have one.
Many times, all of this work can’t happen in one sitting. We may need to be able to review and work with the item several times before we’re finished with it. I call this “processing” the document.
Even after its processed, we may still need the item nearby for reference as we work our research plan in the hopes of reaching our goal. At this stage, I consider this item to be “Active.” The opposite of that would be items I consider to be “Archived.” An archived item has been fully utilized and is no longer playing an active role in my research plan. That’s not to say I may not need to reference it again in the future, which is why it must be archived where I can retrieve it. The point is that the item is not relevant to my current active research. For example, perhaps it pertains to my mother’s side of the family and right now I’m working on my father’s side of the family.
My active digital items are typically added to Evernote, which I consider to be my Active workspace. It is not my archival space. However, this is not to say that you can’t store everything in Evernote forever if that’s what you want to do. You certainly could. I’ve given this a lot of thought and there are a few reasons why I don’t store everything in Evernote.
The main reason I don’t store everything in Evernote is that I’m a firm believer in retaining control of my data. If we store everything on a website or in a cloud service (which Evernote is), they (or their hosting provider) could pull the plug tomorrow and it would all be gone. I certainly don’t think that would happen overnight, although there are real cases of that happening. But I don’t want to take the risk, and I don’t want to have to scramble in a panic to move a mountain of data because I’ve been given a 30 day notice that a service is ending or has been sold to another company. (And let’s not even think about the possibility that the email notification of that happening went to my Spam folder!)
In order to retain control of my family history data, my long-term data storage needs to be within my control: my computer, external hard drives (both backed up with Backblaze) and paper print outs. That being said, when it comes to my active research project, I’m willing to trade the risk for the speed and convenience of using an online tool or service such as Evernote. My active research is a small fraction of my total research, most of which has been archived on my computer.
So, when I first find an item, I have a decision to make: where am I going to put it? Will I save it to my computer or to Evernote? It depends on what it is.
Items I save to Evernote:
- Items needing OCR to be most useful. Examples: Newspaper articles, web clippings
- Items created with my phone or tablet. Examples: Photos of gravesites and documents, interview audio recordings, videos of research trips
- Items needing analysis before confirmed as pertaining to my family. Examples: Record downloaded from a genealogy website. I want these in Evernote because everything is together in one place. Tags and the search feature allow me to instantly retrieve any combination of records I need at any given time for cross reference. And if I need to share any or all of the items with another researcher it’s easy to do with just one share link. A cloud notetaking service make working your research plan much easier. (Premium Members watch my video class Collaborative Genealogy with Evernote.
- Example: Items pertains to my family but not part of my current research project.
- Downloaded genealogy records I don’t have time to process right now.
All items are tagged with relevant information to make them quick and easy to find in addition to keyword searching.
Items I save to my computer hard drive:
- Items to I want to keep that have been processed.
- Digital scans of visual items. Examples: Family Photos, old postcards
- Large files created on my computer (audio, video).
I have a solid system for organizing my folders and file on my computer so it’s quick and easy to find them. If you’re a Premium Member you can watch my step-by-step classes on how to set that up for yourself on my website GenealogyGems.com.
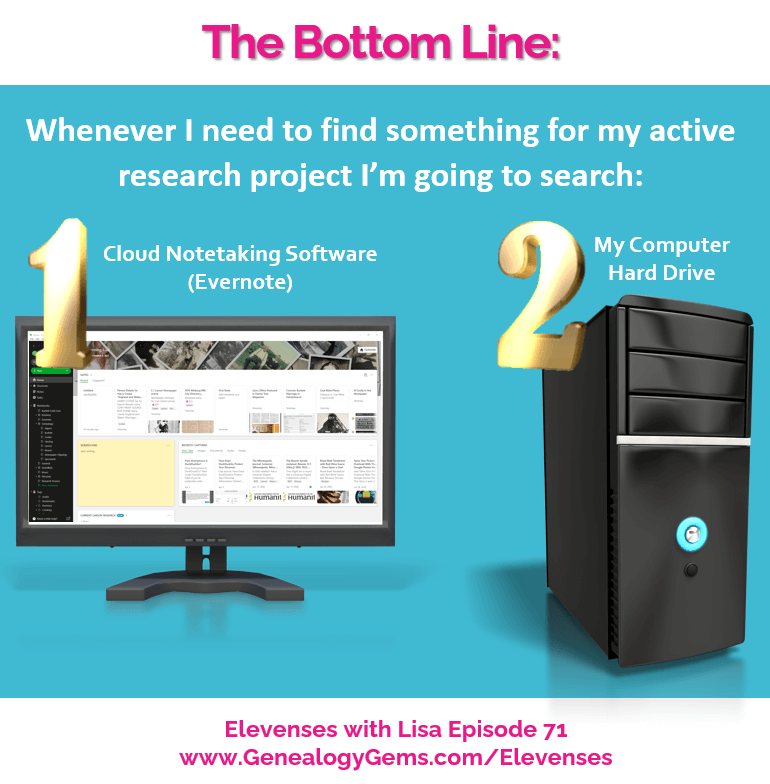
The bottom line is that whenever I need to find something for my active research project I’m going to search my notetaking service first, and then my computer hard drive.
Archiving Processed Items
Once I reach my research goal and I’m done actively using those sources, I’m ready to archive them. I could just leave everything in Evernote, but I want to make sure that all genealogical documents that I referenced as a source in my master database, are archived on my computer for long-term storage that I control, and that is being automatically backed up.
An important thing to understand about Evernote is that you can’t just download everything with one click in its original file format. However, you can save individual digitized items in your note, such as genealogical records, to your hard drive. Since there is no lifetime storage limit, I leave the note intact in Evernote, and I save the image to my computer hard drive. Save the image by right-clicking on it (in Windows, & I think it is Command click on a Mac) select Save As and save it to the appropriate archival folder. I do this at the end of the research project. Now you may feel like your “research project” never ends! But I’m referring to a genealogy research plan.
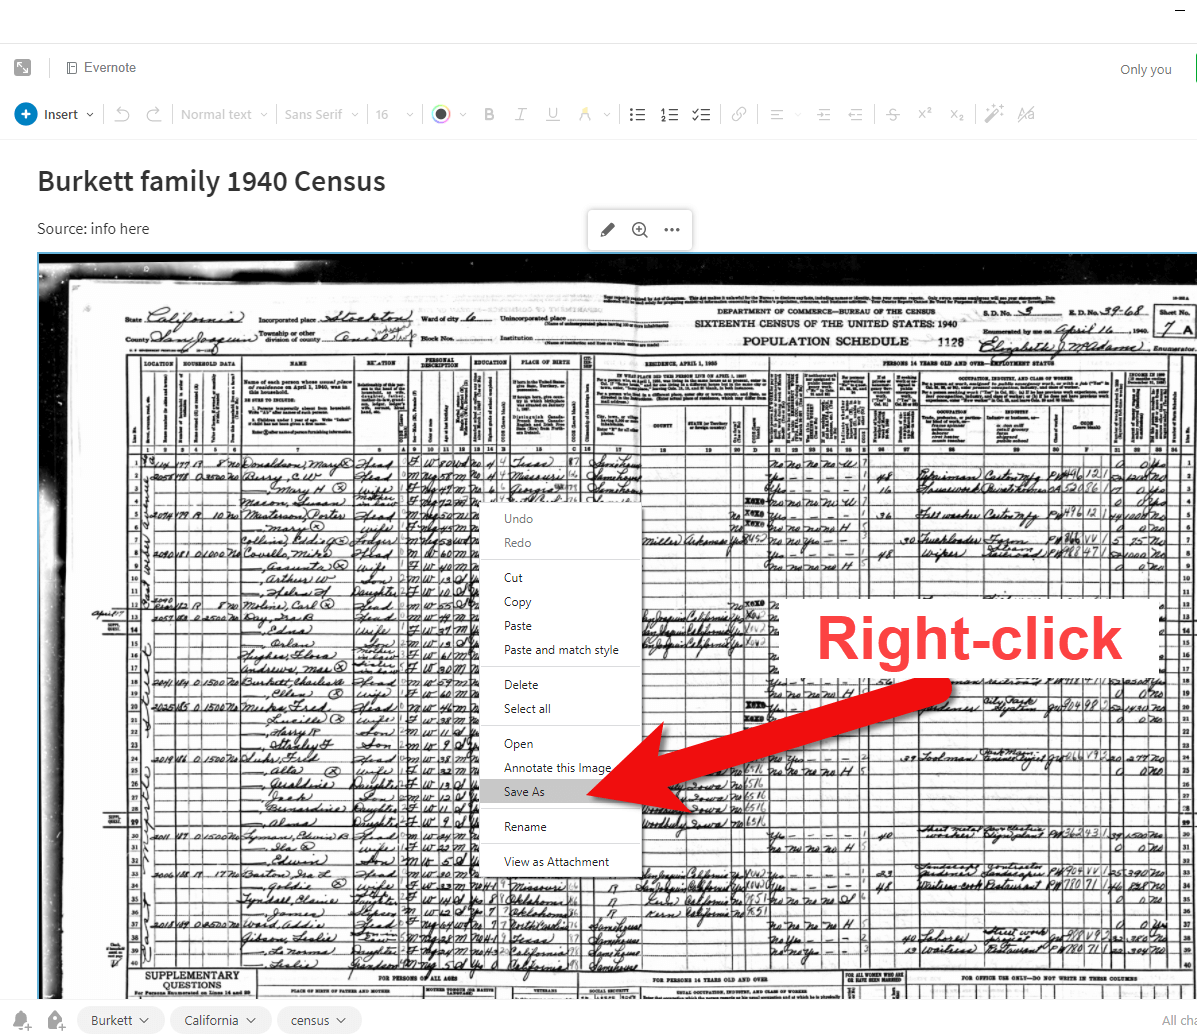
How to save a document image to your hard drive from Evernote.
You can learn how to create one in Evernote by watching my Premium video class Using Evernote to Create a Research Plan. (Premium membership required.) Of course, after I’ve answered my research question I quickly develop the next one and build a plan around it. So, you’re right, it never actually ends – thank goodness!
How Do I Find It Later?
My software database is the brain of my genealogy operations. I may have family tree information on various genealogy websites, on my computer, in Evernote and maybe even on my own family history website. But my database is the final word on what I have found and believe to be accurate. As I draw conclusions and add data to my family tree in my database, I cite my source. Therefore, everything I need to know about my tree is in one location I control on my own computer. If someone asks me a question about someone in my family tree, I can quickly look up the information and also see where I got it (the source).
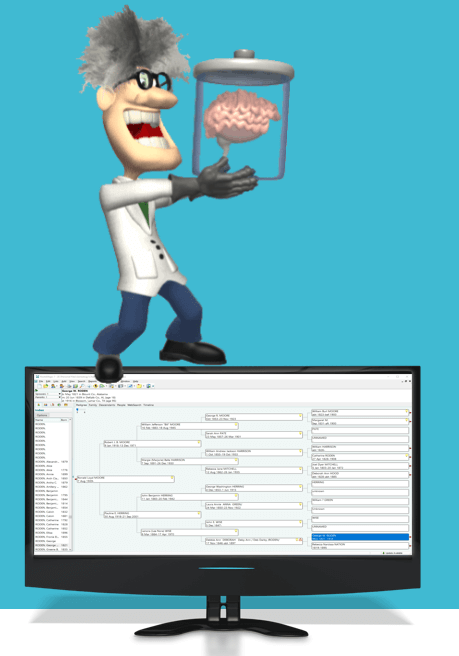
“Your genealogy database software is the brain of the organization.” Lisa Louise Cooke
When I want to refer back to one of those sources I would look in one of three places:
- My computer archival digital files (especially if it’s not part of my active research plan). This is easy to do because I know my folder system well, and it guides me. I’ve never lost anything yet!
- Evernote (particularly if the source is part of my current research plan.)
- The surname binder (if my citation tells me or I suspect it would be an archived piece of paper.)
Because I stick to my system, I usually instinctively know where to look. And because of they way each is set up, I can find things FAST!
Final Thoughts
Of course there are always exceptions to any rule, and there may be an item or situation that doesn’t fall perfectly neatly into a category or activity. Use your own best judgement on how to handle those. OCR search capability and great systems for digital and paper items will make it possible to find what you need when you need it. And most importantly, you’ll retain control over your family history legacy.
Be sure to share your Evernote credentials in a secure place and share them with a trusted relative so that the account can be passed on in the future. Learn more about protecting your legacy by watching my video class Saving Your Research from Destruction. (Premium membership required.)
Resources
Premium Members: download this exclusive ad-free show notes cheat sheet PDF.
Not a member yet? Learn more and join the Genealogy Gems and Elevenses with Lisa family here.
Genealogy Gems Premium Videos including:
- Organize Your Research with Evernote
- Making Evernote Effortless
- Using Evernote to Create a Research Plan
- Evernote: 10 Projects You Can Do
- Collaborative Genealogy with Evernote
Learn more with Lisa’s Premium Video Classes
Elevenses with Lisa Archive
You can find the Elevenses with Lisa Video Archive here or through the menu: Premium > Premium Videos > Elevenses with Lisa.
Free Newsletter and Bonus Gift
Please click here to sign up now if you haven’t already. You’ll receive a BONUS free eBook with your first email.
Solutions for Broken Website Links
Every genealogist has experienced the frustration of clicking on a link and discovering that the page is gone or the resource is now defunct. Things change rapidly as technology evolves, so it’s a problem that isn’t going away any time soon.
Genealogy Gems Podcast listeners often ask what to do when they run across a broken or defunct website in the show notes of older episodes of The Genealogy Gems Podcast. I’ve got answers for you today that can help you get back on track whenever this happens to you.
I received this email from a listener of the free Genealogy Gems Podcast, and it’s one I’ve received from lots of listeners and genealogists alike:
“As one of your podcast listeners who is working my way through past episodes, I am running into a bit of frustration that I am wondering if you, on someone else reading this, can help me on. I have tried to get to a couple of websites that guests of yours mentioned, with no success. (I’m listening to episodes from) 2010, where I am at now, (and that) may not be all that long ago for many, but it is an eon in internet terms.
Are you, or anybody else reading this, aware of any person or site tracking genealogy related websites that records/posts notations of name changes, buy-outs by other service providers, or just plain disappearances? You might have mentioned some in the interim, but I’m still a hundred episodes in arrears.”
That’s the wonderful thing about podcasts, you can listen when the episode is published or even a decade later. That’s because podcasts, unlike radio shows, are recordings that you can access whenever it’s convenient for you. But my listener is correct, things change quickly online, and that includes website links I refer to in the show notes web pages of older episodes.
How to Find Information When a Website has Disappeared
I love hearing that listeners are enjoying the free Genealogy Gems Podcast archive. We hear over and over that our listeners pick up something new each time they listen. However, I completely understand the frustration of encountering defunct websites and resources. What a bother they are!
Unfortunately with the speed at which online information changes, it’s just about as impossible to keep years of web content current (while still producing new content) as it is finding a genealogy record that burned in a courthouse fire!
The good news is that with a little persistence, you can probably locate where a source has moved to or find alternatives that may provide the same function. Paying attention to clues and details around the original source itself can lead you to alternatives that can accomplish the same goals or provide the same or similar information. And of course, tracking down information that’s gone missing is certainly a valuable skill in all areas of genealogy!
Here are a few great strategies to help you find information when a website has disappeared:
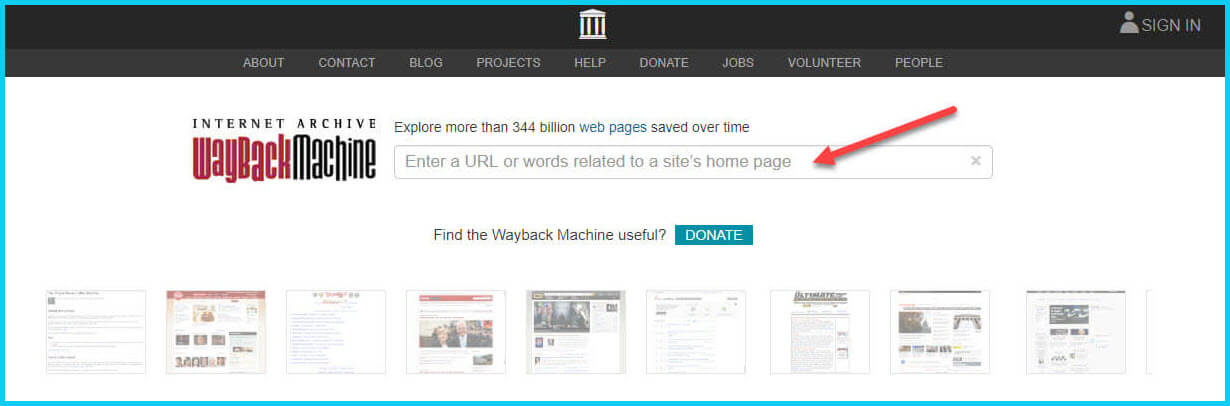
1. The Wayback Machine Can Find Defunct Sites
1) If you run across a link to a now defunct site, copy the website link. Next, go to the Internet Archive at https://web.archive.org and paste the web address that you copied into the Wayback Machine search field. Press enter on your keyboard to run the search on that address. You may very likely be able to retrieve a screenshot of the page.
If you’ve been researching your family history for several years, you’ll probably recognize the screenshot of World Vital Records (below) at the Wayback Machine.
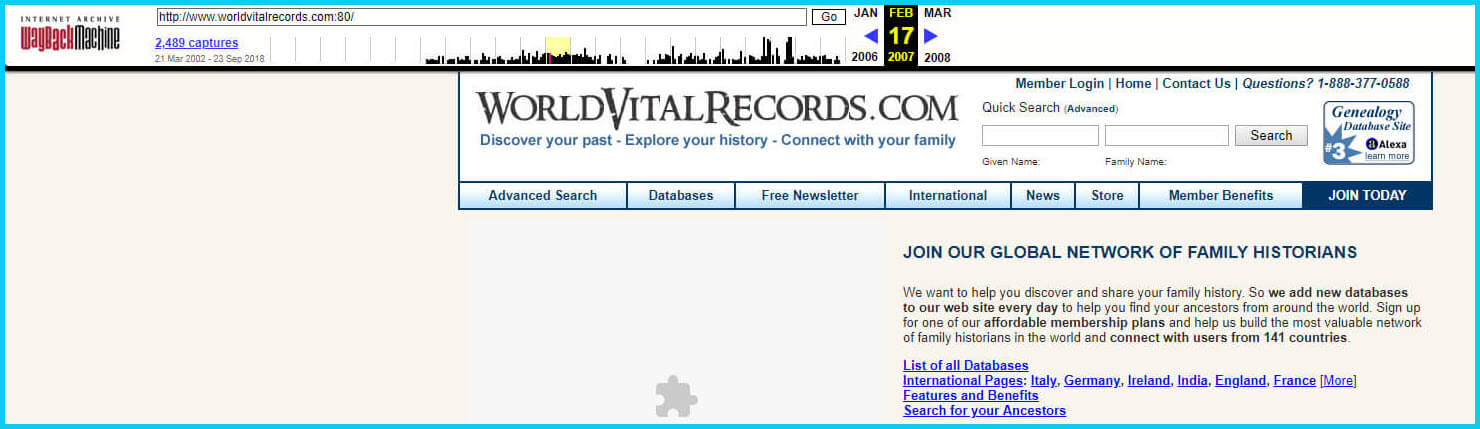
You may not gain access to everything that was there originally, but you’ll very likely glean clues that you can use to find the information you seek on another website using a Google search.
One of the features most recently added to the Wayback Machine is the Save Page Now tool. This helps you capture web pages and add them to the Wayback Machine at the time that you find them. That way, even if the site goes away, you’ll have a copy of the web page for future reference.
This tool works on any web page that allows “crawlers”, which most sites do. Crawlers are used by sites like Google and the Wayback Machine to index information and capture the pages.
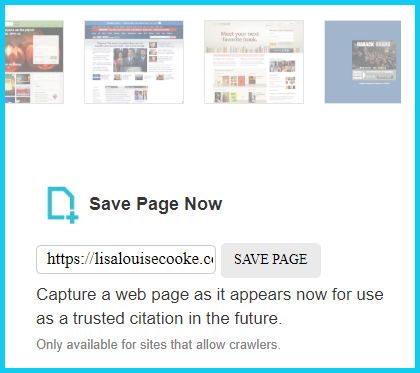
To save a web page using the Wayback Machine, copy the web page’s address and paste it into the Save Page Now field. It will bring up the page in your browser and show you that it’s being processed and will be added to the Wayback Machine.
The page will be conveniently stamped with the date that it was captured. This is helpful because even though websites may stay online for years to come, the content on their pages may be changed over time. By using the Save Page Now feature and adding the web page to the Wayback Machine, you will be able to revisit the information that was on that page on that specific date well into the future, regardless of changes that may be made to it over time.
2. Google Your Question
You’ve heard me say it many times: Just Google it! And that certainly applies here. Google is great at finding alternative sources for the same information. No question is a dumb question when it comes to Google.
If you are running into a challenge with a defunct site or have a question, chances are someone else has had the same question! It may have been posted on a message forum, a blog post or the help section of a website. Google can help you find the question and the answers that were provided.
Let’s say you come across a link to the World Vital Records website in the syllabus of a class you took several years ago. (If you’ve been researching your family history for a while, then you probably remember this genealogy records website.) And imagine that when you type the link into your web browser, you discover that the link is broken and the website no longer exists.
Here’s an example of what you could ask Google in order to find out what has happened to the World Vital Records website:
- When did world vital records close?
- Sunset notice for World Vital Records
- Who acquired World Vital Records?
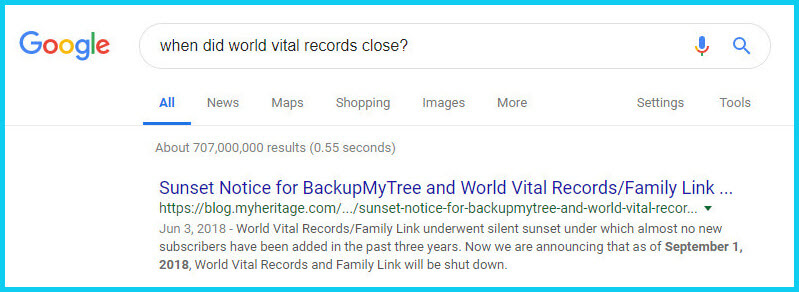
As you can see in the example search in the image above, the sunset notice for World Vital Records, which was acquired by MyHeritage, was issued in September of 2018. Click the link to the article to read up on all the details.
When faced with a broken link your first impulse may be to ask another person or someone you see as an expert on the subject. That can work too, but chances are they may just ask you “did you Google it?” That’s because, like it or not, Googling at the moment you have the question is much faster and provides you with the latest information.
Think of Google as asking your question to every single web page in the world – all at once. If the answer is out there, Google can probably find it.
3. Google the Content
As I said, the internet is growing and changing every day and it is very possible you may find the content is now available elsewhere.
Any good source that provides website URLs will usually include information about what you’ll find on that website. You can use that information to run a Google search. Your goal is to determine if the information you seek is available elsewhere from the same provider, or identify another website that references the same content.
Start by copying short phrases of key information and pasting it into the Google search box. Put quotation marks around the text. Quotation marks are a standard Google search operator and they will tell Google to search for web pages that include that exact phrase, sentence or paragraph. (Quotation marks also work on individual words such as surnames.) If you don’t get an exact search result, remove the quotation marks and place them just around the most important individual key words.
Here’s an example of how this works:
In Genealogy Gems Podcast episode 62 (published back in 2009) I talked with actor Darby Hinton about a new history-themed television series he was producing called Hintons Living History. The show notes include a link to the website devoted to the show. Clicking that link leads to an error page because the website has since been taken down. (For website publishers like myself, we are often faced with the decision between creating new content, or constantly combing through old published content to fix what is out of date. I think you will agree that continuing to create new content is preferable.)
Since the link no longer works, a Google search of the name of the television show in quotation marks (“Hintons Living History”) provides a plethora of information and videos to learn more about the show.
Obvious, But Not Always
While the solutions I’ve shared here may seem somewhat obvious, time and time again I’ve watched people get befuddled by running into broken genealogy website links. It’s totally understandable. In the excitement of the moment of finding something interesting, getting stopped in your tracks by a broken links creates frustration. Our brains tend to focus on that obstacle and frustration rather than the simple solutions that are available.
Now you have a game plan that you can use so that broken links will only be a blip on your genealogical research path.
This article was originally written in January 2019, and extensively updated August 6, 2019. Can you find the old version on the Wayback Machine?
 About the Author: Lisa Louise Cooke
Lisa is the Producer and Host of the Genealogy Gems Podcast, an online genealogy audio show and app. She is the author of the books The Genealogist’s Google Toolbox, Mobile Genealogy, How to Find Your Family History in Newspapers, and the Google Earth for Genealogy video series, an international keynote speaker, and columnist for Family Tree Magazine.
How to Find and Browse Unindexed Records at Ancestry – The Better Browsing Checklist
Browse-only collections at Ancestry and other genealogy websites are sometimes viewed as inaccessible, but they are actually a hidden treasure. Learn how to access these browse-only collections at Ancestry and expand your family history research.

In the past we’ve written about how to access browse-only content at FamilySearch.org. Many readers said it opened a whole new world of genealogy records to them that they didn’t know they were missing.
The good news is that FamilySearch is not alone in offering browse-only content. Ancestry.com also has browse-only collections of digitized records. (Not an Ancestry.com subscriber yet? Click here to learn more. This is an affiliate link and we are compensated if you make a purchase, which supports this free blog. Thank you!)
Knowing how to search and browse records effectively is critical because you shouldn’t just rely on hints. Ancestry, for example, only provides hints from about the top 10% of their most popular databases. That means if you only spend time on reviewing hints, you’re missing a massive amount of genealogical information available in all of the other records.
Typically you’ll be using the search feature to find those other records. However not all records are searchable. That’s because after the long process of acquiring the rights to digitize and publish a genealogy record collection, it takes even longer to get them indexed for a variety of reasons. Thankfully, Ancestry doesn’t always make us wait to gain access to them until the indexing is complete.
The digital images are published without an index. This means they are not searchable by names and other keywords. Therefore, it can take some time to locate a record within one of these collections. But I think you’ll agree it’s more convenient to look through them from the comfort of your own home rather than renting microfilm or traveling to a far off location!
Here’s your checklist for better browsing.
HOW TO FIND BROWSE-ONLY RECORDS AT ANCESTRY
While Ancestry.com doesn’t make it quite as easy as FamilySearch to find browse-only or partially-indexed databases, it’s still very much worth the effort.
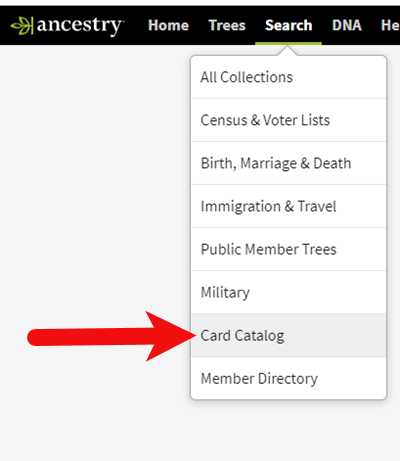
1. Head to the Card Catalog
From the main menu on the Ancestry website, select Search > Card Catalog.
2. Search and Filter
In the upper left corner you can search the catalog by title and / or keyword. However, if you know the type of record you are looking for, such as military records, the best place to start is filtering by that category. If the list is long, you can then search within that category by keywords.
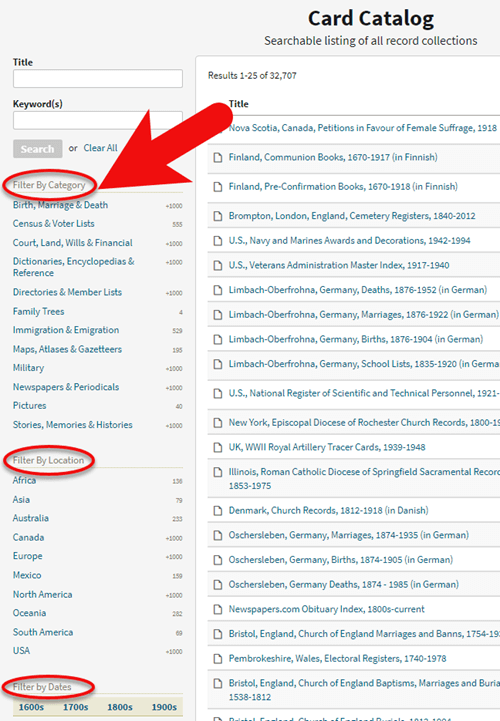
3. Determining if the Records are Searchable
If you don’t see a search box on the left side, then you can assume that this collection has not yet been indexed and therefore isn’t searchable by keywords and other data. Instead you will see typically see the source information box at the top.
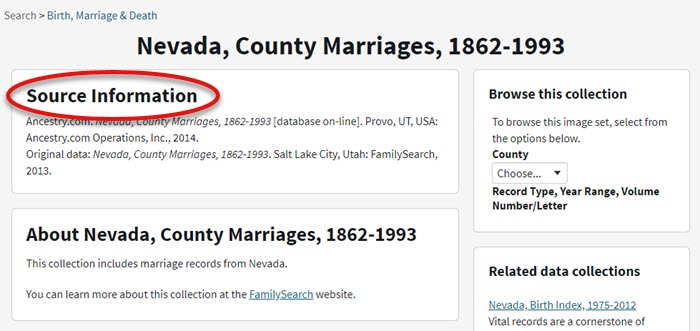
HOW TO FILTER BROWSE-ONLY GENEALOGY RECORDS
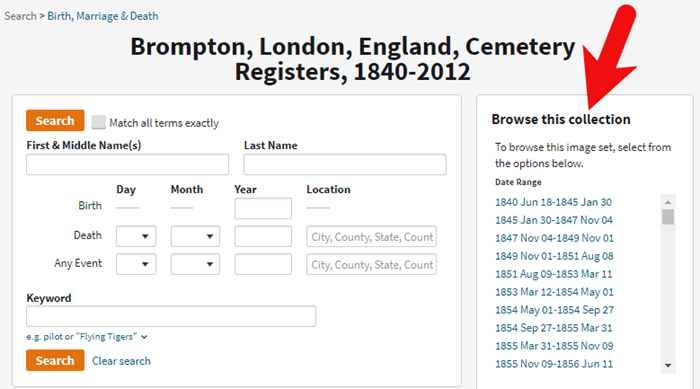
1. Browse This Collection Box
On the right side of the screen you will see a Browse this Collection box. The filtering options presented will depend on the way the collection is organized.
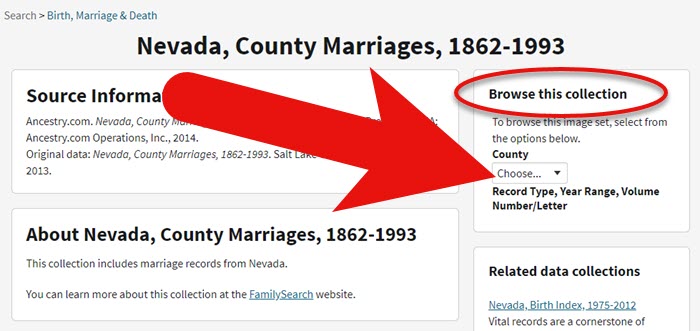
In the case of the Nevada County Marriage database, a drop down menu allows you to filter by county.
2. Make a Selection
As you can see in my example, once I selected a county I can also filter down by record books. So even though you can’t search names, you can often zero in on the portion of the collection most relevant to your search.
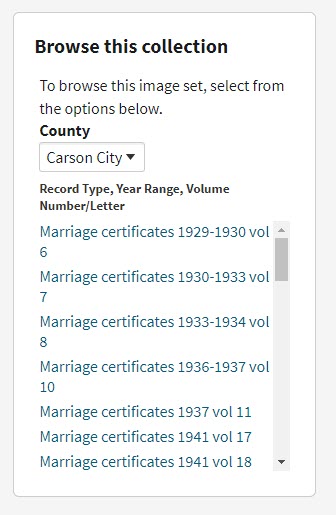
Browse this Collection box
HOW TO BROWSE RECORDS AT ANCESTRY.COM
Once you have selected the available filters, you’ll find yourself in the digitized records. They are displayed in a filmstrip layout which will come in quite handy for navigation through the pages.
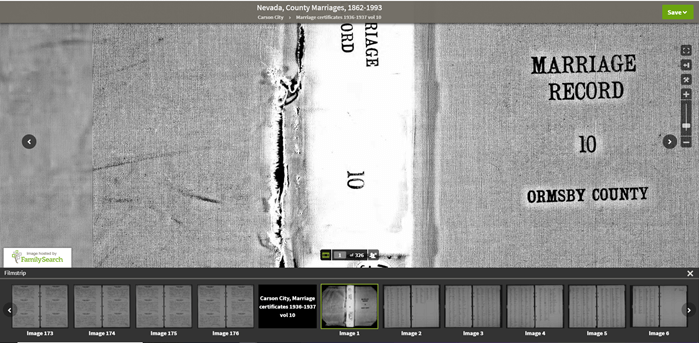
Navigation is crucial since we can’s search by names and keywords. Let’s take a closer look at the ways you can navigate:
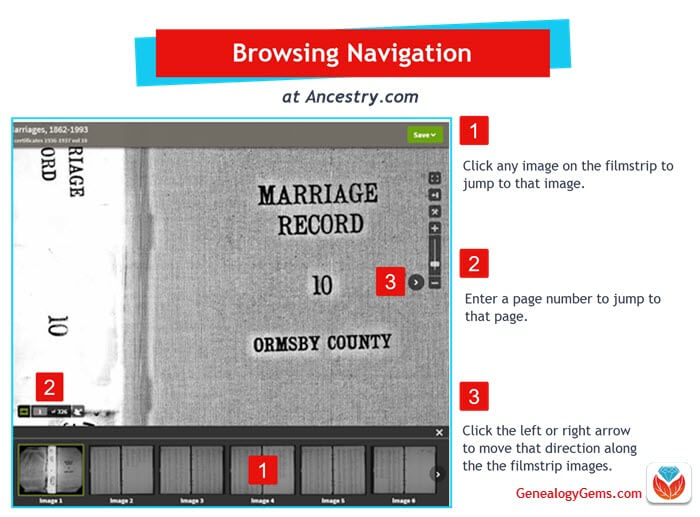
Browsing a digitized genealogy record collection at Ancestry.com
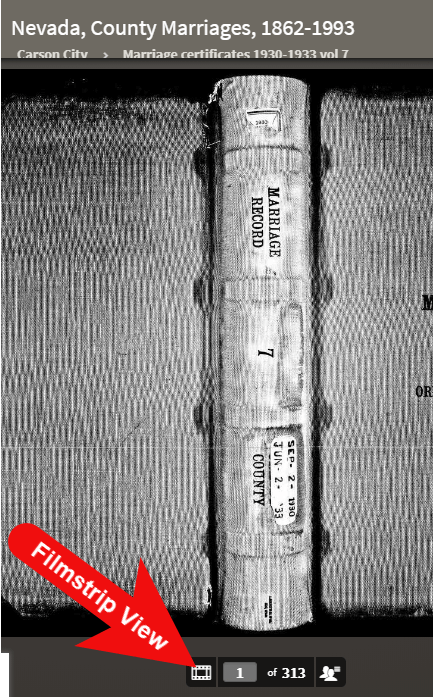
Finding the Filmstrip
if you don’t see the filmstrip view, click the filmstrip icon:
Finding and Using the Original Index
WATCH THE BONUS VIDEO below to see the next section in action. Click on the sound button to the right of the play button to turn on the sound.
Many records that were originally bound in books like this collection include index pages. In this book the index appears at the beginning. If you look closely at the filmstrip images it’s easy to spot where the index lists are and where the records begin.
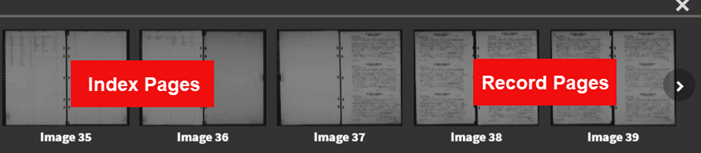
So even though Ancestry hasn’t had the chance to index the records yet, they are indexed in the book. This will make the job of browsing for the records you need even easier.
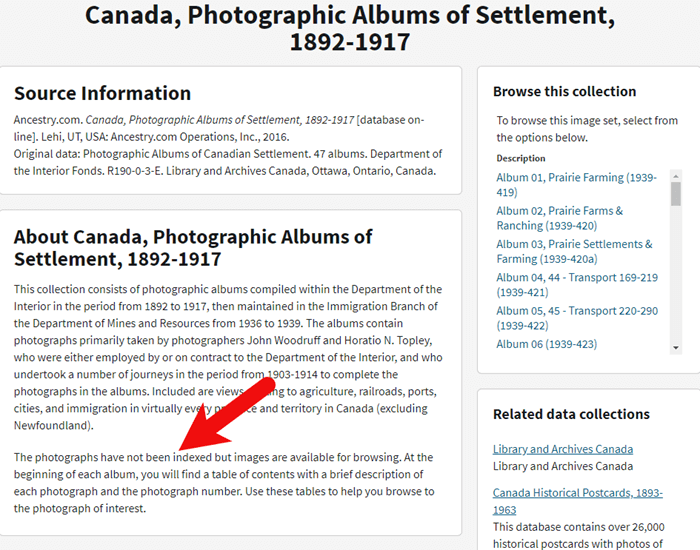
The “About” box on the card catalog entry often includes important information about whether or not the collection has an index. One example of this is the Canada, Photographic Albums of Settlement, 1892-1917 record collection. It is a browse-only series of digitized photo albums by Canada’s Department of the Interior between 1892 and 1917. The collection description includes very useful instructions such as: “At the beginning of each album, you will find a table of contents with a brief description of each photograph and the photograph number. Use these tables to help you browse to the photograph of interest.” As you can see, taking a few extra moments to read about the collection can make browsing it much easier.
Save Time When Browsing Between Volumes
Remember that Browse this Collection box on the right hand side of the card catalog entry page? (See the Browse this Collection box image 6 images above.) This handy menu is also embedded in the record viewer. If you need to switch to a different book, album or other portion of the collection, you don’t have to hit the back button and start over. Instead, at the top of the viewing page, click the volume or collection you are currently viewing (this appears as a sub-title under the main title of the collection.) A browse structure menu will appear showing you all the other options within the collection. Just click the one you want and you will be instantly switched over. Think of it as pulling a different volume of a series of books off the shelf!
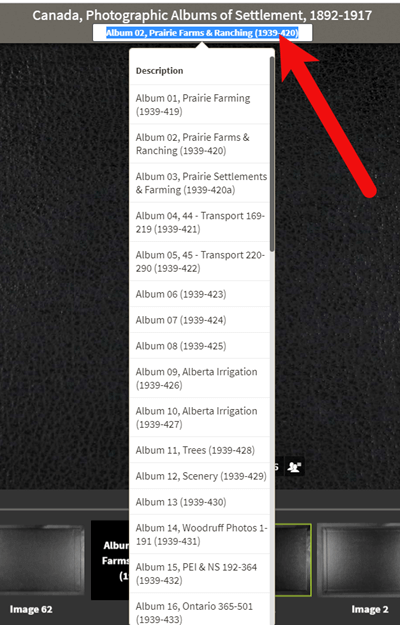
Switching volumes within the collection within the viewer.
Browsing Indexed Records
There will be times when even though a record collection is indexed, you may still want to browse it. Browsing isn’t just for unindexed records. Many genealogy gems can be found by browsing a database that you’ve already searched. You may spot neighbors of interest, other surnames from your family tree, and more. So even when you are working with a record collection that has a search box, look for the browsing option in the right column.
HOW TO FIND THE NEWEST RECORDS AT ANCESTRY.COM
The records most likely to not yet be indexed, and therefore browse-only, are the newest records added to Ancestry. If you’re looking to bust through a brick wall, here’s a great way to find the newest records that just might do it.
1. Go to the Card Catalog
From the main menu on the Ancestry website, select Search > Card Catalog.
2. Sort the Records
In the right hand corner you’ll find a Sort By menu. Select Date Added.
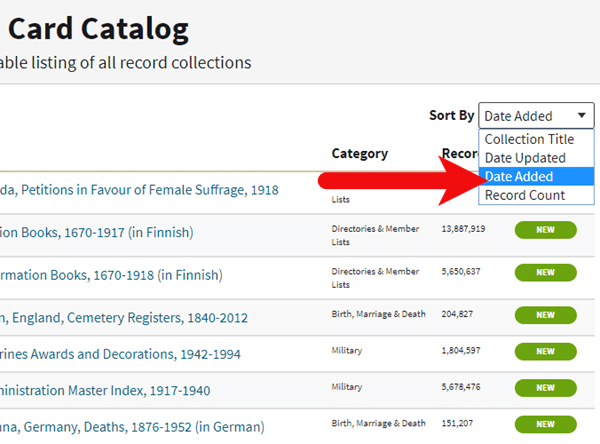
Select Date Added from the Sort by menu.
3. Newest Record View
The Card Catalog will now be presented in the order in which the records were added. The newest records will appear at the top of the list.
4. Filter the List
Use the filters along the left side of the page to filter the collections by record type, location, and date. Then use the search boxes to target keywords. This will give you results that include your keyword starting with the newest collections.
BONUS PDF AND MORE RESOURCES
Making a small investment of time in getting to know the search and browsing functions of a website can pay off big.
BONUS PDF: Click to download a handy ad-free PDF version of this article for easy reference: How to Find and Browse Unindexed Records at Ancestry
Here are three more articles and podcast episodes here at Genealogy Gems that can help you maximize your genealogy research efforts:
- Searching Browse-Only Records at FamilySearch.org
- 4 Tips for Getting the Most from Ancestry.com
- Using Ancestry Library Edition and Other Genealogy Databases at Your Public Library (in Genealogy Gems Premium Podcast episode 125 (Premium Membership required to listen)
WHAT DID YOU UNCOVER USING THESE BROWSING STRATEGIES?
Please leave a comment below and share the genealogy gems that you uncover using these techniques. And of course if you have any questions, leave those as comments as well and I’ll reply.